

Philips AquaTouch Rasoir électrique rasage à sec ou sous l'eau - Mode d’emploi - CFR
Philips AquaTouch Rasoir électrique rasage à sec ou sous l'eau - Mode d’emploi - CFR
Philips AquaTouch Rasoir électrique rasage à sec ou sous l'eau - Mode d’emploi - CFR

Create successful ePaper yourself
Turn your PDF publications into a flip-book with our unique Google optimized e-Paper software.
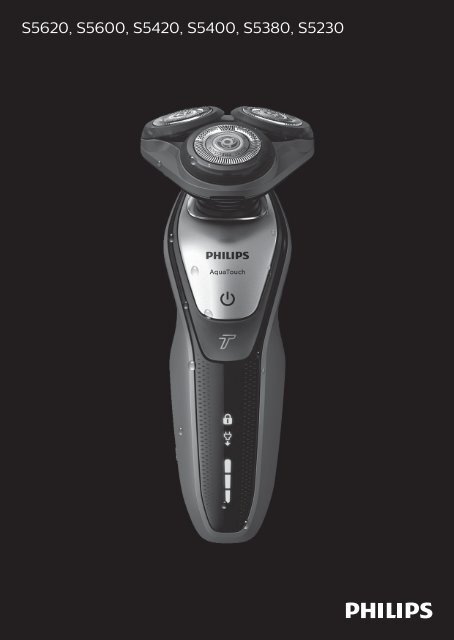
S5620, S5600, S5420, S5400, S5380, S5230<br />
2_002_5832_1_FrontCover_A6_bl.indd 1 11-09-15 11:42
15<br />
1 14<br />
2<br />
3<br />
4<br />
5<br />
6<br />
13<br />
12<br />
11<br />
10<br />
9<br />
8<br />
7<br />
16 18<br />
17
English<br />
Français (Canada)
English<br />
5<br />
Introduction<br />
Congratulations on y<strong>ou</strong>r purchase and welcome to<br />
<strong>Philips</strong>! To fully benefit from the support that <strong>Philips</strong><br />
offers, register y<strong>ou</strong>r product at<br />
www.philips.com/welcome.<br />
Please read this user manual, as it contains information<br />
ab<strong>ou</strong>t the features of this shaver as well as some tips<br />
to make shaving easier and more enjoyable.<br />
General description<br />
1 Protection cap for shaving unit<br />
(S5420,S5400,S5380,S5230 only)<br />
2 Click-on shaving unit<br />
3 On/off button<br />
4 Turbo button (S5620,S5380 only)<br />
5 Handle<br />
6 Socket for small plug<br />
7 Battery charge indicator with 1 light<br />
(S5420,S5400,S5230 only)<br />
8 Battery charge indicator with 3 lights<br />
(S5620,S5600,S5380 only)<br />
9 Unplug for use symbol<br />
10 Travel lock symbol<br />
11 Replacement reminder<br />
12 Cleaning reminder<br />
13 Click-on trimmer attachment<br />
(S5600,S5420,S5400,S5380,S5230 only)<br />
14 Click-on beard styler attachment (S5620 only)<br />
15 Comb for beard styler attachment (S5620 only)<br />
16 Adapter<br />
17 Small plug<br />
18 P<strong>ou</strong>ch (S5620,S5600 only)
6 English<br />
Important safety information<br />
Read this important information carefully before y<strong>ou</strong><br />
use the appliance and its accessories and save it for<br />
future reference. The accessories supplied may vary<br />
for different products.<br />
Danger<br />
- Keep the adapter dry ().<br />
Warning<br />
- The adapter contains a transformer. Do not cut off<br />
the adapter to replace it with another plug, as this<br />
causes a hazard<strong>ou</strong>s situation.<br />
- This appliance can be used by children aged from 8<br />
years and above and persons with reduced<br />
physical, sensory or mental capabilities or lack of<br />
experience and knowledge if they have been given<br />
supervision or instruction concerning use of the<br />
appliance in a safe way and understand the hazards<br />
involved. Children shall not play with the appliance.<br />
Cleaning and user maintenance shall not be made<br />
by children with<strong>ou</strong>t supervision.<br />
- Always unplug the shaver before y<strong>ou</strong> clean it<br />
under the tap.<br />
- Always check the appliance before y<strong>ou</strong> use it. Do<br />
not use the appliance if it is damaged, as this may<br />
cause injury. Always replace a damaged part with<br />
one of the original type.
English<br />
7<br />
Caution<br />
- Never immerse the adapter in water nor rinse it<br />
under the tap.<br />
- Never use water hotter than 80°C to rinse the<br />
shaver.<br />
- Only use this appliance for its intended purpose as<br />
shown in the user manual.<br />
- For hygienic reasons, the appliance sh<strong>ou</strong>ld only be<br />
used by one person.<br />
- Never use compressed air, sc<strong>ou</strong>ring pads, abrasive<br />
cleaning agents or aggressive liquids such as petrol<br />
or acetone to clean the appliance.<br />
- Water may drip from the socket at the bottom of<br />
the shaver when y<strong>ou</strong> rinse it. This is normal and<br />
not danger<strong>ou</strong>s because all electronics are enclosed<br />
in a sealed power unit inside the shaver.<br />
Electromagnetic fields (EMF)<br />
- This <strong>Philips</strong> appliance complies with all applicable<br />
standards and regulations regarding exposure to<br />
electromagnetic fields.<br />
General<br />
- This shaver is waterproof (). It is suitable for use in<br />
the bath or shower and for cleaning under the tap.<br />
For safety reasons, the shaver can therefore only<br />
be used with<strong>ou</strong>t cord.<br />
- The appliance is suitable for voltages ranging from<br />
100 to 240 volts.<br />
- The adapter transforms 100-240 volts to a safe<br />
low voltage of less than 24 volts.<br />
- Maximum noise level: Lc = 69 dB(A)
8 English<br />
The display<br />
Charging<br />
Battery charge indicator with 3 lights (specific<br />
types only)<br />
- Charging takes approx. 1 h<strong>ou</strong>r.<br />
- Quick charge: When the appliance is connected to<br />
the power <strong>ou</strong>tlet, the lights of the battery charge<br />
indicator light up one after the other continu<strong>ou</strong>sly.<br />
When the appliance contains en<strong>ou</strong>gh energy for<br />
one shave, the bottom light of the battery charge<br />
indicator flashes slowly.<br />
- If y<strong>ou</strong> leave the appliance connected to the power<br />
<strong>ou</strong>tlet, the charging process continues. To indicate<br />
that the appliance is charging, first the bottom light<br />
flashes and then lights up continu<strong>ou</strong>sly. Then the<br />
<strong>sec</strong>ond light flashes and then lights up continu<strong>ou</strong>sly,<br />
and so on until the appliance is fully charged.<br />
Battery charge indicator with 1 light (specific<br />
types only)<br />
- Charging takes approx. 1 h<strong>ou</strong>r.<br />
- Quick charge: When the appliance does not<br />
contain en<strong>ou</strong>gh energy for one shave, the battery<br />
charge indicator flashes quickly. When the battery<br />
charge indicator starts flashing slowly, the appliance<br />
contains en<strong>ou</strong>gh energy for one shave .<br />
- If y<strong>ou</strong> leave the appliance connected to the power<br />
<strong>ou</strong>tlet, the charging process continues. To indicate<br />
that the appliance is charging, the battery charge<br />
indicator flashes slowly.
English<br />
9<br />
Battery fully charged<br />
Note: This appliance can only be used with<strong>ou</strong>t cord.<br />
Note: When the battery is full, the display switches off<br />
automatically after 30 minutes.<br />
Note: If y<strong>ou</strong> press the on/off button during charging, the<br />
'unplug for use' symbol flashes white to remind y<strong>ou</strong> that<br />
y<strong>ou</strong> have to disconnect the appliance from the power<br />
<strong>ou</strong>tlet.<br />
When the battery is full, all lights of the battery charge<br />
indicator light up continu<strong>ou</strong>sly.<br />
- Battery charge indicator with 3 lights (specific types<br />
only)<br />
- Battery charge indicator with 1 light (specific types<br />
only)<br />
Battery low<br />
When the battery is almost empty, the battery charge<br />
indicator flashes orange.<br />
- Battery charge indicator with 3 lights (specific types<br />
only)
10 English<br />
- Battery charge indicator with 1 light (specific types<br />
only)<br />
Remaining battery capacity<br />
Battery charge indicator with 3 lights (specific<br />
types only)<br />
- The remaining battery capacity is indicated by the<br />
lights of the battery charge indicator that light up<br />
continu<strong>ou</strong>sly.<br />
’Unplug for use’ reminder<br />
- The appliance is equipped with an ‘unplug for use’<br />
reminder. The ‘unplug for use’ symbol flashes to<br />
remind y<strong>ou</strong> that y<strong>ou</strong> have to disconnect the<br />
appliance from the adapter before y<strong>ou</strong> can switch<br />
it on.<br />
Cleaning reminder<br />
Clean the shaver after every shave for optimal<br />
performance. When y<strong>ou</strong> switch off the shaver, the<br />
cleaning reminder flashes to remind y<strong>ou</strong> to clean the<br />
shaver.
English<br />
11<br />
Travel lock<br />
Y<strong>ou</strong> can lock the shaver when y<strong>ou</strong> are going to travel.<br />
The travel lock prevents the shaver from being<br />
switched on by accident.<br />
Activating the travel lock<br />
1 Press the on/off button for 3 <strong>sec</strong>onds to enter the<br />
travel lock mode.<br />
3 <strong>sec</strong>.<br />
- While y<strong>ou</strong> activate the travel lock, the travel<br />
lock symbol lights up continu<strong>ou</strong>sly. When the<br />
travel lock is activated, the travel lock symbol<br />
flashes.<br />
Deactivating the travel lock<br />
1 Press the on/off button for 3 <strong>sec</strong>onds.<br />
- The travel lock symbol flashes and then lights<br />
up continu<strong>ou</strong>sly. The shaver is now ready for<br />
use again.<br />
Replacing shaving heads<br />
For maximum shaving performance, we advise y<strong>ou</strong> to<br />
replace the shaving heads once a year.<br />
- The appliance is equipped with a replacement<br />
reminder which reminds y<strong>ou</strong> to replace the shaving<br />
heads. The replacement reminder lights up<br />
continu<strong>ou</strong>sly.
12 English<br />
Note: After replacing the shaving heads, y<strong>ou</strong> need to<br />
reset the replacement reminder by pressing the on/off<br />
button for 7 <strong>sec</strong>onds.<br />
Turbo setting (specific types only)<br />
The appliance is equipped with a Turbo setting. This<br />
allows y<strong>ou</strong> to shave hard-to-reach areas more quickly.<br />
Charging<br />
Charging takes approx. 1 h<strong>ou</strong>r.<br />
Note: Y<strong>ou</strong> cannot use the appliance while charging.<br />
Charge the shaver before y<strong>ou</strong> use it for the first time<br />
and when the display indicates that the battery is<br />
almost empty.<br />
Charging with the adapter<br />
1 Make sure the appliance is switched off.<br />
2 Put the adapter in the wall socket (1) and put the<br />
small plug in the appliance (2).<br />
3 After charging, remove the adapter from the wall<br />
socket and pull the small plug <strong>ou</strong>t of the appliance.
English<br />
13<br />
Using the appliance<br />
Switching the appliance on and off<br />
1 To switch on the appliance, press the on/off button<br />
once.<br />
2 To switch off the appliance, press the on/off button<br />
once.<br />
Battery charge indicator with 3 lights (specific types<br />
only): the display lights up for a few <strong>sec</strong>onds to show<br />
the remaining battery status.<br />
Shaving<br />
Skin adaption period<br />
Y<strong>ou</strong>r first shaves may not bring y<strong>ou</strong> the result y<strong>ou</strong><br />
expect and y<strong>ou</strong>r skin may even become slightly<br />
irritated. This is normal. Y<strong>ou</strong>r skin and beard need<br />
time to adapt to any new shaving system. We advise<br />
y<strong>ou</strong> to shave regularly (at least 3 times a week) and<br />
exclusively with this shaver for a period of 3 weeks to<br />
allow y<strong>ou</strong>r skin to adapt to the new shaver.<br />
Note: This appliance can only be used with<strong>ou</strong>t cord.<br />
1 Switch on the appliance.<br />
2 Move the shaving heads over y<strong>ou</strong>r skin in circular<br />
movements.<br />
3 Clean the shaver after use (see 'Cleaning and<br />
maintenance').<br />
Wet shaving<br />
Y<strong>ou</strong> can also use this shaver on a wet face with<br />
shaving foam or shaving gel.<br />
To shave with shaving foam or shaving gel, follow the<br />
steps below:
14 English<br />
1 Apply some water to y<strong>ou</strong>r skin.<br />
2 Apply shaving foam or shaving gel to y<strong>ou</strong>r skin.<br />
3 Rinse the shaving unit under the tap to ensure that<br />
the shaving unit glides smoothly over y<strong>ou</strong>r skin.<br />
4 Switch on the appliance.<br />
5 Move the shaving heads over y<strong>ou</strong>r skin in circular<br />
movements.<br />
Note: Rinse the shaving unit regularly to ensure that<br />
it continues to glide smoothly over y<strong>ou</strong>r skin.<br />
6 Dry y<strong>ou</strong>r face.<br />
7 Clean the shaver after use (see 'Cleaning and<br />
maintenance').<br />
Note: Make sure y<strong>ou</strong> rinse all foam or shaving gel off the<br />
shaver.<br />
Turbo setting (specific types only)<br />
The appliance is equipped with a Turbo setting. This<br />
allows y<strong>ou</strong> to shave hard-to-reach areas more quickly.
English<br />
15<br />
1 To activate the Turbo setting, press the Turbo<br />
button once.<br />
2 Move the shaving heads over y<strong>ou</strong>r skin in circular<br />
movements.<br />
Note: Do not make straight movements.<br />
3 To deactivate the Turbo setting, press the Turbo<br />
button once.<br />
Using the click-on attachments<br />
Note: The accessories supplied may vary for different<br />
products. The box shows the accessories that have been<br />
supplied with y<strong>ou</strong>r appliance.<br />
Removing or attaching the click-on<br />
attachments<br />
1 Make sure the appliance is switched off.<br />
2 Pull the attachment straight off the appliance.<br />
Note: Do not twist the attachment while y<strong>ou</strong> pull it<br />
off the appliance.<br />
3 Insert the lug of the attachment into the slot in the<br />
top of the appliance. Then press down the<br />
attachment to attach it to the appliance (‘click’).<br />
Using the trimmer attachment (specific types<br />
only)<br />
Y<strong>ou</strong> can use the trimmer attachment to groom y<strong>ou</strong>r<br />
sideburns and m<strong>ou</strong>stache.<br />
1 Make sure the appliance is switched off.<br />
2 Remove the shaving unit from the appliance.
16 English<br />
3 Insert the lug of the trimmer attachment into the<br />
slot in the top of the appliance.<br />
4 Switch on the appliance.<br />
5 Y<strong>ou</strong> can now start trimming.<br />
6 Clean the attachment after use (see 'Cleaning and<br />
maintenance').<br />
Using the beard styler attachment (specific<br />
types only)<br />
1 Make sure the appliance is switched off.<br />
2 Insert the lug of the beard styler attachment into<br />
the slot in the top of the appliance. Then press<br />
down the beard styler attachment to attach it to<br />
the appliance (‘click’).<br />
Using the beard styler attachment with comb<br />
Y<strong>ou</strong> can use the beard styler attachment with the<br />
comb attached to style y<strong>ou</strong>r beard at one fixed<br />
setting, but also at different length settings. Y<strong>ou</strong> can<br />
use it also to pre-trim any long hairs before shaving to<br />
have a more comfortable shave.<br />
The hair length settings on the beard styler<br />
attachment correspond to the remaining hair length<br />
after cutting and range from 1 to 5mm.<br />
1 Slide the comb straight into the guiding grooves on<br />
both sides of the attachment (‘click’).
English<br />
17<br />
2<br />
2 Press the length selector and then push it to the<br />
left or right to select the desired hair length setting.<br />
3 Switch on the appliance.<br />
1<br />
4 Y<strong>ou</strong> can now start styling y<strong>ou</strong>r beard by moving<br />
the attachment upwards with gentle pressure<br />
making sure the front of the comb is in full contact<br />
with the skin.<br />
5 Clean the attachment after use (see 'Cleaning and<br />
maintenance').<br />
Using the beard styler attachment with<strong>ou</strong>t<br />
comb<br />
Y<strong>ou</strong> can use the beard styler attachment with<strong>ou</strong>t the<br />
comb to cont<strong>ou</strong>r y<strong>ou</strong>r beard, m<strong>ou</strong>stache, sideburns or<br />
neckline to a length of 0.5mm.<br />
1 Pull the comb off the beard styler attachment.<br />
Note: Grab the comb in the centre to pull it off the<br />
Beard Styler attachment. Do not pull at the sides of<br />
the comb.<br />
2 Switch on the appliance.<br />
3 Y<strong>ou</strong> can now start cont<strong>ou</strong>ring y<strong>ou</strong>r beard,<br />
m<strong>ou</strong>stache, sideburns or neckline by moving the<br />
styler downwards with gentle pressure while<br />
holding it perpendicular to the skin.<br />
4 Clean the attachment after use (see 'Cleaning and<br />
maintenance').
18 English<br />
Cleaning and maintenance<br />
Cleaning the shaver under the tap<br />
Clean the shaver after every shave for optimal<br />
performance.<br />
Caution: Be careful with hot water. Always check<br />
if the water is not too hot, to prevent burning<br />
y<strong>ou</strong>r hands.<br />
Caution: Never dry the shaving unit with a towel<br />
or tissue, as this may damage the shaving heads.<br />
1 Rinse the shaving unit under a hot tap.<br />
2 Press the release button to open the shaving unit.<br />
3 Rinse the shaving head holder under a hot tap for<br />
30 <strong>sec</strong>onds.<br />
4 Carefully shake off excess water and let the shaving<br />
head holder dry.<br />
5 Close the shaving head holder ('click').
English<br />
19<br />
Thor<strong>ou</strong>gh cleaning method<br />
1 Switch off the appliance.<br />
2 Press the release button to open the shaving unit.<br />
3 Pull the shaving head holder off the bottom part of<br />
the shaving unit.<br />
1<br />
2<br />
4 Turn the retaining rings anticlockwise and remove<br />
them.<br />
5 Remove the shaving heads from the shaving head<br />
holder. Each shaving head consists of a cutter and<br />
guard.<br />
Note: Do not clean more than one cutter and guard<br />
at a time, since they are all matching sets. If y<strong>ou</strong><br />
accidentally put a cutter in the wrong shaving guard,<br />
it may take several weeks before optimal shaving<br />
performance is restored.
20 English<br />
6 Clean the cutter and guard under the tap.<br />
7 Put the cutter back into the guard.<br />
8 Place the shaving heads in the shaving head holder.<br />
Note: Make sure that the projections of the shaving<br />
heads fit exactly into the recesses.<br />
1<br />
9 Place the retaining rings back onto the shaving<br />
head holder and turn them clockwise ('click').<br />
2
English<br />
21<br />
- Each retaining ring has two recesses and two<br />
projections that fit exactly in the projections and<br />
recesses of the shaving head holder.<br />
- Turn the ring clockwise until y<strong>ou</strong> hear a 'click' and<br />
the ring is fixed.<br />
Note: Hold the shaving head holder in y<strong>ou</strong>r hand<br />
when y<strong>ou</strong> reinsert the shaving heads and reattach the<br />
retaining rings. Do not place the shaving head holder<br />
on a surface when y<strong>ou</strong> do this, as this may cause<br />
damage.<br />
10Reinsert the hinge of the shaving head holder into<br />
the slot of the shaving unit. Close the shaving head<br />
holder.<br />
Cleaning the click-on attachments<br />
Caution: Never dry the trimmer or beard styler<br />
attachments with a towel or tissue, as this may<br />
damage the trimming teeth.
22 English<br />
Cleaning the trimmer attachment (specific<br />
types only)<br />
Clean the trimmer attachment every time y<strong>ou</strong> have<br />
used it.<br />
1 Switch on the appliance with the trimmer<br />
attachment attached.<br />
2 Rinse the attachment under a hot tap.<br />
3 Switch off the appliance.<br />
4 Carefully shake off excess water and let the<br />
attachment dry.<br />
Tip: For optimal performance, lubricate the teeth of the<br />
attachment with a drop of sewing machine oil every six<br />
months.<br />
Cleaning the beard styler attachment<br />
(specific types only)<br />
Clean the beard styler attachment every time y<strong>ou</strong><br />
have used it.<br />
1 Pull the comb off the beard styler attachment.<br />
Note: Grab the comb in the centre to pull it off the<br />
Beard Styler attachment. Do not pull at the sides of<br />
the comb.<br />
2 Switch on the appliance.<br />
3 Rinse the beard styler attachment and the comb<br />
separately under a hot tap for some time.<br />
4 After cleaning, switch off the appliance.
English<br />
23<br />
5 Carefully shake off excess water and let the beard<br />
styler attachment and comb dry.<br />
Tip: For optimal performance, lubricate the teeth of the<br />
attachment with a drop of sewing machine oil every six<br />
months.<br />
Storage<br />
Note: We advise y<strong>ou</strong> to let the appliance and its<br />
attachments dry before y<strong>ou</strong> put the protection caps on<br />
the attachments and store the shaver in the p<strong>ou</strong>ch.<br />
- Specific types only: Put the protection cap on the<br />
shaver to protect it from any dirt accumulation.<br />
- Specific types only: Store the shaver in the p<strong>ou</strong>ch<br />
supplied.
24 English<br />
Replacement<br />
Replacing the shaving heads<br />
For maximum shaving performance, we advise y<strong>ou</strong> to<br />
replace the shaving heads once a year.<br />
Replacement reminder<br />
The shaving unit symbol will light up to indicate that<br />
the shaving heads need to be replaced. Replace<br />
damaged shaving heads immediately. Only replace the<br />
shaving heads with original <strong>Philips</strong> shaving heads as<br />
specified in chapter ‘Ordering accessories’.<br />
1 The shaving unit symbol lights up continu<strong>ou</strong>sly<br />
when y<strong>ou</strong> switch off the shaver to indicate that the<br />
shaving heads need to be replaced.<br />
2 Press the release button to open the shaving unit.<br />
3 Pull the shaving head holder off the bottom part of<br />
the shaving unit.
English<br />
25<br />
1<br />
2<br />
4 Turn the retaining rings anticlockwise and remove<br />
them.<br />
5 Remove the shavings heads from the shaving head<br />
holder and throw them away.<br />
6 Place new shaving heads in the holder.<br />
Note: Make sure that the projections of the shaving<br />
heads fit exactly into the recesses.<br />
1<br />
7 Place the retaining rings back onto the shaving<br />
head holder and turn them clockwise ('click').<br />
2
26 English<br />
- Each retaining ring has two recesses and two<br />
projections that fit exactly in the projections and<br />
recesses of the shaving head holder.<br />
- Turn the ring clockwise until y<strong>ou</strong>r hear ‘click’ and<br />
the ring is fixed.<br />
Hold the shaving head holder in y<strong>ou</strong>r hand when y<strong>ou</strong><br />
reinsert the shaving heads and reattach the retaining<br />
rings. Do not place the shaving head holder on a<br />
surface when y<strong>ou</strong> do this, as this may cause damage.<br />
8 Reinsert the hinge of the shaving head holder into<br />
the slot of the shaving unit. Close the shaving head<br />
holder (‘click’).<br />
7 <strong>sec</strong>.<br />
9 To reset the replacement reminder, press and hold<br />
the on/off button for approx. 7 <strong>sec</strong>onds.
English<br />
27<br />
Ordering accessories<br />
To buy accessories or spare parts, visit<br />
www.shop.philips.com/service or go to y<strong>ou</strong>r <strong>Philips</strong><br />
dealer. Y<strong>ou</strong> can also contact the <strong>Philips</strong> Consumer<br />
Care Centre in y<strong>ou</strong>r c<strong>ou</strong>ntry (see the worldwide<br />
guarantee leaflet for contact details).<br />
The following accessories and spare parts are<br />
available:<br />
- HQ8505 adapter<br />
- SH50 <strong>Philips</strong> shaving heads<br />
- HQ110 <strong>Philips</strong> shaving head cleaning spray<br />
Note: Availability of the accessories may differ by<br />
c<strong>ou</strong>ntry.<br />
Shaving heads<br />
For maximum shaving performance, we advise y<strong>ou</strong> to<br />
replace the shaving heads once a year.<br />
RECYCLE<br />
A B A C<br />
1.800.822.8837<br />
Disposal<br />
This appliance contains a rechargeable battery which<br />
must be disposed of properly. Contact y<strong>ou</strong>r local<br />
town or city officials for battery disposal information.<br />
Y<strong>ou</strong> can also call 1-800-8-BATTERY or visit<br />
www.rbrc.com for battery drop-off locations.<br />
For assistance, visit <strong>ou</strong>r website<br />
www.philips.com/support or call 1-800-243-3050 toll<br />
free.
28 English<br />
Removing the rechargeable shaver<br />
battery<br />
Caution: Only remove the rechargeable battery<br />
when y<strong>ou</strong> discard the shaver. Make sure the<br />
rechargeable battery is completely empty when<br />
y<strong>ou</strong> remove it.<br />
Caution: Be careful, the battery strips are sharp.<br />
1 Remove the screw in the back panel with a<br />
screwdriver. Then remove the back panel.<br />
2 Bend the hooks aside and remove the power unit.<br />
3 Break the snap hooks and remove the front panel<br />
of the power unit.<br />
4 Take <strong>ou</strong>t the battery holder and cut the battery<br />
tags with a pair of cutting pliers.
English<br />
29<br />
Guarantee and support<br />
If y<strong>ou</strong> need information or support, please<br />
www.philips.com/support or call toll free:<br />
1-866-800-9311. To locate the nearest <strong>Philips</strong><br />
warranty depot, visit <strong>ou</strong>r website www.philips.com.<br />
Gurantee restrictions<br />
- <strong>Philips</strong> Consumer Lifestyle guarantees its products<br />
for a period of two years after the date of<br />
purchase. If any defect due to faulty materials and<br />
workmanship occurs within this two-year<br />
guarantee period, <strong>Philips</strong> Consumer Lifestyle will<br />
repair or replace the product at its expense.<br />
- <strong>Philips</strong> Consumer Lifestyle will only pay for repair<br />
or replacement if convincing proof is provided, for<br />
instance by means of a receipt, that the day on<br />
which service is claimed is within the guarantee<br />
period. The shaving heads (cutters and shaving<br />
guards) are not covered by the terms of the<br />
international guarantee because they are subject to<br />
wear.<br />
- The guarantee is not valid if a defect is due to<br />
damage caused by incorrect use, poor<br />
maintenance (e.g. parts blocked by scale) or if<br />
alterations or repairs have been carried <strong>ou</strong>t by<br />
persons not authorised by <strong>Philips</strong> Consumer<br />
Lifestyle.
30 English<br />
- For the appliance to be used correctly, the user<br />
sh<strong>ou</strong>ld strictly adhere to all instructions included in<br />
the user manual and sh<strong>ou</strong>ld abstain from any<br />
actions or uses that are described as undesired or<br />
which are warned against in the user manual.<br />
- These guarantee restrictions do not affect y<strong>ou</strong>r<br />
statutory rights.<br />
Tr<strong>ou</strong>bleshooting<br />
This chapter summarises the most common problems<br />
y<strong>ou</strong> c<strong>ou</strong>ld enc<strong>ou</strong>nter with the appliance. If y<strong>ou</strong> are<br />
unable to solve the problem with the information<br />
below, visit www.philips.com/support for a list of<br />
frequently asked questions or contact the Consumer<br />
Care Centre in y<strong>ou</strong>r c<strong>ou</strong>ntry.<br />
Problem Possible cause Solution<br />
The appliance<br />
does not<br />
shave as well as<br />
it used to.<br />
The shaving heads are<br />
damaged or worn.<br />
Hairs or dirt obstruct the<br />
shaving heads.<br />
Replace the shaving heads<br />
(see 'Replacement').<br />
Clean the shaving heads<br />
(see 'Cleaning and<br />
maintenance') by<br />
following steps of the<br />
thor<strong>ou</strong>gh cleaning<br />
method.<br />
The appliance<br />
does not work<br />
when I press the<br />
on/off button.<br />
The appliance is still<br />
attached to the power<br />
<strong>ou</strong>tlet. For safety reasons,<br />
the appliance can only be<br />
used with<strong>ou</strong>t cord.<br />
Unplug the appliance and<br />
press the on/off button to<br />
switch on the appliance.
English<br />
31<br />
Problem Possible cause Solution<br />
Water is leaking<br />
from the<br />
bottom of the<br />
appliance.<br />
I replaced the<br />
shaving heads,<br />
but the<br />
replacement<br />
reminder is still<br />
showing.<br />
The rechargeable battery<br />
is empty.<br />
The travel lock is<br />
activated.<br />
The shaving unit is soiled<br />
or damaged to such an<br />
extent that the motor<br />
cannot run.<br />
The shaving heads are<br />
damaged or worn.<br />
During cleaning, water<br />
may collect between the<br />
inner body and the <strong>ou</strong>ter<br />
shell of the appliance.<br />
Y<strong>ou</strong> have not reset the<br />
appliance.<br />
Recharge the battery (see<br />
'Charging').<br />
Press the on/off button<br />
for 3 <strong>sec</strong>onds to<br />
deactivate the travel lock.<br />
Clean the shaving heads<br />
(see 'Cleaning and<br />
maintenance') or replace<br />
them (see 'Replacement').<br />
Replace the shaving heads<br />
(see 'Replacement').<br />
This is normal and not<br />
danger<strong>ou</strong>s because all<br />
electronics are enclosed in<br />
a sealed power unit inside<br />
the appliance.<br />
Reset the appliance by<br />
pressing the on/off button<br />
for approx. 7 <strong>sec</strong>onds<br />
(see').<br />
A shaving head<br />
symbol has<br />
suddenly<br />
appeared on the<br />
display.<br />
This symbol is a<br />
replacement reminder.<br />
Replace the shaving heads<br />
(see 'Replacement').
32 Français (Canada)<br />
Introduction<br />
Félicitations p<strong>ou</strong>r votre achat et bienvenue dans<br />
l'univers <strong>Philips</strong>! P<strong>ou</strong>r profiter pleinement des<br />
avantages de l'assistance <strong>Philips</strong>, enregistrez votre<br />
produit à l'adresse www.philips.com/welcome.<br />
Veuillez lire ce mode d'<strong>emploi</strong>, qui contient des<br />
informations sur les fonctionnalités de ce rasoir, ainsi<br />
que des conseils p<strong>ou</strong>r un <strong>rasage</strong> plus facile et plus<br />
agréable.<br />
Description générale<br />
1 Capot de protection p<strong>ou</strong>r l'unité de <strong>rasage</strong> (S5420,<br />
S5400, S5380, S5230 uniquement)<br />
2 Unité de <strong>rasage</strong> amovible<br />
3 B<strong>ou</strong>ton marche/arrêt<br />
4 B<strong>ou</strong>ton Turbo (S5620, S5380 uniquement)<br />
5 Manche<br />
6 Prise p<strong>ou</strong>r minifiche d’adaptateur<br />
7 Témoin de charge de la pile avec 1 voyant (S5420,<br />
S5400, S5230 uniquement)<br />
8 Témoin de charge de la pile avec 3 voyants<br />
(S5620, S5600, S5380 uniquement)<br />
9 Symbole Débrancher avant utilisation<br />
10 Symbole du système de verr<strong>ou</strong>illage p<strong>ou</strong>r voyage<br />
11 Rappel de remplacement<br />
12 Rappel de nettoyage<br />
13 Accessoire de tonte amovible (S5600, S5420,<br />
S5400, S5380, S5230 uniquement)<br />
14 Accessoire p<strong>ou</strong>r la barbe amovible (S5620<br />
uniquement)<br />
15 Sabot de l'accessoire p<strong>ou</strong>r la barbe (S5620<br />
uniquement)<br />
16 Adaptateur
Français (Canada)<br />
33<br />
17 Petite fiche<br />
18 Étui (S5620, S5600 uniquement)<br />
Renseignements importants sur la sécurité<br />
Lisez attentivement ces informations importantes<br />
avant d'utiliser l'appareil et ses accessoires et<br />
conservez-les p<strong>ou</strong>r un usage ultérieur. Les accessoires<br />
f<strong>ou</strong>rnis peuvent varier selon les différents produits.<br />
Danger<br />
- Gardez l'adaptateur au <strong>sec</strong> ().<br />
Avertissement<br />
- L'adaptateur contient un transformateur. P<strong>ou</strong>r<br />
éviter t<strong>ou</strong>t risque d'accident, ne c<strong>ou</strong>pez pas la fiche<br />
de l'adaptateur p<strong>ou</strong>r la remplacer par une autre.<br />
- Cet appareil peut être utilisé par des enfants âgés<br />
de 8 ans <strong>ou</strong> plus, des personnes dont les capacités<br />
physiques, sensorielles <strong>ou</strong> intellectuelles sont<br />
réduites <strong>ou</strong> des personnes manquant d'expérience<br />
et de connaissances, à condition que ces enfants<br />
<strong>ou</strong> personnes soient s<strong>ou</strong>s surveillance <strong>ou</strong> qu'ils<br />
aient reçu des instructions quant à l'utilisation<br />
sécurisée de l'appareil et qu'ils aient pris<br />
connaissance des dangers enc<strong>ou</strong>rus. Les enfants ne<br />
doivent pas j<strong>ou</strong>er avec l'appareil. Le nettoyage et<br />
l'entretien ne doivent pas être effectués par des<br />
enfants sans surveillance.
34 Français (Canada)<br />
- Débranchez t<strong>ou</strong>j<strong>ou</strong>rs le rasoir avant de le nettoyer<br />
s<strong>ou</strong>s le robinet.<br />
- Vérifiez t<strong>ou</strong>j<strong>ou</strong>rs l'appareil avant utilisation. Afin<br />
d'éviter t<strong>ou</strong>t accident, n'utilisez pas l'appareil s'il est<br />
endommagé. Remplacez t<strong>ou</strong>j<strong>ou</strong>rs une pièce<br />
endommagée par une pièce du même type.<br />
Attention<br />
- Ne rincez jamais l’adaptateur s<strong>ou</strong>s <strong>l'eau</strong> du robinet<br />
et ne le plongez pas dans <strong>l'eau</strong>.<br />
- N'utilisez jamais d'eau dont la température est<br />
supérieure à 80 °C p<strong>ou</strong>r rincer le rasoir.<br />
- N'utilisez cet appareil qu'aux fins décrites dans le<br />
mode d'<strong>emploi</strong>.<br />
- P<strong>ou</strong>r des raisons d'hygiène, l'appareil doit être<br />
utilisé par une seule personne.<br />
- N'utilisez jamais d'air comprimé, de tampons à<br />
récurer, de produits abrasifs <strong>ou</strong> de détergents<br />
agressifs tels que de l'essence <strong>ou</strong> de l'acétone p<strong>ou</strong>r<br />
nettoyer l'appareil.<br />
- Lorsque v<strong>ou</strong>s rincez l'appareil, de <strong>l'eau</strong> peut<br />
s'éc<strong>ou</strong>ler par la prise inférieure. Ce phénomène est<br />
normal et ne présente pas de danger, car t<strong>ou</strong>tes<br />
les pièces électroniques à l'intérieur du rasoir sont<br />
protégées.<br />
Champs électromagnétiques (CEM)<br />
- Cet <strong>Philips</strong> appareil est conforme à t<strong>ou</strong>tes les<br />
normes et à t<strong>ou</strong>s les règlements applicables relatifs<br />
à l'exposition aux champs électromagnétiques.
Français (Canada)<br />
35<br />
Général<br />
- Ce rasoir est étanche (). Il peut être utilisé dans la<br />
baignoire et s<strong>ou</strong>s la d<strong>ou</strong>che, et peut être nettoyé<br />
s<strong>ou</strong>s <strong>l'eau</strong> du robinet. P<strong>ou</strong>r des raisons de sécurité,<br />
le rasoir est uniquement conçu p<strong>ou</strong>r une utilisation<br />
sans fil.<br />
- L'appareil est conçu p<strong>ou</strong>r une tension comprise<br />
entre 100 V et 240 V.<br />
- L'adaptateur transforme la tension de 100-240 V<br />
en une tension de sécurité de moins de 24 V.<br />
- Niveau sonore maximal : Lc = 69 dB(A)<br />
Affichage<br />
Charge en c<strong>ou</strong>rs<br />
Témoin de charge de la pile avec 3 voyants<br />
(certains modèles uniquement)<br />
- Le temps de recharge est d'environ une heure.<br />
- Charge rapide : Lorsque l'appareil est branché à la<br />
prise de c<strong>ou</strong>rant, les voyants du témoin de charge<br />
de la pile s’allument l'un après l'autre sans<br />
interruption. Lorsque l'appareil est suffisamment<br />
chargé p<strong>ou</strong>r une séance de <strong>rasage</strong>, le voyant<br />
inférieur du témoin de charge de la pile clignote<br />
lentement.<br />
- Si v<strong>ou</strong>s laissez l'appareil branché à la prise murale,<br />
le processus de charge se p<strong>ou</strong>rsuit. P<strong>ou</strong>r indiquer<br />
que l'appareil est en c<strong>ou</strong>rs de charge, le voyant<br />
inférieur se met t<strong>ou</strong>t d'abord à clignoter, puis reste<br />
allumé. Ensuite, le <strong>sec</strong>ond voyant clignote, puis<br />
reste allumé, et ainsi de suite jusqu'à ce que<br />
l'appareil soit complètement chargé.
36 Français (Canada)<br />
Témoin de charge de la pile avec 1 voyant<br />
(certains modèles uniquement)<br />
- Le temps de recharge est d'environ une heure.<br />
- Charge rapide : Lorsque l'appareil ne contient pas<br />
assez d'énergie p<strong>ou</strong>r une séance de <strong>rasage</strong>, le<br />
témoin de charge de la pile clignote rapidement.<br />
Lorsque le témoin de charge de la pile se met à<br />
clignoter lentement, cela signifie que l'appareil est<br />
suffisamment chargé p<strong>ou</strong>r une séance de <strong>rasage</strong>.<br />
- Si v<strong>ou</strong>s laissez l'appareil branché à la prise murale,<br />
le processus de charge se p<strong>ou</strong>rsuit. P<strong>ou</strong>r indiquer<br />
que l'appareil est en c<strong>ou</strong>rs de charge, le témoin de<br />
charge de la pile clignote lentement.<br />
Pile complètement chargée<br />
Remarque : Cet appareil est uniquement conçu p<strong>ou</strong>r une<br />
utilisation sans fil.<br />
Remarque : Lorsque la pile est entièrement chargée,<br />
l'afficheur s'éteint automatiquement au b<strong>ou</strong>t de<br />
30 minutes.<br />
Remarque : Si v<strong>ou</strong>s appuyez sur le b<strong>ou</strong>ton marche/arrêt<br />
pendant la charge, le symbole « Débrancher avant<br />
utilisation » clignote en blanc p<strong>ou</strong>r v<strong>ou</strong>s rappeler que<br />
v<strong>ou</strong>s devez débrancher l'appareil de la prise de c<strong>ou</strong>rant.<br />
Lorsque la pile est entièrement chargée, t<strong>ou</strong>s les<br />
voyants du témoin de charge de la pile s'allument de<br />
manière continue.<br />
- Témoin de charge de la pile avec 3 voyants<br />
(certains modèles uniquement)
Français (Canada)<br />
37<br />
- Témoin de charge de la pile avec 1 voyant<br />
(certains modèles uniquement)<br />
Pile faible<br />
Lorsque la pile est presque vide, le témoin de charge<br />
de la pile clignote en orange.<br />
- Témoin de charge de la pile avec 3 voyants<br />
(certains modèles uniquement)<br />
- Témoin de charge de la pile avec 1 voyant<br />
(certains modèles uniquement)<br />
Niveau de charge de la pile<br />
Témoin de charge de la pile avec 3 voyants<br />
(certains modèles uniquement)
38 Français (Canada)<br />
- Le niveau de charge de la pile est indiqué par les<br />
voyants de l'indicateur de charge de la pile qui<br />
s'allument en continu.<br />
Rappel « Débrancher avant utilisation »<br />
- L'appareil est doté d'une fonction de rappel<br />
« Débrancher avant utilisation ». Le symbole<br />
« Débrancher avant utilisation » clignote p<strong>ou</strong>r v<strong>ou</strong>s<br />
rappeler que v<strong>ou</strong>s devez débrancher l'appareil de<br />
l'adaptateur avant de l'allumer.<br />
Rappel de nettoyage<br />
P<strong>ou</strong>r garantir des capacités optimales, nettoyez le<br />
rasoir après chaque utilisation. Lorsque v<strong>ou</strong>s éteignez<br />
le rasoir, l'alarme de nettoyage clignote p<strong>ou</strong>r v<strong>ou</strong>s<br />
rappeler de nettoyer le rasoir.<br />
Système de verr<strong>ou</strong>illage p<strong>ou</strong>r voyage<br />
V<strong>ou</strong>s p<strong>ou</strong>vez verr<strong>ou</strong>iller le rasoir si v<strong>ou</strong>s partez en<br />
voyage. Le verr<strong>ou</strong>illage empêche le rasoir de se<br />
mettre en marche accidentellement.<br />
Activation du système de verr<strong>ou</strong>illage p<strong>ou</strong>r<br />
voyage
Français (Canada)<br />
39<br />
1 Appuyez sur le b<strong>ou</strong>ton marche/arrêt pendant trois<br />
<strong>sec</strong>ondes p<strong>ou</strong>r activer le mode verr<strong>ou</strong>illage p<strong>ou</strong>r<br />
voyage.<br />
3 <strong>sec</strong>.<br />
- Lorsque v<strong>ou</strong>s activez le verr<strong>ou</strong>illage, le symbole<br />
de verr<strong>ou</strong>illage s'allume de manière continue.<br />
Une fois que le verr<strong>ou</strong>illage est activé, le<br />
symbole de verr<strong>ou</strong>illage clignote.<br />
Désactivation du verr<strong>ou</strong>illage<br />
1 Appuyez sur le b<strong>ou</strong>ton marche/arrêt pendant trois<br />
<strong>sec</strong>ondes.<br />
- Le symbole du système de verr<strong>ou</strong>illage p<strong>ou</strong>r<br />
voyage clignote puis reste allumé en continu. Le<br />
rasoir peut être utilisé de n<strong>ou</strong>veau.<br />
Remplacement des têtes de rasoir<br />
P<strong>ou</strong>r garantir des capacités de <strong>rasage</strong> optimales, n<strong>ou</strong>s<br />
v<strong>ou</strong>s recommandons de remplacer les têtes de <strong>rasage</strong><br />
une fois par année.<br />
- P<strong>ou</strong>r v<strong>ou</strong>s rappeler de remplacer les têtes de<br />
<strong>rasage</strong>, l'appareil est doté d'une fonction de rappel<br />
de remplacement. Le voyant de rappel de<br />
remplacement s'allume de manière continue.<br />
Remarque : Après avoir remplacé les têtes de <strong>rasage</strong>,<br />
v<strong>ou</strong>s devez réinitialiser le rappel de remplacement en<br />
appuyant sur le b<strong>ou</strong>ton marche/arrêt pendant<br />
7 <strong>sec</strong>ondes.
40 Français (Canada)<br />
Fonction Turbo (certains modèles<br />
uniquement)<br />
L'appareil est équipé d'une fonction Turbo. Cela v<strong>ou</strong>s<br />
permet de raser plus rapidement les zones difficiles à<br />
atteindre.<br />
Charge en c<strong>ou</strong>rs<br />
Le temps de recharge est d'environ une heure.<br />
Remarque : V<strong>ou</strong>s ne p<strong>ou</strong>vez pas utiliser l'appareil<br />
pendant le chargement.<br />
Mettez le rasoir en charge avant de l'utiliser p<strong>ou</strong>r la<br />
première fois et lorsque l'afficheur indique que la pile<br />
est presque déchargée.<br />
Chargement à l'aide de l'adaptateur<br />
1 Assurez-v<strong>ou</strong>s que l'appareil est bien éteint.<br />
2 Branchez l'adaptateur dans la prise murale (1) et<br />
insérez la petite fiche dans l'appareil (2).<br />
3 Une fois la charge terminée, débranchez<br />
l'adaptateur de la prise murale, puis retirez la petite<br />
fiche de l'appareil.<br />
Utilisation de l'appareil<br />
Mise en marche et arrêt de l'appareil<br />
1 P<strong>ou</strong>r allumer l'appareil, appuyez sur le b<strong>ou</strong>ton<br />
marche/arrêt.<br />
2 P<strong>ou</strong>r éteindre l'appareil, appuyez sur le b<strong>ou</strong>ton<br />
marche/arrêt.<br />
Témoin de charge de la pile avec 3 voyants (certains<br />
modèles uniquement) : l'afficheur s'allume pendant
Français (Canada)<br />
41<br />
quelques <strong>sec</strong>ondes, puis affiche le niveau de charge de<br />
la pile.<br />
Rasage<br />
Période d'adaptation de la peau<br />
Il est possible que vos premières séances de <strong>rasage</strong><br />
n'apportent pas les résultats escomptés et que votre<br />
peau soit même légèrement irritée. Ce phénomène<br />
est normal. Votre peau et votre barbe ont besoin de<br />
temps p<strong>ou</strong>r s'adapter au n<strong>ou</strong>veau système de <strong>rasage</strong>.<br />
N<strong>ou</strong>s v<strong>ou</strong>s conseillons de v<strong>ou</strong>s raser régulièrement<br />
(au moins 3 fois par semaine) et exclusivement avec<br />
ce rasoir pendant 3 semaines p<strong>ou</strong>r habituer votre<br />
peau à ce n<strong>ou</strong>veau rasoir.<br />
Remarque : Cet appareil est uniquement conçu p<strong>ou</strong>r une<br />
utilisation sans fil.<br />
1 Allumez l'appareil.<br />
2 Faites glisser les têtes de rasoir sur votre visage en<br />
effectuant des m<strong>ou</strong>vements circulaires.<br />
3 Nettoyez le rasoir après chaque utilisation (voir').<br />
Rasage humide<br />
V<strong>ou</strong>s p<strong>ou</strong>vez également utiliser votre rasoir avec de la<br />
m<strong>ou</strong>sse <strong>ou</strong> du gel à raser sur votre visage.<br />
P<strong>ou</strong>r un <strong>rasage</strong> avec de la m<strong>ou</strong>sse <strong>ou</strong> du gel à raser,<br />
suivez les étapes ci-dess<strong>ou</strong>s :<br />
1 M<strong>ou</strong>illez votre visage avec de <strong>l'eau</strong>.
42 Français (Canada)<br />
2 Appliquez ensuite la m<strong>ou</strong>sse <strong>ou</strong> le gel à raser.<br />
3 Rincez l'unité de <strong>rasage</strong> s<strong>ou</strong>s <strong>l'eau</strong> du robinet p<strong>ou</strong>r<br />
v<strong>ou</strong>s assurer qu'il glisse facilement sur votre visage.<br />
4 Allumez l'appareil.<br />
5 Faites glisser les têtes de rasoir sur votre visage en<br />
effectuant des m<strong>ou</strong>vements circulaires.<br />
Remarque : Rincez le rasoir régulièrement afin qu'il<br />
puisse continuer à glisser en d<strong>ou</strong>ceur sur votre peau.<br />
6 Séchez votre visage.<br />
7 Nettoyez le rasoir après chaque utilisation (voir').<br />
Remarque : Assurez-v<strong>ou</strong>s d'enlever t<strong>ou</strong>te trace de<br />
m<strong>ou</strong>sse <strong>ou</strong> de gel à raser du rasoir.<br />
Fonction Turbo (certains modèles<br />
uniquement)<br />
L'appareil est équipé d'une fonction Turbo. Cela v<strong>ou</strong>s<br />
permet de raser plus rapidement les zones difficiles à<br />
atteindre.<br />
1 P<strong>ou</strong>r activer la fonction Turbo, appuyez sur le<br />
b<strong>ou</strong>ton Turbo.<br />
2 Faites glisser les têtes de rasoir sur votre visage en<br />
effectuant des m<strong>ou</strong>vements circulaires.<br />
Remarque : Ne faites pas de m<strong>ou</strong>vements rectilignes.<br />
3 P<strong>ou</strong>r désactiver la fonction Turbo, appuyez sur le<br />
b<strong>ou</strong>ton Turbo.
Français (Canada)<br />
43<br />
Utilisation des accessoires amovibles<br />
Remarque : Les accessoires f<strong>ou</strong>rnis peuvent varier selon<br />
les différents produits. Les accessoires qui ont été f<strong>ou</strong>rnis<br />
avec votre appareil sont indiqués sur l'emballage.<br />
Retrait <strong>ou</strong> fixation des accessoires amovibles<br />
1 Assurez-v<strong>ou</strong>s que l'appareil est bien éteint.<br />
2 Détachez l'accessoire de l'appareil.<br />
Remarque : Ne t<strong>ou</strong>rnez pas l'accessoire lorsque v<strong>ou</strong>s<br />
le retirez de l'appareil.<br />
3 Insérez la languette de l'accessoire dans la fente<br />
située sur la partie supérieure de l'appareil. Fixez<br />
ensuite l'accessoire sur l'appareil en le faisant glisser<br />
vers le bas (v<strong>ou</strong>s devez entendre un clic).<br />
Utilisation de l'accessoire de tondeuse<br />
(certains modèles uniquement)<br />
V<strong>ou</strong>s p<strong>ou</strong>vez utiliser l'accessoire de tonte p<strong>ou</strong>r tailler<br />
vos favoris et votre m<strong>ou</strong>stache.<br />
1 Assurez-v<strong>ou</strong>s que l'appareil est bien éteint.<br />
2 Retirez la tête de rasoir de l'appareil.<br />
3 Insérez la languette de la tondeuse dans la fente<br />
située sur la partie supérieure de l'appareil.<br />
4 Allumez l'appareil.
44 Français (Canada)<br />
5 V<strong>ou</strong>s p<strong>ou</strong>vez commencer à tondre.<br />
6 Nettoyez l'accessoire après chaque utilisation<br />
(voir').<br />
Utilisation de l'accessoire p<strong>ou</strong>r la barbe<br />
(certains modèles uniquement)<br />
1 Assurez-v<strong>ou</strong>s que l'appareil est bien éteint.<br />
2 Insérez la languette de l'accessoire p<strong>ou</strong>r la barbe<br />
dans la fente située sur la partie supérieure de<br />
l'appareil. Fixez ensuite l'accessoire p<strong>ou</strong>r la barbe<br />
sur l'appareil en le faisant glisser vers le bas (v<strong>ou</strong>s<br />
devez entendre un clic).<br />
Utilisation de l'accessoire p<strong>ou</strong>r la barbe avec<br />
le peigne<br />
V<strong>ou</strong>s p<strong>ou</strong>vez utiliser l'accessoire p<strong>ou</strong>r la barbe avec le<br />
sabot p<strong>ou</strong>r tailler votre barbe selon un réglage défini,<br />
mais également à différentes hauteurs de c<strong>ou</strong>pe. V<strong>ou</strong>s<br />
p<strong>ou</strong>vez également l'utiliser p<strong>ou</strong>r pré-tailler les poils<br />
longs avant de v<strong>ou</strong>s raser, p<strong>ou</strong>r un <strong>rasage</strong> plus<br />
agréable.<br />
Les réglages de la hauteur de c<strong>ou</strong>pe sur l'accessoire<br />
p<strong>ou</strong>r la barbe correspondent à la hauteur restante de<br />
votre barbe après la c<strong>ou</strong>pe. Ils vont de 1 mm à 5 mm.<br />
1 Faites glisser le sabot dans les rainures situées des<br />
deux côtés de l'accessoire jusqu'à ce que v<strong>ou</strong>s<br />
entendiez un clic.<br />
1<br />
2<br />
2 Appuyez sur le sélecteur de hauteur de c<strong>ou</strong>pe,<br />
puis p<strong>ou</strong>ssez-le vers la gauche <strong>ou</strong> la droite p<strong>ou</strong>r<br />
sélectionner le réglage de la hauteur de c<strong>ou</strong>pe<br />
s<strong>ou</strong>haité.<br />
3 Allumez l'appareil.
Français (Canada)<br />
45<br />
4 V<strong>ou</strong>s p<strong>ou</strong>vez maintenant mettre en forme votre<br />
barbe en déplaçant l'accessoire vers le haut avec<br />
une légère pression et en veillant à ce que l'avant<br />
du sabot soit entièrement en contact avec la peau.<br />
5 Nettoyez l'accessoire après chaque utilisation<br />
(voir').<br />
Utilisation de l'accessoire p<strong>ou</strong>r la barbe sans<br />
le peigne<br />
V<strong>ou</strong>s p<strong>ou</strong>vez utiliser l'accessoire p<strong>ou</strong>r la barbe sans<br />
sabot p<strong>ou</strong>r tailler les cont<strong>ou</strong>rs de votre barbe, de<br />
votre m<strong>ou</strong>stache, de vos favoris <strong>ou</strong> de votre nuque à<br />
une hauteur de 0,5 mm.<br />
1 Retirez le peigne de l'accessoire p<strong>ou</strong>r la barbe.<br />
Remarque : Saisissez le sabot en son centre p<strong>ou</strong>r le<br />
retirer de l'accessoire p<strong>ou</strong>r la barbe. Ne tirez pas sur<br />
les côtés du sabot.<br />
2 Allumez l'appareil.<br />
3 V<strong>ou</strong>s p<strong>ou</strong>vez maintenant commencer à dessiner<br />
les cont<strong>ou</strong>rs de votre barbe, de votre m<strong>ou</strong>stache,<br />
de vos favoris <strong>ou</strong> de votre nuque en déplaçant<br />
l'accessoire barbe vers le bas avec une légère<br />
pression t<strong>ou</strong>t en le maintenant<br />
perpendiculairement à la peau.<br />
4 Nettoyez l'accessoire après chaque utilisation<br />
(voir').<br />
Nettoyage et entretien<br />
Nettoyage du rasoir s<strong>ou</strong>s le robinet<br />
P<strong>ou</strong>r garantir des capacités optimales, nettoyez le<br />
rasoir après chaque utilisation.
46 Français (Canada)<br />
Attention : Attention avec <strong>l'eau</strong> chaude. Veillez à<br />
ce que <strong>l'eau</strong> ne soit pas trop chaude afin de ne pas<br />
v<strong>ou</strong>s brûler.<br />
Attention : Ne séchez jamais la tête de rasoir à<br />
l'aide d'une serviette au risque d'endommager les<br />
têtes de rasoir.<br />
1 Rincez la tête de rasoir s<strong>ou</strong>s <strong>l'eau</strong> chaude.<br />
2 Appuyez sur le b<strong>ou</strong>ton de libération p<strong>ou</strong>r <strong>ou</strong>vrir<br />
l'unité de <strong>rasage</strong>.<br />
3 Rincez le support de la tête de <strong>rasage</strong> à <strong>l'eau</strong><br />
chaude s<strong>ou</strong>s le robinet pendant 30 <strong>sec</strong>ondes.<br />
4 Sec<strong>ou</strong>ez la tête de rasoir p<strong>ou</strong>r éliminer l'excès<br />
d'eau et laissez-la sécher.<br />
5 Fermez le support de la tête de <strong>rasage</strong> (v<strong>ou</strong>s devez<br />
entendre un clic).<br />
Méthode de nettoyage en profondeur<br />
1 Éteignez l'appareil.
Français (Canada)<br />
47<br />
2 Appuyez sur le b<strong>ou</strong>ton de libération p<strong>ou</strong>r <strong>ou</strong>vrir<br />
l'unité de <strong>rasage</strong>.<br />
3 Retirez le support de la tête de <strong>rasage</strong> de la partie<br />
inférieure de la tête de rasoir.<br />
1<br />
2<br />
4 T<strong>ou</strong>rnez les anneaux de fixation dans le sens<br />
inverse des aiguilles d'une montre et retirez-les.<br />
5 Retirez les têtes de <strong>rasage</strong> du support de tête de<br />
<strong>rasage</strong>. Chaque tête se compose d'une lame et<br />
d'une grille.<br />
Remarque : Ne nettoyez qu'une lame et une grille à<br />
la fois, car elles sont assemblées par paires. Si, par<br />
erreur, v<strong>ou</strong>s placez une lame dans la mauvaise grille<br />
de <strong>rasage</strong>, plusieurs semaines peuvent être<br />
nécessaires avant de retr<strong>ou</strong>ver un <strong>rasage</strong> optimal.<br />
6 Nettoyez la lame et la grille s<strong>ou</strong>s <strong>l'eau</strong> du robinet.
48 Français (Canada)<br />
7 Replacez la lame dans la grille.<br />
8 Placez les têtes de <strong>rasage</strong> dans le support de tête<br />
de <strong>rasage</strong>.<br />
Remarque : Veillez à ce que les saillies de la tête du<br />
rasoir s'imbriquent parfaitement dans les creux.<br />
1<br />
9 Remettez les anneaux de fixation en place sur le<br />
support de la tête de <strong>rasage</strong> et t<strong>ou</strong>rnez-les dans le<br />
sens des aiguilles d'une montre (v<strong>ou</strong>s devez<br />
entendre un clic).<br />
2<br />
- Chaque anneau de fixation est p<strong>ou</strong>rvu de<br />
deux encoches et de deux parties saillantes qui<br />
s'encastrent dans celles du support de la tête de<br />
<strong>rasage</strong>.
Français (Canada)<br />
49<br />
- Faites t<strong>ou</strong>rner l'anneau dans le sens des aiguilles<br />
d'une montre jusqu'à ce que v<strong>ou</strong>s entendiez un<br />
clic et que l'anneau soit fixé.<br />
Remarque : Tenez le support de la tête de <strong>rasage</strong><br />
dans la main lorsque v<strong>ou</strong>s réinsérez les têtes de<br />
<strong>rasage</strong> et replacez les anneaux de fixation. Ne placez<br />
pas le support de la tête de <strong>rasage</strong> sur une surface<br />
lors de cette opération, car v<strong>ou</strong>s risqueriez de<br />
l'endommager.<br />
10Réinsérez la charnière du support de la tête de<br />
<strong>rasage</strong> dans la fente de la tête de <strong>rasage</strong>. Fermez le<br />
support de la tête de <strong>rasage</strong>.<br />
Nettoyage des accessoires amovibles<br />
Attention : Ne séchez jamais l'accessoire de tonte<br />
<strong>ou</strong> l'accessoire barbe à l'aide d'une serviette <strong>ou</strong><br />
d'un m<strong>ou</strong>choir, car v<strong>ou</strong>s risqueriez d'endommager<br />
les dents de tonte.<br />
Nettoyage de l'accessoire de tondeuse<br />
(certains modèles uniquement)<br />
Nettoyez l'accessoire de tonte après chaque<br />
utilisation.<br />
1 Allumez l'appareil sur lequel l'accessoire de tonte a<br />
été fixé.
50 Français (Canada)<br />
2 Rincez l'accessoire s<strong>ou</strong>s le robinet d'eau chaude.<br />
3 Éteignez l'appareil.<br />
4 Retirez l'excès d'eau en <strong>sec</strong><strong>ou</strong>ant l'accessoire, puis<br />
laissez-le sécher.<br />
Suggestion : P<strong>ou</strong>r garantir des capacités optimales,<br />
appliquez une g<strong>ou</strong>tte d'huile p<strong>ou</strong>r machine à c<strong>ou</strong>dre sur<br />
les dents de l'accessoire t<strong>ou</strong>s les six mois.<br />
Nettoyage de l'accessoire p<strong>ou</strong>r la barbe<br />
(certains modèles uniquement)<br />
Nettoyez l'accessoire p<strong>ou</strong>r la barbe après chaque<br />
utilisation.<br />
1 Retirez le peigne de l'accessoire p<strong>ou</strong>r la barbe.<br />
Remarque : Saisissez le sabot en son centre p<strong>ou</strong>r le<br />
retirer de l'accessoire p<strong>ou</strong>r la barbe. Ne tirez pas sur<br />
les côtés du sabot.<br />
2 Allumez l'appareil.<br />
3 Passez l'accessoire et le peigne de c<strong>ou</strong>pe<br />
séparément s<strong>ou</strong>s <strong>l'eau</strong> chaude p<strong>ou</strong>r les nettoyer.<br />
4 Après le nettoyage, éteignez l'appareil.
Français (Canada)<br />
51<br />
5 Ég<strong>ou</strong>ttez soigneusement l'excédent d'eau, puis<br />
laissez sécher l'accessoire p<strong>ou</strong>r la barbe et le sabot.<br />
Suggestion : P<strong>ou</strong>r garantir des capacités optimales,<br />
appliquez une g<strong>ou</strong>tte d'huile p<strong>ou</strong>r machine à c<strong>ou</strong>dre sur<br />
les dents de l'accessoire t<strong>ou</strong>s les six mois.<br />
Entreposage<br />
Remarque : N<strong>ou</strong>s v<strong>ou</strong>s conseillons de laisser l'appareil et<br />
ses accessoires sécher avant de placer les capots de<br />
protection sur les accessoires et de ranger le rasoir dans<br />
la h<strong>ou</strong>sse.<br />
- Certains modèles uniquement : Placez le capot de<br />
protection sur le rasoir p<strong>ou</strong>r le protéger de t<strong>ou</strong>te<br />
accumulation de saletés.<br />
- Certains modèles uniquement : Rangez le rasoir<br />
dans la h<strong>ou</strong>sse f<strong>ou</strong>rnie.<br />
Remplacement<br />
Remplacement des têtes de rasoir<br />
P<strong>ou</strong>r garantir des capacités de <strong>rasage</strong> optimales, n<strong>ou</strong>s<br />
v<strong>ou</strong>s recommandons de remplacer les têtes de <strong>rasage</strong><br />
une fois par année.
52 Français (Canada)<br />
Rappel de remplacement<br />
Le symbole de l'unité de <strong>rasage</strong> s'allume p<strong>ou</strong>r indiquer<br />
que les têtes de <strong>rasage</strong> doivent être remplacées.<br />
Remplacez immédiatement les têtes de <strong>rasage</strong><br />
endommagées. Remplacez les têtes de <strong>rasage</strong><br />
uniquement par des têtes de <strong>rasage</strong> <strong>Philips</strong> d'origine,<br />
comme indiqué dans le chapitre « Commande<br />
d'accessoires ».<br />
1 Le symbole de l'unité de <strong>rasage</strong> s'allume de<br />
manière continue lorsque v<strong>ou</strong>s éteignez le rasoir<br />
p<strong>ou</strong>r indiquer que les têtes de <strong>rasage</strong> doivent être<br />
remplacées.<br />
2 Appuyez sur le b<strong>ou</strong>ton de libération p<strong>ou</strong>r <strong>ou</strong>vrir<br />
l'unité de <strong>rasage</strong>.<br />
3 Retirez le support de la tête de <strong>rasage</strong> de la partie<br />
inférieure de la tête de rasoir.<br />
1<br />
2<br />
4 T<strong>ou</strong>rnez les anneaux de fixation dans le sens<br />
inverse des aiguilles d'une montre et retirez-les.
Français (Canada)<br />
53<br />
5 Retirez les têtes de rasoir du support de tête de<br />
rasoir et jetez-les.<br />
6 Insérez les n<strong>ou</strong>velles têtes de rasoir dans le<br />
support.<br />
Remarque : Veillez à ce que les saillies de la tête du<br />
rasoir s'imbriquent parfaitement dans les creux.<br />
1<br />
7 Remettez les anneaux de fixation en place sur le<br />
support de la tête de <strong>rasage</strong> et t<strong>ou</strong>rnez-les dans le<br />
sens des aiguilles d'une montre (v<strong>ou</strong>s devez<br />
entendre un clic).<br />
2<br />
- Chaque anneau de fixation est p<strong>ou</strong>rvu de<br />
deux encoches et de deux parties saillantes qui<br />
s'encastrent dans celles du support de la tête de<br />
<strong>rasage</strong>.
54 Français (Canada)<br />
- Faites t<strong>ou</strong>rner l'anneau dans le sens des aiguilles<br />
d'une montre jusqu'à ce que v<strong>ou</strong>s entendiez un<br />
clic et que l'anneau soit fixé.<br />
Tenez le support de la tête de <strong>rasage</strong> dans la main<br />
lorsque v<strong>ou</strong>s réinsérez les têtes de <strong>rasage</strong> et replacez<br />
les anneaux de fixation. Ne placez pas le support de<br />
la tête de <strong>rasage</strong> sur une surface lors de cette<br />
opération, car v<strong>ou</strong>s risqueriez de l'endommager.<br />
8 Réinsérez la charnière du support de la tête de<br />
<strong>rasage</strong> dans la fente de la tête de <strong>rasage</strong>. Fermez le<br />
support de la tête de <strong>rasage</strong> (v<strong>ou</strong>s devez entendre<br />
un clic).<br />
7 <strong>sec</strong>.<br />
9 P<strong>ou</strong>r réinitialiser le rappel de remplacement,<br />
maintenez le b<strong>ou</strong>ton marche/arrêt enfoncé<br />
pendant environ 7 <strong>sec</strong>ondes.<br />
Commande d'accessoires<br />
P<strong>ou</strong>r acheter des accessoires <strong>ou</strong> des pièces de<br />
rechange, visitez le site Web<br />
www.shop.philips.com/service <strong>ou</strong> rendez-v<strong>ou</strong>s chez<br />
votre revendeur <strong>Philips</strong>. V<strong>ou</strong>s p<strong>ou</strong>vez également<br />
communiquer avec le Service Consommateurs <strong>Philips</strong>
Français (Canada)<br />
55<br />
de votre pays (consultez le dépliant de garantie<br />
internationale p<strong>ou</strong>r obtenir les coordonnées).<br />
V<strong>ou</strong>s p<strong>ou</strong>vez v<strong>ou</strong>s procurer les accessoires et pièces<br />
de rechange suivants :<br />
- Adaptateur HQ8505<br />
- Têtes de <strong>rasage</strong> <strong>Philips</strong> SH50<br />
- Aérosol de nettoyage p<strong>ou</strong>r têtes de <strong>rasage</strong> <strong>Philips</strong><br />
HQ110<br />
Remarque : La disponibilité des accessoires peut varier<br />
d'un pays à un autre.<br />
Têtes de rasoir<br />
P<strong>ou</strong>r garantir des capacités de <strong>rasage</strong> optimales, n<strong>ou</strong>s<br />
v<strong>ou</strong>s recommandons de remplacer les têtes de <strong>rasage</strong><br />
une fois par année.<br />
RECYCLE<br />
A B A C<br />
1.800.822.8837<br />
Mise aux rebuts<br />
Cet appareil contient une pile rechargeable qui doit<br />
être mise au rebut de façon appropriée.<br />
Communiquez avec les responsables locaux de votre<br />
ville p<strong>ou</strong>r obtenir des renseignements. V<strong>ou</strong>s p<strong>ou</strong>vez<br />
également appeler le 1-800-8-BATTERY <strong>ou</strong> visiter le<br />
site www.rbrc.com p<strong>ou</strong>r connaître les emplacements<br />
où v<strong>ou</strong>s p<strong>ou</strong>vez mettre la pile au rebut.<br />
P<strong>ou</strong>r obtenir de l'aide, visitez le site Web<br />
www.philips.com/support <strong>ou</strong> composez le numéro<br />
sans frais 1 800 243-3050.
56 Français (Canada)<br />
P<strong>ou</strong>r retirer la pile rechargeable du rasoir<br />
Attention : Ne retirez la pile rechargeable que<br />
lorsque v<strong>ou</strong>s mettez le rasoir au rebut. Veillez à ce<br />
que la pile rechargeable soit totalement déchargée<br />
avant de la retirer.<br />
Attention : Soyez prudent, car les languettes de la<br />
pile sont c<strong>ou</strong>pantes.<br />
1 Retirez la vis dans le panneau arrière à l'aide d'un<br />
t<strong>ou</strong>rnevis. Puis retirez le panneau arrière.<br />
2 Pliez les crochets sur les côtés et retirez le bloc<br />
d'alimentation.<br />
3 Cassez les accroches et enlevez le panneau avant<br />
du bloc d'alimentation.<br />
4 Sortez le support de la pile et c<strong>ou</strong>pez les fils de la<br />
pile à l'aide d'une pince c<strong>ou</strong>pante.
Français (Canada)<br />
57<br />
Garantie et support<br />
Si v<strong>ou</strong>s avez besoin d'aide <strong>ou</strong> d’informations<br />
supplémentaires, consultez le site Web<br />
www.philips.com/support, <strong>ou</strong> appelez le numéro sans<br />
frais : 1-866-800-9311. P<strong>ou</strong>r localiser le dépôt de<br />
garantie <strong>Philips</strong> le plus proche, visitez notre site Web<br />
www.philips.com.<br />
Limites de la garantie<br />
- <strong>Philips</strong> Consumer Lifestyle garantit ses produits<br />
pendant deux ans à compter de la date d'achat. En<br />
cas de défaillance de l'appareil signalée au c<strong>ou</strong>rs de<br />
la période de garantie, <strong>Philips</strong> Consumer Lifestyle<br />
s'engage à réparer <strong>ou</strong> à remplacer le produit à ses<br />
frais.<br />
- <strong>Philips</strong> Consumer Lifestyle prend en charge les frais<br />
de réparation <strong>ou</strong> de remplacement uniquement<br />
sur présentation de la preuve d'achat (un reçu par<br />
exemple) pr<strong>ou</strong>vant que le produit est c<strong>ou</strong>vert par<br />
la garantie au moment de la demande. Étant<br />
susceptibles de s'user, les têtes de <strong>rasage</strong> (lames et<br />
dresse-poils) ne sont pas c<strong>ou</strong>vertes par la garantie<br />
internationale.
58 Français (Canada)<br />
- Cette garantie n’est pas valide si le produit ne<br />
fonctionne pas en raison d’un dommage causé par<br />
une utilisation inadéquate, un mauvais entretien<br />
(p. ex. pièces bloquées par un dépôt calcaire) <strong>ou</strong> si<br />
des modifications <strong>ou</strong> des réparations ont été<br />
effectuées par une personne non autorisée<br />
par <strong>Philips</strong> Consumer Lifestyle.<br />
- P<strong>ou</strong>r garantir une utilisation correcte du produit,<br />
l'utilisateur est tenu de respecter scrupuleusement<br />
t<strong>ou</strong>tes les instructions du mode d'<strong>emploi</strong> et doit<br />
éviter t<strong>ou</strong>te action déconseillée voire même<br />
contre-indiquée dans ce mode d'<strong>emploi</strong>.<br />
- Les limites de cette garantie n’ont aucune<br />
incidence sur vos droits prévus par la loi.<br />
Dépannage<br />
Cette rubrique récapitule les problèmes les plus<br />
c<strong>ou</strong>rants que v<strong>ou</strong>s p<strong>ou</strong>vez rencontrer avec l'appareil.<br />
Si v<strong>ou</strong>s ne parvenez pas à rés<strong>ou</strong>dre le problème à<br />
l'aide des renseignements ci-dess<strong>ou</strong>s, rendez-v<strong>ou</strong>s sur<br />
le site www.philips.com/support et consultez la<br />
liste de questions fréquemment posées <strong>ou</strong><br />
communiquez avec le Service Consommateurs <strong>Philips</strong><br />
de votre pays.<br />
Problème Cause possible Solution<br />
Les résultats de<br />
<strong>rasage</strong> ne sont<br />
pas aussi<br />
satisfaisants que<br />
d'habitude.<br />
Les têtes du rasoir sont<br />
endommagées <strong>ou</strong> usées.<br />
Remplacez les têtes de<br />
<strong>rasage</strong> (voir').
Français (Canada)<br />
59<br />
Problème Cause possible Solution<br />
Les têtes de rasoir sont<br />
bloquées par des poils <strong>ou</strong><br />
de la p<strong>ou</strong>ssière.<br />
P<strong>ou</strong>r nettoyer les têtes de<br />
rasoir, (voir') suivez les<br />
étapes de la méthode de<br />
nettoyage en profondeur.<br />
L'appareil ne<br />
fonctionne pas<br />
lorsque j'appuie<br />
sur le b<strong>ou</strong>ton<br />
marche/arrêt.<br />
L'appareil est encore<br />
branché à la prise de<br />
c<strong>ou</strong>rant. P<strong>ou</strong>r des raisons<br />
de sécurité, l'appareil est<br />
conçu p<strong>ou</strong>r une utilisation<br />
sans fil uniquement.<br />
Débranchez l'appareil et<br />
appuyez sur le b<strong>ou</strong>ton<br />
marche/arrêt p<strong>ou</strong>r allumer<br />
l'appareil.<br />
De <strong>l'eau</strong><br />
s'échappe du<br />
bas de l'appareil.<br />
La pile rechargeable est<br />
vide.<br />
Le verr<strong>ou</strong>illage est activé.<br />
L'unité de <strong>rasage</strong> est<br />
s<strong>ou</strong>illée <strong>ou</strong> endommagée<br />
à un tel point que le<br />
moteur ne peut plus<br />
t<strong>ou</strong>rner.<br />
Les têtes du rasoir sont<br />
endommagées <strong>ou</strong> usées.<br />
Pendant le nettoyage, de<br />
<strong>l'eau</strong> peut s'accumuler<br />
entre la partie interne et<br />
la coque externe de<br />
l'appareil.<br />
Rechargez la pile (voir').<br />
Appuyez sur le b<strong>ou</strong>ton<br />
marche/arrêt pendant<br />
trois <strong>sec</strong>ondes p<strong>ou</strong>r<br />
désactiver le système de<br />
verr<strong>ou</strong>illage p<strong>ou</strong>r voyage.<br />
Nettoyez les têtes de<br />
<strong>rasage</strong> (voir') <strong>ou</strong><br />
remplacez-les (voir').<br />
Remplacez les têtes de<br />
<strong>rasage</strong> (voir').<br />
Ce phénomène est<br />
normal et ne présente pas<br />
de danger, car t<strong>ou</strong>tes les<br />
pièces électroniques à<br />
l'intérieur de l'appareil<br />
sont protégées.
60 Français (Canada)<br />
Problème Cause possible Solution<br />
J'ai remplacé les<br />
têtes de rasoir,<br />
mais le rappel<br />
de<br />
remplacement<br />
apparaît<br />
t<strong>ou</strong>j<strong>ou</strong>rs.<br />
V<strong>ou</strong>s n'avez pas réinitialisé<br />
l'appareil.<br />
Réinitialisez l'appareil en<br />
maintenant enfoncé le<br />
b<strong>ou</strong>ton marche/arrêt<br />
pendant environ<br />
7 <strong>sec</strong>ondes (voir').<br />
Un symbole de<br />
tête de rasoir<br />
est<br />
s<strong>ou</strong>dainement<br />
apparu à l'écran.<br />
Ce symbole est un rappel<br />
de remplacement.<br />
Remplacez les têtes de<br />
<strong>rasage</strong> (voir').
© 2015 Koninklijke <strong>Philips</strong> N.V. All rights reserved. Specifications are<br />
subject to change with<strong>ou</strong>t notice. Trademarks are the property of<br />
Koninklijke <strong>Philips</strong> N.V. (Royal <strong>Philips</strong>) or their respective owners.<br />
www.philips.com<br />
4222.002.5832.1<br />
2_002_5832_1_BackCover_A6_bl.indd 1<br />
9/10/15 11:53 AM


