

Philips Shaver series 9000 Rasoir électrique rasage à sec ou sous l'eau - Mode d’emploi - FRA
Philips Shaver series 9000 Rasoir électrique rasage à sec ou sous l'eau - Mode d’emploi - FRA
Philips Shaver series 9000 Rasoir électrique rasage à sec ou sous l'eau - Mode d’emploi - FRA

You also want an ePaper? Increase the reach of your titles
YUMPU automatically turns print PDFs into web optimized ePapers that Google loves.
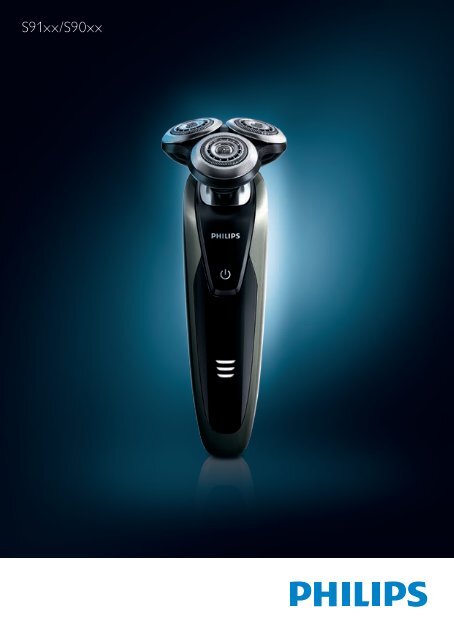
S91xx/S90xx
1
Plus<br />
1 2<br />
3
1 2<br />
3<br />
1 2 3<br />
4 5
1<br />
2<br />
3<br />
4<br />
2<br />
3<br />
4<br />
1 2<br />
3 4<br />
5
1 2<br />
Basic<br />
3<br />
Plus<br />
3<br />
4<br />
3MO<br />
1<br />
2<br />
3<br />
4<br />
5 6<br />
7 8
1M<br />
1<br />
2 3<br />
4 5 6<br />
7<br />
8 9<br />
10
ENGLISH 12<br />
ESPAÑOL 40<br />
<strong>FRA</strong>NÇAIS 69<br />
ITALIANO 98<br />
PORTUGUÊS 127<br />
TÜRKÇE 156<br />
S91XX, S90XX
12<br />
ENGLISH<br />
Introduction<br />
Congratulations on y<strong>ou</strong>r purchase and welcome to<br />
<strong>Philips</strong>! To fully benefit from the support that <strong>Philips</strong><br />
offers, register y<strong>ou</strong>r product at www.philips.com/<br />
welcome.<br />
Please read this user manual, as it contains information<br />
ab<strong>ou</strong>t the features of this shaver as well as some tips<br />
to make shaving easier and more enjoyable.<br />
General description (Fig. 1)<br />
1 Comb for beard styler attachment<br />
2 Click-on beard styler attachment<br />
3 Click-on trimmer attachment<br />
4 Click-on shaving unit<br />
5 On/off button<br />
6 Socket for small plug<br />
7 Exclamation mark<br />
8 Replacement reminder<br />
9 Battery charge indicator<br />
10 Travel lock symbol<br />
11 Cleaning reminder<br />
12 Replacement symbol<br />
13 SmartClean system<br />
14 Cap of SmartClean system<br />
15 On/off button<br />
16 Cleaning symbol<br />
17 Drying symbol<br />
18 Ready symbol<br />
19 Charge symbol<br />
20 Cleaning cartridge for SmartClean system<br />
21 Adapter<br />
22 Small plug<br />
23 Retaining ring holder<br />
24 P<strong>ou</strong>ch
ENGLISH 13<br />
Note: The accessories supplied may vary for different<br />
products. The box shows the accessories that have been<br />
supplied with y<strong>ou</strong>r appliance.<br />
Important<br />
Read this user manual carefully before y<strong>ou</strong> use the<br />
shaver and the SmartClean system. Save this user<br />
manual for future reference.<br />
Danger<br />
--<br />
Keep the adapter dry.<br />
Warning<br />
--<br />
The adapter contains a transformer. Do not cut<br />
off the adapter to replace it with another plug,<br />
as this causes a hazard<strong>ou</strong>s situation.<br />
--<br />
This appliance can be used by children aged from<br />
8 years and above and persons with reduced<br />
physical, sensory or mental capabilities or lack<br />
of experience and knowledge if they have been<br />
given supervision or instruction concerning use<br />
of the appliance in a safe way and understand the<br />
hazards involved. Children shall not play with the<br />
appliance. Cleaning and user maintenance shall not<br />
be made by children with<strong>ou</strong>t supervision.<br />
--<br />
Always unplug the shaver before y<strong>ou</strong> clean it<br />
under the tap.<br />
Caution<br />
--<br />
Never immerse the SmartClean system in water<br />
nor rinse it under the tap.<br />
--<br />
Never use water hotter than 80°C to rinse the<br />
shaver.<br />
--<br />
Do not use the shaver, SmartClean system, adapter<br />
or any other part if it is damaged, as this may<br />
cause injury. Always replace a damaged adapter<br />
or part with one of the original type.
14<br />
ENGLISH<br />
--<br />
Only use the SmartClean system with the original<br />
cleaning cartridge.<br />
--<br />
Always place the SmartClean system on a stable,<br />
level and horizontal surface to prevent leakage.<br />
--<br />
Always make sure that the cartridge compartment<br />
is closed before y<strong>ou</strong> use the SmartClean system<br />
to clean or charge the shaver.<br />
--<br />
When the SmartClean system is ready for use,<br />
do not move it to prevent leakage of cleaning fluid.<br />
--<br />
The SmartClean system thor<strong>ou</strong>ghly cleans but<br />
does not disinfect y<strong>ou</strong>r shaver, therefore do not<br />
share the shaver with others.<br />
--<br />
Never use compressed air, sc<strong>ou</strong>ring pads, abrasive<br />
cleaning agents or aggressive liquids such as petrol<br />
or acetone to clean the appliance.<br />
--<br />
Water may leak from the socket at the bottom<br />
of the shaver when y<strong>ou</strong> rinse it. This is normal<br />
and not danger<strong>ou</strong>s because all electronics are<br />
enclosed in a sealed power unit inside the shaver.<br />
Compliance with standards<br />
--<br />
This shaver is waterproof and complies with the<br />
internationally approved safety regulations. It is<br />
suitable for use in the bath or shower and for<br />
cleaning under the tap. For safety reasons, the<br />
shaver can therefore only be used cordlessly.<br />
--<br />
The shaver and the SmartClean system comply<br />
with all applicable standards and regulations<br />
regarding exposure to electromagnetic fields.<br />
General<br />
--<br />
The adapter is equipped with an automatic<br />
voltage selector and is suitable for mains voltages<br />
ranging from 100 to 240 volts.<br />
--<br />
The adapter transforms 100-240 volts to a safe<br />
low voltage of less than 24 volts.<br />
--<br />
Maximum noise level: Lc = 69dB(A)
ENGLISH 15<br />
The display<br />
Note: Before y<strong>ou</strong> use the shaver for the first time,<br />
remove the protective foil from the display.<br />
--<br />
S91XX/S90XX<br />
Charging<br />
--<br />
Charging takes approx. 1 h<strong>ou</strong>r.<br />
Note: This appliance can only be used cordlessly.<br />
--<br />
Quick charge: When y<strong>ou</strong> connect the appliance<br />
to the mains, it produces a s<strong>ou</strong>nd. Then the lights<br />
of the battery charge indicator light up one after<br />
the other continu<strong>ou</strong>sly. When the shaver contains<br />
en<strong>ou</strong>gh energy for one shave, the bottom light of<br />
the battery charge indicator starts to flash slowly.<br />
--<br />
If y<strong>ou</strong> leave the appliance connected to the<br />
mains, the charging process continues. To indicate<br />
that the appliance is charging, first the bottom<br />
light flashes white and then lights up white<br />
continu<strong>ou</strong>sly. Then the <strong>sec</strong>ond light flashes and<br />
then lights up continu<strong>ou</strong>sly, and so on until the<br />
shaver is fully charged.<br />
Battery fully charged<br />
Note: This appliance can only be used cordlessly.<br />
Note: When the battery is full, the display switches<br />
off automatically after 30 minutes. When y<strong>ou</strong> press<br />
the on/off button during or after charging, y<strong>ou</strong> hear a<br />
s<strong>ou</strong>nd to indicate that the shaver is still connected to<br />
the mains.
16<br />
ENGLISH<br />
--<br />
When the battery is fully charged, all lights of<br />
the battery charge indicator light up white<br />
continu<strong>ou</strong>sly.<br />
Battery low<br />
--<br />
When the battery is almost empty, the bottom<br />
light flashes orange and y<strong>ou</strong> hear a s<strong>ou</strong>nd.<br />
Remaining battery capacity<br />
--<br />
The remaining battery capacity is indicated by the<br />
lights of the battery charge indicator that light up<br />
continu<strong>ou</strong>sly.<br />
Cleaning reminder<br />
For optimal shaving performance, we advise y<strong>ou</strong> to<br />
clean the shaver after every use.<br />
--<br />
When y<strong>ou</strong> switch off the shaver, the cleaning<br />
reminder flashes to remind y<strong>ou</strong> to clean the<br />
shaver.<br />
Travel lock<br />
Y<strong>ou</strong> can lock the shaver when y<strong>ou</strong> are going to<br />
travel. The travel lock prevents the shaver from being<br />
switched on by accident.
ENGLISH 17<br />
Activating the travel lock<br />
1 Press the on/off button for 3 <strong>sec</strong>onds to enter<br />
the travel lock mode.<br />
,,<br />
While y<strong>ou</strong> activate the travel lock, the travel lock<br />
symbol lights up white continu<strong>ou</strong>sly. When the<br />
travel lock is activated, the shaver produces a<br />
s<strong>ou</strong>nd and the travel lock symbol flashes.<br />
Deactivating the travel lock<br />
1 Press the on/off button for 3 <strong>sec</strong>onds.<br />
,,<br />
The travel lock symbol flashes and then lights<br />
up continu<strong>ou</strong>sly.<br />
The shaver is now ready for use again.<br />
Note: Y<strong>ou</strong> can also deactivate the travel lock by<br />
connecting the appliance to the mains.<br />
Replacing shaving heads<br />
For maximum shaving performance, we advise y<strong>ou</strong><br />
to replace the shaving heads every two years.<br />
--<br />
The appliance is equipped with a replacement<br />
reminder which reminds y<strong>ou</strong> to replace the<br />
shaving heads. The replacement reminder lights<br />
up white continu<strong>ou</strong>sly and the arrows flash white.<br />
Y<strong>ou</strong> hear a beep to indicate y<strong>ou</strong> have to replace<br />
the shaving heads.<br />
Note: After replacing the shaving heads, y<strong>ou</strong> need<br />
to reset the shaver by pressing the on/off button for<br />
7 <strong>sec</strong>onds.
18<br />
ENGLISH<br />
Exclamation mark<br />
Blocked shaving heads<br />
--<br />
If the shaving heads are blocked, the exclamation<br />
mark lights up orange continu<strong>ou</strong>sly. The replacement<br />
reminder and the cleaning reminder flash white<br />
alternately and y<strong>ou</strong> hear a s<strong>ou</strong>nd. In this case,<br />
the motor cannot run because the shaving heads<br />
are soiled or damaged.<br />
--<br />
When this happens, y<strong>ou</strong> have to clean the shaving<br />
heads or replace them.<br />
Overheating<br />
--<br />
If the appliance overheats during charging, the<br />
exclamation mark flashes orange.<br />
--<br />
When this happens, the shaver automatically<br />
switches off. Charging continues once the<br />
appliance is back to the normal temperature.<br />
Charging<br />
Charging takes approx. 1 h<strong>ou</strong>r.<br />
A fully charged shaver has a shaving time of up to<br />
50 minutes.<br />
Note: Y<strong>ou</strong> cannot use the appliance while charging.<br />
Charge the shaver before y<strong>ou</strong> use it for the first<br />
time and when the display indicates that the battery<br />
is almost empty .
ENGLISH 19<br />
Charging with the adapter<br />
1 Make sure the appliance is switched off.<br />
2 Insert the small plug into the appliance (1)<br />
and put the adapter in the wall socket (2).<br />
Charging in the SmartClean system<br />
(specific types only)<br />
1 Put the small plug in the SmartClean system.<br />
2 Put the adapter in the wall socket.<br />
3 Press the top cap to be able to place the<br />
shaver in the holder (‘click’).<br />
4 Hold the shaver upside down above the holder.<br />
Make sure the front of the shaver points<br />
towards the SmartClean system.<br />
5 Place the shaver in the holder (1), tilt the<br />
shaver backwards (2) and press down the top<br />
cap to connect the shaver (‘click’) (3).<br />
Note: The battery symbol flashes slowly to indicate the<br />
appliance is charging.
20<br />
ENGLISH<br />
Using the shaver<br />
Shaving<br />
Skin adaptation period<br />
Y<strong>ou</strong>r first shaves may not bring y<strong>ou</strong> the result y<strong>ou</strong><br />
expect and y<strong>ou</strong>r skin may even become slightly<br />
irritated. This is normal. Y<strong>ou</strong>r skin and beard need<br />
time to adapt to any new shaving system.<br />
We advise y<strong>ou</strong> to shave regularly (at least 3 times a<br />
week) with this shaver for a period of 3 weeks<br />
to allow y<strong>ou</strong>r skin to adapt to the new shaver.<br />
Tip: To ensure the best result, we advise y<strong>ou</strong> to pre-trim<br />
y<strong>ou</strong>r beard if y<strong>ou</strong> have not shaved for 3 days or longer.<br />
Note: This appliance can only be used cordlessly.<br />
1 Press the on/off button once to switch on<br />
the shaver.<br />
,,<br />
The display lights up for a few <strong>sec</strong>onds.<br />
2 Move the shaving heads over y<strong>ou</strong>r skin in<br />
circular movements.<br />
--<br />
Do not make straight movements.<br />
3 Press the on/off button once to switch off<br />
the shaver.<br />
,,<br />
The display lights up for a few <strong>sec</strong>onds and then<br />
shows the remaining battery charge.<br />
Wet shaving<br />
Y<strong>ou</strong> can also use this shaver on a wet face with<br />
shaving foam or shaving gel.<br />
To shave with shaving foam or shaving gel,<br />
follow the steps below:
ENGLISH 21<br />
1 Apply some water to y<strong>ou</strong>r skin.<br />
2 Apply shaving foam or shaving gel to y<strong>ou</strong>r skin.<br />
3 Rinse the shaving unit under the tap to ensure<br />
that the shaving unit glides smoothly over<br />
y<strong>ou</strong>r skin.<br />
4 Press the on/off button once to switch on<br />
the shaver.<br />
5 Move the shaving heads over y<strong>ou</strong>r skin in<br />
circular movements.<br />
Note: Rinse the shaver under the tap regularly to<br />
ensure that it continues to glide smoothly over y<strong>ou</strong>r<br />
skin.<br />
6 Dry y<strong>ou</strong>r face and thor<strong>ou</strong>ghly clean the<br />
shaver after use (see chapter ‘Cleaning and<br />
maintenance’).<br />
Note: Make sure y<strong>ou</strong> rinse all foam or shaving gel off<br />
the shaver.
22<br />
ENGLISH<br />
Using the click-on attachments<br />
Note: The accessories supplied may vary for different<br />
products. The box shows the accessories that have been<br />
supplied with y<strong>ou</strong>r appliance.<br />
Using the trimmer attachment<br />
Y<strong>ou</strong> can use the trimmer attachment to groom<br />
y<strong>ou</strong>r sideburns and m<strong>ou</strong>stache.<br />
1 Pull the shaving unit straight off the appliance.<br />
Note: Do not twist the shaving unit while y<strong>ou</strong> pull it off<br />
the appliance.<br />
2 Insert the lug of the trimmer attachment into<br />
the slot in the top of the shaver. Then press<br />
down the trimmer attachment to attach it to<br />
the appliance (‘click’).<br />
3 Press the on/off button once to switch on the<br />
appliance.<br />
,,<br />
The display lights up for a few <strong>sec</strong>onds.<br />
4 Y<strong>ou</strong> can now start trimming.<br />
5 Press the on/off button once to switch off the<br />
appliance.<br />
,,<br />
The display lights up for a few <strong>sec</strong>onds to show<br />
the remaining battery charge.<br />
6 Pull the trimmer attachment straight off the<br />
appliance.<br />
Note: Do not twist the trimmer attachment while y<strong>ou</strong><br />
pull it off the appliance.<br />
7 Insert the lug of the shaving unit into the slot<br />
in the top of the appliance. Then press down<br />
the shaving unit to attach it to the appliance<br />
(‘click’).
ENGLISH 23<br />
Using the beard styler attachment<br />
1 Make sure the appliance is switched off.<br />
2 Pull the shaving unit straight off the appliance.<br />
Note: Do not twist the shaving unit while y<strong>ou</strong> pull it off<br />
the appliance.<br />
3 Insert the lug of the beard styler<br />
attachment into the slot in the top of the<br />
appliance. Then press down the beard styler<br />
attachment to attach it to the appliance (‘click’).<br />
Using the beard styler attachment with comb<br />
Y<strong>ou</strong> can use the beard styler attachment with the<br />
comb attached to style y<strong>ou</strong>r beard at one fixed<br />
setting, but also at different length settings.<br />
The hair length settings on the beard styler<br />
attachment correspond to the remaining hair<br />
length after cutting and range from 1 to 5mm.<br />
1 Slide the comb straight into the guiding<br />
grooves on both sides of the beard styler<br />
attachment (‘click’).<br />
2 Press the length selector and then push it<br />
to the left or right to select the desired hair<br />
length setting.<br />
3 Press the on/off button once to switch on the<br />
appliance.<br />
4 Y<strong>ou</strong> can now start styling y<strong>ou</strong>r beard.
24<br />
ENGLISH<br />
Using the beard styler attachment with<strong>ou</strong>t<br />
comb<br />
Y<strong>ou</strong> can use the beard styler attachment with<strong>ou</strong>t the<br />
comb to cont<strong>ou</strong>r y<strong>ou</strong>r beard, m<strong>ou</strong>stache, sideburns<br />
or neckline.<br />
1 Pull the comb off the beard styler attachment.<br />
Note: Grab the comb in the centre to pull it off the<br />
beard styler attachment. Do not pull at the sides of<br />
the comb.<br />
2 Press the on/off button once to switch on the<br />
appliance.<br />
3 Y<strong>ou</strong> can now start cont<strong>ou</strong>ring y<strong>ou</strong>r beard,<br />
m<strong>ou</strong>stache, sideburns or neckline.<br />
Cleaning and maintenance<br />
Note: The accessories supplied may vary for different<br />
products. The box shows the accessories that have been<br />
supplied with y<strong>ou</strong>r appliance.<br />
Cleaning the shaver in the SmartClean system<br />
The SmartClean system comes in two types.<br />
The features available on y<strong>ou</strong>r SmartClean system<br />
may differ per type:<br />
--<br />
SmartClean system Basic has one phase: the<br />
rinsing phase.<br />
--<br />
SmartClean system Plus has two phases: the<br />
rinsing phase and the drying phase.
Preparing the SmartClean system for use<br />
Do not tilt the SmartClean to prevent leakage.<br />
Note: Hold the SmartClean while y<strong>ou</strong> prepare it<br />
for use.<br />
1 Put the small plug in the back of the<br />
SmartClean system.<br />
2 Put the adapter in the wall socket.<br />
3 Press the button on the side of the SmartClean<br />
system (1) and lift the top part of the<br />
SmartClean system (2).<br />
4 Pull the seal off the cleaning cartridge.<br />
ENGLISH 25<br />
5 Place the cleaning cartridge in the SmartClean<br />
system.<br />
6 Push the top part of the SmartClean system<br />
back down (‘click’).
26<br />
ENGLISH<br />
Using the SmartClean system<br />
Always make sure to shake excess water off the<br />
shaver before y<strong>ou</strong> place it in the SmartClean.<br />
1 Press the top cap to be able to place the<br />
shaver in the holder (‘click’).<br />
2 Hold the shaver upside down above the holder.<br />
Make sure the front of the shaver points<br />
towards the SmartClean system.<br />
3 Place the shaver in the holder (1), tilt the<br />
shaver backwards (2) and press down the top<br />
cap to connect the shaver (‘click’) (3).<br />
,,<br />
The battery symbol starts to flash, which<br />
indicates that the shaver is charging.<br />
4 Press the on/off button on the SmartClean<br />
system to start the cleaning program.<br />
,,<br />
During the rinsing phase, the rinsing symbol<br />
will flash.<br />
Note: The rinsing phase takes approx. 10 minutes.
ENGLISH 27<br />
,,<br />
SmartClean systems Plus only:<br />
During the drying phase, the drying symbol will flash.<br />
Note: The drying phase takes approx. 4 h<strong>ou</strong>rs.<br />
,,<br />
When the cleaning program has been completed,<br />
the ready symbol lights up continu<strong>ou</strong>sly.<br />
,,<br />
The battery symbol lights up continu<strong>ou</strong>sly to<br />
indicate that the shaver is fully charged.<br />
Note: Charging takes approx. 1 h<strong>ou</strong>r.<br />
Note: If y<strong>ou</strong> press the on/off button of the<br />
SmartClean system during the cleaning program,<br />
the program aborts. In this case, the rinsing or drying<br />
symbol stops flashing.<br />
Note: If y<strong>ou</strong> remove the adapter from the wall socket<br />
during the cleaning program, the program aborts.<br />
Note: 30 minutes after the cleaning program and<br />
charging have been completed, the SmartClean<br />
switches off automatically.<br />
Replacing the cartridge of the SmartClean<br />
System<br />
--<br />
Replace the cleaning cartridge when the<br />
replacement symbol flashes orange or when y<strong>ou</strong><br />
are no longer satisfied with the result.<br />
1 Press the button on the side of the SmartClean<br />
system (1) and lift the top part of the<br />
SmartClean system (2).
28<br />
ENGLISH<br />
2 Take the empty cleaning cartridge from the<br />
SmartClean system and p<strong>ou</strong>r any remaining<br />
cleaning fluid <strong>ou</strong>t of the cleaning cartridge.<br />
Y<strong>ou</strong> can simply p<strong>ou</strong>r the cleaning fluid down the sink.<br />
3 Throw away the empty cleaning cartridge.<br />
4 Unpack the new cleaning cartridge and pull the<br />
seal off the cartridge.<br />
5 Place the new cleaning cartridge in the<br />
SmartClean system.<br />
6 Push the top part of the SmartClean system<br />
back down (‘click’).<br />
Cleaning the shaver under the tap<br />
Clean the shaver after every shave for optimal<br />
shaving performance.<br />
Be careful with hot water. Always check if the<br />
water is not too hot, to prevent y<strong>ou</strong>r hands from<br />
getting burnt.<br />
Never dry the shaving unit with a towel or tissue,<br />
as this may damage the shaving heads.<br />
1 Rinse the shaving unit under a warm tap for<br />
some time.
ENGLISH 29<br />
2 Pull the shaving head holder off the bottom<br />
part of the shaving unit.<br />
3 Rinse the shaving head holder under a warm tap.<br />
4 Carefully shake off excess water and let the<br />
shaving head holder dry.<br />
5 Reattach the shaving head holder to the<br />
bottom part of the shaving unit (‘click’).<br />
Thor<strong>ou</strong>gh cleaning method<br />
Make sure the appliance is switched off.<br />
1 Pull the shaving head holder off the bottom<br />
part of the shaving unit.<br />
2 Place the retaining ring holder on the retaining<br />
ring (1), turn it anticlockwise (2) and lift it off<br />
the shaving head (3).<br />
Remove the retaining ring from the retaining<br />
ring holder and repeat this process for the other<br />
retaining rings.<br />
3 Remove the shaving heads from the shaving<br />
head holder. Each shaving head consists of a<br />
cutter and guard.<br />
Note: Do not clean more than one cutter and guard<br />
at a time, since they are all matching sets. If y<strong>ou</strong><br />
accidentally put a cutter in the wrong shaving guard,<br />
it may take several weeks before optimal shaving<br />
performance is restored.
30<br />
ENGLISH<br />
4 Clean the cutter and guard under the tap.<br />
5 After cleaning, place the cutter back into the<br />
guard.<br />
6 Put the shaving heads back into the shaving<br />
head holder.<br />
Note: Make sure the notches on both sides of the<br />
shaving heads fit exactly onto the projections in the<br />
shaving-head holder.<br />
7 Place the retaining ring holder on the retaining<br />
ring (1), place it on the shaving head (2) and<br />
turn it clockwise (3) to reattach the retaining<br />
ring.<br />
Repeat this process for the other retaining rings.<br />
Note: Hold the shaving head holder in y<strong>ou</strong>r hand<br />
when y<strong>ou</strong> reinsert the shaving heads and reattach the<br />
retaining rings. Do not place the shaving head holder<br />
on a surface when y<strong>ou</strong> do this, as this may cause<br />
damage.<br />
8 Reattach the shaving head holder to the<br />
bottom part of the shaving unit.
Cleaning the click-on attachments<br />
ENGLISH 31<br />
Cleaning the trimmer attachment<br />
Clean the trimmer attachment every time y<strong>ou</strong> have<br />
used it.<br />
1 Switch on the appliance with the trimmer<br />
attachment attached.<br />
2 Rinse the trimmer attachment under a hot tap<br />
for some time.<br />
3 Carefully shake off excess water and let the<br />
trimmer attachment dry.<br />
4 After cleaning, switch off the appliance.<br />
Tip: For optimal trimmer performance, lubricate the<br />
trimmer teeth with a drop of sewing machine oil every<br />
six months.<br />
Cleaning the beard styler attachment<br />
Clean the beard styler attachment every time y<strong>ou</strong><br />
have used it.<br />
1 Pull the comb off the beard styler attachment.<br />
2 Rinse the beard styler attachment and the<br />
comb separately under a hot tap for some time.<br />
3 Carefully shake off excess water and let the<br />
beard styler attachment and comb dry.<br />
4 Lubricate the teeth with a drop of sewing<br />
machine oil every six months.
32<br />
ENGLISH<br />
Storage<br />
1 Store the shaver in the p<strong>ou</strong>ch supplied.<br />
Note: We advise y<strong>ou</strong> to let the shaver dry before y<strong>ou</strong><br />
store it in the p<strong>ou</strong>ch.<br />
Replacement<br />
Replacing the shaving heads<br />
For maximum shaving performance, we advise y<strong>ou</strong><br />
to replace the shaving heads every two years.<br />
Replacement reminder<br />
The shaving unit symbol lights up to indicate that<br />
the shaving heads need to be replaced. Replace<br />
damaged shaving heads right away.<br />
Only replace the shaving heads with original SH90<br />
<strong>Philips</strong> shaving heads.<br />
1 The shaving unit symbol lights up continu<strong>ou</strong>sly,<br />
the arrows flash white and y<strong>ou</strong> hear a beep<br />
when y<strong>ou</strong> switch off the shaver .<br />
2 Pull the shaving head holder off the bottom<br />
part of the shaving unit.<br />
3 Place the retaining ring holder on the retaining<br />
ring (1), turn it anticlockwise (2) and lift it off<br />
the shaving head (3).<br />
Remove the retaining ring from the retaining<br />
ring holder and repeat this process for the other<br />
retaining rings.
ENGLISH 33<br />
4 Remove the shavings heads from the shaving<br />
head holder and throw them away.<br />
5 Place new shaving heads in the holder.<br />
Note: Make sure the notches on both sides of the<br />
shaving heads fit exactly onto the projections in the<br />
shaving-head holder.<br />
6 Place the retaining ring holder on the<br />
retaining ring (1), place it on the shaving head<br />
(2) and turn it clockwise (3) to reattach the<br />
retaining ring.<br />
Repeat this process for the other retaining rings.<br />
Note: Hold the shaving head holder in y<strong>ou</strong>r hand<br />
when y<strong>ou</strong> reinsert the shaving heads and reattach the<br />
retaining rings. Do not place the shaving head holder<br />
on a surface when y<strong>ou</strong> do this, as this may cause<br />
damage.<br />
7 Reattach the shaving head holder to the<br />
bottom part of the shaving unit.<br />
8 To reset the shaver, press and hold the on/off<br />
button for approx. 7 <strong>sec</strong>onds. Wait until y<strong>ou</strong><br />
hear two beeps.
34<br />
ENGLISH<br />
Ordering accessories<br />
To buy accessories or spare parts, visit<br />
www.shop.philips.com/service. or go to y<strong>ou</strong>r<br />
<strong>Philips</strong> dealer. Y<strong>ou</strong> can also contact the <strong>Philips</strong><br />
Consumer Care Centre in y<strong>ou</strong>r c<strong>ou</strong>ntry (see the<br />
worldwide guarantee leaflet for contact details).<br />
The following parts are available:<br />
--<br />
HQ8505 adapter<br />
--<br />
SH90 <strong>Philips</strong> shaving heads<br />
--<br />
HQ110 <strong>Philips</strong> Shaving Head Cleaning Spray<br />
--<br />
RQ111 <strong>Philips</strong> beard styler attachment<br />
--<br />
RQ585 <strong>Philips</strong> cleansing brush attachment<br />
--<br />
RQ560/RQ563 <strong>Philips</strong> cleansing brush heads<br />
--<br />
JC301/JC302/JC303/JC304/JC305 cleaning cartridge<br />
Shaving heads<br />
--<br />
We advise y<strong>ou</strong> to replace y<strong>ou</strong>r shaving heads<br />
every two years. Always replace the shaving heads<br />
with original SH90 <strong>Philips</strong> shaving heads.<br />
Recycling<br />
--<br />
This symbol on a product means that the product<br />
is covered by European Directive 2012/19/EU.<br />
--<br />
This symbol means that the product contains a<br />
built-in rechargeable battery covered by European<br />
Directive 2006/66/EC which cannot be disposed<br />
of with normal h<strong>ou</strong>sehold waste. We strongly<br />
advise y<strong>ou</strong> to take y<strong>ou</strong>r product to an official<br />
collection point or a <strong>Philips</strong> service centre to have<br />
a professional remove the rechargeable battery.
ENGLISH 35<br />
--<br />
Inform y<strong>ou</strong>rself ab<strong>ou</strong>t the local separate collection<br />
system for electrical and electronic products and<br />
rechargeable batteries. Follow local rules and never<br />
dispose of the product and rechargeable batteries<br />
with normal h<strong>ou</strong>sehold waste. Correct disposal<br />
of old products and rechargeable batteries helps<br />
prevent negative consequences for the environment<br />
and human health.<br />
Removing the rechargeable shaver battery<br />
Note: We strongly advise y<strong>ou</strong> to have a professional<br />
remove the rechargeable battery.<br />
Only remove the rechargeable battery when<br />
y<strong>ou</strong> discard the shaver. Make sure the battery is<br />
completely empty when y<strong>ou</strong> remove it.<br />
Be careful, the battery strips are sharp.<br />
1 Insert the screwdriver into the slot between<br />
the front and back panel in the bottom of the<br />
appliance. Remove the back panel.<br />
2 Remove the front panel.<br />
3 Unscrew the two screws at the top of the<br />
inner panel and remove the inner panel.<br />
4 Remove the rechargeable battery with a<br />
screwdriver.<br />
Guarantee and support<br />
If y<strong>ou</strong> need information or support, please visit<br />
www.philips.com/support or read the separate<br />
worldwide guarantee leaflet.
36<br />
ENGLISH<br />
Guarantee restrictions<br />
The shaving heads (cutters and guards) are not<br />
covered by the terms of the international guarantee<br />
because they are subject to wear.<br />
Tr<strong>ou</strong>bleshooting<br />
This chapter summarises the most common problems<br />
y<strong>ou</strong> c<strong>ou</strong>ld enc<strong>ou</strong>nter with the appliance. If y<strong>ou</strong> are<br />
unable to solve the problem with the information<br />
below, visit www.philips.com/support for a list of<br />
frequently asked questions or contact the Consumer<br />
Care Centre in y<strong>ou</strong>r c<strong>ou</strong>ntry.<br />
Problem Possible cause Solution<br />
The shaver does<br />
not work when I<br />
press the on/off<br />
button.<br />
The shaver does<br />
not shave as<br />
well as it used<br />
to.<br />
The shaver it still<br />
attached to the<br />
mains. For safety<br />
reasons, the shaver<br />
can only be used<br />
cordlessly.<br />
The rechargeable<br />
battery is empty.<br />
The travel lock<br />
is activated.<br />
The shaving heads<br />
are damaged or<br />
worn.<br />
Unplug the shaver and press<br />
the on/off button to switch<br />
on the shaver.<br />
Recharge the battery<br />
(see chapter ‘Charging’).<br />
Press the on/off button for<br />
3 <strong>sec</strong>onds to deactivate the<br />
travel lock.<br />
Replace the shaving heads<br />
(see chapter ‘Replacement’).
ENGLISH 37<br />
Problem Possible cause Solution<br />
I replaced<br />
the shaving<br />
heads, but the<br />
replacement<br />
reminder is still<br />
showing.<br />
A shaving<br />
head symbol<br />
has suddenly<br />
appeared on the<br />
display.<br />
An exclamation<br />
mark has<br />
suddenly<br />
appeared on<br />
the display while<br />
charging.<br />
Hairs or dirt obstruct<br />
the shaving heads.<br />
Y<strong>ou</strong> have not reset<br />
the shaver.<br />
This symbol is<br />
a replacement<br />
reminder.<br />
The shaver is<br />
overheated.<br />
Clean the shaving heads<br />
(see chapter ‘Cleaning and<br />
maintenance’).<br />
Clean the shaver thor<strong>ou</strong>ghly<br />
before y<strong>ou</strong> continue shaving<br />
(see chapter ‘Cleaning and<br />
maintenance’).<br />
Reset the shaver by pressing<br />
the on/off button for<br />
approx. 7 <strong>sec</strong>onds (see<br />
chapter ‘Replacement’).<br />
Replace the shaving heads<br />
(see chapter ‘Replacement’).<br />
Disconnect the shaver<br />
from the mains for<br />
approx. 10 minutes.
38<br />
ENGLISH<br />
Problem Possible cause Solution<br />
An exclamation<br />
mark,<br />
replacement<br />
reminder and<br />
the cleaning<br />
reminder<br />
have suddenly<br />
appeared on the<br />
display.<br />
Water is leaking<br />
from the<br />
bottom of the<br />
shaver.<br />
The SmartClean<br />
system does not<br />
work when I<br />
press the on/off<br />
button.<br />
The shaver is<br />
not entirely<br />
clean after I<br />
clean it in the<br />
SmartClean<br />
system.<br />
The shaving heads<br />
are soiled or<br />
damaged.<br />
During cleaning,<br />
water may collect<br />
between the inner<br />
body and the <strong>ou</strong>ter<br />
shell of the shaver.<br />
The SmartClean<br />
system is not<br />
connected to the<br />
mains.<br />
Y<strong>ou</strong> have not<br />
placed the shaver in<br />
the SmartClean<br />
system properly, so<br />
there is no electrical<br />
connection between<br />
the SmartClean<br />
system and the<br />
shaver.<br />
The cleaning<br />
cartridge needs<br />
replacement.<br />
Replace (see chapter<br />
‘Replacement’) or clean the<br />
shaving heads (see chapter<br />
‘Cleaning and maintenance’).<br />
This is normal and not<br />
danger<strong>ou</strong>s because all<br />
electronics are enclosed in<br />
a sealed power unit inside<br />
the shaver.<br />
Put the small plug in<br />
SmartClean system and<br />
put the adapter in the wall<br />
socket.<br />
Press down the top cap<br />
(‘click’) to ensure a proper<br />
connection between the<br />
shaver and the SmartClean<br />
system.<br />
Replace the cleaning<br />
cartridge (see chapter<br />
‘Cleaning and maintenance’).
ENGLISH 39<br />
Problem Possible cause Solution<br />
The shaver<br />
is not fully<br />
charged after I<br />
charge it in the<br />
SmartClean<br />
system.<br />
The cleaning<br />
cartridge is empty.<br />
The replacement<br />
symbol flashes to<br />
indicate y<strong>ou</strong> have to<br />
replace the cleaning<br />
cartridge.<br />
Y<strong>ou</strong> have used<br />
another cleaning<br />
fluid than the original<br />
<strong>Philips</strong> cleaning<br />
cartridge.<br />
The drain of the<br />
cleaning cartridge<br />
might be blocked.<br />
Y<strong>ou</strong> have not placed<br />
the shaver in the<br />
SmartClean system<br />
properly.<br />
Place a new cleaning<br />
cartridge in the SmartClean<br />
system (see chapter<br />
‘Cleaning and maintenance’).<br />
Only use the <strong>Philips</strong> cleaning<br />
cartridge.<br />
Push the hairs down the<br />
drain with a toothpick.<br />
Press down the top cap<br />
(‘click’) to ensure a proper<br />
connection between the<br />
shaver and the SmartClean<br />
system.
40<br />
ESPAÑOL<br />
Introducción<br />
Enhorabuena por la compra de este producto y<br />
bienvenido a <strong>Philips</strong>. Para sacar el mayor partido<br />
de la asistencia que <strong>Philips</strong> le ofrece, registre su<br />
producto en www.philips.com/welcome.<br />
Lea atentamente este manual de usuario, en el cual<br />
encontrará información sobre las características de<br />
esta afeitadora, así como algunos consejos para que<br />
el afeitado le resulte más fácil y agradable.<br />
Descripción general (fig. 1)<br />
1 Peine-guía del accesorio perfilador de barba<br />
2 Accesorio para crear tu estilo de barba de fácil<br />
montaje<br />
3 Recortador de fácil montaje<br />
4 Unidad de afeitado de fácil montaje<br />
5 Botón de encendido/apagado<br />
6 Toma para clavija pequeña<br />
7 Signo de exclamación<br />
8 Recordatorio de sustitución<br />
9 Indicador de carga de la batería<br />
10 Símbolo del bloqueo para viajes<br />
11 Recordatorio de limpieza<br />
12 Símbolo de sustitución<br />
13 Sistema SmartClean<br />
14 Tapa del sistema SmartClean<br />
15 Botón de encendido/apagado<br />
16 Símbolo de limpieza<br />
17 Símbolo de <strong>sec</strong>ado<br />
18 Símbolo indicador de listo<br />
19 Símbolo de carga<br />
20 Cartucho de limpieza para el sistema SmartClean<br />
21 Adaptador de corriente<br />
22 Clavija pequeña
ESPAÑOL 41<br />
23 Soporte del anillo de retención<br />
24 Funda<br />
Nota: Los accesorios suministrados pueden variar<br />
según el producto. La caja muestra los accesorios que<br />
se han suministrado con el aparato.<br />
Importante<br />
Antes de usar la afeitadora y el sistema SmartClean,<br />
lea atentamente este manual del usuario y<br />
consérvelo por si necesitara consultarlo en el futuro.<br />
Peligro<br />
--<br />
Mantenga el adaptador <strong>sec</strong>o.<br />
Advertencia<br />
--<br />
El adaptador incorpora un transformador.<br />
No corte el adaptador para sustituirlo por<br />
otra clavija, ya que podría provocar situaciones<br />
de peligro.<br />
--<br />
Este aparato puede ser usado por niños a partir<br />
de 8 años y por personas con su capacidad<br />
física, psíquica o sensorial reducida y por quienes<br />
no tengan los conocimientos y la experiencia<br />
necesarios, si han sido supervisados o instruidos<br />
acerca del uso del aparato de forma segura y<br />
siempre que sepan los riesgos que conlleva su uso.<br />
No permita que los niños jueguen con el aparato.<br />
Los niños no deben llevar a cabo la limpieza ni el<br />
mantenimiento a menos que sean supervisados.<br />
--<br />
Desenchufe siempre la afeitadora antes de<br />
limpiarla bajo el grifo.
42<br />
ESPAÑOL<br />
Precaución<br />
--<br />
No sumerja nunca el sistema SmartClean en agua<br />
ni lo enjuague bajo el grifo.<br />
--<br />
No utilice nunca agua a una temperatura superior<br />
a 80 °C para enjuagar la afeitadora.<br />
--<br />
No utilice la afeitadora, el sistema SmartClean, el<br />
adaptador ni ninguna otra pieza si están dañados,<br />
ya que podría ocasionar lesiones. Sustituya<br />
siempre un adaptador o una pieza dañados por<br />
uno del modelo original.<br />
--<br />
Utilice únicamente el sistema SmartClean con el<br />
cartucho de limpieza original.<br />
--<br />
Coloque siempre el sistema SmartClean sobre<br />
una superficie horizontal, plana y estable para<br />
evitar que el líquido se derrame.<br />
--<br />
Asegúrese siempre de que el compartimento del<br />
cartucho está cerrado antes de utilizar el sistema<br />
SmartClean para limpiar o cargar la afeitadora.<br />
--<br />
Cuando el sistema SmartClean esté listo parar<br />
usar, no lo mueva para evitar que el líquido<br />
limpiador se derrame.<br />
--<br />
El sistema SmartClean limpia en profundidad,<br />
pero no desinfecta la afeitadora. Por eso no debe<br />
compartir la afeitadora con otras personas.<br />
--<br />
No utilice nunca aire comprimido, estropajos,<br />
agentes abrasivos ni líquidos agresivos, como<br />
gasolina o acetona, para limpiar el aparato.<br />
--<br />
Cuando enjuague la afeitadora es posible que<br />
salga agua por el orificio de su parte inferior. Esto<br />
es normal y no es peligroso, ya que todos los<br />
sistemas electrónicos están dentro de una unidad<br />
motora hermética en el interior de la afeitadora.
Cumplimiento de estándares<br />
--<br />
Esta afeitadora es resistente al agua y<br />
cumple las normas de seguridad aprobadas<br />
internacionalmente. Se puede utilizar en la bañera<br />
o la ducha y se puede limpiar bajo el grifo. Por lo<br />
tanto, por motivos de seguridad, la afeitadora solo<br />
funciona sin cable.<br />
--<br />
La afeitadora y el sistema SmartClean cumplen<br />
los estándares y las normativas aplicables sobre<br />
exposición a campos electromagnéticos.<br />
General<br />
--<br />
El adaptador está equipado con un selector<br />
automático de voltaje y es apto para voltajes de<br />
red entre 100 y 240 voltios.<br />
--<br />
El adaptador transforma la corriente de<br />
100 - 240 voltios en un bajo voltaje de seguridad<br />
inferior a 24 voltios.<br />
--<br />
Nivel de ruido máximo: Lc = 69 dB(A)<br />
La pantalla<br />
ESPAÑOL 43<br />
Nota: Antes de utilizar la afeitadora por primera vez,<br />
quite la lámina protectora de la pantalla.<br />
--<br />
S91XX/S90XX
44<br />
ESPAÑOL<br />
Carga<br />
--<br />
La afeitadora tarda aproximadamente 1 hora en<br />
cargarse.<br />
Nota: Este aparato solo funciona sin cable.<br />
--<br />
Carga rápida: cuando enchufa el aparato a la red<br />
eléctrica, este produce un sonido. A continuación,<br />
los pilotos del indicador de carga de la batería<br />
se iluminan uno tras otro de forma continuada.<br />
Cuando la afeitadora tiene suficiente energía para<br />
un afeitado, el piloto de la parte inferior<br />
del indicador de carga de la batería comienza<br />
a parpadear lentamente.<br />
--<br />
Si deja el aparato enchufado, el proceso de carga<br />
continúa. Para indicar que el aparato se está<br />
cargando, primero el piloto inferior parpadea<br />
en blanco y, a continuación, se ilumina en blanco<br />
de forma continuada. Seguidamente, el segundo<br />
piloto parpadea y se ilumina de forma continuada<br />
y así sucesivamente hasta que la afeitadora se<br />
carga por completo.<br />
Batería completamente cargada<br />
Nota: Este aparato solo funciona sin cable.<br />
Nota: Cuando la batería está cargada por completo,<br />
la pantalla se apaga automáticamente después de<br />
30 minutos. Al pulsar el botón de encendido/apagado<br />
durante o después de la carga, se oye un sonido que<br />
indica que la afeitadora aún está conectada a la red<br />
eléctrica.<br />
--<br />
Cuando la batería esté totalmente cargada, todos<br />
los pilotos del indicador del nivel de carga se<br />
iluminarán en blanco de forma continua.
ESPAÑOL 45<br />
Batería baja<br />
--<br />
Cuando la batería está casi descargada, el piloto<br />
inferior comienza a parpadear en naranja y se oye<br />
un sonido.<br />
Carga disponible en la batería<br />
--<br />
La carga disponible de la batería está indicada por<br />
los pilotos del indicador de carga de la batería que<br />
se iluminan de forma continua.<br />
Recordatorio de limpieza<br />
Para conseguir un rendimiento de afeitado óptimo,<br />
le aconsejamos que limpie la afeitadora después de<br />
cada uso.<br />
--<br />
Al apagar la afeitadora, el recordatorio de limpieza<br />
parpadea para recordarle que debe limpiar la<br />
afeitadora.<br />
Bloqueo para viajes<br />
Puede bloquear la afeitadora cuando vaya de viaje.<br />
Con ello evitará que la afeitadora se encienda<br />
accidentalmente.<br />
Activación del bloqueo para viajes<br />
1 Para activar el modo de bloqueo para viajes,<br />
mantenga pulsado el botón de encendido/<br />
apagado durante 3 segundos.<br />
,,<br />
Al activar el bloqueo para viajes, el símbolo del<br />
bloqueo para viajes se ilumina en blanco de<br />
forma continua. Cuando el bloqueo para viajes<br />
está activado, la afeitadora produce un sonido y<br />
el símbolo del bloqueo para viajes parpadea.
46<br />
ESPAÑOL<br />
Desactivación del bloqueo para viajes<br />
1 Pulse el botón de encendido/apagado durante<br />
3 segundos.<br />
,,<br />
El símbolo del bloqueo para viajes parpadea y,<br />
a continuación, se ilumina de forma continua.<br />
La afeitadora está lista para usar de nuevo.<br />
Nota: También puede desactivar el bloqueo para viajes<br />
conectando el aparato a la red eléctrica.<br />
Sustitución de los cabezales de afeitado<br />
Para un rendimiento de afeitado óptimo, le<br />
aconsejamos que sustituya los cabezales de afeitado<br />
cada dos años.<br />
--<br />
El aparato está equipado con un recordatorio<br />
de sustitución que le recuerda que debe sustituir<br />
los cabezales de afeitado. El recordatorio de<br />
sustitución se ilumina en blanco de forma<br />
permanente y las flechas parpadean en blanco.<br />
Se oirá un pitido para indicarle que tiene que<br />
sustituir los cabezales de afeitado.<br />
Nota: Después de sustituir los cabezales de afeitado,<br />
es necesario restablecer la afeitadora pulsando el<br />
botón de encendido/apagado durante 7 segundos.<br />
Signo de exclamación<br />
Cabezales de afeitado bloqueados<br />
--<br />
Si los cabezales de afeitado están bloqueados, el<br />
signo de exclamación se ilumina en naranja de<br />
forma continua. El recordatorio de sustitución y<br />
el recordatorio de limpieza parpadean en blanco<br />
alternativamente y se oye un sonido. En ese caso,<br />
el motor no funciona porque los cabezales están<br />
sucios o dañados.<br />
--<br />
Si esto sucede, deberá limpiar o sustituir los<br />
cabezales de afeitado.
ESPAÑOL 47<br />
Sobrecalentamiento<br />
--<br />
Si el aparato se calienta en exceso durante la<br />
carga, el signo de exclamación parpadea en color<br />
naranja.<br />
--<br />
Cuando esto sucede, la afeitadora se apaga<br />
automáticamente. La carga continúa una vez que<br />
el aparato vuelva a la temperatura normal.<br />
Carga<br />
La afeitadora tarda aproximadamente 1 hora en<br />
cargarse.<br />
Una afeitadora completamente cargada proporciona<br />
un tiempo de afeitado de hasta 50 minutos.<br />
Nota: No puede utilizar el aparato mientras se está<br />
cargando.<br />
Cargue la afeitadora antes de utilizarla por primera<br />
vez y cuando la pantalla indique que la batería está<br />
casi vacía.<br />
Carga con el adaptador<br />
1 Asegúrese de que el aparato está apagado.<br />
2 Inserte la clavija pequeña en el aparato (1) y<br />
enchufe el adaptador a la toma de corriente (2).
48<br />
ESPAÑOL<br />
Carga mediante el sistema SmartClean<br />
(solo en modelos específicos)<br />
1 Enchufe la clavija pequeña al sistema<br />
SmartClean.<br />
2 Enchufe el adaptador a la toma de corriente.<br />
3 Presione la tapa superior para poder colocar la<br />
afeitadora en el soporte (“clic”).<br />
4 Coloque la afeitadora boca abajo encima del<br />
soporte. Asegúrese de que la parte frontal de<br />
la afeitadora esté orientada hacia el sistema<br />
SmartClean.<br />
5 Coloque la afeitadora en el soporte (1),<br />
incline la afeitadora hacia atrás (2) y presione<br />
hacia abajo la parte superior para conectar la<br />
afeitadora (“clic”) (3).<br />
Nota: El símbolo de la batería parpadea lentamente<br />
para indicar que el aparato se está cargando.<br />
Utilización de la afeitadora<br />
Afeitado<br />
Período de adaptación de la piel<br />
Es posible que, las primeras veces que se afeite, no<br />
obtenga el resultado que espera y que la piel se irrite<br />
ligeramente; es normal. La piel y la barba necesitan<br />
tiempo para adaptarse a un nuevo sistema de afeitado.<br />
Le recomendamos que se afeite regularmente (al menos<br />
3 veces a la semana) con esta afeitadora durante un<br />
periodo de 3 semanas para que la piel se adapte a la<br />
nueva afeitadora.
ESPAÑOL 49<br />
Consejo: Para obtener los mejores resultados, le<br />
recomendamos que recorte previamente la barba si no<br />
se ha afeitado durante 3 días o más.<br />
Nota: Este aparato solo funciona sin cable.<br />
1 Pulse el botón de encendido/apagado una vez<br />
para encender la afeitadora.<br />
,,<br />
La pantalla se ilumina durante unos segundos.<br />
2 Desplace los cabezales de afeitado sobre la piel,<br />
haciendo movimientos circulares.<br />
--<br />
No haga movimientos rectos.<br />
3 Pulse el botón de encendido/apagado una vez<br />
para apagar la afeitadora.<br />
,,<br />
La pantalla se ilumina durante unos segundos<br />
y a continuación muestra la carga disponible en<br />
la batería.<br />
Afeitado húmedo<br />
También puede usar esta afeitadora con la cara<br />
húmeda si incorpora espuma o gel de afeitar.<br />
Para afeitarse con espuma o gel de afeitar, siga los<br />
siguientes pasos:<br />
1 Humedézcase la piel.<br />
2 Aplique espuma o gel de afeitar sobre la piel.<br />
3 Enjuague la unidad de afeitado bajo el grifo<br />
para asegurarse de que se desliza suavemente<br />
sobre la piel.
50<br />
ESPAÑOL<br />
4 Pulse el botón de encendido/apagado una vez<br />
para encender la afeitadora.<br />
5 Desplace los cabezales de afeitado sobre la piel,<br />
haciendo movimientos circulares.<br />
Nota: Enjuague la afeitadora bajo el grifo regularmente<br />
para asegurarse de que sigue deslizándose suavemente<br />
sobre la piel.<br />
6 Séquese la cara y limpie concienzudamente<br />
la afeitadora después de usarla (consulte el<br />
capítulo “Limpieza y mantenimiento”).<br />
Nota: Asegúrese de que enjuaga toda la espuma y gel<br />
de afeitar de la afeitadora.<br />
Uso de los accesorios de fácil montaje<br />
Nota: Los accesorios suministrados pueden variar<br />
según el producto. La caja muestra los accesorios que<br />
se han suministrado con el aparato.<br />
Uso del recortador<br />
Puede utilizar el recortador para recortar las patillas<br />
y el bigote.<br />
1 Tire de la unidad de afeitado para extraerla<br />
del aparato.<br />
Nota: No gire la unidad de afeitado mientras la extrae<br />
del aparato.<br />
2 Inserte el saliente del recortador en la<br />
ranura de la parte superior de la afeitadora.<br />
Luego presiónelo hacia abajo para fijarlo a la<br />
afeitadora (“clic”).<br />
3 Pulse el botón de encendido/apagado una vez<br />
para encender el aparato.<br />
,,<br />
La pantalla se ilumina durante unos segundos.
ESPAÑOL 51<br />
4 Ya puede comenzar a utilizar el recortador.<br />
5 Pulse el botón de encendido/apagado una vez<br />
para apagar el aparato.<br />
,,<br />
La pantalla se ilumina durante unos segundos<br />
para mostrar la carga disponible en la batería.<br />
6 Tire del recortador para extraerlo del aparato.<br />
Nota: No gire el recortador mientras lo extrae del aparato.<br />
7 Inserte el saliente de la unidad de afeitado en<br />
la ranura de la parte superior de la afeitadora.<br />
Luego presione la unidad de afeitado hacia<br />
abajo para fijarla a la afeitadora.<br />
Uso del accesorio perfilador de barba<br />
1 Asegúrese de que el aparato está apagado.<br />
2 Tire de la unidad de afeitado para extraerla<br />
del aparato.<br />
Nota: No gire la unidad de afeitado mientras la extrae<br />
del aparato.<br />
3 Inserte el saliente del accesorio perfilador<br />
de barba en la ranura de la parte superior<br />
de la afeitadora. Luego presione el accesorio<br />
perfilador de barba hacia abajo para fijarlo en<br />
la afeitadora (“clic”).<br />
Uso del accesorio perfilador de barba con el<br />
peine-guía<br />
Puede utilizar el accesorio perfilador de barba con<br />
el peine-guía colocado para perfilar la barba con una<br />
longitud fija, pero también con diferentes ajustes de<br />
longitud. Los ajustes de longitud del accesorio perfilador<br />
de barba se corresponden con la longitud del pelo que<br />
queda después de cortar, ya va de 1 a 5 mm.
52<br />
ESPAÑOL<br />
1 Deslice el peine-guía por las ranuras de guía<br />
situadas a ambos lados del accesorio perfilador<br />
de barba (“clic”).<br />
2 Pulse el selector de longitud y, a continuación,<br />
empújelo a la izquierda o la derecha para<br />
seleccionar el ajuste de longitud de corte que<br />
desee.<br />
3 Pulse el botón de encendido/apagado una vez<br />
para encender el aparato.<br />
4 Ya puede empezar a perfilar la barba.<br />
Uso del accesorio perfilador de barba sin el<br />
peine-guía<br />
Puede utilizar el accesorio perfilador de barba sin el<br />
peine-guía para perfilar la barba, el bigote, las patillas<br />
o la línea del cuello.<br />
1 Tire del peine-guía para extraerlo del accesorio<br />
perfilador de barba.<br />
Nota: Sujete el peine-guía por el centro para extraerlo<br />
del accesorio perfilador de barba. No tire de los<br />
laterales del peine-guía.<br />
2 Pulse el botón de encendido/apagado una vez<br />
para encender el aparato.<br />
3 Ya puede empezar a perfilar la barba, el bigote,<br />
las patillas o la línea del cuello.
ESPAÑOL 53<br />
Limpieza y mantenimiento<br />
Nota: Los accesorios suministrados pueden variar<br />
según el producto. La caja muestra los accesorios que<br />
se han suministrado con el aparato.<br />
Limpieza de la afeitadora con el sistema<br />
SmartClean<br />
El sistema SmartClean está disponible en dos<br />
modelos. Las funciones del sistema SmartClean<br />
puede variar según el modelo:<br />
--<br />
El sistema SmartClean Basic tiene una fase: la fase<br />
de enjuagado.<br />
--<br />
El sistema SmartClean Plus consta de dos fases:<br />
la fase de enjuagado y la fase de <strong>sec</strong>ado.<br />
Preparación del sistema SmartClean para<br />
su uso<br />
No incline el sistema SmartClean para evitar que<br />
gotee.<br />
Nota: Sujete el sistema SmartClean mientras lo<br />
prepara para su uso.<br />
1 Enchufe la clavija pequeña en la parte posterior<br />
del sistema SmartClean.<br />
2 Enchufe el adaptador a la toma de corriente.<br />
3 Pulse el botón en el lateral del sistema<br />
SmartClean (1) y saque la parte superior del<br />
sistema SmartClean (2).
54<br />
ESPAÑOL<br />
4 Quite el sellado del cartucho de limpieza.<br />
5 Coloque el cartucho de limpieza en el sistema<br />
SmartClean.<br />
6 Presione la parte superior del sistema<br />
SmartClean hacia abajo (“clic”).<br />
Uso del sistema SmartClean<br />
Asegúrese de retirar el exceso de agua de la<br />
afeitadora antes de colocarla en el sistema<br />
SmartClean.<br />
1 Presione la tapa superior para poder colocar la<br />
afeitadora en el soporte (“clic”).
ESPAÑOL 55<br />
2 Coloque la afeitadora boca abajo encima del<br />
soporte. Asegúrese de que la parte frontal de<br />
la afeitadora esté orientada hacia el sistema<br />
SmartClean.<br />
3 Coloque la afeitadora en el soporte (1),<br />
incline la afeitadora hacia atrás (2) y presione<br />
hacia abajo la parte superior para conectar la<br />
afeitadora (“clic”) (3).<br />
,,<br />
El símbolo de la batería comienza a parpadear,<br />
lo que indica que la afeitadora se está cargando.<br />
4 Pulse el botón de encendido/apagado del<br />
sistema SmartClean para iniciar el programa<br />
de limpieza.<br />
,,<br />
Durante la fase de enjuagado parpadea el<br />
símbolo de enjuagado.<br />
Nota: La fase de enjuagado dura aproximadamente<br />
10 minutos.<br />
,,<br />
Solo para sistemas SmartClean Plus:<br />
Durante la fase de <strong>sec</strong>ado parpadea el símbolo<br />
de <strong>sec</strong>ado.<br />
Nota: La fase de <strong>sec</strong>ado dura aproximadamente<br />
4 horas.<br />
,,<br />
Cuando el programa de limpieza se haya<br />
completado, el símbolo indicador de listo se<br />
ilumina de forma continua.<br />
,,<br />
El símbolo de la batería se ilumina de forma<br />
continua para indicar que la afeitadora está<br />
completamente cargada.<br />
Nota: La afeitadora tarda aproximadamente 1 hora<br />
en cargarse.
56<br />
ESPAÑOL<br />
Nota: Si pulsa el botón de encendido/apagado del<br />
sistema SmartClean durante el programa de limpieza,<br />
éste se interrumpe. En este caso, el símbolo de<br />
enjuagado o de <strong>sec</strong>ado deja de parpadear.<br />
Nota: Si desenchufa el adaptador de la toma de corriente<br />
durante el programa de limpieza, éste se interrumpirá.<br />
Nota: Treinta minutos después de que el programa<br />
de limpieza y carga se hayan completado, el sistema<br />
SmartClean se apaga automáticamente.<br />
Sustitución del cartucho del sistema<br />
SmartClean<br />
--<br />
Sustituya el cartucho de limpieza cuando el<br />
símbolo de sustitución parpadee en naranja o<br />
cuando no esté satisfecho con el resultado.<br />
1 Pulse el botón en el lateral del sistema<br />
SmartClean (1) y saque la parte superior del<br />
sistema SmartClean (2).<br />
2 Saque el cartucho de limpieza de vaciar el<br />
sistema SmartClean y vacíe los restos de<br />
líquido limpiador del cartucho de limpieza.<br />
Puede vaciar el líquido limpiador en el fregadero.<br />
3 Tire el cartucho de limpieza vacío.<br />
4 Desembale el nuevo cartucho de limpieza y<br />
quite el sellado del cartucho.<br />
5 Coloque el nuevo cartucho de limpieza en el<br />
sistema SmartClean.<br />
6 Presione la parte superior del sistema<br />
SmartClean hacia abajo (“clic”).
ESPAÑOL 57<br />
Limpieza de la afeitadora bajo el grifo<br />
Para conseguir un rendimiento de afeitado óptimo,<br />
limpie la afeitadora después de cada uso.<br />
Tenga cuidado con el agua caliente. Compruebe<br />
siempre que el agua no esté demasiado caliente<br />
para evitar quemarse las manos.<br />
No seque nunca la unidad de afeitado con una<br />
toalla o un paño, ya que esto podría dañar los<br />
cabezales de afeitado.<br />
1 Enjuague la unidad de afeitado durante un rato<br />
con agua caliente del grifo.<br />
2 Tire del soporte del cabezal de afeitado desde<br />
la parte inferior de la unidad de afeitado.<br />
3 Enjuague el soporte del cabezal de afeitado<br />
bajo el grifo con agua caliente.<br />
4 Sacuda el exceso de agua y deje que el soporte<br />
del cabezal de afeitado se seque.<br />
5 Vuelva a colocar el soporte del cabezal de<br />
afeitado en la parte inferior de la unidad de<br />
afeitado (“clic”).<br />
Método de limpieza a fondo<br />
Asegúrese de que el aparato está apagado.<br />
1 Tire del soporte del cabezal de afeitado desde<br />
la parte inferior de la afeitadora para extraerlo.
58<br />
ESPAÑOL<br />
2 Coloque el soporte del anillo de retención<br />
en el anillo de retención (1), gírelo en sentido<br />
contrario al de las agujas del reloj (2) y<br />
extráigalo del cabezal de afeitado (3).<br />
Extraiga el anillo de retención del soporte del anillo<br />
de retención y repita este proceso para los otros<br />
anillos de retención.<br />
3 Retire los cabezales de afeitado del soporte del<br />
cabezal de afeitado. Cada cabezal de afeitado<br />
consta de una cuchilla y su protector.<br />
Nota: No limpie más de una cuchilla y su protector<br />
al mismo tiempo, ya que forman conjuntos entre sí.<br />
Si coloca accidentalmente una cuchilla en el protector<br />
incorrecto, puede que tarde varias semanas en volver<br />
a obtener un rendimiento óptimo en el afeitado.<br />
4 Limpie la cuchilla y el protector bajo el grifo.<br />
5 Después de la limpieza, vuelva a colocar la<br />
cuchilla en el protector.<br />
6 Vuelva a colocar los cabezales en el soporte<br />
del cabezal de afeitado.<br />
Nota: Asegúrese de que las muescas de ambos lados<br />
de los cabezales de afeitado encajan perfectamente en<br />
los salientes del soporte del cabezal de afeitado.
ESPAÑOL 59<br />
7 Coloque el soporte del anillo de retención<br />
en el anillo de retención (1), colóquelo en el<br />
cabezal de afeitado (2) y gírelo en el sentido de<br />
las agujas del reloj (3) para volver a colocar el<br />
anillo de retención.<br />
Repita el proceso para los otros anillos de retención.<br />
Nota: Aguante el soporte del cabezal de afeitado<br />
con la mano cuando vuelva a colocar los cabezales<br />
de afeitado y los anillos de retención. No coloque el<br />
soporte del cabezal de afeitado en una superficie al<br />
hacer esto; podría dañarla.<br />
8 Vuelva a colocar el soporte del cabezal de<br />
afeitado en la parte inferior de la unidad<br />
de afeitado.<br />
Limpieza de los accesorios de fácil montaje<br />
Limpieza del recortador<br />
Limpie el recortador cada vez que lo utilice.<br />
1 Encienda el aparato con el recortador<br />
colocado.<br />
2 Enjuague el recortador durante un rato con<br />
agua caliente del grifo.<br />
3 Sacuda el exceso de agua y deje que el<br />
recortador se seque.<br />
4 Después de limpiarlo, apague el aparato.<br />
Consejo: Para conseguir unos resultados óptimos,<br />
lubrique los dientes del cortapatillas con una gota de<br />
aceite de máquina de coser cada seis meses.
60<br />
ESPAÑOL<br />
Limpieza del accesorio perfilador de barba<br />
Limpie el accesorio perfilador de barba cada vez que<br />
lo utilice.<br />
1 Tire del peine-guía para extraerlo del accesorio<br />
perfilador de barba.<br />
2 Enjuague el accesorio perfilador de barba y el<br />
peine-guía por separado durante un momento<br />
bajo el grifo con agua caliente.<br />
3 Sacuda el exceso de agua y deje que el accesorio<br />
perfilador de barba y el peine-guía se sequen.<br />
4 Cada seis meses lubrique los dientes del<br />
recortador con una gota de aceite de máquina<br />
de coser.<br />
Almacenamiento<br />
1 Guarde la afeitadora en la funda suministrada.<br />
Nota: Le recomendamos que deje que la afeitadora se<br />
seque antes de guardarla en la bolsa.<br />
Sustitución<br />
Sustitución de los cabezales de afeitado<br />
Para un rendimiento de afeitado óptimo,<br />
le aconsejamos que sustituya los cabezales de<br />
afeitado cada dos años.
ESPAÑOL 61<br />
Recordatorio de sustitución<br />
El símbolo de la unidad de afeitado se iluminará para<br />
indicar que es necesario sustituir los cabezales de<br />
afeitado. Sustituya los cabezales de afeitado dañados<br />
directamente.<br />
Sustituya los cabezales de afeitado únicamente por<br />
cabezales de afeitado originales <strong>Philips</strong> SH90.<br />
1 El símbolo de la unidad de afeitado se ilumina<br />
de forma continua, las flechas parpadean en<br />
blanco y se oye un pitido al apagar la afeitadora.<br />
2 Tire del soporte del cabezal de afeitado desde<br />
la parte inferior de la afeitadora para extraerlo.<br />
3 Coloque el soporte del anillo de retención<br />
en el anillo de retención (1), gírelo en sentido<br />
contrario al de las agujas del reloj (2) y<br />
extráigalo del cabezal de afeitado (3).<br />
Extraiga el anillo de retención del soporte del anillo<br />
de retención y repita este proceso para los otros<br />
anillos de retención.<br />
4 Retire los cabezales de afeitado del soporte y<br />
deséchelos.<br />
5 Coloque los cabezales de afeitado nuevos en el<br />
soporte.<br />
Nota: Asegúrese de que las muescas de ambos lados<br />
de los cabezales de afeitado encajan perfectamente en<br />
los salientes del soporte del cabezal de afeitado.
62<br />
ESPAÑOL<br />
6 Coloque el soporte del anillo de retención<br />
en el anillo de retención (1), colóquelo en el<br />
cabezal de afeitado (2) y gírelo en el sentido de<br />
las agujas del reloj (3) para volver a colocar el<br />
anillo de retención.<br />
Repita el proceso para los otros anillos de retención.<br />
Nota: Aguante el soporte del cabezal de afeitado<br />
con la mano cuando vuelva a colocar los cabezales<br />
de afeitado y los anillos de retención. No coloque el<br />
soporte del cabezal de afeitado en una superficie al<br />
hacer esto; podría dañarla.<br />
7 Vuelva a colocar el soporte del cabezal de<br />
afeitado en la parte inferior de la unidad de<br />
afeitado.<br />
8 Para restablecer la afeitadora, mantenga<br />
pulsado el botón de encendido/apagado<br />
durante 7 segundos aproximadamente. Espere<br />
hasta que escuche dos pitidos.<br />
Solicitud de accesorios<br />
Para comprar accesorios o piezas de repuesto, visite<br />
www.shop.philips.com/service o acuda a su<br />
distribuidor de <strong>Philips</strong>. También puede ponerse en<br />
contacto con el Servicio de Atención al Cliente de<br />
<strong>Philips</strong> en su país (consulte el folleto de garantía<br />
mundial para encontrar los datos de contacto).<br />
Las siguientes piezas de repuesto están disponibles:<br />
--<br />
Adaptador HQ8505<br />
--<br />
Cabezales de afeitado <strong>Philips</strong> SH90<br />
--<br />
Spray limpiador para cabezales de afeitado<br />
<strong>Philips</strong> HQ110<br />
--<br />
Accesorio perfilador de barba <strong>Philips</strong> RQ111<br />
--<br />
Accesorio de cepillo de limpieza <strong>Philips</strong> RQ585
--<br />
Cabezales del cepillo de limpieza <strong>Philips</strong> RQ560/<br />
RQ563<br />
--<br />
Cartucho de limpieza JC301/JC302/JC303/JC304/<br />
JC305<br />
Cabezales de afeitado<br />
--<br />
Le aconsejamos reemplazar sus cabezales de<br />
afeitado cada dos años. Sustituya los cabezales de<br />
afeitado únicamente por cabezales de afeitado<br />
<strong>Philips</strong> SH90 originales.<br />
Reciclaje<br />
ESPAÑOL 63<br />
--<br />
Este símbolo en un producto significa que el<br />
producto cumple con la directiva europea<br />
2012/19/UE.<br />
--<br />
Este símbolo significa que el producto contiene<br />
una batería recargable integrada cubierta por<br />
la directiva europea 2006/66/CE, que no se debe<br />
tirar con la basura normal del hogar.<br />
Le recomendamos encarecidamente que lleve el<br />
producto a un punto de recogida oficial o a un<br />
centro de servicio <strong>Philips</strong> para que un profesional<br />
extraiga la batería recargable.<br />
--<br />
Infórmese sobre el sistema local de recogida<br />
selectiva de baterías recargables y productos<br />
eléctricos y electrónicos. Siga la normativa local y<br />
no de<strong>sec</strong>he el producto ni la batería recargable<br />
con la basura normal del hogar. El correcto<br />
de<strong>sec</strong>ho de los productos antiguos y las baterías<br />
recargables ayuda a evitar con<strong>sec</strong>uencias negativas<br />
para el medio ambiente y la salud humana.
64<br />
ESPAÑOL<br />
Cómo quitar la batería recargable de<br />
la afeitadora<br />
Nota: Le recomendamos encarecidamente que acuda a<br />
un profesional para que extraiga la batería recargable.<br />
Extraiga la batería únicamente cuando de<strong>sec</strong>he<br />
la afeitadora. Asegúrese de que la batería esté<br />
completamente descargada cuando la extraiga<br />
del aparato.<br />
Tenga cuidado con las tiras de la batería ya que<br />
están afiladas.<br />
1 Introduzca el destornillador en la ranura<br />
situada entre el panel frontal y el posterior<br />
en la parte inferior del aparato. Quite el panel<br />
posterior.<br />
2 Quite el panel frontal.<br />
3 Desenrosque los dos tornillos de la parte<br />
superior del panel interno y quite el panel<br />
interno.<br />
4 Quite la batería recargable con un<br />
destornillador.<br />
Garantía y asistencia<br />
Si necesita asistencia o información, visite<br />
www.philips.com/support o lea el folleto<br />
de garantía mundial independiente.<br />
Restricciones de la garantía<br />
Los cabezales de afeitado (cuchillas y protectores)<br />
no están cubiertos por las condiciones de la garantía<br />
internacional debido a que están sujetos a desgaste.
Guía de resolución de problemas<br />
En este capítulo se resumen los problemas más<br />
frecuentes que pueden surgir con el aparato.<br />
Si no puede resolver el problema con la siguiente<br />
información, visite www.philips.com/support<br />
para consultar una lista de preguntas más frecuentes<br />
o póngase en contacto con el Servicio de Atención<br />
al Cliente en su país.<br />
Problema Posible causa Solución<br />
ESPAÑOL 65<br />
La afeitadora no<br />
funciona cuando<br />
pulso el botón<br />
de encendido/<br />
apagado.<br />
La afeitadora no<br />
afeita tan bien<br />
como antes.<br />
La afeitadora aún<br />
está conectada<br />
a la red eléctrica.<br />
Por motivos de<br />
seguridad, la<br />
afeitadora solo se<br />
puede utilizar sin<br />
cable.<br />
La batería recargable<br />
está descargada.<br />
El bloqueo para<br />
viajes está activado.<br />
Los cabezales<br />
de afeitado<br />
están gastados o<br />
deteriorados.<br />
Desenchufe la afeitadora<br />
y pulse el botón de<br />
encendido/apagado para<br />
encender la afeitadora.<br />
Recargue la batería<br />
(consulte el capítulo<br />
“Carga”).<br />
Para desactivar el bloqueo<br />
para viajes, mantenga<br />
pulsado el botón de<br />
encendido/apagado durante<br />
3 segundos.<br />
Sustituya los cabezales<br />
de afeitado (consulte el<br />
capítulo “Sustitución”).
66<br />
ESPAÑOL<br />
Problema Posible causa Solución<br />
He sustituido<br />
los cabezales de<br />
afeitado, pero el<br />
recordatorio de<br />
sustitución sigue<br />
apareciendo.<br />
El símbolo del<br />
cabezal de<br />
afeitado ha<br />
aparecido de<br />
repente en la<br />
pantalla.<br />
Ha aparecido<br />
un signo de<br />
exclamación de<br />
repente en la<br />
pantalla durante la<br />
carga.<br />
El pelo o la<br />
suciedad obstruyen<br />
los cabezales de<br />
afeitado.<br />
No ha reiniciado la<br />
afeitadora.<br />
Este símbolo es un<br />
recordatorio de<br />
sustitución.<br />
La afeitadora se ha<br />
sobrecalentado.<br />
Limpie los cabezales<br />
de afeitado (consulte<br />
el capítulo “Limpieza y<br />
mantenimiento”).<br />
Limpie bien el aparato<br />
antes de seguir<br />
afeitándose (consulte<br />
el capítulo “Limpieza y<br />
mantenimiento”).<br />
Reinicie la afeitadora<br />
pulsando el botón de<br />
encendido/apagado durante<br />
unos 7 segundos (consulte<br />
el capítulo “Sustitución”).<br />
Sustituya los cabezales<br />
de afeitado (consulte el<br />
capítulo “Sustitución”).<br />
Desconecte la afeitadora<br />
de la toma de corriente<br />
durante 10 minutos<br />
aproximadamente.
Problema Posible causa Solución<br />
ESPAÑOL 67<br />
Ha aparecido<br />
un signo de<br />
exclamación, un<br />
recordatorio<br />
de sustitución y<br />
el recordatorio<br />
de limpieza de<br />
pronto en la<br />
pantalla.<br />
Sale agua de la<br />
parte inferior de<br />
la afeitadora.<br />
El sistema<br />
SmartClean no<br />
funciona cuando<br />
pulso el botón<br />
de encendido/<br />
apagado.<br />
La afeitadora no<br />
está totalmente<br />
limpia después de<br />
haberla limpiado<br />
con el sistema<br />
SmartClean.<br />
Los cabezales de<br />
afeitado están sucios<br />
o dañados.<br />
Durante la limpieza,<br />
puede acumularse<br />
agua entre el cuerpo<br />
interior y la carcasa<br />
exterior de la<br />
afeitadora.<br />
El sistema<br />
SmartClean no está<br />
enchufado a la red.<br />
No ha colocado<br />
la afeitadora<br />
correctamente en el<br />
sistema SmartClean,<br />
por lo que no hay<br />
conexión eléctrica<br />
entre el sistema<br />
SmartClean y la<br />
afeitadora.<br />
Sustituya (consulte el<br />
capítulo “Sustitución”)<br />
o limpie los cabezales<br />
de afeitado (consulte<br />
el capítulo “Limpieza y<br />
mantenimiento”).<br />
Esto es normal y no es<br />
peligroso, ya que todos los<br />
sistemas electrónicos están<br />
dentro de la unidad motora<br />
hermética en el interior de<br />
la afeitadora.<br />
Enchufe la clavija pequeña<br />
en el sistema SmartClean<br />
y enchufe el adaptador a la<br />
toma de corriente.<br />
Presione hacia abajo la<br />
tapa superior (“clic”)<br />
para garantizar una<br />
conexión adecuada entre<br />
la afeitadora y el sistema<br />
SmartClean.
68<br />
ESPAÑOL<br />
Problema Posible causa Solución<br />
La afeitadora<br />
no está<br />
completamente<br />
cargada tras<br />
cargarla en<br />
el cargador<br />
o el sistema<br />
SmartClean.<br />
Es necesario sustituir<br />
el cartucho de<br />
limpieza.<br />
El cartucho de<br />
limpieza está vacío.<br />
El símbolo de<br />
sustitución parpadea<br />
para indicar que<br />
tiene que sustituir<br />
el cartucho de<br />
limpieza.<br />
Ha usado un líquido<br />
limpiador distinto<br />
al cartucho de<br />
limpieza original de<br />
<strong>Philips</strong>.<br />
El desagüe del<br />
cartucho de<br />
limpieza podría estar<br />
bloqueado.<br />
No ha colocado<br />
correctamente la<br />
afeitadora en el<br />
sistema SmartClean.<br />
Sustituya el cartucho<br />
de limpieza (consulte<br />
el capítulo “Limpieza y<br />
mantenimiento”).<br />
Coloque un nuevo<br />
cartucho de limpieza<br />
en el sistema<br />
SmartClean (consulte<br />
el capítulo “Limpieza y<br />
mantenimiento”).<br />
Utilice solo el cartucho de<br />
limpieza de <strong>Philips</strong>.<br />
Retire los pelos del desagüe<br />
con un palillo.<br />
Presione hacia abajo la<br />
tapa superior (“clic”)<br />
para garantizar una<br />
conexión adecuada entre<br />
la afeitadora y el sistema<br />
SmartClean.
<strong>FRA</strong>NÇAIS<br />
69<br />
Introduction<br />
Félicitations p<strong>ou</strong>r votre achat et bienvenue dans<br />
l’univers <strong>Philips</strong> ! P<strong>ou</strong>r profiter pleinement de<br />
l’assistance <strong>Philips</strong>, enregistrez votre produit sur le site<br />
à l’adresse suivante : www.philips.com/welcome.<br />
Veuillez lire ce mode d’<strong>emploi</strong>, qui contient des<br />
informations sur les fonctionnalités de ce rasoir, ainsi que<br />
des conseils p<strong>ou</strong>r un <strong>rasage</strong> plus facile et plus agréable.<br />
Description générale (fig. 1)<br />
1 Sabot de l’accessoire barbe<br />
2 Accessoire barbe clipsable<br />
3 Accessoire de tondeuse clipsable<br />
4 Unité de <strong>rasage</strong> clipsable<br />
5 B<strong>ou</strong>ton marche/arrêt<br />
6 Prise p<strong>ou</strong>r petite fiche<br />
7 Point d’exclamation<br />
8 Rappel de remplacement<br />
9 Témoin de charge de la batterie<br />
10 Symbole de verr<strong>ou</strong>illage<br />
11 Alarme de nettoyage<br />
12 Symbole de remplacement<br />
13 Système SmartClean<br />
14 Capuchon du système SmartClean<br />
15 B<strong>ou</strong>ton marche/arrêt<br />
16 Symbole de nettoyage<br />
17 Symbole de séchage<br />
18 Symbole « Prêt à l’<strong>emploi</strong> »<br />
19 Symbole de charge<br />
20 Cart<strong>ou</strong>che de nettoyage du système SmartClean<br />
21 Adaptateur<br />
22 Petite fiche<br />
23 Support d’anneau de fixation<br />
24 Tr<strong>ou</strong>sse
70<br />
<strong>FRA</strong>NÇAIS<br />
Remarque : Les accessoires f<strong>ou</strong>rnis peuvent varier<br />
selon les différents produits. L’emballage indique les<br />
accessoires qui ont été f<strong>ou</strong>rnis avec votre appareil.<br />
Important<br />
Lisez ce mode d’<strong>emploi</strong> attentivement avant d’utiliser<br />
le rasoir et le système SmartClean. Conservez ce<br />
mode d’<strong>emploi</strong> p<strong>ou</strong>r un usage ultérieur.<br />
Danger<br />
--<br />
Gardez l’adaptateur au <strong>sec</strong>.<br />
Avertissement<br />
--<br />
L’adaptateur contient un transformateur.<br />
N’essayez pas de remplacer la fiche de<br />
l’adaptateur p<strong>ou</strong>r éviter t<strong>ou</strong>t accident.<br />
--<br />
Cet appareil peut être utilisé par des enfants<br />
âgés de 8 ans <strong>ou</strong> plus, des personnes dont les<br />
capacités physiques, sensorielles <strong>ou</strong> intellectuelles<br />
sont réduites <strong>ou</strong> des personnes manquant<br />
d’expérience et de connaissances, à condition<br />
que ces enfants <strong>ou</strong> personnes soient s<strong>ou</strong>s<br />
surveillance <strong>ou</strong> qu’ils aient reçu des instructions<br />
quant à l’utilisation sécurisée de l’appareil et qu’ils<br />
aient pris connaissance des dangers enc<strong>ou</strong>rus.<br />
Les enfants ne doivent pas j<strong>ou</strong>er avec l’appareil.<br />
Le nettoyage et l’entretien ne doivent pas être<br />
réalisés par des enfants sans surveillance.<br />
--<br />
Débranchez t<strong>ou</strong>j<strong>ou</strong>rs le rasoir avant de le<br />
nettoyer s<strong>ou</strong>s l’eau.
<strong>FRA</strong>NÇAIS 71<br />
Attention<br />
--<br />
Ne plongez jamais le système SmartClean dans<br />
l’eau et ne le rincez pas s<strong>ou</strong>s le robinet.<br />
--<br />
N’utilisez jamais une eau dont la température est<br />
supérieure à 80 °C p<strong>ou</strong>r rincer le rasoir.<br />
--<br />
Afin d’éviter t<strong>ou</strong>t accident, n’utilisez pas le rasoir,<br />
le système SmartClean ni aucune autre pièce<br />
s’ils sont endommagés. Remplacez t<strong>ou</strong>j<strong>ou</strong>rs<br />
l’adaptateur <strong>ou</strong> t<strong>ou</strong>te partie endommagée par une<br />
pièce du même type.<br />
--<br />
Utilisez le système SmartClean uniquement avec<br />
la cart<strong>ou</strong>che de nettoyage d’origine.<br />
--<br />
Placez t<strong>ou</strong>j<strong>ou</strong>rs le système SmartClean sur une<br />
surface stable et horizontale p<strong>ou</strong>r éviter t<strong>ou</strong>te<br />
fuite de liquide.<br />
--<br />
Assurez-v<strong>ou</strong>s t<strong>ou</strong>j<strong>ou</strong>rs que le compartiment de<br />
la cart<strong>ou</strong>che est fermé avant d’utiliser le système<br />
SmartClean p<strong>ou</strong>r nettoyer <strong>ou</strong> charger le rasoir.<br />
--<br />
Lorsque le système SmartClean est prêt à<br />
l’<strong>emploi</strong>, ne le b<strong>ou</strong>gez pas p<strong>ou</strong>r éviter t<strong>ou</strong>te fuite.<br />
--<br />
Le système SmartClean nettoie le rasoir en<br />
profondeur mais ne le désinfecte pas. Il est donc<br />
préférable que le rasoir ne soit utilisé que par une<br />
seule personne.<br />
--<br />
N’utilisez jamais d’air comprimé, de tampons à<br />
récurer, de produits abrasifs <strong>ou</strong> de détergents<br />
agressifs tels que de l’essence <strong>ou</strong> de l’acétone<br />
p<strong>ou</strong>r nettoyer l’appareil.<br />
--<br />
Lorsque v<strong>ou</strong>s rincez l’appareil, de l’eau peut<br />
s’éc<strong>ou</strong>ler par la prise inférieure. Ce phénomène<br />
est normal et ne présente pas de danger car<br />
t<strong>ou</strong>tes les pièces électroniques à l’intérieur du<br />
rasoir sont protégées.
72<br />
<strong>FRA</strong>NÇAIS<br />
Conforme aux normes<br />
--<br />
Ce rasoir est étanche et conforme aux normes<br />
internationales de sécurité. Il peut être utilisé<br />
dans le bain <strong>ou</strong> s<strong>ou</strong>s la d<strong>ou</strong>che et nettoyé à l’eau<br />
c<strong>ou</strong>rante en t<strong>ou</strong>te sécurité. P<strong>ou</strong>r des raisons de<br />
sécurité, il est dès lors uniquement prévu p<strong>ou</strong>r<br />
une utilisation sans fil.<br />
--<br />
Le rasoir et le système SmartClean sont<br />
conformes à t<strong>ou</strong>tes les normes et à t<strong>ou</strong>s les<br />
règlements applicables relatifs à l’exposition aux<br />
champs électromagnétiques.<br />
Général<br />
--<br />
Cet adaptateur est équipé d’un sélecteur de<br />
tension automatique et est conçu p<strong>ou</strong>r une<br />
tension <strong>sec</strong>teur comprise entre 100 V et 240 V.<br />
--<br />
L’adaptateur transforme la tension de 100-240 V<br />
en une tension de sécurité de moins de 24 V.<br />
--<br />
Niveau sonore maximal : Lc = 69 dB(A)<br />
Afficheur<br />
Remarque : Avant d’utiliser le rasoir p<strong>ou</strong>r la première<br />
fois, retirez le film de protection de l’afficheur.<br />
--<br />
S91XX/S90XX
Charge<br />
--<br />
La charge dure environ 1 heure.<br />
<strong>FRA</strong>NÇAIS 73<br />
Remarque : Cet appareil est uniquement prévu p<strong>ou</strong>r<br />
une utilisation sans fil.<br />
--<br />
Charge rapide : lorsque v<strong>ou</strong>s branchez l’appareil<br />
sur le <strong>sec</strong>teur, il produit un son. Ensuite, les<br />
lumières du voyant de charge de la batterie<br />
s’allument l’une après l’autre en continu. Lorsque le<br />
rasoir est suffisamment chargé p<strong>ou</strong>r une séance de<br />
<strong>rasage</strong>, la lumière inférieure du voyant de charge<br />
de la batterie commence à clignoter lentement.<br />
--<br />
Si v<strong>ou</strong>s laissez l’appareil branché sur le <strong>sec</strong>teur, le<br />
processus de charge se p<strong>ou</strong>rsuit. P<strong>ou</strong>r indiquer<br />
que l’appareil est en c<strong>ou</strong>rs de charge, la lumière<br />
inférieur se met t<strong>ou</strong>t d’abord à clignoter en blanc,<br />
puis reste allumée en blanc. Ensuite, la <strong>sec</strong>onde<br />
lumière clignote, puis reste allumée, et ainsi de<br />
suite jusqu’à ce que le rasoir soit complètement<br />
chargé.<br />
Batterie entièrement chargée<br />
Remarque : Cet appareil est uniquement prévu p<strong>ou</strong>r<br />
une utilisation sans fil.<br />
Remarque : Lorsque la batterie est complètement<br />
chargée, l’afficheur s’éteint automatiquement après<br />
30 minutes. Lorsque v<strong>ou</strong>s appuyez sur le b<strong>ou</strong>ton<br />
marche/arrêt pendant <strong>ou</strong> après une période de charge,<br />
v<strong>ou</strong>s entendez un son qui v<strong>ou</strong>s indique que le rasoir est<br />
t<strong>ou</strong>j<strong>ou</strong>rs branché sur le <strong>sec</strong>teur.<br />
--<br />
Lorsque la batterie est entièrement chargée,<br />
t<strong>ou</strong>s les voyants de charge de celle-ci s’allument<br />
en blanc de manière continue.
74<br />
<strong>FRA</strong>NÇAIS<br />
Piles faibles<br />
--<br />
Lorsque la batterie est presque vide, le voyant<br />
inférieur clignote en orange et v<strong>ou</strong>s entendez un son.<br />
Niveau de charge de la batterie<br />
--<br />
Le niveau de charge de la batterie restant est<br />
indiqué par les voyants du témoin de charge de la<br />
batterie qui s’allument de manière continue.<br />
Alarme de nettoyage<br />
P<strong>ou</strong>r garantir des performances de <strong>rasage</strong> optimales,<br />
n<strong>ou</strong>s v<strong>ou</strong>s recommandons de nettoyer le rasoir<br />
après chaque utilisation.<br />
--<br />
Lorsque v<strong>ou</strong>s éteignez le rasoir, l’alarme de nettoyage<br />
clignote p<strong>ou</strong>r rappeler de nettoyer le rasoir.<br />
Système de verr<strong>ou</strong>illage p<strong>ou</strong>r voyage<br />
V<strong>ou</strong>s p<strong>ou</strong>vez verr<strong>ou</strong>iller le rasoir si v<strong>ou</strong>s partez en<br />
voyage. Le verr<strong>ou</strong>illage empêche le rasoir de se<br />
mettre en marche accidentellement.<br />
Activation du verr<strong>ou</strong>illage<br />
1 Appuyez sur le b<strong>ou</strong>ton marche/arrêt pendant<br />
3 <strong>sec</strong>ondes p<strong>ou</strong>r activer le verr<strong>ou</strong>illage.<br />
,,<br />
Pendant l’activation du système de verr<strong>ou</strong>illage,<br />
le symbole du système de verr<strong>ou</strong>illage s’allume<br />
en blanc de manière continue. Une fois le<br />
système de verr<strong>ou</strong>illage activé, le rasoir émet<br />
un son et le symbole du système de verr<strong>ou</strong>illage<br />
clignote.
<strong>FRA</strong>NÇAIS 75<br />
Désactivation du verr<strong>ou</strong>illage<br />
1 Maintenez enfoncé le b<strong>ou</strong>ton marche/arrêt<br />
pendant 3 <strong>sec</strong>ondes.<br />
,,<br />
Le symbole du système de verr<strong>ou</strong>illage clignote,<br />
puis s’allume de manière continue.<br />
Le rasoir est de n<strong>ou</strong>veau prêt à l’<strong>emploi</strong>.<br />
Remarque : V<strong>ou</strong>s p<strong>ou</strong>vez aussi désactiver le système de<br />
verr<strong>ou</strong>illage en branchant le rasoir sur le <strong>sec</strong>teur.<br />
Remplacement des têtes de <strong>rasage</strong><br />
P<strong>ou</strong>r garantir des performances de <strong>rasage</strong> optimales,<br />
n<strong>ou</strong>s v<strong>ou</strong>s recommandons de remplacer les têtes<br />
de <strong>rasage</strong> t<strong>ou</strong>s les deux ans.<br />
--<br />
Le rappel de remplacement de l’appareil v<strong>ou</strong>s<br />
rappelle de remplacer les têtes de <strong>rasage</strong>.<br />
Le rappel de remplacement s’allume en blanc<br />
de manière continue et les flèches clignotent en<br />
blanc. V<strong>ou</strong>s entendez un signal sonore qui v<strong>ou</strong>s<br />
indique que v<strong>ou</strong>s devez remplacer les têtes de<br />
<strong>rasage</strong>.<br />
Remarque : Après avoir remplacé les têtes de <strong>rasage</strong>,<br />
v<strong>ou</strong>s devez réinitialiser le rasoir en appuyant sur le<br />
b<strong>ou</strong>ton marche/arrêt pendant 7 <strong>sec</strong>ondes.<br />
Point d’exclamation<br />
Têtes de <strong>rasage</strong> bloquées<br />
--<br />
En cas de blocage des têtes de <strong>rasage</strong>, le point<br />
d’exclamation s’allume en orange de manière<br />
continue. Le rappel de remplacement et l’alarme<br />
de nettoyage clignotent en blanc alternativement<br />
et v<strong>ou</strong>s entendez un son. Dans ce cas, le moteur<br />
ne peut pas fonctionner, car les têtes de <strong>rasage</strong><br />
sont sales <strong>ou</strong> endommagées.<br />
--<br />
Lorsque cela se produit, v<strong>ou</strong>s devez nettoyer les<br />
têtes de <strong>rasage</strong> <strong>ou</strong> les remplacer.
76<br />
<strong>FRA</strong>NÇAIS<br />
Surchauffe<br />
--<br />
Si l’appareil surchauffe pendant la charge, le point<br />
d’exclamation se met à clignoter en orange.<br />
--<br />
Lorsque cela se produit, le rasoir s’éteint<br />
automatiquement. La charge reprend une fois que<br />
l’appareil a retr<strong>ou</strong>vé sa température normale.<br />
Charge<br />
La charge dure environ 1 heure.<br />
Un rasoir complètement chargé offre une<br />
autonomie de <strong>rasage</strong> de 50 minutes environ.<br />
Remarque : Il est impossible d’utiliser l’appareil<br />
pendant la charge.<br />
Mettez le rasoir en charge avant de l’utiliser p<strong>ou</strong>r la<br />
première fois et lorsque l’afficheur indique que la<br />
batterie est presque déchargée.<br />
Charge avec l’adaptateur<br />
1 Assurez-v<strong>ou</strong>s que l’appareil est éteint.<br />
2 Insérez la petite fiche dans la prise de l’appareil<br />
(1) et branchez l’adaptateur sur la prise<br />
<strong>sec</strong>teur (2).<br />
Charge dans le système SmartClean<br />
(certains modèles uniquement)<br />
1 Insérez la petite fiche dans le système<br />
SmartClean.<br />
2 Branchez l’adaptateur sur la prise <strong>sec</strong>teur.<br />
3 Appuyez sur le capuchon supérieur p<strong>ou</strong>r<br />
p<strong>ou</strong>voir placer le rasoir sur le support (clic).
<strong>FRA</strong>NÇAIS 77<br />
4 Maintenez le rasoir à l’envers au-dessus du<br />
support avec l’avant du rasoir orienté vers le<br />
système SmartClean.<br />
5 Placez le rasoir dans le support (1), penchez<br />
le rasoir en arrière (2) et appuyez sur le<br />
capuchon supérieur p<strong>ou</strong>r connecter le rasoir<br />
(clic) (3).<br />
Remarque : Le symbole de la batterie clignote lentement<br />
p<strong>ou</strong>r indiquer que l’appareil est en c<strong>ou</strong>rs de charge.<br />
Utilisation du rasoir<br />
Rasage<br />
Période d’adaptation de la peau<br />
Il est possible que vos premières séances de <strong>rasage</strong><br />
n’apportent pas les résultats escomptés et que votre<br />
peau soit même légèrement irritée. Ce phénomène<br />
est normal. Votre peau et votre barbe ont besoin de<br />
temps p<strong>ou</strong>r s’adapter au n<strong>ou</strong>veau système de <strong>rasage</strong>.<br />
N<strong>ou</strong>s v<strong>ou</strong>s conseillons de v<strong>ou</strong>s raser régulièrement<br />
(au moins 3 fois par semaine) avec ce rasoir pendant<br />
3 semaines p<strong>ou</strong>r habituer votre peau à ce n<strong>ou</strong>veau<br />
rasoir.<br />
Conseil : P<strong>ou</strong>r garantir le meilleur résultat possible, n<strong>ou</strong>s<br />
v<strong>ou</strong>s conseillons un pré<strong>rasage</strong> si votre barde est longue<br />
de 3 j<strong>ou</strong>rs <strong>ou</strong> plus.<br />
Remarque : Cet appareil est uniquement prévu p<strong>ou</strong>r<br />
une utilisation sans fil.
78<br />
<strong>FRA</strong>NÇAIS<br />
1 Mettez le rasoir en marche en appuyant sur le<br />
b<strong>ou</strong>ton marche/arrêt.<br />
,,<br />
L’afficheur s’allume pendant quelques <strong>sec</strong>ondes.<br />
2 Faites glisser les têtes de rasoir sur votre peau<br />
en effectuant des m<strong>ou</strong>vements circulaires.<br />
--<br />
Ne faites pas de m<strong>ou</strong>vements rectilignes.<br />
3 Arrêtez le rasoir en appuyant sur le b<strong>ou</strong>ton<br />
marche/arrêt.<br />
,,<br />
L’afficheur s’allume pendant quelques <strong>sec</strong>ondes,<br />
puis affiche le niveau de charge de la batterie.<br />
Rasage sur peau humide<br />
V<strong>ou</strong>s p<strong>ou</strong>vez également utiliser ce rasoir sur un visage<br />
humide avec de la m<strong>ou</strong>sse à raser <strong>ou</strong> du gel de <strong>rasage</strong>.<br />
P<strong>ou</strong>r v<strong>ou</strong>s raser avec de la m<strong>ou</strong>sse à raser <strong>ou</strong> du gel<br />
de <strong>rasage</strong> suivez les étapes ci-dess<strong>ou</strong>s :<br />
1 M<strong>ou</strong>illez votre peau.<br />
2 Appliquez de la m<strong>ou</strong>sse à raser <strong>ou</strong> du gel de<br />
<strong>rasage</strong> sur votre peau.<br />
3 Rincez la tête de rasoir s<strong>ou</strong>s le robinet afin que<br />
le rasoir puisse continuer à glisser en d<strong>ou</strong>ceur<br />
sur votre peau.<br />
4 Mettez le rasoir en marche en appuyant sur le<br />
b<strong>ou</strong>ton marche/arrêt.<br />
5 Faites glisser les têtes de rasoir sur votre peau<br />
en effectuant des m<strong>ou</strong>vements circulaires.<br />
Remarque : Rincez le rasoir s<strong>ou</strong>s le robinet<br />
régulièrement afin que le rasoir puisse continuer<br />
à glisser en d<strong>ou</strong>ceur sur votre peau.
<strong>FRA</strong>NÇAIS 79<br />
6 Séchez votre visage et nettoyez soigneusement<br />
le rasoir après utilisation (voir le chapitre<br />
« Nettoyage et entretien »).<br />
Remarque : Rincez le rasoir p<strong>ou</strong>r éliminer<br />
complètement la m<strong>ou</strong>sse.<br />
Utilisation des accessoires clipsables<br />
Remarque : Les accessoires f<strong>ou</strong>rnis peuvent varier<br />
selon les différents produits. L’emballage indique les<br />
accessoires qui ont été f<strong>ou</strong>rnis avec votre appareil.<br />
Utilisation de la tondeuse<br />
V<strong>ou</strong>s p<strong>ou</strong>vez utiliser la tondeuse p<strong>ou</strong>r tailler vos<br />
favoris et votre m<strong>ou</strong>stache.<br />
1 Détachez la tête de rasoir de l’appareil.<br />
Remarque : Ne t<strong>ou</strong>rnez pas la tête de rasoir pendant<br />
que v<strong>ou</strong>s la retirez de l’appareil.<br />
2 Insérez la languette de la tondeuse dans la<br />
fente située sur la partie supérieure du rasoir.<br />
Fixez ensuite la tondeuse sur l’appareil en la<br />
p<strong>ou</strong>ssant vers le bas (clic).<br />
3 Mettez l’appareil en marche en appuyant sur le<br />
b<strong>ou</strong>ton marche/arrêt.<br />
,,<br />
L’afficheur s’allume pendant quelques <strong>sec</strong>ondes.<br />
4 V<strong>ou</strong>s p<strong>ou</strong>vez commencer à v<strong>ou</strong>s tailler les<br />
favoris et la m<strong>ou</strong>stache.<br />
5 Éteignez l’appareil en appuyant une fois sur le<br />
b<strong>ou</strong>ton marche/arrêt.<br />
,,<br />
L’afficheur s’allume pendant quelques <strong>sec</strong>ondes,<br />
puis affiche le niveau de charge de la batterie.
80<br />
<strong>FRA</strong>NÇAIS<br />
6 Détachez la tondeuse de l’appareil.<br />
Remarque : Ne t<strong>ou</strong>rnez pas la tondeuse tandis que<br />
v<strong>ou</strong>s la retirez de l’appareil.<br />
7 Insérez la languette de la tête de rasoir dans<br />
la fente située sur la partie supérieure de<br />
l’appareil. Fixez ensuite la tête de rasoir sur<br />
l’appareil en la faisant glisser vers le bas (clic).<br />
Utilisation de l’accessoire barbe<br />
1 Assurez-v<strong>ou</strong>s que l’appareil est éteint.<br />
2 Détachez la tête de rasoir de l’appareil.<br />
Remarque : Ne t<strong>ou</strong>rnez pas la tête de rasoir pendant<br />
que v<strong>ou</strong>s la retirez de l’appareil.<br />
3 Insérez la languette de l’accessoire barbe dans<br />
la fente située sur la partie supérieure de<br />
l’appareil. Fixez ensuite l’accessoire barbe sur<br />
l’appareil en le faisant glisser vers le bas (clic).<br />
Utilisation de l’accessoire barbe avec sabot<br />
V<strong>ou</strong>s p<strong>ou</strong>vez utiliser l’accessoire barbe avec le sabot<br />
p<strong>ou</strong>r tailler votre barbe avec un réglage défini, mais<br />
également à différentes hauteurs de c<strong>ou</strong>pe. Les<br />
réglages de la hauteur de c<strong>ou</strong>pe sur l’accessoire<br />
barbe correspondent à la hauteur restante de votre<br />
barbe après la c<strong>ou</strong>pe. V<strong>ou</strong>s p<strong>ou</strong>vez choisir un réglage<br />
entre 1 et 5 mm.<br />
1 Faites glisser le sabot dans les rainures situées<br />
des deux côtés de l’accessoire barbe, jusqu’à ce<br />
que v<strong>ou</strong>s entendiez un clic.
<strong>FRA</strong>NÇAIS 81<br />
2 Appuyez sur le sélecteur de hauteur de c<strong>ou</strong>pe,<br />
puis p<strong>ou</strong>ssez-le vers la gauche <strong>ou</strong> la droite<br />
p<strong>ou</strong>r sélectionner le réglage de la hauteur de<br />
c<strong>ou</strong>pe s<strong>ou</strong>haité.<br />
3 Mettez l’appareil en marche en appuyant sur le<br />
b<strong>ou</strong>ton marche/arrêt.<br />
4 V<strong>ou</strong>s p<strong>ou</strong>vez maintenant mettre en forme<br />
votre barbe.<br />
Utilisation de l’accessoire barbe sans sabot<br />
V<strong>ou</strong>s p<strong>ou</strong>vez utiliser l’accessoire barbe sans sabot<br />
p<strong>ou</strong>r tailler les cont<strong>ou</strong>rs de votre barbe, de votre<br />
m<strong>ou</strong>stache, de vos pattes <strong>ou</strong> de votre nuque.<br />
1 Retirez le sabot de l’accessoire barbe.<br />
Remarque : Saisissez le sabot par son centre p<strong>ou</strong>r le<br />
retirer de l’accessoire barbe. Ne tirez pas sur les côtés<br />
du sabot.<br />
2 Mettez l’appareil en marche en appuyant sur le<br />
b<strong>ou</strong>ton marche/arrêt.<br />
3 V<strong>ou</strong>s p<strong>ou</strong>vez alors commencer à tailler les<br />
cont<strong>ou</strong>rs votre barbe, de votre m<strong>ou</strong>stache,<br />
de vos favoris <strong>ou</strong> de votre nuque.<br />
Nettoyage et entretien<br />
Remarque : Les accessoires f<strong>ou</strong>rnis peuvent varier<br />
selon les différents produits. L’emballage indique les<br />
accessoires qui ont été f<strong>ou</strong>rnis avec votre appareil.
82<br />
<strong>FRA</strong>NÇAIS<br />
Nettoyage du rasoir dans le système<br />
SmartClean<br />
Il existe deux types de système SmartClean.<br />
Les fonctionnalités disponibles sur votre système<br />
SmartClean peuvent varier en fonction du type :<br />
--<br />
Le système SmartClean Basic présente une seule<br />
phase : la phase de rinçage.<br />
--<br />
Le système SmartClean Plus présente deux<br />
phases : la phase de rinçage et la phase de<br />
séchage.<br />
Préparation du système SmartClean<br />
p<strong>ou</strong>r utilisation<br />
N’inclinez pas le système SmartClean p<strong>ou</strong>r éviter<br />
les fuites.<br />
Remarque : Tenez le système SmartClean tandis que<br />
v<strong>ou</strong>s le préparez p<strong>ou</strong>r utilisation.<br />
1 Branchez la petite fiche au dos du système<br />
SmartClean.<br />
2 Branchez l’adaptateur sur la prise <strong>sec</strong>teur.<br />
3 Appuyez sur le b<strong>ou</strong>ton latéral du système<br />
SmartClean (1) et s<strong>ou</strong>levez le haut du système<br />
SmartClean (2).<br />
4 Enlevez la protection hermétique de la<br />
cart<strong>ou</strong>che de nettoyage.
<strong>FRA</strong>NÇAIS 83<br />
5 Placez la cart<strong>ou</strong>che de nettoyage dans le<br />
système SmartClean.<br />
6 Remettez en place le haut du système<br />
SmartClean en appuyant dessus (clic).<br />
Utilisation du système SmartClean<br />
Veillez t<strong>ou</strong>j<strong>ou</strong>rs à évacuer l’excès d’eau du rasoir<br />
avant de l’installer dans le système SmartClean.<br />
1 Appuyez sur le capuchon supérieur p<strong>ou</strong>r<br />
p<strong>ou</strong>voir placer le rasoir sur le support (clic).<br />
2 Maintenez le rasoir à l’envers au-dessus du<br />
support avec l’avant du rasoir orienté vers le<br />
système SmartClean.
84<br />
<strong>FRA</strong>NÇAIS<br />
3 Placez le rasoir dans le support (1), penchez<br />
le rasoir en arrière (2) et appuyez sur le<br />
capuchon supérieur p<strong>ou</strong>r connecter le rasoir<br />
(clic) (3).<br />
,,<br />
Le symbole de la batterie commence à clignoter,<br />
ce qui indique que le rasoir est en c<strong>ou</strong>rs de charge.<br />
4 Appuyez sur le b<strong>ou</strong>ton Marche/Arrêt du<br />
système de nettoyage SmartClean p<strong>ou</strong>r<br />
démarrer le programme de nettoyage.<br />
,,<br />
Pendant la phase de rinçage, le symbole de<br />
rinçage clignote.<br />
Remarque : La phase de rinçage dure environ<br />
10 minutes.<br />
,,<br />
Systèmes SmartClean Plus uniquement :<br />
Pendant la phase de séchage, le symbole de séchage<br />
clignote.<br />
Remarque : La phase de séchage dure environ<br />
4 heures.<br />
,,<br />
Au terme du programme de nettoyage, le<br />
symbole « Prêt à l’<strong>emploi</strong> » s’allume en continu.<br />
,,<br />
Le symbole de la batterie s’allume également<br />
en continu p<strong>ou</strong>r indiquer que le rasoir est<br />
complètement chargé.<br />
Remarque : La charge dure environ 1 heure.<br />
Remarque : Si v<strong>ou</strong>s appuyez sur le b<strong>ou</strong>ton Marche/<br />
Arrêt du système SmartClean pendant le programme<br />
de nettoyage, le programme s’annule. Dans un tel cas,<br />
le symbole de séchage <strong>ou</strong> de rinçage arrête de clignoter.
<strong>FRA</strong>NÇAIS 85<br />
Remarque : Si v<strong>ou</strong>s retirez l’adaptateur de la prise<br />
<strong>sec</strong>teur pendant le programme de nettoyage, le<br />
programme s’annule.<br />
Remarque : 30 minutes après la fin du programme<br />
de nettoyage et la charge complète de l’appareil, le<br />
système SmartClean s’éteint automatiquement.<br />
Remplacement de la cart<strong>ou</strong>che du système<br />
SmartClean<br />
--<br />
Remplacez la cart<strong>ou</strong>che de nettoyage lorsque le<br />
symbole de remplacement clignote en orange <strong>ou</strong><br />
lorsque v<strong>ou</strong>s n’êtes plus satisfait par le résultat.<br />
1 Appuyez sur le b<strong>ou</strong>ton latéral du système<br />
SmartClean (1) et s<strong>ou</strong>levez le haut du système<br />
SmartClean (2).<br />
2 Videz le liquide de nettoyage qui reste encore<br />
dans la cart<strong>ou</strong>che de nettoyage avant de<br />
la jeter.<br />
V<strong>ou</strong>s p<strong>ou</strong>vez simplement verser le liquide de<br />
nettoyage dans le lavabo.<br />
3 Jetez la cart<strong>ou</strong>che vide de nettoyage.<br />
4 Déballez la n<strong>ou</strong>velle cart<strong>ou</strong>che de nettoyage,<br />
puis retirez la protection hermétique de la<br />
cart<strong>ou</strong>che.<br />
5 Placez la n<strong>ou</strong>velle cart<strong>ou</strong>che de nettoyage dans<br />
le système SmartClean.<br />
6 Remettez en place le haut du système<br />
SmartClean en appuyant dessus (clic).
86<br />
<strong>FRA</strong>NÇAIS<br />
Nettoyage du rasoir à l’eau<br />
P<strong>ou</strong>r garantir des performances de <strong>rasage</strong> optimales,<br />
nettoyez le rasoir après chaque utilisation.<br />
Veillez à ce que l’eau ne soit pas trop chaude p<strong>ou</strong>r<br />
ne pas v<strong>ou</strong>s brûler.<br />
Ne séchez jamais la tête de rasoir à l’aide d’une<br />
serviette au risque d’endommager les têtes de rasoir.<br />
1 Rincez la tête du rasoir à l’eau chaude pendant<br />
un certain temps.<br />
2 Retirez le support de la tête de <strong>rasage</strong> de la<br />
partie inférieure de celle-ci.<br />
3 Rincez rapidement le support de la tête de<br />
rasoir, s<strong>ou</strong>s l’eau chaude.<br />
4 Sec<strong>ou</strong>ez la tête de rasoir p<strong>ou</strong>r éliminer l’excès<br />
d’eau et laissez-la sécher.<br />
5 Remettez le support de la tête de rasoir dans<br />
la partie inférieure de la tête de rasoir (clic).<br />
Méthode de nettoyage en profondeur<br />
Assurez-v<strong>ou</strong>s que l’appareil est éteint.<br />
1 Retirez le support de la tête de <strong>rasage</strong> de la<br />
partie inférieure de la tête de rasoir.
<strong>FRA</strong>NÇAIS 87<br />
2 Placez le support de l’anneau de fixation sur<br />
l’anneau (1), faites-le pivoter dans le sens<br />
inverse des aiguilles d’une montre (2), puis<br />
enlevez la tête de <strong>rasage</strong> (3).<br />
Retirez l’anneau de fixation de son support, puis<br />
répétez cette opération p<strong>ou</strong>r chacun des anneaux<br />
de fixation.<br />
3 Retirez les têtes de <strong>rasage</strong> à l’aide de leur<br />
support. Chaque tête se compose d’une lame<br />
et d’une grille.<br />
Remarque : Nettoyez uniquement une lame et une<br />
grille à la fois, car elles sont assemblées par paire.<br />
Si par erreur v<strong>ou</strong>s ne placez pas une lame dans<br />
la bonne grille, plusieurs semaines risquent d’être<br />
nécessaires avant que v<strong>ou</strong>s ne puissiez obtenir à<br />
n<strong>ou</strong>veau un <strong>rasage</strong> optimal.<br />
4 Nettoyez la lame et la grille en les passant s<strong>ou</strong>s<br />
l’eau du robinet.<br />
5 Après nettoyage, replacez la lame dans la grille.<br />
6 Replacez les têtes de <strong>rasage</strong> sur leur support.<br />
Remarque : Assurez-v<strong>ou</strong>s que les languettes sur les<br />
deux côtés des têtes de <strong>rasage</strong> s’insèrent correctement<br />
dans les projections du support de la tête de <strong>rasage</strong>.
88<br />
<strong>FRA</strong>NÇAIS<br />
7 Placez le support de l’anneau de fixation sur<br />
l’anneau (1), puis sur la tête de <strong>rasage</strong> (2).<br />
Faites-le ensuite pivoter dans le sens des<br />
aiguilles d’une montre (3) p<strong>ou</strong>r fixer à n<strong>ou</strong>veau<br />
l’anneau de fixation.<br />
Répétez cette opération p<strong>ou</strong>r les autres anneaux<br />
de fixation.<br />
Remarque : Tenez le support de la tête de <strong>rasage</strong> dans<br />
la main lorsque v<strong>ou</strong>s réinsérez les têtes de <strong>rasage</strong><br />
et refixez les anneaux de fixation. Ne placez pas le<br />
support de la tête de <strong>rasage</strong> sur une surface lors de<br />
cette opération car v<strong>ou</strong>s risqueriez de l’endommager.<br />
8 Remettez le support de la tête de rasoir dans<br />
la partie inférieure de la tête de rasoir.<br />
Nettoyage des accessoires clipsables<br />
Nettoyage de la tondeuse<br />
Nettoyez la tondeuse après chaque utilisation.<br />
1 Après installation de la tondeuse sur le rasoir,<br />
allumez l’appareil.<br />
2 Rincez la tondeuse à l’eau chaude pendant un<br />
certain temps.<br />
3 Sec<strong>ou</strong>ez la tête de rasoir p<strong>ou</strong>r éliminer l’excès<br />
d’eau, puis laissez-la sécher.<br />
4 Après le nettoyage, éteignez l’appareil.<br />
Conseil : P<strong>ou</strong>r garantir des performances de <strong>rasage</strong><br />
optimales, appliquez une g<strong>ou</strong>tte d’huile p<strong>ou</strong>r machine<br />
à c<strong>ou</strong>dre sur la tondeuse s<strong>ou</strong>s les six mois.
Nettoyage de l’accessoire barbe<br />
Nettoyez l’accessoire barbe après chaque utilisation.<br />
1 Retirez le sabot de l’accessoire barbe.<br />
2 Rincez l’accessoire barbe et le sabot<br />
séparément s<strong>ou</strong>s un robinet d’eau chaude<br />
pendant un certain temps.<br />
3 Ég<strong>ou</strong>ttez soigneusement l’excédent d’eau, puis<br />
laissez l’accessoire barbe et le sabot sécher.<br />
4 T<strong>ou</strong>s les six mois, lubrifiez les dents de la<br />
tondeuse en utilisant une petite quantité<br />
d’huile p<strong>ou</strong>r machine à c<strong>ou</strong>dre.<br />
Rangement<br />
<strong>FRA</strong>NÇAIS 89<br />
1 Rangez le rasoir dans la h<strong>ou</strong>sse f<strong>ou</strong>rnie.<br />
Remarque : N<strong>ou</strong>s v<strong>ou</strong>s conseillons de laisser sécher le<br />
rasoir avant de le ranger dans sa h<strong>ou</strong>sse.<br />
Remplacement<br />
Remplacement des têtes de <strong>rasage</strong><br />
P<strong>ou</strong>r garantir des performances de <strong>rasage</strong> optimales,<br />
n<strong>ou</strong>s v<strong>ou</strong>s recommandons de remplacer les têtes de<br />
<strong>rasage</strong> t<strong>ou</strong>s les deux ans.<br />
Rappel de remplacement<br />
Le voyant des têtes de rasoir s’allume p<strong>ou</strong>r indiquer<br />
que les têtes de <strong>rasage</strong> doivent être remplacées.<br />
Remplacez immédiatement les têtes de rasoir<br />
endommagées.<br />
Remplacez uniquement les têtes de rasoir par des<br />
têtes de rasoir <strong>Philips</strong> SH90 d’origine.
90<br />
<strong>FRA</strong>NÇAIS<br />
1 Le symbole des têtes de rasoir s’allume en<br />
continu, les flèches clignotent en blanc et<br />
v<strong>ou</strong>s entendez un signal sonore lorsque v<strong>ou</strong>s<br />
éteignez le rasoir.<br />
2 Retirez le support de la tête de <strong>rasage</strong> de la<br />
partie inférieure de la tête de rasoir.<br />
3 Placez le support de l’anneau de fixation sur<br />
l’anneau (1), faites-le pivoter dans le sens<br />
inverse des aiguilles d’une montre (2),<br />
puis enlevez la tête de <strong>rasage</strong> (3).<br />
Retirez l’anneau de fixation de son support, puis<br />
répétez cette opération p<strong>ou</strong>r chacun des anneaux<br />
de fixation.<br />
4 Retirez les têtes de <strong>rasage</strong> de leur support,<br />
puis mettez-les au rebut.<br />
5 Installez de n<strong>ou</strong>velles têtes de <strong>rasage</strong> dans le<br />
support.<br />
Remarque : Assurez-v<strong>ou</strong>s que les languettes sur les<br />
deux côtés des têtes de <strong>rasage</strong> s’insèrent correctement<br />
dans les projections du support de la tête de <strong>rasage</strong>.
<strong>FRA</strong>NÇAIS 91<br />
6 Placez le support de l’anneau de fixation<br />
sur l’anneau (1), puis sur la tête de <strong>rasage</strong><br />
(2). Faites-le ensuite pivoter dans le sens des<br />
aiguilles d’une montre (3) p<strong>ou</strong>r fixer à n<strong>ou</strong>veau<br />
l’anneau de fixation.<br />
Répétez cette opération p<strong>ou</strong>r les autres anneaux<br />
de fixation.<br />
Remarque : Tenez le support de la tête de <strong>rasage</strong> dans<br />
la main lorsque v<strong>ou</strong>s réinsérez les têtes de <strong>rasage</strong><br />
et refixez les anneaux de fixation. Ne placez pas le<br />
support de la tête de <strong>rasage</strong> sur une surface lors de<br />
cette opération car v<strong>ou</strong>s risqueriez de l’endommager.<br />
7 Remettez le support de tête de <strong>rasage</strong> dans la<br />
partie inférieure de la tête de rasoir.<br />
8 P<strong>ou</strong>r réinitialiser le rasoir, maintenez le b<strong>ou</strong>ton<br />
Marche/Arrêt enfoncé pendant environ<br />
7 <strong>sec</strong>ondes. Patientez jusqu’à ce que l’appareil<br />
émette deux signaux sonores.<br />
Commande d’accessoires<br />
P<strong>ou</strong>r acheter des accessoires <strong>ou</strong> des pièces de rechange,<br />
visitez le site Web www.shop.philips.com/<br />
service <strong>ou</strong> rendez-v<strong>ou</strong>s chez votre revendeur <strong>Philips</strong>.<br />
V<strong>ou</strong>s p<strong>ou</strong>vez également contacter le Service<br />
Consommateurs <strong>Philips</strong> de votre pays (voir le dépliant<br />
de garantie internationale p<strong>ou</strong>r les coordonnées).<br />
Les pièces suivantes sont disponibles :<br />
--<br />
Adaptateur HQ8505<br />
--<br />
Têtes de <strong>rasage</strong> <strong>Philips</strong> SH90<br />
--<br />
Spray <strong>Philips</strong> Shaving Head Cleaner HQ110<br />
--<br />
Accessoire barbe <strong>Philips</strong> RQ111<br />
--<br />
Brosse nettoyante RQ585 <strong>Philips</strong>
92<br />
<strong>FRA</strong>NÇAIS<br />
--<br />
Têtes de brosse de nettoyage <strong>Philips</strong> RQ560/RQ563<br />
--<br />
Cart<strong>ou</strong>che de nettoyage JC301/JC302/JC303/<br />
JC304/JC305<br />
Têtes de rasoir<br />
--<br />
N<strong>ou</strong>s v<strong>ou</strong>s conseillons de remplacer vos têtes de<br />
<strong>rasage</strong> t<strong>ou</strong>s les deux ans. Remplacez t<strong>ou</strong>j<strong>ou</strong>rs les<br />
têtes de <strong>rasage</strong> par des têtes de <strong>rasage</strong> SH90 <strong>Philips</strong>.<br />
Recyclage<br />
--<br />
Ce symbole sur un produit indique que ce dernier<br />
est conforme à la directive européenne 2012/19/ UE.<br />
--<br />
Ce symbole signifie que le produit contient une<br />
batterie rechargeable intégrée conforme à la<br />
directive européenne 2006/66/CE, qui ne doit pas<br />
être mise au rebut avec les ordures ménagères.<br />
N<strong>ou</strong>s v<strong>ou</strong>s conseillons vivement de déposer<br />
votre produit dans un centre de collecte officiel<br />
<strong>ou</strong> un Centre Service Agréé <strong>Philips</strong> p<strong>ou</strong>r qu’un<br />
professionnel retire la batterie rechargeable.<br />
--<br />
Renseignez-v<strong>ou</strong>s sur les dispositions en vigueur<br />
dans votre région concernant la collecte séparée<br />
des appareils é<strong>lectrique</strong>s et électroniques et des<br />
piles rechargeables. Respectez les réglementations<br />
locales et ne jetez pas le produit et les piles<br />
rechargeables avec les ordures ménagères.<br />
La mise au rebut citoyenne des anciens produits<br />
et des piles rechargeables permet de protéger<br />
l’environnement et la santé.
<strong>FRA</strong>NÇAIS 93<br />
Retrait de la batterie rechargeable du rasoir<br />
Remarque : N<strong>ou</strong>s v<strong>ou</strong>s conseillons vivement de faire<br />
retirer la batterie rechargeable par un professionnel.<br />
Retirez la batterie rechargeable uniquement<br />
lorsque v<strong>ou</strong>s mettez le rasoir au rebut. Assurezv<strong>ou</strong>s<br />
que la batterie est complètement déchargée<br />
lorsque v<strong>ou</strong>s la retirez.<br />
Soyez prudent car les languettes des batteries<br />
sont c<strong>ou</strong>pantes.<br />
1 Insérez le t<strong>ou</strong>rnevis dans la fente située entre<br />
l’avant et l’arrière du panneau figurant au bas<br />
de l’appareil. Enlevez le panneau arrière.<br />
2 Retirez le panneau avant.<br />
3 Dévissez les deux vis en haut du panneau<br />
intérieur et retirez le panneau intérieur.<br />
4 Retirez la batterie rechargeable à l’aide d’un<br />
t<strong>ou</strong>rnevis.<br />
Garantie et assistance<br />
Si v<strong>ou</strong>s avez besoin d’une assistance <strong>ou</strong><br />
d’informations supplémentaires, consultez le site<br />
Web www.philips.com/support <strong>ou</strong> lisez le<br />
dépliant séparé sur la garantie internationale.<br />
Limites de la garantie<br />
Étant susceptibles de s’user, les têtes de rasoir<br />
(lames et grilles) ne sont pas c<strong>ou</strong>vertes par la<br />
garantie internationale.
94<br />
<strong>FRA</strong>NÇAIS<br />
Dépannage<br />
Cette rubrique présente les problèmes les plus<br />
c<strong>ou</strong>rants que v<strong>ou</strong>s p<strong>ou</strong>vez rencontrer avec votre<br />
appareil. Si v<strong>ou</strong>s ne parvenez pas à rés<strong>ou</strong>dre le<br />
problème à l’aide des informations ci-dess<strong>ou</strong>s,<br />
rendez-v<strong>ou</strong>s sur www.philips.com/support<br />
p<strong>ou</strong>r consulter les questions fréquemment posées,<br />
<strong>ou</strong> contactez le Service Consommateurs de votre pays.<br />
Problème Cause possible Solution<br />
Le rasoir ne<br />
fonctionne pas<br />
lorsque j’appuie<br />
sur le b<strong>ou</strong>ton<br />
marche/arrêt.<br />
Les résultats<br />
de <strong>rasage</strong> ne<br />
sont pas aussi<br />
satisfaisants que<br />
d’habitude.<br />
Le rasoir est<br />
encore branché<br />
sur le <strong>sec</strong>teur. P<strong>ou</strong>r<br />
les raisons de<br />
sécurité, le rasoir est<br />
uniquement prévu<br />
p<strong>ou</strong>r une utilisation<br />
sans fil.<br />
La batterie<br />
rechargeable est vide.<br />
Le verr<strong>ou</strong>illage est<br />
activé.<br />
Les têtes de rasoir<br />
sont endommagées<br />
<strong>ou</strong> usées.<br />
Des cheveux <strong>ou</strong> de<br />
la saleté obstruent<br />
les têtes de <strong>rasage</strong>.<br />
Débranchez le rasoir, puis<br />
appuyez sur le b<strong>ou</strong>ton<br />
Marche/Arrêt p<strong>ou</strong>r allumer<br />
le rasoir.<br />
Rechargez la batterie (voir le<br />
chapitre « Charge »).<br />
Appuyez sur le b<strong>ou</strong>ton<br />
marche/arrêt pendant<br />
3 <strong>sec</strong>ondes p<strong>ou</strong>r désactiver<br />
le verr<strong>ou</strong>illage.<br />
Remplacez les têtes de<br />
rasoir (voir le chapitre<br />
« Remplacement »).<br />
Nettoyez les têtes de <strong>rasage</strong><br />
(voir le chapitre « Nettoyage<br />
et entretien »).
Problème Cause possible Solution<br />
<strong>FRA</strong>NÇAIS 95<br />
J’ai remplacé<br />
les têtes de<br />
<strong>rasage</strong>, mais<br />
le rappel de<br />
remplacement<br />
continue de<br />
s’afficher.<br />
Un symbole de<br />
tête de <strong>rasage</strong><br />
est apparu<br />
s<strong>ou</strong>dainement<br />
sur l’afficheur.<br />
Un point<br />
d’exclamation<br />
est<br />
s<strong>ou</strong>dainement<br />
apparu sur<br />
l’afficheur alors<br />
que le rasoir<br />
était en charge.<br />
V<strong>ou</strong>s n’avez pas<br />
réinitialisé le rasoir.<br />
Ce symbole est<br />
un rappel de<br />
remplacement.<br />
Le rasoir a surchauffé.<br />
Nettoyez entièrement<br />
l’appareil avant de<br />
recommencer à v<strong>ou</strong>s raser.<br />
(voir le chapitre « Nettoyage<br />
et entretien »).<br />
Réinitialisez le rasoir en<br />
appuyant sur le b<strong>ou</strong>ton<br />
Marche/Arrêt pendant<br />
environ 7 <strong>sec</strong>ondes (voir le<br />
chapitre « Remplacement »).<br />
Remplacez les têtes de<br />
rasoir (voir le chapitre<br />
« Remplacement »).<br />
Déconnectez le rasoir<br />
de l’alimentation pendant<br />
environ 10 minutes.
96<br />
<strong>FRA</strong>NÇAIS<br />
Problème Cause possible Solution<br />
Un point<br />
d’exclamation,<br />
un rappel de<br />
remplacement<br />
et l’alarme de<br />
nettoyage sont<br />
s<strong>ou</strong>dainement<br />
apparus sur<br />
l’afficheur.<br />
De l’eau<br />
s’échappe du<br />
bas du rasoir.<br />
Le système<br />
de nettoyage<br />
SmartClean ne<br />
fonctionne pas<br />
lorsque j’appuie<br />
sur le b<strong>ou</strong>ton<br />
Marche/Arrêt.<br />
Le rasoir n’est<br />
pas t<strong>ou</strong>t à fait<br />
propre après<br />
son nettoyage<br />
à l’aide du<br />
système<br />
SmartClean.<br />
Les têtes de <strong>rasage</strong><br />
sont sales <strong>ou</strong><br />
endommagées.<br />
Pendant le nettoyage,<br />
de l’eau peut<br />
s’accumuler entre la<br />
partie interne et la<br />
coque externe du<br />
rasoir.<br />
Le système<br />
SmartClean n’est<br />
pas branché sur le<br />
<strong>sec</strong>teur.<br />
V<strong>ou</strong>s n’avez pas<br />
installé correctement<br />
le rasoir sur le<br />
système de nettoyage<br />
SmartClean, aucune<br />
connexion é<strong>lectrique</strong><br />
entre le système<br />
SmartClean et le<br />
rasoir ne peut donc<br />
être établie.<br />
Remplacez (voir le chapitre<br />
« Remplacement ») <strong>ou</strong><br />
nettoyez les têtes de <strong>rasage</strong><br />
(voir le chapitre « Nettoyage<br />
et entretien »).<br />
Ceci est normal et n’est<br />
pas dangereux, car t<strong>ou</strong>s les<br />
composants électroniques,<br />
logés à l’intérieur du bloc<br />
d’alimentation du rasoir,<br />
sont protégés par une<br />
protection hermétique.<br />
Enfoncez la petite fiche<br />
dans le système SmartClean,<br />
puis l’adaptateur dans la<br />
prise <strong>sec</strong>teur.<br />
Appuyez sur le capuchon<br />
supérieur (clic) p<strong>ou</strong>r garantir<br />
une connexion adéquate<br />
entre le rasoir et le système<br />
SmartClean.
Problème Cause possible Solution<br />
<strong>FRA</strong>NÇAIS 97<br />
Le rasoir n’est<br />
pas entièrement<br />
chargé après<br />
avoir été<br />
chargé à l’aide<br />
du système<br />
SmartClean.<br />
La cart<strong>ou</strong>che de<br />
nettoyage doit être<br />
remplacée.<br />
La cart<strong>ou</strong>che de<br />
nettoyage est<br />
vide. Le symbole<br />
de remplacement<br />
clignote p<strong>ou</strong>r<br />
indiquer que v<strong>ou</strong>s<br />
devez remplacer<br />
la cart<strong>ou</strong>che de<br />
nettoyage.<br />
V<strong>ou</strong>s avez utilisé un<br />
liquide de nettoyage<br />
autre que le liquide<br />
de la cart<strong>ou</strong>che de<br />
nettoyage <strong>Philips</strong>.<br />
L’évacuation de<br />
la cart<strong>ou</strong>che de<br />
nettoyage est peutêtre<br />
bloquée.<br />
V<strong>ou</strong>s n’avez pas<br />
installé le rasoir<br />
correctement dans le<br />
système de nettoyage<br />
SmartClean.<br />
Remplacez la cart<strong>ou</strong>che de<br />
nettoyage (voir le chapitre<br />
« Nettoyage et entretien »).<br />
Installez une n<strong>ou</strong>velle<br />
cart<strong>ou</strong>che de nettoyage<br />
dans le système SmartClean<br />
(voir le chapitre « Nettoyage<br />
et entretien »).<br />
Utilisez uniquement une<br />
cart<strong>ou</strong>che de nettoyage<br />
<strong>Philips</strong>.<br />
P<strong>ou</strong>ssez les poils en bas de<br />
l’évacuation à l’aide d’un<br />
cure-dents.<br />
Appuyez sur le capuchon<br />
supérieur (clic) p<strong>ou</strong>r garantir<br />
une connexion adéquate<br />
entre le rasoir et le système<br />
SmartClean.
98<br />
ITALIANO<br />
Introduzione<br />
Congratulazioni per l’acquisto e benvenuti in <strong>Philips</strong>!<br />
Per trarre il massimo vantaggio dall’assistenza <strong>Philips</strong>,<br />
registrate il vostro prodotto su www.philips.com/<br />
welcome<br />
Il presente manuale dell’utente contiene informazioni<br />
sulle funzioni di questo rasoio e utili suggerimenti<br />
per rendere la rasatura più semplice e confortevole.<br />
Descrizione generale (fig. 1)<br />
1 Pettine per l’accessorio regolabarba<br />
2 Accessorio regolabarba rimovibile<br />
3 Accessorio rifinitore rimovibile<br />
4 Unità di rasatura rimovibile<br />
5 Pulsante on/off<br />
6 Presa spinotto<br />
7 Punto esclamativo<br />
8 Promemoria di sostituzione<br />
9 Indicatore di ricarica della batteria<br />
10 Simbolo del blocco da viaggio<br />
11 Promemoria di pulizia<br />
12 Simbolo di sostituzione<br />
13 Sistema SmartClean<br />
14 Cappuccio del sistema SmartClean<br />
15 Pulsante on/off<br />
16 Simbolo di lavaggio<br />
17 Simbolo di asciugatura<br />
18 Simbolo apparecchio pronto<br />
19 Simbolo di ricarica<br />
20 Cartuccia di pulizia per il sistema SmartClean<br />
21 Adattatore<br />
22 Spinotto<br />
23 Supporto per anello d’arresto<br />
24 Custodia morbida
ITALIANO 99<br />
Nota: Gli accessori forniti potrebbero essere diversi in<br />
base ai prodotti. La confezione mostra gli accessori<br />
forniti con l’apparecchio.<br />
Importante<br />
Prima di utilizzare il rasoio e il sistema SmartClean,<br />
leggete attentamente il presente manuale utente e<br />
conservatelo per eventuali riferimenti futuri.<br />
Pericolo<br />
--<br />
Mantenete sempre asciutto l’adattatore.<br />
Avviso<br />
--<br />
L’adattatore contiene un trasformatore.<br />
Non tagliate l’adattatore per sostituirlo con<br />
un’altra spina onde evitare situazioni pericolose.<br />
--<br />
Quest’apparecchio può essere usato da bambini<br />
a partire da 8 anni di età e da persone con<br />
capacità mentali, fisiche o sensoriali ridotte, prive<br />
di esperienza o conoscenze adatte a condizione<br />
che tali persone abbiano ricevuto assistenza o<br />
formazione per utilizzare l’apparecchio in maniera<br />
sicura e capiscano i potenziali pericoli associati<br />
a tale uso. Evitate che i bambini giochino con<br />
l’apparecchio. La manutenzione e la pulizia non<br />
devono essere eseguite da bambini se non in<br />
presenza di un adulto.<br />
--<br />
Scollegate sempre la spina dal rasoio prima di<br />
pulirlo sotto l’acqua corrente.<br />
Attenzione<br />
--<br />
Non immergete mai in acqua il sistema<br />
SmartClean né sciacquatelo sotto l’acqua corrente.<br />
--<br />
Non utilizzate acqua ad una temperatura<br />
superiore a 80°C per sciacquare il rasoio.<br />
--<br />
Non usate il rasoio, il sistema SmartClean o altri<br />
componenti se danneggiati, in quanto potrebbero<br />
causare lesioni. Se danneggiati, sostituite sempre
100 ITALIANO<br />
l’adattatore o un altro componente con ricambi<br />
originali.<br />
--<br />
Utilizzate il sistema SmartClean solo con la<br />
cartuccia di pulizia originale.<br />
--<br />
Posizionate sempre il sistema SmartClean su<br />
una superficie stabile e orizzontale per evitare la<br />
fuoriuscita di liquido.<br />
--<br />
Assicuratevi sempre che il vano cartucce sia<br />
chiuso prima di utilizzare il sistema SmartClean<br />
per pulire o ricaricare il rasoio.<br />
--<br />
Quando il sistema SmartClean è pronto per<br />
l’uso, non spostatelo, per evitare la fuoriuscita del<br />
liquido per la pulizia.<br />
--<br />
Il sistema SmartClean consente di lavare<br />
accuratamente il rasoio, ma non di disinfettarlo.<br />
Si consiglia pertanto di non condividere il rasoio<br />
con altre persone.<br />
--<br />
Non usate aria compressa, prodotti o sostanze<br />
abrasive o detergenti aggressivi, come benzina o<br />
acetone, per pulire l’apparecchio.<br />
--<br />
Quando sciacquate l’apparecchio, potreste<br />
riscontrare una fuoriuscita di acqua dalla presa che<br />
si trova nella parte inferiore del rasoio. Si tratta<br />
di un fenomeno del tutto normale e sicuro, in<br />
quanto tutte le parti elettroniche sono racchiuse<br />
nel gruppo di alimentazione sigillato, all’interno del<br />
rasoio.<br />
Conformità agli standard<br />
--<br />
Il rasoio è impermeabile e conforme alle norme<br />
di sicurezza approvate a livello internazionale.<br />
Può essere usato in bagno o sotto la doccia<br />
e pulito sotto l’acqua corrente. Per ragioni di<br />
sicurezza, il rasoio può quindi essere utilizzato<br />
solo senza filo.
--<br />
Il rasoio e il sistema SmartClean sono conformi<br />
a tutte le norme e ai regolamenti applicabili<br />
riguardanti l’esposizione ai campi elettromagnetici.<br />
Indicazioni generali<br />
--<br />
L’apparecchio è provvisto di un selettore<br />
automatico di tensione ed è adatto per l’utilizzo<br />
con tensioni comprese fra 100 e 240 volt.<br />
--<br />
L’adattatore trasforma la tensione a 100-240 volt<br />
in una tensione più bassa e sicura inferiore ai<br />
24 volt.<br />
--<br />
Livello di rumorosità massimo: Lc = 69 dB(A)<br />
Il display<br />
ITALIANO 101<br />
Nota: Prima di utilizzare il rasoio la prima volta,<br />
rimuovete la pellicola protettiva dal display.<br />
--<br />
S91XX/S90XX<br />
Come ricaricare l’apparecchio<br />
--<br />
La ricarica richiede circa 1 ora.<br />
Nota: questo apparecchio può essere utilizzato solo<br />
senza filo.<br />
--<br />
Ricarica rapida: quando collegate l’apparecchio<br />
alla presa di corrente, viene emesso un segnale<br />
acustico. Le spie dell’indicatore di ricarica<br />
della batteria si accendono una dopo l’altra, in<br />
modo continuativo. Quando il rasoio dispone<br />
dell’autonomia sufficiente per una rasatura, la spia<br />
inferiore dell’indicatore di ricarica della batteria<br />
inizia a lampeggiare lentamente.<br />
--<br />
Se lasciate l’apparecchio collegato alla presa<br />
di corrente, la fase di ricarica continua.
102 ITALIANO<br />
Quindi, prima la spia inferiore e poi la <strong>sec</strong>onda<br />
spia lampeggiano in bianco e restano accese<br />
finché il rasoio non è completamente carico.<br />
Ricarica completa della batteria<br />
Nota: questo apparecchio può essere utilizzato solo<br />
senza filo.<br />
Nota: Quando la batteria è carica, il display si spegne<br />
automaticamente dopo 30 minuti. Quando si preme<br />
il pulsante on/off durante o dopo la ricarica, viene<br />
emesso un segnale acustico che indica che il rasoio è<br />
ancora collegato alla presa di corrente.<br />
--<br />
Quando la batteria è completamente carica,<br />
tutte le spie dell’indicatore di ricarica della batteria<br />
si accendono di luce bianca fissa.<br />
Batteria scarica<br />
--<br />
Quando la batteria è quasi scarica, la spia inferiore<br />
lampeggia in arancione e viene emesso un segnale<br />
acustico.<br />
Batteria residua<br />
--<br />
La carica residua della batteria è indicata dalle<br />
spie dell’indicatore di ricarica della batteria che si<br />
accendono di luce fissa.<br />
Promemoria di pulizia<br />
Per ottenere prestazioni di rasatura ottimali,<br />
si consiglia di pulire il rasoio dopo ogni utilizzo.<br />
--<br />
Quando spegnete il rasoio, il promemoria di<br />
pulizia lampeggia per indicare che è necessario<br />
pulire il rasoio.
ITALIANO 103<br />
Blocco da viaggio<br />
Per portare l’apparecchio in viaggio, è possibile<br />
bloccare il rasoio. Il blocco da viaggio impedisce che<br />
il rasoio venga acceso accidentalmente.<br />
Come attivare il blocco da viaggio<br />
1 Per attivare il blocco da viaggio, tenete<br />
premuto il pulsante on/off per circa 3 <strong>sec</strong>ondi.<br />
,,<br />
Quando attivate la funzione di blocco da viaggio,<br />
il simbolo del blocco da viaggio si accende di<br />
luce bianca fissa. Quando il blocco da viaggio è<br />
attivato, il rasoio emette un segnale acustico e il<br />
simbolo del blocco da viaggio lampeggia.<br />
Disattivazione della funzione di blocco<br />
da viaggio<br />
1 Tenete premuto il pulsante on/off per<br />
3 <strong>sec</strong>ondi.<br />
,,<br />
Il simbolo del blocco da viaggio lampeggia e<br />
quindi si accende fisso.<br />
Il rasoio è di nuovo pronto per l’uso.<br />
Nota: potete disattivare il blocco da viaggio collegando<br />
l’apparecchio alla presa di corrente.<br />
Sostituzione delle testine di rasatura<br />
Per ottenere prestazioni di rasatura ottimali, vi<br />
consigliamo di sostituire le testine di rasatura ogni<br />
due anni.<br />
--<br />
L’apparecchio è dotato di un promemoria<br />
che ricorda di sostituire le testine di rasatura.<br />
Il promemoria di sostituzione si accende di luce<br />
bianca fissa e le frecce lampeggiano in bianco.<br />
Viene emesso un segnale acustico per indicare che<br />
è necessario sostituire le testine di rasatura.
104 ITALIANO<br />
Nota: dopo aver sostituito le testine, è necessario<br />
ripristinare il rasoio premendo il pulsante on/off<br />
per 7 <strong>sec</strong>ondi.<br />
Punto esclamativo<br />
Testine di rasatura bloccate<br />
--<br />
Se le testine di rasatura si bloccano, il punto<br />
esclamativo si accende di luce fissa arancione.<br />
Il promemoria per la sostituzione e il promemoria<br />
di pulizia lampeggiano alternativamente in bianco<br />
e viene emesso un segnale acustico. In questo<br />
caso, il motore non funziona perché le testine di<br />
rasatura sono sporche o danneggiate.<br />
--<br />
In tal caso, è necessario pulire le testine di rasatura<br />
o sostituirle.<br />
Surriscaldamento<br />
--<br />
Se l’apparecchio si surriscalda durante la ricarica,<br />
il punto esclamativo lampeggia in arancione.<br />
--<br />
In tal caso, il rasoio si spegne automaticamente.<br />
La ricarica continua una volta che l’apparecchio<br />
torna alla temperatura normale.<br />
Come ricaricare l’apparecchio<br />
La ricarica richiede circa 1 ora.<br />
Quando il rasoio è completamente carico ha<br />
un’autonomia di rasatura massima di 50 minuti.<br />
Nota: non è possibile utilizzare l’apparecchio durante<br />
la ricarica.<br />
Il rasoio deve essere caricato prima di utilizzare<br />
l’apparecchio per la prima volta e quando il display<br />
indica che la batteria è quasi scarica.
ITALIANO 105<br />
Carica tramite adattatore<br />
1 Controllate che l’apparecchio sia spento.<br />
2 Inserite lo spinotto nell’apparecchio (1)<br />
e l’adattatore nella presa di corrente (2).<br />
Ricarica tramite sistema SmartClean<br />
(solo per modelli specifici)<br />
1 Collegate lo spinotto al sistema SmartClean.<br />
2 Inserite la spina dell’adattatore nella presa di<br />
corrente a muro.<br />
3 Premere il cappuccio superiore per inserire<br />
il rasoio nel supporto fino a farlo scattare in<br />
posizione.<br />
4 Tenete il rasoio elettrico capovolto sopra il<br />
supporto. Assicuratevi che la parte anteriore<br />
del rasoio sia rivolta verso il sistema<br />
SmartClean.<br />
5 Posizionate il rasoio nel supporto (1), inclinate<br />
il rasoio all’indietro (2) e premete verso il<br />
basso il cappuccio superiore per collegare<br />
il rasoio fino a che non scatta in posizione<br />
(“clic”) (3).<br />
Nota: Il simbolo della batteria lampeggia lentamente<br />
a indicare che l’apparecchio è in fase di ricarica.
106 ITALIANO<br />
Modalità d’uso del rasoio<br />
Rasatura<br />
Periodo di adattamento sulla pelle<br />
Le prime rasature potrebbero non avere il risultato<br />
che vi aspettate e la vostra pelle potrebbe anche<br />
irritarsi un po’. Questo è normale. La pelle e la barba<br />
hanno bisogno di tempo per adattarsi a qualunque<br />
nuovo sistema di rasatura.<br />
Vi consigliamo una rasatura regolare (almeno 3 volte a<br />
settimana) utilizzando questo rasoio per un periodo<br />
di 3 settimane per consentire alla pelle di adattarsi al<br />
nuovo rasoio.<br />
Consiglio: per risultati ottimali, si consiglia di regolare<br />
prima la barba se non vi siete rasati per più di 3 giorni.<br />
Nota: questo apparecchio può essere utilizzato solo<br />
senza filo.<br />
1 Premete il pulsante on/off per accendere il<br />
rasoio.<br />
,,<br />
Il display si illumina per alcuni <strong>sec</strong>ondi.<br />
2 Fate scorrere le testine di rasatura sulla pelle,<br />
compiendo movimenti circolari.<br />
--<br />
Non fate movimenti lineari.<br />
3 Premete il pulsante on/off per spegnere il<br />
rasoio.<br />
,,<br />
Il display si illumina per alcuni <strong>sec</strong>ondi, quindi<br />
viene visualizzata la carica residua della batteria.
ITALIANO 107<br />
Rasatura su pelle bagnata<br />
Potete usare questo rasoio anche sulla pelle del<br />
volto ricoperta di schiuma da barba o gel per la<br />
rasatura.<br />
Per radersi con la schiuma da barba o il gel per la<br />
rasatura, seguite i passaggi riportati sotto:<br />
1 Bagnate la pelle.<br />
2 Applicate quindi la schiuma da barba o il gel<br />
per la rasatura.<br />
3 Bagnate l’unità di rasatura sotto il rubinetto<br />
per fare in modo che l’unità di rasatura scorra<br />
facilmente sulla vostra pelle.<br />
4 Premete il pulsante on/off per accendere il<br />
rasoio.<br />
5 Fate scorrere le testine di rasatura sulla pelle,<br />
compiendo movimenti circolari.<br />
Nota: Risciacquate il rasoio sotto il rubinetto<br />
regolarmente per mantenere una perfetta<br />
scorrevolezza sulla pelle.<br />
6 Asciugate il viso e pulite a fondo il rasoio<br />
dopo l’uso (vedere il capitolo “Pulizia e<br />
manutenzione”).<br />
Nota: Rimuovete con cura tutta la schiuma o il gel<br />
dal rasoio.
108 ITALIANO<br />
Uso degli accessori rimovibili<br />
Nota: Gli accessori forniti potrebbero essere diversi in<br />
base ai prodotti. La confezione mostra gli accessori<br />
forniti con l’apparecchio.<br />
Uso del rifinitore<br />
Potete utilizzare il rifinitore per regolare basette e<br />
baffi.<br />
1 Estraete l’unità di rasatura dall’apparecchio.<br />
Nota: non ruotate l’unità di rasatura mentre la estraete<br />
dall’apparecchio.<br />
2 Inserite la linguetta del rifinitore nella fessura<br />
posta nella parte superiore del rasoio. A questo<br />
punto, premete il rifinitore verso il basso finché<br />
non scatta in posizione sull’apparecchio (“clic”).<br />
3 Premete il pulsante on/off per accendere<br />
l’apparecchio.<br />
,,<br />
Il display si illumina per alcuni <strong>sec</strong>ondi.<br />
4 A questo punto, potete iniziare a rifinire la barba.<br />
5 Premete una volta il pulsante on/off per<br />
spegnere l’apparecchio.<br />
,,<br />
Il display si illumina per alcuni <strong>sec</strong>ondi, quindi<br />
viene visualizzata la carica residua della batteria.<br />
6 Estraete il rifinitore dall’apparecchio.<br />
Nota: non ruotate il rifinitore mentre lo estraete<br />
dall’apparecchio.<br />
7 Inserite la linguetta dell’unità di rasatura nella<br />
fessura posta nella parte superiore del rasoio.<br />
A questo punto, premete l’unità di rasatura<br />
verso il basso finché non scatta in posizione<br />
sull’apparecchio (“clic”).
ITALIANO 109<br />
Uso dell’accessorio regolabarba<br />
1 Controllate che l’apparecchio sia spento.<br />
2 Estraete l’unità di rasatura dall’apparecchio.<br />
Nota: non ruotate l’unità di rasatura mentre la estraete<br />
dall’apparecchio.<br />
3 Inserite la linguetta dell’accessorio regolabarba<br />
nella fessura posta nella parte superiore del<br />
rasoio. A questo punto, premete l’accessorio<br />
regolabarba verso il basso finché non scatta in<br />
posizione sull’apparecchio (“clic”).<br />
Utilizzo dell’accessorio regolabarba con il<br />
pettine<br />
Per regolare la lunghezza della vostra barba potrete<br />
utilizzare l’accessorio regolabarba con il pettine<br />
abbinato. Le impostazioni di lunghezza di taglio<br />
dell’accessorio regolabarba corrispondono alla<br />
lunghezza residua dopo il taglio (da 1 a 5 mm).<br />
1 Fate scivolare il pettine nelle scanalature poste<br />
su entrambi i lati dell’accessorio regolabarba<br />
fino a che non scatta in posizione.<br />
2 Premete il selettore della lunghezza, quindi<br />
premetelo verso sinistra o verso destra<br />
per selezionare l’impostazione di lunghezza<br />
desiderata.<br />
3 Premete il pulsante on/off per accendere<br />
l’apparecchio.
110 ITALIANO<br />
4 Potete iniziare a regolare la vostra barba.<br />
Utilizzo dell’accessorio regolabarba senza<br />
il pettine<br />
Potete utilizzare l’accessorio regolabarba senza il<br />
pettine per definire il contorno della barba, dei baffi,<br />
delle basette o della nuca.<br />
1 Estraete il pettine dall’accessorio regolabarba.<br />
Nota: afferrate la parte centrale del pettine per<br />
staccarlo dall’accessorio regolabarba. Non tiratelo<br />
dai lati.<br />
2 Premete il pulsante on/off per accendere<br />
l’apparecchio.<br />
3 Potete ora definire il contorno della barba,<br />
dei baffi, delle basette e della nuca.<br />
Pulizia e manutenzione<br />
Nota: Gli accessori forniti potrebbero essere diversi in<br />
base ai prodotti. La confezione mostra gli accessori<br />
forniti con l’apparecchio.<br />
Pulizia del rasoio con il sistema SmartClean<br />
Il sistema SmartClean può essere di due tipi e,<br />
pertanto, le caratteristiche del vostro SmartClean<br />
potrebbero essere diverse in base al tipo specifico:<br />
--<br />
il sistema SmartClean Basic offre una sola fase: la<br />
fase di risciacquo.
ITALIANO 111<br />
--<br />
Il sistema SmartClean Plus presenta due fasi: la<br />
fase di risciacquo e la fase di asciugatura.<br />
Preparazione all’uso del sistema<br />
SmartClean<br />
non inclinate lo SmartClean per evitare la<br />
fuoriuscita di liquido.<br />
Nota: tenete in mano lo SmartClean mentre lo<br />
preparate per l’uso.<br />
1 Inserite lo spinotto nella parte posteriore del<br />
sistema SmartClean.<br />
2 Inserite la spina dell’adattatore nella presa di<br />
corrente a muro.<br />
3 Premete il pulsante sul lato del sistema<br />
SmartClean (1) ed estraete la parte superiore<br />
del sistema SmartClean (2).<br />
4 Rimuovete il sigillo dalla cartuccia di pulizia.<br />
5 Posizionate la cartuccia di pulizia nel sistema<br />
SmartClean.
112 ITALIANO<br />
6 Spingete la parte superiore del sistema<br />
SmartClean verso il basso fino a farlo scattare<br />
in posizione (“clic”).<br />
Uso del sistema SmartClean<br />
verificate sempre di rimuovere l’acqua in eccesso<br />
dal rasoio prima di riporlo nello SmartClean.<br />
1 Premere il cappuccio superiore per inserire<br />
il rasoio nel supporto fino a farlo scattare in<br />
posizione.<br />
2 Tenete il rasoio elettrico capovolto sopra il<br />
supporto. Assicuratevi che la parte anteriore<br />
del rasoio sia rivolta verso il sistema<br />
SmartClean.<br />
3 Posizionate il rasoio nel supporto (1), inclinate<br />
il rasoio all’indietro (2) e premete verso il<br />
basso il cappuccio superiore per collegare<br />
il rasoio fino a che non scatta in posizione<br />
(“clic”) (3).<br />
,,<br />
Il simbolo della batteria inizia a lampeggiare a<br />
indicare che il rasoio è in fase di ricarica.
ITALIANO 113<br />
4 Premete il pulsante on/off del sistema<br />
SmartClean per avviare il programma di pulizia.<br />
,,<br />
Durante la fase di risciacquo, il relativo simbolo<br />
lampeggia.<br />
Nota: la fase di risciacquo dura circa 10 minuti.<br />
,,<br />
Solo sistemi SmartClean Plus:<br />
Durante la fase di asciugatura, il relativo simbolo<br />
lampeggia.<br />
Nota: la fase di asciugatura richiede circa 4 ore.<br />
,,<br />
Quando il programma di pulizia è stato<br />
completato, il simbolo di apparecchio pronto si<br />
accende di luce fissa.<br />
,,<br />
Il simbolo della batteria si accende di luce fissa<br />
ad indicare che il rasoio è completamente carico.<br />
Nota: La ricarica richiede circa 1 ora.<br />
Nota: se premete il pulsante on/off del sistema<br />
SmartClean durante il programma di pulizia, il<br />
programma viene interrotto. In questo caso, il simbolo<br />
di asciugatura o di risciacquo smette di lampeggiare.<br />
Nota: se rimuovete l’adattatore dalla presa di corrente<br />
durante il programma di pulizia, il programma viene<br />
interrotto.<br />
Nota: dopo 30 minuti dal completamento del<br />
programma di pulizia e della ricarica, SmartClean<br />
si spegne automaticamente.
114 ITALIANO<br />
Sostituzione della cartuccia del sistema<br />
SmartClean<br />
--<br />
Sostituite la cartuccia di pulizia quando il simbolo<br />
di sostituzione lampeggia in arancione o quando<br />
non siete più soddisfatti dei risultati.<br />
1 Premete il pulsante sul lato del sistema<br />
SmartClean (1) ed estraete la parte superiore<br />
del sistema SmartClean (2).<br />
2 Estraete la cartuccia di pulizia vuota dal<br />
sistema SmartClean e svuotate la cartuccia<br />
dall’eventuale liquido detergente residuo.<br />
Potete versare il liquido detergente direttamente<br />
nel lavandino.<br />
3 Gettate la cartuccia di pulizia vuota.<br />
4 Estraete la nuova cartuccia di pulizia e togliete<br />
il sigillo della cartuccia.<br />
5 Inserite la nuova cartuccia di pulizia nel sistema<br />
SmartClean.<br />
6 Spingete la parte superiore del sistema<br />
SmartClean verso il basso fino a farlo scattare<br />
in posizione (“clic”).<br />
Pulizia del rasoio sotto l’acqua corrente<br />
Pulite il rasoio dopo ogni sessione di rasatura per<br />
ottenere prestazioni ottimali.<br />
Prestate particolare attenzione quando utilizzate<br />
l’acqua calda: verificate sempre che non sia troppo<br />
calda per evitare di scottarvi.
ITALIANO 115<br />
Non asciugate l’unità di rasatura con un panno o<br />
asciugamano per evitare di danneggiare le testine<br />
di rasatura.<br />
1 Sciacquate per un po’ l’unità di rasatura<br />
sotto acqua corrente calda.<br />
2 Estraete il supporto della testina di rasatura<br />
dalla parte inferiore dell’unità di rasatura.<br />
3 Sciacquate il supporto della testina di rasatura<br />
sotto l’acqua calda corrente.<br />
4 Eliminate con cura l’acqua in eccesso e<br />
attendete che il supporto della testina di<br />
rasatura si asciughi.<br />
5 Reinserite il supporto della testina di rasatura<br />
sulla parte inferiore dell’unità di rasatura (“clic”).<br />
Metodo di pulizia accurata<br />
Controllate che l’apparecchio sia spento.<br />
1 Estraete il supporto della testina di rasatura<br />
dalla parte inferiore dell’unità di rasatura.
116 ITALIANO<br />
2 Posizionate il supporto per l’anello d’arresto<br />
sull’anello d’arresto (1), ruotatelo in senso<br />
antiorario (2) e rimuovetelo dalla testina di<br />
rasatura (3).<br />
Rimuovete l’anello d’arresto dal supporto e ripetete<br />
la procedura per gli altri anelli di arresto.<br />
3 Rimuovete le testine di rasatura dal supporto<br />
della testina di rasatura. Ogni testina di<br />
rasatura è composta da una lama e da un<br />
paralama.<br />
Nota: non pulite più di una lama e di un paralama<br />
alla volta, per evitare di scambiarli. In caso venissero<br />
accidentalmente scambiati, potrebbero trascorrere<br />
alcune settimane prima di ottenere nuovamente<br />
risultati di rasatura ottimali.<br />
4 Pulite la lama e il paralama sotto l’acqua<br />
corrente.<br />
5 Dopo la pulizia, riposizionate la lama nel<br />
paralama.<br />
6 Riposizionate le testine di rasatura all’interno<br />
del supporto per le testine di rasatura.<br />
Nota: Controllate che le tacche riportate su entrambi<br />
i lati delle testine di rasatura combacino esattamente<br />
con le sporgenze del portatestina di rasatura.
ITALIANO 117<br />
7 Posizionate il supporto per l’anello d’arresto<br />
sull’anello d’arresto (1), posizionatelo sulla<br />
testina di rasatura (2) e ruotatelo in senso<br />
orario (3) per bloccare nuovamente l’anello<br />
d’arresto.<br />
Ripetere questa procedura per gli altri anelli<br />
d’arresto.<br />
Nota: Quando inserite le testine di rasatura e fissate<br />
gli anelli di arresto, tenete il portatestina e non<br />
posizionatelo su una superficie, onde evitare danni.<br />
8 Reinserite il supporto della testina di rasatura<br />
sulla parte inferiore dell’unità di rasatura.<br />
Pulizia degli accessori rimovibili<br />
Pulizia del rifinitore<br />
Pulite il rifinitore dopo ogni utilizzo.<br />
1 Accendete l’apparecchio con il rifinitore<br />
inserito.<br />
2 Sciacquate il rifinitore tenendolo per un po’<br />
sotto acqua corrente calda.<br />
3 Eliminate con cura l’acqua in eccesso e<br />
attendete che il rifinitore si asciughi.<br />
4 Dopo la pulizia, spegnete l’apparecchio.<br />
Consiglio: Per ottenere prestazioni ottimali, lubrificate i<br />
dentini del tagliabasette ogni sei mesi, utilizzando una<br />
goccia di olio per macchina da cucire.
118 ITALIANO<br />
Pulizia dell’accessorio regolabarba<br />
Pulite l’accessorio regolabarba dopo ogni utilizzo.<br />
1 Estraete il pettine dall’accessorio regolabarba.<br />
2 Sciacquate separatamente l’accessorio<br />
regolabarba e il pettine sotto un getto di acqua<br />
calda per alcuni minuti.<br />
3 Eliminate con cura l’acqua in eccesso e<br />
attendete che l’accessorio regolabarba e il<br />
pettine si asciughino.<br />
4 Lubrificate i dentini ogni sei mesi, utilizzando<br />
una goccia di olio per macchina da cucire.<br />
Conservazione<br />
1 Riponete il rasoio nell’apposita custodia.<br />
Nota: vi consigliamo di far asciugare il rasoio prima di<br />
riporlo nella custodia.<br />
Sostituzione<br />
Sostituzione delle testine di rasatura<br />
Per ottenere prestazioni di rasatura ottimali,<br />
vi consigliamo di sostituire le testine di rasatura<br />
ogni due anni.<br />
Promemoria di sostituzione<br />
Il simbolo dell’unità di rasatura si accende per<br />
indicare che è necessario sostituire le testine.<br />
Sostituite subito le testine di rasatura danneggiate.<br />
Sostituitele solo con testine di rasatura <strong>Philips</strong><br />
SH90 originali.
ITALIANO 119<br />
1 Il simbolo dell’unità di rasatura si accende di<br />
luce fissa, le frecce lampeggiano in bianco e<br />
viene emesso un segnale acustico quando il<br />
rasoio viene spento.<br />
2 Estraete il supporto della testina di rasatura<br />
dalla parte inferiore dell’unità di rasatura.<br />
3 Posizionate il supporto per l’anello d’arresto<br />
sull’anello d’arresto (1), ruotatelo in senso<br />
antiorario (2) e rimuovetelo dalla testina di<br />
rasatura (3).<br />
Rimuovete l’anello d’arresto dal supporto e ripetete<br />
la procedura per gli altri anelli di arresto.<br />
4 Rimuovete le testine di rasatura dal loro<br />
supporto e gettatele.<br />
5 Inserite nuove testine di rasatura sul supporto.<br />
Nota: Controllate che le tacche riportate su entrambi<br />
i lati delle testine di rasatura combacino esattamente<br />
con le sporgenze del portatestina di rasatura.
120 ITALIANO<br />
6 Posizionate il supporto per l’anello d’arresto<br />
sull’anello d’arresto (1), posizionatelo sulla<br />
testina di rasatura (2) e ruotatelo in senso<br />
orario (3) per bloccare nuovamente l’anello<br />
d’arresto.<br />
Ripetere questa procedura per gli altri anelli<br />
d’arresto.<br />
Nota: Quando inserite le testine di rasatura e fissate<br />
gli anelli di arresto, tenete il portatestina e non<br />
posizionatelo su una superficie, onde evitare danni.<br />
7 Reinserite il supporto della testina di rasatura<br />
sulla parte inferiore dell’unità di rasatura.<br />
8 Per ripristinare il rasoio, tenete premuto<br />
il pulsante on/off per circa 7 <strong>sec</strong>ondi.<br />
Attendete fino a quando vengono emessi<br />
due segnali acustici.<br />
Ordinazione degli accessori<br />
Per acquistare accessori o parti di ricambio, visitate<br />
il sito www.shop.philips.com/service oppure<br />
recatevi presso il vostro rivenditore <strong>Philips</strong>. Potete<br />
contattare anche il Centro Assistenza Clienti<br />
<strong>Philips</strong> del vostro paese (per i dettagli di contatto,<br />
consultate l’opuscolo della garanzia internazionale).<br />
Parti di ricambio disponibili:<br />
--<br />
Adattatore HQ8505<br />
--<br />
Testine di rasatura <strong>Philips</strong> SH90<br />
--<br />
Spray detergente per testine HQ110 <strong>Philips</strong><br />
--<br />
Accessorio regolabarba <strong>Philips</strong> RQ111<br />
--<br />
Accessorio spazzola di pulizia <strong>Philips</strong> RQ585<br />
--<br />
Testine di pulizia <strong>Philips</strong> RQ560/RQ563<br />
--<br />
Cartuccia di pulizia JC301/JC302/JC303/JC304/JC305
ITALIANO 121<br />
Testine di rasatura<br />
--<br />
Vi consigliamo di sostituire le testine di rasatura<br />
ogni due anni. Sostituite sempre le testine di<br />
rasatura con testine di rasatura originali <strong>Philips</strong><br />
SH90.<br />
Riciclaggio<br />
--<br />
Questo simbolo indica che il prodotto è<br />
conforme alla Direttiva europea 2012/19/EU.<br />
--<br />
Questo simbolo indica che il prodotto contiene una<br />
batteria ricaricabile conforme alla direttiva europea<br />
2006/66/CE e che quindi non può essere smaltita<br />
con i normali rifiuti domestici. Vi consigliamo di<br />
portare l’apparecchio presso un punto di raccolta<br />
o un centro assistenza <strong>Philips</strong> dove un tecnico<br />
provvederà alla rimozione della batteria.<br />
--<br />
Informatevi sulle normative locali relative alla<br />
raccolta differenziata dei prodotti elettrici ed<br />
elettronici e delle batterie ricaricabili. Attenetevi<br />
alle normative locali e non smaltite il prodotto e le<br />
batterie ricaricabili con i normali rifiuti domestici.<br />
Lo smaltimento corretto dei vostri prodotti usati<br />
contribuisce a prevenire potenziali effetti negativi<br />
sull’ambiente e sulla salute.
122 ITALIANO<br />
Rimozione della batteria ricaricabile del rasoio<br />
Nota: consigliamo di far rimuovere la batteria<br />
ricaricabile da un tecnico.<br />
rimuovete la batteria ricaricabile solo quando avete<br />
deciso di gettare il rasoio. Prima di rimuoverla,<br />
assicuratevi che sia completamente scarica.<br />
Attenzione: le estremità delle batterie sono<br />
molto affilate!<br />
1 Inserite il cacciavite nella fessura tra pannello<br />
anteriore e posteriore nella parte inferiore<br />
dell’apparecchio. Rimuovete il pannello<br />
posteriore.<br />
2 Rimuovete il pannello anteriore.<br />
3 Allentate le due viti poste sulla parte superiore<br />
del pannello interno e rimuovete il pannello<br />
interno.<br />
4 Rimuovete la batteria ricaricabile utilizzando un<br />
cacciavite.<br />
Garanzia e assistenza<br />
Per assistenza o informazioni, visitate il sito Web<br />
all’indirizzo www.philips.com/support oppure<br />
leggete l’opuscolo della garanzia internazionale.<br />
Limitazioni della garanzia<br />
Le testine di rasatura (lame e paralame) non sono<br />
coperte dalla garanzia internazionale perché sono<br />
componenti soggetti a usura.
Risoluzione dei problemi<br />
Questo capitolo riassume i problemi più comuni<br />
che potreste riscontrare con l’apparecchio. Se non<br />
riuscite a risolvere il problema con le informazioni<br />
riportate sotto, visitate il sito www.philips.com/<br />
support per un elenco di domande frequenti o<br />
contattate il centro assistenza clienti del vostro paese.<br />
Problema Possibile causa Soluzione<br />
ITALIANO 123<br />
Il rasoio non<br />
funziona<br />
premendo il<br />
pulsante on/off.<br />
Perché il rasoio<br />
non funziona<br />
come al solito?<br />
Il rasoio è ancora<br />
collegato alla presa<br />
di corrente. Per<br />
motivi di sicurezza,<br />
il rasoio può essere<br />
utilizzato solo senza<br />
filo.<br />
La batteria<br />
ricaricabile è<br />
scarica.<br />
Il blocco da viaggio<br />
è attivo.<br />
Le testine di<br />
rasatura sono<br />
danneggiate o<br />
usurate.<br />
Peli o sporcizia<br />
ostruiscono le<br />
testine di rasatura.<br />
Scollegate la spina del rasoio<br />
e premete il pulsante on/off<br />
per accenderlo.<br />
Ricaricate la batteria<br />
(vedere il capitolo “Carica”).<br />
Per disattivare il blocco da<br />
viaggio, tenete premuto il<br />
pulsante on/off per circa<br />
3 <strong>sec</strong>ondi.<br />
Sostituite le testine di<br />
rasatura (vedere il capitolo<br />
“Sostituzione”).<br />
Pulite accuratamente le<br />
testine di rasatura (vedere<br />
il capitolo “Pulizia e<br />
manutenzione”).
124 ITALIANO<br />
Problema Possibile causa Soluzione<br />
Ho sostituito le<br />
testine di rasatura,<br />
ma il promemoria<br />
per la sostituzione<br />
viene ancora<br />
visualizzato.<br />
Sul display<br />
è comparso<br />
improvvisamente<br />
il simbolo della<br />
testina di rasatura.<br />
Durante la<br />
ricarica, sul display<br />
è comparso<br />
improvvisamente<br />
un punto<br />
esclamativo.<br />
Sul display<br />
sono comparsi<br />
improvvisamente<br />
un punto<br />
esclamativo, il<br />
promemoria di<br />
sostituzione e il<br />
promemoria di<br />
pulizia.<br />
Non avete<br />
ripristinato il rasoio.<br />
Questo simbolo è<br />
un promemoria di<br />
sostituzione.<br />
Il rasoio si è<br />
surriscaldato.<br />
Le testine di<br />
rasatura sono<br />
sporche o<br />
danneggiate.<br />
Pulite il rasoio<br />
accuratamente prima di<br />
continuare la rasatura<br />
(vedere il capitolo “Pulizia e<br />
manutenzione”).<br />
Ripristinate il rasoio<br />
premendo il pulsante on/off<br />
per 7 <strong>sec</strong>ondi (vedere il<br />
capitolo “Sostituzione”).<br />
Sostituite le testine di<br />
rasatura (vedere il capitolo<br />
“Sostituzione”).<br />
Scollegate il rasoio dalla<br />
presa di corrente per circa<br />
10 minuti.<br />
Sostituite (vedere il capitolo<br />
“Sostituzione”) o pulite<br />
le testine di rasatura<br />
(vedere il capitolo “Pulizia e<br />
manutenzione”).
Problema Possibile causa Soluzione<br />
ITALIANO 125<br />
Dalla parte<br />
inferiore del<br />
rasoio fuoriesce<br />
acqua.<br />
Il sistema<br />
SmartClean<br />
non funziona<br />
premendo il<br />
pulsante on/off.<br />
Dopo la pulizia<br />
all’interno<br />
del sistema<br />
SmartClean il<br />
rasoio non è<br />
totalmente pulito.<br />
Durante la pulizia,<br />
si può accumulare<br />
dell’acqua tra il<br />
corpo interno e<br />
l’involucro esterno<br />
del rasoio.<br />
Il sistema<br />
SmartClean<br />
non è collegato<br />
all’alimentazione.<br />
Non avete<br />
posizionato il<br />
rasoio nel sistema<br />
SmartClean<br />
correttamente e<br />
non vi è quindi<br />
alcun collegamento<br />
elettrico tra il<br />
sistema SmartClean<br />
ed il rasoio stesso.<br />
La cartuccia di<br />
pulizia deve essere<br />
sostituita.<br />
Si tratta di un fenomeno<br />
del tutto normale e sicuro,<br />
in quanto tutte le parti<br />
elettroniche sono racchiuse<br />
in un guscio sigillato,<br />
all’interno del rasoio.<br />
Inserite lo spinotto nel<br />
sistema SmartClean<br />
e inserite la spina<br />
dell’adattatore nella presa di<br />
corrente a muro.<br />
Premete verso il basso il<br />
cappuccio superiore fino a<br />
che non scatta in posizione<br />
(“clic”) per assicurare un<br />
collegamento corretto<br />
tra il rasoio e il sistema<br />
SmartClean.<br />
Sostituite la cartuccia di<br />
pulizia (vedere il capitolo<br />
“Pulizia e manutenzione”).
126 ITALIANO<br />
Problema Possibile causa Soluzione<br />
Il rasoio non<br />
è caricato<br />
completamente<br />
dopo la ricarica<br />
nel sistema<br />
SmartClean.<br />
La cartuccia di<br />
pulizia è vuota.<br />
Il simbolo di<br />
sostituzione<br />
lampeggia per<br />
indicare che<br />
è necessario<br />
sostituire la<br />
cartuccia di pulizia.<br />
Avete usato un<br />
liquido detergente<br />
diverso dalla<br />
cartuccia di pulizia<br />
originale <strong>Philips</strong>.<br />
Lo scarico della<br />
cartuccia di pulizia<br />
potrebbe essere<br />
bloccato.<br />
Non avete<br />
posizionato il<br />
rasoio nel sistema<br />
SmartClean<br />
correttamente.<br />
Posizionate una nuova<br />
cartuccia di pulizia nel<br />
sistema SmartClean<br />
(vedere il capitolo “Pulizia e<br />
manutenzione”).<br />
Utilizzate solo la cartuccia di<br />
pulizia <strong>Philips</strong>.<br />
Rimuovete i peli<br />
dallo scarico con uno<br />
stuzzicadenti.<br />
Premete verso il basso il<br />
cappuccio superiore fino a<br />
che non scatta in posizione<br />
(“clic”) per assicurare un<br />
collegamento corretto<br />
tra il rasoio e il sistema<br />
SmartClean.
PORTUGUÊS 127<br />
Introdução<br />
Parabéns pela sua compra e bem-vindo à <strong>Philips</strong>!<br />
Para tirar todo o partido da assistência fornecida pela<br />
<strong>Philips</strong>, registe o seu produto em www.philips.com/<br />
welcome.<br />
Leia este manual do utilizador, visto que contém<br />
informações sobre as funcionalidades desta máquina<br />
de barbear, bem como algumas sugestões para se<br />
barbear de forma mais fácil e agradável.<br />
Descrição geral (fig. 1)<br />
1 Pente para acessório estilizador de barba<br />
2 Acessório estilizador de barba de encaixe<br />
3 Acessório aparador de encaixe<br />
4 Elemento de corte de encaixe<br />
5 Botão ligar/desligar<br />
6 Tomada para ficha pequena<br />
7 Ponto de exclamação<br />
8 Lembrete de substituição<br />
9 Indicador de carga da bateria<br />
10 Símbolo do bloqueio de viagem<br />
11 Aviso de limpeza<br />
12 Símbolo da substituição<br />
13 Sistema SmartClean<br />
14 Tampa do sistema SmartClean<br />
15 Botão ligar/desligar<br />
16 Símbolo de limpeza<br />
17 Símbolo de <strong>sec</strong>agem<br />
18 Símbolo de pronto<br />
19 Símbolo de carregamento<br />
20 Recarga de limpeza para sistema SmartClean<br />
21 Transformador<br />
22 Ficha pequena<br />
23 Suporte do anel de retenção<br />
24 Bolsa
128 PORTUGUÊS<br />
Nota: Os acessórios fornecidos podem variar consoante<br />
os diferentes produtos. A caixa mostra os acessórios<br />
que são fornecidos com o seu aparelho.<br />
Importante<br />
Leia cuidadosamente este manual do utilizador<br />
antes de utilizar a máquina de barbear e o sistema<br />
SmartClean. Guarde este manual do utilizador para<br />
uma eventual consulta futura.<br />
Perigo<br />
--<br />
Mantenha o adaptador <strong>sec</strong>o.<br />
Aviso<br />
--<br />
O adaptador contém um transformador. Não<br />
corte o adaptador para o substituir por <strong>ou</strong>tro,<br />
porque isso poderá dar origem a situações de<br />
perigo.<br />
--<br />
Este aparelho pode ser utilizado por crianças<br />
com idade igual <strong>ou</strong> superior a 8 anos e por<br />
pessoas com capacidades físicas, sensoriais <strong>ou</strong><br />
mentais reduzidas, <strong>ou</strong> com falta de experiência<br />
e conhecimento, caso sejam supervisionadas<br />
<strong>ou</strong> tenham recebido instruções relativas à<br />
utilização segura do aparelho e se tiverem sido<br />
alertadas para os perigos envolvidos. As crianças<br />
não podem brincar com o aparelho. A limpeza<br />
e a manutenção do utilizador não podem ser<br />
efectuadas por crianças sem supervisão.<br />
--<br />
Antes de lavar em água corrente, desligue sempre<br />
a máquina de barbear da corrente.
PORTUGUÊS 129<br />
Cuidado<br />
--<br />
Nunca imerja o sistema SmartClean em água nem<br />
o enxagúe em água corrente.<br />
--<br />
Não lave a máquina de barbear em água de<br />
temperatura superior a 80 °C.<br />
--<br />
Não utilize a máquina de barbear, o sistema<br />
SmartClean, o transformador nem qualquer<br />
<strong>ou</strong>tra peça que esteja danificada, visto que isto<br />
pode causar ferimentos. Substitua sempre um<br />
transformador <strong>ou</strong> uma peça danificada por um<br />
equivalente de origem.<br />
--<br />
Utilize apenas o sistema SmartClean com a<br />
recarga de limpeza original.<br />
--<br />
Coloque sempre o sistema SmartClean sobre<br />
uma superfície estável, plana e horizontal para<br />
evitar fugas.<br />
--<br />
Certifique-se sempre de que o compartimento<br />
da recarga está fechado antes de utilizar o sistema<br />
SmartClean para limpar <strong>ou</strong> carregar a máquina de<br />
barbear.<br />
--<br />
Quando o sistema SmartClean estiver pronto a<br />
utilizar, não deve ser deslocado para não haver<br />
fugas do líquido de limpeza.<br />
--<br />
O sistema SmartClean limpa em profundidade,<br />
mas não desinfecta a sua máquina de barbear, por<br />
isso não deve ser partilhado com <strong>ou</strong>tras pessoas.<br />
--<br />
Nunca utilize ar comprimido, esfregões, agentes de<br />
limpeza abrasivos <strong>ou</strong> líquidos agressivos, tais como<br />
petróleo <strong>ou</strong> acetona, para limpar o aparelho.<br />
--<br />
Pode pingar água da tomada na base da máquina<br />
de barbear ao enxaguá-la em água corrente.<br />
É normal e não é perigoso porque todos os<br />
componentes eléctricos estão protegidos numa<br />
unidade de alimentação selada no interior da<br />
máquina de barbear.
130 PORTUGUÊS<br />
Conformidade com as normas<br />
--<br />
Esta máquina de barbear está em conformidade<br />
com as normas de segurança aprovadas<br />
internacionalmente. Esta é adequada para<br />
utilização na banheira <strong>ou</strong> no chuveiro e para<br />
limpeza em água corrente. Para razões de<br />
segurança, a máquina de barbear só pode ser<br />
utilizada sem fios.<br />
--<br />
A máquina de barbear e o sistema SmartClean<br />
cumprem todas as normas e regulamentos<br />
aplicáveis relativos à exposição a campos<br />
electromagnéticos.<br />
Geral<br />
--<br />
O transformador está equipado com um selector<br />
de voltagem automático e está preparado para<br />
voltagens entre os 100 e 240 volts.<br />
--<br />
O adaptador transforma 100-240 volts numa<br />
tensão segura e baixa inferior a 24 volts.<br />
--<br />
Nível máximo de ruído: Lc = 69 dB(A)<br />
Visor<br />
Nota: Antes de utilizar a máquina de barbear pela<br />
primeira vez, retire a película de protecção do visor.<br />
--<br />
S91XX/S90XX<br />
Carregamento<br />
--<br />
O carregamento demora aprox. 1 hora.<br />
Nota: Este aparelho só pode ser utilizado sem fios.<br />
--<br />
Carga rápida: quando liga o aparelho à corrente<br />
eléctrica, este emite um som. Em seguida, as luzes<br />
do indicador de carga da bateria acendem-se
PORTUGUÊS 131<br />
progressivamente uma após a <strong>ou</strong>tra. Quando a<br />
máquina de barbear contém energia suficiente para<br />
um barbear completo, a luz inferior do indicador de<br />
carga da bateria apresenta uma intermitência lenta.<br />
--<br />
Se deixar o aparelho ligado à corrente eléctrica, o<br />
processo de carregamento continua. Para indicar<br />
que o aparelho está a carregar, primeiro a luz<br />
inferior fica intermitente a branco e, em seguida,<br />
mantém-se continuamente acesa a branco.<br />
Seguidamente, a segunda luz fica intermitente e<br />
depois mantém-se continuamente acesa, e assim<br />
con<strong>sec</strong>utivamente até a máquina de barbear estar<br />
totalmente carregada.<br />
Bateria completamente carregada<br />
Nota: Este aparelho só pode ser utilizado sem fios.<br />
Nota: Quando a bateria está totalmente carregada, o<br />
visor desliga-se automaticamente depois de 30 minutos.<br />
Quando premir o botão ligar/desligar durante <strong>ou</strong> após<br />
o carregamento, é emitido um som para indicar que<br />
a máquina ainda está ligada à corrente eléctrica.<br />
--<br />
Quando a bateria está completamente carregada,<br />
todas as luzes do indicador de carga da bateria<br />
mantêm-se continuamente acesas a branco.<br />
Bateria fraca<br />
--<br />
Quando a bateria estiver quase vazia, a luz inferior<br />
fica intermitente a cor de laranja e é emitido um som.
132 PORTUGUÊS<br />
Capacidade restante da bateria<br />
--<br />
A capacidade restante da bateria é indicada pelas<br />
luzes do indicador de carga da bateria que se<br />
mantêm continuamente acesas.<br />
Aviso de limpeza<br />
Para obter o melhor desempenho da máquina de<br />
barbear, é aconselhável limpar a máquina de barbear<br />
após cada utilização.<br />
--<br />
Quando desliga a máquina de barbear, o aviso de<br />
limpeza fica intermitente para o avisar que deve<br />
limpar a máquina de barbear.<br />
Bloqueio de viagem<br />
Pode bloquear a máquina de barbear quando viaja.<br />
O bloqueio de viagem evita que a máquina de<br />
barbear se ligue acidentalmente.<br />
Activar o bloqueio de viagem<br />
1 Prima o botão ligar/desligar durante<br />
3 segundos para aceder ao modo de bloqueio<br />
de viagem.<br />
,,<br />
Quando activar o bloqueio de viagem, o<br />
símbolo do bloqueio de viagem mantém-se<br />
continuamente aceso a branco. Quando o<br />
bloqueio de viagem está activado, a máquina de<br />
barbear emite um som e o símbolo do bloqueio<br />
de viagem fica intermitente.<br />
Desactivar o bloqueio de viagem<br />
1 Prima o botão ligar/desligar durante três segundos.<br />
,,<br />
O símbolo do bloqueio de viagem fica<br />
intermitente e, em seguida, mantém-se<br />
continuamente aceso.<br />
A máquina de barbear está pronta para ser<br />
novamente utilizada.
PORTUGUÊS 133<br />
Nota: Também pode desactivar o bloqueio de viagem<br />
ligando o aparelho à corrente eléctrica.<br />
Substituição das cabeças de corte<br />
Para o desempenho máximo de corte, é aconselhável<br />
substituir as cabeças de corte a cada dois anos.<br />
--<br />
O aparelho está equipado com um lembrete de<br />
substituição que o avisa que deve substituir as<br />
cabeças de corte. O lembrete de substituição<br />
mantém-se continuamente aceso a branco e as<br />
setas ficam intermitentes a branco. É emitido um<br />
sinal sonoro para indicar que tem de substituir as<br />
cabeças de corte.<br />
Nota: Depois de substituir as cabeças de corte, tem<br />
de repor a máquina de barbear premindo o botão<br />
ligar/desligar durante 7 segundos.<br />
Ponto de exclamação<br />
Cabeças de corte bloqueadas<br />
--<br />
Se as cabeças de corte estiverem bloqueadas, o<br />
ponto de exclamação mantém-se continuamente<br />
aceso a cor de laranja. O lembrete de substituição<br />
e o aviso de limpeza ficam intermitentes a branco<br />
alternadamente e é emitido um som. Neste caso,<br />
o motor não pode funcionar porque as cabeças<br />
de corte estão sujas <strong>ou</strong> danificadas.<br />
--<br />
Quando isto acontece, tem de limpar <strong>ou</strong> substituir<br />
as cabeças de corte.<br />
Sobreaquecimento<br />
--<br />
Se o aparelho sobreaquecer durante o<br />
carregamento, o ponto de exclamação fica<br />
intermitente a cor de laranja.<br />
--<br />
Se isto acontecer, a máquina de barbear desligase<br />
automaticamente. O carregamento continua<br />
quando o aparelho voltar à temperatura normal.
134 PORTUGUÊS<br />
Carregamento<br />
O carregamento demora aprox. 1 hora.<br />
Uma máquina de barbear completamente carregada<br />
tem uma autonomia de até 50 minutos.<br />
Nota: Não pode utilizar o aparelho enquanto este carrega.<br />
Carregue a máquina de barbear antes de a utilizar<br />
pela primeira vez e quando o visor indicar que a<br />
bateria está quase vazia.<br />
Carregar com o adaptador<br />
1 Certifique-se de que o aparelho está desligado.<br />
2 Introduza a ficha pequena no aparelho (1)<br />
e ligue o adaptador à tomada eléctrica (2).<br />
Carregamento no sistema SmartClean<br />
(apenas modelos específicos)<br />
1 Introduza a ficha pequena no sistema<br />
SmartClean.<br />
2 Ligue o adaptador à tomada eléctrica.<br />
3 Prima a tampa superior para poder colocar a<br />
máquina de barbear no suporte (<strong>ou</strong>ve-se um<br />
estalido).<br />
4 Segure na máquina de barbear voltada ao<br />
contrário, sobre o suporte. Certifique-se de<br />
que a parte frontal da máquina está voltada<br />
para o sistema SmartClean.
PORTUGUÊS 135<br />
5 Coloque a máquina de barbear no suporte (1),<br />
incline a máquina para trás (2) e pressione a<br />
tampa superior para conectar a máquina de<br />
barbear (<strong>ou</strong>ve-se um estalido) (3).<br />
Nota: O símbolo da bateria apresenta uma intermitência<br />
lenta para indicar que o aparelho está a carregar.<br />
Utilização da máquina de barbear<br />
Corte<br />
Período de adaptação da pele<br />
As suas primeiras utilizações poderão não<br />
apresentar o resultado esperado e a sua pele<br />
poderá mesmo ficar levemente irritada. Isto é<br />
normal. A sua pele e a sua barba necessitam de<br />
tempo para se adaptarem a qualquer novo sistema<br />
de barbear.<br />
Aconselhamo-lo a barbear-se regularmente<br />
(no mínimo, 3 vezes por semana) com esta máquina,<br />
durante um período de 3 semanas, para que a sua<br />
pele se adapte à nova máquina de barbear.<br />
Sugestão: Para assegurar os melhores resultados,<br />
aconselhamo-lo a aparar previamente a barba se não<br />
se tiver barbeado nos últimos 3 <strong>ou</strong> mais dias.<br />
Nota: Este aparelho só pode ser utilizado sem fios.<br />
1 Prima uma vez o botão ligar/desligar para ligar<br />
a máquina de barbear.<br />
,,<br />
O visor acende-se por alguns segundos.
136 PORTUGUÊS<br />
2 Passe as cabeças de corte sobre a pele,<br />
efectuando movimentos circulares.<br />
--<br />
Não efectue movimentos rectilíneos.<br />
3 Prima uma vez o botão de ligar/desligar para<br />
desligar a máquina de barbear.<br />
,,<br />
O visor acende-se durante alguns segundos e,<br />
em seguida, apresenta a carga restante da bateria.<br />
Barbear a pele húmida<br />
Também pode utilizar esta máquina de barbear com<br />
o rosto húmido com espuma <strong>ou</strong> gel de barbear.<br />
Para se barbear com espuma <strong>ou</strong> gel de barbear,<br />
siga os passos abaixo:<br />
1 Aplique alguma água na sua pele.<br />
2 Aplique espuma <strong>ou</strong> gel de barbear na pele.<br />
3 Enxagúe o acessório de corte em água<br />
corrente para garantir que o acessório de<br />
corte desliza suavemente sobre a sua pele.<br />
4 Prima uma vez o botão ligar/desligar para ligar<br />
a máquina de barbear.<br />
5 Passe as cabeças de corte sobre a pele,<br />
efectuando movimentos circulares.<br />
Nota: Enxagúe regularmente a máquina de barbear<br />
em água corrente para se assegurar de que esta<br />
continua a deslizar suavemente sobre a sua pele.
PORTUGUÊS 137<br />
6 Seque o rosto e limpe a máquina de barbear<br />
cuidadosamente depois da utilização<br />
(consulte o capítulo “Limpeza e manutenção”).<br />
Nota: Assegure-se de que enxagua toda a espuma <strong>ou</strong><br />
gel de barbear da máquina de barbear.<br />
Utilizar os acessórios de encaixe<br />
Nota: Os acessórios fornecidos podem variar consoante<br />
os diferentes produtos. A caixa mostra os acessórios<br />
que são fornecidos com o seu aparelho.<br />
Utilizar o acessório aparador<br />
Pode utilizar o acessório aparador para aparar as<br />
patilhas e o bigode.<br />
1 Puxe o elemento de corte para fora da<br />
máquina de barbear.<br />
Nota: Não rode o elemento de corte enquanto o puxa<br />
para fora do aparelho.<br />
2 Introduza a saliência do acessório aparador na<br />
ranhura na parte superior da máquina de barbear.<br />
Em seguida, pressione o acessório aparador para<br />
o encaixar no aparelho (<strong>ou</strong>ve-se um estalido).<br />
3 Prima uma vez o botão ligar/desligar no<br />
aparelho.<br />
,,<br />
O visor acende-se por alguns segundos.<br />
4 Pode agora utilizar o aparador.<br />
5 Prima uma vez o botão ligar/desligar para<br />
desligar o aparelho.<br />
,,<br />
O visor acende-se durante alguns segundos para<br />
apresentar a carga restante da bateria.
138 PORTUGUÊS<br />
6 Retire o acessório aparador do aparelho,<br />
puxando-o.<br />
Nota: Não rode o acessório aparador enquanto o puxa<br />
para fora do aparelho.<br />
7 Introduza a saliência do elemento de corte<br />
na ranhura na parte superior do aparelho.<br />
Em seguida, pressione o elemento de corte<br />
para baixo para o encaixar no aparelho<br />
(<strong>ou</strong>ve-se um estalido).<br />
Utilizar o acessório estilizador de barba<br />
1 Certifique-se de que o aparelho está desligado.<br />
2 Puxe o elemento de corte para fora da<br />
máquina de barbear.<br />
Nota: Não rode o elemento de corte enquanto o puxa<br />
para fora do aparelho.<br />
3 Introduza a saliência do acessório estilizador<br />
de barba na ranhura na parte superior do<br />
aparelho. Pressione o acessório estilizador<br />
de barba para o encaixar no aparelho<br />
(<strong>ou</strong>ve-se um estalido).<br />
Utilizar o acessório estilizador de barba<br />
com pente<br />
Pode utilizar o acessório estilizador de barba com<br />
o pente encaixado para modelar a sua barba numa<br />
regulação fixa, mas também pode utilizar regulações<br />
de comprimento diferentes. As regulações de<br />
comprimento do pêlo no acessório estilizador de<br />
barba correspondem ao comprimento do pêlo<br />
depois do corte e variam de 1 a 5 mm.
PORTUGUÊS 139<br />
1 Deslize o pente directamente nas ranhuras de<br />
guia de ambos os lados do acessório estilizador<br />
de barba (<strong>ou</strong>ve-se um estalido).<br />
2 Prima o selector de comprimento e, em seguida,<br />
desloque-o para a esquerda <strong>ou</strong> para a direita<br />
para seleccionar a regulação desejada do<br />
comprimento do pêlo.<br />
3 Prima uma vez o botão ligar/desligar no aparelho.<br />
4 Agora pode começar a estilizar a sua barba.<br />
Utilizar o acessório estilizador de barba<br />
sem pente<br />
Pode utilizar o acessório estilizador de barba sem o<br />
pente para definir os contornos da barba, do bigode,<br />
das patilhas <strong>ou</strong> da linha do pescoço.<br />
1 Retire o pente do acessório estilizador de<br />
barba, puxando-o.<br />
Nota: Agarre o pente pelo centro e puxe-o para fora<br />
do acessório estilizador de barba. Não puxe o pente<br />
pelos lados.<br />
2 Prima uma vez o botão ligar/desligar no<br />
aparelho.<br />
3 Agora pode começar a definir os contornos da<br />
sua barba, bigode, patilhas <strong>ou</strong> linha do pescoço.
140 PORTUGUÊS<br />
Limpeza e manutenção<br />
Nota: Os acessórios fornecidos podem variar consoante<br />
os diferentes produtos. A caixa mostra os acessórios<br />
que são fornecidos com o seu aparelho.<br />
Limpar a máquina de barbear no sistema<br />
SmartClean<br />
O sistema SmartClean é fornecido em duas versões.<br />
As funcionalidades disponíveis no seu sistema<br />
SmartClean podem diferir dependendo da versão:<br />
--<br />
O sistema SmartClean Basic possui uma fase:<br />
a fase de enxaguamento.<br />
--<br />
O sistema SmartClean Plus possui duas fases:<br />
a fase de enxaguamento e a fase de <strong>sec</strong>agem.<br />
Preparar o sistema SmartClean para a<br />
utilização<br />
Não incline o SmartClean para evitar derrames.<br />
Nota: Segure o SmartClean enquanto o prepara para<br />
a utilização.<br />
1 Ligue a ficha pequena na parte posterior do<br />
sistema SmartClean.<br />
2 Ligue o adaptador à tomada eléctrica.<br />
3 Prima o botão na parte lateral do sistema<br />
SmartClean (1) e levante a parte superior do<br />
sistema SmartClean (2).
PORTUGUÊS 141<br />
4 Retire o selo da recarga de limpeza.<br />
5 Coloque a recarga de limpeza no sistema<br />
SmartClean.<br />
6 Pressione a parte superior do sistema<br />
SmartClean novamente para baixo (<strong>ou</strong>ve-se<br />
um estalido).<br />
Utilizar o sistema SmartClean<br />
Certifique-se sempre de que sacode a água em<br />
excesso da máquina de barbear antes de a colocar<br />
no SmartClean.<br />
1 Prima a tampa superior para poder colocar a<br />
máquina de barbear no suporte (<strong>ou</strong>ve-se um<br />
estalido).
142 PORTUGUÊS<br />
2 Segure na máquina de barbear voltada ao<br />
contrário, sobre o suporte. Certifique-se de<br />
que a parte frontal da máquina está voltada<br />
para o sistema SmartClean.<br />
3 Coloque a máquina de barbear no suporte (1),<br />
incline a máquina para trás (2) e pressione a<br />
tampa superior para conectar a máquina de<br />
barbear (<strong>ou</strong>ve-se um estalido) (3).<br />
,,<br />
O símbolo da bateria fica intermitente, o que<br />
indica que a máquina de barbear está a carregar.<br />
4 Prima o botão ligar/desligar no sistema<br />
SmartClean para iniciar o programa de limpeza.<br />
,,<br />
Durante a fase de enxaguamento, o símbolo de<br />
enxaguamento fica intermitente.<br />
Nota: A fase de enxaguamento demora<br />
aproximadamente 10 minutos.<br />
,,<br />
Apenas sistemas SmartClean Plus:<br />
Durante a fase de <strong>sec</strong>agem, o símbolo de <strong>sec</strong>agem<br />
fica intermitente.<br />
Nota: A fase de <strong>sec</strong>agem demora aproximadamente<br />
4 horas.<br />
,,<br />
Quando o programa de limpeza estiver<br />
concluído, o símbolo de pronto mantém-se<br />
continuamente aceso.<br />
,,<br />
O símbolo da bateria mantém-se continuamente<br />
aceso para indicar que a máquina de barbear<br />
está completamente carregada.<br />
Nota: O carregamento demora aprox. 1 hora.
PORTUGUÊS 143<br />
Nota: Se premir o botão ligar/desligar do sistema<br />
SmartClean durante o programa de limpeza, o<br />
programa é interrompido. Neste caso, a intermitência<br />
do símbolo de enxaguamento <strong>ou</strong> de <strong>sec</strong>agem pára.<br />
Nota: Se remover o adaptador da tomada eléctrica<br />
durante o programa de limpeza, este é interrompido.<br />
Nota: Depois de decorridos 30 minutos após a<br />
conclusão do programa de limpeza e do carregamento,<br />
o SmartClean desliga-se automaticamente.<br />
Substituir a recarga do sistema SmartClean<br />
--<br />
Substitua a recarga de limpeza quando o símbolo<br />
de substituição ficar intermitente a cor de laranja<br />
<strong>ou</strong> quando não estiver satisfeito com o resultado<br />
final.<br />
1 Prima o botão na parte lateral do sistema<br />
SmartClean (1) e levante a parte superior do<br />
sistema SmartClean (2).<br />
2 Retire a recarga de limpeza vazia do sistema<br />
SmartClean e esvazie o líquido de limpeza<br />
restante da recarga de limpeza.<br />
Pode simplesmente verter o líquido de limpeza no<br />
lavatório.<br />
3 Elimine a recarga de limpeza vazia.<br />
4 Retire a nova recarga de limpeza da embalagem<br />
e retire o selo da recarga.<br />
5 Coloque a nova recarga de limpeza no sistema<br />
SmartClean.<br />
6 Pressione a parte superior do sistema SmartClean<br />
novamente para baixo (<strong>ou</strong>ve-se um estalido).
144 PORTUGUÊS<br />
Limpeza da máquina de barbear à torneira<br />
Limpe a máquina de barbear após cada utilização<br />
para obter o melhor desempenho da máquina<br />
de barbear.<br />
Tenha cuidado com a água quente. Verifique sempre<br />
se não está demasiado quente para evitar queimar<br />
as mãos.<br />
Nunca seque o acessório de corte com uma toalha<br />
<strong>ou</strong> lenço de papel, pois pode danificar as cabeças<br />
de corte.<br />
1 Enxagúe o elemento de corte em água morna<br />
corrente durante algum tempo.<br />
2 Puxe o suporte da cabeça de corte para fora<br />
da parte inferior do elemento de corte.<br />
3 Enxagúe o suporte da cabeça de corte em água<br />
morna corrente.<br />
4 Sacuda cuidadosamente o excesso de água<br />
e deixe o suporte da cabeça de corte <strong>sec</strong>ar.<br />
5 Volte a encaixar o suporte da cabeça de<br />
corte na parte inferior do acessório de corte<br />
(<strong>ou</strong>ve-se um estalido).
Método de limpeza profunda<br />
PORTUGUÊS 145<br />
Certifique-se de que o aparelho está desligado.<br />
1 Puxe o suporte da cabeça de corte para fora<br />
da parte inferior do acessório de corte.<br />
2 Coloque o suporte do anel de retenção<br />
no anel de retenção (1), rode-o para a<br />
esquerda (2) e levante-o para fora da cabeça<br />
de corte (3).<br />
Retire o anel de retenção do respectivo suporte<br />
e repita este processo para os restantes anéis de<br />
retenção.<br />
3 Retire as cabeças de corte do respectivo<br />
suporte. Cada cabeça de corte é composta<br />
por uma lâmina e uma protecção.<br />
Nota: Não limpe mais do que uma lâmina e uma<br />
protecção de cada vez, visto que estas formam<br />
conjuntos. Se combinar acidentalmente uma lâmina<br />
com a protecção incorrecta, poderá demorar várias<br />
semanas até que a eficácia de barbear seja restaurada.<br />
4 Limpe a lâmina e a protecção em água<br />
corrente.<br />
5 Depois da limpeza, volte a colocar a lâmina na<br />
protecção.
146 PORTUGUÊS<br />
6 Volte a colocar as cabeças de corte no<br />
respectivo suporte.<br />
Nota: Certifique-se de que os entalhes dos dois lados<br />
das cabeças de corte se encaixam nas saliências no<br />
suporte da cabeça de corte.<br />
7 Coloque o suporte do anel de retenção no<br />
anel de retenção (1), coloque-o na cabeça de<br />
corte (2) e rode-a para a direita (3) para voltar<br />
a fixar o anel de retenção.<br />
Repita este processo para os restantes anéis de<br />
retenção.<br />
Nota: Segure o suporte da cabeça de corte na sua<br />
mão quando voltar a inserir as cabeças de corte<br />
e voltar a fixar os anéis de retenção. Não p<strong>ou</strong>se o<br />
suporte da cabeça de corte sobre nenhuma superfície<br />
ao fazer isto, pois pode causar danos.<br />
8 Volte a encaixar o suporte da cabeça de corte<br />
na parte inferior do acessório de corte.<br />
Limpar os acessórios de encaixe<br />
Limpar o acessório aparador<br />
Limpe o acessório aparador sempre que o utilizar.<br />
1 Ligue o aparelho com o acessório aparador<br />
encaixado.<br />
2 Enxagúe o acessório aparador em água quente<br />
corrente durante algum tempo.<br />
3 Sacuda cuidadosamente o excesso de água e<br />
deixe o acessório aparador <strong>sec</strong>ar.
4 Depois da limpeza, desligue o aparelho.<br />
Sugestão: A cada seis meses, lubrifique os dentes do<br />
aparador com uma gota de óleo para máquinas de<br />
costura para obter o melhor desempenho.<br />
Limpar o acessório estilizador de barba<br />
Limpe o acessório estilizador de barba de cada vez<br />
que o utilizar.<br />
1 Retire o pente do acessório estilizador de<br />
barba, puxando-o.<br />
2 Enxagúe o acessório estilizador de barba e o<br />
pente, em separado, em água quente corrente<br />
durante algum tempo.<br />
3 Sacuda cuidadosamente o excesso de água<br />
e deixe o acessório estilizador de barba e o<br />
pente <strong>sec</strong>arem.<br />
4 A cada seis meses, lubrifique os dentes com<br />
uma gota de óleo para máquinas de costura.<br />
Arrumação<br />
PORTUGUÊS 147<br />
1 Guarde a máquina de barbear na bolsa<br />
fornecida.<br />
Nota: Aconselhamo-lo a deixar a máquina de barbear<br />
<strong>sec</strong>ar antes de a guardar na bolsa.
148 PORTUGUÊS<br />
Substituição<br />
Substituição das cabeças de corte<br />
Para o desempenho máximo de corte, é aconselhável<br />
substituir as cabeças de corte a cada dois anos.<br />
Lembrete de substituição<br />
O símbolo do elemento de corte acende-se<br />
para indicar que as cabeças de corte devem ser<br />
substituídas. Substitua cabeças de corte danificadas<br />
de imediato.<br />
Substitua as cabeças de corte apenas por cabeças<br />
de corte SH90 originais da <strong>Philips</strong>.<br />
1 O símbolo do elemento de corte mantémse<br />
continuamente aceso, as setas ficam<br />
intermitentes a branco e é emitido um sinal<br />
sonoro quando desliga a máquina de barbear.<br />
2 Puxe o suporte da cabeça de corte para fora<br />
da parte inferior do acessório de corte.<br />
3 Coloque o suporte do anel de retenção no<br />
anel de retenção (1), rode-o para a esquerda<br />
(2) e levante-o para fora da cabeça de<br />
corte (3).<br />
Retire o anel de retenção do respectivo suporte<br />
e repita este processo para os restantes anéis de<br />
retenção.<br />
4 Retire as cabeças de corte do respectivo<br />
suporte e elimine-as.
PORTUGUÊS 149<br />
5 Coloque novas cabeças de corte no suporte.<br />
Nota: Certifique-se de que os entalhes dos dois lados<br />
das cabeças de corte se encaixam nas saliências no<br />
suporte da cabeça de corte.<br />
6 Coloque o suporte do anel de retenção no<br />
anel de retenção (1), coloque-o na cabeça de<br />
corte (2) e rode-a para a direita (3) para voltar<br />
a fixar o anel de retenção.<br />
Repita este processo para os restantes anéis de<br />
retenção.<br />
Nota: Segure o suporte da cabeça de corte na sua<br />
mão quando voltar a inserir as cabeças de corte<br />
e voltar a fixar os anéis de retenção. Não p<strong>ou</strong>se o<br />
suporte da cabeça de corte sobre nenhuma superfície<br />
ao fazer isto, pois pode causar danos.<br />
7 Volte a encaixar o suporte da cabeça de corte<br />
na parte inferior do elemento de corte.<br />
8 Para repor a máquina de barbear, mantenha<br />
o botão ligar/desligar premido durante<br />
aproximadamente 7 segundos. Aguarde até<br />
<strong>ou</strong>vir dois sinais sonoros.
150 PORTUGUÊS<br />
Encomendar acessórios<br />
Para comprar acessórios <strong>ou</strong> peças sobressalentes,<br />
visite www.shop.philips.com/service <strong>ou</strong> vá ao<br />
seu revendedor <strong>Philips</strong>. Também pode contactar o<br />
Centro de Apoio ao Cliente da <strong>Philips</strong> no seu país<br />
(consulte os detalhes de contacto no folheto da<br />
garantia mundial).<br />
Estão disponíveis as seguintes peças:<br />
--<br />
Adaptador HQ8505<br />
--<br />
Cabeças de corteSH90 da <strong>Philips</strong><br />
--<br />
Spray para limpeza das cabeças de corte <strong>Philips</strong><br />
HQ110<br />
--<br />
Acessório estilizador de barba RQ111 da <strong>Philips</strong><br />
--<br />
Acessório escova de limpeza RQ585 da <strong>Philips</strong><br />
--<br />
Cabeças escova de limpeza RQ560/RQ563<br />
da <strong>Philips</strong><br />
--<br />
Recarga de limpeza JC301/JC302/JC303/JC304/<br />
JC305<br />
Cabeças de corte<br />
--<br />
Aconselhamo-lo a substituir as suas cabeças<br />
de corte a cada dois anos. Substitua sempre as<br />
cabeças de corte por cabeças de corte SH90<br />
originais da <strong>Philips</strong>.<br />
Reciclagem<br />
--<br />
Este símbolo num produto significa que o produto<br />
está abrangido pela Directiva Europeia 2012/19/ UE.
PORTUGUÊS 151<br />
--<br />
Este símbolo significa que o produto contém uma<br />
bateria recarregável incorporada abrangida pela<br />
directiva europeia 2006/66/CE, o que significa que<br />
esta não pode ser eliminada juntamente com os<br />
resíduos domésticos comuns. Recomendamos<br />
vivamente que leve o seu produto a um ponto<br />
de recolha oficial <strong>ou</strong> a um centro de assistência<br />
da <strong>Philips</strong> para que um técnico qualificado retire<br />
a bateria recarregável.<br />
--<br />
Informe-se acerca do sistema local de recolha<br />
de resíduos relativamente a produtos eléctricos<br />
e electrónicos e pilhas recarregáveis. Cumpra<br />
as regras locais e nunca elimine o produto e as<br />
pilhas recarregáveis com os resíduos domésticos<br />
comuns. A eliminação correcta de produtos<br />
usados e das pilhas recarregáveis ajuda a evitar<br />
consequências nocivas para o meio ambiente e<br />
para a saúde pública.<br />
Remoção da bateria recarregável da<br />
máquina de barbear<br />
Nota: Recomenda-se vivamente que a bateria<br />
recarregável seja removida por um técnico qualificado.<br />
Retire a bateria recarregável apenas quando se desfizer<br />
da máquina de barbear. Certifique-se de que a bateria<br />
está completamente vazia quando a retirar.<br />
Tenha cuidado porque as bandas da bateria são afiadas.
152 PORTUGUÊS<br />
1 Introduza a chave de fendas na ranhura entre<br />
os painéis frontal e posterior na parte inferior<br />
do aparelho. Retire o painel posterior.<br />
2 Retire o painel frontal.<br />
3 Desaperte os dois parafusos na parte superior<br />
do painel interior e retire o painel interior.<br />
4 Retire a bateria recarregável com uma chave<br />
de fendas.<br />
Garantia e assistência<br />
Se precisar de informações <strong>ou</strong> assistência, visite<br />
www.philips.com/support <strong>ou</strong> leia o folheto da<br />
garantia mundial em separado.<br />
Restrições à garantia<br />
As cabeças de corte (lâminas e protecções)<br />
não estão abrangidas pelos termos da garantia<br />
internacional, uma vez que estão sujeitas a desgaste.<br />
Resolução de problemas<br />
Este capítulo resume os problemas mais comuns que<br />
podem surgir no aparelho. Se não conseguir resolver<br />
o problema com as informações fornecidas a seguir,<br />
visite www.philips.com/support para consultar<br />
uma lista de perguntas frequentes <strong>ou</strong> contacte o<br />
Centro de Apoio ao Cliente no seu país.
Problema Possível causa Solução<br />
PORTUGUÊS 153<br />
A máquina de<br />
barbear não<br />
funciona quando<br />
primo o botão<br />
ligar/desligar.<br />
O desempenho<br />
da máquina<br />
de barbear<br />
deterior<strong>ou</strong>-se.<br />
A máquina de<br />
barbear continua<br />
ligada à corrente<br />
eléctrica. Por razões<br />
de segurança, a<br />
máquina de barbear<br />
só pode ser<br />
utilizada sem fios.<br />
A bateria<br />
recarregável está<br />
vazia.<br />
O bloqueio de<br />
viagem está<br />
activado.<br />
As cabeças de<br />
corte estão<br />
danificadas <strong>ou</strong><br />
gastas.<br />
Pêlos <strong>ou</strong> sujidade<br />
obstruem as<br />
cabeças de corte.<br />
Desligue a máquina de<br />
barbear e prima o botão<br />
ligar/desligar para ligar a<br />
máquina de barbear.<br />
Recarregue a bateria<br />
(consulte o capítulo<br />
“Carregamento”).<br />
Prima o botão ligar/desligar<br />
durante 3 segundos para<br />
desactivar o bloqueio de<br />
viagem.<br />
Substitua as cabeças de<br />
corte (consulte o capítulo<br />
“Substituição”).<br />
Limpe as cabeças de corte<br />
(consulte o capítulo “Limpeza<br />
e manutenção”).<br />
Limpe a máquina de barbear<br />
cuidadosamente antes de<br />
continuar a barbear-se<br />
(consulte o capítulo “Limpeza<br />
e manutenção”).
154 PORTUGUÊS<br />
Problema Possível causa Solução<br />
Substituí as<br />
cabeças de<br />
corte, mas o<br />
lembrete de<br />
substituição<br />
continua activo.<br />
Um símbolo<br />
da cabeça de<br />
corte apareceu<br />
subitamente no<br />
visor.<br />
Apareceu<br />
subitamente<br />
um ponto de<br />
exclamação no<br />
visor durante o<br />
carregamento.<br />
Um ponto de<br />
exclamação, o<br />
lembrete de<br />
substituição e o<br />
aviso de limpeza<br />
apareceram<br />
subitamente no<br />
visor.<br />
Há uma fuga<br />
de água na<br />
parte inferior<br />
da máquina de<br />
barbear.<br />
Não repôs a<br />
máquina de barbear.<br />
Este símbolo é<br />
um lembrete de<br />
substituição.<br />
A máquina<br />
de barbear<br />
sobreaqueceu.<br />
As cabeças de<br />
corte estão sujas<br />
<strong>ou</strong> danificadas.<br />
Durante a limpeza,<br />
pode acumularse<br />
água entre o<br />
corpo interior e a<br />
estrutura exterior<br />
da máquina de<br />
barbear.<br />
Reponha a máquina de<br />
barbear premindo o botão<br />
ligar/desligar durante<br />
aproximadamente 7 segundos<br />
(consulte o capítulo<br />
“Substituição”).<br />
Substitua as cabeças de<br />
corte (consulte o capítulo<br />
“Substituição”).<br />
Desligue a máquina de<br />
barbear da corrente eléctrica<br />
durante aprox. 10 minutos.<br />
Substitua (consulte o capítulo<br />
“Substituição”) <strong>ou</strong> limpe as<br />
cabeças de corte (consulte<br />
o capítulo “Limpeza e<br />
manutenção”).<br />
Isto é normal e não é<br />
perigoso, visto que todos os<br />
componentes eléctricos estão<br />
protegidos numa unidade<br />
de alimentação isolada no<br />
interior da máquina de<br />
barbear.
Problema Possível causa Solução<br />
PORTUGUÊS 155<br />
O sistema<br />
SmartClean não<br />
funciona quando<br />
primo o botão<br />
ligar/desligar.<br />
A máquina de<br />
barbear não<br />
está totalmente<br />
limpa depois<br />
de a limpar<br />
com o sistema<br />
SmartClean.<br />
O sistema<br />
SmartClean não<br />
está ligado à<br />
alimentação.<br />
Não coloc<strong>ou</strong> a<br />
máquina de barbear<br />
correctamente no<br />
sistema SmartClean,<br />
por isso, não há<br />
nenhuma ligação<br />
eléctrica entre o<br />
sistema SmartClean<br />
e a máquina de<br />
barbear.<br />
A recarga de<br />
limpeza tem de ser<br />
substituída.<br />
A recarga de<br />
limpeza está vazia.<br />
O símbolo de<br />
substituição fica<br />
intermitente para<br />
indicar que tem de<br />
substituir a recarga<br />
de limpeza.<br />
Utiliz<strong>ou</strong> <strong>ou</strong>tro<br />
líquido de limpeza<br />
em vez da recarga<br />
de limpeza original<br />
da <strong>Philips</strong>.<br />
Introduza a ficha pequena no<br />
sistema SmartClean e ligue o<br />
adaptador à tomada eléctrica.<br />
Pressione a tampa superior<br />
(<strong>ou</strong>ve-se um estalido) para<br />
garantir um contacto correcto<br />
entre a máquina de barbear e<br />
o sistema SmartClean.<br />
Substitua a recarga de limpeza<br />
(consulte o capítulo “Limpeza<br />
e manutenção”).<br />
Coloque uma nova recarga<br />
de limpeza no sistema<br />
SmartClean (consulte<br />
o capítulo “Limpeza e<br />
manutenção”).<br />
Utilize apenas a recarga de<br />
limpeza da <strong>Philips</strong>.
156 PORTUGUÊS<br />
Problema Possível causa Solução<br />
A máquina de<br />
barbear não está<br />
completamente<br />
carregada<br />
depois de<br />
a carregar<br />
no sistema<br />
SmartClean.<br />
O escoamento<br />
da recarga de<br />
limpeza pode estar<br />
obstruído.<br />
Não coloc<strong>ou</strong> a<br />
máquina de barbear<br />
correctamente no<br />
sistema SmartClean.<br />
Empurre os pêlos no<br />
escoamento com um palito.<br />
Pressione a tampa superior<br />
(<strong>ou</strong>ve-se um estalido) para<br />
garantir um contacto correcto<br />
entre a máquina de barbear e<br />
o sistema SmartClean.
TÜRKÇE 157<br />
Giriş<br />
Ürünümüzü satın aldığınız için teşekkür ederiz.<br />
<strong>Philips</strong>’e hoş geldiniz! <strong>Philips</strong>’in sunduğu destekten<br />
faydalanabilmek için lütfen ürününüzü şu adresten<br />
kaydedin: www.philips.com/welcome.<br />
Tıraş makinenizin özellikleri hakkındaki bilgilerin<br />
yanı sıra, tıraşı kolaylaştıran ve daha eğlenceli bir<br />
hale getiren bazı ipuçları içerdiğinden, bu kullanıcı<br />
kılavuzunu lütfen okuyun.<br />
Genel açıklamalar (Şek. 1)<br />
1 Sakal şekillendirme aparatı tarağı<br />
2 Takılıp çıkarılır sakal şekillendirme aparatı<br />
3 Takılıp çıkarılır düzeltici başlığı<br />
4 Takılıp çıkarılır tıraş ünitesi<br />
5 Açma/kapama düğmesi<br />
6 Küçük fiş için soket<br />
7 Ünlem işareti<br />
8 Değiştirme uyarısı<br />
9 Pil şarj göstergesi<br />
10 Seyahat kilidi simgesi<br />
11 Temizlik uyarısı<br />
12 Değiştirme simgesi<br />
13 SmartClean sistemi<br />
14 SmartClean sistemi kapağı<br />
15 Açma/kapama düğmesi<br />
16 Temizleme simgesi<br />
17 Kurutma simgesi<br />
18 Hazır simgesi<br />
19 Şarj simgesi<br />
20 SmartClean sistemi temizleme kartuşu<br />
21 Adaptör<br />
22 Küçük fiş<br />
23 Tutma halkası yuvası<br />
24 Çanta
158 TÜRKÇE<br />
Not: Cihazla birlikte verilen aksesuarlar ürünlere<br />
göre farklılık gösterebilir. Cihazınızla birlikte verilen<br />
aksesuarları kutu üzerinde görebilirsiniz.<br />
Önemli<br />
Tıraş makinesini ve SmartClean sistemini kullanmadan<br />
önce bu kullanım kılavuzunu dikkatle okuyun. İleride<br />
başvurmak için bu kullanım kılavuzunu saklayın.<br />
Tehlike<br />
--<br />
Adaptörü kuru tutmaya dikkat edin.<br />
Uyarı<br />
--<br />
Adaptörde bir dönüştürücü bulunmaktadır. Tehlikeli<br />
bir duruma sebep olabileceğinden, adaptörü başka<br />
bir fişle değiştirmek için kesmeyin.<br />
--<br />
Bu cihazın 8 yaşın üzerindeki çocuklar ve fiziksel,<br />
motor ya da zihinsel becerileri gelişmemiş veya<br />
bilgi ve tecrübe açısından eksik kişiler tarafından<br />
kullanımı sadece bu kişilerin nezaretinden sorumlu<br />
kişilerin bulunması veya cihazın güvenli kullanım<br />
talimatlarının bu kişilere sağlanması ve olası<br />
tehlikelerin anlatılması durumunda mümkündür.<br />
Çocuklar cihazla oynamamalıdır. Temizlik ve<br />
kullanıcı bakımı herhangi bir gözetim olmadan<br />
çocuklar tarafından yapılmamalıdır.<br />
--<br />
Tıraş makinesini musluk altında yıkamadan önce<br />
mutlaka prizden çekin.<br />
Dikkat<br />
--<br />
SmartClean sistemini kesinlikle suya batırmayın<br />
veya musluk altında yıkamayın.<br />
--<br />
Tıraş makinesini durulamak için asla 80°C’den sıcak<br />
su kullanmayın.<br />
--<br />
Yaralanmaya yol açabileceğinden, hasarlı durumdaki<br />
tıraş makinesini, SmartClean sistemini, adaptörü<br />
veya herhangi bir parçasını kullanmayın. Hasarlı<br />
adaptörü veya parçayı mutlaka orijinaliyle değiştirin.
TÜRKÇE 159<br />
--<br />
SmartClean sistemini sadece orijinal temizleme<br />
kartuşu ile kullanın.<br />
--<br />
SmartClean sistemini, akmasını önlemek için daima<br />
düz, yatay bir sabit bir zemine yerleştirin.<br />
--<br />
Tıraş makinesini temizlemek veya şarj etmek için<br />
SmartClean sistemini kullanmaya başlamadan önce<br />
kartuş yuvasının kapalı olduğundan emin olun.<br />
--<br />
SmartClean sistemi kullanıma hazır olduğunda,<br />
içindeki temizlik sıvısının dökülmesini önlemek için<br />
hareket ettirmeyin.<br />
--<br />
SmartClean sistemi, tıraş makinenizi temizler fakat<br />
dezenfekte etmez, bu yüzden tıraş makinesini<br />
sadece kendiniz kullanın, başkalarına kullandırmayın.<br />
--<br />
Cihazı temizlemek için asla basınçlı hava, ovalama<br />
bezleri, benzin veya aseton gibi aşındırıcı temizlik<br />
ürünleri veya zarar verici sıvılar kullanmayın.<br />
--<br />
Tıraş makinesini yıkadığınızda, alt kısımda bulunan<br />
fiş soketinden içeri su sızabilir. Bu durum normaldir<br />
ve cihazın tüm elektronik parçaları su geçirmez bir<br />
güç ünitesi ile kaplı olduğu için tehlikeli değildir.<br />
Standartlara uygunluk<br />
--<br />
Bu tıraş makinesi, su geçirmez ve uluslararası<br />
onaylanmış güvenlik düzenlemelerine uygundur.<br />
Banyo veya duşta kullanıma ve musluk altında<br />
temizlemeye uygundur. Güvenlik nedeniyle, tıraş<br />
makinesi bu nedenle yalnızca kablosuz olarak<br />
kullanılabilir.<br />
--<br />
Tıraş makinesi ve SmartClean sistemi<br />
elektromanyetik alanlara maruz kalmaya ilişkin<br />
geçerli tüm standartlara ve düzenlemelere uygundur.
160 TÜRKÇE<br />
Genel<br />
--<br />
Adaptörde otomatik gerilim seçme fonksiyonu<br />
vardır ve cihaz 100-240 volt arası elektrik şebeke<br />
gerilimlerinde kullanıma uygundur.<br />
--<br />
Adaptör 100-240 volt’u güvenli seviye olan<br />
24 volttan daha düşük değerlere çevirmektedir.<br />
--<br />
Maksimum gürültü düzeyi: Lc = 69dB(A)<br />
Ekran<br />
Not: Tıraş makinesini ilk kez kullanmadan önce<br />
ekrandaki koruyucu folyoyu çıkarın.<br />
--<br />
S91XX/S90XX<br />
Şarj etme<br />
--<br />
Şarj olma süresi yaklaşık 1 saattir.<br />
Not: Bu cihaz yalnızca kablosuz olarak kullanılabilir.<br />
--<br />
Hızlı şarj: Cihazı elektriğe bağladığınızda bir ses<br />
duyulur. Ardından pil şarj cihazı göstergesinin ışıkları<br />
sürekli olarak arka arkaya yanar. Tıraş makinesinde<br />
bir tıraş için yeterli güç bulunduğunda, pil şarj<br />
göstergesinin alt kısmındaki ışık yavaşça yanıp söner.<br />
--<br />
Cihazı elektriğe bağlı bırakırsanız şarj işlemi<br />
devam eder. Cihazın şarj olduğunu göstermek<br />
için öncelikle alt kısımdaki ışık beyaz renkte yanıp<br />
söner ve ardından sürekli beyaz renkte yanar.<br />
Daha sonra ikinci ışık yanıp söner ve ardından<br />
sürekli olarak yanar. Bu işlem tıraş makinesi tam<br />
olarak şarj edilene kadar devam eder.
TÜRKÇE 161<br />
Pil tamamen şarj edildiğine<br />
Not: Bu cihaz yalnızca kablosuz olarak kullanılabilir.<br />
Not: Pil dolu olduğunda, ekran 30 dakika sonra<br />
otomatik olarak kapanır. Şarj işlemi sırasında veya<br />
sonrasında açma/kapama düğmesine bastığınızda tıraş<br />
makinesinin hala elektriğe bağlı olduğunu gösteren bir<br />
uyarı sesi duyulur.<br />
--<br />
Pil tamamen şarj olduğunda, pil şarj göstergesindeki<br />
tüm ışıklar beyaz renkte sürekli yanar.<br />
Düşük pil<br />
--<br />
Pil bitmek üzereyken, alt ışık turuncu renkte yanıp<br />
söner ve bir uyarı sesi duyulur.<br />
Kalan şarj seviyesi<br />
--<br />
Pil şarj göstergesinde sürekli olarak yanan ışıklar<br />
kalan pil seviyesini gösterir.<br />
Temizlik uyarısı<br />
Optimum tıraş performansı için her kullanımdan<br />
sonra tıraş makinesini temizlemenizi öneririz.<br />
--<br />
Tıraş makinesini kapattığınızda, temizlik uyarısı tıraş<br />
makinesinin temizlenmesi gerektiğini hatırlatmak<br />
üzere yanıp söner.<br />
Seyahat kilidi<br />
Seyahate çıkacağınız zaman tıraş makinesini<br />
kilitleyebilirsiniz. Seyahat kilidi tıraş makinesinin<br />
yanlışlıkla açılmasını önler.
162 TÜRKÇE<br />
Seyahat kilidini çalıştırma<br />
1 Seyahat kilidi moduna girmek için açma/kapama<br />
düğmesini 3 saniye basılı tutun.<br />
,,<br />
Seyahat kilidi etkinleştirilirken seyahat kilidi<br />
simgesi beyaz renkte sürekli yanar. Seyahat kilidi<br />
etkin duruma geldiğinde tıraş makinesinden bir<br />
uyarı sesi duyulur ve seyahat kilidi simgesi yanıp<br />
söner.<br />
Seyahat kilidini devre dışı bırakma<br />
1 Açma/kapama düğmesini 3 saniye basılı tutun.<br />
,,<br />
Seyahat kilidi simgesi yanıp sönmeye başlar ve<br />
ardından sürekli yanar.<br />
Tıraş makinesi tekrar kullanıma hazırdır.<br />
Not: Seyahat kilidini cihazı elektriğe bağlayarak da<br />
devre dışı bırakabilirsiniz.<br />
Tıraş başlıklarının değiştirilmesi<br />
Maksimum tıraş performansı için tıraş başlıklarını iki<br />
yılda bir değiştirmenizi öneririz.<br />
--<br />
Cihazda tıraş başlıklarının değiştirilmesi gerektiğini<br />
hatırlatan değiştirme uyarısı bulunur. Değiştirme<br />
uyarısı beyaz renkte sürekli yanar ve ok işaretleri<br />
beyaz renkte yanıp söner. Tıraş başlıklarının<br />
değiştirilmesi gerektiğini belirten bir uyarı sesi<br />
duyulur.<br />
Not: Tıraş başlıkları değiştirildikten sonra tıraş makinesi<br />
açma/kapama düğmesine 7 saniye boyunca basılarak<br />
sıfırlanmalıdır.
TÜRKÇE 163<br />
Ünlem işareti<br />
Tıkalı tıraş başlıkları<br />
--<br />
Tıraş başlıkları tıkanmışsa ünlem işareti turuncu<br />
renkte sürekli yanar. Değiştirme uyarısı ve temizlik<br />
uyarısı sırayla beyaz renkte yanıp söner ve bir uyarı<br />
sesi duyulur. Bu durumda, tıraş başlıkları kirli veya<br />
hasarlı olduğundan motor çalışmaz.<br />
--<br />
Bu durum gerçekleştiğinde, tıraş başlıklarının<br />
temizlenmesi veya değiştirilmesi gerekir.<br />
Aşırı ısınma<br />
--<br />
Cihaz şarj sırasında aşırı ısınırsa ünlem işareti<br />
turuncu renkte yanıp söner.<br />
--<br />
Bu durumda tıraş makinesi otomatik olarak<br />
kapanır. Cihaz normal sıcaklığa döndüğünde şarj<br />
işlemi devam eder.<br />
Şarj etme<br />
Şarj olma süresi yaklaşık 1 saattir.<br />
Tamamen şarj olmuş bir tıraş makinesi 50 dakikaya<br />
kadar tıraş süresi sağlar.<br />
Not: Cihaz şarj sırasında kullanılamaz.<br />
Tıraş makinesini ilk kullanımdan önce ve ekranda pilin<br />
bitmek üzere olduğu görüntülendiğinde şarj edin.<br />
Adaptörle şarj etme<br />
1 Cihazın kapalı olduğundan emin olun.<br />
2 Küçük fişi cihaza (1) ve adaptörü de prize (2)<br />
takın.
164 TÜRKÇE<br />
SmartClean sisteminde şarj etme<br />
(sadece belirli modellerde)<br />
1 Küçük fişi SmartClean sistemine takın.<br />
2 Adaptörü prize takın.<br />
3 Tıraş makinesini yuvaya yerleştirmek için üst<br />
kapağı bastırın (‘klik’ sesi duyulur).<br />
4 Tıraş makinesini yuva üzerinde baş aşağı tutun.<br />
Tıraş makinesinin ön tarafının SmartClean<br />
sistemine dönük olduğundan emin olun.<br />
5 Tıraş makinesini yuvaya (1) yerleştirin, geriye<br />
doğru yatırın (2) ve sisteme bağlamak için üst<br />
kapağı aşağı doğru bastırın ( ‘klik’ sesi duyulur) (3).<br />
Not: Pil simgesi yavaşça yanıp sönerek cihazın şarj<br />
edilmekte olduğunu gösterir.<br />
Tıraş makinesinin kullanılması<br />
Tıraş olma<br />
Cilt adaptasyon dönemi<br />
İlk tıraşlarınızda beklediğiniz sonucu alamayabilirsiniz<br />
ve cildiniz biraz tahriş olabilir. Bu durum normaldir.<br />
Cildinizin ve sakalınızın yeni tıraş sistemine alışmak<br />
için zamana ihtiyacı vardır.<br />
Cildinizin yeni tıraş makinesine uyum sağlayabilmesi<br />
için 3 haftalık bir süre boyunca düzenli olarak<br />
(haftada en az 3 kez) tıraş olmanızı öneririz.
TÜRKÇE 165<br />
İpucu: En iyi sonucu sağlamak için 3 gün ya da<br />
daha uzun bir süre tıraş olmadığınızda ilk olarak ön<br />
düzeltme yapmanızı öneririz.<br />
Not: Bu cihaz yalnızca kablosuz olarak kullanılabilir.<br />
1 Tıraş makinesini çalıştırmak için açma/kapama<br />
düğmesine bir kez basın.<br />
,,<br />
Ekran birkaç saniye aydınlanır.<br />
2 Tıraş başlıklarını dairesel hareketler yaparak<br />
cildinizin üzerinde dolaştırın.<br />
--<br />
Düz hareket ettirmeyin.<br />
3 Tıraş makinesini kapatmak için açma/kapama<br />
düğmesine bir kere basın.<br />
,,<br />
Ekran birkaç saniye aydınlanır ve ardından kalan<br />
pil şarj seviyesini gösterir.<br />
Islak tıraş<br />
İsterseniz bu tıraş makinesini tıraş köpüğü veya tıraş<br />
jeliyle ıslak cilt üzerinde de kullanabilirsiniz.<br />
Tıraş köpüğü veya tıraş jeliyle kullanarak tıraş olmak<br />
için aşağıdaki adımları izleyin:<br />
1 Cildinizi bir miktar suyla ıslatın.<br />
2 Tıraş köpüğünü veya jelini cildinize sürün.<br />
3 Tıraş ünitesinin cildinizde kolayca kaymasını<br />
sağlamak için tıraş ünitesini musluk altında<br />
ıslatın.<br />
4 Tıraş makinesini çalıştırmak için açma/kapama<br />
düğmesine bir kez basın.
166 TÜRKÇE<br />
5 Tıraş başlıklarını dairesel hareketler yaparak<br />
cildinizin üzerinde dolaştırın.<br />
Not: Cildinizde kolayca kaymasını sağlamak için tıraş<br />
ünitesini sık sık musluk altında ıslatın.<br />
6 Kullanım sonrasında yüzünüzü kurutun ve tıraş<br />
makinesini iyice temizleyin (bkz.‘Temizlik ve<br />
bakım’ bölümü).<br />
Not: Tıraş makinesindeki köpük veya jeli tamamen<br />
temizleyin.<br />
Takılıp çıkarılır aparatları kullanma<br />
Not: Cihazla birlikte verilen aksesuarlar ürünlere<br />
göre farklılık gösterebilir. Cihazınızla birlikte verilen<br />
aksesuarları kutu üzerinde görebilirsiniz.<br />
Düzeltici başlığını kullanma<br />
Favorilerinizi ve bıyığınızı düzeltmek için düzeltici<br />
başlığını kullanabilirsiniz.<br />
1 Tıraş ünitesini cihazdan çekerek çıkarın.<br />
Not: Tıraş ünitesini cihazdan çekerek çıkarırken<br />
çevirmeyin.<br />
2 Düzeltici başlığının sapını tıraş makinesinin<br />
üzerindeki yuvaya yerleştirin. Daha sonra<br />
düzeltici başlığı cihaza takmak için aşağı doğru<br />
bastırın (‘klik’ sesi duyulur).<br />
3 Cihazı çalıştırmak için açma/kapama düğmesine<br />
bir kere basın.<br />
,,<br />
Ekran birkaç saniye aydınlanır.
TÜRKÇE 167<br />
4 Artık düzeltmeye başlayabilirsiniz.<br />
5 Cihazı kapatmak için açma/kapama düğmesine<br />
bir kez basın.<br />
,,<br />
Ekran birkaç saniye aydınlanır ve kalan pil şarj<br />
seviyesini gösterir.<br />
6 Düzeltme aparatını cihazdan çekerek çıkarın.<br />
Not: Düzeltme aparatını cihazdan çekerek çıkarırken<br />
çevirmeyin.<br />
7 Tıraş ünitesinin sapını cihazın üzerindeki yuvaya<br />
yerleştirin. Daha sonra tıraş ünitesini cihaza<br />
takmak için aşağı bastırın (‘klik’ sesi duyulur).<br />
Sakal şekillendirme aparatını kullanma<br />
1 Cihazın kapalı olduğundan emin olun.<br />
2 Tıraş ünitesini cihazdan çekerek çıkarın.<br />
Not: Tıraş ünitesini cihazdan çekerek çıkarırken<br />
çevirmeyin.<br />
3 Sakal şekillendirme aparatının sapını cihazın<br />
üzerindeki yuvaya yerleştirin. Daha sonra sakal<br />
şekillendirme aparatını cihaza takmak için<br />
aşağı bastırın (‘klik’ sesi duyulur).<br />
Sakal şekillendirme aparatının tarakla<br />
kullanılması<br />
Sakalınızı tek bir ayarda şekillendirmek veya farklı<br />
uzunluk ayarları kullanmak için sakal şekillendirme<br />
aparatını tarağıyla birlikte kullanabilirsiniz. Sakal<br />
şekillendirme aparatındaki sakal uzunluk ayarları,<br />
şekillendirme işleminden sonraki sakal uzunluğuna<br />
karşılık gelir ve 1-5 mm arasında değişir.
168 TÜRKÇE<br />
1 Tarağı sakal şekillendirme aparatının iki<br />
yanındaki düzeltme oluklarına kaydırarak takın<br />
(‘klik’ sesi duyulur).<br />
2 Uzunluk seçiciye basın ve istediğiniz sakal<br />
uzunluk ayarını seçmek için sağa veya sola<br />
ittirin.<br />
3 Cihazı çalıştırmak için açma/kapama düğmesine<br />
bir kere basın.<br />
4 Şimdi sakalınızı şekillendirmeye başlayabilirsiniz.<br />
Sakal şekillendirme aparatının tarak<br />
olmadan kullanılması<br />
Sakalınıza, bıyığınıza, favorilerinize veya ensedeki<br />
saç çizginize şekil vermek için sakal şekillendirme<br />
aparatını tarak olmadan kullanabilirsiniz.<br />
1 Sakal şekillendirme aparatının tarağını çekerek<br />
çıkarın.<br />
Not: Tarağı sakal şekillendirme aparatından çıkarmak<br />
için merkezinden tutun. Tarağı kenarlarından çekmeyin.<br />
2 Cihazı çalıştırmak için açma/kapama düğmesine<br />
bir kere basın.<br />
3 Sakal, bıyık, favori veya ensedeki saç çizginize<br />
şekil vermeye başlayabilirsiniz.
TÜRKÇE 169<br />
Temizlik ve bakım<br />
Not: Cihazla birlikte verilen aksesuarlar ürünlere<br />
göre farklılık gösterebilir. Cihazınızla birlikte verilen<br />
aksesuarları kutu üzerinde görebilirsiniz.<br />
Tıraş makinesini SmartClean sisteminde<br />
temizleme<br />
SmartClean sistemi iki farklı seçenekle sunulur.<br />
SmartClean sisteminizin özellikleri seçeneklere göre<br />
farklılık gösterebilir:<br />
--<br />
Basic SmartClean sistemi tek aşamadan oluşur:<br />
durulama aşaması.<br />
--<br />
Plus SmartClean sistemi iki aşamadan oluşur:<br />
durulama aşaması ve kurutma aşaması.<br />
SmartClean sistemini kullanıma hazırlama<br />
Sızıntıyı önlemek için SmartClean sistemini<br />
yatırmayın.<br />
Not: SmartClean’i tutarak kullanıma hazırlayın.<br />
1 Küçük fişi SmartClean sisteminin arkasına takın.<br />
2 Adaptörü prize takın.<br />
3 SmartClean sisteminin yanındaki düğmeye (1)<br />
basın ve SmartClean sisteminin üst kısmını<br />
kaldırın (2).
170 TÜRKÇE<br />
4 Temizleme kartuşu contasını çekerek çıkarın.<br />
5 Temizleme kartuşunu SmartClean sistemine<br />
yerleştirin.<br />
6 SmartClean sisteminin üst parçasını bastırarak<br />
yerine oturtun ( ‘klik’ sesi duyulur).<br />
SmartClean sistemini kullanma<br />
Tıraş makinesini SmartClean sistemine<br />
yerleştirmeden önce mutlaka fazla suyun<br />
temizlendiğinden emin olun.<br />
1 Tıraş makinesini yuvaya yerleştirmek için üst<br />
kapağı bastırın (‘klik’ sesi duyulur).
TÜRKÇE 171<br />
2 Tıraş makinesini yuva üzerinde baş aşağı tutun.<br />
Tıraş makinesinin ön tarafının SmartClean<br />
sistemine dönük olduğundan emin olun.<br />
3 Tıraş makinesini yuvaya (1) yerleştirin, geriye<br />
doğru yatırın (2) ve sisteme bağlamak için<br />
üst kapağı aşağı doğru bastırın ( ‘klik’ sesi<br />
duyulur) (3).<br />
,,<br />
Pil simgesi yanıp sönerek tıraş makinesinin şarj<br />
edilmekte olduğunu gösterir.<br />
4 Temizleme programını başlatmak için<br />
SmartClean sisteminin açma/kapama düğmesine<br />
basın.<br />
,,<br />
Durulama simgesi durulama aşaması boyunca<br />
yanıp söner.<br />
Not: Durulama aşaması yaklaşık 10 dakika sürer.<br />
,,<br />
Sadece Plus SmartClean sistemleri:<br />
Kurutma simgesi kurutma aşaması boyunca<br />
yanıp söner.<br />
Not: Kurutma aşaması yaklaşık 4 saat sürer.<br />
,,<br />
Temizleme programı tamamladığında hazır<br />
simgesi sürekli yanar.<br />
,,<br />
Pil simgesi tıraş makinesinin tamamen şarj<br />
olduğunu göstermek üzere sürekli yanar.<br />
Not: Şarj olma süresi yaklaşık 1 saattir.<br />
Not: Temizleme programı sırasında SmartClean<br />
sisteminin açma/kapama düğmesine<br />
basılırsa program iptal edilir. Bu durumda, durulama<br />
veya kurutma simgesinin yanıp sönmesi durur.
172 TÜRKÇE<br />
Not: Temizleme programı sırasında adaptör prizden<br />
çekilirse program iptal olur.<br />
Not: Temizleme programı ve şarj işlemi<br />
tamamlandıktan 30 dakika sonra SmartClean<br />
otomatik olarak kapanır.<br />
SmartClean Sistemi kartuşunu değiştirme<br />
--<br />
Değiştirme simgesi turuncu renkte yanıp<br />
söndüğünde veya artık sonuçtan memnun<br />
değilseniz temizleme kartuşunu değiştirin.<br />
1 SmartClean sisteminin yanındaki düğmeye (1)<br />
basın ve SmartClean sisteminin üst kısmını<br />
kaldırın (2).<br />
2 Boş temizleme kartuşunu SmartClean<br />
sisteminden çıkarın ve temizleme kartuşunda<br />
kalan temizleme sıvısını boşaltın.<br />
Temizleme sıvısını lavaboya dökebilirsiniz.<br />
3 Boş temizleme kartuşunu çöpe atın.<br />
4 Yeni temizleme kartuşu ambalajını açın ve<br />
kartuş contasını çekerek çıkarın.<br />
5 Yeni temizleme kartuşunu SmartClean<br />
sistemine yerleştirin.<br />
6 SmartClean sisteminin üst parçasını bastırarak<br />
yerine oturtun ( ‘klik’ sesi duyulur).<br />
Tıraş makinesinin musluk altında<br />
temizlenmesi<br />
Optimum tıraş performansı için her tıraştan sonra<br />
tıraş makinesini temizleyin.
TÜRKÇE 173<br />
Sıcak suya dikkat edin. Ellerinizin yanmaması için<br />
daima suyun çok sıcak olmadığını kontrol edin.<br />
Tıraş ünitesini kuruturken kesinlikle havlu veya<br />
peçete kullanmayın. Tıraş başlıklarına zarar<br />
verebilirsiniz.<br />
1 Tıraş ünitesini bir süre ılık suyun altına tutun.<br />
2 Tıraş başlığı tutucuyu tıraş ünitesinin alt<br />
kısmından çekip çıkarın.<br />
3 Tıraş başlığı tutucuyu ılık suyun altına tutun.<br />
4 Kalan suları dikkatlice sallayarak giderin ve tıraş<br />
başlığı tutucunun kurumasını bekleyin.<br />
5 Tıraş başlığı tutucuyu tekrar tıraş ünitesinin alt<br />
kısmına takın (‘klik’ sesi duyulur).<br />
Derinlemesine temizlik yöntemi<br />
Cihazın kapalı olduğundan emin olun.<br />
1 Tıraş başlığı tutucuyu tıraş ünitesinin en alt<br />
kısmından çekip çıkarın.<br />
2 Tutma halkasının yuvasını tutma halkasına<br />
yerleştirin (1), saat yönünün tersine döndürün<br />
(2) ve tıraş başlığından kaldırarak çıkarın (3).<br />
Tutma halkasını tutma halkası yuvasından çıkarın ve<br />
bu işlemi diğer tutma halkaları için tekrarlayın.
174 TÜRKÇE<br />
3 Tıraş başlıklarını tıraş başlığı tutucudan çıkarın.<br />
Her bir tıraş başlığında bir bıçak ve koruyucu<br />
bulunur.<br />
Not: Birbirleriyle eşleşen takımlar olduklarından, her<br />
seferinde sadece bir bıçak ve koruyucuyu temizleyin.<br />
Bıçakları yanlış koruyucuya takarsanız en iyi tıraş<br />
performansına ulaşmanız haftalarca sürebilir.<br />
4 Bıçak ve koruyucuyu musluk suyu altında<br />
temizleyin.<br />
5 Temizleme işleminden sonra, bıçağı koruyucuya<br />
geri takın.<br />
6 Tıraş başlıklarını tekrar tıraş başlığı tutucuya<br />
takın.<br />
Not: Tıraş başlıklarının iki yanındaki çentiklerin tıraş<br />
başlığı tutucudaki çıkıntılara tam olarak oturduğundan<br />
emin olun.<br />
7 Tutma halkası yuvasını tutma halkasına<br />
yerleştirin (1), tıraş başlığına takın (2) ve tutma<br />
halkasını tekrar yerine oturtmak için saat<br />
yönünden döndürün (3).<br />
Bu işlemi diğer tutma halkaları için tekrarlayın.
TÜRKÇE 175<br />
Not: Tıraş başlıklarını ve tutma halkalarını tekrar<br />
takarken tıraş başlığı tutucuyu elinizden bırakmayın.<br />
Hasara neden olabileceğinden bu işlem sırasında tıraş<br />
başlığı tutucuyu herhangi bir zemin üzerine koymayın.<br />
8 Tıraş başlığı tutucuyu tekrar tıraş ünitesinin alt<br />
kısmına takın.<br />
Takılıp çıkarılır aparatları temizleme<br />
Düzeltici başlığını temizleme<br />
Düzeltici başlığını her kullanımdan sonra temizleyin.<br />
1 Cihazı düzeltici başlığı takılı haldeyken açın.<br />
2 Düzeltici başlığını bir süre sıcak suyun altına tutun.<br />
3 Kalan suyu dikkatlice silkeleyin ve<br />
düzeltici başlığının kurumasını bekleyin.<br />
4 Temizledikten sonra cihazı kapatın.<br />
İpucu: Optimum düzeltici performansı için düzelticinin<br />
dişlerini altı ayda bir, bir damla dikiş makinesi yağıyla<br />
yağlayın.<br />
Sakal şekillendirme aparatının temizlenmesi<br />
Sakal şekillendirme aparatını her kullanımdan sonra<br />
temizleyin.<br />
1 Sakal şekillendirme aparatının tarağını çekerek<br />
çıkarın.<br />
2 Sakal şekillendirme aparatını ve tarağı ayrı<br />
ayrı olarak kısa bir süre sıcak musluk suyunun<br />
altında durulayın.<br />
3 Kalan suyu dikkatlice silkeleyin ve sakal şekillendirme<br />
aparatı ve tarağının kurumasını bekleyin.<br />
4 Aparatın dişlerini altı ayda bir, bir damla dikiş<br />
makinesi yağıyla yağlayın.
176 TÜRKÇE<br />
Saklama<br />
1 Tıraş makinesini birlikte verilen kılıfında<br />
saklayın.<br />
Not: Tıraş makinesini kılıfına koymadan önce<br />
kurumasını beklemenizi öneririz.<br />
Değiştirme<br />
Tıraş başlıklarının değiştirilmesi<br />
Maksimum tıraş performansı için tıraş başlıklarını<br />
iki yılda bir değiştirmenizi öneririz.<br />
Değiştirme uyarısı<br />
Tıraş ünitesi simgesinin yanarak tıraş başlıklarının<br />
değiştirilmesi gerektiği uyarısını verir. Hasarlı tıraş<br />
başlıklarını hemen değiştirin.<br />
Tıraş başlıklarını yalnızca orijinal SH90 <strong>Philips</strong> tıraş<br />
başlıkları ile değiştirin.<br />
1 Tıraş ünitesi simgesi sabit olarak yanar, ok<br />
işaretleri beyaz renkte yanıp söner ve tıraş<br />
makinesi kapatıldığında bir uyarı sesi duyulur.<br />
2 Tıraş başlığı tutucuyu tıraş ünitesinin en alt<br />
kısmından çekip çıkarın.<br />
3 Tutma halkasının yuvasını tutma halkasına<br />
yerleştirin (1), saat yönünün tersine döndürün<br />
(2) ve tıraş başlığından kaldırarak çıkarın (3).<br />
Tutma halkasını tutma halkası yuvasından çıkarın ve<br />
bu işlemi diğer tutma halkaları için tekrarlayın.
TÜRKÇE 177<br />
4 Tıraş başlıklarını tıraş başlığı yuvasından çıkarın<br />
ve çöpe atın.<br />
5 Yeni başlıkları yuvaya takın.<br />
Not: Tıraş başlıklarının iki yanındaki çentiklerin tıraş<br />
başlığı tutucudaki çıkıntılara tam olarak oturduğundan<br />
emin olun.<br />
6 Tutma halkası yuvasını tutma halkasına<br />
yerleştirin (1), tıraş başlığına takın (2) ve tutma<br />
halkasını tekrar yerine oturtmak için saat<br />
yönünden döndürün (3).<br />
Bu işlemi diğer tutma halkaları için tekrarlayın.<br />
Not: Tıraş başlıklarını ve tutma halkalarını tekrar<br />
takarken tıraş başlığı tutucuyu elinizden bırakmayın.<br />
Hasara neden olabileceğinden bu işlem sırasında tıraş<br />
başlığı tutucuyu herhangi bir zemin üzerine koymayın.<br />
7 Tıraş başlığı tutucuyu tekrar tıraş ünitesinin alt<br />
kısmına takın.<br />
8 Tıraş makinesini sıfırlamak için açma/kapama<br />
düğmesini yaklaşık 7 saniye basılı tutun. İki uyarı<br />
sesi duyana kadar bekleyin.
178 TÜRKÇE<br />
Aksesuarların sipariş edilmesi<br />
Aksesuar veya yedek parça satın almak için<br />
www.shop.philips.com/service adresini ziyaret<br />
edin ya da <strong>Philips</strong> bayinize gidin. Aynı zamanda<br />
ülkenizdeki <strong>Philips</strong> Müşteri Destek Merkezi ile iletişim<br />
kurabilirsiniz (iletişim bilgileri için dünya çapında<br />
garanti kitapçığına başvurun).<br />
Aşağıdaki parçalar bulunmaktadır:<br />
--<br />
HQ8505 adaptör<br />
--<br />
SH90 <strong>Philips</strong> tıraş başlıkları<br />
--<br />
HQ110 <strong>Philips</strong> Tıraş Başlığı Temizleme Spreyi<br />
--<br />
RQ111 <strong>Philips</strong> sakal şekillendirme aparatı<br />
--<br />
RQ585 <strong>Philips</strong> temizleme fırçası aparatı<br />
--<br />
RQ560/RQ563 <strong>Philips</strong> temizleme fırçası başlıkları<br />
--<br />
JC301/JC302/JC303/JC304/JC305 temizleme<br />
kartuşu<br />
Tıraş başlıkları<br />
--<br />
Tıraş başlıklarınızı iki yılda bir değiştirmenizi<br />
öneririz. Tıraş başlıklarını mutlaka orijinal SH90<br />
<strong>Philips</strong> tıraş başlıklarıyla değiştirin.
TÜRKÇE 179<br />
Geri dönüşüm<br />
--<br />
Ürünlerin üzerindeki bu simge, ürünün 2012/19/<br />
EU sayılı Avrupa Yönergesi kapsamında olduğu<br />
anlamına gelir.<br />
--<br />
Bu simge, ürünün normal evsel atıklarla birlikte<br />
atılmaması gereken ve 2006/66/EC sayılı Avrupa<br />
Yönergesi kapsamında olan dahili şarj edilebilir<br />
pil içerdiği anlamına gelir. Şarj edilebilir pilin bir<br />
uzman tarafından çıkarılması için ürününüzü resmi<br />
bir toplama noktasına veya bir <strong>Philips</strong> servis<br />
merkezine götürmenizi önemle tavsiye ederiz.<br />
--<br />
Elektrikli ve elektronik ürünlerle şarj edilebilir<br />
pillerin ayrı toplanmasıyla ilgili yerel sist hakkında<br />
bilgi edinin. Yerel kurallara uyun, ürün ve pilleri asla<br />
normal ev atıklarıyla birlikte atmayın. Eski ürün ve<br />
şarj edilebilir pillerin doğru şekilde atılması, çevreyi<br />
ve insan sağlığını olumsuz etkileyecek sonuçların<br />
önlenmesine yardımcı olur.<br />
Şarj edilebilir tıraş makinesi pilinin<br />
çıkarılması<br />
Dikkat: Şarj edilebilir pilin bir uzman tarafından<br />
çıkarılmasını önemle tavsiye ederiz.<br />
Şarj edilebilir pilleri, sadece tıraş makinesini<br />
atacağınız zaman çıkarın. Pilleri çıkarırken tamamen<br />
boş olduklarından emin olun.<br />
Pil şeritleri keskindir, dikkatli olun.<br />
1 Tornavidayı cihazın alt kısmında ön ve arka<br />
panellerin arasında yer alan yuvaya sokun.<br />
Arka paneli çıkarın.
180 TÜRKÇE<br />
2 Ön paneli çıkarın.<br />
3 İç panelin üst kısmında yer alan iki vidayı sökün<br />
ve iç paneli çıkarın.<br />
4 Şarj edilebilir pili tornavida yardımıyla çıkarın.<br />
Garanti ve destek<br />
Bilgi veya desteğe ihtiyaç duyarsanız lütfen<br />
www.philips.com/support adresini ziyaret edin<br />
veya dünya çapında garanti kitapçığını okuyun.<br />
Garanti sınırlamaları<br />
Tıraş başlıkları (bıçaklar ve koruyucular) aşınmaya<br />
maruz kaldığından uluslararası garanti kapsamında<br />
değildir.<br />
Sorun giderme<br />
Bu bölüm, cihazda en sık karşılaşabileceğiniz<br />
sorunları özetlemektedir. Sorunu aşağıdaki bilgilerle<br />
çözemiyorsanız, sık sorulan sorular listesi için<br />
www.philips.com/support adresini ziyaret<br />
edin veya ülkenizdeki Müşteri Destek Merkezi<br />
ile iletişim kurun.<br />
Sorun Nedeni Çözüm<br />
Açma/kapama<br />
düğmesine bastığımda<br />
tıraş makinesi çalışmıyor.<br />
Tıraş makinesi hala<br />
elektriğe bağlıdır.<br />
Güvenlik nedeniyle,<br />
tıraş makinesi yalnızca<br />
kablosuz olarak<br />
kullanılabilir.<br />
Şarj edilebilir pil<br />
bitmiştir.<br />
Tıraş makinesini<br />
prizden çekin ve<br />
çalıştırmak için<br />
açma/kapama<br />
düğmesine basın.<br />
Pili tekrar şarj edin.<br />
(bkz. ‘Şarj etme’<br />
bölümü).
Sorun Nedeni Çözüm<br />
TÜRKÇE 181<br />
Tıraş makinesi eskisi gibi<br />
iyi tıraş etmiyor.<br />
Tıraş başlıklarını<br />
değiştirdiğim halde cihaz<br />
hala değiştirme uyarısı<br />
veriyor.<br />
Ekranda aniden<br />
tıraş başlığı simgesi<br />
görüntülendi.<br />
Seyahat kilidi<br />
devrededir.<br />
Tıraş başlıkları hasarlı<br />
veya yıpranmıştır.<br />
Kıllar veya kir tıraş<br />
başlıklarını tıkamıştır.<br />
Tıraş makinesini<br />
sıfırlamamış olabilirsiniz.<br />
Bu simge, bir<br />
değiştirme uyarısıdır.<br />
Seyahat kilidini<br />
devre dışı bırakmak<br />
için açma/kapama<br />
düğmesini 3 saniye<br />
basılı tutun.<br />
Tıraş başlıklarını<br />
değiştirin<br />
(bkz.‘Değiştirme’<br />
bölümü).<br />
Tıraş başlıklarını<br />
temizleyin<br />
(bkz.‘Temizlik ve<br />
bakım’ bölümü).<br />
Tıraş olmaya<br />
devam etmeden<br />
önce tıraş<br />
makinesini iyice<br />
temizleyin<br />
(bkz.‘Temizlik ve<br />
bakım’ bölümü).<br />
Açma/kapama<br />
düğmesine yaklaşık<br />
7 saniye basarak<br />
tıraş makinesini<br />
sıfırlayın (bkz.<br />
‘Değiştirme’<br />
bölümü).<br />
Tıraş başlıklarını<br />
değiştirin<br />
(bkz.‘Değiştirme’<br />
bölümü).
182 TÜRKÇE<br />
Sorun Nedeni Çözüm<br />
Şarj sırasında ekranda<br />
aniden bir ünlem işareti<br />
görüntülendi.<br />
Ekranda aniden bir<br />
ünlem işareti, değiştirme<br />
uyarısı ve temizlik uyarısı<br />
görüntülendi.<br />
Tıraş makinesinin alt<br />
kısmından su sızıyor.<br />
Açma/kapama<br />
düğmesine bastığımda<br />
SmartClean sistemi<br />
çalışmıyor.<br />
SmartClean sisteminde<br />
temizledikten sonra<br />
tıraş makinesi tamamen<br />
temiz olmuyor.<br />
Tıraş makinesini aşırı<br />
ısınmıştır.<br />
Tıraş başlıkları kirli veya<br />
hasarlıdır.<br />
Temizlik sırasında tıraş<br />
makinesinin iç gövdesi<br />
ile dış muhafazası<br />
arasında su birikebilir.<br />
SmartClean sistemi<br />
elektriğe bağlı değildir.<br />
Tıraş makinesini<br />
SmartClean sistemine<br />
düzgün şekilde<br />
yerleştirmediğinizden<br />
SmartClean sistemi ile<br />
tıraş makinesi arasında<br />
elektrik bağlantısı<br />
bulunmuyor olabilir.<br />
Tıraş makinesini<br />
prizden çekerek<br />
yaklaşık 10 dakika<br />
bekleyin.<br />
Tıraş başlıklarını<br />
değiştirin<br />
(bkz.‘Değiştirme’<br />
bölümü) veya<br />
temizleyin<br />
(bkz.‘Temizlik ve<br />
bakım’ bölümü).<br />
Bu durum normaldir<br />
ve tıraş makinesi<br />
içindeki tüm elektronik<br />
parçalar su<br />
geçirmez bir güç<br />
ünitesi içine yerleştirildiğinden<br />
tehlike<br />
teşkil etmez.<br />
Küçük fişi<br />
SmartClean<br />
sistemine takın ve<br />
adaptörü prize takın.<br />
SmartClean sistemi<br />
ile tıraş makinesi<br />
arasında doğru<br />
şekilde bağlantı<br />
sağlanması için üst<br />
kapağı bastırın<br />
(‘klik’ sesi duyulur).
Sorun Nedeni Çözüm<br />
TÜRKÇE 183<br />
Tıraş<br />
makinesini SmartClean<br />
sisteminde şarj ettikten<br />
sonra tıraş makinesi<br />
tamamen şarj olmuyor.<br />
Temizleme kartuşunun<br />
değiştirilmesi gerekir.<br />
Temizleme kartuşu<br />
boştur. Değiştirme<br />
simgesi, temizleme<br />
kartuşunun<br />
değiştirilmesi gerektiğini<br />
göstermek üzere yanıp<br />
söner.<br />
Orijinal <strong>Philips</strong><br />
temizleme kartuşu<br />
yerine başka bir<br />
temizleme sıvısı<br />
kullanmış olabilirsiniz.<br />
Temizleme kartuşunun<br />
boşaltma kanalı<br />
tıkanmış olabilir.<br />
Tıraş<br />
makinesini SmartClean<br />
sistemine düzgün<br />
yerleştirmemiş<br />
olabilirsiniz.<br />
Temizleme<br />
kartuşunu değiştirin<br />
(bkz.‘Temizlik ve<br />
bakım’ bölümü).<br />
SmartClean<br />
sistemine yeni bir<br />
temizleme kartuşu<br />
yerleştirin<br />
(bkz.‘Temizlik ve<br />
bakım’ bölümü).<br />
Sadece orijinal<br />
<strong>Philips</strong> temizleme<br />
kartuşu kullanın.<br />
Boşaltma kanalında<br />
biriken kılları<br />
bir kürdan ile<br />
temizleyin.<br />
SmartClean sistemi<br />
ile tıraş makinesi<br />
arasında doğru<br />
şekilde bağlantı<br />
sağlanması için üst<br />
kapağı bastırın<br />
(‘klik’ sesi duyulur).
© 2014 Koninklijke <strong>Philips</strong> Electronics N.V.<br />
All rights reserved.<br />
Document order number: 4222.002.5615.3 (12/2014)


