DU.35L2FC - TAS Unger OG
DU.35L2FC - TAS Unger OG
DU.35L2FC - TAS Unger OG

You also want an ePaper? Increase the reach of your titles
YUMPU automatically turns print PDFs into web optimized ePapers that Google loves.
L8542848<br />
Rev. 12/05/02<br />
Manual istruzioni e catalogo ricambi<br />
Operating instructions and spare parts catalogue<br />
Betriebsanleitung und Ersatzteilliste<br />
Livret d’instructions et catalogue des pieces de rechange<br />
Manual de instrucciones y catálogo de recambios<br />
Książeczka z instrukcjami i katalog części wymiennych<br />
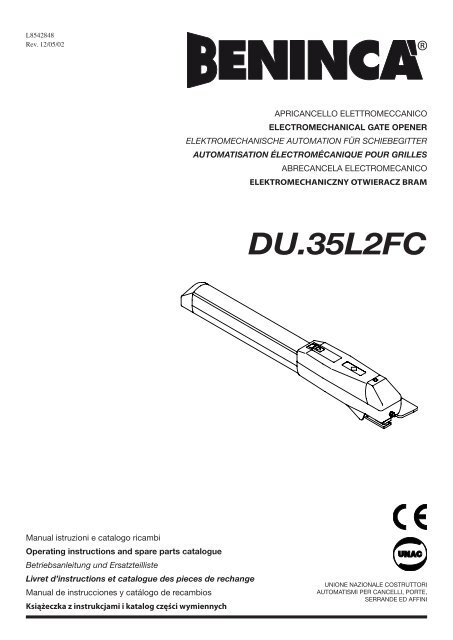
APRICANCELLO ELETTROMECCANICO<br />
ELECTROMECHANICAL GATE OPENER<br />
ELEKTROMECHANISCHE AUTOMATION FÜR SCHIEBEGITTER<br />
AUTOMATISATION ÉLECTROMÉCANIQUE POUR GRILLES<br />
ABRECANCELA ELECTROMECANICO<br />
ELEKTROMECHANICZNY OTWIERACZ BRAM<br />
<strong>DU.35L2FC</strong><br />
UNIONE NAZIONALE COSTRUTTORI<br />
AUTOMATISMI PER CANCELLI, PORTE,<br />
SERRANDE ED AFFINI
2<br />
Fabbricante: Automatismi Benincà S.r.l.<br />
Indirizzo: Via Capitello, 45 - 36066 Sandrigo (VI) - Italia<br />
Dichiarazione CE di conformità per macchine<br />
(Direttiva 89/392 CE, Allegato II, parte B)<br />
Divieto di messa in servizio<br />
Dichiara che: lʼautomazione per cancelli a battente modello <strong>DU.35L2FC</strong>.<br />
• è costruito per essere incorporato in una macchina o per essere assemblato con altri macchinari per costituire una macchina considerata<br />
dalla Direttiva 89/392 CE, come modificata;<br />
• non è dunque conforme in tutti i punti alle disposizioni di questa Direttiva;<br />
• è conforme alle condizioni delle seguenti altre Direttive CE:<br />
Direttiva bassa tensione 73/23/CEE, 93/68/CEE.<br />
Direttiva compatibilità elettromagnetica 89/336/CEE, 93/68/CEE.<br />
e che:<br />
• sono state applicate le seguenti (parti/clausole di) norme armonizzate:<br />
EN 61000-6-3, EN 61000-6-1, EN 60335-1.<br />
e inoltre dichiara che non è consentito mettere in servizio il macchinario fino a che la macchina in cui sarà incorporato o di cui diverrà<br />
componente sia stata identificata e ne sia stata dichiarata la conformità alle condizioni della Direttiva 89/392 CE e alla legislazione<br />
nazionale che la traspone, vale a dire fino a che il macchinario di cui alla presente dichiarazione non formi un complesso unico con<br />
la macchina finale.<br />
Benincà Luigi, Responsabile legale.<br />
Sandrigo, 01/07/2004.<br />
Manufacturer: Automatismi Benincà S.r.l.<br />
Address: Via Capitello, 45 - 36066 Sandrigo (VI) - Italia<br />
Declaration by the manufacturer<br />
(Directive 89/392/EEC, Art. 4.2 and Annex II, sub B)<br />
Divieto di messa in servizio<br />
Herewith declares that: the operator for hinged gates model <strong>DU.35L2FC</strong>.<br />
• is intended to be incorpored into machinery or to be assembled with other machinery to constitute machinery covered by Directive<br />
89/392 EEC, as amended;<br />
• does therefore not in every respect comply with the provisions of this Directive;<br />
• does comply with the provisions of the following other EEC Directives:<br />
Direttiva bassa tensione 73/23/CEE, 93/68/CEE.<br />
Direttiva compatibilità elettromagnetica 89/336/CEE, 93/68/CEE.<br />
and that:<br />
• the following (parts/clauses of) harmonized standards have been applied:<br />
EN 61000-6-3, EN 61000-6-1, EN 60335-1.<br />
and furthermore declares that it is not allowed to put the machinery into service until the machinery into which it is to be incorporated<br />
or of which it is to be a component has been found and declared to be in conformity with the provisions of Directive 89/392/EEC and<br />
with national implementing legislation, i.e. as a whole, including the machinery referred to in this declaration.<br />
Benincà Luigi, Responsabile legale.<br />
Sandrigo, 01/07/2004.
Herstellerklärung<br />
(gemäß EG-Richtlinie 89/392/EWG, Artikel 4.2 und Anhang II, sub B.)<br />
Verbot der Inbetriebnahme<br />
Hersteller: Automatismi Benincà S.r.l.<br />
Adresse: Via Capitello, 45 - 36066 Sandrigo (VI) - Italia<br />
erklärt hiermit, daß: Antriebe für Drehflügeltore <strong>DU.35L2FC</strong>.<br />
• vorgesehen ist zum Einbau in eine Maschine oder mit anderen Maschinen zu einer Maschine im Sinne der Richtlinie 89/392/EWG,<br />
inklusive deren Änderunge, zusammengefügt werden soll;<br />
• aus diesem Grunde nicht in allen Teilen den Bestimmungen dieser Richtlinie entspricht;<br />
• den Bestimmungen der folgenden anderen EG-Richtlinien entspricht:<br />
Direttiva bassa tensione 73/23/CEE, 93/68/CEE.<br />
Direttiva compatibilità elettromagnetica 89/336/CEE, 93/68/CEE.<br />
und daß:<br />
• folgende harmonisierte Normen (oder Teile/Klauseln hieraus) zur Anwendung gelangten:<br />
EN 61000-6-3, EN 61000-6-1, EN 60335-1.<br />
und erklärt des weiteren daß die Inbetriebnahme solange untersagt ist, bis die Maschine oder Anlage, in welche diese Maschine<br />
eingebaut wird oder von welcher sie eine Komponente dasteilt, als Ganzes (d.h. inklusive der Maschine, für welche diese Erklärung<br />
ausgesteilt wurde) den Bestimmungen der Richtlinie 89/392/EWG sowie dem entsprechenden nationalen Reschtserlaß zur Umsetzung<br />
der Richtlinie in nationales Recht entspricht, und die entsprechende Konformitätserklärung ausgestellt ist.<br />
Benincà Luigi, Responsabile legale.<br />
Sandrigo, 01/07/2004.<br />
Fabricant: Automatismi Benincà S.r.l.<br />
Adresse: Via Capitello, 45 - 36066 Sandrigo (VI) - Italia<br />
Declaration du fabricant<br />
(Directive 89/392/CEE, Article 4.2 et Annex II, Chapitre B)<br />
Interdiction de mise en service<br />
Déclaire ci-apres que: lʼautomation pour portails ouvrants <strong>DU.35L2FC</strong>.<br />
• est prévue pour être incorporée dans une machine ou être assemblée avec dʼautres machines pour consituer une machine couverte<br />
par la directive 89/392/CEE, modifiée;<br />
• nʼest donc pas conforme en tout point aux dispositions de cette directive;<br />
• est conforme aux dispositions des directives CEE suivantes:<br />
Direttiva bassa tensione 73/23/CEE, 93/68/CEE.<br />
Direttiva compatibilità elettromagnetica 89/336/CEE, 93/68/CEE.<br />
et que:<br />
• les (parties/paragraphes) suivants des normes harmonisées ont été appliquées:<br />
EN 61000-6-3, EN 61000-6-1, EN 60335-1.<br />
et déclare par ailleurs quʼil est interdit de mettre la machine en service avant que la machine dans laquelle elle sera incorporée ou<br />
dont elle constitue une parte ait été considerée et declarée conforme aux dispositions de la Directive 89/392/CEE et aux législations<br />
nationales la transposant, cʼest-à-dire formant un ensemble incluant la machine concernée par la présente déclaration.<br />
Benincà Luigi, Responsabile legale.<br />
Sandrigo, 01/07/2004.<br />
3
4<br />
Fabricante: Automatismi Benincà S.r.l.<br />
Dirección: Via Capitello, 45 - 36066 Sandrigo (VI) - Italy<br />
Declaración CE de conformidad para maquinas<br />
(Directiva 89/392 CE, Apartado II, parte B)<br />
Prohibición de puesta en servicio<br />
Declara que: la automatización para cancelas de batiente <strong>DU.35L2FC</strong>.<br />
• está construída para ser incorporada en una máquina o para ser ensamblada con otras maquinarias para construir una máquina<br />
considerada por la Directiva 89/392 CE, como modificada;<br />
• no es, por consiguiente, conforme en todos los puntos a la posiciones de esta Directiva;<br />
• es conforme a las condiciones de las siguientes otras Directivas CE:<br />
Directiva de la baja tensión 73/23/CEE, 93/68/CEE.<br />
Directiva de compatibilidad electromagnética 89/336/CEE, 93/68/CEE<br />
y que<br />
• han sido aplicadas las siguientes (partes/claúsulas de) normas armonizadas:<br />
EN 61000-6-3, EN 61000-6-1, EN 60335-1.<br />
además declara que no ha permitido poner en servicio la maquinaria hasta que la máquina en la cual será incorporada o de la cual<br />
resultará componente esté identificada y no sea declarada la conformidad a las condiciones de la Directiva 89/392 CE y a la legislación<br />
nacional que le corresponda, vale decir, hasta que la maquinaria correspondiente a la presente declaración no forme un conjunto único<br />
con la máquina final.<br />
Benincà Luigi, Responsable legal.<br />
Sandrigo, 01/07/2004.<br />
Producent: Automatismi Benincà S.r.l.<br />
Adres: Via Capitello, 45 - 36066 Sandrigo (VI) - Italia<br />
Deklaracja UE o zgodności z normami dla maszyn<br />
(Wytyczna 89/392 UE, Załącznik II, Część B)<br />
Zakaz użytkowania<br />
Oświadcza że: Automatyzm do bram uchylnych model <strong>DU.35L2FC</strong>.<br />
• został opracowany z myślą o wbudowaniu go do maszyny lub zmontowania z innymi urządzeniami w celu skonstruowania maszyny<br />
uznanej przez Wytyczną 89/392 UE, za zmodyfikowaną;<br />
• nie jest więc zgodny we wszystkich punktach z Wytyczną;<br />
• jest natomiast zgodny z wymogami innych, poniżej wyszczególnionych, Wytycznych UE:<br />
Wytyczna o niskim napięciu 73/23/EWG i 93/68/EWG<br />
Wytyczna o zdolności współdziałania elektromagnetycznego 89/336/EWG, 93/68/EWG.<br />
i że:<br />
• zastosowane zostały następujące normy (ich klauzule/części) standard:<br />
EN 61000-6-3, EN 61000-6-1, EN 60335-1.<br />
ponadto oświadcza, że zabronione jest stosowanie automatyzmu do czasu kiedy maszyna, do której ma być wbudowany lub stanowić<br />
jej element składowy, nie uzyska świadectwa identyfikacyjnego oraz świadectwa orzekającego jej zgodność z wymogami Wytycznej<br />
89/392 UE oraz z przepisami obowiązującymi w kraju sprowadzającym urządzenie, a więc do czasu kiedy automatyzm stanowiący<br />
przedmiot niniejszego oświadczenia nie stanie się częścią składową urządzenia gotowego.<br />
Benincà Luigi, Radca prawny<br />
Sandrigo, 01/07/2004.
Dati tecnici Technical data Technische Daten Donnees technique Datos técnicos Dane techniczne <strong>DU.35L2FC</strong><br />
Alimentazione<br />
Potenza assorbita<br />
Corrente assorbita<br />
Spinta<br />
Classe isolamento<br />
Temper. funzionamento<br />
Rumorosità<br />
Condensatore<br />
Lubrificazione<br />
Corsa standard<br />
Peso<br />
Power supply<br />
Absorbed rating<br />
Absorbed current<br />
Thrust<br />
Insulation class<br />
Operating temperature<br />
Noise level<br />
Capacitor<br />
Lubrication<br />
Standard stroke<br />
Weight<br />
Arresto in apertura (necessario se non si usa il F. C.).<br />
Stop when opening (necessary if not using the<br />
limit stop).<br />
Endanschlag zur Öffnung (nötig, wenn kein Endschalter<br />
benutzt wird).<br />
Arrêt en ouverture (arrêt en ouverture nécessaire<br />
si on n’utilise pas le F.C.).<br />
Tope en apertura (necesario si no se usa el F.C.).<br />
Zatrzymanie przy otwieraniu (konieczne, jeżeli nie<br />
używa się wyłącznika krańcowego)<br />
Speisung<br />
Leistung<br />
Strom-Verbrauch<br />
Druck<br />
Isolierklasse<br />
Laufzeit<br />
Geräuschentwicklung<br />
Kondensator<br />
Schmierung<br />
Standardhub<br />
Gewicht<br />
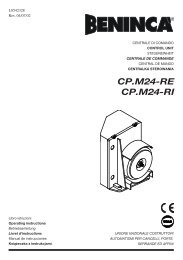
Dimensioni d’ingombro<br />
Overall dimensions<br />
Abmessungen<br />
Dimensions d’encombrement<br />
Dimensiones exteriores<br />
Wymiary gabarytowe<br />
970<br />
Alimentation<br />
Puissance absorbée<br />
Courant absorbé<br />
Poussée<br />
Classe d'isolement<br />
Température de fonct.<br />
Bruit<br />
Condensateur<br />
Lubrification<br />
Course standard<br />
Poids<br />
500*<br />
Fig.1<br />
Alimentación<br />
Potencia absorbida<br />
Corriente absorbida<br />
Par<br />
Clase de aislamiento<br />
Temperatura funcionam.<br />
Ruido<br />
Condensador<br />
Lubrificación<br />
Carrera estancar<br />
Peso<br />
354<br />
Zasilanie<br />
Natężemie<br />
Pobór mocy<br />
Skok<br />
Klasa izolacji<br />
Temperatura przy pracy<br />
max. halas<br />
Kondensator<br />
Smarowanie<br />
Posuw standard<br />
Ciężar<br />
92<br />
* Corsa.<br />
Stroke.<br />
Hub.<br />
Course.<br />
Carrera.<br />
Posuw.<br />
136<br />
230 Vac<br />
310 W<br />
1,4 A<br />
2000 N<br />
Arresto in chiusura - indispensabile.<br />
Stop when closing - essential.<br />
Endanschlag zur Schließung - unerläßlich.<br />
Arrêt en fermeture - indispensable.<br />
Tope de cierre indispensable.<br />
Zatrzymanie przy zamykaniu; obowiązkowo.<br />
F<br />
-20°C / +70°C<br />
6<br />
Apertura max.<br />
Max. opening<br />
Max. Öffnung<br />
Ouverture max.<br />
Abiertura max.<br />
Z<br />
K<br />
P<br />
Tempo apertura 90°<br />
Opening time<br />
Öffnungszeit<br />
Temps d’ouverture<br />
Tiempo de abiertura<br />
X Y Z K M *<br />
Otwarcie maks.<br />
min.<br />
max<br />
Czas otwierania<br />
X<br />
M<br />
Dimensioni max. anta<br />
Max. wing dimensions<br />
Max Flügelmasse<br />
Dimens. max. de la porte<br />
Dimens. max. de la hoja<br />
Maks. wymiary skrzydła<br />
L (m) P (kg)<br />
2 600<br />
90° 150 150 90 675 90<br />
30"<br />
2,5 500<br />
90°<br />
130°<br />
230<br />
150<br />
230<br />
150<br />
160<br />
* N.B.: La quota M max. è riferita ad una quota V= 50 mm<br />
* N.B.: The dimension M max. refers to a dimension V= 50 mm<br />
* N.B.: Das Maß M max. bezieht sich auf ein Maß V= 50 mm<br />
* N.B.: La cote M max. est référée à une cote V= 50 mm<br />
* N.B.: La cota M máx. hace referencia a la cota V= 50 mm<br />
* N.B.: Wymiar M max odnosi się do parametru V = 50 mm<br />
90<br />
T<br />
600<br />
675<br />
155<br />
90<br />
Mettere a livello.<br />
Level.<br />
Nivellieren.<br />
Mettre de niveau.<br />
Nivelar.<br />
Uliniować<br />
45"<br />
35"<br />
3 400<br />
4<br />
300<br />
5 200<br />
2<br />
Fig.2<br />
400<br />
2,5 350<br />
3 300<br />
4 200<br />
S<br />
Y
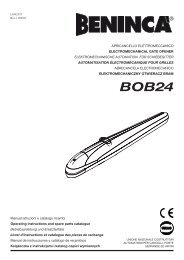
U<br />
Fig.3<br />
Collegamenti - Connections - Kabelanschlüsse<br />
Connexions - Conexiones - Połączenia<br />
Fig.A - Cablaggio standard - i finecorsa di apertura/chiusura (FCO/FCC)<br />
interrompono le rispettive fasi del motore.<br />
Pic.A - Default wiring - Opening and closing limit switches are connected<br />
in series with the motor’s phases.<br />
Abb. A - Standardverkabelung - die Endschalter für Öffnen/Schließen (FCO/<br />
FCC) unterbrechen die jeweiligen Motorphasen.<br />
Fig.A – Câblage standard - les fins de course d’ouverture et de fermeture<br />
(FCO/FCC) interrompent les phases respectives du moteur.<br />
Fig.A – Cableo estándar – los fines de carrera de apertura/cierre (FCO/FCC)<br />
interrumpen las respectivas fases del motor.<br />
Rys. A – Trasy kablowe standard - krańcówki otwierania/zamykania (FCO/FCC)<br />
przerywają odnośne fazy silnika.<br />
� �<br />
�� ���<br />
� � � � � �<br />
��<br />
�<br />
��<br />
��� ���<br />
��<br />
��� ���<br />
��<br />
���������<br />
������������<br />
�������������<br />
��<br />
������������<br />
���������������<br />
�������������<br />
�<br />
R<br />
D<br />
M<br />
V<br />
�� ���<br />
Vite Ø3.9 UNI 6955.<br />
Screw Ø3.9 UNI 6955.<br />
Schraube Ø3.9 UNI 6955.<br />
Vis Ø3.9 UNI 6955.<br />
Tornillo Ø3.9 UNI 6955<br />
Sruba Ø3.9 UNI 6955.<br />
Fig.B - Per collegare i finecorsa di apertura/chiusura (FCO/FCC) alla centrale modificare i collegamenti<br />
come indicato. E' necessario aggiungere il morsetto evidenziato per il collegamento<br />
del comune finecorsa (+V).<br />
Pic.B - To connect the opening and closing limit switches (FCO/FCC) to the main control<br />
board is necessary to perform the changes showed in this picture. One more terminal<br />
(+V) must be added in order to connect the limit switches common.<br />
Abb. B – Um die Endschalter für Öffnen/Schließen (FCO/FCC) an die Zentrale anzuschließen,<br />
die Verbindungen wie angegeben verändern. Für den Anschluss des gemeinsamen Leiters des<br />
Endschalters (+V) muss die markierte Klemme hinzugefügt werden.<br />
Fig.B – Pour connecter les fins de course d’ouverture et de fermeture (FCO/FCC) à la<br />
logique de commande, modifier les connexions suivant les indications. il faut ajouter la<br />
borne mise en évidence pour la connexion du conducteur commun fin de course (+V).<br />
Fig.B – Para conectar los fines de carrera de apertura/cierre (FCO/FCC) a la centralita,<br />
modificar las conexiones como se indica. Es necesario incorporar el borne indicado<br />
para conectar el conductor común de fin de carrera (+V).<br />
Rys. B – By podłączyć krańcówki otwierania/zamykania (FCO/FCC) do centralki należy<br />
zmienić podłączenia według podanych wskazówek. Konieczny jest dodatkowy,<br />
oznaczony na rysunku, zacisk do połączenia ze wspólną krańcówką (+V).<br />
���<br />
������ ������<br />
����� ������ ����<br />
���������� ����������<br />
������ ������<br />
����� �����<br />
�������<br />
P<br />
� � � � � �<br />
��<br />
��<br />
��<br />
��� ���<br />
��� ��� ��� ���<br />
��<br />
7
8<br />
T<br />
D<br />
Anticipa.<br />
Advance.<br />
Verlangsamt.<br />
Anticipe.<br />
Adelanta.<br />
Wyprzedzenie<br />
Posticipa.<br />
Postpone.<br />
Anziehen.<br />
Diffère.<br />
Atrasa.<br />
Opóźnienie<br />
marrone: F.C. chiude<br />
brown: limit stop closes<br />
brauner Draht: Endschalter richtung ”Tor-zu”<br />
marron: le fin de course referme<br />
marron: F.C. cerrar<br />
Brązowy:Wył. krańc. zamykania<br />
Posticipa.<br />
Postpone.<br />
Anziehen.<br />
Diffère.<br />
Atrasa.<br />
Opóźnienie<br />
Attenzione: se l’automatismo non viene fermato in tempo,<br />
la piastra può tranciare il cavo.<br />
Warning: if the automatism does not stop in time, the<br />
plate may cut the cable.<br />
Achtung: Wenn der Antrieb nicht rechtzeitig angehalten<br />
wird, kann die Platte das Kabel durchschneiden.<br />
Attention: si l’automatisme n’est pas arrêté à temps,<br />
la plaque peut couper le câble.<br />
Atencion! Si el automatismo no se para a tiempo, la pletina<br />
de anclaje puede cortar la manguera.<br />
Uwaga: jeżeli urządzenie automatyzacji nie zostanie<br />
odpowiednio wcześnie zatrzymane, płyta może przeciąć<br />
przewód.<br />
Anticipa.<br />
Advance.<br />
Verlangsamt.<br />
Anticipe.<br />
Adelanta.<br />
Wyprzedzenie<br />
bleu: comune F.C.<br />
blue: limit stop common<br />
blauer Draht: gemeinsamer Erdung<br />
bleu: fin de course commun<br />
azul: comun F.C.<br />
Granatowy: Wspólny wył. krańc.<br />
F.C. apertura<br />
Opening limit stop<br />
Öffnungsendschalter<br />
Fin de course d’ouverture<br />
F.C. apertura<br />
Wył. krańc. otwierania<br />
F.C. chiusura<br />
Closing limit stop<br />
Endschalter in ”zu”<br />
Fin de course de fermeture<br />
F.C. de cierre<br />
Wył. krańc. zamykania<br />
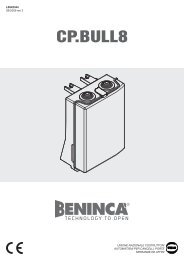
Fig.4<br />
marrone: F.C. apre<br />
brown: limit stop opens<br />
brauner Draht: Endschalter richtung ”Tor-auf”<br />
marron: le fin de course ouvre<br />
marron: F.C. abrir<br />
Brązowy: Wył- krańc. otwierania<br />
bleu: comune F.C.<br />
blue: limit stop common<br />
blauer Draht: gemeinsamer Erdung<br />
bleu: fin de course commun<br />
azul: comun F.C.<br />
Granatowy: Wspólny wył. krańc.<br />
F<br />
N.B.: Utilizzare solamente questo foro della piastra.<br />
N.B.: Only use this plate hole.<br />
Anmerkung: Nur diese Öffnung der Platte verwenden.<br />
N.B.: Utiliser seulement ce trou de la plaque.<br />
NOTA: Utilizar solamente este agujero de la pletina de anclaje.<br />
N.B.: Należy używać wyłącznie tego otworu płyty.<br />
F
C<br />
Tirare.<br />
Pull.<br />
Ziehen.<br />
Tirer.<br />
Tirar.<br />
Ciągnąć<br />
Fig.5<br />
Spostare nel senso della freccia.<br />
Move arrowise.<br />
In Pfeilrichtung schieben.<br />
Déplacer dans le sens de la flèche.<br />
Desplazar en el sentido de la flecha.<br />
Przesunąć w kierunku strzałki<br />
Premere.<br />
Press.<br />
Drücken.<br />
Pousser.<br />
Presionar.<br />
Wcisnąć<br />
Inserire e ruotare di 90°.<br />
Insert and rotate by 90°.<br />
Einstecken und um 90° drehen.<br />
Insérer et tourner de 90°.<br />
Insertar y girar 90°.<br />
Wprowadzić i obrócić o 90°.<br />
Farla ruotare fino sentire lo scatto.<br />
Rotate till the click.<br />
Drehen, bis man es schnappen hört.<br />
La faire tourner jusqu’à obtention du déclic.<br />
Hacerla girar hasta sentir el golpecillo de desbloqueo.<br />
Obracać aż do usłyszenia dźwięku wskazującego<br />
zadziałanie urządzenia.<br />
9
10<br />
2x0,35<br />
2<br />
2x1,5<br />
2x0,35<br />
2x1<br />
3<br />
4x1,5<br />
1<br />
Legenda:<br />
1 Motoriduttore <strong>DU.35L2FC</strong><br />
2 Fotocellule SC.P50 (da incasso), SC.P50E (da esterno)<br />
3 Selettore a chiave ID.SC o ID.SCE (da esterno) o tastiera digitale ID.PTD<br />
4 Lampeggiante ID.LUX<br />
5 Antenna LO.E1N (superreattiva) o LO.E1LUX (quarzata)<br />
6 Centrale elettronica DA.93A<br />
Legenda:<br />
1 Motoreducer <strong>DU.35L2FC</strong><br />
2 Photo-electric cells SC.P50 (built in), SC.P50E (external)<br />
3 Key selector ID.SC or ID.SCE (external) or digital keyboard ID.PTD<br />
4 Flash-light ID.LUX<br />
5 Antenna LO.E1N (superreactive) or LO.E1LUX (quartz)<br />
6 Electronic gearcase DA.93A<br />
Zeichenerklärung:<br />
1 Getriebemotor <strong>DU.35L2FC</strong><br />
2 Fotozelle SC.P50 (eingelegt), SC.P50E (außenliegend)<br />
3 Schlüssel-Selektor ID.SC oder ID.SCE (außenliegend) oder Digital-Tastatur ID.PTD<br />
4 Blinker ID.LUX<br />
5 Antennne LO.E1N (Superreaktiv) oder LO.E1LUX (Quartz)<br />
6 Elektroschrank DA.93A<br />
4<br />
N.B.: Tenere separati i cavi di potenza da quelli ausiliari.<br />
N.B.: The power cables must be kept separated from the auxiliary cables.<br />
Wichtig: Leistungskabel von Hilfskabeln getrennt halten.<br />
N.B.: Séparer les câbles de puissance des câbles auxiliaires.<br />
N.B.: Tener separados los cables de potencia de los auxiliares.<br />
Uwaga: należy trzymać w oddali przewody zasilania od przewodów pomocniczych.<br />
1<br />
2<br />
4x1,5<br />
2x1<br />
3x1,5 min<br />
230Vac<br />
4x0,35<br />
Légende:<br />
1 Moteur-réducteur <strong>DU.35L2FC</strong><br />
2 Photocellule SC.P50 (noyée) - SC.P50E (d’extérieur)<br />
3 Selecteur à clé ID.SC ou ID.SCE (d’extérieur) ou clavier digital ID.PTD<br />
4 Clignotant ID.LUX<br />
5 Antenne LO.E1N (super-active) ou LO.E1LUX (au quartz)<br />
6 Centrale électronique DA.93A<br />
RG 58<br />
Leyenda:<br />
1 Motorreductor <strong>DU.35L2FC</strong>.<br />
2 Fotocélulas SC.P50 (de empotrar), SC.P50E (de superficie).<br />
3 Selectores a llave ID.SC o ID.SCE (de superficie).<br />
4 Relampagueador ID.LUX.<br />
5 Antena LO.E1N (superreactiva) o LO.E1LUX (cuarzada).<br />
6 Central electrónica DA.93A.<br />
Legenda:<br />
1 Siłownik <strong>DU.35L2FC</strong><br />
2 Fotokomórki SC.P50 (wbudowane), SC.P50E (zewnętrzne)<br />
3 Wyłącznik kluczowy ID.SC lub ID.SCE (zewnętrzny) lub elektroniczna tablica<br />
przyciskowa ID.PTD<br />
4 Lampa migocąca ID.LUX<br />
5 Antena LO.E1N (superczuła) lub LO.E1LUX (kwarcowa )<br />
6 Centralka elektroniczna DA.93A<br />
5<br />
6
Introduzione<br />
Ci congratuliamo con voi per aver scelto il motoriduttore <strong>DU.35L2FC</strong>.<br />
Tutti gli articoli della vasta gamma Benincà sono il frutto di una ventennale esperienza nel settore degli automatismi e di<br />
una continua ricerca di nuovi materiali e di tecnologie all’avanguardia.<br />
Proprio per questo, oggi siamo in grado di offrire dei prodotti estremamente affidabili che, grazie alla loro potenza, efficacia<br />
e durata, soddisfano pienamente le esigenze dell’utente finale.<br />
Tutti i nostri prodotti vengono costruiti in conformità alle norme vigenti e sono coperti da garanzia.<br />
Inoltre, una polizza R.C. prodotti stipulata con primaria compagnia assicurativa copre eventuali danni a cose o persone<br />
causati da difetti di fabbricazione.<br />
Notizie generali<br />
Per un buon funzionamento delle automazioni in oggetto, il cancello da automatizzare dovrà rispondere alle seguenti<br />
caratteristiche:<br />
- buona robustezza e rigidità<br />
- le cerniere devono presentare giochi minimi e permettere che le manovre manuali siano dolci e regolari<br />
- in posizione di chiusura le ante devono combaciare fra loro per tutta l’altezza.<br />
1. Caratteristiche generali<br />
Semplice ed affidabile può essere installato su qualsiasi cancello a battente fino a max. 3m per anta.<br />
Armonico ed elegante è costruito interamente in alluminio. Il gruppo di riduzione robusto e ben collaudato lo rende affidabile<br />
e silenzioso. È inoltre dotato di finecorsa molto semplici e pratici da regolare e di sblocco d’emergenza a chiave<br />
personalizzata.<br />
2. Arresti meccanici (fig. 1)<br />
È indispensabile che il portone da automatizzare disponga di un arresto meccanico in chiusura; l’arresto meccanico<br />
diventa necessario anche in apertura quando non viene utilizzato l’apposito F.C.<br />
3. Messa in posa dell’automatismo<br />
3.1 Stabilire l’altezza dal suolo dell’automatismo (si consiglia il più centrato possibile rispetto al portone ed in corrispondenza<br />
di un solido traverso). Saldare quindi la piastra P (se il pilastro è in muratura richiedere l’apposita staffa ad<br />
avvitare) rispettando le quote di fig. 2.<br />
3.2 Con il portone in chiusura, saldare la staffa S allo stesso livello della piastra P (fig. 3) ad un traverso del portone o ad<br />
altro elemento adeguatamente robusto; tener presente che in questa condizione il pistone non deve essere totalmente<br />
a fine corsa.<br />
• Togliere quindi il riparo R ed il supporto morsettiera M.<br />
• Inserire l’attuatore sul perno della staffa S.<br />
• Inserire lo snodo posteriore U sulla piastra P ed inserirvi il perno V.<br />
• Bloccare quest’ultimo con il dado autobloccante D. Serrare infine la vite T.<br />
Nota<br />
È possibile accedere con il cavo di alimentazione dalla parte inferiore dell’automatismo tramite uno dei due fori ivi predisposti;<br />
in questo caso usufruire del foro sulla piastra indicato in figura e fare attenzione che l’automatismo si fermi<br />
prima di tranciare il cavo.<br />
4. Regolazione finecorsa (fig.4)<br />
Per la regolazione del finecorsa in apertura procedere come segue:<br />
• togliere il tappo T<br />
• agire quindi sul dado D mediante una chiave esagonale a tubo da 10mm; ruotarlo in senso orario per anticipare l’intervento<br />
del finecorsa F, viceversa per posticiparlo.<br />
5. Sblocco e manovra manuale<br />
Come gli altri automatismi della gamma Benincà, anche il <strong>DU.35L2FC</strong> è dotato di uno sblocco semplice e funzionale<br />
che permette la manovra manuale in assenza di energia elettrica. Per sbloccare l’automatismo procedere come segue:<br />
(vedi fig. 5):<br />
• spostare il copriserratura C nel senso della freccia fino a vedere quest’ultima.<br />
• Inserire la chiave personalizzata e ruotarla di 90°.<br />
• Premere sul lato posteriore della portina P ed, aiutandosi poi tirandola dalla parte anteriore, farla ruotare fino a sentire<br />
lo scatto.<br />
Per ripristinare il funzionamento abbassare la portina; la prima manovra ripristinerà il normale funzionamento.<br />
N.B.: Se non si utilizza il finecorsa in apertura, è consigliabile portare il cancello in posizione prossima alla chiusura<br />
prima di ripristinare il funzionamento automatico.<br />
ATTENZIONE<br />
La polizza RC prodotti, che risponde di eventuali danni a cose o persone causati da difetti di fabbricazione, richiede la<br />
conformità dell’impianto alla normativa vigente e l’utilizzo di accessori originali Benincà.<br />
11
12<br />
Introduction<br />
Thank you for choosing our <strong>DU.35L2FC</strong> ratiomotor.<br />
All items in the wide Benincà production range are the result of twenty-years’ experience in the automatism sector and<br />
of continuous research for new materials and advanced technologies.<br />
We are, therefore, in the position to offer higly reliable products that due to their power, effectiveness and useful life, fully<br />
satisfy the final user’s requirements.<br />
All our products are manufactured to the existing standard and are covered by warranty.<br />
Possible injury to people or accidents caused by defects in construction are covered by a civil liability policy drawn up<br />
with one of the major insurance companies.<br />
General information<br />
For an efficient operation of these automatisms, the gate must have the following features:<br />
- good stoutness and stiffness<br />
- all hinges must have positive clearances and permit smooth and regular manual operations.<br />
- when wings are closed their height have to fit together.<br />
1. General features<br />
The <strong>DU.35L2FC</strong> electromechanical gate opener is simple and reliable and can be installed onto any swing-gate having<br />
up to 3m max wings. Harmonious and elegant it is made entirely in aluminium.<br />
The stout and well tested reduction unit makes it reliable and noiseless. It is also equipped with simple and easily adjustable<br />
limit stops and an emergency release with personalised key.<br />
2. Mechanical stops (fig. 1)<br />
It is necessary that the gate to be automatised has got a mechanical stop when closing; this mechanical stop becomes<br />
necessary also when opening in case the suitable limit stop is not used.<br />
3. Automatism positioning<br />
3.1 Fix the distance from the ground of the automatism has (it is advisable it is in the middle of the gate and possibly<br />
close to a strong ledger). Now weld the plate P (if the pilaster is made of cement ask for the screwing flask) as per dimensions<br />
given on fig. 2).<br />
3.2 When the gate is closing, weld the flask S at the same level of the plate P (fig. 3) to a gate ledger or to another stout<br />
element; please remember that in this condition the piston must not be totally at the end of its stroke.<br />
• Remove then the protection R and the terminal board support M.<br />
• Insert the back articulated joint U onto the plate P and insert the pivot V. Tighten the pivot through the self-blocking<br />
nut D.<br />
• Tighten now the screw T.<br />
Note<br />
The power supply cable can be introduced into the lower part of the automatism, by means of one of the two holes<br />
situated there. If this is the case, use the plate hole indicated in the figure and make sure that the automatism stops<br />
before cutting the cable.<br />
4. Limit stop adjustment (fig.4)<br />
For the limit stop adjustment when opening, proceed as follows:<br />
• remove cap T<br />
• loosen nut D by means of a 10mm hexagon head socket spanner; turn the nut clockwise to advance the triggering of<br />
the limit switch F and anticlockwise to postpone triggering.<br />
5. Release and manual move<br />
As all the other automatisms in the Benincà production range, also the <strong>DU.35L2FC</strong> has a simple and functional release<br />
which permits the manual move when there is no electricity. To release the automatism, please proceed as follows (see<br />
fig. 5):<br />
• Move the lock-cover C until the arrow is visible.<br />
• Insert the personalised key and rotate it by 90°.<br />
• Press onto the back side of the door P and rotate it to a click by pulling from the front side.<br />
In order to make it run again, lower the small door; the first manoeuvre will re-establish the manual operation.<br />
P.N.: if the opening limit stop is not used, it is advisable to bring the gate in a position close to the closing one<br />
before re-establishing the automatic running.<br />
CAUTION<br />
The civil liability policy, which covers possible injuries to people or accidents caused by defects in construction, requires<br />
the system to be to existing standard and to use original Benincà accessories.
Einleitung<br />
Wir danken Ihnen dafür, daß Sie sich für den <strong>DU.35L2FC</strong> Gitteröffner entschieden haben.<br />
Alle Produkte der umfangreichen Benincà Produktion sind das Ergebnis der zwanzigjährigen Erfahrungen im Bereich der<br />
Automation und der ständigen Erforschung von neuen Materialien und fortgeschrittenen Technologien.<br />
Aus diesem Grund sind wir heute in der Lage, zuverlässige Produkte anzubieten, die, dank ihren Stärke, Wirksamkeit<br />
und Haltbarkeit, der Anforderungen des Endverbrauchers völlig gerecht werden.<br />
Alle Produkte sind nach Normen gefertigt und durch Garantie gedeckt.<br />
Eventuelle Personen- oder Sachschäden, die durch Fertigungsfehler verursacht werden können, werden durch eine der<br />
wichtigsten Versicherungsgesellschaften gedeckt.<br />
Allgemeine Information<br />
Zum guten Betrieb der genannten Automation, muß das Gitter folgende Eigenschaften haben:<br />
- Stärke und Festigkeit<br />
- Die Scharniere müssen minimale Spiele aufweisen und die manuelle Öffnung und Schließung müssen in jedem Fall<br />
leicht sein.<br />
- Bei der Schließung müssen die Flügel genau aufeinander passen<br />
1. Allgemeine Eigenshaften<br />
Der einfache und zuverlässige Automatismus kann an jedem Flügeltor von höchstens 3m je Flügel angebracht werden.<br />
Er hat eine harmonische und elegante Form und ist ganz aus Aluminium gebaut.<br />
Die starke und gut eingefahrene Untersetzungseinheit macht ihn zuverlässig und leise. Außerdem ist er mit sehr einfachen<br />
und praktisch regulierbaren Endschaltern und Notfreigabe mit individuellem Schlüssel versehen.<br />
2. Mechanische Endanschläge<br />
Es ist unerläßlich, daß das zu automatisierende Tor einen mechanischen Halt beim Schließen hat; dieser ist auch beim<br />
Öffnen nötig, wenn der dazu bestimmte Endschalter nicht benutzt wird.<br />
3. Anbringung des Automatismus<br />
3.1 Die Höhe des Automatismus über dem Fußboden bestimmen (möglichst auf die Mitte des Tores und auf einen festen<br />
Querträger bezogen). Dann die Platte P anschweißen (wenn der Pfeiler gemauert ist, verlangen Sie den Anschraubbügel).<br />
Dabei die Maße von Bild 2 einhalten.<br />
3.2 Bei geschlossenem Tor den Bügel S auf gleicher Höhe mit der Platte P (Bild 3) an einen Querträger des Tores oder<br />
an einen anderen entsprechend festen Teil schweißen und dabei bedenken, daß der Kolben in diesem Zustand nicht<br />
ganz auf Endanschlag stehen darf.<br />
• Dann nehme man den Handschutz R und den Klemmbretthalter M ab.<br />
• Den Trieb auf den Stift des Bügels S setzen. Das hintere Gelenk U auf die Platte P setzen und den Stift V einfügen;<br />
diesen mit der selbstsperrenden Mutter D sperren.<br />
• Schließlich ziehen Sie Schraube T an.<br />
Hinweis:<br />
Über eine der Öffnungen, die im unteren Teil des Antriebs vorgesehen sind, kann das Versorgungskabel zugeführt werden.<br />
In diesem Fall ist die in der Abbildung gezeigte Öffnung in der Platte zu verwenden. Hierbei beachten, daß der Antrieb<br />
vor dem Kabel anhält, um eine Schnittgefahr zu vermeiden.<br />
4. Einstellung des Endschalters (Bild 4)<br />
Zur Einstellung des Endschalters beim Öffnen gehe man folgendermaßen vor:<br />
• Stopfen T abnehmen.<br />
• Mit einem Sechskantsteckschlüssel zu 10mm die Mutter D in den Uhrzeigersinn drehen, um das Einschalten des<br />
Endschalters F vorzuverlegen oder gegen den Uhrzeigersinn drehen, um das Einschalten zu verzögern.<br />
5. Freigabe und Handbetrieb<br />
Wie die anderen Automatismen von Benincà, ist <strong>DU.35L2FC</strong> mit einer einfachen und praktischen Freigabe versehen, die<br />
Handbetrieb bei Stromausfall ermöglicht. Zur Freigabe des Automatismus gehe man so vor (siehe Bild 5):<br />
• Schloßdeckel C in Pfeilrichtung schieben, bis der Pfeil sichtbar wird.<br />
• Den individuellen Schlüssel einstecken und um 90° drehen.<br />
• Auf die Rückseite des Türchens P drücken, dieses nach vorn ziehen und drehen, bis man es schnappen hört.<br />
Zur Wiederaufnahme des Betriebes das Türchen senken. Die erste Verschiebung stellt den normalen Betrieb wieder<br />
her.<br />
Anmerkung: benutzt man den Endschalter nicht beim Öffnen, sollte man das Tor nahezu in Schließstellung bringen,<br />
bevor man den automatischen Betrieb wiederherstellt.<br />
BITTE BEACHTEN<br />
Die Versicherung deckt nur Personen- oder Sachschäden, die durch Fertigungsfehler verursacht werden und gilt nur bei<br />
Einsatz von Benincà Original-Ersatzteilen und wenn die Anlage der Normen entspricht.<br />
13
14<br />
Introduction<br />
Nous ne pouvons que féliciter d’avoir porté votre choix sur le moto-réducteur <strong>DU.35L2FC</strong>.<br />
Vingt années d’expérience dans le secteur des automatismes ainsi que dans le recherche de nouveaux matériaux et technologies<br />
de pointe, nous ont permis de développer tous les nombreux articles de la gamme Benincà. Pour ces raisons,<br />
nous sommes en mesure de proposer des produits extrémement fiables et qui grâce à leurs puissances, performances<br />
et longévité, répondent aux exigences des utilisateurs.<br />
Tous nos produits sont construits selon les normes en vigueur et sont garantis.<br />
En plus, une police d’assurance responsabilité civile garantie la couverture d’éventuels sinistres à personnes ou objects<br />
causés par les défauts de fabrication.<br />
Notice générales<br />
Pour un bon fonctionnement de l’automatisme en object, la porte basculante doit avoir les suivantes caractéristiques:<br />
- bonne robustesse et rigidité<br />
- les charniéres doivent avoir un moindre jeu pour permettre que les manoeuvres soient aisées et réguliéres.<br />
- en position de fermeture, les portes doivent parfaitement coïncider entre elles et sur toute la hauteur.<br />
1. Caractéristiques générales<br />
Simple et fiable, il peut être installé sur tout type de portail à battant de dimension maximum de 3m par porte. Harmonique<br />
et élégant, il est entièrement construit en aluminium.<br />
Le groupe de réduction robuste et complètement testé le rend fiable et silencieux. De plus il est équipé de fins de course<br />
très simples et pratiques à régler et de déblocage d’arrêt d’urgence à clé personnalisé.<br />
2. Arrêts mécaniques (fig. 1)<br />
Il est indispensable que le portail à automatiser dispose d’un arrêt mécanique en fermeture. L’arrêt mécanique devient<br />
nécessaire aussi en ouverture quand le F.C. spécial n’est pas utilisé.<br />
3. Mise en place de l’automatisme<br />
3.1 Établir la hauteur par rapport au sol de l’automatisme (nous vous conseillons de la déterminer la plus centrée possible<br />
par rapport au portail et en correspondance d’une traverse solide). Souder donc la plaque P (si le pilier est en béton<br />
demander la patte appropriée à visser) en respectant les côtes de la fig. 2.<br />
3.2 Avec le portail en fermeture, souder la patte S au même niveau de la plaque P (fig. 3) à une traverse du portail ou<br />
à un autre élément de robustesse adéquate: veuillez tenir compte que dans cette condition le piston ne doit pas être<br />
totalement en fin de course.<br />
• Enlever donc la protection R et le support de la barrette M.<br />
• Insérer le réalisateur sur la tige de la patte S.<br />
• Insérer le joint à rotule postérieur U sur la plaque P et insérer la tige V.<br />
• Bloquer cette dernière avec l’écrou auto bloquant D.<br />
• Serrer enfin la vis T.<br />
Note<br />
Il est possible d’accéder avec le câble d’alimentation par la partie inférieure de l’automatisme au moyen de l’un des deux<br />
trous spécialement prédisposés; dans ce cas, il faut utiliser le trou sur la plaque indiqué dans la figure et faire attention<br />
à ce que l’automatisme s’arrête avant de couper le câble.<br />
4. Réglage du fin de course (fig. 4)<br />
Pour le réglage du fin de course en ouverture procéder comme suit:<br />
• Retirer le bouchon T;<br />
• Intervenir ensuite sur l'écrou D à l'aide d'une clé à tube hexagonale de 10mm; le tourner dans le sens des aiguilles<br />
d'une montre pour anticiper l'intervention du fin de course F et dans le sens contraire pour la différer.<br />
5. Déblocage et manoeuvre manuelle<br />
Comme pour les autres automatismes de la gamme Beninca, le <strong>DU.35L2FC</strong> est équipé d’un déblocage simple et fonctionnel<br />
qui permet la manoeuvre manuelle en absence d’énergie électrique.<br />
Pour débloquer l’automatisme procéder comme suit (voir fig. 5):<br />
• déplacer le couvre serrure C dans le sens de la flèche jusqu’à voir cette dernière.<br />
• Insérer la clé personnalisée et la tourner de 90°.<br />
• Pousser sur le côté postérieur de la porte P et en s’aidant par la suite en la tirant du côté antérieur, la faire tourner<br />
jusqu’à obtention du déclic.<br />
Pour rétablir le fonctionnement, abaisser la porte. La première manoeuvre rétablira le fonctionnement normal.<br />
N.B.: Si on n’utilise pas le fin de course en ouverture, il est conseillé de mettre le portail dans une position proche<br />
de la fermeture avant de rétablir le fonctionnement automatique.<br />
ATTENTION<br />
Pour que la police d’assurance R.C. réponde à d’eventuels sinistres causés à choses ou personnes, en cas de défauts de fabrication,<br />
il faut que le montage soit réalisé suivant les normes en vigueur et que soient utilisés des accessoires Benincà.
Introduccion<br />
Nos congratulamos con vd. por haber elegido el motorreductor <strong>DU.35L2FC</strong>.<br />
Todos los artículos de la vasta gama Benincà son el fruto de una veinteañal experiencia en el sector de los automatismos<br />
y de una contínua búsqueda de nuevos materiales y de tecnología de vanguardia.<br />
Precisamente por esto, hoy nos encontramos en situación de poder ofrecer productos extremadamente fiables que, gracias<br />
a su potencia, eficacia y duración, satisfacen plenamente las exigencias del usuario final. Todos nuestros productos<br />
están construidos de conformidad con la norma y están garantizados. Además, una póliza R.C. productos, estipulada<br />
con una de las principales compañías de seguros, cubre eventuales daños a personas o cosas causados por defecto<br />
de fabricación.<br />
Noticias generales<br />
Para un buen funcionamiento de las automatizaciones en cuestión, la cancela a automatizar deberá responder a las<br />
siguientes características:<br />
- Buena robustez y rigidez<br />
- Las bisagras deben presentar un mínimo juego y permitir que las maniobras manuales sean suaves y regulares.<br />
- En posición cerrada las hojas deben quedar al mismo nivel en altura.<br />
1. Caracteristicas generales<br />
Simple y fiable puede ser instalado sobre cualquier cancela de batiente de hasta 3mts. por hoja.<br />
Armónico y elegante está contruido totalmente en aluminio. El grupo de reducción, robusto y bien comprobado, lo hace<br />
fiable y silencioso. Está además provisto de finales de carrera muy simple y prácticos de regular y de desbloqueo de<br />
emergencias con llave personalizada.<br />
2. Topes mecanicos (fig. 1)<br />
Es indispensable que la puerta para automatizar disponga de un tope mecánico en el cierre; el tope mecánico resulta<br />
necesario también en apertura cuando no se utiliza el correspondiente F.C.<br />
3. Posicionamiento del automatismo<br />
3.1 Establecer la altura del suelo para el automatismo (se aconseja lo más centrado posible con respecto a la puerta<br />
y en correspondencia con un solido travesaño). Soldar entonce la pletina P (si el pilar no es metálico requiere la correspondiente<br />
placa de atornillar) respetando las cotas de la fig.2.<br />
3.2 Con la puerta cerrada, soldar la pletina S al mismo nivel de la placa P (fig. 3) a un travesaño de la puerta o a otro<br />
elemento adecuadamente robusto; se debe tener en cuenta que esta condición el pistón no debe estar totalmente en<br />
el final de carrera.<br />
• Quitar a continuación la tapa R y el soporte de bornes M.<br />
• Insertar el operador sobre el perno de la placa S.<br />
• Insertar la articulación posterior U sobre la placa P y pasarles el perno V.<br />
• Blocar éste último con la tuerca autoblocante D.<br />
• Atornillar finalmente el tornillo T.<br />
Nota<br />
Es posible acceder con la manguera de alimentacion a la parte inferior del automatismo mediante uno de los agujeros<br />
predispuestos para ello; en este caso aprovechar el agujero de la placa indicado en la figura y tener cuidade que el<br />
automatismo se pare antes de corter la manguera.<br />
4. Regulacion del final de carrera (fig.4)<br />
Para la regulación del final de carrera en apertura proceder como sigue:<br />
• Quitar el tapón T.<br />
• Actuar seguidamente sobre la tuerca D con una llave hexagonal de tubo de 10mm; girar la tuerca en sentido horario<br />
para adelantar la actuación del final de carrera F, en sentido antihorario para retrasarla.<br />
6. Desbloqueo y maniobra manual<br />
Como los demás automatismos de la gama Benincà el <strong>DU.35L2FC</strong> está provisto de un desbloqueo simple y funcional<br />
que permite la maniobra manual en ausencia de energía eléctrica. Para desbloquear el automatismo proceder como<br />
sigue (vease fig.5):<br />
• Desplazar el cubrecerradura C en el sintido de la flecha hasta ver ésta última.<br />
• Meter la llave personalizada y girarla 90.<br />
• Presionar sobre el lado posterior de la puentecilla P y ayudándose después tirar de la parte anterior, haciéndola girar<br />
hasta sentir el golpecillo de desbloqueo.<br />
Para restablecer el funcionamiento bajar la puentecilla; la primera maniobra restablecerá el normal funcionamiento.<br />
NOTA: Si no se utiliza el final de carrera en apertura, es aconsejable poner la cancela en posición próxima al<br />
cierre antes de restablecer el funcionamiento automático.<br />
ATENCION<br />
La póliza RC productos, que responde de eventuales daños a personas o cosas causados por defectos de fabricación,<br />
requiere la conformidad de la instalación según la normativa y la utilización de accessorios originales Benincà.<br />
15
16<br />
Wstęp<br />
Gratulujemy Państwu wyboru siłownika <strong>DU.35L2FC</strong>. Wszystkie urządzenia szerokiej gamy produktów Benincà są wynikiem<br />
dwudziestoletniego doświadczenia w sektorze automatyzacji oraz ciągłych poszukiwań nowych materiałów i nowoczesnej<br />
technologii.<br />
Właśnie dzięki temu jesteśmy w stanie oferować produkty dające wysoki stopień zaufania, które dzięki swojej mocy, skuteczności<br />
działania i trwałości są w stanie w pełni zadowolić wymagania użytkownika.<br />
Wszystkie nasze produkty wykonywane są zgodnie z przepisami obowiązujących norm i podlegają gwarancji.<br />
Ponadto gwarantowane są dodatkowo przez polisę ubezpieczeniową odpowiedzialności cywilnej podpisaną z jedną ze znanych<br />
firm ubezpieczeniowych, pokrywającą ewentualne szkody na rzecz osób lub rzeczy wynikłe na skutek wad fabrycznych.<br />
Uwagi ogólne<br />
W celu zapewnienia prawidłowego działania urządzenia automatyzacji, brama, na której będzie zamontowane musi odpowiadać<br />
niżej wymienionym parametrom:<br />
- solidna i sztywna konstrukcja<br />
- zawiasy muszą mieć odpowiedni luz pozwalający na dokonanie manewru ręcznego w sposób regularny i nie wymagający użycia<br />
siły<br />
- w pozycji zamknięcia skrzydła bramy muszą przylegać do siebie na całej ich długości.<br />
1. Podstawowe parametry urządzenia<br />
Urządzenie proste i skuteczne w działaniu, może być zainstalowane na jakiejkolwiek bramie skrzydłowej o szerokości skrzydła<br />
maks. 3 m. Eleganckie, o zharmonizowanej formie, wykonane całkowicie z aluminium. Zespół siłownika jest solidny i sprawdzony<br />
w działaniu, co zapewnia jego skuteczność i cichą pracę. Wyposażony jest w wyłącznik krańcowy o prostej konstrukcji i łatwej<br />
regulacji oraz w system odblokowania bezpieczeństwa na klucz osobisty.<br />
2. Zatrzymanie mechaniczne (rys. 1)<br />
Konieczne jest, żeby brama, która ma być automatyzowana, posiadała mechaniczne urządzenie zatrzymywania biegu w fazie<br />
zamykania; takie samo mechaniczne urządzenie zatrzymywania konieczne jest w fazie otwierania, jeżeli nie jest używany odpowiedni<br />
wyłącznik krańcowy.<br />
3. Instalowanie urządzenia automatyzacji<br />
3.1 W pierwszej kolejności należy ustalić na jakiej wysokości od podłoża będzie zamontowane urządzenie automatyzacji (sugeruje<br />
się pozycję możliwie najbardziej wycentrowaną w stosunku do bramy, najlepiej na solidnej poprzecznicy). Następnie należy<br />
przyspawać płytę P (jeżeli słupek jest murowany, konieczny jest odpowiedni wspornik przykręcany) zgodnie z wymiarami podanymi<br />
na rys. 2.<br />
3.2 Przy bramie zamkniętej należy przyspawać do porzecznicy bramy lub innego solidnego elementu konstrukcji wspornik S na<br />
tym samym poziomie co płyta P (rys. 3); należy pamiętać, że w tej sytuacji tłok nie może być w pozycji odpowiadającej pełnemu<br />
zadziałaniu wyłącznika krańcowego.<br />
• Następnie należy odjąć osłonę R oraz obudowę skrzynki zaciskowej.<br />
• Umocować siłownik na sworzniu wspornika S.<br />
• Zamontować przegub tylny U na płycie P i wprowadzić sworzeń V.<br />
• Zamocować ten ostatni przy pomocy nakrętki samoblokującej D. Dokręcić śrubę T.<br />
Uwaga<br />
Można wprowadzić przewód zasilania w dolnej części urządzenia automatyzacji przeprowadzając go przez jeden z wywierconych<br />
otworów; w tym przypadku należy wykorzystać otwór na płycie wskazany na rysunku, zwracając uwagę, żeby urządzenie<br />
zatrzymało się w sposób uniemożliwiający przecięcie przewodu.<br />
4. Regulowanie wyłącznika krańcowego (rys.4)<br />
W celu wyregulowania wyłącznika krańcowego należy postępować tak jak podano poniżej.<br />
• zdjąć zaślepkę T<br />
• następnie przy pomocy klucza rurowego sześciokątnego 10 mm należy obracać nakrętkę D, w kierunku zgodnym z kierunkiem<br />
obrotu wskazówek zegara w celu wyprzedzenia operacji zadziałania wyłącznika krańcowego lub w kierunku odwrotnym w<br />
celu opóźnienia tej operacji.<br />
5. Odblokowanie i manewr ręczny<br />
Taka jak w przypadku innych urządzeń gamy produktów Benincà, również <strong>DU.35L2FC</strong> wyposażony jest w proste i funkcjonalne<br />
urządzenie odblokowania, które pozwala na dokonanie manewru ręcznego w przypadku wystąpienia braku energii elektrycznej.<br />
W celu odblokownia urządzenia automatyzacji należy postępować tak jak podano poniżej (zobacz rys. 5).<br />
• odchylić zaślepkę zamka C w kierunku strzałki aż do odsłonięcia zamka.<br />
• Wprowadzić klucz osobisty i obrócić go o 90°.<br />
• Nacisnąć tylną ścianę drzwiczek P, a następnie pociągając je od strony przedniej obracać aż do usłyszenia dźwięku oznaczającego<br />
zadziałanie mechanizmu.<br />
W celu przywrócenia działania należy obniżyć drzwiczki – pierwszy manewr przywróci normalne działanie urządzenia automatyzacji.<br />
N.B.: Jeżeli używany jest wyłącznik krańcowy otwierania, przed przywróceniem działania automatycznego sugeruje<br />
się ustawienie bramy w pozycji prawie zamkniętej.<br />
UWAGA<br />
Polisa odpowiedzialności cywilnej w odniesieniu do produktów, która pokrywa ewentualne koszty za szkody na rzecz osób i<br />
rzeczy spowodowane wadami fabrycznymi wymaga, żeby cała instalacja wykonana była zgodne z obowiązującymi normami<br />
oraz zastosowania oryginalnych akcesoriów firmy Benincà.
<strong>DU.35L2FC</strong><br />
Libro istruzioni per l’utilizzatore - User’s handbook<br />
Handbuch für den Verbraucher - Manuel d’instructions pour l’utilisateur<br />
Manual de instrucciones para el usuario - Książeczka z instrukcjami dla użytkownika<br />
Fig.A<br />
Fig.B<br />
Fig.C<br />
C<br />
Tirare.<br />
Pull.<br />
Ziehen.<br />
Tirer.<br />
Tirar.<br />
Ciągnąć<br />
Spostare nel senso della freccia.<br />
Move arrowise.<br />
In Pfeilrichtung schieben.<br />
Déplacer dans le sens de la flèche.<br />
Desplazar en el sentido de la flecha.<br />
Przesunąć w kierunku strzałki<br />
Premere.<br />
Press.<br />
Drücken.<br />
Pousser.<br />
Presionar.<br />
Wcisnąć<br />
Inserire e ruotare di 90°.<br />
Insert and rotate by 90°.<br />
Einstecken und um 90° drehen.<br />
Insérer et tourner de 90°.<br />
Insertar y girar 90°.<br />
Wprowadzić i obrócić o 90°.<br />
Farla ruotare fino sentire lo scatto.<br />
Rotate till the click.<br />
Drehen, bis man es schnappen hört.<br />
La faire tourner jusqu’à obtention du déclic.<br />
Hacerla girar hasta sentir el golpecillo de desbloqueo.<br />
Obracać aż do usłyszenia dźwięku wskazującego<br />
zadziałanie urządzenia.<br />
17
18<br />
Norme di sicurezza<br />
• Non sostare nella zona di movimento delle ante.<br />
• Non lasciare che i bambini giochino con i comandi o in prossimità<br />
delle ante.<br />
• In caso di anomalie di funzionamento non tentare di riparare il<br />
guasto ma avvertire un tecnico specializzato.<br />
Manovra manuale e d’emergenza<br />
In caso di mancanza dell’energia elettrica o di guasto, per azionare<br />
manualmente le ante procedere come segue (riferirsi alle figure<br />
A,B,C):<br />
• spostare il copriserratura C nel senso della freccia fino a vedere<br />
quest’ultima.<br />
• Inserire la chiave personalizzata e ruotarla di 90°.<br />
• Premere sul lato posteriore della portina P ed, aiutandosi poi<br />
tirandola dalla parte anteriore, farla ruotare fino a sentire lo<br />
scatto.<br />
Per ripristinare il funzionamento abbassare la portina; la prima<br />
manovra ripristinerà il normale funzionamento.<br />
N.B.: Se non si utilizza il finecorsa in apertura, è consigliabile<br />
portare il cancello in posizione prossima alla chiusura prima di<br />
ripristinare il funzionamento automatico.<br />
Manutenzione<br />
• Controllare periodicamente l’efficienza dello sblocco manuale di<br />
emergenza.<br />
• Astenersi assolutamente dal tentativo di effettuare riparazioni,<br />
potreste incorrere in incidenti; per queste operazioni contattare<br />
un tecnico specializzato.<br />
• L’attuatore non richiede manutenzioni ordinarie, tuttavia è necessario<br />
verificare periodicamente l’efficienza dei dispositivi di<br />
sicurezza e le altre parti dell’impianto che potrebbero creare<br />
pericoli in seguito ad usura.<br />
Smaltimento<br />
Qualora il prodotto venga posto fuori servizio, è necessario seguire<br />
le disposizioni legislative in vigore al momento per quanto riguarda<br />
lo smaltimento differenziato ed il riciclaggio dei vari componenti<br />
(metalli, plastiche, cavi elettrici, ecc.); è consigliabile contattare<br />
il vostro installatore o una ditta specializzata ed abilitata allo<br />
scopo.<br />
Attenzione<br />
Tutti i prodotti Benincà sono coperti da polizza assicurativa che<br />
risponde di eventuali danni a cose o persone causati da difetti di<br />
fabbricazione, richiede però la marcatura CE della ”macchina” e<br />
l’utilizzo di componenti originali Benincà.<br />
Safety rules<br />
• Do not stand in the movement area of the gate.<br />
• Do not let children play with controls and near the gate.<br />
• Should operating faults occur, do not attempt to repair the fault<br />
but call a qualified technician.<br />
Manual and emergency manoeuvre<br />
In the event of a power cut or breakdown, proceed as follows to<br />
operate the wings manually (refer to figures A,B,C):<br />
• Move the lock-cover C until the arrow is visible.<br />
• Insert the personalised key and rotate it by 90°.<br />
• Press onto the back side of the door P and rotate it to a click by<br />
pulling from the front side.<br />
In order to make it run again, lower the small door; the first manoeuvre<br />
will re-establish the manual operation.<br />
P.N.: if the opening limit stop is not used, it is advisable to bring the<br />
gate in a position close to the closing one before re-establishing<br />
the automatic running.<br />
Maintenance<br />
• Every month check the good operation of the emergency manual<br />
release.<br />
• It is mandatory not to carry out extraordinary maintenance or<br />
repairs as accidents may be caused. These operations must be<br />
carried out by qualified personnel only.<br />
• The operator is maintenance free but it is necessary to check<br />
periodically if the safety devices and the other components of<br />
the automation system work properly. Wear and tear of some<br />
components could cause dangers.<br />
Waste disposal<br />
If the product must be dismantled, it must be disposed according<br />
to regulations in force regarding the differentiated waste disposal<br />
and the recycling of components (metals, plastics, electric cables,<br />
etc..). For this operation it is advisable to call your installer or a<br />
specialised company.<br />
Warning<br />
All Benincá products are covered by insurance policy for any possible<br />
damages to objects and persons caused by construction<br />
faults under condition that the entire system be marked CE and<br />
only Benincá parts be used.<br />
Sicherheitsvorschriften<br />
• Nicht im Öffnungsbereich verweilen.<br />
• Kinder nicht mit den Steuerungen oder in der Nähe des Tores<br />
spielen lassen.<br />
• Bei Funktionsausfällen nicht versuchen, den Schaden selber zu<br />
beheben, sondern den Techniker rufen.<br />
Manuelle Bedienung und Notbetrieb<br />
Um das Tor im Falle eines Stromausfalls oder einer Betriebsstörung<br />
von Hand betätigen zu können, die Entriegelung wie folgt<br />
einsetzen (siehe Abbildungen A, B, C):<br />
• Schloßdeckel C in Pfeilrichtung schieben, bis der Pfeil sichtbar<br />
wird.<br />
• Den individuellen Schlüssel einstecken und um 90° drehen.<br />
• Auf die Rückseite des Türchens P drücken, dieses nach vorn<br />
ziehen und drehen, bis man es schnappen hört.<br />
Zur Wiederaufnahme des Betriebes das Türchen senken. Die<br />
erste Verschiebung stellt den normalen Betrieb wieder her.<br />
Anmerkung: benutzt man den Endschalter nicht beim Öffnen,<br />
sollte man das Tor nahezu in Schließstellung bringen, bevor man<br />
den automatischen Betrieb wiederherstellt.<br />
Wartung<br />
• Monatliche Kontrolle der manuellen Notentriegelung<br />
• Es ist absolut untersagt, selbstständig Sonderwartung oder<br />
Reparaturen vorzunehmen, da Unfälle die Folge sein können;<br />
wenden Sie sich an den Techniker.<br />
• Der Antrieb braucht keine ordentliche Unterhaltung aber es ist<br />
periodisch notwendig die Leistungsfähigkeit der Sicherheitsvorrichtungen<br />
und die andere Teile des Anlages zu prüfen. Sie<br />
könnten durch Abnutzung Gefaht hervorbringen.<br />
Entsorgung<br />
Wird das Gerät außer Betrieb gesetzt, müssen die gültigen Gesetzesvorschriften<br />
zur differenzierten Entsorgung und Wiederverwendung<br />
der Einzelkomponenten, wie Metall, Plastik, Elektrokabel,<br />
usw., beachtet werden. Rufen Sie Ihren Installateur oder eine<br />
Entsorgungsfirma.<br />
Achtung<br />
Alle Produkte BENINCA’ wurden mit einem Versicherungsschein<br />
versehen, der alle eventuellen Schäden an Dingen oder Personen<br />
abdeckt, die durch Herstellungsdefekte hervorgerufen wurden,<br />
vorausgesetzt, das Gerät besitzt die Kennzeichnung EU und es<br />
wurden original BENINCA’ Einzelkomponenten verwendet.<br />
Normes de sécurité<br />
• Ne vous arrêtez jamais dans la zone de mouvement des portes.<br />
• Ne laissez pas les enfants jouer avec les commandes ou à proximité<br />
des portes.<br />
• En cas d’anomalies de fonctionnement, n’essayez pas de réparer
la panne mais contactez un technicien spécialisé.<br />
Manœuvre manuelle et d’urgence<br />
En cas de coupure de courant ou de panne, pour actionner manuellement<br />
les vantaux, procéder de la façon suivante (se référer<br />
aux figures A,B,C) :<br />
• déplacer le couvre serrure C dans le sens de la flèche jusqu’à<br />
voir cette dernière.<br />
• Insérer la clé personnalisée et la tourner de 90°.<br />
• Pousser sur le côté postérieur de la porte P et en s’aidant par<br />
la suite en la tirant du côté antérieur, la faire tourner jusqu’à<br />
obtention du déclic.<br />
Pour rétablir le fonctionnement, abaisser la porte. La première<br />
manoeuvre rétablira le fonctionnement normal.<br />
N.B.: Si on n’utilise pas le fin de course en ouverture, il est conseillé<br />
de mettre le portail dans une position proche de la fermeture avant<br />
de rétablir le fonctionnement automatique.<br />
Maintenance<br />
• Contrôler tous les mois le bon état du déverrouilleur manuel<br />
d’urgence.<br />
• S’abstenir impérativement de toute tentative d’effectuer des<br />
maintenances extraordinaires ou des réparations, sous risque<br />
d’accident. Contactez un technicien spécialisé pour ces opérations.<br />
• L’actuateur ne demande pas de manutention ordinaire mais il faut<br />
verifier periodiquement l’efficience des dispositifs de sécurité et<br />
les autres parties de l’installation qui puissent créer dangers à<br />
cause d’usure.<br />
Démolition<br />
Au cas où le produit serait mis hors service, il est impératif de se<br />
conformer aux lois en vigueur pour ce qui concerne l’élimination<br />
différenciée et le recyclage des différents composants (métaux,<br />
matières plastiques câbles électriques, etc...) contactez votre installateur<br />
ou une firme spécialisée autorisée à cet effet.<br />
Attention<br />
Tous les produits Benincà sont couverts par une police d’assurance<br />
qui répond d’éventuels préjudices corporels ou matériels<br />
provoqués à cause de défauts de fabrication, mais qui requiert<br />
toutefois le marquage CE de la “machine” et l’utilisation de pièces<br />
de rechange d’origine Benincà.<br />
Normas de seguridad<br />
• No pararse en la zona de movimiento de las hojas.<br />
• No dejar que los niños jueguen con los mando o en proximidad<br />
de las hojas.<br />
• En caso de anomalías de funcionamiento no intentar reparar la<br />
avería sino que avisar a un técnico especializado.<br />
Maniobra manual y de emergencia<br />
De fallar el suministro de energía eléctrica o en caso de avería y<br />
para accionar manualmente las puertas, hay que hacer lo siguiente<br />
(tener como referencia las figuras A,B,C):<br />
• Desplazar el cubrecerradura C en el sintido de la flecha hasta<br />
ver ésta última.<br />
• Meter la llave personalizada y girarla 90.<br />
• Presionar sobre el lado posterior de la puentecilla P y ayudándose<br />
después tirar de la parte anterior, haciéndola girar hasta sentir<br />
el golpecillo de desbloqueo.<br />
Para restablecer el funcionamiento bajar la puentecilla; la primera<br />
maniobra restablecerá el normal funcionamiento.<br />
NOTA: Si no se utiliza el final de carrera en apertura, es aconsejable<br />
poner la cancela en posición próxima al cierre antes de restablecer<br />
el funcionamiento automático.<br />
Mantenimiento<br />
• Controlar periódicamente la eficiencia del desbloqueo manual<br />
de emergencia.<br />
• Abstenerse absolutamente de intentar efectuar reparaciones,<br />
podrían incurrir en accidentes; para estas operaciones contactar<br />
con un técnico especializado.<br />
• El operador no requiere mantenimiento habitual, no obstante<br />
es necesario verificar periódicamente la eficiencia de los dispositivos<br />
de seguridad y las otras partes de la instalación que<br />
pudiesen crear peligros a causa del desgaste.<br />
Eliminación de aguas sucias<br />
Cada vez que el producto esté fuera de servicio, es necesario<br />
seguir las disposiciones legislativas en vigor en ese momento en<br />
cuanto concierne a la eliminación de suciedad y al reciclaje de<br />
varios componentes (metales, plásticos, cables eléctricos, etc.),<br />
es aconsejable contactar con su instalador o con una empresa<br />
especializada y habilitada para tal fin.<br />
Atención<br />
Todos los productos Benincà están cubiertos por una póliza de<br />
seguros que responde de eventuales daños a personas o cosas,<br />
causados por defectos de fabricación, requiere sin embargo<br />
la marca CE de la ”máquina” y la utilización de componentes<br />
originales Benincà.<br />
Normy bezpieczeństwa<br />
• Starać się nie przebywać w obszarze posuwu skrzydeł.<br />
• Niedopuścić aby dzieci bawiły się sterownikami lub w pobliżu<br />
skrzydeł bramy.<br />
• W przypadku niewłaściwego funkcjonowania nie starać się<br />
samemu dokonywać naprawy a powiadomić o fakcie technika<br />
wyspecjalizowanego.<br />
Sterowanie ręczne i awaryjne<br />
W przypadku braku dopływu energii elektrycznej podczas awarii,<br />
dla ręcznego sterowania skrzydeł bramy należy postępować według<br />
poniższych wskazówek (opierać się na przykładach podanych na<br />
rysunkach A,B,C):<br />
• odchylić zaślepkę zamka C w kierunku strzałki aż do odsłonięcia<br />
zamka.<br />
• Wprowadzić klucz osobisty i obrócić go o 90°.<br />
• Nacisnąć tylną ścianę drzwiczek P, a następnie pociągając je od<br />
strony przedniej obracać aż do usłyszenia dźwięku oznaczającego<br />
zadziałanie mechanizmu.<br />
W celu przywrócenia działania należy obniżyć drzwiczki – pierwszy<br />
manewr przywróci normalne działanie urządzenia automatyzacji.<br />
N.B.: Jeżeli używany jest wyłącznik krańcowy otwierania, przed<br />
przywróceniem działania automatycznego sugeruje się ustawienie<br />
bramy w pozycji prawie zamkniętej.<br />
Konserwacja<br />
• Sprawdzać okresowo sprawność działania ręcznego mechanizmu<br />
odblokowującego i bezpieczeństwa.<br />
• Nie starać się w żadnym wypadku dokonywać napraw samemu z<br />
racji na możliwość ulegnięcia wypadkowi, w celu naprawy należy<br />
skontaktować się z technikiem wyspecjalizowanym.<br />
• Siłownik nie wymaga normalnej konserwacji, tym niemniej wskazane<br />
jest okresowe sprawdzanie sprawnoścsi działania elementów<br />
bezpieczeństwa i pozostałych części instalacji, mogących stanowić<br />
zagrożenie z racji na stan zużycia.<br />
Eliminacja i demolowanie<br />
W przypadku gdy urządzenie nie nadaje się już do dalszego<br />
użytkowania, w celu pozbycia się go należy ściśle przestrzegać<br />
obowiązujących w danym momencie norm prawnych regulujących<br />
zróżnicowany rozkład na części i odzyskiwanie niektórych elementów<br />
składowych (metale, plastyk, kable elektryczne, itp.); wskazane jest<br />
skontaktowanie się z instalatorem lub wyspecjalizowaną firmą,<br />
autoryzowaną do tego rodzaju prac.<br />
Uwaga<br />
Wszystkie produkty Benincà objęte są polisą ubezpieczeniową na<br />
pokrycie szkód poniesionych przez rzeczy lub osoby w wyniku wad<br />
produkcyjnych, pod warunkiem że urządzenia posiadają oznakowanie<br />
CE i oryginalne części Benincà.<br />
19
�<br />
�<br />
Pos. Denominazione - Description - Bezeichnung - Dénomination - Denominación - Określenie Cod.<br />
A Tubo alluminio Guide Führung Guide Guía aluminio Rura 9686148<br />
B Vite s. f. Screw Schraube Vis sans fin Tornillo sin fin Śruba dwustronna 9686149<br />
C Finecorsa Apertura Open Limit stop<br />
Öffungsendschalter<br />
D Finecorsa Chiusura Close Limit stop Zu Endschalter<br />
�<br />
�<br />
Fin de course<br />
d'ouverture<br />
Fin de course de<br />
fermeture<br />
Final de carrera de<br />
apertura<br />
Final de carrera de<br />
cierre<br />
Krańcówka Otwiera 9686147<br />
Krańcówka Zamyka 9686075<br />
1 Leva di sblocco Release lever Hebel Levier Pal. de desbloq. Dźwigienka 9686054<br />
2 Blister Blister Blister Blister Blister Blister 9686078<br />
3 Motore Motor Motor Moteur Motor Silnik 9686053<br />
4 Supporto Support Stütze Support Soporte Zaczep 9686052<br />
5 Ingranaggio Release gear Zahnrad Engrenage Engranaje Koło zębate 9686051<br />
AUTOMATISMI BENINCÀ SpA- Via Capitello, 45 - 36066 Sandrigo (VI) - Tel. 0444 751030 r.a. - Fax 0444 759728<br />
�<br />
�<br />
�<br />
�<br />
�