Bush Pig - Fly Angler Australia
Bush Pig - Fly Angler Australia
Bush Pig - Fly Angler Australia

You also want an ePaper? Increase the reach of your titles
YUMPU automatically turns print PDFs into web optimized ePapers that Google loves.
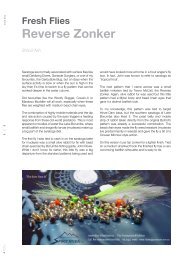
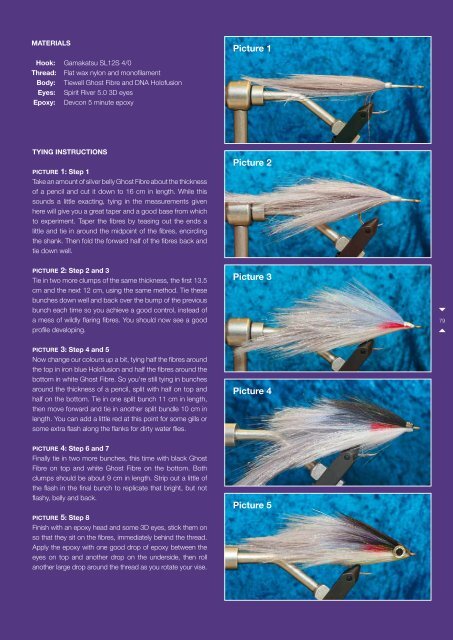
MaterialsHook: Gamakatsu SL12S 4/0Thread: Flat wax nylon and monofilamentBody: Tiewell Ghost Fibre and DNA HolofusionEyes: Spirit River 5.0 3D eyesEpoxy: Devcon 5 minute epoxyPicture 1TYING INSTRUCTIONSpicture 1: Step 1Take an amount of silver belly Ghost Fibre about the thicknessof a pencil and cut it down to 16 cm in length. While thissounds a little exacting, tying in the measurements givenhere will give you a great taper and a good base from whichto experiment. Taper the fibres by teasing out the ends alittle and tie in around the midpoint of the fibres, encirclingthe shank. Then fold the forward half of the fibres back andtie down well.Picture 2picture 2: Step 2 and 3Tie in two more clumps of the same thickness, the first 13.5cm and the next 12 cm, using the same method. Tie thesebunches down well and back over the bump of the previousbunch each time so you achieve a good control, instead ofa mess of wildly flaring fibres. You should now see a goodprofile developing.Picture 379picture 3: Step 4 and 5Now change our colours up a bit, tying half the fibres aroundthe top in iron blue Holofusion and half the fibres around thebottom in white Ghost Fibre. So you’re still tying in bunchesaround the thickness of a pencil, split with half on top andhalf on the bottom. Tie in one split bunch 11 cm in length,then move forward and tie in another split bundle 10 cm inlength. You can add a little red at this point for some gills orsome extra flash along the flanks for dirty water flies.Picture 4picture 4: Step 6 and 7Finally tie in two more bunches, this time with black GhostFibre on top and white Ghost Fibre on the bottom. Bothclumps should be about 9 cm in length. Strip out a little ofthe flash in the final bunch to replicate that bright, but notflashy, belly and back.picture 5: Step 8Finish with an epoxy head and some 3D eyes, stick them onso that they sit on the fibres, immediately behind the thread.Apply the epoxy with one good drop of epoxy between theeyes on top and another drop on the underside, then rollanother large drop around the thread as you rotate your vise.Picture 5