Clan - FL - Spazio
Clan - FL - Spazio
Clan - FL - Spazio

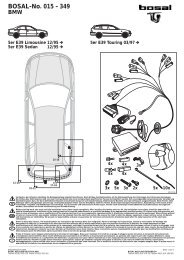
Create successful ePaper yourself
Turn your PDF publications into a flip-book with our unique Google optimized e-Paper software.
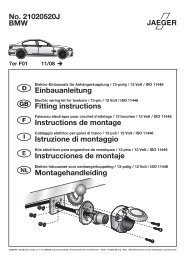
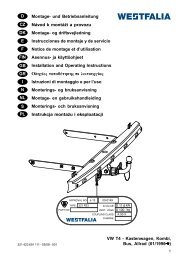
Fissaggio<br />
del box alle barre<br />
1<br />
A<br />
2<br />
C<br />
A<br />
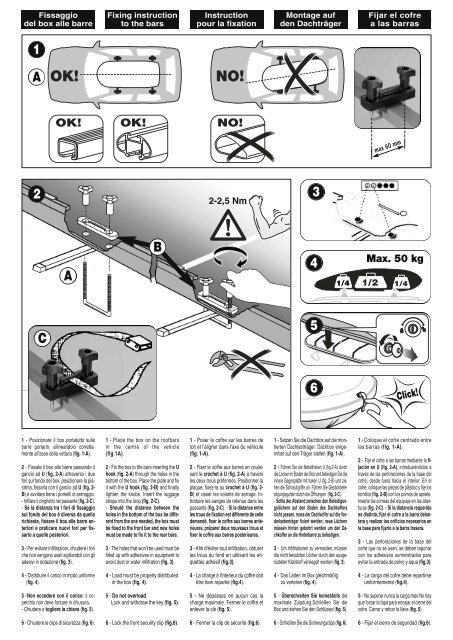
1 - Posizionare il box portatutto sulle<br />
barre portanti, allineandolo correttamente<br />
all'asse della vettura (fig. 1-A).<br />
2 - Fissate il box alle barre passando il<br />
gancio ad U (fig. 2-A) attraverso i due<br />
fori sul fondo del box, posizionare la piastrina,<br />
fissarla con il gancio ad U (fig. 2-<br />
B) e avvitare bene i pomelli di serraggio.<br />
- Infilare il cinghetto nel passante (fig. 2-C).<br />
- Se la distanza tra i fori di fissaggio<br />
sul fondo del box è diversa da quella<br />
richiesta, fissare il box alle barre anteriori<br />
e praticare nuovi fori per fissarlo<br />
a quelle posteriori.<br />
3 - Per evitare infiltrazioni, chiudere i fori<br />
che non vengono usati sigillandoli con gli<br />
adesivi in dotazione (fig. 3).<br />
4 - Distribuire il carico in modo uniforme<br />
(fig. 4).<br />
5 - Non eccedere con il carico: il coperchio<br />
non deve forzare in chiusura.<br />
- Chiudere e togliere la chiave (fig. 5).<br />
6 - Chiudere le clips di sicurezza (fig. 6).<br />
Fixing instruction<br />
to the bars<br />
B<br />
1 - Place the box on the roofbars<br />
in the centre of the vehicle<br />
(fig.1A).<br />
2 - Fix the box to the bars inserting the U<br />
hook (fig. 2-A) through the holes in the<br />
bottom of the box. Place the plate and fix<br />
it with the U hook (fig. 2-B) and finally<br />
tighten the knobs. Insert the luggage<br />
straps into the loop (fig. 2-C).<br />
- Should the distance between the<br />
holes in the bottom of the box be different<br />
from the one needed, the box must<br />
be fixed to the front bar and new holes<br />
must be made to fix it to the rear bars.<br />
3 - The holes that won't be used must be<br />
filled up with adhesives in equipment to<br />
avoid dust or water infiltration (fig. 3).<br />
4 - Load must be properly distributed<br />
in the box (fig. 4).<br />
5 - Do not overload.<br />
Lock and withdraw the key (fig. 5).<br />
6 - Lock the front security clip (fig.6).<br />
Instruction<br />
pour la fixation<br />
2-2,5 Nm<br />
1 - Poser le coffre sur les barres de<br />
toit et l'aligner dans l'axe du véhicule<br />
(fig. 1-A).<br />
2 - Fixer le coffre aux barres en coulissant<br />
le crochet à U (fig. 2-A) à travers<br />
les deux trous préformés. Positionner la<br />
plaque, fixez-la au crochet à U (fig. 2-<br />
B) et visser les volants de serrage. Introduire<br />
les sanges de retenue dans les<br />
passants (fig. 2-C). - Si la distance entre<br />
les trous de fixation est differente de celle<br />
demandé, fixer le coffre aux barres antérieures,<br />
préparer deux nouveaux trous et<br />
fixer le coffre aux barres posterieures.<br />
3 - Afin d'éviter tout infiltration, obturer<br />
les trous du fond en utilisant les etiquettes<br />
adhésif (fig.3).<br />
4 - La charge à l'interieur du coffre doit<br />
être bien repartie (fig.4).<br />
5 - Ne dépassez en aucun cas la<br />
charge maximale. Fermer le coffre et<br />
enlever la clé (fig. 5).<br />
6 - Fermer la clip de sécurité (fig.6).<br />
Montage auf<br />
den Dachträger<br />
3<br />
4<br />
5<br />
6<br />
1 - Setzen Sie die Dachbox auf die montierten<br />
Dachlastträger. Dachbox eingemittet<br />
auf den Träger stellen (fig. 1-A).<br />
2 - Führen Sie die Metallhaken U (fig.2-A) durch<br />
die Löcker im Boden der Box und befestigen Sie die<br />
innere Gegenplatte mit haken U (fig. 2-B) und ziehen<br />
die Schraubgriffe an. Führen Sie Gepäckbefestigungsgurten<br />
durch die Öffnungen (fig. 2-C).<br />
- Sollte der Abstand zwischen den Befestigungslöchern<br />
auf den Boden des Dachkoffers<br />
nicht passen, muss der Dachkoffer auf die Vorderlastenträger<br />
fixiert werden; neue Löchern<br />
müssen hinten gebohrt werden um den Dachkoffer<br />
an die Hinterbarre zu befestigen.<br />
3 - Um Infiltrationen zu vermeiden, müssen<br />
die nicht benutzten Löcher durch den ausgerüsteten<br />
Klebstoff versiegelt werden (fig. 3).<br />
4 - Das Laden im Box gleichmäßig<br />
zu verteilen (fig. 4).<br />
5 - Überschreiten Sie keinesfalls die<br />
maximale Zuladung.Schließen Sie die<br />
Box und ziehen Sie den Schlüssel (fig. 5).<br />
6 - Schließen Sie die Sicherungsclips (fig. 6).<br />
Fijar el cofre<br />
a las barras<br />
max 60 mm<br />
1 - Coloque el cofre centrado entre<br />
las barras (fig. 1-A).<br />
2 - Fije el cofre a las barras mediante la fijación<br />
en U (fig. 2-A), introduciéndolos a<br />
través de las perforaciones da la base del<br />
cofre, desde fuera hacia el interior. En el<br />
cofre, coloque las piezas de plástico y fije los<br />
tornillos (fig. 2-B) con los pomos de apriete.<br />
Inserte las correas del equipaje en las aberturas<br />
(fig. 2-C). - Si la distancia requerida<br />
es distinta, fijar el cofre a la barra delantera<br />
y realizar los orificios necesarios en<br />
la base para fijarlo a la barra trasera.<br />
3 - Las perforaciones de la base del<br />
cofre que no se usen, se deben taponar<br />
con los adhesivos suministrados para<br />
evitar la entrada de polvo y aqua (fig.3).<br />
4 - La carga del cofre debe repartirse<br />
uniformemente (fig.4).<br />
5 - No superar nunca la carga máx.No hay<br />
que forzar la tapa para encajar el cierre del<br />
cofre. Cerrar y retirar la llave.(fig. 5).<br />
6 - Fijar el cierre de seguridad (fig.6).