HDS 551 C, 558 C, HDS 558 CSX, 698 CSX, 698 C, 798 C ... - Kärcher
HDS 551 C, 558 C, HDS 558 CSX, 698 CSX, 698 C, 798 C ... - Kärcher
HDS 551 C, 558 C, HDS 558 CSX, 698 CSX, 698 C, 798 C ... - Kärcher

You also want an ePaper? Increase the reach of your titles
YUMPU automatically turns print PDFs into web optimized ePapers that Google loves.
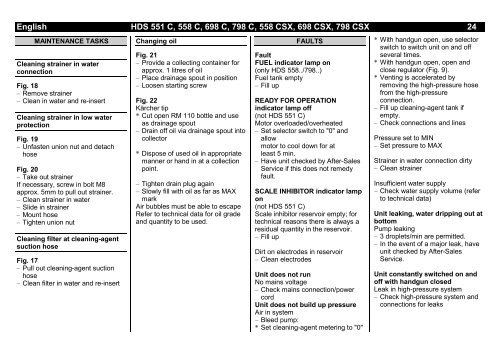
English <strong>HDS</strong> <strong>551</strong> C, <strong>558</strong> C, <strong>698</strong> C, <strong>798</strong> C, <strong>558</strong> <strong>CSX</strong>, <strong>698</strong> <strong>CSX</strong>, <strong>798</strong> <strong>CSX</strong> 24<br />
MAINTENANCE TASKS<br />
Cleaning strainer in water<br />
connection<br />
Fig. 18<br />
– Remove strainer<br />
– Clean in water and re-insert<br />
Cleaning strainer in low water<br />
protection<br />
Fig. 19<br />
– Unfasten union nut and detach<br />
hose<br />
Fig. 20<br />
– Take out strainer<br />
If necessary, screw in bolt M8<br />
approx. 5mm to pull out strainer.<br />
– Clean strainer in water<br />
– Slide in strainer<br />
– Mount hose<br />
– Tighten union nut<br />
Cleaning filter at cleaning-agent<br />
suction hose<br />
Fig. 17<br />
– Pull out cleaning-agent suction<br />
hose<br />
– Clean filter in water and re-insert<br />
Changing oil<br />
Fig. 21<br />
– Provide a collecting container for<br />
approx. 1 litres of oil<br />
– Place drainage spout in position<br />
– Loosen starting screw<br />
Fig. 22<br />
<strong>Kärcher</strong> tip<br />
* Cut open RM 110 bottle and use<br />
as drainage spout<br />
– Drain off oil via drainage spout into<br />
collector<br />
* Dispose of used oil in appropriate<br />
manner or hand in at a collection<br />
point.<br />
– Tighten drain plug again<br />
– Slowly fill with oil as far as MAX<br />
mark<br />
Air bubbles must be able to escape<br />
Refer to technical data for oil grade<br />
and quantity to be used.<br />
FAULTS<br />
Fault<br />
FUEL indicator lamp on<br />
(only <strong>HDS</strong> <strong>558</strong>../<strong>798</strong>..)<br />
Fuel tank empty<br />
– Fill up<br />
READY FOR OPERATION<br />
indicator lamp off<br />
(not <strong>HDS</strong> <strong>551</strong> C)<br />
Motor overloaded/overheated<br />
– Set selector switch to "0" and<br />
allow<br />
motor to cool down for at<br />
least 5 min.<br />
– Have unit checked by After-Sales<br />
Service if this does not remedy<br />
fault.<br />
SCALE INHIBITOR indicator lamp<br />
on<br />
(not <strong>HDS</strong> <strong>551</strong> C)<br />
Scale inhibitor reservoir empty; for<br />
technical reasons there is always a<br />
residual quantity in the reservoir.<br />
– Fill up<br />
Dirt on electrodes in reservoir<br />
– Clean electrodes<br />
Unit does not run<br />
No mains voltage<br />
– Check mains connection/power<br />
cord<br />
Unit does not build up pressure<br />
Air in system<br />
– Bleed pump:<br />
* Set cleaning-agent metering to "0"<br />
* With handgun open, use selector<br />
switch to switch unit on and off<br />
several times.<br />
* With handgun open, open and<br />
close regulator (Fig. 9).<br />
* Venting is accelerated by<br />
removing the high-pressure hose<br />
from the high-pressure<br />
connection.<br />
– Fill up cleaning-agent tank if<br />
empty.<br />
– Check connections and lines<br />
Pressure set to MIN<br />
– Set pressure to MAX<br />
Strainer in water connection dirty<br />
– Clean strainer<br />
Insufficient water supply<br />
– Check water supply volume (refer<br />
to technical data)<br />
Unit leaking, water dripping out at<br />
bottom<br />
Pump leaking<br />
– 3 droplets/min are permitted.<br />
– In the event of a major leak, have<br />
unit checked by After-Sales<br />
Service.<br />
Unit constantly switched on and<br />
off with handgun closed<br />
Leak in high-pressure system<br />
– Check high-pressure system and<br />
connections for leaks