

RACCORDI A STRINGERE PER TUBO MULTISTRATO “AL ...
RACCORDI A STRINGERE PER TUBO MULTISTRATO “AL ...
RACCORDI A STRINGERE PER TUBO MULTISTRATO “AL ...

Create successful ePaper yourself
Turn your PDF publications into a flip-book with our unique Google optimized e-Paper software.
ISTRUZIONI DI MONTAGGIO<br />
ASSEMBLING INSTRUCTIONS<br />
ISTRUZIONI DI MONTAGGIO<br />
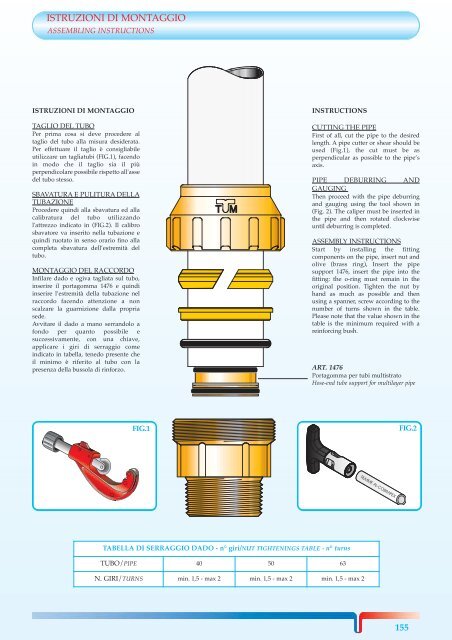
TAGLIO DEL <strong>TUBO</strong><br />
Per prima cosa si deve procedere al<br />
taglio del tubo alla misura desiderata.<br />
Per effettuare il taglio è consigliabile<br />
utilizzare un tagliatubi (FIG.1), facendo<br />
in modo che il taglio sia il più<br />
perpendicolare possibile rispetto all'asse<br />
del tubo stesso.<br />
SBAVATURA E PULITURA DELLA<br />
TUBAZIONE<br />
Procedere quindi alla sbavatura ed alla<br />
calibratura del tubo utilizzando<br />
l'attrezzo indicato in (FIG.2). Il calibro<br />
sbavatore va inserito nella tubazione e<br />
quindi ruotato in senso orario fino alla<br />
completa sbavatura dell’estremità del<br />
tubo.<br />
MONTAGGIO DEL RACCORDO<br />
Infilare dado e ogiva tagliata sul tubo,<br />
inserire il portagomma 1476 e quindi<br />
inserire l’estremità della tubazione nel<br />
raccordo facendo attenzione a non<br />
scalzare la guarnizione dalla propria<br />
sede.<br />
Avvitare il dado a mano serrandolo a<br />
fondo per quanto possibile e<br />
successivamente, con una chiave,<br />
applicare i giri di serraggio come<br />
indicato in tabella, tenedo presente che<br />
il minimo è riferito al tubo con la<br />
presenza della bussola di rinforzo.<br />
FIG.1<br />
INSTRUCTIONS<br />
TABELLA DI SERRAGGIO DADO - n° giri/NUT TIGHTENINGS TABLE - n° turns<br />
<strong>TUBO</strong>/PIPE 40 50 63<br />
CUTTING THE PIPE<br />
First of all, cut the pipe to the desired<br />
length. A pipe cutter or shear should be<br />
used (Fig.1), the cut must be as<br />
perpendicular as possible to the pipe’s<br />
axis.<br />
PIPE DEBURRING AND<br />
GAUGING<br />
Then proceed with the pipe deburring<br />
and gauging using the tool shown in<br />
(Fig. 2). The caliper must be inserted in<br />
the pipe and then rotated clockwise<br />
until deburring is completed.<br />
ASSEMBLY INSTRUCTIONS<br />
Start by installing the fitting<br />
components on the pipe, insert nut and<br />
olive (brass ring), Insert the pipe<br />
support 1476, insert the pipe into the<br />
fitting: the o-ring must remain in the<br />
original position. Tighten the nut by<br />
hand as much as possible and then<br />
using a spanner, screw according to the<br />
number of turns shown in the table.<br />
Please note that the value shown in the<br />
table is the minimum required with a<br />
reinforcing bush.<br />
ART. 1476<br />
Portagomma per tubi multistrato<br />
Hose-end tube support for multilayer pipe<br />
N. GIRI/TURNS min. 1,5 - max 2 min. 1,5 - max 2 min. 1,5 - max 2<br />
FIG.2<br />
155
