

Fitingi Fittings Raccordi - cimos titan
Fitingi Fittings Raccordi - cimos titan
Fitingi Fittings Raccordi - cimos titan

Create successful ePaper yourself
Turn your PDF publications into a flip-book with our unique Google optimized e-Paper software.
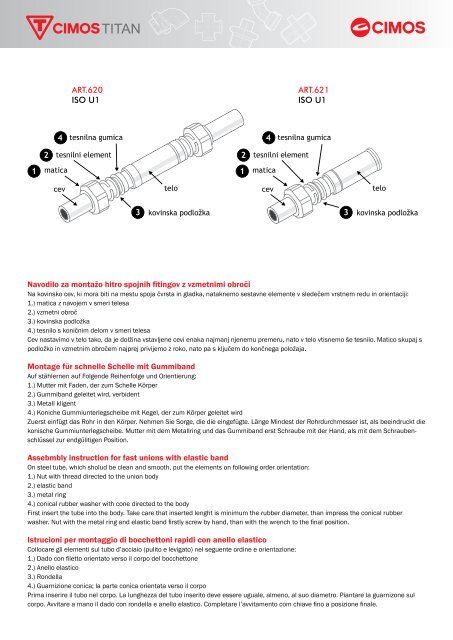
ART.620<br />
ISO U1<br />
ART.621<br />
ISO U1<br />
Navodilo za montažo hitro spojnih fitingov z vzmetnimi obroči<br />
Na kovinsko cev, ki mora biti na mestu spoja čvrsta in gladka, nataknemo sestavne elemente v sledečem vrstnem redu in orientaciji:<br />
1.) matica z navojem v smeri telesa<br />
2.) vzmetni obroč<br />
3.) kovinska podložka<br />
4.) tesnilo s koničnim delom v smeri telesa<br />
Cev nastavimo v telo tako, da je dolžina vstavljene cevi enaka najmanj njenemu premeru, nato v telo vtisnemo še tesnilo. Matico skupaj s<br />
podložko in vzmetnim obročem najprej privijemo z roko, nato pa s ključem do končnega položaja.<br />
Montage für schnelle Schelle mit Gummiband<br />
Auf stählernen auf Folgende Reihenfolge und Orientierung:<br />
1.) Mutter mit Faden, der zum Schelle Körper<br />
2.) Gummiband geleitet wird, verbident<br />
3.) Metall kligent<br />
4.) Koniche Gummiunterlegscheibe mit Kegel, der zum Körper geleitet wird<br />
Zuerst einfügt das Rohr in den Körper. Nehmen Sie Sorge, die die eingefügte. Länge Mindest der Rohrdurchmesser ist, als beeindruckt die<br />
konische Gummiunterlegscheibe. Mutter mit dem Metallring und das Gummiband erst Schraube mit der Hand, als mit dem Schraubenschlüssel<br />
zur endgülitigen Position.<br />
Assebmbly instruction for fast unions with elastic band<br />
On steel tube, which sholud be clean and smooth, put the elements on following order orientation:<br />
1.) Nut with thread directed to the union body<br />
2.) elastic band<br />
3.) metal ring<br />
4.) conical rubber washer with cone directed to the body<br />
First insert the tube into the body. Take care that inserted lenght is minimum the rubber diameter, than impress the conical rubber<br />
washer. Nut with the metal ring and elastic band firstly screw by hand, than with the wrench to the final position.<br />
Istrucioni per montaggio di bocchettoni rapidi con anello elastico<br />
Collocare gli elementi sul tubo d’acciaio (pulito e levigato) nel seguente ordine e orientazione:<br />
1.) Dado con filetto orientato verso il corpo del bocchettone<br />
2.) Anello elastico<br />
3.) Rondella<br />
4.) Guarnizione conica; la parte conica orientata verso il corpo<br />
Prima inserire il tubo nel corpo. La lunghezza del tubo inserito deve essere uguale, almeno, al suo diametro. Piantare la guarnizone sul<br />
corpo. Avvitare a mano il dado con rondella e anello elastico. Completare l’avvitamento com chiave fino a posizione finale.