
Create successful ePaper yourself
Turn your PDF publications into a flip-book with our unique Google optimized e-Paper software.
EN<br />
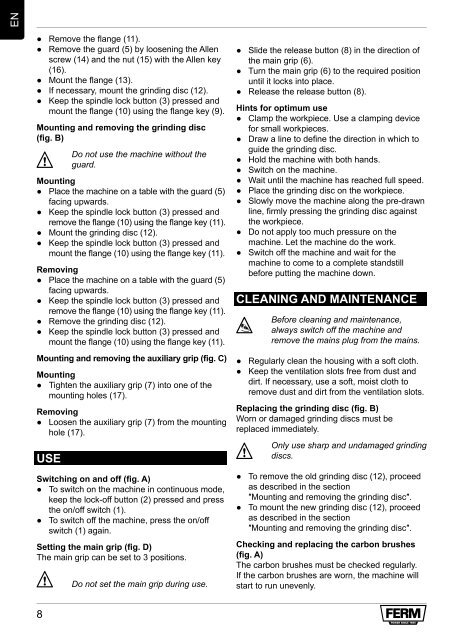
● Remove the flange (11).<br />
● Remove the guard (5) by loosening the Allen<br />
screw (14) and the nut (15) with the Allen key<br />
(16).<br />
● Mount the flange (13).<br />
● If necessary, mount the grinding disc (12).<br />
● Keep the spindle lock button (3) pressed and<br />
mount the flange (10) using the flange key (9).<br />
Mounting and removing the grinding disc<br />
(fig. B)<br />
2<br />
8<br />
Do not use the machine without the<br />
guard.<br />
Mounting<br />
● Place the machine on a table with the guard (5)<br />
facing upwards.<br />
● Keep the spindle lock button (3) pressed and<br />
remove the flange (10) using the flange key (11).<br />
● Mount the grinding disc (12).<br />
● Keep the spindle lock button (3) pressed and<br />
mount the flange (10) using the flange key (11).<br />
Removing<br />
● Place the machine on a table with the guard (5)<br />
facing upwards.<br />
● Keep the spindle lock button (3) pressed and<br />
remove the flange (10) using the flange key (11).<br />
● Remove the grinding disc (12).<br />
● Keep the spindle lock button (3) pressed and<br />
mount the flange (10) using the flange key (11).<br />
Mounting and removing the auxiliary grip (fig. C)<br />
Mounting<br />
● Tighten the auxiliary grip (7) into one of the<br />
mounting holes (17).<br />
Removing<br />
● Loosen the auxiliary grip (7) from the mounting<br />
hole (17).<br />
USE<br />
Switching on and off (fig. A)<br />
● To switch on the machine in continuous mode,<br />
keep the lock-off button (2) pressed and press<br />
the on/off switch (1).<br />
● To switch off the machine, press the on/off<br />
switch (1) again.<br />
Setting the main grip (fig. D)<br />
The main grip can be set to 3 positions.<br />
2<br />
Do not set the main grip during use.<br />
● Slide the release button (8) in the direction of<br />
the main grip (6).<br />
● Turn the main grip (6) to the required position<br />
until it locks into place.<br />
● Release the release button (8).<br />
Hints for optimum use<br />
● Clamp the workpiece. Use a clamping device<br />
for small workpieces.<br />
● Draw a line to define the direction in which to<br />
guide the grinding disc.<br />
● Hold the machine with both hands.<br />
● Switch on the machine.<br />
● Wait until the machine has reached full speed.<br />
● Place the grinding disc on the workpiece.<br />
● Slowly move the machine along the pre-drawn<br />
line, firmly pressing the grinding disc against<br />
the workpiece.<br />
● Do not apply too much pressure on the<br />
machine. Let the machine do the work.<br />
● Switch off the machine and wait for the<br />
machine to <strong>com</strong>e to a <strong>com</strong>plete standstill<br />
before putting the machine down.<br />
CLEANING AND MAINTENANCE<br />
4<br />
Before cleaning and maintenance,<br />
always switch off the machine and<br />
remove the mains plug from the mains.<br />
● Regularly clean the housing with a soft cloth.<br />
● Keep the ventilation slots free from dust and<br />
dirt. If necessary, use a soft, moist cloth to<br />
remove dust and dirt from the ventilation slots.<br />
Replacing the grinding disc (fig. B)<br />
Worn or damaged grinding discs must be<br />
replaced immediately.<br />
2<br />
Only use sharp and undamaged grinding<br />
discs.<br />
● To remove the old grinding disc (12), proceed<br />
as described in the section<br />
″Mounting and removing the grinding disc″.<br />
● To mount the new grinding disc (12), proceed<br />
as described in the section<br />
″Mounting and removing the grinding disc″.<br />
Checking and replacing the carbon brushes<br />
(fig. A)<br />
The carbon brushes must be checked regularly.<br />
If the carbon brushes are worn, the machine will<br />
start to run unevenly.