L:\1 AUTOMOBILE\A014PFV\Notice\Page 1 A014.CATDrawing
L:\1 AUTOMOBILE\A014PFV\Notice\Page 1 A014.CATDrawing
L:\1 AUTOMOBILE\A014PFV\Notice\Page 1 A014.CATDrawing

You also want an ePaper? Increase the reach of your titles
YUMPU automatically turns print PDFs into web optimized ePapers that Google loves.
ENGLISH<br />
You have just purchased a MOTTEZ cycle carrier, a product designed and manufactured in France.<br />
Thank you for choosing our product, we hope you will be completely satisfied with it.<br />
It is essential that you read these instructions before use.<br />
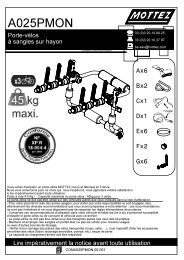
Weight empty 8 kg / Maximum permitted load on cycle carrier: 45 kg or 3 bicycles.<br />
This cycle carrier must not be used on vehicles other than those indicated in the vehicle application<br />
list.<br />
- For your safety and that of other users and to limit your liability, read the recommendations that we<br />
have prepared carefully; they are not meant to be exhaustive and do not absolve you from your duty to<br />
respect basic common sense rules.<br />
- Keep these recommendations for use in your vehicle and ensure that they are read by any person<br />
who installs the cycle carrier or drives the vehicle while it is installed.<br />
- The cycle carrier may only be used for the transport of bicycles.<br />
- Look after the straps and only use them if they are in perfect condition. Do not use them for other<br />
purposes or with other fixing buckles.<br />
- Check that bicycle components are properly secured (wheels, saddle, etc.). It is essential to remove<br />
detachable accessories from bicycles (drinks bottle, removable lights, pump, etc.) or they may be lost.<br />
- The rear load limit must be respected.<br />
1 – Fitting the upper straps:<br />
- Thread the two upper straps A through the upper buckles. PAY ATTENTION TO THE DIRECTION<br />
OF INSERTION.<br />
2 – Fitting the cycle carrier to the vehicle:<br />
- Attach the two upper straps to the upper metal edge of the tailgate.<br />
NEVER SUPPORT THE CYCLE CARRIER OR THE STRAPS ON A COMPOSITE (PLASTIC)<br />
SPOILER.<br />
- For vehicles with a frameless rear screen (glued screen) or with a wide rubber seal, use the special<br />
adapter* (Kit ref. A027B).<br />
- Measure the length L of the straps in accordance with the application guide for your vehicle.<br />
3 – Adjusting the cycle carrier:<br />
- Adjust the numbers X1 of the cycle support arm and X2 of the support bar in accordance with the<br />
application guide for your vehicle.<br />
- Re-tighten the handles.<br />
- ENSURE THAT IN THE TIGHTENED POSITION THE SUPPORT ARM IS PROPERLY LOCKED IN<br />
POSITION.<br />
4 – Checking:<br />
- Check that only the sleeves M are in contact with a sufficiently solid part of the bodywork (bumper,<br />
strengthening bar, rib, window, etc.) and also check the strength of the strap attachment points.<br />
- Ensure that no other part of the cycle carrier touches the vehicle. For safety purposes leave a gap of<br />
several centimetres between the car body and the cycle carrier’s framework.<br />
5 – Fitting the side straps:<br />
- Thread the two side straps A through the buckles.<br />
PAY ATTENTION TO THE DIRECTION OF INSERTION.<br />
6 – Attaching the side straps to the vehicle:<br />
- Attach the two side straps to the metal edge of the side of the tailgate.<br />
- Ensure that the loops do not pass around the sleeves N.<br />
7 – Fitting the lower straps:<br />
- Pass the two lower straps A through the lower buckles. PAY ATTENTION TO THE DIRECTION OF<br />
INSERTION.<br />
Attaching to the vehicle: ON THE SIDE BEAMS for preference (metal part under the vehicle)<br />
or ON THE TAILGATE only if indicated in the list of vehicles (metal tailgate rim).<br />
NEVER SUPPORT ON OR FIX TO A PLASTIC COMPONENT.