Bed.-Anl. HS Sauger Seite 1-96 - Starmix
Bed.-Anl. HS Sauger Seite 1-96 - Starmix
Bed.-Anl. HS Sauger Seite 1-96 - Starmix

Create successful ePaper yourself
Turn your PDF publications into a flip-book with our unique Google optimized e-Paper software.
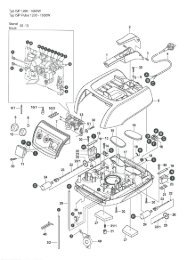
5.1 Container w.<br />
Open the lock-in closures r of the 20-l and 32-l container,<br />
and lift off the top section 1. Tip over the container and<br />
press in the steering rollers with pivot u until they<br />
lock into place. Screw the large wheels t onto the axles z;<br />
see fig. A.<br />
The supplied steel axle z for the 45-l container is pushed<br />
through the guide on the container, after which the wheels<br />
t and steering rollers u are mounted as indicated in<br />
fig. B.<br />
The steering rollers u for appliances with 22-l, 35-l and<br />
55-l stainless steel containers with chassis crosshead are<br />
mounted as indicated in fig. C.<br />
Insert suction tube o (when contained in scope of<br />
supply) into the container guide from above and push<br />
down until it engages.<br />
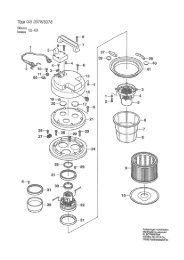
5.2 Filters 8 – q.<br />
Fitting the filters, depending upon the given model:<br />
– Push the folded filter cartridge 0 in a straight<br />
manner over the case 5, right up to the stop point, and<br />
lock the bayonet mount q; see fig. D. The folded filter<br />
is suitable for wet and dry suction cleaning.<br />
– Foam filter<br />
To suction the water, first remove the folded filter; push<br />
the foam filter 8 over the casing 5, see Fig. E.<br />
– Take hold of the paper filter bag i at the flange<br />
and push vertically from above into the guide of the<br />
cyclone suction opening e until the stop point is<br />
reached. The bag must rest against the container wall;<br />
see fig. F.<br />
For stainless steel containers, push the flange onto the<br />
suction opening at the bottom first and then at the top,<br />
then keep pushing as far as it will go.<br />
– The bag increases the dust retaining capacity<br />
and is intended for hygienic disposal. Paper<br />
filter bags can only be used for dry suction<br />
cleaning.<br />
– Place the filter sack 9 in the container w respectively<br />
for stainless steel containers slip over the edge of the<br />
container, see fig. G.<br />
Remove the filter for wet suction cleaning.<br />
5.3 Top section 1.<br />
From time to time, or when the suction force decreases, take<br />
out the motor protection filter 7 for cleaning; see fig. I.<br />
Place the top section 1 right-way-round on the<br />
container as indicated in fig. H. Observe the anti-rotation<br />
protection. The paper filter bag i must not be damaged,<br />
and the lock-in closure r must engage securely.<br />
5.4 Socket with ON/OFF automatic<br />
switching system.<br />
For suction cleaners with socket and ON/OFF automatic<br />
switching system.<br />
The socket 2e is intended for the connection of electrical<br />
tools. In the “0“ switch setting, the socket can be used as an<br />
extension line (e.g. for a light).<br />
Connected load: Suction unit and appliance max. 16 A<br />
WARNING! An electric tool must be switched off when it<br />
is connected. The socket is always live when the plug is inserted<br />
in a mains socket, irrespective of the switch position.<br />
The suction openings of electric tools are not standard.<br />
Consequently, an adapter (Rubber sleeve) 547275 is<br />
available that can be shortened to fit the given electric tool.<br />
For other suction connections contact your dealer or the<br />
manufacturer of the given electric tool.<br />
5.5 Filter cleaning.<br />
Appliances fitted with an electromagnetic cleaning device<br />
can remove the dust adhering to the folded filter 0 by vibration.<br />
This ensures optimal use of the folded filter and extends<br />
the operating cycles.<br />
6. Electrical fittings.<br />
6.1 Version with rocker switch.<br />
The appliance is switched ON/OFF or switched into automatic<br />
mode with the switch 2a on the top section 1.<br />
Appliances with an electronic suction force control feature<br />
a rotary knob 2c with which the suction force can be<br />
adapted to the object that is being suction cleaned.<br />
6.2 Version with rotary switch.<br />
Switch the unit on using the rotary switch 2a, see Fig. 1,<br />
on the upper part 1; (or switch to automatic or vibration<br />
mode).<br />
0 = Sucker >off<<br />
I min = Sucker >on< (manual mode) reduced suction<br />
performance<br />
I max = Sucker >on< (manual mode) full suction<br />
performance<br />
A = Stand-by mode for automatic ON/OFF switching.<br />
AR<br />
(Sucker is switched on and off by the electr.-tool)<br />
= Stand-by mode for automatic ON/OFF switching.<br />
(Sucker is switched on and off by the electr.-tool).<br />
Also, if the suction performance deteriorates, however at the<br />
latest when the volume flow display lights up, the filter<br />
cleaning function is switched on automatically for approx.<br />
7 seconds. To do this, the sucker uses the work break, i.e.<br />
the electr.-tool needs to be switched off or be off.<br />
12