Istruzioni montaggio - Bettio Zanzariere
Istruzioni montaggio - Bettio Zanzariere
Istruzioni montaggio - Bettio Zanzariere

You also want an ePaper? Increase the reach of your titles
YUMPU automatically turns print PDFs into web optimized ePapers that Google loves.
Manuale di installazione, uso e manutenzione<br />
Installation, user and maintenance manual
GRAZIE per aver scelto MINISCENICA ® e BETTIO.<br />
MINISCENICA ® continua con coerenza la tradizione di <strong>Bettio</strong> focalizzata sulla realizzazione di zanzariere di concezione nuova e rivoluzionaria che, tra gli importanti<br />
vantaggi offerti, consente un passaggio agevole anche in locali frequentati da bambini e anziani grazie alla completa assenza di barriere architettoniche.<br />
Profili dalle dimensioni davvero contenute per l’installazione in spazi ridotti; possibilità di fermare la barra maniglia in tutte le posizioni grazie ad un efficace sistema<br />
meccanico che consente di non utilizzare profili di riscontro laterali per la chiusura; assolutamente priva di guida a pavimento: tutto questo è MINISCENICA ® , una<br />
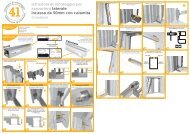
zanzariera con Brevetto internazionale <strong>Bettio</strong>, che richiede solo 43mm d’ingombro per l’installazione, 46mm se si utilizza la cuffia che consente una regolazione<br />
fino a +6mm. MINISCENICA ® è un prodotto installabile ad incasso e reversibile tenendo in considerazione che, guardando il prodotto dall’interno della stanza, se<br />
il cassonetto è installato a destra la rete risulterà a filo esterno mentre se il cassonetto è installato a sinistra la rete risulterà a filo interno. A richiesta è disponibile<br />
il doppio battente con apertura decentrata, l’opzionale profilo di scorrimento in colore argento e, in caso di muri irregolari, un profilo di riscontro che permette una<br />
chiusura perfetta dal punto di vista estetico.<br />
THANK YOU for your choice of MINISCENICA ®<br />
and BETTIO.<br />
MINISCENICA ® keeps up coherently <strong>Bettio</strong>’s tradition focused on a new and revolutionary concept of insect screen that numbers among its new features an easy<br />
pass through also in rooms with children and elderly people, thanks to the total absence of architectural barriers.<br />
Small aluminum profiles for an installation in reduced frames; chance to stop the handle bar in each desired position due to a mechanical system making the side<br />
profile totally useless; free from any ground rail. MINISCENICA ® , internationally patented by <strong>Bettio</strong>, is all such features. In order to install MINISCENICA ® you need<br />
only 43mm room – 46mm if you use the side cap on the upper track that allows a 6mm regulation. You can install MINISCENICA ® also within the frame.<br />
Moreover, MINISCENICA ® can be installed indifferently on the right and left side, only remembering that once installed on the right you’ll see the mesh more external,<br />
whether installed on the left the mesh will be more internal.<br />
Finally, upon specific request, you will find available the double door option with not central opening; an optional sliding profile silver coated; and, if your walls are<br />
not regularly squared, a side profile allowing a perfect closing from the aesthetical point of view.<br />
BREVETTO<br />
INTERNAZIONALE<br />
BETTIO
Miniscenica ® versione<br />
tradizionale<br />
INDICE CONTENTS<br />
Pg. 5-26<br />
Miniscenica ® regular<br />
version<br />
Pg. 5-26<br />
Regolazioni<br />
Pg. 18-23<br />
Adjustments<br />
Pg. 18-23<br />
Installazioni opzionali Pg. 27-29<br />
Optional installations Pg. 27-29<br />
Miniscenica ® versione ad<br />
incasso<br />
Pg. 31-37<br />
Miniscenica ® built-inguide<br />
version<br />
Pg. 31-37<br />
Problemi e soluzioni Pg. 38-39<br />
Problems and solutions Pg. 38-39<br />
Manutenzione Pg. 40-41<br />
Maintenance Pg. 40-41<br />
Prodotti per zanzariere Pg. 42-44<br />
Flyscreen products Pg. 42-44<br />
Sicurezza e normative Pg. 45-53<br />
Safety and CE rules Pg. 45-53
Versione tradizionale<br />
Regular version<br />
1<br />
22<br />
23<br />
15<br />
19<br />
30<br />
26<br />
27 28<br />
34<br />
46<br />
2<br />
14<br />
45<br />
16<br />
21<br />
Non manomettere alcuna delle viti, se<br />
non espressamente indicato nel manuale.<br />
Pena decadenza della garanzia!<br />
Do not loosen any screws except<br />
where expressely indicated, otherwise<br />
the warranty will decay!<br />
1. Zanzariera<br />
2. Profilo compensatore<br />
14. Supporto cassonetto<br />
15. Regolatori<br />
16. Cuffia per guida<br />
19. Tappi per profilo di riscontro<br />
21. Tappo compensatore<br />
22. Ferma Guida Inferiore<br />
23. Ferma Guida Superiore<br />
26. Viti STEI M 5x6<br />
27. Viti TBL TX15 4x19,3<br />
28. Viti TBL TX15 4x14<br />
30. Chiave esagonale 2,5mm<br />
34. Chiave Torx T15<br />
45. Piastrina a pavimento<br />
46. Tappi regolatore<br />
1. Flyscreen<br />
2. Adjuster profile<br />
14. Box support<br />
15. Adjusters<br />
16. Track side cap<br />
19. Closing profile caps<br />
21. Adjuster end caps<br />
22. Lower Peg<br />
23. Upper Peg<br />
26. STEI M 5x6 screws<br />
27. TBL TX15 4x19,3 screws<br />
28. TBL TX15 4x14 screws<br />
30. Hexagonal key 2,5mm<br />
34. Torx T15 key<br />
45. Floor plate<br />
46. Adjuster caps<br />
Versione tradizionale<br />
Regular version<br />
5
2<br />
Inserire fino a<br />
raggiungere i fori.<br />
Verso il lato cassonetto.<br />
15<br />
Insert to reach the holes.<br />
Towards the box side.<br />
6<br />
Versione tradizionale<br />
Regular version
In assenza di appoggio alla<br />
parete utilizzare il tappo<br />
compensatore.<br />
21<br />
If you can’t lean the profiles<br />
against the wall, please use<br />
the adjuster caps.<br />
2<br />
2<br />
21<br />
Anta fissa<br />
Anta apribile<br />
Fixed door<br />
Sliding door<br />
26<br />
26<br />
30<br />
Versione tradizionale<br />
Regular version<br />
7
Versione ad un battente<br />
One leaf version<br />
2<br />
Appoggiare sul lato di<br />
<strong>montaggio</strong> del cassonetto.<br />
Lean against the box side.<br />
Versione a due battenti<br />
Two leaves version<br />
2 2<br />
8<br />
Versione tradizionale<br />
Regular version
15<br />
15<br />
2<br />
15<br />
Versione tradizionale<br />
Regular version<br />
9
14<br />
14<br />
10<br />
Versione tradizionale<br />
Regular version
23<br />
22<br />
Conservare i pezzi n. 22<br />
e 23 in caso il prodotto<br />
debba essere imballato<br />
nuovamente.<br />
Please, retain pcs. n.22<br />
and 23 in case you have to<br />
package again the product.<br />
Versione tradizionale<br />
Regular version<br />
11
Inserire la guida facendo<br />
passare la ruota nera<br />
nell’apposita sede.<br />
Insert the guide by making<br />
the black wheel pass inside<br />
its own housing.<br />
STOP!<br />
12<br />
Versione tradizionale<br />
Regular version
Assicurarsi che<br />
il cordino grosso<br />
sia inserito correttamente<br />
nella gola<br />
della puleggia.<br />
Make sure that the<br />
thick cord is in the<br />
groove of the pulley.<br />
Assicurarsi che il cordino fino<br />
superiore sia libero di muoversi.<br />
Make sure that the thin upper<br />
cord is free to move.<br />
Versione tradizionale<br />
Regular version<br />
13
2<br />
1<br />
1<br />
1<br />
2<br />
14<br />
14<br />
14<br />
Versione tradizionale<br />
Regular version
28<br />
28<br />
34<br />
Avvitare la vite corta n° 28 finchè la zanzariera<br />
inizia a sollevarsi, quindi svitare il<br />
grano esagonale del regolatore con la chiave<br />
adatta (6 mm) e farlo appoggiare dietro la<br />
guida. Se la vite 28 dovesse risultare troppo<br />
corta per essere avvitata al regolatore, utilizzare<br />
la vite lunga n° 27.<br />
Tighten the short screw No. 28 until the flyscreen<br />
begins to rise, then unscrew the hex<br />
adjuster with the appropriate key (6 mm) and<br />
place it behind the guide. If the screw 28 is<br />
too short use the long screw No. 27.<br />
Versione tradizionale<br />
Regular version<br />
15
Se la vite corta n.28 dovesse<br />
risultare insufficiente per la<br />
regolazione utilizzare la vite<br />
lunga n.27.<br />
If the screw 28 is too short<br />
use the long screw No. 27.<br />
28<br />
28<br />
34<br />
16<br />
Versione tradizionale<br />
Regular version
NO<br />
Verificare che i fili non<br />
siano bloccati dalle viti!<br />
Make sure the strings are not<br />
blocked by the screws!<br />
ok!<br />
Versione tradizionale<br />
Regular version<br />
17
ok!<br />
18<br />
Deve passare almeno un foglio<br />
di carta sotto la maniglia.<br />
At least a sheet of paper must<br />
pass underneath the handlebar.<br />
Regolazioni<br />
Adjustments<br />
1-2 mm
Se la vite corta n.28 dovesse<br />
risultare insufficiente per la<br />
regolazione utilizzare la vite<br />
lunga n.27.<br />
> 2 mm<br />
If the screw 28 is too short<br />
use the long screw No. 27.<br />
1<br />
2<br />
28 28<br />
3<br />
34 34<br />
max.<br />
6 mm<br />
Regolazioni<br />
Adjustments<br />
19
max.<br />
3-4 mm<br />
Per differenze oltre i<br />
4mm usare il Profilo<br />
di Riscontro opzionale<br />
(pg.28).<br />
For gaps over 4mm<br />
use the optional<br />
closing profile (p.28)<br />
20<br />
Regolazioni<br />
Adjustments
1<br />
34<br />
2<br />
3<br />
34<br />
Regolazioni<br />
Adjustments<br />
21
Per differenze oltre i<br />
4mm usare il Profilo<br />
di Riscontro opzionale<br />
(pg.28).<br />
For gaps over 4mm<br />
use the optional<br />
closing profile (p.28)<br />
22<br />
Regolazioni<br />
Adjustments<br />
max.<br />
3-4 mm
34 34<br />
1 3<br />
2<br />
Regolazioni<br />
Adjustments<br />
23
Versione ad un battente<br />
One leaf version<br />
Versione a due battenti<br />
Two leaves version<br />
16<br />
clack!<br />
16<br />
16<br />
16<br />
24<br />
Versione tradizionale<br />
Regular version
46<br />
Versione tradizionale<br />
Regular version<br />
25
ok!<br />
26<br />
Versione tradizionale<br />
Regular version
Versione ad un battente<br />
One leaf version<br />
Versione a due battenti<br />
Two leaves version<br />
45<br />
45<br />
45<br />
Installazioni opzionali<br />
Optional installation 27
Versione tradizionale ad un battente<br />
One leaf regular version<br />
19<br />
Profilo di riscontro<br />
opzionale, consigliato<br />
per fuori squadra maggiori<br />
di 4mm.<br />
28<br />
Installazioni opzionali<br />
Optional installation<br />
Optional side profile.<br />
Reccomended for over<br />
4mm out-of-line walls.
Profilo di scorrimento<br />
opzionale.<br />
Optional sliding profile.<br />
Installazioni opzionali<br />
Optional installation 29
160cm<br />
Per la vostra sicurezza:<br />
apporre gli speciali<br />
adesivi segnaletici ad<br />
una altezza di 160 cm.<br />
For your safety: please<br />
put the stickers at 160<br />
cm height.<br />
30<br />
Sicurezza<br />
Safety
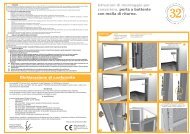
Versione ad incasso<br />
Built-in-guide version<br />
23<br />
22<br />
1<br />
47<br />
15<br />
27 28 34<br />
46<br />
14<br />
16<br />
45<br />
1. Zanzariera<br />
14. Supporto cassonetto<br />
15. Regolatori<br />
16. Cuffia per guida<br />
22. Ferma Guida Inferiore<br />
23. Ferma Guida Superiore<br />
27. Viti TBL TX15 4x19,3<br />
28. Viti TBL TX15 4x14<br />
34. Chiave Torx T15<br />
45. Piastrina a pavimento<br />
46. Tappi regolatore<br />
47. Cassa facile<br />
1. Flyscreen<br />
14. Box support<br />
15. Adjusters<br />
16. Track side cap<br />
22. Lower Peg<br />
23. Upper Peg<br />
27. TBL TX15 4x19,3 screws<br />
28. TBL TX15 4x14 screws<br />
34. Torx T15 key<br />
45. Floor plate<br />
46. Adjuster caps<br />
47. Easy casement profiles<br />
Versione incasso<br />
Built-in-guide version<br />
31
47<br />
38mm<br />
14<br />
47<br />
optional<br />
Inserire degli spessori in<br />
legno. In alternativa usare il<br />
compensatore in alluminio<br />
opzionale.<br />
Shim with wood pieces. Alternatively<br />
use the optional<br />
aluminium adjuster.<br />
Lato di <strong>montaggio</strong> del<br />
cassonetto.<br />
Box side.<br />
14<br />
32<br />
Versione incasso<br />
Built-in-guide version
50<br />
12 38<br />
38<br />
finita<br />
ncasso<br />
optional<br />
Inserire degli spessori in<br />
legno. In alternativa usare il<br />
compensatore in alluminio<br />
opzionale.<br />
Shim with wood pieces. Alternatively<br />
use the optional<br />
aluminium adjuster.<br />
47<br />
misura finita<br />
misura incasso<br />
38mm<br />
10<br />
+6<br />
EST IN<br />
47<br />
Versione incasso<br />
Built-in-guide version<br />
33
47 47<br />
34<br />
Versione incasso<br />
Built-in-guide version
Versione ad un battente<br />
One leaf version<br />
Versione a due battenti<br />
Two leaves version<br />
47<br />
47 47<br />
47<br />
Versione incasso<br />
Built-in-guide version<br />
35
1<br />
23<br />
22<br />
36<br />
Versione incasso<br />
Built-in-guide version<br />
14<br />
2<br />
Seguire le istruzioni da pg.5 a<br />
pg. 30 per l’installazione di ogni<br />
battente.<br />
For the installation of each leaf<br />
follow the instructions from page<br />
5 to page 30.
Versione a due battenti<br />
Two leaves version<br />
16<br />
16<br />
clack!<br />
16<br />
Versione incasso<br />
Built-in-guide version<br />
37
NO<br />
38<br />
Problemi e soluzioni<br />
Troubleshooting
ok!<br />
Nel caso in cui la rete esca<br />
accidentalmente dalla sua sede,<br />
reinserirla delicatamente con l’aiuto<br />
delle mani, prima di riavvolgerla nel<br />
cassonetto.<br />
If the mesh goes accidentally off<br />
rail, insert it again gently by hands<br />
before closing the screen.<br />
Problemi e soluzioni<br />
Troubleshooting<br />
39
Aspirare delicatamente la rete e le parti<br />
esposte alla polvere.<br />
Vacuum the mesh and the areas exposed<br />
to dust.<br />
Lubrificare periodicamente i lati della<br />
guida mobile con lo Speciale Lubrificante<br />
per prodotti Scenica ® <strong>Bettio</strong>.<br />
Periodically lubricate the sliding rail<br />
sides by using the special lubricant for<br />
Scenica ® items <strong>Bettio</strong>.<br />
40<br />
Manutenzione<br />
Maintenance
Pulire con un panno umido di soluzione<br />
neutra. Per ottenere risultati ottimali<br />
raccomandiamo l’uso dei Prodotti per la<br />
Pulizia & Manutenzione delle <strong>Zanzariere</strong><br />
<strong>Bettio</strong>, studiati appositamente per garantire<br />
il massimo delle prestazioni nel tempo.<br />
Clean only with a wet cloth and neutral<br />
solution.<br />
For the best results we suggest you to use<br />
<strong>Bettio</strong>’s Flyscreens Products for Cleaning<br />
and Maintenance: they are expressly studied<br />
to grant you the maximum performance<br />
in time.<br />
Manutenzione<br />
Maintenance<br />
41
KIT PULIZIA/MANUTENZIONE ZANZARIERA<br />
CLEANING/MAINTENANCE FLYSCREEN SET<br />
SPRAY ARIA COMPRESSA<br />
Rimuove con facilità i residui di lavorazione che possono prodursi in<br />
fase di assemblaggio. Si utilizza anche per la pulizia periodica della<br />
guida mobile e della rete.<br />
COMPRESSED AIR SPRAY<br />
It removes easily all traces made during the assembling process. You<br />
can also use it for the periodical cleaning of mesh and sliding rail.<br />
SPRAY LUBRIFICANTE<br />
Indispensabile per il corretto assemblaggio, nonché l’installazione e<br />
la manutenzione di tutti i prodotti SCENICA ® . La sua speciale miscela<br />
evita l’accumulo dello sporco all’interno dei meccanismi di movimentazione<br />
e mantiene il funzionamento fluido e silenzioso.<br />
LUBRICANT SPRAY<br />
Indispensable for a good assembling, installation and maintenance of<br />
SCENICA ® products. The special mix of the lubricant prevents to gather<br />
dirt inside the handling mechanisms and also keeps the functioning<br />
silent and fluid.<br />
SPRAY PULITORE ALLUMINIO/RETE<br />
Studiato specificatamente per la pulizia dei profili in alluminio e della<br />
rete, questo prodotto elimina tutte le impurità senza intaccare la vernice,<br />
mantenendo la zanzariera perfettamente integra nel tempo.<br />
ALUMINIUM/MESH CLEANER SPRAY<br />
Expressly studied for the cleaning of mesh and aluminium profiles, this<br />
product removes all the impurities without damaging the coating and<br />
then keeps the flyscreen perfectly clean.<br />
42<br />
Prodotti per <strong>Zanzariere</strong><br />
Flyscreen products
PURIFICATORE ARIA BETTIO<br />
AIR PURIFIER SPRAY<br />
Rivoluzionario prodotto che tramite una<br />
semplice applicazione sulla rete permette di<br />
purificare l’aria che la attraversa in maniera<br />
totalmente ecologica. Grazie all’azione fotocatalitica,<br />
elimina gli agenti inquinanti nocivi, come<br />
smog, polveri sottili e pollini, tutelando la salute<br />
di chi vive o lavora all’interno dell’ambiente<br />
trattato e, nel contempo, mantiene la rete<br />
costantemente pulita.<br />
Contenuto: 100 ml. di prodotto, spugna di applicazione.<br />
Revolutionary product that allows to purify the<br />
air that passes through the flyscreen in a totally<br />
ecological manner. Thanks to it’s photocatalytic<br />
action, removes harmful contaminants such as<br />
smog, soot and pollen, safeguarding the health<br />
of those who live or work within the environment<br />
keeping your flyscreen constantly clean.<br />
Content: 100 ml. of product, application sponge.<br />
Prodotti per <strong>Zanzariere</strong><br />
Flyscreen products 43
BETTIO PROFESSIONAL KIT<br />
VALIGIA INSTALLAZIONE/MANUTENZIONE ZANZARIERA<br />
Una pratica valigia per l’installatore che contiene uno spray<br />
lubrificante, uno spray aria compressa, uno spray pulitore alluminio/rete,<br />
un cacciavite TORX e un cacciavite esagonale.<br />
INSTALLATION / MAINTENANCE FLYSCREEN BAG<br />
A practical bag dedicated to the installers. Inside you can find:<br />
a lubricant spray, a compressed air spray, a aluminium/mesh<br />
cleaner spray, a TORX screwdriver and an hexagonal screwdriver.<br />
44<br />
Prodotti per <strong>Zanzariere</strong><br />
Flyscreen products
DICHIARAZIONE DI CONFORMITÀ<br />
ai sensi della Direttiva Europea 2006/42/CE<br />
EN 13561<br />
La società BETTIO Service S.p.A. con sede in Via dell’Artigianato n°9, 30020 Marcon (Venezia), nella persona del Sig. Loris <strong>Bettio</strong> nella sua qualità di<br />
Presidente espressamente delegato a questo scopo e sotto la sua propria esclusiva responsabilità,<br />
D I C H I A R A<br />
che la persona autorizzata a costituire il fascicolo tecnico, è l’Ing. Franco Zannoner reperibile presso l’Azienda;<br />
che le zanzariere con rete in fibra di vetro nei modelli MINISCENICA ® , laterale senza barriere 40 e MINISCENICA ® Incasso, laterale incasso senza barriere<br />
40, in varie misure come specificato nel Catalogo in vigore,<br />
SONO C O N F O R M I<br />
ai requisiti delle seguenti Direttive Europee:<br />
• 2006/42/CE<br />
• EN 13561:2004 “tende da sole” requisiti di funzionamento e sicurezza. Resistenza al vento NPD.<br />
• EN 14201:2004 Resistenza alle operazioni ripetute.<br />
• EN 13120:2004 Tende tecniche - requisiti di funzionamento e sicurezza.<br />
• UNI EN 349/94 Spazi minimi per evitare lo schiacciamento di parti del corpo.<br />
• UNI EN ISO 12100-1/2005, UNI EN ISO 12100-2/2005 Sicurezza del macchinario. Principi generali di progettazione.<br />
• UNI EN 1050/98 Principi per la valutazione del rischio.<br />
nonchè alle loro modifiche e aggiornamenti ed alle disposizioni che ne attuano il recepimento all’interno dell’Ordinamento Legislativo Nazionale<br />
del paese di destinazione e di utilizzo della zanzariera.<br />
Firma del delegato<br />
BETTIO SERVICE S.p.A.<br />
Presidente Loris <strong>Bettio</strong> Marcon (VE), 29 dicembre 2009<br />
Sicurezza-Normative<br />
Safety - CE rules<br />
45
ISTRUZIONI D’USO E MANUTENZIONE (ISTRUZIONI ORIGINALI)<br />
1. SCOPO<br />
Queste istruzioni sono rivolte a chi utilizza la zanzariera o la tenda come installatore, manutentore, proprietario o utente.<br />
Con questo strumento la BETTIO SERVICE SPA intende fornire al Cliente uno strumento di supporto per un uso più consapevole e corretto dei<br />
sistemi di zanzariere e tende filtranti o oscuranti installati, al fine di un’ottimizzazione delle loro prestazioni. E’ quindi consigliato per un corretto e<br />
vantaggioso utilizzo del sistema tenere disponibili le presenti note ai fini di garantire una rapida consultazione ogni qualvolta le circostanze lo rendano<br />
necessario. Esse sono comunque supportate dal Manuale d’Uso e Manutenzione e dal Fascicolo Tecnico disponibili in Azienda.<br />
2. CAMPO DI APPLICAZIONE<br />
Le presenti istruzioni si riferiscono ai modelli MINISCENICA ® , laterale senza barriere 40 e MINISCENICA ® Incasso, laterale incasso senza barriere 40,<br />
per i quali sono coerentemente adattati i contenuti.<br />
3. RIFERIMENTI<br />
Le presenti istruzioni, sono state redatte, secondo il punto 1.7.4 della Direttiva 2006/42/CE e tenendo conto delle normali condizioni di uso della<br />
macchina al fine di informare, unitamente alle altre istruzioni per l’uso apposte sulla macchina, gli operatori/utilizzatori anche sui rischi residui che la<br />
stessa presenta.<br />
4. USI PREVISTI<br />
La funzione del sistema zanzariera installato è esclusivamente quella di dare protezione contro l’intrusione di insetti e piccoli animali negli ambienti da<br />
proteggere.<br />
Ogni impiego diverso da quello indicato deve essere considerato improprio, e pertanto vietato, in quanto le relative condizioni di<br />
esercizio non sono state considerate nell’ analisi dei rischi condotta dal fabbricante e per i quali potrebbero non essere presenti<br />
protezioni specifiche. E’ vietato appoggiarsi alla rete. E’ vietato lasciare la barra maniglia senza accompagnarla fino al totale<br />
riavvolgimento della rete o del tessuto.<br />
Quando la velocità del vento raggiunge i 20 km/h è necessario chiudere la zanzariera o la tenda.<br />
L’uso improprio assolve da ogni responsabilità il costruttore stesso, per eventuali danni causati a persone o cose.<br />
Il mancato rispetto delle condizioni d’uso fa decadere automaticamente qualsiasi tipo di garanzia data dal produttore.<br />
5. REQUISITI DELL’ OPERATORE<br />
L’uso normale della zanzariera è consentito ad operatori non professionisti purchè di età superiore ad anni 12.<br />
Le operazioni di installazione, riparazione e manutenzione straordinaria, devono essere effettuate da personale tecnico qualificato.<br />
6. RACCOMANDAZIONI PER L’INSTALLAZIONE<br />
L’installazione deve essere eseguita nel pieno rispetto del D.Lgs. 81/2008 e delle successive modifiche e integrazioni, per tutto ciò che attiene la<br />
sicurezza delle persone.<br />
46<br />
Sicurezza-Normative<br />
Safety - CE rules
Il committente e l’installatore sono rispettivamente responsabili ai sensi della legge vigente, in materia di sicurezza.<br />
E’ necessario controllare, prima dell’utilizzo, che trabattelli, ponteggi, scale e tutti i dispositivi di protezione individuale<br />
(imbracature, cinghie di sicurezza, guanti, scarpe di sicurezza, elmetti, ecc.), eventualmente utilizzati, siano a norma ed in buono stato.<br />
Utilizzare i mezzi d’imbracatura adeguati.<br />
Nel caso gli installatori siano più di uno, è necessario coordinare i lavori, definire i compiti e le responsabilità. Gli operatori devono comportarsi in<br />
conformità alle istruzioni di sicurezza ricevute (POS). Nel caso in cui il prodotto debba essere montato ad un piano elevato rispetto a quello di terra, è<br />
necessario delimitare e presidiare l’area durante la salita al piano del prodotto in modo che nessuno possa trovarsi sotto l’eventuale carico sospeso.<br />
L’imballo del prodotto contiene le istruzioni di <strong>montaggio</strong>, d’uso, manutenzione e garanzia: l’installatore deve accertarsi che siano consegnate,<br />
previa lettura e commento, all’utilizzatore finale.<br />
7. INSTALLAZIONE DELLA STRUTTURA MECCANICA<br />
Una installazione non corretta può essere causa di infortuni alle persone. Leggere attentamente le istruzioni per un fissaggio corretto<br />
del prodotto in modo da evitare rischi di caduta dello stesso.<br />
E’ necessario verificare lo stato della struttura sulla quale viene effettuato l’ancoraggio/fissaggio della zanzariera.<br />
In realtà lo sforzo dinamico cui il telaio dovrà resistere con la zanzariera completamente svolta dal cassonetto, è quello del vento che soffia a 130<br />
km/h. In presenza di mattoni forati utilizzare tasselli espansibili con collante chimico di adeguate dimensioni. Nel caso non siano rispettati i requisiti di<br />
resistenza necessari ad un fissaggio in sicurezza, aumentare il numero di tasselli e viti. La scelta delle viti e dei tasselli di ancoraggio, dipende anche<br />
dallo stato e dalla natura della struttura muraria/metallica/serramento sulla quale si effettua l’installazione/fissaggio. I tasselli e le viti non sono forniti con<br />
il prodotto. Fare attenzione nella manipolazione del prodotto: gli avvolgitori sono montati con molle cariche. Le istruzioni di posa in opera, sono descritte<br />
nel foglio contenuto nell’imballo.L’eventuale attività di sigillatura sarà eseguita con resina siliconica neutra.<br />
Quando la velocità del vento raggiunge i 20 km/h è necessario chiudere la zanzariera.<br />
8. MANUTENZIONE<br />
8.1 Manutenzione ordinaria<br />
Data l’alta qualità dei materiali impiegati nella costruzione della zanzariera, non è prevista alcuna manutenzione ordinaria tranne l’eventuale pulizia<br />
della rete per salvaguardarla dalla formazione di muffe causate dal deposito di polveri o altro materiale sulla stessa.<br />
La rete, deve essere controllata visivamente almeno 2 volte all’anno: in primavera prima dell’utilizzo per la stagione estiva ed in autunno prima della chiusura<br />
invernale. La pulizia della rete può essere effettuata con aspirazione della polvere, oppure con spugna o panno umido utilizzando acqua tiepida.<br />
Fare asciugare la rete dopo la pulizia e prima dell’avvolgimento. Per la pulizia, NON utilizzare solventi-ammoniaca-idrocarburi.<br />
ATTENZIONE: la pulizia con scale, trabattelli o altro è riservata a personale specializzato che dovrà eseguire le operazioni nel rispetto<br />
delle norme di sicurezza e dovrà utilizzare i dispositivi di protezione individuale quali imbracature di sicurezza con fune di trattenuta (vedi<br />
D.Lgs. 81/2008).<br />
Sicurezza-Normative<br />
Safety - CE rules 47
8.2 Manutenzione straordinaria<br />
ATTENZIONE: tutte le operazioni di manutenzione straordinaria devono essere effettuate da personale professionalmente qualificato ed<br />
addestrato: pertanto è necessario richiedere l’intervento dello specialista. Vedere le istruzioni di installazione di posa in opera per l’eventuale<br />
s<strong>montaggio</strong> della zanzariera, o di parti di essa.<br />
In presenza di strappi sulla rete, anche di piccole dimensioni, è necessario provvedere alla sua sostituzione.<br />
Usare parti di ricambio originali, pena la decadenza della garanzia.<br />
9. GARANZIA<br />
La garanzia si applica in relazione ai contenuti del D.Lgs. n.24 del 02.02.2002. La durata della Garanzia è di 24 mesi (o maggiore quando esplicitamente<br />
indicato) per le Persone fisiche che acquistano il prodotto per scopi che possono considerarsi estranei alla loro attività professionale (Cliente<br />
privato finale). E’ di 12 mesi se il prodotto è fatturato ad un’Impresa o Professione soggetto di IVA.<br />
La garanzia si riconosce sul funzionamento del prodotto e sui materiali che lo compongono, esclusi i danni indiretti. Non vengono coinvolti<br />
nel concetto di garanzia eventuali costi sostenuti per raggiungere il luogo dove si trova il prodotto oggetto di garanzia ed eventuali<br />
costi di installazione o rimozione.<br />
Poiché è prassi utilizzare il documento fiscale di vendita per dare validità e data certa alla garanzia, lo stesso documento ne determinerà la durata.<br />
9.1 Norme per la validità della Garanzia<br />
Rispettare l’uso consentito del prodotto. Rispettare le norme d’uso e manutenzione. La garanzia sarà valida solo se accompagnata dal documento<br />
di vendita, comprovante la data d’acquisto. L’installazione, così come la manutenzione obbligatoria, dovrà essere effettuata solo ed esclusivamente<br />
da un installatore specializzato; entrambe dovranno essere comprovate con il documento fiscale relativo a questa garanzia.<br />
9.2 Decadimento della Garanzia.<br />
- Uso improprio del prodotto in occasione di vento, pioggia, grandine, neve e/o altri eventi combinati.<br />
- Cedimento della parte dove il prodotto è stato ancorato.<br />
- Manomissione del prodotto; installazione, s<strong>montaggio</strong>, manutenzione non effettuati da installatore specializzato o non effettuati secondo le norme<br />
e le istruzioni di <strong>montaggio</strong>.<br />
- Mancata manutenzione obbligatoria entro i termini stabiliti.<br />
- Uso di parti di ricambio non originali BETTIO SERVICE SPA.<br />
- Rimozione od occultamento dell’etichetta identificativa BETTIO SERVICE SPA, per cui la rintracciabilità del prodotto non risulta possibile.<br />
48<br />
Sicurezza-Normative<br />
Safety - CE rules
Per altre specifiche esclusioni dalla Garanzia, si fa riferimento alle eventuali note specificate dall’Azienda. Per qualsiasi controversia, si elegge quale<br />
unico foro competente quello di Venezia.<br />
10. IMBALLO MOVIMENTAZIONE E TRASPORTO<br />
I prodotti Scenica® sono imballati in scatole di cartone per proteggere e bloccare l’intelaiatura durante il trasporto. Se il trasporto della zanzariera avviene<br />
tramite un vettore il prodotto viene imballato in scatola di cartone e poi inserito in un’ulteriore scatola di cartone riempita a sua volta con sacchetti<br />
d’aria al fine di proteggere e bloccare la struttura durante la movimentazione ed il trasporto.<br />
Date le dimensioni e la forma del prodotto, è necessario, oltre la misura in lunghezza di 240 cm, effettuare la movimentazione manuale in<br />
due persone.L’imballo contiene le istruzioni di <strong>montaggio</strong>, d’uso, manutenzione e garanzia: il montatore deve accertarsi che siano consegnate,<br />
previa lettura e commento, all’utilizzatore finale.<br />
Non lasciare alla portata dei bambini i materiali d’imballo, possono costituire fonte di pericolo per gli stessi.<br />
11. ELENCO DEI RISCHI<br />
11.1 Installazione: Adottare tutte le precauzioni previste in cantiere con particolare riguardo a quelle riguardanti i rischi di caduta.<br />
11.2 Rischi inerenti l’utilizzo e la normale manutenzione.<br />
Prodotti con molla di richiamo:<br />
-Pericolo di caduta durante le operazioni di pulizia del telaio, del tessuto e/o della rete: evitare di sporgersi o farlo solo utilizzando attrezzature<br />
adeguate<br />
11.3 Rischi inerenti la manutenzione/riparazione:<br />
a) Pericolo di urto durante le operazioni di carico/scarico della molla<br />
b) Pericolo di non corretto ripristino della zanzariera durante il cambio della rete<br />
c) Pericolo derivante dal mancato utilizzo di attrezzature e DPI non marchiati CE<br />
11.4 Pericolo di inciampo sulla guida mobile dei prodotti Scenica ® : apporre segnaletica di avvertimento<br />
11.5 Pericolo di inciampo sulla guida inferiore della porta con apertura laterale: apporre segnaletica di avvertimento<br />
11.6 Rischi inerenti la dismissione: la dismissione del prodotto deve essere eseguita in base alle norme al momento in vigore<br />
11.7 Il livello di rumore è inferiore a 70 dB(A)<br />
Sicurezza-Normative<br />
Safety - CE rules<br />
49
EN 13561<br />
DECLARATION OF CONFORMITY<br />
in accordance with European Directive 2006/42/EC<br />
The company BETTIO Service S.p.A. with registered office in Via dell’Artigianato No. 9, 30020 Marcon (Venezia), as represented by Mr Loris <strong>Bettio</strong> in<br />
his capacity as Chairman expressly delegated for this purpose and under his own responsibility,<br />
DECLARES<br />
that the person authorized to create the technical file is the engineer Mr Franco Zannoner who can be contacted at the Company;<br />
that the flyscreens with fibreglass mesh - MINISCENICA ® - lateral 40 without barriers and MINISCENICA ® built-in-guide, lateral 40 built-in-guide without<br />
barriers, in the various sizes as specified in the current catalogue,<br />
COMPLIE<br />
with the requirements of the following European Directives:<br />
• 2006/42/EC<br />
• EN 13561:2004 “External blinds” performance requirements including safety. Wind resistance NPD.<br />
• EN 14201:2004 Resistance to repeated operations.<br />
• EN 13120:2004 Internal blinds – performance requirements including safety.<br />
• UNI EN 349/94 Minimum gaps to avoid crushing parts of the human body.<br />
• UNI EN ISO 12100-1/2005, UNI EN ISO 12100-2/2005 Safety of machinery. General principles for design.<br />
• UNI EN 1050/98 Principles for risk assessment.<br />
It also complies with the amendments and updates of the above Directives and the provisions that implement their assimilation into the National Legal<br />
System of the country of destination and installation of the insect screen.<br />
Signature of person empowered Marcon (VE), 29 December 2009<br />
Chairman Loris <strong>Bettio</strong><br />
50<br />
Sicurezza-Normative<br />
Safety - CE rules
INSTRUCTIONS FOR USE AND MAINTENANCE (TRANSLATION OF ORIGINAL INSTRUCTIONS)<br />
1. PURPOSE<br />
These instructions are intended for those who use the flyscreen, such as the installer, maintenance person, owner or user.<br />
With this instruction booklet BETTIO SERVICE SPA wishes to provide Customers with a tool for better, correct use of installed flyscreens and light<br />
filtering or blackout blinds, so as to optimize their performance. For correct and best use of the system it is therefore recommended that these notes<br />
be kept to hand for quick reference whenever required. Supplementary information may be had in the Operating and Maintenance Guide and the<br />
Technical File available at the Company’s offices.<br />
2. SCOPE<br />
These instructions refer to the following models: MINISCENICA ® - lateral 40 without barriers and MINISCENICA ® built-in-guide, lateral 40 built-in-guide<br />
without barriers, for which the contents are suitably adapted.<br />
3. REFERENCES<br />
These instructions have been prepared, as have other instructions for use applied to the product, in accordance with point 1.7.4 of Directive 2006/42/<br />
EC taking into consideration normal conditions of use of the product, to inform operators and users also of the residual risks that the product presents.<br />
4. ENVISAGED USE<br />
The function of the installed flyscreen system is solely to provide protection against the intrusion of insects and small animals into the environments to<br />
be protected.<br />
Any use other than has been described above is considered incorrect and is therefore forbidden, since the relative working<br />
conditions will not have been taken into account when the manufacturer analysed the risks and consequently there could be no<br />
specific protective devices fitted. Do not lean against the mesh. Do not let go of the handle rail until the mesh is fully rewound.<br />
Misuse relieves the manufacturer from all liability for any injury to persons or damage to property.<br />
Failure to comply with the conditions of use automatically invalidates any type of warranty given by the manufacturer.<br />
5. OPERATOR REQUIREMENTS<br />
Normal use of the flyscreen is allowed for non-professional users provided they are aged 12 and over. Installation, repair and extraordinary maintenance<br />
must be carried out by qualified technical personnel.<br />
6. RECOMMENDATIONS FOR INSTALLATION<br />
Installation must be carried out in full compliance with Italian Legislative Decree 81/2008 and subsequent amendments and additions for all that concerns<br />
the safety of persons. In accordance with current laws, the client and the installer are both responsible with regard to safety. Before using any<br />
equipment such as drills, screwdrivers, work platforms, scaffolding, steps and all personal protection equipment (slings/harness, safety belts, gloves,<br />
safety shoes, helmets, etc.), check that they are in compliance with regulations and in good condition. Use suitable slings or harnesses. If there is<br />
more than one installer, the work must be coordinated and the tasks and responsibilities defined. Users must abide by the applicable safety instructions<br />
received (POS). If the product is to be installed on any floor above ground level, the area must be cordoned off and supervised while the product<br />
is being raised to the relevant floor so that no person is under any suspended load.<br />
7. INSTALLATION OF THE MECHANICAL STRUCTURE<br />
Incorrect installation can cause injury to persons. Carefully read the instructions for correct fixing of the product so that there is no risk of<br />
it falling down.<br />
Sicurezza-Normative<br />
Safety - CE rules 51
The state of the structure on which the flyscreen will be fixed must be checked on the basis of the dynamic stress that the frame must<br />
withstand with the flyscreen fully unwound from the cassette, and that is a wind speed of 130 km/h. With hollow bricks use suitably sized<br />
expansion plugs with chemical adhesive.<br />
If the resistance requirements necessary for safe fixing are not satisfied, increase the number of wall plugs and screws. The screws and wall plugs<br />
also depend on the state and the nature of the structure, masonry/metal/wood window/door frame, onto which the installation/fixing is to be carried<br />
out. Wall plugs and screws are not supplied with the product. Take care when handling the product: the winder mechanisms are mounted with loaded<br />
springs. The instructions for installation are described on the sheet contained in the pack. Any sealing must be done with neutral silicone resin. The<br />
flyscreen must be closed when the wind speed reaches 20 km/h.<br />
8. MAINTENANCE<br />
8.1 Routine maintenance<br />
Given the high quality of the materials used in making the flyscreen, no routine maintenance is envisaged other than cleaning the mesh to protect it<br />
against the formation of mould/mildew caused by dust or other material being deposited on them. The mesh must be visually inspected at least twice<br />
a year; a mesh screen should be checked in spring before being used for the summer and in autumn before packing it up for the winter.<br />
The mesh may be cleaned with a vacuum cleaner; the mesh may also be cleaned with a sponge or cloth dampened with lukewarm water. Let the<br />
mesh dry thoroughly after cleaning before winding it up. Do NOT use solvents, ammonia or hydrocarbons for cleaning.<br />
CAUTION: cleaning carried out using steps, platforms or such must only be done by specialised personnel working in conformity with<br />
safety regulations and who must use suitable personal protective equipment such as body harnesses with separate safety line (see Italian<br />
Legislative Decree 81/2008).<br />
8.2 Extraordinary maintenance<br />
CAUTION: only professionally qualified and trained personnel may carry out extraordinary maintenance: it is therefore necessary to<br />
request the service of a specialist. If the flyscreen or any part of it needs to be dismantled, see the installation instructions. If the mesh is torn,<br />
however small the tear, it must be replaced.<br />
Only use original spare parts otherwise the warranty is invalidated.<br />
9. WARRANTY<br />
The warranty is applicable in relation to the contents of Italian Legislative Decree No. 24 of 02.02.2002. The Warranty is for 24 months (or more when<br />
explicitly indicated) and covers natural persons who purchase the product for purposes that may be considered unrelated to their professional activity<br />
(private end customer). The warranty is for 12 months if the product is invoiced to a Company or Professional office subject to VAT.<br />
The warranty covers any part or parts which are shown to be defective due to faulty material or workmanship. The company will not be responsible<br />
for any incidental or consequential damage or injury. The warranty does not cover any costs incurred to reach the place where the product is installed<br />
nor any costs for installation or removal. As is accepted practice, the original invoice or receipt is evidence of the date of purchase and therefore of<br />
the validity and duration of the warranty.<br />
9.1 Rules for the Warranty to be valid<br />
-Comply with the allowed use of the product.<br />
-Comply with the instructions for use and maintenance.<br />
52<br />
Sicurezza-Normative<br />
Safety - CE rules
-The warranty will only be valid if accompanied by the invoice or receipt giving evidence of the date of purchase.<br />
-Only a specialised installer must carry out installation and compulsory maintenance, proof of which must be shown by means<br />
of the taxation document with regard to this warranty.<br />
9.2 Invalidation of the Warranty.<br />
- Misuse of the product in the presence of wind, rain, hail, snow or other combined events.<br />
- Collapse of the part where the product has been anchored.<br />
- Tampering with the product; installation, dismantling and maintenance not carried out by a specialised installer or not carried out in accordance with<br />
regulations and installation instructions.<br />
- Failure to have compulsory maintenance carried out within the established times.<br />
- Use of other than BETTIO SERVICE SPA original spare parts.<br />
- Removal or concealment of the BETTIO SERVICE SPA identification label making traceability of the product impossible.<br />
For other specific exclusions from the Warranty, see any notes specified by the Company. For all and any dispute the sole place of jurisdiction is<br />
Venice.<br />
10. PACKAGING, HANDLING AND TRANSPORTATION<br />
The Scenica ® products are packed in cardboard boxes to protect and lock the frame during transport. If the transport of the flyscreen is via a carrier,<br />
the product is packed in a cardboard box and then inserted into a further cardboard box filled with air bags in order to protect and secure the structure<br />
during handling and transport .<br />
Given the size and shape of the product, it is necessary, beyond the measure of 240 cm in length, to perform the manual handling by two<br />
people.<br />
Keep the packaging materials out of reach of children, since they can be a source of danger.<br />
11. LIST OF RISKS<br />
11.1 Installation: take all the necessary precautions on site especially in respect of the risks of fall.<br />
11.2 Risks related to use and routine maintenance.<br />
Products with return spring:<br />
- danger of fall during cleaning of mesh: avoid leaning out of windows or only do so using suitable equipment.<br />
11.3 Risks related to maintenance/repair:<br />
a) danger of impact during spring loading/release operations<br />
b) danger of incorrect refitting of the flyscreen after mesh replacement<br />
c) danger due to failure to use equipment and to PPE that do not bear the EC mark<br />
11.4 Danger of tripping over chain elements: place warning signs<br />
11.5 Danger of tripping over guide for door with side opening: place warning signs<br />
11.6 Risks related to disposal: the product must be disposed of in accordance with rules and regulations currently in force<br />
11.7 The noise level is below 70 dB(A)<br />
Sicurezza-Normative<br />
Safety - CE rules<br />
53
www.bettio.it<br />
Visita il sito <strong>Bettio</strong>!<br />
Potrai scaricare i cataloghi più aggiornati e le istruzioni, visionare i modelli di ultimissima<br />
generazione, essere informato sulle news dell’Azienda: fiere, eventi e curiosità.<br />
Nella sezione Media Video la multimedialità è di casa: una ricca selezione di eventi,<br />
convention, fiere, istruzioni di <strong>montaggio</strong> dettagliate e video promozionali dei diversi<br />
prodotti, tutto a portata di un click!<br />
Visit <strong>Bettio</strong> web site!<br />
You can download updated catalogues and instructions sheets, look at the brand new flyscreen<br />
models, get informed about company’s news (exhibitions, events and curiosities).<br />
Media Video section is home to many multimedia features: a rich selection of events,<br />
conventions, exhibitions, detailed instructions and promo videos of the products. You can<br />
get everything with a simple click!
Gentile Cliente,<br />
Le ricordiamo che il mondo delle zanzariere BETTIO è vasto e molto ben<br />
assortito e comprende anche tanti altri modelli per tutti gli usi ed esigenze della Sua<br />
casa. La invitiamo ad approfondire la conoscenza dei nostri prodotti che offrono<br />
molteplici soluzioni anche all’applicazione della zanzariera nei vani finestra. Ed inoltre<br />
la linea LIVING, la tenda oscurante o filtrante a misura che protegge dal sole ed<br />
arreda la casa e l’ufficio, e il cui catalogo comprende numerosi tipi di tessuti – tra cui<br />
alcuni assai tecnici – che consentono la personalizzazione con foto e loghi<br />
o l’isolamento anche termico degli ambienti.<br />
Per ulteriori informazioni può rivolgersi presso il Suo rivenditore di fiducia.
Dear Customer,<br />
We remind you that the world of BETTIO insect screens is pretty big and well assorted<br />
and includes also many more models for every use and need of Your home. We invite<br />
you to deepen your knowledge of our products that offer several solutions also for the<br />
installation of flyscreens in window rooms. Moreover, we suggest you the line called<br />
LIVING, a black-out and shading roller blinds range, made-to-measure, that protects<br />
from the sunlight and fits your home and office. The LIVING catalogue includes various<br />
fabrics – some of them with very technical features – that enable you to customize the<br />
screens with photos and logos, or the thermic isolation of the rooms.<br />
For further informations, please, contact your BETTIO area manager
<strong>Bettio</strong>, azienda leader nel settore delle zanzariere deve la sua evoluzione alla determinazione<br />
ed intraprendenza dei suoi fondatori. Negli anni 90, <strong>Bettio</strong> inizia la produzione<br />
in larga scala di zanzariere ed oggi, unita sotto un unico marchio <strong>Bettio</strong><br />
<strong>Zanzariere</strong> Flyscreens, opera nel mercato internazionale in 2 divisioni: <strong>Bettio</strong> Service,<br />
dedicata alla produzione di zanzariere su misura e <strong>Bettio</strong> Group, orientata alla<br />
produzione di sistemi semilavorati per zanzariere.<br />
Il successo non è casuale: <strong>Bettio</strong> fonda la sua mission su prodotti di eccellenza,<br />
sapiente mix di abilità tecnica, innovazione tecnologica, ricerca costante ed un team<br />
affiatato. Inoltre la capacità di coinvolgere la propria clientela in eventi entusiasmanti<br />
fanno della <strong>Bettio</strong> il Partner ideale per lo sviluppo dei propri progetti.<br />
<strong>Bettio</strong>, leading manufacturer of insect screen systems, has evolved up to the present top market position thanks to the determination and enterprising<br />
attitude of the people who established it. <strong>Bettio</strong> starts its activity in a massive scale during the ‘90s and today, under the sole brand <strong>Bettio</strong> <strong>Zanzariere</strong><br />
Flyscreens, the company sells its products in the international markets with its two branches: <strong>Bettio</strong> Service is committed to the manufacturing<br />
of made-to-measure items, whereas <strong>Bettio</strong> Group is focused on semi finished products. Company’s success is not accidental: the grounds of<br />
<strong>Bettio</strong>’s mission are top quality items resulting from a well balanced mix of technical skill, technological innovations, steady R&D process and a well<br />
working team. Moreover <strong>Bettio</strong> is able to involve the customers in exciting events, so it is the ideal Partner to develop their projects.
Prima nata del nostro Gruppo, <strong>Bettio</strong> Service si dedica con costante passione,<br />
alla produzione di zanzariere, oscuranti e filtranti su misura. Nonostante molto<br />
tempo sia passato dalla sua nascita, l’obiettivo di <strong>Bettio</strong> Service è rimasto<br />
assolutamente immutato: produrre zanzariere innovative, pratiche, funzionali e<br />
soprattutto di altissima qualità: oggetti che durino nel tempo e si armonizzino<br />
all’interno della casa come un vero articolo di arredamento.<br />
Meccanismi brevettati, soluzioni innovative, sicurezza dei prodotti garantita<br />
dalla marcatura CE, precisione e puntualità delle consegne ed un efficace servizio<br />
di assistenza al cliente pre- e post-vendita: grazie a tutto questo i nostri<br />
prodotti sono oggi conosciuti ed apprezzati da milioni di<br />
italiani che hanno installato le zanzariere <strong>Bettio</strong> nelle<br />
loro case.<br />
As the eldest branch of our Group, <strong>Bettio</strong> Service is committed with unchanged enthusiasm to the manufacturing of made-to-measure flyscreens<br />
and, black out/shading screens . Although a lot of time has passed since than, <strong>Bettio</strong>’s goal is always the same: the manufacturing of innovative,<br />
handy and practical flyscreens, lasting for years and matching the home interiors as a real decoration item.<br />
Patented mechanisms, innovative solutions, products safety granted by the CE branding, accurate and punctual deliveries, a good pre- and<br />
post-sales assistence: thanks to all of these factors our products are well known and appreciated by millions of Italians who have purchased and<br />
installed <strong>Bettio</strong>’s flyscreens in their homes.
EN 13561<br />
Download viewer at<br />
www.i-nigma.com<br />
www.bettio.it<br />
©Maggio 2013 L’ape Bizzy è un cartoon di Giorgio Cavazzano .I disegni del presente manuale sono puramente indicativi. L’ Azienda si riserva di apportare modifiche in qualsiasi momento e senza preavviso.