

Philips Streamium Wireless Music Center - Istruzioni per l'uso - ENG
Philips Streamium Wireless Music Center - Istruzioni per l'uso - ENG
Philips Streamium Wireless Music Center - Istruzioni per l'uso - ENG

You also want an ePaper? Increase the reach of your titles
YUMPU automatically turns print PDFs into web optimized ePapers that Google loves.
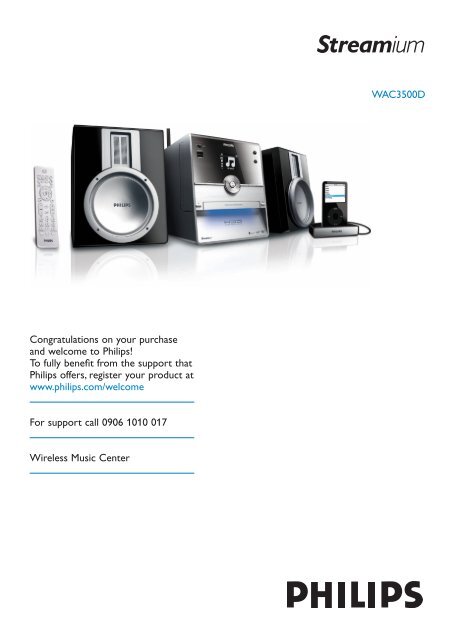
WAC3500D<br />
Congratulations on your purchase<br />
and welcome to <strong>Philips</strong>!<br />
To fully benefit from the support that<br />
<strong>Philips</strong> offers, register your product at<br />
www.philips.com/welcome<br />
For support call 0906 1010 017<br />
<strong>Wireless</strong> <strong>Music</strong> <strong>Center</strong>
<strong>Philips</strong> Consumer Electronics<br />
HK- 0721-WAC3500D<br />
(report No.)<br />
EC DECLARATION OF CONFORMITY<br />
We,<br />
<strong>Philips</strong> Consumer Electronics<br />
(manufacturerís name)<br />
<strong>Philips</strong>, Glaslaan 2, 5616 JB Eindhoven, The Netherlands<br />
(manufacturerís address)<br />
declare under our responsibility that the electrical product:<br />
<strong>Philips</strong> WAC3500D/12 /05<br />
(name) (type or model)<br />
<strong>Wireless</strong> <strong>Music</strong> <strong>Center</strong><br />
(product description)<br />
to which this declaration relates is in conformity with the following standards:<br />
EN55013 : 2001 +A1:2003 EN 300 328 : 2004<br />
EN55020 : 2002 + A1:2003 +A2:2005 EN 301 489-1 : 2005<br />
EN 55022: 2006 EN 301 489-17: 2002<br />
EN 55024: 1998 +A1:2001 +A2:2003 EN 50371 : 2002<br />
EN 60065: 2002 +A1:2006<br />
(title and/or number and date of issue of the standards)<br />
following the provisions of R &TTE Directive 1999/5/EC ( incl. 73/23/EEC & 93/68/EEC<br />
directives and is produced by a manufacturing organization on ISO 9000 level.<br />
Eindhoven,<br />
May 24, 2007<br />
(place, date)<br />
Eric Tijssen<br />
Program Manager<br />
PCE I-Lab Entertainment Solutions<br />
(signature, name and function)
EN <strong>Wireless</strong> <strong>Music</strong> <strong>Center</strong> 1
Important notes for users in the U.K.<br />
Mains plug<br />
This apparatus is fitted with an approved 13- Amp<br />
plug.To change a fuse in this type of plug, proceed as<br />
follows:<br />
1 Remove fuse cover and fuse.<br />
2 Fix the new fuse which should be a BS1362 5-<br />
Amp, A.S.T.A. or BSI approved type.<br />
3 Refit the fuse cover.<br />
If the fitted plug is not suitable for your socket<br />
outlets, it should be cut off and an appropriate<br />
plug should be fitted in its place.<br />
If the mains plug contains a fuse, it should have<br />
a value of 5 Amp. If a plug without a fuse is<br />
used, the fuse at the distribution board should<br />
not be greater than 5 Amp.<br />
Note:The severed plug must be disposed, so as to<br />
avoid a possible shock hazard due to it being<br />
inserted into another 13-Amp socket.<br />
How to connect a plug<br />
Norge<br />
Typeskilt finnes på apparatens bakside.<br />
Observer: Nettbryteren er sekundert<br />
innkoplet. Den innebygde netdelen er derfor<br />
ikke frakoplet nettet så lenge apparatet<br />
er tilsluttet nettkontakten.<br />
For å redusere faren for brann eller elektrisk<br />
støt, skal apparatet ikke utsettes for regn eller<br />
fuktighet.<br />
CLASS 1<br />
LASER PRODUCT<br />
The wires in the mains lead are colored using the following<br />
codes: blue = neutral (N), brown = live (L).<br />
• As these colors may not correspond with the<br />
color markings identifying the terminals in your<br />
plug, proceed as follows:<br />
– Connect the blue wire to the terminal<br />
marked N or colored black.<br />
– Connect the brown wire to the terminal<br />
marked L or colored red.<br />
– Do not connect either wire to the earth<br />
terminal in the plug, marked E (or e) or colored<br />
green (or green and yellow).<br />
Before replacing the plug cover, make sure that the<br />
cord grip is clamped over the sheath of the lead and<br />
not simply over the two wires.<br />
Copyright in the U.K.<br />
Recording and playback of any materials may require<br />
consent. See Copyright Act 1956 and The<br />
Performerb’s Protection Acts 1958 to 1972.
Table of contents<br />
1 Important 3<br />
1.1 Safety 3<br />
1.2 GPL Package written offer 4<br />
1.3 LGPL Library written offer 4<br />
1.4 Environmental information 4<br />
1.5 Disposal of your old product 5<br />
1.6 Maintenance 5<br />
1.7 Hearing Safety 6<br />
1.8 Register your product 7<br />
5.6.1 Smart equalizer 27<br />
5.6.2 Equalizer 28<br />
5.6.3 DBB (Dynamic Bass Boost) 28<br />
5.6.4 Incredible surround 29<br />
5.7 Display adjustment 29<br />
5.8 Selecting languages 30<br />
5.9 Sleep 30<br />
5.10 Alarm 31<br />
5.10.1 Set alarm / alarm time / repeat mode 31<br />
<strong>ENG</strong>LISH<br />
2 Your <strong>Wireless</strong> <strong>Music</strong> <strong>Center</strong> &<br />
Station 8<br />
2.1 What’s in the box 8<br />
2.2 Overview <strong>Wireless</strong> <strong>Music</strong> <strong>Center</strong> 10<br />
2.2.1 Controls on <strong>Center</strong> 10<br />
2.3 Overview remote controls 12<br />
2.4 Overview display 14<br />
3 Installation 15<br />
3.1 Install <strong>Center</strong> 15<br />
3.2 Connect AC power 15<br />
3.3 Rear connections 16<br />
3.3.1 Connect antennas 16<br />
3.3.2 Connect a portable (USB) flash device 17<br />
3.3.3 Connect your iPod 18<br />
3.3.4 Connect additional appliances 19<br />
4 Prepare 20<br />
4.1 Set the clock 20<br />
4.1.1 View the clock 22<br />
4.2 Remote control 22<br />
4.2.1 Remote control battery installation 22<br />
4.3 Navigation controls 24<br />
4.4 Alphanumeric keys 24<br />
5 Basic functions 25<br />
5.1 Power modes and functions 25<br />
5.2 Eco Standby (power-saving mode) 26<br />
5.3 Auto-Standby 26<br />
5.4 Volume control 26<br />
5.5 MUTE 27<br />
5.6 Sound control 27<br />
6 HD (Hard Disk) 32<br />
6.1 Play HD <strong>Music</strong> 32<br />
6.2 Search 32<br />
6.2.1 Search by keywords 32<br />
6.2.2 Select track of same artist 34<br />
6.2.3 Select track of same genre 34<br />
6.2.4 Find track in current album (during<br />
playback) 34<br />
6.2.5 Find passage in current track (during<br />
playback) 35<br />
6.3 Play modes REPEAT, SHUFFLE 35<br />
6.4 Build music library on <strong>Center</strong> 36<br />
6.4.1 Rip music from CDs 36<br />
6.4.2 Import from your PC 39<br />
6.4.3 Record from radio or external source 39<br />
6.5 Create a playlist 40<br />
6.6 Delete a playlist, album or track 41<br />
6.7 View track information 41<br />
6.8 Backup to PC 42<br />
6.9 View system information 42<br />
6.10 Edit track information 43<br />
7 CD 44<br />
7.1 Supported discs 44<br />
7.2 Play discs 45<br />
7.2.1 Search by keywords 45<br />
7.2.2 Find track in current album (during<br />
playback) 46<br />
7.2.3 Find passage in current track (during<br />
playback) 46<br />
7.3 Play modes REPEAT, SHUFFLE 47<br />
7.4 View track information 47<br />
Table of contents 1
8 FM radio 48<br />
8.1 Tune radio stations 48<br />
8.2 Store preset radio stations 48<br />
8.2.1 Autostore: Automatic preset program 48<br />
8.2.2 Manual store: manual preset program 49<br />
8.2.3 Listen to preset station 49<br />
8.3 RDS 50<br />
8.4 NEWS 50<br />
8.5 Internet radio 51<br />
8.5.1 First time use 51<br />
8.5.2 Regular use 52<br />
8.5.3 Add internet radio stations and bookmark<br />
your favorites 53<br />
9 UPnP 54<br />
9.1 UPnP (Universal Plug and Play) 54<br />
9.1.1 About UPnP* 54<br />
9.1.2 About UPnP* enabled devices 54<br />
9.2 Connect to the UPnP device 55<br />
9.3 UPnP playback 55<br />
9.3.1 Play music from UPnP device 55<br />
9.3.2 Play music from <strong>Center</strong> as UPnP source 56<br />
10 External sources 57<br />
10.1 Play or record to USB mass storage<br />
device 57<br />
10.1.1 About USB device 57<br />
10.1.2 Play music from USB device 58<br />
10.1.3 Transfer music to USB device 59<br />
10.2 Play your iPod music 61<br />
10.3 Play additional appliances 62<br />
11 Network settings 63<br />
11.1 Add Stations to Wi-Fi network of <strong>Center</strong><br />
63<br />
11.1.1 Delete a Station 65<br />
11.2 Connect to Wi-Fi (wireless) enabled<br />
home network 65<br />
11.2.1 Network settings on <strong>Center</strong> 65<br />
11.3 Connect to wired home network 66<br />
11.3.1 Set network on <strong>Center</strong> 67<br />
11.4 Connect to two different home<br />
networks 68<br />
11.5 View connection status with home<br />
network 68<br />
11.6 Connect to Internet 68<br />
12 Connect to your PC 71<br />
12.1 Use WADM 73<br />
12.1.1 Import from your PC using WADM 74<br />
12.1.2 Edit track information using WADM 75<br />
12.1.3 Backup music library of <strong>Center</strong> to your PC<br />
using WADM 76<br />
12.1.4 Restore backup files from your PC to<br />
<strong>Center</strong> 76<br />
13 Gracenote® CD Information 77<br />
13.1 Gracenote® Media Database 77<br />
13.1.1 Update Gracenote® Media Database 77<br />
13.2 Gracenote® Internet Queries 77<br />
13.2.1 Look up CD track information 77<br />
14 Expandable features 78<br />
14.1 MUSIC FOLLOWS ME 78<br />
14.2 MUSIC BROADCAST 78<br />
15 Firmware Upgrade 80<br />
15.1 Upgrade firmware 80<br />
15.2 Restore previous firmware 81<br />
15.3 Re-establish Wi-Fi network of <strong>Center</strong><br />
and Stations 81<br />
16 Reset 82<br />
17 Technical data 84<br />
18 Frequently asked questions 85<br />
19 Troubleshooting 89<br />
2<br />
Table of contents
1 Important<br />
1.1 Safety<br />
<strong>ENG</strong>LISH<br />
Warning! To avoid the risk fire, electric shock, injuries or damages, follow these safety<br />
instructions:<br />
• Do not open the product or remove the cover.The interior does not contain any userserviceable<br />
parts.<br />
• Do not place objects filled with liquid, such as vases, on the product.<br />
• Do not stick objects into the openings of the product.<br />
• Do not drop objects such as pa<strong>per</strong>clips into the openings.<br />
• Do not expose the product to splashing or dripping water.<br />
• Do not expose the product to rain or high humidity.The product is for indoor use only.<br />
• Do not place sources of naked flames, such as burning candles, on the product.<br />
• Position the product in a location with adequate ventilation.Allow at least 10 cm (4 inches)<br />
clearance at the rear and the top of the product and 5 cm (2 inches) on each side.<br />
• Do not cover the ventilation openings with items such as newspa<strong>per</strong>s, tablecloths, curtains, etc.<br />
• Do not oil or lubricate the mechanical parts of the product.<br />
Caution! To avoid the risk of injuries or damages, follow these safety instructions:<br />
• Visible and invisible laser radiation! Do not look at the laser beam.<br />
• The set does not contain any user-serviceable parts.<br />
• Place the set on a level, firm and sturdy surface.<br />
• Keep the system, batteries and discs in a cool dry place.<br />
• Do not exposure the product to humidity, rain, or heat sources like radiators, amplifiers, or<br />
direct sunlight.<br />
• Modification of the product can result in hazardous EMC radiation or other unsafe o<strong>per</strong>ations.<br />
This product complies with the radio interference requirements of the European Community.<br />
<strong>Philips</strong> Electronics, BG Entertainment Solutions, hereby declare that this product WAC3500D is in<br />
compliance with the essential requirements and other relevant provisions of the Directive<br />
1999/5/EC.<br />
The making of unauthorized duplicates of copy-protected materials, including computer programs,<br />
files, broadcasts and sound recordings, may be an infringement of copyrights and constitutes as<br />
criminal offence.This equipment should not be used for such purposes.<br />
Note<br />
The use of controls or adjustments or <strong>per</strong>formance of procedures other than described in the<br />
user manual may result in hazardous radiation exposure or unsafe o<strong>per</strong>ation.<br />
Important 3
1.2 GPL Package written offer<br />
This product contains Linux 2.4.27-vrsl that is made available under the GNU GPL license version<br />
2 (hereafter called ‘the Program’).<br />
<strong>Philips</strong> Electronics Hong Kong Ltd. hereby offers to deliver or make available, upon request, for a<br />
charge no more than the cost of physically <strong>per</strong>forming source distribution, a complete machinereadable<br />
copy of the corresponding source code of the Program on a medium customarily used for<br />
software interchange. Please contact: Head of Development BLC Audio PDCC Development 5/F.,<br />
<strong>Philips</strong> Electronics Building 5 Science Park East Avenue Hong Kong Science Park Shatin Hong Kong<br />
This offer is valid for a <strong>per</strong>iod of three years after the date of purchase of this product.<br />
1.3 LGPL Library written offer<br />
This product contains Linux 2.4.27-vrsl that is made available under the GNU LGPL license version<br />
2.1 (hereafter called ‘the Library’).<br />
<strong>Philips</strong> Electronics Hong Kong Ltd. hereby offers to deliver or make available, upon request, for a<br />
charge no more than the cost of physically <strong>per</strong>forming source distribution, a complete machinereadable<br />
copy of the corresponding source code of the Library on a medium customarily used for<br />
software interchange. Please contact: Head of Development BLC Audio PDCC Development 5/F.,<br />
<strong>Philips</strong> Electronics Building 5 Science Park East Avenue Hong Kong Science Park Shatin Hong Kong<br />
This offer is valid for a <strong>per</strong>iod of three years after the date of purchase of this product.<br />
1.4 Environmental information<br />
All redundant packaging material has been omitted.We made the packaging easily separable into<br />
three mono materials: cardboard (box), polystyrene foam (buffer) and polyethylene (bags, protective<br />
foam sheet).<br />
The product consists of materials that can be recycled if disassembled by a specialized company.<br />
Please observe local regulations regarding the disposal of packaging materials, exhausted batteries<br />
and old equipment.<br />
4<br />
Important
1.5 Disposal of your old product<br />
Your product is designed and manufactured with high quality materials and components,<br />
which can be recycled and reused.<br />
<strong>ENG</strong>LISH<br />
In order to preserve, protect and improve the quality of the environment, protect human<br />
health, and utilize natural resources prudently and rationally, you should return the<br />
unserviceable product either to the place where you purchased it, or to a relevant facility in<br />
accordance with the local statutory regulations.<br />
The crossed-out wheeled bin indicates that the product must not be disposed of in the household<br />
refuse.The symbol is used in conjunction either with a solid bar or the date of manufacture / launch.<br />
Please act according to your local rules and do not dispose of your old products with your normal<br />
household waste.The correct disposal of your old product will help prevent potential negative<br />
consequences for the environment and human health.<br />
Batteries contain chemical substances that may pollute the environment, so they should be<br />
disposed of at an official collection point.<br />
1.6 Maintenance<br />
Clean the set<br />
• Use a soft cloth slightly moistened with a mild detergent solution.<br />
• Do not use any solutions that contain alcohol, spirits, ammonia or abrasives, as these can harm<br />
the product.<br />
Clean your discs<br />
• When a disc becomes dirty, clean it with a cleaning cloth.Wipe the disc from the center out.<br />
• Do not use solvents such as benzene, thinner, or antistatic spray intended for analog records.<br />
Care for the HD (Hard Disk )<br />
The HD is a delicate piece of equipment that is prone to damage due to its long recording capacity<br />
and high speed o<strong>per</strong>ation.<br />
• Do not move the unit while it is switched on.<br />
• Do not remove the AC power plug from the power outlet during o<strong>per</strong>ation.<br />
• Do not use the unit in excessively hot or humid places as this may cause condensation to form<br />
inside the unit.<br />
If the HD fails, playback and recording will not be possible. In this case, is will be necessary to<br />
replace the HD unit.<br />
Note<br />
The HD is not recommended for <strong>per</strong>manent storage of recorded contents. Before creating<br />
your music library, create a back up of the music on your PC. If necessary, you can later restore<br />
your system with these backup files.<br />
Important 5
1.7 Hearing Safety<br />
Listen at a moderate volume.<br />
• Using headphones at a high volume can impair your hearing.This product can produce<br />
sounds in decibel ranges that may cause hearing loss for a normal <strong>per</strong>son, even for<br />
exposure less than a minute.The higher decibel ranges are offered for those that may have<br />
already ex<strong>per</strong>ienced some hearing loss.<br />
• Sound can be deceiving. Over time your hearing ‘comfort level’ adapts to higher volumes of<br />
sound. So after prolonged listening, what sounds ‘normal’ can actually be loud and harmful to<br />
your hearing.To guard against this, set your volume to a safe level before your hearing adapts and<br />
leave it there.<br />
To establish a safe volume level:<br />
• Set your volume control at a low setting.<br />
• Slowly increase the sound until you can hear it comfortably and clearly, without distortion.<br />
Listen for reasonable <strong>per</strong>iods of time:<br />
• Prolonged exposure to sound, even at normally ‘safe’ levels, can also cause hearing loss.<br />
• Be sure to use your equipment reasonably and take appropriate breaks.<br />
Be sure to observe the following guidelines when using your headphones.<br />
• Listen at reasonable volumes for reasonable <strong>per</strong>iods of time.<br />
• Be careful not to adjust the volume as your hearing adapts.<br />
• Do not turn up the volume so high that you can’t hear what’s around you.<br />
• You should use caution or temporarily discontinue use in potentially hazardous situations.<br />
• Do not use headphones while o<strong>per</strong>ating a motorized vehicle, cycling, skateboarding, etc.; it may<br />
create a traffic hazard and is illegal in many areas.<br />
Important (for models supplied with headphones):<br />
<strong>Philips</strong> guarantees compliance with the maximum sound power of its audio players as determined<br />
by relevant regulatory bodies only with the original model of provided headphones. In case this one<br />
needs replacement, we recommend that you contact your retailer to order a model identical to<br />
that of the original, provided by <strong>Philips</strong>.<br />
6<br />
Important
1.8 Register your product<br />
To fully benefit from the support that <strong>Philips</strong> offers, register your product at<br />
www.philips.com/welcome.<br />
<strong>ENG</strong>LISH<br />
As it is possible for you to upgrade your product, we recommend that you also register your<br />
product on www.club.philips.com so that we can inform you as soon as new and free upgrades<br />
are available.<br />
Products from <strong>Philips</strong> have been designed and manufactured to the highest quality standards. If your<br />
product does not work correctly, <strong>per</strong>haps the connection and configuration must be revised.<br />
To enhance your home entertainment ex<strong>per</strong>ience, our support website (www.philips.com/support)<br />
offers you the information you need to enjoy your product as well as new additions to our range<br />
of products.<br />
Please visit www.philips.com/support and enter the product name (WAC3500D) to view:<br />
• FAQ (Frequently Asked Questions)<br />
• Latest user manuals and PC software manuals<br />
• Firmware upgrade files for WAC3500D online<br />
• Interactive troubleshooting<br />
If you register your product at www.club.philips.com, we will be able to inform you as soon as<br />
new and free upgrades are available.<br />
Enjoy your <strong>Wireless</strong> <strong>Music</strong> <strong>Center</strong>!<br />
Important 7
2 Your <strong>Wireless</strong> <strong>Music</strong> <strong>Center</strong> & Station<br />
Congratulations on your purchase and welcome to <strong>Philips</strong>!<br />
With the <strong>Wireless</strong> <strong>Music</strong> <strong>Center</strong> you can:<br />
• Stream music from your PC<br />
• Dock your iPod<br />
• Plug & play from USB devices<br />
• Enjoy HD playback<br />
You can store up to 15000 songs in the 80GB Hard Disk of the <strong>Center</strong> and you can connect up to<br />
5 Stations to <strong>Center</strong>.<br />
All stored music can be wirelessly streamed from <strong>Center</strong> to the connected Stations using Wi-Fi*.<br />
Your CD player and PC are no longer bound by wires.<br />
* Wi-Fi is used to describe wireless LAN enabled products that are based on the IEEE 802.11 standards.<br />
The presence of the Wi-Fi logo indicates that a product has been certified for intero<strong>per</strong>ability.<br />
2.1 What’s in the box<br />
<strong>Wireless</strong> <strong>Music</strong> <strong>Center</strong> WAC3500<br />
8<br />
Your wireless music centre and station
Congratulations on your purchase<br />
and welcome to <strong>Philips</strong>!<br />
To fully benefit from the support that<br />
<strong>Philips</strong> offers, register your product at<br />
www.philips.com/welcome<br />
For support call 0906 1010 017<br />
<strong>Wireless</strong> <strong>Music</strong> <strong>Center</strong> + Station<br />
WACS3500D<br />
Supplied accessories<br />
<strong>Philips</strong> <strong>Streamium</strong><br />
WAC3500D<br />
<strong>Wireless</strong> <strong>Music</strong> <strong>Center</strong><br />
Quick start guide<br />
<strong>ENG</strong>LISH<br />
1 Connect / Set up<br />
2 Enjoy<br />
3 Enjoy with your home network / PC<br />
Remote control, 1-way,<br />
including 2x AAA batteries<br />
Quick start guide<br />
User manual<br />
PC Suite CD 1 x Ethernet cable 1 x FM wire antenna<br />
1 x AC power cable iPod docking cradle 8 x iPod dock adapter<br />
Before using the remote control:<br />
Insert batteries as shown.<br />
Your wireless music centre and station 9
2.2 Overview <strong>Wireless</strong> <strong>Music</strong> <strong>Center</strong><br />
17<br />
1<br />
16<br />
15<br />
14<br />
13<br />
12<br />
11<br />
10<br />
2<br />
3<br />
4<br />
5<br />
6<br />
7<br />
8<br />
9<br />
2.2.1 Controls on <strong>Center</strong><br />
1<br />
2<br />
3<br />
4<br />
5<br />
6<br />
p<br />
headphones jack<br />
VOLUME +, -<br />
Adjusts the volume level up / down<br />
LCD<br />
Display shows the status of the set<br />
IR (infrared) remote control sensor<br />
J(<br />
Press to skip to previous track / press and<br />
hold to rewind<br />
MARK/UNMARK<br />
Selects or deselects tracks you want to<br />
record (press & hold to select / deselect<br />
ALL tracks).<br />
10<br />
11<br />
REC 0<br />
CD/Radio/AUX: starts to record to the<br />
HARD DISK (HD)<br />
1 / 2 / 3 / 4<br />
Navigation controls (left, right up, down)<br />
allow you to scroll through the option lists<br />
1<br />
HD/CD/USB/UPnP: returns to previous<br />
option lists<br />
3 / 4<br />
HD/CD/USB/UPnP: skips/searches<br />
tracks/passage back/forward (in playback<br />
screen)<br />
Fast scroll through options/alphanumeric<br />
lists<br />
Radio: tunes to stations<br />
7<br />
8<br />
9<br />
STOP<br />
Stops playback or recording<br />
OPEN/CLOSE /<br />
Opens / closes the CD door<br />
CD door<br />
Insert discs with graphics facing up<br />
2<br />
Confirms selection<br />
Radio: enters the list of present stations<br />
OK / 2;<br />
Starts or pauses playing<br />
10<br />
Your wireless music centre and station
12<br />
HOME<br />
Menu: HD <strong>Music</strong> ,<br />
CD ,<br />
Radio ,<br />
UPnP (Universal Plug & Play) ,<br />
Portable (USB Universal Serial Bus) ,<br />
AUX (separately connected device)<br />
<strong>ENG</strong>LISH<br />
13<br />
14<br />
15<br />
16<br />
17<br />
MENU<br />
Enters or exits setup menu<br />
)K<br />
Press to skip to next track / press and hold<br />
to fast forward<br />
USB jack<br />
y ON / STANDBY / ECO STANDBY<br />
Press briefly to toggle between modes<br />
Standby and ON.<br />
Press & hold to toggle power modes<br />
between ON and Eco Standby (power-saving<br />
mode).<br />
Green indicator light = the set is<br />
switched ON.<br />
Red indicator light = the set is switched<br />
to Standby or Eco Standby.<br />
Wi-Fi antenna<br />
Your wireless music centre and station 11
2.3 Overview remote controls<br />
28<br />
31<br />
30<br />
29<br />
27<br />
26<br />
25<br />
24<br />
23<br />
22<br />
21<br />
1<br />
2<br />
3<br />
4<br />
6<br />
7<br />
8<br />
9 10<br />
11<br />
5<br />
12<br />
13<br />
14<br />
15<br />
16<br />
17<br />
18<br />
19<br />
20<br />
4<br />
5<br />
6<br />
7<br />
SEARCH ( )<br />
Searches by keywords<br />
VIEW<br />
Toggles between playback screen and<br />
previous options list<br />
MENU<br />
Enters or exits the setup menu<br />
1 / 2 / 3 / 4<br />
Navigation controls (left, right, up, down)<br />
allow you to scroll through the option lists<br />
1<br />
2<br />
3<br />
y<br />
Press briefly to switch the <strong>Center</strong> to ON or<br />
Standby<br />
Press & hold to switch the <strong>Center</strong> to Eco<br />
Standby (power-saving mode)<br />
FM TUNER<br />
Selects FM radio<br />
HOME<br />
Selects<br />
HD <strong>Music</strong> ,<br />
CD ,<br />
Radio ,<br />
UPnP (Universal Plug & Play) ,<br />
Portable (USB Universal Serial Bus) , or<br />
AUX (separately connected device)<br />
In Standby mode: switches the <strong>Center</strong> ON<br />
and selects HD <strong>Music</strong> ,<br />
CD ,<br />
Radio ,<br />
UPnP ,<br />
Portable ,or<br />
AUX<br />
8<br />
9<br />
1<br />
HD/CD/USB/UPnP: returns to previous<br />
option lists<br />
Text input: moves the cursor backwards<br />
3 / 4<br />
HD/CD/USB/UPnP: skips/searches<br />
tracks/passage back/forward (in playback<br />
screen)<br />
Scrolls fast through options list<br />
Radio: tunes to stations<br />
2<br />
Confirms selection<br />
Radio: enters the list of preset stations<br />
Text entry: confirms input and moves the<br />
cursor forward<br />
OK, 2/;<br />
Confirms selection<br />
Starts playing<br />
)K<br />
Fast forwards or skips to next track<br />
12<br />
Your wireless music centre and station
10<br />
11<br />
12<br />
13<br />
14<br />
15<br />
9<br />
Stops playback or recording<br />
VOL +, -<br />
Adjusts the volume level up or down<br />
MUTE<br />
Deactivates the sound temporarily<br />
SHUFFLE (3 def)<br />
Selects random playback<br />
REPEAT (2 abc)<br />
Selects continuous playback<br />
INCR.SURR. (6 mno)<br />
Selects Incredible Surround sound effect<br />
23<br />
24<br />
25<br />
26<br />
SMART EQ (4 ghi)<br />
HD: toggles between sound settings for the<br />
current Genre on or off<br />
SLEEP (1 .,?!’@-_:;/)<br />
Adjusts, displays or switches off the sleep<br />
timer<br />
SCROLL 3, 4<br />
Scrolls the display screen up or down<br />
J(<br />
Rewinds or skips to previous track<br />
CLEAR<br />
Text entry: deletes the input before the<br />
cursor<br />
<strong>ENG</strong>LISH<br />
16<br />
DBB (Dynamic Bass Boost) (5 jkl)<br />
Toggles the bass enhancement between on<br />
(DBB1, DBB2, DBB3) and off<br />
27<br />
REC 0<br />
CD/Radio/AUX: starts to record to the<br />
HD<br />
17<br />
RDS/NEWS (9 wxyz)<br />
Radio: selects RDS information<br />
HD/CD/UPnP/AUX/USB: toggles<br />
between NEWS function on and off<br />
28<br />
MARK/UNMARK<br />
Selects or deselects tracks you want to<br />
record (press & hold to select/deselect ALL<br />
tracks).<br />
18<br />
19<br />
SAME GENRE (8 tuv)<br />
HD: plays all the tracks of the current<br />
Genre<br />
MUSIC FOLLOWS ME<br />
HD: moves music playback between <strong>Center</strong><br />
and Station<br />
29<br />
30<br />
AUX<br />
Selects AUX (separately connected device)<br />
CD/MP3-CD<br />
Selects CD source<br />
In Standby mode: switches the <strong>Center</strong><br />
ON and selects CD source<br />
20<br />
21<br />
(0 )<br />
MUSIC BROADCAST<br />
HD: broadcasts music from <strong>Center</strong> to<br />
Station<br />
31<br />
HD<br />
Selects HD (Hard Disk) source<br />
In Standby mode: switches the <strong>Center</strong><br />
ON and selects HD (Hard Disk) source<br />
22<br />
SAME ARTIST (7 pqrs)<br />
HD: plays all the tracks of the current artist<br />
HD: enables wireless range extender (refer<br />
to extender’s manual for details)<br />
Your wireless music centre and station 13
2.4 Overview display<br />
Icons of the LCD:<br />
Icon Description Icon Description<br />
Client connected<br />
Repeat all<br />
Client not connected Repeat 1<br />
<strong>Music</strong><br />
UPnP<br />
Aux mode<br />
CD mode<br />
HD mode<br />
Radio mode<br />
USB mode<br />
iPod mode<br />
Record (rip) mode<br />
Shuffle<br />
Alarm<br />
<strong>Music</strong> broadcast<br />
<strong>Music</strong> follows me<br />
Mute<br />
RDS / NEWS<br />
Sleep<br />
Smart EQ<br />
Wi-Fi connected<br />
Wi-Fi and Ethernet connected<br />
14<br />
Your wireless music centre and station
3 Installation<br />
3.1 Install <strong>Center</strong><br />
<strong>ENG</strong>LISH<br />
Note<br />
Before you decide where and how to install the set, test the Wi-Fi connection and rear cable<br />
connections to find a suitable location.<br />
The <strong>Center</strong> is designed to be free standing.<br />
3.2 Connect AC power<br />
Important! Always press & hold y to switch the <strong>Center</strong> to power-saving mode before<br />
removing its power plug.<br />
Ensure that all rear connections are established before you power up the set.<br />
Connect the AC power cord to the mains outlet.The set is now powered up (switched on).<br />
When in Standby or Eco Standby mode, <strong>Center</strong> still consume some power.<br />
To disconnect the system from the power supply completely, remove the power plug from the<br />
mains outlet.<br />
For users in the U.K., please follow the instructions on page iii.<br />
Installation 15
3.3 Rear connections<br />
Note<br />
• Never connect or disconnect power cables when the mains supply is switched on.<br />
• Install <strong>Center</strong> within easy reach of suitable AC power outlets.<br />
3.3.1 Connect antennas<br />
1<br />
2<br />
Extend wire antenna.<br />
Connect wire antenna to FM antenna jack:<br />
3<br />
4<br />
5<br />
6<br />
Optional:To improve FM reception you can install an extension line (sold separately) between<br />
the wire antenna and the antenna jack.<br />
Unwind the antenna extension line completely.<br />
Move it in different directions to find the optimal reception (if possible, keep it away from the<br />
TV, VCR or other radiation sources).<br />
For best results elevate or ceiling-mount the antenna.<br />
16<br />
Installation
3.3.2 Connect a portable (USB) flash device<br />
You can play back music from a portable (USB) flash device.<br />
You can also transfer music from the library to the portable flash device.<br />
<strong>ENG</strong>LISH<br />
1<br />
Insert the USB plug of the portable flash device into the socket<br />
on <strong>Center</strong>.<br />
For portable flash devices with USB cable:<br />
1 Insert one end of the USB cable (not supplied) into the socket<br />
on <strong>Center</strong>.<br />
2<br />
Insert the other end of the USB cable into the USB output terminal of the portable flash<br />
device.<br />
For more details and instructions on how to play and transfer music: See 10 External sources.<br />
Tip<br />
• <strong>Center</strong> only supports portable (USB) flash devices that adhere to the following standards:<br />
- USB MSC (Type '0')<br />
- USB MTP<br />
- File system in FAT12 / FAT16 / FAT32<br />
- O<strong>per</strong>ations based on simple folder type navigation (also known as a normal FAT file<br />
system), and not based on proprietary track database.<br />
• The following USB devices will not be supported by <strong>Center</strong>:<br />
Products with database UI (Artists,Albums and Genre based navigation) as these products<br />
normally store music files in a specific hidden folder and use embedded proprietary track<br />
database that <strong>Center</strong> is unable to read pro<strong>per</strong>ly.<br />
Installation 17
3.3.3 Connect your iPod<br />
You can connect your iPod to the <strong>Center</strong> using the supplied <strong>Philips</strong> docking cradle and data/audio<br />
cable. Now you can enjoy the music library in your iPod via the sophisticated speaker system of the<br />
set.You can even charge your iPod at the same time.<br />
1<br />
Connect your Dock to <strong>Center</strong>:<br />
a<br />
b<br />
Connect the 9-pin docking cable to the DOCK IN of <strong>Center</strong>.<br />
Connect the audio cable to the AUX IN on <strong>Center</strong> (red & white plugs must match color<br />
coding of AUX IN).<br />
2<br />
Insert your iPod into the Dock.<br />
3 Press HOME and select Portable (iPod) .<br />
> Your iPod is displayed.<br />
4<br />
Use 3 or 4 and 2 on the remote control (or use the navigation control of your iPod) to select<br />
the music in your iPod menu system.<br />
The iPod can now be controlled via the remote control of the <strong>Center</strong>.<br />
18<br />
Installation
3.3.4 Connect additional appliances<br />
It is possible to play audio output from an external source, e.g.TV,VCR, Laser Disc player, DVD<br />
player on <strong>Center</strong>.You can also record the audio output to the music library in the HD of <strong>Center</strong>.<br />
<strong>ENG</strong>LISH<br />
On the additional appliance<br />
Connect one end of the audio cable (not supplied) to the AUDIO OUT terminals on the<br />
additional appliance.<br />
Connect the other end of the audio cables to the AUX IN terminals on <strong>Center</strong>.<br />
To record audio output to the library (HD) of <strong>Center</strong>, see section 6.4 HD: Building music<br />
library on <strong>Center</strong>.<br />
For instructions on how to play back music from additional appliances, see 10.3 Play additional<br />
appliances.<br />
Tip<br />
• If the connected device has only one single audio out terminal, connect it to the AUX IN left<br />
terminal. (Alternatively, you can use a 'single to double' cinch cable, but the sound output is<br />
still mono).<br />
• Always refer to the user manual of your other equipment for complete connection.<br />
Installation 19
4 Prepare<br />
4.1 Set the clock<br />
The time can be displayed in 24-hour or 12-hour format.You can set up your clock on <strong>Center</strong>.<br />
There are two methods to set the clock, RDS automatic time synchronization and manual time setup.<br />
RDS auto time sync:<br />
If you have preset RDS radio stations, you can synchronize the clock with one of the RDS stations.<br />
1<br />
2<br />
Press MENU to enter the menu screen.<br />
Use 3 or 4 and 2 to select Settings followed by Time.<br />
3<br />
Use 3 or 4 and 2 to select Auto Time Sync.<br />
4 Use 3 or 4 and 2 to select the RDS radio station you wish to synchronize the clock with.<br />
> The screen shows a confirmation screen:<br />
20<br />
Prepare
Manual time set:<br />
1 Press MENU to enter the menu screen.<br />
2 Use 3 or 4 and 2 to select Settings followed by Time.<br />
<strong>ENG</strong>LISH<br />
3<br />
Use 3, 4, or the numeric keypad (0-9), and 2 to select Set Time.<br />
> The display shows current clock setting (00:00 by default)<br />
4<br />
5<br />
Use 3, 4, or the numeric keypad (0-9) repeatedly to set the hours followed by the minutes.<br />
Confirm with OK.<br />
Tip<br />
• Change to 12-hour or 24-hour format:<br />
1 In the Time menu, select Time Format.<br />
2 Use 3 or 4 and 2 to select your option.<br />
• If you disconnect the power supply (pull the mains plug), the clock will be reset (settings will<br />
not be saved).<br />
Prepare 21
4.1.1 View the clock<br />
1 Press & hold VIEW button for about 5 seconds.<br />
> The clock will appear briefly in the display.<br />
Tip<br />
• In Standby mode, you can briefly press View to turn on the LCD backlights and view clock<br />
more clearly.<br />
• If you disconnect the power supply (pull the mains plug), the clock will be reset (settings will<br />
not be saved).<br />
4.2 Remote control<br />
<strong>Center</strong> is supplied with a remote control.<br />
Important!<br />
• Always point the remote control directly towards the IR sensor on <strong>Center</strong>.<br />
• First, select the source you wish to control by pressing one of the source select keys on the<br />
remote control (for example MP3-CD/CD, HD, FM TUNER,AUX).Then select the desired<br />
function (for example 2/; / J( / )K).<br />
4.2.1 Remote control battery installation<br />
Caution!<br />
To avoid the risk of explosion:<br />
• Do not puncture, cut, or manipulate batteries in any way and do not throw them into the fire.<br />
• Do not short-circuit the battery terminals.<br />
To avoid burn injuries:<br />
• Wear protective gloves when you handle leaking batteries.<br />
To avoid leakage of corrosive battery fluid and damage to the product:<br />
• Always replace all batteries at the same time<br />
• Do not mix old and new batteries or batteries of different types.<br />
• Replace batteries immediately if they are exhausted.<br />
• Always remove the batteries, if the remote control will not be used for a longer <strong>per</strong>iod of<br />
time.<br />
To avoid batteries being accidentally swallowed:<br />
• Always keep them out of reach of children and pets. (Consult a physician immediately, if a<br />
battery has been swallowed!)<br />
22<br />
Prepare
Installing batteries:<br />
1 Open battery compartment.<br />
<strong>ENG</strong>LISH<br />
2<br />
Install 2 batteries type LR03 or AAA in the remote control..<br />
3<br />
4<br />
Observe correct polarity (refer to ‘+’ / ‘-’ symbols inside the battery compartment).<br />
Close battery compartment.<br />
IMPORTANT BATTERY INFORMATION!<br />
Batteries containing hazardous substances are marked with the crossed-out wheeled bin.<br />
The symbol indicates that it is prohibited to dispose of the product with the domestic<br />
refuse.The chemical symbols for the respective hazardous substances are Cd = Cadmium,<br />
Hg = Mercury, Pb = Lead.<br />
You - as the user - are legally obliged to dispose of all batteries in accordance with your local<br />
regulations or to return them to the shop where you purchased the batteries.<br />
Thus, you fulfill your legal obligations and contribute to environmental protection!<br />
Prepare 23
4.3 Navigation controls<br />
1<br />
2<br />
3<br />
4<br />
Use the navigation controls 1 / 2 / 3 / 4 when navigating through options.<br />
Highlight options with 3 / 4.<br />
Enter submenus with 2.<br />
Confirm selections with OK or 2.<br />
4.4 Alphanumeric keys<br />
1<br />
2<br />
Use the alphanumeric keys to enter letters or numbers.<br />
When the text box appears, press the alphanumeric keys repeatedly until the desired<br />
letter/number appears.<br />
3<br />
4<br />
5<br />
Use 1 / 2 to move the cursor back / forward.<br />
Press J( to delete the entry before the cursor.<br />
Press OK to close the text box and move to the next option list.<br />
Note<br />
You will enter the previous / next option list if the cursor reaches the beginning or the end of<br />
the text box.<br />
24<br />
Prepare
5 Basic functions<br />
5.1 Power modes and functions<br />
<strong>ENG</strong>LISH<br />
When you plug the product into your mains supply, it powers up and is in power mode ON.The y<br />
button allows you to change the power mode.A colored light in the button indicates the current<br />
power mode:<br />
Status<br />
Button indicator light<br />
ON<br />
green<br />
Standby<br />
red<br />
Eco Standby red<br />
(power-saving mode)<br />
ON<br />
Status STANDBY ECO STANDBY<br />
Characteristics fast boot slow boot<br />
Remote control on standby off<br />
Streaming on standby off<br />
1 When <strong>Center</strong> is ON (green button light), press y:<br />
> <strong>Center</strong> switches to Standby mode.<br />
The button light changes from green to red.<br />
To switch the <strong>Center</strong> back ON again,<br />
a press y.<br />
> <strong>Center</strong> switches ON and remembers the last source selected:<br />
The button light changes from red to green.<br />
OR<br />
b<br />
press one of the source buttons on the remote control, MP3-CD/CD, HD, FM TUNER,<br />
AUX, or HOME.<br />
2<br />
To select functions, press HOME and use 3 or 4 and 2 to select your option (HOME,<br />
respectively MP3-CD/CD, HD on remote control).<br />
Basic functions 25
5.2 Eco Standby (power-saving mode)<br />
In the power-saving mode Eco Standby, the display and Wi-Fi connections of the product are turned<br />
off.The HD (Hard Disk) of <strong>Center</strong> also becomes inactive.When <strong>Center</strong> is switched to Eco Standby,<br />
you cannot stream music between <strong>Center</strong> and Stations or import music from the PC to <strong>Center</strong>.<br />
During Eco Standby the remote control is inactive.<br />
1 With <strong>Center</strong> switched ON, press & hold y:<br />
> <strong>Center</strong> changes to Eco Standby.<br />
The button lights up red.<br />
The display is switched off.<br />
2 To switch the <strong>Center</strong> ON, press y on the set. (The remote controls are still inactive.)<br />
> <strong>Center</strong> switches to the last source selected.<br />
Tip<br />
• In the power-saving mode Eco Standby, the settings for networking, sound, display, language<br />
and CD recording, as well as the tuner presets, and the volume level (maximum: moderate<br />
level) will be retained in the memory of the set.<br />
• To protect the HD, always switch <strong>Center</strong> to Eco Standby before removing its power plug<br />
from the mains outlet.<br />
• Remember that the remote controls are inactive during Eco Standby.<br />
5.3 Auto-Standby<br />
If at the end of playback / recording (ripping) <strong>Center</strong> remains in the stop mode for longer than 20<br />
minutes, <strong>Center</strong> will automatically switch to Standby mode in order to save power.<br />
5.4 Volume control<br />
1<br />
Check that playback has started.<br />
2 Adjust the volume with VOL +/- buttons.<br />
> Display shows a horizontal bar indicating the volume level.<br />
26<br />
Basic functions
5.5 MUTE<br />
During playback, you can deactivate the sound without switching off the set.<br />
1<br />
To deactivate the sound, press MUTE.<br />
<strong>ENG</strong>LISH<br />
> The icon appears.<br />
Playback continues without sound.<br />
2 To reactivate the sound, press MUTE again or adjust the volume with VOL +.<br />
> The icon disappears.<br />
5.6 Sound control<br />
5.6.1 Smart equalizer<br />
This function enables you to play music with the matching sound settings.<br />
Activate the Smart Equalizer:<br />
1 During playback, press SMART EQUALIZER<br />
> The icon appears if Smart Equalizer is activated.<br />
Deactivate the Smart Equalizer:<br />
1 Press MENU to enter the menu screen<br />
2<br />
Press 3 or 4 and 2 to select Settings, followed by Equalizer.<br />
3 Press 3 or 4 and 2 to select Off.<br />
> The icon disappears.<br />
Basic functions 27
5.6.2 Equalizer<br />
Equalizer enables you to select predefined sound settings.<br />
Set Equalizer:<br />
1 Press MENU to enter the menu screen.<br />
2<br />
Use 3 or 4 and 2 to select Equalizer.<br />
3<br />
4<br />
Use 3 or 4 and 2 to select Rock, Pop (default), Jazz, Neutral, Techno, Classical,<br />
Treble/Bass.<br />
Confirm with OK.<br />
Set Treble or Bass:<br />
1 Press MENU to enter the menu screen.<br />
2<br />
3<br />
Use 3 or 4 and 2 to select Settings, followed by Treble or Bass.<br />
Navigate 1 / 2 / 3 / 4 to highlight your option:<br />
Treble (+3 to -3), Bass (+3 to -3)<br />
5.6.3 DBB (Dynamic Bass Boost)<br />
Press DBB (Dynamic Bass Boost) once or more times to change the bass settings. Select your<br />
option: DBB OFF (default), DBB 1, DBB 2, or DBB 3.<br />
Tip<br />
Some discs might be recorded in high modulation, which causes a distortion at high volume. If<br />
this occurs, switch off DBB or reduce the volume.<br />
28<br />
Basic functions
5.6.4 Incredible surround<br />
Press INCR. SURROUND (INCR. SURR. on the remote control) once or more times to toggle<br />
the surround sound effect between On and Off.<br />
<strong>ENG</strong>LISH<br />
> Display shows: IS ON or IS OFF.<br />
5.7 Display adjustment<br />
With the controls on <strong>Center</strong> (or on the remote control) you can adjust the backlight and contrast<br />
settings of the display.<br />
1<br />
2<br />
3<br />
Press MENU to enter the menu screen<br />
Use 3 or 4 and 2 to select Settings, followed by Display.<br />
Press 3 / 4 and 2 to select Backlight or Contrast:<br />
Backlight<br />
1 Press 3 or 4 and 2 to select On or Off.<br />
Contrast:<br />
1 Press 3 or 4 to increase or reduce the contrast.<br />
Basic functions 29
5.8 Selecting languages<br />
1<br />
2<br />
3<br />
Press MENU to enter the menu screen.<br />
Use 3 or 4 and 2 to select Settings, followed by Language.<br />
Use 3 or 4 and 2 to choose English, Français, Español, Nederlands, Italiano or<br />
Deutsch.<br />
5.9 Sleep<br />
You can preset a certain <strong>per</strong>iod of time after which <strong>Center</strong> will switch to Standby mode.<br />
1 On the remote control, press SLEEP repeatedly to select the desired time <strong>per</strong>iod (in minutes):<br />
> Display shows in sequence: Sleep 15, 30, 45, 60, 90, 120, OFF.<br />
2 Select the desired time <strong>per</strong>iod.<br />
> Display shows the selected option briefly and returns to its previous status.The icon appears when<br />
a time is selected.<br />
3 To view the countdown time to Standby mode, briefly press SLEEP again.<br />
> When the selected sleep time expires, <strong>Center</strong> automatically switches to Standby mode.<br />
4<br />
To deactivate the sleep timer before the sleep time expires, press SLEEP repeatedly until<br />
SLEEP OFF is selected.The icon disappears.<br />
30<br />
Basic functions
5.10 Alarm<br />
Important! The clock must be set correctly before the alarm is set.<br />
<strong>ENG</strong>LISH<br />
5.10.1 Set alarm / alarm time / repeat mode<br />
1<br />
2<br />
Press MENU to enter the menu screen.<br />
Use 3 or 4 and 2 to select Settings.<br />
3 Use 3 or 4 and 2 to select Alarm, followed by Alarm On or Off.<br />
> The Alarm Time screen appears.<br />
4<br />
5<br />
In the Alarm Time screen, use 3 or 4 and 2 to enter the hours and minutes.<br />
Confirm the alarm time with OK or 2.<br />
6 Use 3 or 4 and 2 to select repeat mode Once or Daily.<br />
> The screen briefly shows Alarm On and appears in the display.<br />
Basic functions 31
6 HD (Hard Disk)<br />
6.1 Play HD <strong>Music</strong><br />
<strong>Music</strong> is centrally stored in the 80GB HD (Hard Disk) on the <strong>Center</strong>.<br />
1<br />
Check that <strong>Center</strong> is switched ON or in Standby mode (see 5 Basic functions).<br />
2 Press HOME and select HD <strong>Music</strong> (or press HD on remote control).<br />
> Display shows HD <strong>Music</strong> and the categories of your music library: Playlists, Artists, Albums,<br />
Genres, All tracks.<br />
Playlists: customizable collection of your favorite tracks sorted by playlist name in<br />
alphanumeric order.<br />
Artists: collection of albums sorted by artist name in alphanumeric order.<br />
Albums: collection of albums sorted by album name in alphanumeric order.<br />
Genres: collection of albums sorted by music style (only if album information available).<br />
All tracks:All tracks sorted by track name in alphanumerical order.<br />
3<br />
Use 3 or 4 and 2 to select your option.<br />
6.2 Search<br />
6.2.1 Search by keywords<br />
The keyword should be the first letter or word in the title of the track you wish to search for: By<br />
entering a keyword, you can quickly find all the items beginning with the keyword you entered<br />
(note that this feature is case sensitive).<br />
1<br />
Navigate 1 / 2 / 3 / 4 to enter desired option list of tracks, albums or playlists.<br />
32<br />
Hard Disk
2 On remote control, press SEARCH<br />
> Display: text box appears<br />
<strong>ENG</strong>LISH<br />
3<br />
Use alphanumeric keys to enter keyword (maximum 8 characters) (see 4.4 Prepare:<br />
Alphanumeric keys)<br />
4 Press OK to start searching<br />
> Display: Searching...<br />
Searching starts from the beginning of current option list.<br />
The matched items appear at the top of the list.<br />
The option list automatically shows the closest match in the alphabet if no match is found.<br />
Display: Searching... disappears.<br />
5<br />
Press STOP 9 to stop searching.<br />
Tip<br />
• Searching will also stop when:<br />
• you select another source<br />
• you switch off the set<br />
Hard Disk 33
6.2.2 Select track of same artist<br />
1<br />
During playback, press SAME ARTIST<br />
> Playback of found tracks by the current artist continues after current track.<br />
6.2.3 Select track of same genre<br />
1<br />
During playback, press SAME GENRE<br />
> Playback of found tracks of same genre as current track continues after current track.<br />
Tip<br />
Not all tracks have an automatic genre tag, so you may have to manually assign a genre for your<br />
tracks before loading them to the HD of <strong>Center</strong>.<br />
6.2.4 Find track in current album (during playback)<br />
1<br />
In playback screen, navigate with 3 / 4 to select track in current album during playback.<br />
34<br />
Hard Disk
6.2.5 Find passage in current track (during playback)<br />
1<br />
In playback screen, press & hold 3 / 4 or J( / )K<br />
<strong>ENG</strong>LISH<br />
> Track gets scanned at high speed.<br />
2 When you found the passage you want, release 3 / 4 or J( / )K<br />
> Normal play resumes.<br />
6.3 Play modes REPEAT, SHUFFLE<br />
plays the current track continuously<br />
repeats all the tracks (under current selection of playlist, artist, genre, album, or All<br />
tracks)<br />
repeats all the tracks (under current selection of playlist, artist, genre, album, or All<br />
tracks) in random order<br />
plays tracks (under current selection of playlist, artist, genre, album, or All tracks) in<br />
random order<br />
1<br />
2<br />
During playback press REPEAT or / and SHUFFLE once or more times to select desired<br />
play mode.The play mode icons appear in the display.<br />
To return to normal playback, press REPEAT or / and SHUFFLE repeatedly until the various<br />
mode icons disappear from the display.<br />
Note<br />
If is active, it will be deactivated when pressing SHUFFLE.To activate / press<br />
first SHUFFLE, then REPEAT 1.<br />
Hard Disk 35
6.4 Build music library on <strong>Center</strong><br />
Important!<br />
• Recording is <strong>per</strong>mitted only if there is no infringement of copyrights or any other rights of<br />
third parties.<br />
• For CDs encoded with copyright protection technologies used by some record companies,<br />
recording will be restricted.<br />
• The making of unauthorized duplicates of copy-protected material, including computer<br />
programs, files, broadcasts and sound recordings, may be an infringement of copyrights and<br />
constitute a criminal offence.This equipment should not be used for such purposes.<br />
You can build a music library in the HD of <strong>Center</strong> by ripping from CDs, importing from PC and<br />
recording from external sources.<br />
6.4.1 Rip music from CDs<br />
Important!<br />
Ripped files are first stored in a temporary memory:<br />
Always switch the <strong>Center</strong> to Eco Standby to ensure files are fully processed before<br />
disconnecting <strong>Center</strong> from the power source.While the <strong>Center</strong> is ripping the files, you can<br />
continue to listen to your music.<br />
You can rip audio CD tracks from your CDs and store them as MP3 files in the HD of <strong>Center</strong>.The<br />
Gracenote <strong>Music</strong>ID® enables your set to look up CD information (including album, artist, genre,<br />
track information) from its database. It allows the recorded CD tracks to be pro<strong>per</strong>ly categorized<br />
(for example, under artist, albums, genres or all tracks) and also to be merged with the existing<br />
tracks in the HD.To update your Gracenote® Media Database, see the section 12 Connect to<br />
your PC in this manual.<br />
<strong>Music</strong> recognition technology and related data are provided by Gracenote®. Gracenote is the<br />
industry standard in music recognition technology and related content delivery. For more<br />
information, please visit www.gracenote.com.<br />
CD and music-related data from Gracenote, Inc., copyright © 2000-2007 Gracenote. Gracenote<br />
Software, copyright © 2000-2007 Gracenote.This product and service may practice one or more<br />
of the following U.S. Patents: #5,987,525; #6,061,680; #6,154,773, #6,161,132, #6,230,192,<br />
#6,230,207, #6,240,459, #6,304,523, #6,330,593, #7,167,857, and other patents issued or pending.<br />
Gracenote and CDDB are registered trademarks of Gracenote.The Gracenote logo and logotype,<br />
and the ‘Powered by Gracenote’ logo are trademarks of Gracenote.<br />
Gracenote® is a registered trademark of Gracenote, Inc.The Gracenote logo and logotype, and<br />
the ‘Powered by Gracenote’ logo are trademarks of Gracenote.<br />
36<br />
Hard Disk
Rip from a CD at high speed:<br />
(Audio CD, MP3/WMA CD)<br />
<strong>ENG</strong>LISH<br />
1<br />
Insert CD with printed side facing up:<br />
For MP3/WMA CD, press 2 on a highlighted file folder to enter the track list.<br />
2 In the track list screen, press RECORD 0 (remote control REC).<br />
> List of tracks with check boxes appears:<br />
3<br />
Press MARK/UNMARK to select/deselect tracks (hold MARK/UNMARK to select/deselect<br />
all tracks).<br />
Hard Disk 37
4 Press RECORD 0 (REC) to start ripping.<br />
> Display shows CD-Rip and the current track name.<br />
(A default album name, e.g.Album_001 is assigned if the CD track information cannot be found in<br />
the Gracenote® database.)<br />
> <strong>Center</strong> returns to CD mode when ripping is complete.<br />
5<br />
6<br />
To rip another CD repeat steps 1 to 4 again.<br />
To stop ripping, press STOP 9.<br />
Rip from a CD during playback:<br />
(Only from Audio CD)<br />
1 During playback, press RECORD 0 (remote control REC).<br />
> Recording and playback start from the current track.<br />
Display shows CD-Rec and the current album name.<br />
Change ripping speed:<br />
1 Press MENU to enter menu screen.<br />
2<br />
3<br />
4<br />
5<br />
Use 3 or 4 and 2 to select Settings.<br />
In Settings screen, press 3 or 4 and 2 to select Rec Speed.<br />
Press 3 or 4 and 2 to select Normal Speed.<br />
Press RECORD 0 (remote control REC) to start recording.<br />
38<br />
Hard Disk
Change ripping quality:<br />
1 Press MENU to enter menu screen.<br />
2 Use 3 or 4 and 2 to select Settings.<br />
<strong>ENG</strong>LISH<br />
3<br />
4<br />
5<br />
In Settings screen, press 3 or 4 and 2 to select Rec Quality.<br />
Press 3 or 4 and 2 to select 128kbps, 160kbps, 192kbps, 256kbps, or 320kbps.<br />
Press RECORD 0 (remote control REC) to start recording.<br />
Tip<br />
• By default, the recorded tracks are converted to MP3 files at the rate of 128kbps (near-CD<br />
quality). For better sound quality, you can select a higher kbps rate.<br />
• To edit track information on <strong>Center</strong>, see 6.10 Edit track information, or to edit track<br />
information no your PC, see 12.1.2 Edit track information using WADM.<br />
6.4.2 Import from your PC<br />
The <strong>Wireless</strong> Audio Device Manager (WADM) in the supplied PC Suite CD helps you organize<br />
music files on your PC and import them into <strong>Center</strong>. For details, see 12.1 Use WADM in this<br />
manual.<br />
6.4.3 Record from radio or external source<br />
A maximum recording time of 3-hours can be made from the radio or an external source.<br />
1<br />
a<br />
In Radio mode, tune the desired radio station (see 8.1 FM radio:Tuning to radio<br />
stations).<br />
or<br />
b<br />
In AUX mode, start playback from the external source.<br />
2 Press RECORD<br />
> The recoding starts.<br />
3 Press STOP 9 to stop recording.<br />
> The recording will be saved as a file under RADIO or AUX in Albums. A file name is assigned, e.g.<br />
Radio_01, or Aux_01.<br />
Hard Disk 39
6.5 Create a playlist<br />
A playlist is a custom collection of your favorite music.You can create up to 99 playlists in the HD<br />
of <strong>Center</strong>.<br />
1<br />
2<br />
In HD <strong>Music</strong> mode, press MENU to enter the menu screen.<br />
Use 3 or 4 and 2 to select Create Playlist<br />
> A new playlist is created (a default album name, e.g. Playlist_001, is assigned).<br />
Display shows: Playlist created.To add tracks, select Add to Playlist.<br />
1<br />
2<br />
3<br />
4<br />
Navigate with 1 / 2 / 3 / 4 to highlight the desired Track or All tracks.<br />
Select Add to Playlist.<br />
Press MENU to enter the menu screen.<br />
Use 3 or 4 and 2 to display the selection of playlists.<br />
5 Use 3 or 4 and 2 to select the desired playlist.<br />
> Display shows all added tracks in playlist.<br />
6<br />
Repeat steps to select and store all desired tracks.<br />
40<br />
Hard Disk
6.6 Delete a playlist, album or track<br />
This feature works only on <strong>Center</strong>.<br />
1<br />
Navigate with 1 / 2 / 3 / 4 to enter a category (Playlist,Artists,Albums, Genres,All tracks).<br />
<strong>ENG</strong>LISH<br />
2<br />
3<br />
4<br />
If necessary, press 3 or 4 and 2 once or more times to highlight the playlist album or track<br />
you wish to delete.<br />
Press MENU to enter the menu screen.<br />
Use 3 or 4 and 2 to select Delete Playlist, Delete Album or Delete Track<br />
5<br />
Press 2 to select Yes.<br />
6.7 View track information<br />
Note<br />
The feature View track information is only available in mode HD <strong>Music</strong>.<br />
1<br />
Press the VIEW button on the remote control once or more times to enter the track list<br />
screen.<br />
Hard Disk 41
2<br />
Press 2 to display the track information screen (e.g. track name, file type, file size, bit rate of<br />
mp3/wma files).<br />
3<br />
Press the VIEW button once or more times to return to the HD playback screen.<br />
6.8 Backup to PC<br />
The <strong>Wireless</strong> Audio Device Manager (WADM) in the supplied PC Suite CD allows you to backup<br />
contents on the HD to your PC.The backup files on your PC can be subsequently restored to<br />
<strong>Center</strong> if the files on the HD are lost or corrupted. For details, see the section 12 Connect to<br />
your PC in this manual.<br />
6.9 View system information<br />
1<br />
Press MENU to enter the menu screen.<br />
2 Use 3 or 4 and 2 to enter Information menu.<br />
> The display shows: System, <strong>Wireless</strong> and Wired.<br />
a<br />
Use 3 or 4 and 2 to select System.<br />
> Name of <strong>Center</strong> or Station and firmware version (on <strong>Center</strong> also: free hard disk space) is shown on<br />
the display:<br />
b Use 3 or 4 and 2 to select <strong>Wireless</strong>.<br />
> List of available information items (e.g. SSID,<strong>Wireless</strong> Mode,WEP Key, MAC Address, Subnet mask,<br />
IP Address, and IP Mode) is shown on the display:<br />
c Use 3 or 4 and 2 to select Wired.<br />
> List of available information (e.g. Subnet mask, IP Address, and IP mode) are shown on the display:<br />
42<br />
Hard Disk
6.10 Edit track information<br />
Note<br />
Use the remote control to Edit track information.<br />
<strong>ENG</strong>LISH<br />
You can edit track title, album name, etc.:<br />
1<br />
2<br />
Press HOME to select HD.<br />
Use 3 or 4 and 2 to select the track to be edited.<br />
3 Press MENU.<br />
> 'Edit' is shown on the LCD display<br />
4<br />
5<br />
Use 3 or 4 and 2 to select Edit.<br />
Now you can start editing track information by following the sequence:<br />
Edit track title > Edit Artist name > Edit Album name > Edit Genre name<br />
Press the following keys on remote control to edit track information:<br />
Alphanumeric keys Insert text into the current position.<br />
1 Move highlight to previous editing position. In leftmost position:<br />
press to move to previous screen.<br />
2 Move highlight to next editing position.<br />
J( Press briefly to delete highlighted text, Press & hold to delete all<br />
text.<br />
OK<br />
Confirms text and enters next screen.<br />
> When you completed your editing, the LCD shows 'Updating...' followed by 'Update success' (or 'System<br />
busy, please edit later' if the update was not successful).<br />
Tip<br />
• If no key is pressed for 60 seconds, the edit screen will disappear without saving anything.<br />
• You can enter an editing string of max. 21¬characters.<br />
• You can also edit album/playlist names. (All tracks in that album/playlist will bear the new<br />
album/playlist name.)<br />
• You can also use 3 or 4 on <strong>Center</strong> or remote control to enter text:<br />
3 Press briefly to skip to previous character<br />
Press & hold to fast scroll through the character list<br />
4 Press briefly to skip to next character<br />
Press & hold to fast scroll through the character list.<br />
Hard Disk 43
7 CD<br />
7.1 Supported discs<br />
You can play the following discs on the system:<br />
• Pre-recorded audio CDs (CDDA)<br />
• Finalized audio CD-Rs and CD-RWs (12cm CD / 8cm CD, 185 MB / 200 MB)<br />
• MP3/WMA-CDs (CD-R/CD-RWs with MP3/WMA)<br />
• AAC-CDs (MPEG4 AAC LC raw format, .m4a/.m4b files)<br />
Important! This system is designed for regular discs.Therefore, do not use any accessories<br />
such as disc stabilizer rings or disc treatment sheets, etc.<br />
About MP3/ WMA<br />
The music compression technology MP3 (MPEG1 Audio Layer 3) and WMA (Windows Media<br />
Audio) significantly reduces the digital data of an audio CD, while maintaining the sound quality.<br />
Windows Media Audio® is a registered trademark of Microsoft Corporation.<br />
Supported formats:<br />
• Disc format ISO9660, Joliet, UDF (created on Adaptec Direct CD v5.0 and Nero Burning ROM<br />
UDF v5.5) and multi-session CDs<br />
• MP3 bit rate (data rate): 32-320 Kbps and variable bit rate.<br />
• 8-cm and 12-cm CD-R/CD-RW up to 730MB<br />
• Directory nesting up to a maximum of 8 levels<br />
• Directory nesting up to a maximum of 8 levels<br />
• MP3 VBR,WMA VBR<br />
• AAC (MPEG4 AAC LC raw format, .m4a/.m4b files)<br />
The system does not play or support the following:<br />
• Empty albums that do not contain any MP3/WMA files and hence will not be displayed.<br />
• Unsupported formats are skipped (e.g. files with .doc extension are ignored).<br />
• DRM protected WMA files<br />
• WAV, PCM audio files<br />
• WMA files in lossless format<br />
44<br />
Tip<br />
• Make sure that MP3 files end on extension .mp3,WMA files end on extension .wma, and<br />
AAC files end on extension .m4a or .m4b.<br />
• To burn/convert DRM protected WMA files use Windows Media Player 10 (or later.Visit<br />
www. microsoft.com for details about Windows Media Player and WM DRM (Windows<br />
Media Digital Rights Management).<br />
CD
7.2 Play discs<br />
1<br />
2<br />
Press / to open the CD tray.<br />
Insert CD into CD tray with printed (label) side facing up.<br />
<strong>ENG</strong>LISH<br />
3 Press / to close CD tray.<br />
> Display shows: Reading CD.<br />
Audio CD: list of tracks appears (Track information may not appear, if it is not found in the HD<br />
database and if there is no Internet connection to update the missing information from the Gracenote®<br />
service site.)<br />
MP3/WMA CD: list of albums appears.<br />
Display shows:<br />
Others<br />
CDDA<br />
All tracks<br />
MP3/WMA/AAC files that are not sorted into albums (folders)<br />
located in the root directory of the disc.<br />
CDDA files on an enhanced CD or a mixed mode CD.<br />
All supported files in any albums (folders) on the disc.<br />
4<br />
5<br />
Press the navigation controls 3 or 4 and 2 to select your option.<br />
Press 2; to start playback<br />
• On a highlighted album, to start playback of album.<br />
• On All tracks, to start playback of all tracks on disc.<br />
6<br />
a To temporarily pause playback, press 2;.<br />
b<br />
To resume playback, press button again.<br />
7<br />
8<br />
To stop playback, press STOP 9.<br />
To remove disc, press EJECT / on <strong>Center</strong>.<br />
7.2.1 Search by keywords<br />
The keyword should be the first letter or word of the album title, artist name, track title, genre<br />
name, or playlist name you wish to search for: By entering a keyword, you can quickly find the item<br />
that most closely matches to your search criteria.The search cursor will stop at the closest<br />
alphabetical match in the list.<br />
Note<br />
The keyword search is supported in modes HD <strong>Music</strong> and USB only.<br />
CD 45
1<br />
2<br />
Navigate 1 / 2 / 3 / 4 to enter desired option list of albums, artists, tracks, genres or playlists.<br />
On remote control, press SEARCH<br />
> Display: text box appears<br />
3<br />
Use alphanumeric keys to enter keyword (maximum 8 characters) (see 4.4 Prepare:<br />
Alphanumeric keys)<br />
4 Press OK to start searching<br />
> Display: Searching…<br />
Searching starts from the beginning of current option list.<br />
The matched items appear at the top of the list.<br />
The option list automatically shows the closest match in the alphabet if no match is found.<br />
Display: Searching… disappears.<br />
5<br />
Press STOP 9 to stop searching.<br />
Tip<br />
The search will also stop when:<br />
• you select another source<br />
• you switch off the set<br />
7.2.2 Find track in current album (during playback)<br />
In playback screen, press 3 / 4 (or J( / )K ) to select previous or next track in current album<br />
during playback.<br />
7.2.3 Find passage in current track (during playback)<br />
1<br />
2<br />
In playback screen, press & hold 3 / 4 (or J( / )K) to scan currently playing track at high speed.<br />
When you found the passage you want, release 3 / 4 (or J( / )K) to resume normal playback.<br />
46<br />
CD
7.3 Play modes REPEAT, SHUFFLE<br />
plays the current track continuously<br />
repeats all the tracks (under current artist, genre, or album)<br />
<strong>ENG</strong>LISH<br />
repeats all the tracks (under current artist, genre, or album) in random order<br />
plays tracks (under current artist, genre, or album) in random order<br />
1<br />
2<br />
During playback press REPEAT or / and SHUFFLE once or more times to select play mode.<br />
To return to normal playback, press REPEAT or / and SHUFFLE repeatedly until the various<br />
modes are no longer displayed.<br />
7.4 View track information<br />
To view track information:<br />
1<br />
Press VIEW on remote control once or more times to enter playback screen.<br />
2 Press 2.<br />
> Display shows track information (e.g. track name, file type, file size, bit rate of mp3/wma files).<br />
3<br />
Press VIEW once or more times to return to playback screen.<br />
CD 47
8 FM radio<br />
8.1 Tune radio stations<br />
1<br />
2<br />
3<br />
Connect the supplied FM wire antenna to <strong>Center</strong> (see 3 Installation).<br />
Ensure that <strong>Center</strong> is switched on or in Standby mode (see 5 Basic functions).<br />
Press HOME<br />
4 Press the navigation controls 3 or 4 and 2 to select Radio > FM Tuner.<br />
> Playback screen appears.<br />
Display: Radio, radio station frequency and preset number (if programmed).<br />
5 Press & hold 3 or 4 until frequency in display starts running.<br />
> The radio automatically tunes to a station of sufficient reception.<br />
Display during automatic tuning: Searching...<br />
If a station is received in stereo, is shown.<br />
When you are receiving an RDS station, is shown.<br />
6<br />
7<br />
Repeat tuning process until you find the desired radio station.<br />
To tune to a weak station, press 3 or 4 briefly and repeatedly until you have established<br />
optimum reception.<br />
8.2 Store preset radio stations<br />
You can store up to 60 radio stations in the preset memory.<br />
8.2.1 Autostore:Automatic preset program<br />
Autostore automatically starts programming radio stations into the preset memory, beginning with<br />
Preset 1.Available stations are programmed in the order of their radio frequency, RDS stations are<br />
followed by FM stations.A maximum of 10 RDS stations will be stored (Preset 01 to Preset 10).<br />
1<br />
Press MENU to enter the menu screen.<br />
2 Use 3 or 4 and 2 to select autostore radio.<br />
> Display: Autostore, please wait… Press 'Stop' to exit.<br />
When all stations are stored, the first preset station automatically starts playing.<br />
48<br />
FM radio
8.2.2 Manual store: manual preset program<br />
1<br />
2<br />
3<br />
In FM radio mode, use 3 or 4 to select / tune your desired radio station.<br />
Press MENU to enter the menu screen.<br />
Use 3 or 4 and 2 to select Save to Preset.<br />
<strong>ENG</strong>LISH<br />
4 Use 3 or 4 and 2 to select the desired preset number (PR01, PR02,…PR60).<br />
> Current radio station is stored under selected preset number.<br />
8.2.3 Listen to preset station<br />
1<br />
2<br />
In FM radio mode, press 2 to access the list of preset stations.<br />
Use 3 or 4 and 2 to select the preset station.<br />
FM radio 49
8.3 RDS<br />
RDS (Radio Data System) is a service that allows FM stations to send additional information along<br />
with the FM radio signal.<br />
Tune to RDS radio station (see 8.2.1 Autostore: Automatic preset program)<br />
Display shows (if available):<br />
• Name of radio station<br />
• Radio frequency<br />
• Program type (e.g. News, Pop, <strong>Music</strong>)<br />
• RDS radio text<br />
8.4 NEWS<br />
You can activate radio NEWS while listening to another source on WAC3500D. <strong>Center</strong> will tune<br />
to a RDS radio station stored in the preset memory under one of the 10 first numbers.<br />
1<br />
During playback (any source except radio) press RDS/NEWS on remote control.<br />
> Icon appears and NEWS ON is briefly displayed.<br />
(If no RDS station is found or no news transmission is detected during the scan, the icon<br />
disappears and NEWS OFF is briefly displayed.)<br />
Playback continues while <strong>Center</strong> scans the first 10 preset stations.<br />
When a news transmission is detected, <strong>Center</strong> will switch to the RDS station broadcasting the<br />
news transmission and the icon starts flashing.<br />
After the news transmission is over, <strong>Center</strong> will stay tuned to the news station.<br />
50<br />
FM radio
2 To deactivate NEWS, press RDS/NEWS again.<br />
> Icon disappears and NEWS OFF is briefly displayed.<br />
Note<br />
Ensure that you have stored RDS stations in the first 10 preset locations (see 8.2.1<br />
Autostore: Automatic preset program).<br />
<strong>ENG</strong>LISH<br />
8.5 Internet radio<br />
You can also listen to all the most popular Internet Radio stations by connecting through the <strong>Philips</strong><br />
web service, where automated links to active stations are maintained and updated at regular<br />
intervals.<br />
The Internet Radio feature requires registration with <strong>Philips</strong>.The registration process only has to<br />
be completed once, when you are using the Internet Radio for the first time.You can register more<br />
than one user. Each user will have to register separately, following these instructions:<br />
8.5.1 First time use<br />
Important!<br />
Ensure you are connected to the Internet when you use the Internet Radio feature. See<br />
11 Network Settings for information on how to get your system connected to the home<br />
network and the Internet.<br />
Use the remote control for the registration process.<br />
For first time use of the Internet radio you must register with <strong>Philips</strong>.<br />
To register you need a valid email address.<br />
Note<br />
If you enter an email address that is already registered with <strong>Philips</strong>, the display asks for your<br />
password. Enter your password and enjoy Internet radio!<br />
Internet radio registration process:<br />
On <strong>Center</strong>:<br />
1 Press HOME one or more times to select Radio.<br />
2 From the radio menu, select Internet Radio.<br />
> Internet connection starts.<br />
The Internet Radio registration help screen appears.<br />
3 Enter any valid email address.<br />
> Display shows confirmation that the automated email dispatch has been initiated.<br />
FM radio 51
On your PC:<br />
1 Check the inbox of the email address you entered and look for a message from<br />
'ConsumerCare@<strong>Philips</strong>.com' with the subject: Your <strong>Streamium</strong> Registration...<br />
2<br />
Read and follow the instructions given in the email to complete your registration process on<br />
the <strong>Philips</strong> website.<br />
On <strong>Center</strong>:<br />
Display returns to Radio menu.<br />
Note<br />
• Press HOME to exit any time.Your email address will be remembered.<br />
• Other <strong>per</strong>sons can register individually to enjoy Internet radio with their own settings.<br />
8.5.2 Regular use<br />
Regular users can access the Internet radio directly through the Radio menu screen.<br />
8.5.2.1 Radio services<br />
On <strong>Center</strong>:<br />
1 Press HOME one or more times to select Radio.<br />
2<br />
3<br />
4<br />
5<br />
6<br />
From the Radio menu, select Internet Radio.<br />
Use 3 or 4 and 2 to select User.<br />
Use 3 or 4 and 2 to select Services.<br />
Use 3 or 4 and 2 to make your selection from the Service List (RadioIO, or Live365).<br />
Use 3 or 4 and 2 to select the desired station.<br />
52<br />
FM radio
8.5.3 Add internet radio stations and bookmark your favorites<br />
On <strong>Center</strong>:<br />
1 In Internet radio mode press 2 to bookmark the current radio station as a favorite.<br />
<strong>ENG</strong>LISH<br />
OR<br />
On your PC<br />
1 Log in with your registered email address at www.philips.com/welcome.<br />
2<br />
3<br />
Select <strong>Streamium</strong> Management on the left hand side of the window.<br />
Choose radio stations from the list.<br />
4 Mark them as favorites.<br />
> The marked stations will appear as My Media and Favorite Stations the next time you connect.<br />
Note<br />
Playback of the favorite stations is subject to broadcast format and availability of station.<br />
8.5.3.1 My Media<br />
On <strong>Center</strong>:<br />
1 Press HOME one or more times to select Radio.<br />
2<br />
From the radio menu, select Internet Radio.<br />
If multiple users are registered:<br />
a<br />
Use 3 or 4 and 2 to select<br />
3<br />
4<br />
Use 3 or 4 and 2 to select My Media.<br />
Use 3 or 4 and 2 to make your selection from the My Media List of Stations.<br />
8.5.3.2 Favorite stations<br />
On <strong>Center</strong>:<br />
1 Press HOME one or more times to select Radio.<br />
2<br />
From the radio menu, select Internet Radio.<br />
If multiple users are registered:<br />
a<br />
Use 3 or 4 and 2 to select<br />
3<br />
4<br />
Use 3 or 4 and 2 to select Favorite Stations.<br />
Use 3 or 4 and 2 to make your selection from the List of Favorite Stations.<br />
FM radio 53
9 UPnP<br />
Ensure you are connected to your home network when you use the UPnP feature. See<br />
11 Network Settings for information on how to get your system connected to the home<br />
network and the Internet.<br />
9.1 UPnP (Universal Plug and Play)<br />
UPnP is a standard which connects multiple devices (wirelessly or wired) with each other and<br />
enables them to work seamlessly. If you are familiar with UPnP¬ enabled devices,WAC3500D<br />
brings you additional benefits to enrich your wireless music streaming ex<strong>per</strong>ience. If you are not<br />
familiar with UPnP-enabled devices, please visit www.upnp.org for details.<br />
9.1.1 About UPnP*<br />
In addition to the music library of <strong>Center</strong>, an UPnP-enabled device can also serve as a music library.<br />
The music collection on the UPnP enabled device can be played on <strong>Center</strong>, wirelessly or through<br />
the supplied Ethernet cable.<br />
You can also play the music library of <strong>Center</strong> on the UPnP enabled device, thus expanding your<br />
home music network.<br />
* Universal Plug and Play (UPnP) builds on standard networking technologies and provides<br />
standardized protocols for a wide variety of home and small business devices. It allows easy<br />
intero<strong>per</strong>ability of all the devices supporting the networking technologies.<br />
9.1.2 About UPnP* enabled devices<br />
The UPnP device can be a PC or other device running UPnP software.<br />
1<br />
2<br />
3<br />
To use the UPnP device with <strong>Center</strong>, connect <strong>Center</strong> to the UPnP network of the device (see<br />
9.2 Connect to UPnP device).<br />
To play the music library of your UPnP device on <strong>Center</strong> check that UPnP server software is<br />
pro<strong>per</strong>ly installed and enabled on the device (e.g.Windows Media Player 11 or <strong>Philips</strong><br />
Multimedia Manager). For more help refer to Windows Media Player.<br />
To play the music library of <strong>Center</strong> on the UPnP device, check with the user manual of your<br />
UPnP device to make sure it is able to receive music from other UPnP enabled devices.<br />
54<br />
Universal Plug and Play
9.2 Connect to the UPnP device<br />
When connecting to the network of the UPnP device, you have the following options:<br />
• Connect wirelessly or through an Ethernet cable.<br />
<strong>ENG</strong>LISH<br />
For more information on the connection, see 11. Network settings: Connect to external Wi-<br />
Fi enabled or wired home network.<br />
Important! Connecting other UPnP clients to <strong>Philips</strong> <strong>Wireless</strong> <strong>Music</strong> <strong>Center</strong> may take longer<br />
than connecting a <strong>Philips</strong> <strong>Wireless</strong> <strong>Music</strong> Station to <strong>Center</strong>.<br />
9.3 UPnP playback<br />
Important!<br />
• You can only stream music files in non-protected MP3,WMA, or AAC (.M4A) format when<br />
WAC3500D is in UPnP mode.<br />
• You cannot stream video or picture contents.<br />
During UPnP playback, some playback features in the Wi-Fi network on <strong>Center</strong> will be unavailable,<br />
including <strong>Music</strong> Broadcast, <strong>Music</strong> Follows Me, Same Artist, Same Genre, Creating / Deleting Playlist,<br />
and Recording.<br />
9.3.1 Play music from UPnP device<br />
Important! If you cannot find the UPnP server on the network, refresh the UPnP mode of<br />
<strong>Center</strong> by changing the mode (press HOME key).<br />
1<br />
2<br />
3<br />
Check that the UPnP device is switched on.<br />
Switch off the firewall running on the UPnP¬ enabled PC during UPnP playback.<br />
Check that <strong>Center</strong> is connected to the network of the UPnP device (see 11.5 Network<br />
settings:View connection status).<br />
Universal Plug and Play 55
On <strong>Center</strong>:<br />
4 Press HOME on remote control to select UPnP mode.<br />
> The display on <strong>Center</strong> shows a list of connected UPnP devices (up to 4 UPnP devices).<br />
(Server not found appears if there is no UPnP device found in the network.)<br />
5 Use 3 or 4 and 2 to select your desired UPnP device.<br />
> The music library of the UPnP device appears on <strong>Center</strong> as well as on the UPnP device.<br />
On <strong>Center</strong>:<br />
6 Play the music library of the UPnP device in the same way as you play Hard Disk (HD) (see 6<br />
HD).<br />
9.3.2 Play music from <strong>Center</strong> as UPnP source<br />
1<br />
Check that <strong>Center</strong> is switched on or already in standby mode.<br />
2 Check that the UPnP device is connected to <strong>Center</strong> (see 11.5 Network setting :View<br />
connection status)<br />
> The music library of <strong>Center</strong> appears on the UPnP enabled device as it does on <strong>Center</strong>.<br />
3<br />
Use the function keys on the UPnP device to play the music library of <strong>Center</strong>.<br />
56<br />
Universal Plug and Play
10 External sources<br />
10.1 Play or record to USB mass storage device<br />
<strong>ENG</strong>LISH<br />
You can playback music from a USB device on <strong>Center</strong>.You can also transfer the music library to a<br />
USB mass storage device, so that you can carry your favorite music with you wherever you go.<br />
10.1.1 About USB device<br />
Important!<br />
• In some USB flash players (memory) devices, the stored content is recorded using copyright<br />
protection technology. Such protected contents cannot be played on any other devices (such<br />
as the <strong>Center</strong>).<br />
• Protected (DRM) WMA files cannot be played due to copyright issues.<br />
Compatible USB mass storage devices:<br />
The following devices can be used on <strong>Center</strong>:<br />
• USB flash memory devices (USB 2.0 or USB1.1)<br />
• USB flash devices (USB 2.0 or USB1.1)<br />
Supported formats:<br />
• USB or memory file format FAT12, FAT16,<br />
• FAT32 (sector size: 512 - 65,536 bytes)<br />
• MP3 bit rate (data rate): 32-320 Kbps and variable bit rate<br />
• WMA v9 or earlier versions<br />
• AAC (AAC-LC audio up to L3 in<br />
• MPEG-4/.m4a files.)<br />
• Directory nesting up to a maximum of 8 levels<br />
• Number of tracks/titles: maximum 9999<br />
• File name in Unicode UTF8 (maximum length: 256 bytes)<br />
<strong>Center</strong> will not play or support the following:<br />
• Empty albums that do not contain any MP3/WMA files and hence will not be displayed.<br />
• Unsupported formats are skipped (e.g. files with .doc extension are ignored).<br />
• WAV, PCM audio files<br />
• DRM protected WMA files<br />
• WMA files in lossless format<br />
External sources 57
How to transfer music files from your PC to a USB mass storage device<br />
• You can easily transfer your favorite music from your PC to a USB mass storage device by drag &<br />
drop.<br />
• You can use the music management software of your flash device for the music transfer.<br />
• Organize your MP3/WMA files in different folders or sub-folders as needed.<br />
Tip<br />
• Make sure that MP3 files end on extension .mp3 and WMA files end on extension .wma.<br />
• For DRM protected WMA files, use Windows Media Player 10 (or later) for CD burning /<br />
conversion.Visit www.microsoft.com for details about Windows Media Player and WM DRM<br />
(Windows Media Digital Rights Management)<br />
10.1.2 Play music from USB device<br />
To play back music from a portable (USB) flash device:<br />
1<br />
2<br />
3<br />
Check that USB device is pro<strong>per</strong>ly connected to <strong>Center</strong> (see 3.3.2 Installation: Connect<br />
USB mass storage device)<br />
Press HOME.<br />
Select PORTABLE .<br />
4 Select USB.<br />
> Your portable (USB) flash device is displayed.<br />
5<br />
Use 3 or 4 and 2 to select your music.<br />
Note<br />
No USB Device Present appears if the USB device is not supported by <strong>Center</strong>.<br />
File system not supported appears if unsupported file formats are used on the USB device.<br />
Empty Folder appears if no supported audio format file is found on the USB device.<br />
6<br />
Play audio files on the USB as you do with the albums/tracks on a HD (see 6 HD).<br />
Tip<br />
Due to compatibility reasons, the album/track information may differ from what is displayed<br />
through the music management software of the flash device.<br />
58<br />
External sources
10.1.3 Transfer music to USB device<br />
Important!<br />
• There is no support for transfer of music to MTP devices.<br />
• Recording is <strong>per</strong>mitted only if there is no infringement of copyrights or any other rights of<br />
third parties.<br />
• For CDs encoded with copyright protection technologies used by some record companies,<br />
recording will be restricted.<br />
• Making unauthorized duplicates of copy-protected material, including computer programs, files,<br />
broadcasts and sound recordings, may be an infringement of copyrights and constitute a<br />
criminal offence.This equipment should not be used for such purposes.<br />
• Transfer to USB device is only supported by <strong>Center</strong>.<br />
• DRM protected files might not play if they are transferred to the USB device.<br />
<strong>ENG</strong>LISH<br />
1<br />
2<br />
3<br />
Check that the USB device is pro<strong>per</strong>ly connected to <strong>Center</strong>.<br />
On <strong>Center</strong>, press HOME and use 3 or 4 and 2 as necessary to select HD.<br />
If it is in HD playing mode, press STOP to stop playing.<br />
Use 3 or 4 and 2 to select an option (Playlists,Artists, etc…) and enter the corresponding list<br />
of tracks.<br />
4 In the track list screen, press RECORD (REC on remote control)<br />
> The list of tracks appears.<br />
5<br />
Press MARK/UNMARK to select or deselect the tracks to be recorded.<br />
To select/deselect all tracks, Press & hold MARK/UNMARK.<br />
External sources 59
6 Press RECORD to start recording.<br />
> Display shows: Transferring...<br />
The number of tracks transferred / to be transferred appears.<br />
Selected tracks are transferred to the USB device.<br />
Tip<br />
• Press 1 to stop selecting tracks and return to the list of tracks.To continue, repeat steps 3 to<br />
5.<br />
• Recording will also stop when:<br />
- the USB device is unplugged and the display shows: Connection interrupt, Cancel transfer...<br />
- the USB device has more than 99 folders and 999 titles and the display shows: Device is<br />
full, Cancel transferring...<br />
Find the transferred tracks on your USB device<br />
All the transferred tracks are saved in the USB device under the folder structure<br />
<strong>Music</strong>\Genre\Artist\Album, and are named as XX-trackname.mp3.<br />
Play the transferred tracks on another music player<br />
You can play the transferred tracks on music players supporting USB playback. On different players,<br />
the files/folders may be browsed in different ways.<br />
60<br />
External sources
10.2 Play your iPod music<br />
With the enclosed <strong>Philips</strong> iPod docking cradle, you can enjoy the music library on your iPod player<br />
through the speaker system of the WAC3500D.<br />
<strong>ENG</strong>LISH<br />
To play your iPod music:<br />
1 Check that <strong>Center</strong> is switched on.<br />
2<br />
Connect your Dock to <strong>Center</strong> (see 3.3.3 Connect your iPod).<br />
a<br />
b<br />
Connect the 9-pin docking cable to the DOCK IN of <strong>Center</strong>.<br />
Connect the audio cable to the AUX IN on <strong>Center</strong> (red & white plugs must match color<br />
coding of AUX IN).<br />
3<br />
Insert your iPod into the Dock.<br />
4 Press HOME and select Portable (iPod) .<br />
> Your iPod is displayed<br />
5 Use 3 or 4 and 2 on the remote control (or use the navigation control of your iPod) to select<br />
the music in your iPod menu system.<br />
> The iPod can now be controlled via the remote control of the <strong>Center</strong>.<br />
Tip<br />
All features except for the volume can still be controlled on the iPod itself too.<br />
External sources 61
10.3 Play additional appliances<br />
You can play files from additional appliances on <strong>Center</strong> by connecting the audio output (e.g.TV,<br />
VCR, Laser Disc player, DVD player).You can also record up to 3 hours of audio output to the<br />
music library in the HD of <strong>Center</strong>.<br />
1<br />
2<br />
Check that the additional appliance is pro<strong>per</strong>ly connected (see 3.3.4 Installation: Connect<br />
additional appliances).<br />
Ensure that <strong>Center</strong> is switched on (see 5 Basic functions).<br />
On <strong>Center</strong>:<br />
3<br />
4<br />
Press HOME.<br />
Press the navigation controls 3 or 4 and 2 to select AUX .<br />
> Your additional appliance (external source) is displayed.<br />
On your additional appliance:<br />
5 Use the controls as you normally would.<br />
6<br />
To adjust sound and volume, use the sound controls on WAC3500D or on your external<br />
source.<br />
62<br />
External sources
11 Network settings<br />
You can add <strong>Center</strong> to your existing home network. Set your network according to your needs as<br />
follows:<br />
<strong>ENG</strong>LISH<br />
Type What you want Go to<br />
Simple network settings Add Stations to Wi-Fi network of <strong>Center</strong> Section 11.1<br />
Connect to your PC Section 12<br />
Connect to internet for Gracenote® internet service Section 13<br />
Advanced network<br />
settings<br />
Connect to external Wi-Fi home network Section 11.2<br />
Connect to external wired home network Section 11.3<br />
Ex<strong>per</strong>t network setting Connect to two different networks Section 11.4<br />
11.1 Add Stations to Wi-Fi network of <strong>Center</strong><br />
Important!<br />
• Always press & hold y to switch <strong>Center</strong> / Station to Eco standby (power-saving mode) before<br />
removing its power plug.<br />
• Always power up the <strong>Center</strong> first, and then power up the Station.<br />
• Never block <strong>Center</strong> from Station by thick walls or more than one wall.<br />
• Avoid installation near large metal objects.<br />
You can connect up to five Stations to <strong>Center</strong>.When adding a Station to the Wi-Fi network of<br />
<strong>Center</strong>, you can play the music library of <strong>Center</strong> on Station, or move music playback between<br />
<strong>Center</strong> and Station (see 6 HD).<br />
On <strong>Center</strong>:<br />
1 Check that <strong>Center</strong> is in HD source.<br />
2<br />
3<br />
Press MENU to enter the menu screen.<br />
Use 3 or 4 and 2 to enter Station Management (Mgnt) menu.<br />
Network settings 63
4 Use 3 or 4 and 2 to select Add New Station.<br />
> You will enter Installation Mode. Search for the new station starts.<br />
Playback stops on the previously associated Station if you are playing the HD source.<br />
Tip<br />
• For better Wi-Fi reception, rotate the Wi-Fi antenna or adjust the location of <strong>Center</strong> and<br />
Station.<br />
• If five Stations are already connected, the option Add New Station is not available. In this<br />
case, please delete another Station first and then add the new Station<br />
On Station:<br />
1 Disconnect the power plug of Station and then connect it to the power supply again.<br />
> Display: Connecting to <strong>Center</strong><br />
2<br />
To enter Installation Mode:<br />
a<br />
On a new Station that is still unassociated with the <strong>Center</strong>:<br />
1 Select language.<br />
> Station enters automatic installation mode.<br />
b<br />
On a Station that was already paired with another <strong>Center</strong>:<br />
1 Press MENU.<br />
2 Select Installation mode.<br />
> Display: <strong>Center</strong> found<br />
Connecting to <strong>Center</strong>…<br />
On <strong>Center</strong>:<br />
3 Press STOP 9 when all the Stations are found.<br />
> HD screen appears once Station is connected to <strong>Center</strong>.<br />
64<br />
Network settings
11.1.1 Delete a Station<br />
1<br />
2<br />
3<br />
Check that <strong>Center</strong> is in HD source.<br />
Press MENU to enter the menu screen.<br />
Use 3 or 4 and 2 to enter Station Management (Mgnt) menu.<br />
<strong>ENG</strong>LISH<br />
4 Press 3 or 4 and 2 to select Delete Station.<br />
> The list of connected Stations will be displayed on <strong>Center</strong>.<br />
5<br />
6<br />
Use 3 or 4 and 2 to select Station you wish to delete.<br />
Press 3 or 4 and 2 to select YES.<br />
11.2 Connect to Wi-Fi (wireless) enabled home network<br />
The Wi-Fi enabled network is a Wi-Fi infrastructure network or a Wi-Fi enabled home network<br />
with a router.<br />
Important! Connecting other UPnP clients to <strong>Philips</strong> <strong>Wireless</strong> <strong>Music</strong> <strong>Center</strong> may take longer<br />
than connecting a <strong>Philips</strong> <strong>Wireless</strong> <strong>Music</strong> Station to <strong>Center</strong>.<br />
1<br />
To connect <strong>Center</strong> to a Wi-Fi enabled home network, start the Add Network procedure on <strong>Center</strong>.<br />
For music playback within the home network, see 9.3 UPnP: UPnP Playback.<br />
11.2.1 Network settings on <strong>Center</strong><br />
Note<br />
For WEP (Wired Equivalent Privacy) / WPA (Wi-Fi Protected Access) / WPA2 key setting to<br />
secure your network, always refer to the user manual of the router.WPA/WPA2 is the newest<br />
and strongest encryption method. If this is not available (generally for older devices) choose WEP.<br />
On <strong>Center</strong>, search for networks:<br />
1 Press MENU to enter the menu screen.<br />
Network settings 65
2<br />
Use 3 or 4 and 2 to enter Settings followed by Network, then <strong>Wireless</strong>.<br />
> Display: Searching for Networks...<br />
List of networks appears. (Network Not Found appears if no network is found.)<br />
3<br />
4<br />
5<br />
Select the Wi-Fi network (router) to which your desired UPnP device is connected.<br />
Press 2 to continue.<br />
If you already know the WEP / WPA<br />
/ WPA2 key for the Wi-Fi network:<br />
If there is no WEP / WPA / WPA2<br />
key for the Wi-Fi network:<br />
Use the remote control to enter<br />
the WEP,WPA, or WPA2 key.<br />
Press OK to skip.<br />
Press OK to<br />
confirm.<br />
6<br />
In screen Set IP Mode, select Automatic.<br />
7 As prompted, select Yes to apply the settings.<br />
> <strong>Center</strong> is connected to the Wi-Fi home network.<br />
Any Stations might be disconnected from the Wi-Fi network of <strong>Center</strong>.<br />
Tip<br />
If you change the WEP / WPA / WPA2 key after you have added the WAC3500D into your<br />
home network, the connection between the WAC3500D and your home network will be lost.<br />
In this case, please restart WAC3500D <strong>Center</strong> in order to refresh the IP update.<br />
Applicable if you already have a wireless network (hub/switch/router).<br />
11.3 Connect to wired home network<br />
The wired home network can be a single PC, a PC network, another <strong>Center</strong> or a Station.<br />
<strong>Center</strong> can access the wired and wireless home network at the same time. Using the supplied<br />
Ethernet cable, you can connect <strong>Center</strong> separately to a wired network while maintaining its Wi-Fi<br />
connection (e.g. the Wi-Fi connection between <strong>Center</strong> and on or more Stations, or the Wi-Fi<br />
connection with a home network). In this way, you can opt to play the music library of the wired<br />
network only on <strong>Center</strong> or a single Station (UPnP playback).<br />
At the same time, you can still enjoy all the music playback features on the Wi-Fi network.<br />
66<br />
Network settings
11.3.1 Set network on <strong>Center</strong><br />
1<br />
2<br />
3<br />
4<br />
Check that network device is switched on and firewall (if applicable) is switched off.<br />
Connect supplied Ethernet cable to Ethernet ports on network device and <strong>Center</strong>.<br />
Press MENU to enter the menu screen<br />
Use 3 or 4 and 2 to enter Settings followed by Network, then Wired.<br />
<strong>ENG</strong>LISH<br />
5<br />
6<br />
Press 2 to continue.<br />
In Set IP Mode screen: If you are using a DHCP* enabled network device, select Automatic.<br />
* DHCP stands for Dynamic Host Configuration Protocol. It is a protocol for assigning dynamic IP<br />
addresses to devices on a network.<br />
If there is no DHCP, select Static and assign an IP address and subnet mask as prompted using the<br />
alphanumeric keys (see 4.4 Alphanumeric keys).This procedure is applicable only, if you already<br />
have a wired network (hub / switch / router) in your home.<br />
On <strong>Center</strong><br />
1 As prompted, select YES to apply settings.<br />
> <strong>Center</strong> is connected to the external wired network.<br />
On the display the icon is changed to .<br />
www<br />
Router<br />
<strong>Wireless</strong> / Wired<br />
Network settings 67
11.4 Connect to two different home networks<br />
WAC3500D can be added into two different home networks via wired and wireless network ports.<br />
Note that the IP addresses of the two different network ports cannot be in one subnet;<br />
WAC3500D has no router function and cannot determine which port to use.<br />
Important! Once <strong>Center</strong> is added to the Wi-Fi network, all Wi-Fi ad-hoc connections with the<br />
WAC3500D will be shut down.<br />
Applicable if you have two home networks.<br />
WAC3500D cannot shadow the IP of a network device that is not activated. Please be careful of<br />
the IP address settings to avoid IP address conflict between the wired and Wi-Fi ports.<br />
11.5 View connection status with home network<br />
1<br />
2<br />
Check that <strong>Center</strong> is in HD source.<br />
Press MENU to enter the menu screen.<br />
3 Use 3 or 4 and 2 to enter Information menu.<br />
> The display shows: System,<strong>Wireless</strong> and Wired.<br />
4 Use 3 or 4 and 2 to select <strong>Wireless</strong> or Wired.<br />
> <strong>Wireless</strong>: information about the <strong>Wireless</strong> settings.<br />
Wired: information about the Wired settings.<br />
11.6 Connect to Internet<br />
Important! Make sure that no dial-up, user name or password is required for the Internet<br />
access.<br />
Check that you have connected <strong>Center</strong> to an access point or router with Internet access or<br />
connect <strong>Center</strong> to an ADSL modem with internet access directly.<br />
Set DNS and Gateway<br />
If you are using a DHCP* enabled access point, router or ADSL modem, the DNS and Gateway can<br />
be obtained automatically, so you need only to set <strong>Center</strong> to Automatic (DHCP):<br />
1<br />
2<br />
Press MENU.<br />
Use 3 or 4 and 2 to select Settings followed by Network.<br />
68<br />
Network settings
3<br />
Select Wired or <strong>Wireless</strong>.<br />
4<br />
Use 3 or 4 and 2 to select Automatic (DHCP).<br />
* DHCP stands for Dynamic Host Configuration Protocol. It is a protocol for assigning dynamic IP<br />
addresses to devices on a network.<br />
<strong>ENG</strong>LISH<br />
If there is not DHCP, the following steps show how to get DNS and Gateway settings of the<br />
current network from the PC connected to the same network:<br />
1<br />
2<br />
3<br />
On your PC, Click Start > Run<br />
Type cmd and click OK<br />
Type ipconfig/all<br />
4<br />
Write down the DNS and Gateway of the current connection.<br />
On <strong>Center</strong><br />
1 Press MENU to enter the menu screen.<br />
2<br />
3<br />
Use 3 or 4 and 2 to enter Settings followed by Network, then Wired.<br />
Press 2 to continue.<br />
Network settings 69
Set DNS<br />
1 Enter the DNS server you wrote down.<br />
2<br />
3<br />
Press OK to confirm.<br />
Press OK to skip Set DNS2.<br />
Tip<br />
If necessary, follow Steps 1 and 2 above to set a secondary DNS server in Set DNS2.<br />
Set Gateway<br />
1 Enter the Gateway you wrote down.<br />
2<br />
Press OK to confirm.<br />
Set proxy<br />
1 If you are using a proxy server to visit websites, enable Proxy and proceed with the proxy<br />
setting as prompted, then press OK to confirm Otherwise, press OK to skip.<br />
2 Apply settings as prompted.<br />
> Settings will change.<br />
Connection to station could be lost appears.<br />
70<br />
Network settings
12 Connect to your PC<br />
Minimum PC requirements:<br />
• Windows 2000 SP4 (or above) / XP SP2 / Vista<br />
• Pentium III 500MHz processor or higher<br />
• 256MB RAM<br />
• CD-ROM drive<br />
• Ethernet adapter, enabled (for wired connection) - or<br />
<strong>Wireless</strong> Network adapter 802.11 b/g (for wireless connection)<br />
• 500MB free hard disk space<br />
<strong>ENG</strong>LISH<br />
Install WADM (<strong>Philips</strong> <strong>Wireless</strong> Audio Device Manager, see also 18 FAQ)<br />
1<br />
2<br />
Log onto your PC with administrator rights enabled.<br />
Disable the firewall of your computer to make the connection.<br />
a For Windows 2000 / XP: On your PC, press Start > Settings > Control Panel ><br />
Firewall > Off.<br />
b<br />
For Windows Vista: On your PC, press Start > Control Panel > Firewall > Turn<br />
Firewall On or Off > Off.<br />
3<br />
4<br />
Insert PC Suite CD into your PC.<br />
Select language and accept license terms.<br />
5 On the Welcome screen, click Next.<br />
> The installation process starts automatically.<br />
When installation is completed, click Quit.<br />
Connect <strong>Center</strong> to PC (Wired connection)<br />
Use the supplied orange Ethernet cable to connect the WAC3500D to your PC. (Make sure that<br />
the Ethernet port on your PC is enabled to establish WADM connection).<br />
www<br />
Router<br />
Wired connection<br />
Connect to your PC 71
Launch WADM<br />
1 Double click WADM.<br />
> A list of discovered <strong>Center</strong>s appears.<br />
2<br />
3<br />
4<br />
5<br />
6<br />
If your <strong>Center</strong> appears, continue with step 6.<br />
If your <strong>Center</strong> is not found, select Connection Wizard.<br />
In Connection Wizard screen, select Express Mode.<br />
Click Next and follow the instructions.<br />
Select your <strong>Center</strong> from the list and click Connect now.<br />
Connect <strong>Center</strong> to PC (<strong>Wireless</strong> connection)<br />
Enable your wireless router.<br />
Configure Network from <strong>Center</strong>: Select MENU > Settings > Network > <strong>Wireless</strong> (select<br />
desired Network) > (enter encryption key) > Automatic > Apply Settings > Yes<br />
www<br />
Router<br />
<strong>Wireless</strong> connection<br />
Launch WADM<br />
Compatibility check for Windows Vista:<br />
1 Right click on the WADM icon.<br />
2<br />
3<br />
Select Pro<strong>per</strong>ties > Compatibility and make sure the check box under 'Compatibility mode'<br />
and 'Privilege level' is marked.<br />
Click OK.<br />
72<br />
Connect to your PC
Launch for Windows XP or Vista:<br />
1 Double click WADM.<br />
> A list of discovered <strong>Center</strong>s appears.<br />
2 If your <strong>Center</strong> appears, continue with step 6.<br />
<strong>ENG</strong>LISH<br />
3<br />
4<br />
5<br />
6<br />
If your <strong>Center</strong> is not found, select Connection Wizard.<br />
In Connection Wizard screen, select Express Mode.<br />
Click Next and follow the instructions.<br />
Select your <strong>Center</strong> from the list and click Connect now.<br />
Tip<br />
• If the IP configuration of <strong>Center</strong> is not in the default range (Subnet mask: 255.255.0.0; IP<br />
address: 172.31.x.x), select Connection Wizard > Custom Mode. Enter the current IP<br />
configuration of <strong>Center</strong> as prompted. Press MENU and select Information > Wired to<br />
check IP configuration.<br />
• When WADM is running, Internet access of your PC may be disabled. Close WADM to<br />
restore access.<br />
12.1 Use WADM<br />
The <strong>Wireless</strong> Audio Device Manager (WADM) in the by-packed PC Suite CD helps you import<br />
music files to <strong>Center</strong> and organize them on your PC.<br />
Connect to your PC 73
12.1.1 Import from your PC using WADM<br />
1<br />
Connect <strong>Center</strong> to your PC (see 12 Connect to your PC).<br />
On your PC:<br />
2 In the WADM main menu, click Content Management.<br />
> A new window appears.<br />
3<br />
4<br />
3<br />
4<br />
5<br />
On My Computer panel, click to highlight a desired file / folder.<br />
Drag selection to My Device panel.<br />
While importing, you can add more files / folders to the import queue.<br />
Tip<br />
Importing less than 4G or 1000 songs at each attempt offers best results.<br />
74<br />
Connect to your PC
12.1.2 Edit track information using WADM<br />
You can edit track information using WADM.<br />
On your PC:<br />
1 In the WADM main menu, click Content Management.<br />
<strong>ENG</strong>LISH<br />
2<br />
3<br />
4<br />
In the device window, click to highlight the desired track.<br />
With your mouse, right click the highlighted track.<br />
Select Track info.<br />
Tip<br />
• To select more than one file, press and hold Ctrl on your PC keyboard and click the desired<br />
files.<br />
• To playback tracks, double click on the track to start playing.<br />
• Click Title or Artist to sort the music files by track name or by artist<br />
• In case the edited ID3 tags are not shown on WADM, go to File > Refresh Content to<br />
refresh the WADM. Otherwise, restart WADM.<br />
• Always press and hold y to switch the <strong>Center</strong> to Eco Standby (power-saving mode) before<br />
removing its power plug to avoid losing tracks.<br />
Connect to your PC 75
12.1.3 Backup music library of <strong>Center</strong> to your PC using WADM<br />
On your PC:<br />
1 In the WADM main menu, click Content Management.<br />
2<br />
Follow the screen instructions to backup the music library of <strong>Center</strong> to your PC. Backup files<br />
are named with current date.<br />
Tip<br />
• Make sure that you have adequate space to store the backup files.<br />
• Do not delete the backup file using Windows Explorer. If the backup file is accidentally<br />
deleted, search for the file named YOURMAC.inx using Windows Explorer search tool and<br />
then delete it.You can only <strong>per</strong>form backup after that.<br />
12.1.4 Restore backup files from your PC to <strong>Center</strong><br />
On your PC:<br />
1 In the WADM main menu, click Restore Content.<br />
2<br />
3<br />
Click to highlight the file to be restored.<br />
Click Open.<br />
Tip<br />
• After changing network settings with WADM, press and hold y to switch <strong>Center</strong> to Eco<br />
Standby (power-saving mode) to refresh IP update.<br />
• If some of the WADM functions cannot be used, they might be blocked by your anti-virus<br />
software. It is recommended to turn off the antivirus software temporarily.<br />
76<br />
Connect to your PC
13 Gracenote® CD Information<br />
Gracenote <strong>Music</strong>ID® provides the set with CD track information (including album, artist, genre,<br />
track information) from its built-in database. It allows the recorded CD tracks to be pro<strong>per</strong>ly<br />
categorized (for example, under Artists, Albums, Genres or All tracks) and be merged with the<br />
existing tracks in the hard disk.<br />
<strong>ENG</strong>LISH<br />
13.1 Gracenote® Media Database<br />
A 800 MB CD database (contains 800,000 most popular CDs) is embedded in every for quick lookup<br />
on track information. An update file that contains newly released CDs is available quarterly on<br />
www.club.philips.com for download.<br />
13.1.1 Update Gracenote® Media Database<br />
Use your PC to register your product on www.club.philips.com and go to “Show Upgrades &<br />
Support” page to download Gracenote® Media Database update. Note that the updates are posted<br />
quarterly and new updates are independent from old updates, i.e. a new update can be installed,<br />
even without the previous update.<br />
After storing the file on your PC, you can either burn a CD with the update file using your favorite<br />
CD burning software and drop the CD into <strong>Center</strong> for automatic update, or you can use the<br />
Gracenote® update option of WADM if you have connected your PC to <strong>Center</strong>.<br />
13.2 Gracenote® Internet Queries<br />
If the CD track information of your new CD disc cannot be displayed on the WAC3500D, the<br />
quickest and surest solution is to ensure you have followed the steps in 11.6 Connect to<br />
Internet and follow 13.2.1 Look up track information..<br />
13.2.1 Look up CD track information<br />
1 With an internet connection present (see 11.6 Connect to Internet), insert the CD of which<br />
you require the information (insert disc into CD tray of <strong>Center</strong> with graphics facing up).<br />
> Searching starts immediately.The system will search the local Gracenote® CD database first. If the CD<br />
track information cannot be found, the online search will start.The search results are shown on the<br />
display of <strong>Center</strong>.<br />
Tip<br />
• If the internet query failed due to a disruption in the internet connection, the error message<br />
Check the internet setup for CD Database on-line will appear.<br />
• Check if your internet connection is correct (see 11.6 Connect to Internet).<br />
Gracenote® CD Information 77
14 Expandable features<br />
You can connect up to 5 Stations (sold separately) to <strong>Center</strong> via Wi-Fi, so your music playback can<br />
be moved between <strong>Center</strong> and Stations.You and your family can enjoy and share music with ease<br />
wherever you are in your home.<br />
14.1 MUSIC FOLLOWS ME<br />
As you move around at home, let the music move with you between <strong>Center</strong> and Station and<br />
between Stations.<br />
On the source unit (<strong>Center</strong>) where music is playing:<br />
1 Press MUSIC FOLLOWS ME to stop playback from that unit and activate the function.<br />
> The icon appears on the displays of <strong>Center</strong> and Station.<br />
On the destination unit (connected Station) where you want to listen:<br />
2 Press MUSIC FOLLOWS ME to activate the playback.<br />
> The icon disappears from the displays of <strong>Center</strong> and Station, and the music will start to play.<br />
Simultaneously, the music (audio output) of the source unit is stopped.<br />
Any selected play modes (e.g. ) will be retained on the destination unit (see 6.3 Play modes<br />
REPEAT, SHUFFLE).<br />
3<br />
To stop MUSIC FOLLOWS ME, press STOP 9 on the destination unit.<br />
Tip<br />
• MUSIC FOLLOWS ME will be automatically deactivated if you do not activate MUSIC<br />
FOLLOWS ME on the destination unit within 5 minutes<br />
• To deactivate MUSIC FOLLOWS ME, press MUSIC FOLLOWS ME again.<br />
• After activating MUSIC FOLLOWS ME on the destination unit you can select other tracks or<br />
source for playback.<br />
14.2 MUSIC BROADCAST<br />
MUSIC BROADCAST allows you to broadcast music from <strong>Center</strong> (sold separately) to Stations.<br />
78<br />
Expandable features
On connected Stations:<br />
1 Check that Station is switched on or in standby mode.<br />
On <strong>Center</strong>:<br />
2 In HD source, play back the music that you wish to broadcast to Stations.<br />
<strong>ENG</strong>LISH<br />
3 Press MUSIC BROADCAST to activate the function.<br />
> The icon appears on <strong>Center</strong> and Stations.<br />
A countdown of 5 seconds starts.<br />
On <strong>Center</strong> and Station:<br />
The selected music starts to play simultaneously after about 5 seconds.<br />
4<br />
To stop MUSIC BROADCAST, press STOP 9 on <strong>Center</strong>.<br />
Tip<br />
• To exit MUSIC BROADCAST on Station, press STOP 9 on Station.To broadcast music to<br />
Station again, press STOP 9 on <strong>Center</strong>, and then start playback again and activate MUSIC<br />
BROADCAST on <strong>Center</strong> again.<br />
• MUSIC BROADCAST will also stop when:<br />
- <strong>Center</strong> is switched to Standby mode or Eco Standby mode<br />
- the selected album or list (Playlist,Artist, Genre,…) has reached the end<br />
• To set play modes, select Repeat or Shuffle before activating MUSIC BROADCAST.<br />
Expandable features 79
15 Firmware Upgrade<br />
15.1 Upgrade firmware<br />
The supplied PC Installer CD <strong>Wireless</strong> Audio Device Manager (WADM) helps you get the upgrades<br />
for WAC3500D <strong>Center</strong>.<br />
On <strong>Center</strong>:<br />
Important!<br />
• Never interrupt the firmware upgrading before its completion.<br />
• Never o<strong>per</strong>ate other functions before finishing the installation.<br />
1<br />
2<br />
Register your <strong>Philips</strong> <strong>Wireless</strong> <strong>Music</strong> <strong>Center</strong> with www.club.philips.com.<br />
Download the firmware upgrade files and store them on your PC.<br />
3 Connect <strong>Center</strong> to power supply.<br />
> HD screen appears on <strong>Center</strong>.<br />
4<br />
5<br />
6<br />
7<br />
Connect <strong>Center</strong> to your PC via the supplied Ethernet cable.<br />
Install and launch WADM (see section 12 Connect to your PC).<br />
Click to enter the Firmware upgrade submenu.<br />
As prompted, click Browse and indicate the location where you kept the firmware upgrade<br />
files on PC.<br />
8 Click Apply to start upgrading firmware.<br />
> The display shows Updating firmware, please wait...<br />
<strong>Center</strong> will reboot itself during the installation process.<br />
When <strong>Center</strong> returns to HD screen, the installation is completed.<br />
80<br />
Firmware upgrade
15.2 Restore previous firmware<br />
After the firmware of <strong>Center</strong> is upgraded, you can restore it to its previous version as desired.<br />
On <strong>Center</strong><br />
1 Press MENU to enter the menu screen.<br />
<strong>ENG</strong>LISH<br />
2<br />
3<br />
Use 3 or 4 and 2 to enter Settings followed by Firmware, then Restore firmware.<br />
Press 2 to select Yes.<br />
After upgrading or restoring the firmware of <strong>Center</strong>, you need to reestablish the Wi-Fi connection<br />
between <strong>Center</strong> and Stations.<br />
15.3 Re-establish Wi-Fi network of <strong>Center</strong> and Stations<br />
On <strong>Center</strong>:<br />
1 Press MENU to enter the menu screen.<br />
2<br />
Use 3 or 4 and 2 to enter Station Mgnt menu.<br />
3 Use 3 or 4 and 2 to select Add New Station.<br />
> Searching for Stations starts.<br />
On Station:<br />
1 Disconnect the power plug of Station and then connect them to the power supply again.<br />
> Connecting to <strong>Center</strong> appears.<br />
2<br />
Press MENU on the remote control to enter the selection screen of Installation Mode.<br />
3 Use 3 or 4 and 2 to enter Installation Mode.<br />
> Stations start to connect to <strong>Center</strong>.<br />
4<br />
Press STOP 9 on <strong>Center</strong> when all Stations are found.<br />
Firmware upgrade 81
16 Reset<br />
You can restore <strong>Center</strong> o the default settings (including network settings).<br />
When to reset <strong>Center</strong>:<br />
• Reset <strong>Center</strong> to re¬establish Wi-Fi connection between <strong>Center</strong> and Station.<br />
• Reset <strong>Center</strong> to change the way <strong>Center</strong> connects to a Wi-Fi enabled / wired home network.<br />
1<br />
2<br />
3<br />
Check that <strong>Center</strong> is switched on (see 5 Basic functions).<br />
Press MENU to enter the menu screen.<br />
Use 3 or 4 and 2 to enter Settings followed by Restore settings.<br />
4 Press 2 to select Yes.<br />
> <strong>Center</strong> is rebooted.<br />
Language selection screen appears.<br />
5 Select your desired language: English, Français, Español, Nederlands, Italiano or Deutsch.<br />
> <strong>Center</strong> enters Installation Mode.<br />
The search for <strong>Center</strong> or Stations starts.<br />
The Wi-Fi connection is being reestablished.<br />
If the <strong>Center</strong> is reset and connected Stations are not reset:<br />
1 On the Station, disconnect the power plug and connect them to the power supply again.<br />
> Connecting to <strong>Center</strong> appears.<br />
2<br />
3<br />
4<br />
On the remote control, press MENU to enter menu screen.<br />
Use 3 or 4 and 2 to enter Installation Mode.<br />
Stations start to connect to <strong>Center</strong>.<br />
If a Station is reset and <strong>Center</strong> is not reset:<br />
1 On <strong>Center</strong>, select HD mode.<br />
2<br />
3<br />
Press MENU to enter the menu screen.<br />
Use 3 or 4 and 2 to enter Station Management (Mgnt) menu.<br />
4 Use 3 or 4 and 2 to select Add New Station.<br />
> Searching for Stations starts.<br />
82<br />
Reset
If <strong>Center</strong> and Stations are reset:<br />
1 Select language and then enter Installation Mode.<br />
2 Press STOP 9 on <strong>Center</strong> when all Stations are found.<br />
<strong>ENG</strong>LISH<br />
Tip<br />
• Restoring to default settings does not delete any stored music tracks.<br />
• After restoration to default settings, the network mode will return to ad-hoc mode.<br />
Reset 83
17 Technical data<br />
General<br />
AC Power<br />
230V ±10% {Data<br />
changes with stroke<br />
version}<br />
Dimensions (w x h x d)185 x 210 x 248 mm<br />
Weight (with/without speakers)<br />
approx. 5.5 kg / 3.5 kg<br />
Power consumption<br />
Active<br />
< 45 W<br />
Standby<br />
< 20 W<br />
Eco Power Standby < 0.9 W<br />
Amplifier<br />
Output power<br />
Frequency response<br />
Signal-to-noise ratio<br />
<strong>Wireless</strong><br />
<strong>Wireless</strong> standard<br />
<strong>Wireless</strong> security<br />
Frequency range<br />
2 x 40 W (RMS)<br />
60 - 22,000 Hz, -3dB<br />
> 72 dBA (IEC)<br />
802.11g, backwards<br />
compatible to 802.11b<br />
WEP (64 or 128bit),<br />
WPA/WPA2 (8-63<br />
characters)<br />
2412-2462 MHz (CH1-<br />
CH11)<br />
Wired (LAN / Ethernet)<br />
Wired standard 802.3 / 802.3u<br />
Speed<br />
10 / 100 MBit/s<br />
Mode<br />
half / full duplex<br />
Crossover detection (Auto MDIX) Yes<br />
HD player<br />
Frequency range 60-20,000 Hz, -3 dB<br />
Signal-to-noise ratio 72 dBA (IEC)<br />
MPEG 1 Layer 3 (MP3-CD) MPEG AUDIO<br />
MP3-CD bit rate 32-320 kbps,VBR<br />
WMA bit rate up to 160 kbps<br />
Sampling frequencies 32, 44.1, 48 kHz<br />
HD storage capacity 80GB*<br />
Recording quality 128, or 160, or 192, or<br />
256, or 320 kbps<br />
Recording speed 1x, 4x<br />
CDDB (CD recognition database)<br />
internal Gracenote® /<br />
online access enabled<br />
* Actual formatted capacity will be less<br />
USB player<br />
USB<br />
12Mb/s,V1.1 (supports<br />
MP3,WMA and M4A<br />
files)<br />
MSC, MTP<br />
USB class<br />
Number of tracks/titles maximum 9999<br />
Speakers<br />
2-way bass reflex system<br />
Dimensions (w x h x d)160 x 208 x 263 mm<br />
Specifications and external appearance<br />
are subject to change without notice.<br />
Tuner<br />
FM wave range<br />
Number of presets 60<br />
FM antenna/cable<br />
87.5-108 MHz {Data<br />
changes with stroke<br />
version}<br />
COAX / Dipole-antenna<br />
(75W IEC-connector)<br />
84<br />
Technical data
18 Frequently asked questions<br />
Attention!<br />
• Never try to repair the system yourself as this will invalidate the warranty. Do not open the<br />
system as there is a risk of electric shock.<br />
• If a fault occurs, first check the points listed below before taking the system for repair. If you<br />
are unable to resolve a problem by following these hints, consult your dealer or <strong>Philips</strong> for<br />
help.<br />
<strong>ENG</strong>LISH<br />
Question<br />
Is there a maximum<br />
distance of transmission<br />
between <strong>Philips</strong> <strong>Wireless</strong><br />
<strong>Music</strong> <strong>Center</strong> and<br />
Station/PC for effective<br />
streaming?<br />
What does 'Recording<br />
from CDs' mean and<br />
what functions can I use<br />
while the recording is in<br />
progress?<br />
Do I need to<br />
immediately update the<br />
Gracenote music<br />
recognition database<br />
stored in <strong>Philips</strong><br />
<strong>Wireless</strong> <strong>Music</strong> <strong>Center</strong><br />
straight after bringing it<br />
home?<br />
Answer<br />
Yes.The maximum distance of Wi-Fi transmission is 250m measured<br />
in open spaces.<br />
However, in a home environment where solid obstacles such as walls<br />
and doors are present, the effective transmission distance is<br />
significantly reduced to approximately 50-100m.Try to re-position<br />
the set if you ex<strong>per</strong>ience transmission problems.<br />
'Recording from CDs' (ripping) is the process by which a CD track is<br />
converted into the much smaller MP3 format, and is then added to<br />
the <strong>Wireless</strong> <strong>Music</strong> <strong>Center</strong>'s music library (hard disk). On the<br />
<strong>Wireless</strong> <strong>Music</strong> <strong>Center</strong>, 'Recording from CDs' requires two stages:<br />
Firstly, it reads the CD content and stores it temporarily on the hard<br />
disk.<br />
Secondly, it converts this temporary CD content into MP3 format - a<br />
process called 'background-encoding'.<br />
It takes 1 hour to convert 1 hour of CD music.<br />
During the first stage of the conversion you cannot stream or<br />
broadcast music from <strong>Center</strong>; though you can still stream music<br />
from Stations.Always switch the set to Eco Standby (power-saving<br />
mode) before removing its power plug.<br />
No.There is already a massive CD track database pre-stored in<br />
<strong>Philips</strong> <strong>Wireless</strong> <strong>Music</strong> <strong>Center</strong>, which should match most of the CDs<br />
released within the last six months.<br />
Frequently asked questions 85
Question<br />
Does <strong>Philips</strong> provide<br />
Gracenote® music<br />
recognition database<br />
updates?<br />
What is <strong>Philips</strong> <strong>Wireless</strong><br />
Audio Device Manager<br />
(WADM)?<br />
Answer<br />
Yes.We provide quarterly updates of the Gracenote® music<br />
recognition database through the website<br />
http://www.club.philips.com.<br />
Download the file to your PC and update the built-in Gracenote®<br />
music recognition database from the PC using WADM in the<br />
supplied PC suite.Alternatively, you can burn the downloaded file to<br />
a CD and insert the CD into the CD loader of the <strong>Center</strong> to<br />
update the database.<br />
WADM mainly serves to transfer your music library from your PC<br />
to the <strong>Wireless</strong> <strong>Music</strong> <strong>Center</strong>. In addition, it provides a one-stop<br />
solution to help you manage the music library on the <strong>Center</strong>, e.g.<br />
edit track information, create / rename playlists, backup / restore<br />
music library of the <strong>Center</strong>, as well as network settings, Gracenote®<br />
music recognition update, Firmware upgrade.<br />
For details, see 12 Connect to your PC in this manual and WADM<br />
help file.<br />
Simply connect and enjoy<br />
You have a lot of MP3 files on your portable music player.You would like to enjoy them with your<br />
family and friends on a better sound system. <strong>Philips</strong> WAC3500 offers instant access to your music<br />
via 'USB Direct' - in the comfort of your living room Supported devices <strong>Philips</strong> WAC3500 'USB<br />
Direct' allows simple plug-and-play compatibility with MP3 players and USB flash drives that are<br />
compliant with USB Mass Storage Device Class.<br />
Question<br />
What is 'USB Direct'?<br />
Can I copy files via USB<br />
Direct from the<br />
WAC3500 to a USB<br />
device and vice versa?<br />
How do I use the USB<br />
Direct?<br />
Answer<br />
<strong>Philips</strong> 'USB Direct' enables you to play MP3, M4A and WMA music<br />
files from a USB device via the WAC3500, and to transfer music files<br />
from the WAC3500 to a USB device.<br />
Yes.You can copy music files from the WAC3500 to a USB device.<br />
You cannot copy music files from a USB device to the WAC3500.<br />
1 Plug in your USB device.<br />
2 Press HOME and use the navigation controls 3 or 4 and 2 to<br />
select Portable > USB.<br />
3 Use 4 or 3 and 2 to select the file you want to play.<br />
86<br />
Frequently asked questions
Question<br />
How do I copy music<br />
files from the WAC3500<br />
to a USB device?<br />
Answer<br />
1 Plug in your USB device.<br />
2 Press HOME and use the navigation controls 3 or 4 and 2 to<br />
select HD mode.<br />
3 Use 3 or 4 and 2 to navigate in a playlist, artist list, album... etc.,<br />
and to enter its corresponding list of tracks.<br />
4 Press REC 0 to invoke the selection option.<br />
<strong>ENG</strong>LISH<br />
How do I exit the USB<br />
Direct?<br />
Can I play music from<br />
my portable MP3 player<br />
or USB flash drive via<br />
USB Direct?<br />
Why doesn't my USB<br />
Mass Storage Device<br />
Class (USB MSC) work<br />
with the WAC3500?<br />
Does USB Direct work<br />
with Apple iPods?<br />
Does USB Direct work<br />
with <strong>Philips</strong> GoGear?<br />
When I plug in a USB<br />
device in the WAC3500<br />
and switch to USB<br />
mode, the display shows<br />
a message 'No USB<br />
device detected'.What<br />
does this mean?<br />
Does USB Direct<br />
support the play back of<br />
protected contents?<br />
Why does it take so long<br />
to display the contents<br />
on my USB device?<br />
5 Press MARK/UNMARK to select / deselect tracks and press<br />
REC 0 once again to start copying.<br />
Stop playback of the files and press HOME to exit.Alternatively, just<br />
unplug your USB device.<br />
Yes.As long as your MP3 player or USB flash drive is compliant with<br />
the USB Mass Storage Device Class and does not contain any<br />
proprietary database, then you should be able to play music from<br />
your portable MP3 player or USB flash drive via USB Direct.<br />
Since there are various kinds of USB Mass Storage Device Class<br />
(USB MSC), not all devices are guaranteed to be compatible. For<br />
example, some USB flash drives can work with Windows XP,Apple<br />
Mac and Linux while other USB flash drives may work with Windows<br />
but not with Mac.This is because some drive manufacturers test<br />
their devices with the Windows XP platform only, not fully in<br />
compliance with the specifications of the USB consortium of testing<br />
on most platforms.This also explains why Linux does not support all<br />
USB Mass Storage Device Classes (USB MSC).<br />
USB Direct can work with Apple iPod Shuffle, but not the other<br />
iPods such as iPod Video, iPod Nano and iPod Photo.<br />
USB Direct works with most <strong>Philips</strong> GoGear MP3 players such as<br />
the SA11xx, SA12xx, SA13xx series, but not with hard disk based<br />
MP3 players.<br />
This means your USB device cannot be recognized by USB Direct.<br />
No.The USB Direct feature of WAC3500 does not support playback<br />
of any protected music files on the <strong>Center</strong>.<br />
This could be due to the large number of files or the size of the files<br />
on your USB device. Or, there could be other non-supported file<br />
formats on your USB device that the system is trying to read.<br />
Frequently asked questions 87
Question<br />
How are the songs<br />
sorted when the USB<br />
device is plugged into<br />
the WAC3500?<br />
What is the maximum<br />
number of tracks that<br />
the WAC3500 supports?<br />
Why does the system<br />
not play some of my<br />
music files?<br />
Answer<br />
The songs will be scanned and categorized into: Playlists,Artists,<br />
Albums, Genres and All tracks.<br />
WAC3500 supports a USB device with a maximum of 9999 tracks.<br />
Only music files in the following formats are supported:<br />
• MP3 (bit rates from 8 to 320 kbps; sampling frequencies from 8 to<br />
48 kHz);<br />
• WMA (v7 & v9 'Standard' audio, CBR or VBR, with bit rates of up<br />
to 192 kbps with any standard sample frequency.)<br />
• AAC (AAC-LC audio up to L3 in MPEG-4/.m4a files.)<br />
<strong>Philips</strong> has tested and confirmed that the WAC3500 supports the following products:<br />
Flash Player <strong>Philips</strong> KEY007, KEY010, KEY013, HDD1XX (HDD100 /<br />
HDD120), SA16X (SA160 / SA164 / SA165 / SA167 /<br />
SA169), SA170, SA175, SA177, SA179, SA159, SA26X<br />
(SA261), PSA61X / PSA612, HDD084, HDD1XXX<br />
(HDD1830 / HDD1420 / HDD1620 / HDD1630 /<br />
HDD1835), HDD6XXX (HDD6320/00), SA1100/02,<br />
SA1115/02, SA12XX, SA13XX (SA1300/02), SA2000,<br />
SA40XX, SA5000, PMC7230, SA9XXX (SA9200, Flat I),<br />
SA21XX, SA31XX, SA41XX, SA51XX<br />
Apple iPod Shuffle, Shuffle Gen 2, Mini, Nano Gen 1/2, Photo,<br />
Video Gen 1/2<br />
Creative Zen Micro, MuVo TX FM, MuVo Micro N200, MuVo VIDZ,<br />
Zen <strong>Music</strong>.Photo Vision:M, DMPFX200<br />
Sony NW-HD3, NW-E105,NW-E307<br />
iRiver U10CT (0081) OR 103, H10,T10<br />
JNC SSF-F302<br />
Samsung YP-T7V<br />
SanDisk Sansa m260<br />
Flash Drive<br />
SanDisk: Cruzer Flash Drive, Cruzer U3 Flash drive<br />
Sony Mirco Vault Elite<br />
Toshiba Flash memory U3<br />
PQI PQI<br />
88<br />
Frequently asked questions
19 Troubleshooting<br />
Warning!<br />
Never try to repair the system yourself as this will invalidate the warranty. Do not open the<br />
system as there is a risk of electric shock.<br />
If a fault occurs, first check the points listed below before taking the system for repair. If you are<br />
unable to resolve a problem by following these hints, consult your dealer or <strong>Philips</strong> for help.<br />
<strong>ENG</strong>LISH<br />
Problem<br />
Solution<br />
I get interference on my If you are playing the set, stop playback and take the<br />
wireless (Wi-Fi) link between appropriate measures as follows:<br />
the <strong>Center</strong> and Station/PC. • Keep the <strong>Center</strong> at least 3 meters away from such devices.<br />
The WAC3500 o<strong>per</strong>ates in the • Use the WEP/WPA/WPA2 key when connecting the<br />
2.4GHz radio frequency spectrum. <strong>Center</strong> to an existing wireless PC network.To set WEP /<br />
Many other household / IT devices WPA / WPA2 key, connect <strong>Center</strong> to your PC using <strong>Philips</strong><br />
also o<strong>per</strong>ate in this frequency <strong>Wireless</strong> Audio Device Manager (WADM) in the by-packed<br />
spectrum, for example: microwave PC Suite CD. In the Device Configuration of WADM, enter<br />
ovens, DECT phones, Bluetooth the <strong>Wireless</strong> Network submenu. In the Device <strong>Wireless</strong><br />
devices such as headphones, Authentication Type, select WEP or WPA / WPA2.<br />
computer mouses, wireless routers, • Change the o<strong>per</strong>ating channel of the <strong>Center</strong> when<br />
cordless phones,Wi-Fi compatible connecting it to an existing wireless PC network.To<br />
printers, PDAs.<br />
change channels, connect the <strong>Center</strong> to your PC using<br />
These devices can interfere with the <strong>Philips</strong> <strong>Wireless</strong> Audio Device Manager (WADM) in the bypacked<br />
PC Suite CD. In the Device Configuration of<br />
Wi-Fi link between the <strong>Center</strong> and<br />
your PC, resulting in interference WADM, enter the SSID of your <strong>Wireless</strong> Network and<br />
such as pause during playback, slow select Ad-hoc mode. See Connect to your PC in this<br />
response to your o<strong>per</strong>ation, etc.The manual and the WADM help file.<br />
severity of interference varies • If possible, change the o<strong>per</strong>ating channels of the other Widepending<br />
on the extent of Fi devices in your home.<br />
radiation from the device and the • Turn the devices in different directions to minimize<br />
strength of Wi-Fi signals in that interference.<br />
position.<br />
I accidentally pulled the speaker<br />
wires out of the clip.<br />
Follow the illustrations below to reinsert the speaker wires<br />
(gold wire to the hole marked '+' and silver wire to the<br />
other hole).<br />
Troubleshooting 89
Problem<br />
The remote control does not<br />
function pro<strong>per</strong>ly.<br />
The WAC3500 <strong>Center</strong>'s screen<br />
is stuck in a menu or shows no<br />
response for a long <strong>per</strong>iod of<br />
time (2-5 minutes).<br />
'No Disc'/ 'Cannot read CD' is<br />
displayed.<br />
Sound cannot be heard or is of<br />
poor quality.<br />
The disc skips tracks.<br />
Sound skips during MP3/WMA<br />
playback.<br />
Some files on the USB device<br />
are not displayed.<br />
Radio reception is poor<br />
There is interference on the<br />
radio reception whenever the<br />
<strong>Center</strong> is near my PC.<br />
Such interference happens to<br />
most built-in tuner products.<br />
Some WADM functions cannot<br />
be used.<br />
Solution<br />
• Reduce the distance between the remote control and the<br />
set.<br />
• Insert the batteries with their polarities (+/- signs) aligned<br />
as indicated.<br />
• Replace the batteries.<br />
• Point the remote control directly towards the IR sensor.<br />
First try to press y to enter the power saving mode. If the<br />
problem <strong>per</strong>sists, disconnect and reconnect the power plug<br />
to restart the WAC3500.<br />
• Insert a suitable disc.<br />
• Check if the disc is inserted with graphic printed side<br />
facing up.<br />
• Wait for the moisture condensation on the lens to clear.<br />
• Replace or clean the disc, see 1.5 Maintenance.<br />
• Use a finalized CD-RW or CD-R.<br />
• Adjust the volume.<br />
• Disconnect the headphones.<br />
• Deactivate MUTE.<br />
• Connect the speakers pro<strong>per</strong>ly.<br />
• Replace or clean the disc.<br />
• Deactivate SHUFFLE.<br />
• The MP3 / WMA file may be made at a compression level<br />
exceeding 320kbps. Use a lower compression level to rip<br />
audio CD tracks.<br />
• Replace or clean disc.<br />
• Only completely recorded MP3 / WMA files can be found<br />
and played by WAC3500. Check if the file has been<br />
recorded completely.<br />
• DRM-protected WMA files cannot be played on<br />
WAC3500.<br />
• If the signal is too weak, adjust the antenna or connect an<br />
external antenna for better reception.<br />
• Increase the distance between the set and your TV or<br />
VCR.<br />
• Install the supplied FM wire antenna for better reception.<br />
• Keep the <strong>Center</strong> at least 1 meter away from your PC.<br />
Your anti-virus software might affect the running of the<br />
WADM.Turn off your anti-virus software temporarily.<br />
90<br />
Troubleshooting
Problem<br />
I edited ID3 tags in WADM, but<br />
the screen does not show the<br />
updated ID3 tags.What shall I<br />
do?<br />
Backup function no longer<br />
works.<br />
I have problem installing<br />
WADM or after installation, I<br />
cannot launch WADM.<br />
I see the message “Check the<br />
internet setup for Gracenote<br />
online” even though I am sure<br />
that the WAC3500 is<br />
connected to my home<br />
wireless network with internet<br />
connection.<br />
Solution<br />
• Go to File > Refresh Content to refresh the WADM.<br />
• Restart WADM.<br />
This is because the previously backed up file was deleted in<br />
Windows Explorer. Do not delete the file in this way. If you<br />
want to delete the back up file, please use WADM to<br />
manage.<br />
If the backup file is accidentally deleted, please find the file<br />
named YOURMAC.inx by using search tool of your Explorer<br />
and then delete it.<br />
Only after that you can do a backup again.<br />
• Please make sure your O<strong>per</strong>ating System is either<br />
Windows 2000 with service pack 4 and above, or<br />
Windows XP.<br />
• Please check if your PC has a virus.<br />
• Please go to Menu > Settings > Network > Internet<br />
to check if your DNS server is correctly set up.Also make<br />
sure that you have set up the proxy server, if your home<br />
wireless network needs a proxy server for the internet<br />
connection.<br />
• There is a chance that you are already successfully<br />
connected to Gracenote® online, but your CD is not in<br />
their database.<br />
<strong>ENG</strong>LISH<br />
Troubleshooting 91
Gracenote® End User License Agreement<br />
This application or device contains software from Gracenote, Inc. of Emeryville, California<br />
(“Gracenote”).The software from Gracenote (the “Gracenote Software”) enables this application to<br />
<strong>per</strong>form disc and/or file identification and obtain music-related information, including name, artist,<br />
track, and title information (“Gracenote Data”) from online servers or embedded databases<br />
(collectively,“Gracenote Servers”) and to <strong>per</strong>form other functions.You may use Gracenote Data only<br />
by means of the intended End-User functions of this application or device.<br />
You agree that you will use Gracenote Data, the Gracenote Software, and Gracenote Servers for<br />
your own <strong>per</strong>sonal non-commercial use only.You agree not to assign, copy, transfer or transmit the<br />
Gracenote Software or any Gracenote Data to any third party.YOU AGREE NOT TO USE OR<br />
EXPLOIT GRACENOTE DATA,THE GRACENOTE SOFTWARE, OR GRACENOTE SERVERS,<br />
EXCEPT AS EXPRESSLY PERMITTED HEREIN.<br />
You agree that your non-exclusive license to use the Gracenote Data, the Gracenote Software, and<br />
Gracenote Servers will terminate if you violate these restrictions. If your license terminates, you agree<br />
to cease any and all use of the Gracenote Data, the Gracenote Software, and Gracenote Servers.<br />
Gracenote reserves all rights in Gracenote Data, the Gracenote Software, and the Gracenote Servers,<br />
including all ownership rights. Under no circumstances will Gracenote become liable for any payment<br />
to you for any information that you provide.You agree that Gracenote, Inc. may enforce its rights<br />
under this Agreement against you directly in its own name.<br />
The Gracenote service uses a unique identifier to track queries for statistical purposes.The purpose<br />
of a randomly assigned numeric identifier is to allow the Gracenote service to count queries without<br />
knowing anything about who you are. For more information, see the web page for the Gracenote<br />
Privacy Policy for the Gracenote service.<br />
The Gracenote Software and each item of Gracenote Data are licensed to you “AS IS.” Gracenote<br />
makes no representations or warranties, express or implied, regarding the accuracy of any Gracenote<br />
Data from in the Gracenote Servers. Gracenote reserves the right to delete data from the Gracenote<br />
Servers or to change data categories for any cause that Gracenote deems sufficient. No warranty is<br />
made that the Gracenote Software or Gracenote Servers are error-free or that functioning of<br />
Gracenote Software or Gracenote Servers will be uninterrupted. Gracenote is not obligated to<br />
provide you with new enhanced or additional data types or categories that Gracenote may provide in<br />
the future and is free to discontinue its services at any time.<br />
GRACENOTE DISCLAIMS ALL WARRANTIES EXPRESS OR IMPLIED, INCLUDING, BUT NOT<br />
LIMITED TO, IMPLIED WARRANTIES OF MERCHANTABILITY, FITNESS FOR A PARTICULAR<br />
PURPOSE,TITLE,AND NON-INFRINGEMENT. GRACENOTE DOES NOT WARRANT THE<br />
RESULTS THAT WILL BE OBTAINED BY YOUR USE OF THE GRACENOTE SOFTWARE OR ANY<br />
GRACENOTE SERVER. IN NO CASE WILL GRACENOTE BE LIABLE FOR ANY CONSEQUENTIAL<br />
OR INCIDENTAL DAMAGES OR FOR ANY LOST PROFITS OR LOST REVENUES.<br />
© Gracenote 2006 Version 20061005
Specifications are subject to change without notice.<br />
Trademarks are the pro<strong>per</strong>ty of Koninklijke <strong>Philips</strong><br />
Electronics N.V. or their respective owners<br />
© 2007 Koninklijke <strong>Philips</strong> Electronics N.V.<br />
All rights reserved.<br />
www.philips.com<br />
Printed in China<br />
wk7504


