

Samsung 50-150 mm F2.8 S ED OIS Professional Telephoto Zoom Lens - User Manual_0.01MB, pdf, KOREAN, ENGLISH, CHINESE
Samsung 50-150 mm F2.8 S ED OIS Professional Telephoto Zoom Lens - User Manual_0.01MB, pdf, KOREAN, ENGLISH, CHINESE
Samsung 50-150 mm F2.8 S ED OIS Professional Telephoto Zoom Lens - User Manual_0.01MB, pdf, KOREAN, ENGLISH, CHINESE

You also want an ePaper? Increase the reach of your titles
YUMPU automatically turns print PDFs into web optimized ePapers that Google loves.
A<br />
C<br />
F<br />
사용 설명서<br />
NX <strong>50</strong>-1<strong>50</strong><strong>mm</strong> <strong>F2.8</strong> S <strong>ED</strong> <strong>OIS</strong><br />
이 설명서는 제품의 상세 사용 방법을 담고 있습니다. 올바른 사용과 유지를 위해<br />
반드시 사용 설명서를 읽고 바르게 사용해 주세요.<br />
#<br />
$<br />
@<br />
!<br />
0<br />
9<br />
8<br />
D<br />
G<br />
1<br />
2<br />
3<br />
4<br />
5<br />
6<br />
7<br />
B<br />
E<br />
H<br />
AD68-08611A (1.1)<br />
1<br />
한국어<br />
사용하기 전에<br />
SAMSUNG 렌즈를 구입해 주셔서 감사합니다. 설명서에 사용된 이미지는<br />
실제와 다를 수 있습니다. 렌즈를 정상적으로 사용하기 위해서는 카메라<br />
본체 펌웨어를 업데이트 해야 합니다. www.samsung.com/sec에서<br />
펌웨어를 내려받으세요.<br />
제품의 특징<br />
<strong>F2.8</strong>의 고정 조리개 값과 35 <strong>mm</strong> 환산 77~231 <strong>mm</strong>의 화각을 통해<br />
야생 및 스포츠 사진은 물론 인물 사진에도 최적인 프로페셔널 사진가를<br />
위한 렌즈입니다.<br />
구성품<br />
렌즈, 렌즈 덮개, 렌즈 마운트 덮개, 후드, 삼각대 거치대,<br />
휴대용 파우치, 사용 설명서(별매품: 필터)<br />
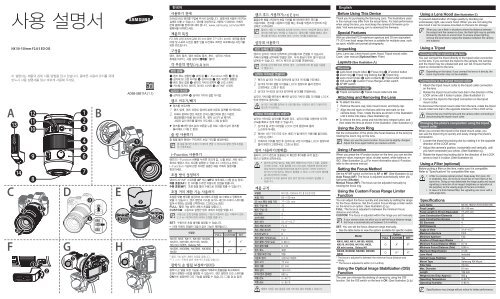
각 부분의 명칭(그림 A 참조)<br />
렌즈 본체<br />
1 렌즈 후드 결합점 2 초점 링 3 i-Function 버튼 4 줌 링<br />
5 삼각대 링 고정 다이얼 6 삼각대 링 7 렌즈 마운트 결합점<br />
8 렌즈 정보 접점 9 삼각대 거치대 장착부 0 <strong>OIS</strong> 스위치<br />
! 커스텀 포커스 레인지 리미터 스위치 @ AF/MF 스위치<br />
삼각대 거치대<br />
# 삼각대 장착부 $ 삼각대 거치대 결합 다이얼<br />
렌즈 끼우기/빼기<br />
► 렌즈를 끼우려면<br />
1 렌즈 덮개, 렌즈 마운트 덮개와 본체 마운트 덮개를 제거하세요.<br />
2 카메라 본체의 렌즈 마운트 인덱스(빨간색)와 렌즈 마운트<br />
결합점(빨간색)을 일치시킨 후, 찰칵 소리가 날 때까지<br />
그림과 같이 렌즈를 돌려서 끼우세요.(그림 B 참조)<br />
► 렌즈를 빼려면 렌즈 분리 버튼을 누른 채로 그림과 같이 렌즈를<br />
돌리세요.(그림 C 참조)<br />
줌 링 사용하기<br />
줌 링을 돌려 원하는 구도(렌즈 초점 거리)를 설정하세요.<br />
줌 링을 돌리면 초점이 미세하게 변할 수 있으므로 촬영 전에 초점을<br />
다시 맞추세요.<br />
i-Function 사용하기<br />
렌즈의 i-Function 버튼을 누르면 조리개 값, 노출 보정, 셔터 속도,<br />
화이트 밸런스 또는 ISO를 설정할 수 있습니다.(그림 D-a 참조)<br />
i-Function 기능에 관한 자세한 설명은 해당 카메라 설명서를<br />
참조하세요.<br />
초점 방식 설정하기<br />
렌즈의 AF/MF 스위치를 AF 또는 MF로 맞추세요.(그림 D-b 참조)<br />
자동 초점(AF): 반 셔터를 누르면 자동으로 초점을 맞춥니다.<br />
수동 초점(MF): 초점 링을 돌려 수동으로 초점을 맞출 수 있습니다.<br />
초점 거리 제한 기능 사용하기<br />
초점을 맞출 범위를 설정하여 피사체의 초점을 보다 빠르고 정확하게<br />
맞출 수 있습니다. 렌즈 옆면의 커스텀 포커스 레인지 리미터 스위치를<br />
밀어서 원하는 옵션을 선택하세요.(그림 D-b 참조)<br />
FULL: 촬영 가능 범위 내에서 초점을 맞춥니다.<br />
CUSTOM: 수동으로 설정한 범위 내에서 초점을 맞춥니다.<br />
수동으로 초점 범위를 설정하는 기능이 지원되지 않는 카메라의 경우,<br />
2.4 m~무한대 범위 내에서 초점을 맞춥니다.<br />
SET: 수동으로 초점 범위를 설정할 수 있습니다.<br />
• 아래 카메라 모델은 다음과 같이 기능이 제한됩니다.<br />
모델명<br />
NX10, NX5, NX11, NX100, NX200,<br />
NX210, NX1000, NX1100, NX20,<br />
NX mini 시리즈, Galaxy NX<br />
NX300, NX300M, NX2000, NX3000,<br />
NX30<br />
* 촬영 가능 범위 내에서 초점을 맞춥니다.<br />
** 2.4 m~무한대 범위 내에서만 초점을 맞춥니다.<br />
광학식 손 떨림 보정하기(<strong>OIS</strong>)<br />
옵션<br />
FULL CUSTOM SET<br />
O X* X*<br />
O X** X*<br />
광학식 손 떨림 보정 기능을 사용해 카메라의 흔들림을 최소화하여<br />
초점이 정확한 사진을 촬영할 수 있습니다. 렌즈 옆면의 <strong>OIS</strong> 스위치를<br />
ON으로 설정하면 <strong>OIS</strong> 기능을 실행할 수 있습니다.(그림 D-b 참조)<br />
렌즈 후드 사용하기(그림 E 참조)<br />
불필요한 빛을 차단하여 화질 저하를 방지하려면 렌즈 후드를<br />
사용하세요. 렌즈를 사용하지 않을 때는 후드를 뒤집어서 렌즈에 끼운<br />
상태로 보관하세요.<br />
플래시 사용 시 카메라와 피사체 사이의 거리가 가까우면 렌즈나 렌즈<br />
후드에 의해 빛이 차단될 수 있습니다. 플래시를 사용할 때에는 렌즈<br />
후드를 제거하고 피사체와 렌즈 사이의 거리를 조절하세요.<br />
삼각대 사용하기<br />
렌즈 본체로 연결하기<br />
렌즈의 삼각대 거치대 장착부에 삼각대를 바로 연결할 수 있습니다.<br />
카메라 본체를 삼각대에 연결할 경우, 무게 중심이 맞지 않아 앞으로<br />
넘어질 수 있습니다. 반드시 렌즈와 삼각대를 연결하세요.<br />
렌즈를 삼각대에 바로 장착한 경우, 삼각대에 따라 줌 링을 사용할<br />
수 없습니다.<br />
삼각대 거치대로 연결하기<br />
1 렌즈의 삼각대 거치대 장착부에 삼각대 거치대를 끼우세요.<br />
2 삼각대 거치대 결합 다이얼을 LOCK 방향으로 돌려 완전히<br />
고정하세요.(그림 F 참조)<br />
3 삼각대 거치대의 삼각대 장착부에 삼각대를 연결하세요.<br />
삼각대 거치대를 렌즈에서 빼려면 삼각대 거치대 결합 다이얼을 LOCK<br />
반대 방향으로 돌리세요.<br />
삼각대 거치대를 장착하거나 분리할 때는 카메라나 렌즈가 떨어지지<br />
않도록 주의하세요.<br />
삼각대 거치대로 구도 바꾸기<br />
삼각대 거치대로 삼각대를 연결한 경우, 삼각대 링을 사용하여 사진의<br />
구도를 빠르고 쉽게 바꿀 수 있습니다.<br />
1 삼각대 링 고정 다이얼을 LOCK 반대 방향으로 돌려<br />
느슨하게 푸세요.<br />
2 원하는 사진 구도(가로 또는 세로)가 될 때까지 카메라를 돌리세요.<br />
(그림 G 참조)<br />
3 카메라의 위치를 정한 후 삼각대 링 고정 다이얼을 LOCK 방향으로<br />
돌려 완전히 고정하세요.(그림 H 참조)<br />
필터 사용하기(별매품)<br />
필터의 크기가 렌즈와 호환되는지 확인한 후(‘제품 규격’ 참조)<br />
렌즈의 앞면에 장착하세요.<br />
• 렌즈에 장착된 필터는 정밀 광학 제품이므로 먼지나 오물, 긁힘에<br />
주의해 주세요. 또한 필터를 2개 이상 겹쳐 사용하면 렌즈에 따라<br />
화질 저하와 비네팅(액세서리에 렌즈의 화각이 가려져 이미지의<br />
모서리가 어두워지는 현상)이 발생할 수 있으니 2개 이상의 필터를<br />
동시에 장착하지 마세요.<br />
• 프레임이 두꺼운 필터의 경우 광각 렌즈에 비네팅이 발생할 수<br />
있습니다.<br />
제품 규격<br />
모델명<br />
초점 거리<br />
NX <strong>50</strong>-1<strong>50</strong><strong>mm</strong> <strong>F2.8</strong> S <strong>ED</strong> <strong>OIS</strong><br />
<strong>50</strong>~1<strong>50</strong> <strong>mm</strong><br />
35 <strong>mm</strong> 환산 초점 거리 77~231 <strong>mm</strong><br />
렌즈 구성-매 20<br />
렌즈 구성-군 13<br />
<strong>ED</strong> 렌즈 4<br />
XHR 렌즈 1<br />
렌즈 화각 31.4°~10.7°<br />
최대 개방 조리개 <strong>F2.8</strong><br />
최소 개방 조리개<br />
조리개 날의 수 9<br />
최단 촬영 거리(Wide)<br />
최단 촬영 거리(Tele)<br />
F22<br />
0.7 m<br />
0.98 m<br />
최대 촬영 배율 0.13X<br />
렌즈 후드<br />
손 떨림 보정 기능<br />
마운트 형식<br />
필터 크기<br />
최대 지름<br />
최대 길이<br />
무게 (렌즈 본체만)<br />
포함<br />
있음<br />
삼성 NX 마운트<br />
72 <strong>mm</strong><br />
81 <strong>mm</strong><br />
154 <strong>mm</strong><br />
880 g<br />
작동 온도 0~40 °C<br />
작동 습도 5~85 %<br />
English<br />
Before Using This Device<br />
Thank you for purchasing the <strong>Samsung</strong> <strong>Lens</strong>. The illustrations used<br />
in this manual may differ from the actual items. For best performance<br />
when using this lens, you must keep the camera′s firmware up-todate.<br />
Visit www.samsung.com to download the firmware.<br />
Special Features<br />
With an ultra-fast <strong>F2.8</strong> maximum aperture and 35 <strong>mm</strong> equivalent<br />
77–231 <strong>mm</strong> focal range the lens is suitable for multiple uses, such<br />
as sport, wildlife and portrait photography.<br />
Unpacking<br />
<strong>Lens</strong>, <strong>Lens</strong> cap, <strong>Lens</strong> mount cover, Hood, Tripod mount collar,<br />
Case, <strong>User</strong> manual (Optional Item: Filter)<br />
Layouts (See illustration A)<br />
The lens<br />
1 <strong>Lens</strong> hood mount index 2 Focus ring 3 i-Function button<br />
4 <strong>Zoom</strong> ring 5 Tripod ring locking dial 6 Tripod ring<br />
7 <strong>Lens</strong> mount index 8 <strong>Lens</strong> contacts 9 Tripod collar connection<br />
0 <strong>OIS</strong> switch ! Custom Focus Range Limiter switch<br />
@ AF/MF switch<br />
The tripod mount collar<br />
# Tripod connection $ Tripod mount collar lock dial<br />
Attaching and Removing the <strong>Lens</strong><br />
► To attach the lens,<br />
1 Remove the lens cap, lens mount cover, and body cap.<br />
2 Align the red mark on the lens with the red mark on the<br />
camera body. Then, rotate the lens as shown in the illustration<br />
until it locks into place. (See illustration B)<br />
► To remove the lens, press and hold the lens release button, and<br />
then rotate the lens as shown in the illustration. (See illustration C)<br />
Using the <strong>Zoom</strong> Ring<br />
Set the composition of the photo (the focal distance of the lens) by<br />
rotating the zoom ring on the lens.<br />
When you use the zoom function, focus can be slightly changed.<br />
Adjust the focus again before you capture a photo.<br />
Using i-Function<br />
When you press the i-Function button on the lens, you can set the<br />
aperture value, exposure value, shutter speed, white balance, or<br />
ISO. (See illustration D-a) For more information about i-Function,<br />
refer to the camera manual.<br />
Setting the Focus Method<br />
Set the AF/MF switch on the lens to AF or MF. (See illustration D-b)<br />
Auto Focus (AF): The focus is adjusted automatically when you<br />
half-press [Shutter].<br />
<strong>Manual</strong> Focus (MF): The focus can be adjusted manually by<br />
rotating the focus ring.<br />
Using the Custom Focus Range Limiter<br />
Function<br />
You can adjust the focus quickly and precisely by setting the range<br />
for the focus distance. Set the Custom Focus Range Limiter switch<br />
on the lens to an option. (See illustration D-b)<br />
FULL: The focus is adjusted to between the minimum focus<br />
distance and infinity.<br />
CUSTOM: The focus is adjusted within the range you set manually.<br />
If your camera does not allow you to set the focus distance range,<br />
the focus is automatically set between 2.4 m-infinity.<br />
SET: You can set the focus distance range manually.<br />
• See the table below to view the options available for specific models.<br />
Model<br />
Option<br />
FULL CUSTOM SET<br />
NX10, NX5, NX11, NX100, NX200,<br />
NX210, NX1000, NX1100, NX20,<br />
O X* X*<br />
NX mini series, Galaxy NX<br />
NX300, NX300M, NX2000, NX3000,<br />
NX30<br />
O X** X*<br />
* The focus is adjusted to between the minimum focus distance and<br />
infinity.<br />
** The focus is adjusted to within 2.4 m-infinity.<br />
Using the Optical Image Stabilization (<strong>OIS</strong>)<br />
Function<br />
The user can minimize the shaking of camera by using the <strong>OIS</strong><br />
function. Set the <strong>OIS</strong> switch on the lens to ON. (See illustration D-b)<br />
Using a <strong>Lens</strong> Hood (See illustration E)<br />
To prevent deterioration of image quality by blocking out<br />
unnecessary light, use a lens hood. When you are not using the<br />
lens hood it can be reverse-mounted on the lens for storage.<br />
When you use a flash in situations where the distance between<br />
the subject and the camera is close, the flash light may be partially<br />
blocked by the lens or a lens hood. To ensure proper lighting,<br />
remove the lens hood or adjust the distance between the camera<br />
and subjects.<br />
Using a Tripod<br />
Connecting the tripod to the lens<br />
You can connect the tripod directly to the tripod collar connection<br />
on the lens. If you connect the tripod to the camera, the camera<br />
and the tripod may be unbalanced and can fall. Ensure that the<br />
tripod is connected to the lens.<br />
Depending on the tripod, if you connect the lens to it directly, the<br />
zoom ring function may not be available.<br />
Connecting to the tripod mount collar<br />
1 Attach the tripod mount collar to the tripod collar connection<br />
on the lens.<br />
2 Rotate the tripod mount collar lock dial in the direction of the<br />
LOCK arrow until it locks in place. (See illustration F)<br />
3 Connect the tripod to the tripod connection on the tripod<br />
mount collar.<br />
To disconnect the tripod mount collar from the lens, rotate the tripod<br />
mount collar lock dial in the opposite direction of the LOCK arrow.<br />
Ensure that you hold the lens and the camera when connecting or<br />
disconnecting the tripod mount collar.<br />
Changing the photo′s composition using the tripod<br />
mount collar<br />
When you connect the tripod to the tripod mount collar, you<br />
can use the tripod ring to quickly and easily change the photo′s<br />
composition.<br />
1 Loosen the tripod ring locking dial by rotating it in the opposite<br />
direction of the LOCK arrow.<br />
2 Adjust the camera′s position, horizontally and vertically, until<br />
you have composed your photo. (See illustration G)<br />
3 Rotate the tripod ring locking dial in the direction of the LOCK<br />
arrow to lock it in place. (See illustration H)<br />
Using a Filter (optional)<br />
Before putting a filter on the lens, make sure it is compatible.<br />
Refer to "Specifications" for compatible filter size.<br />
• A filter is a precise optical product. Keep away from dust, dirt,<br />
or scratches. Also, do not try to mount two or more filters at the<br />
same time. Doing so may deteriorate the image quality and cause<br />
vignetting (a reduction of an image′s brightness or saturation at<br />
the periphery as the viewing angle of the lens is hidden).<br />
• In case of a thick framed filter, the vignetting can occur with a<br />
wide-angle lens.<br />
Specifications<br />
<strong>Lens</strong> Name<br />
NX <strong>50</strong>-1<strong>50</strong><strong>mm</strong> <strong>F2.8</strong> S <strong>ED</strong> <strong>OIS</strong><br />
Focal Length<br />
<strong>50</strong>–1<strong>50</strong> <strong>mm</strong><br />
Focal Length in 35 <strong>mm</strong> Equivalent 77–231 <strong>mm</strong><br />
<strong>Lens</strong> Construction-Elements 20<br />
<strong>Lens</strong> Construction-Groups 13<br />
<strong>ED</strong> Elements 4<br />
XHR Elements 1<br />
Angle of View 31.4°–10.7°<br />
Maximum Aperture <strong>F2.8</strong><br />
Minimum Aperture<br />
F22<br />
Number of Diaphragm Blades 9<br />
Minimum Focus Distance (Wide) 0.7 m<br />
Minimum Focus Distance (Tele) 0.98 m<br />
Maximum Magnification 0.13X<br />
<strong>Lens</strong> Hood<br />
Included<br />
Optical Image Stabilizer<br />
Yes<br />
Mount Type<br />
<strong>Samsung</strong> NX Mount<br />
Filter Size<br />
72 <strong>mm</strong><br />
Max. Diameter<br />
81 <strong>mm</strong><br />
Length<br />
154 <strong>mm</strong><br />
Weight (<strong>Lens</strong> Only, Approx.) 880 g<br />
Operating Temperature 0–40 °C<br />
Operating Humidity 5–85 %<br />
제품의 사양은 성능 향상을 위해 사전 예고 없이 변경될 수 있습니다.<br />
Specifications may change without notice for better performance.
A<br />
#<br />
C<br />
$<br />
@<br />
!<br />
0<br />
9<br />
8<br />
D<br />
1<br />
2<br />
3<br />
4<br />
5<br />
6<br />
7<br />
B<br />
E<br />
F G H<br />
1<br />
简 体 中 文<br />
使 用 本 设 备 前<br />
镜 头<br />
使 用 说 明 书<br />
简 体 中 文<br />
感 谢 您 购 买 三 星 镜 头 。 本 说 明 书 中 使 用 的 图 片 可 能 和 实 物 有 所 差 异 。<br />
为 在 使 用 镜 头 时 获 得 最 佳 性 能 , 您 必 须 保 持 相 机 的 固 件 最 新 。 请 访 问<br />
www.samsung.com 以 下 载 固 件 。<br />
特 殊 功 能<br />
借 助 超 快 的 <strong>F2.8</strong> 最 大 光 圈 和 相 当 于 35 <strong>mm</strong> 底 片 的 77–231 <strong>mm</strong> 对<br />
焦 范 围 , 这 款 镜 头 非 常 适 合 拍 摄 运 动 、 野 生 动 物 和 人 像 摄 影 等 多<br />
种 用 途 。<br />
拆 开 包 装<br />
镜 头 、 镜 头 盖 、 镜 头 接 口 盖 、 遮 光 罩 、 三 脚 架 插 座 套 环 、 镜 头 包 、<br />
使 用 说 明 书 ( 另 购 物 品 : 滤 光 镜 )<br />
各 部 位 名 称 ( 见 图 A)<br />
镜 头<br />
1 镜 头 遮 光 罩 接 口 指 示 2 对 焦 圈 3 i-Function 按 钮 4 变 焦 环<br />
5 脚 架 环 锁 定 旋 钮 6 脚 架 环 7 镜 头 连 接 指 示 8 镜 头 触 点<br />
9 三 脚 架 套 环 接 口 0 <strong>OIS</strong> 开 关 ! 自 定 义 对 焦 范 围 限 制 开 关<br />
@ AF/MF 开 关<br />
三 脚 架 插 座 套 环<br />
# 三 脚 架 接 口 $ 三 脚 架 插 座 套 环 锁 定 旋 钮<br />
安 装 和 卸 下 镜 头<br />
► 要 安 装 镜 头 :<br />
1 卸 下 镜 头 盖 、 镜 头 接 口 盖 和 机 身 盖 。<br />
2 让 镜 头 上 的 红 色 标 记 对 准 相 机 机 身 上 的 红 色 标 记 。 然 后<br />
如 图 所 示 旋 转 镜 头 , 直 到 其 锁 定 到 位 。( 见 图 B)<br />
► 要 卸 下 镜 头 , 按 住 镜 头 释 放 按 钮 , 然 后 如 图 所 示 旋 转 镜 头 。<br />
( 见 图 C)<br />
使 用 变 焦 环<br />
旋 转 镜 头 上 的 变 焦 环 设 置 相 片 的 构 图 ( 镜 头 的 焦 距 )。<br />
更 改 焦 距 会 造 成 对 焦 的 轻 微 改 变 。 建 议 拍 照 前 重 新 调 整 对 焦 。<br />
使 用 i-Function<br />
按 下 镜 头 上 的 i-Function 按 钮 时 , 可 以 设 置 光 圈 值 、 曝 光 值 、 快 门 速<br />
度 、 白 平 衡 或 ISO。( 见 图 D-a) 有 关 i-Function 的 更 多 信 息 , 请<br />
参 阅 相 机 说 明 书 。<br />
设 置 对 焦 方 法<br />
将 镜 头 上 的 AF/MF 开 关 置 于 AF 或 MF。( 见 图 D-b)<br />
自 动 对 焦 (AF): 半 按 下 [ 快 门 ] 时 , 对 焦 将 会 自 动 调 整 。<br />
手 动 对 焦 (MF): 可 以 通 过 旋 转 对 焦 圈 来 手 动 调 整 对 焦 。<br />
使 用 自 定 义 对 焦 范 围 限 制 功 能<br />
可 以 通 过 设 置 对 焦 距 离 的 范 围 来 快 速 精 确 地 调 整 对 焦 。 将 镜 头 上 的 自<br />
定 义 对 焦 范 围 限 制 开 关 设 置 为 一 个 选 项 。( 见 图 D-b)<br />
FULL: 对 焦 可 在 最 小 对 焦 距 离 和 无 限 远 之 间 调 整 。<br />
CUSTOM: 对 焦 可 在 您 手 动 设 置 的 范 围 内 调 整 。<br />
如 果 相 机 不 允 许 您 设 置 焦 距 范 围 , 焦 距 将 自 动 设 置 为 2.4 m- 无<br />
限 远 之 间 。<br />
SET: 可 以 手 动 设 置 对 焦 距 离 范 围 。<br />
• 请 参 阅 下 表 以 查 看 特 定 型 号 的 可 用 选 项 。<br />
型 号<br />
NX10, NX5, NX11, NX100, NX200,<br />
NX210, NX1000, NX1100, NX20,<br />
NX mini 系 列 , Galaxy NX<br />
NX300, NX300M, NX2000,<br />
NX3000, NX30<br />
* 对 焦 可 在 最 小 对 焦 距 离 和 无 限 远 之 间 调 整 。<br />
** 对 焦 可 在 2.4 m- 无 限 远 的 范 围 内 调 整 。<br />
使 用 光 学 图 像 稳 定 (<strong>OIS</strong>) 功 能<br />
选 项<br />
FULL CUSTOM SET<br />
O X* X*<br />
O X** X*<br />
用 户 可 使 用 <strong>OIS</strong> 功 能 来 减 少 相 机 的 晃 动 。 将 镜 头 上 的 <strong>OIS</strong> 开 关 置 于<br />
ON。( 见 图 D-b)<br />
使 用 镜 头 遮 光 罩 ( 见 图 E)<br />
若 要 避 免 影 像 画 质 因 不 必 要 的 光 线 遮 挡 而 变 差 , 请 使 用 镜 头 遮 光 罩 。<br />
在 不 使 用 镜 头 遮 光 罩 时 , 可 以 将 其 反 向 安 装 到 镜 头 上 以 便 于 存 储 。<br />
在 拍 摄 对 象 与 相 机 之 间 距 离 较 近 的 情 况 下 使 用 闪 光 灯 时 , 闪 光 灯<br />
光 线 可 能 会 被 镜 头 或 镜 头 遮 光 罩 部 分 遮 挡 。 为 确 保 获 得 适 当 的 光<br />
照 , 请 卸 下 镜 头 遮 光 罩 或 调 整 相 机 和 拍 摄 对 象 之 间 的 距 离 。<br />
使 用 三 脚 架<br />
将 三 脚 架 连 接 至 镜 头<br />
可 以 将 三 脚 架 直 接 连 接 至 镜 头 上 的 三 脚 架 套 环 接 口 上 。 如 果 将 三 脚<br />
架 连 接 至 相 机 , 相 机 和 三 脚 架 可 能 不 平 衡 并 会 摔 落 。 确 保 三 脚 架 连<br />
接 到 了 镜 头 。<br />
取 决 于 三 脚 架 , 如 果 直 接 连 接 镜 头 , 变 焦 环 功 能 可 能 不 起 作 用 。<br />
连 接 至 三 脚 架 插 座 套 环<br />
1 将 三 脚 架 插 座 套 环 装 到 镜 头 上 的 三 脚 架 套 环 接 口 。<br />
2 按 LOCK 箭 头 的 方 向 旋 转 三 脚 架 插 座 套 环 锁<br />
定 旋 钮 , 直 至 其 锁 定 到 位 。( 见 图 F)<br />
3 将 三 脚 架 连 接 至 三 脚 架 插 座 套 环 上 的 三 脚 架 接 口 。<br />
要 从 镜 头 断 开 三 脚 架 插 座 套 环 的 连 接 , 请 按 LOCK 箭 头 的 相 反 方 向<br />
旋 转 三 脚 架 插 座 套 环 锁 定 旋 钮 。<br />
确 保 在 连 接 或 断 开 连 接 三 脚 架 插 座 套 环 时 握 住 镜 头 和 相 机 。<br />
使 用 三 脚 架 插 座 套 环 更 改 照 片 的 构 图<br />
将 三 脚 架 连 接 至 三 脚 架 插 座 套 环 时 , 可 以 使 用 脚 架 环 以 轻 松 快 捷 地<br />
更 改 照 片 的 构 图 。<br />
1 按 LOCK 箭 头 的 相 反 方 向 旋 转 以 松 开 脚 架 环 锁 定 旋 钮 。<br />
2 水 平 或 垂 直 调 整 相 机 的 位 置 , 直 至 您 已 为 照 片 构 图 。<br />
( 见 图 G)<br />
3 按 LOCK 箭 头 的 方 向 旋 转 脚 架 环 锁 定 旋 钮 以 将 其 锁 定 到 位 。<br />
( 见 图 H)<br />
使 用 滤 光 镜 ( 另 购 )<br />
将 滤 光 镜 连 接 在 镜 头 上 之 前 , 请 确 保 滤 光 镜 与 镜 头 兼 容 。<br />
关 于 兼 容 的 滤 光 片 尺 寸 , 请 参 考 “ 规 格 ”。<br />
规 格<br />
镜 头 名 称<br />
焦 距<br />
• 滤 光 镜 是 精 密 的 光 学 设 备 。 远 离 灰 尘 、 污 垢 或 刮 痕 。 另 外 , 请<br />
勿 尝 试 同 时 安 装 两 个 或 更 多 滤 光 镜 。 否 则 可 能 会 使 图 像 质 量 变<br />
差 并 导 致 虚 光 照 ( 由 于 镜 头 的 视 角 被 隐 藏 , 外 围 的 图 像 亮 度 或<br />
饱 和 度 将 会 降 低 )。<br />
• 如 果 使 用 广 角 镜 头 和 较 厚 的 滤 光 镜 , 影 像 可 能 会 发 暗 。<br />
相 当 于 35 <strong>mm</strong> 的 焦 距<br />
镜 头 结 构 - 元 件 20<br />
镜 头 结 构 - 组 13<br />
<strong>ED</strong> 元 件 4<br />
XHR 元 件 1<br />
NX <strong>50</strong>-1<strong>50</strong><strong>mm</strong> <strong>F2.8</strong> S <strong>ED</strong> <strong>OIS</strong><br />
<strong>50</strong>–1<strong>50</strong> <strong>mm</strong><br />
77–231 <strong>mm</strong><br />
查 看 角 度 31.4°–10.7°<br />
最 大 光 圈 <strong>F2.8</strong><br />
最 小 光 圈<br />
光 圈 叶 片 数 9<br />
最 小 焦 距 ( 广 角 )<br />
最 小 焦 距 ( 长 焦 )<br />
F22<br />
0.7 m<br />
0.98 m<br />
最 大 放 大 倍 率 0.13X<br />
镜 头 遮 光 罩<br />
光 学 图 像 稳 定<br />
接 口 类 型<br />
滤 光 片 尺 寸<br />
最 大 直 径<br />
长 度<br />
重 量 ( 仅 限 镜 头 , 近 似 值 )<br />
附 带<br />
是<br />
三 星 NX 接 口<br />
72 <strong>mm</strong><br />
81 <strong>mm</strong><br />
154 <strong>mm</strong><br />
880 g<br />
操 作 温 度 0–40 °C<br />
操 作 湿 度 5–85%<br />
规 格 如 有 变 更 , 恕 不 另 行 通 知 。<br />
한국어<br />
안전을 위한 주의 사항<br />
사용자의 안전을 지키고 재산상의 손해를 막기 위한 내용입니다.<br />
반드시 잘 읽고 제품을 올바르게 사용해 주세요.<br />
경고<br />
주의<br />
• 렌즈나 카메라를 사용하여 태양을 정면으로 바라보지 마세요.<br />
시력에 치명적인 손상을 입을 수 있습니다.<br />
• 어린이가 렌즈나 카메라를 만지지 않도록 주의하세요.<br />
• 렌즈 덮개를 끼우지 않은 상태로 직사광선이 비치는 장소에<br />
보관하지 마세요. 렌즈를 통과한 직사광선이 불에 타기 쉬운<br />
물질에 닿을 경우 화재가 발생할 수 있습니다.<br />
• 삼각대는 강도가 높은 제품을 권장합니다. 강도가 약한 삼각대<br />
사용 시 삼각대가 쓰러져 카메라가 손상될 수 있습니다.<br />
렌즈 보관 및 유지<br />
• 건조하고 통풍이 잘되는 곳에 보관하세요.<br />
• 벽장, 옷장, 차 안, 온도나 습도가 높은 곳, 방충제, 약품 등이 있는 장소에<br />
보관하지 마세요.<br />
• 렌즈 사용 중 물이 들어가면 제품에 이상이 발생할 수 있으니 주의하세요.<br />
• 먼지가 많은 환경에서 렌즈를 교환하지 마세요.<br />
• 렌즈는 수분의 유입이나 먼지의 차단을 보증하진 않습니다. 극심한 환경에<br />
제품을 노출하지 마세요.<br />
• 먼지 제거를 위해 시너, 알코올, 벤젠과 같은 화학 약품을 사용하지 마세요.<br />
• 렌즈는 정밀 광학 제품이므로 떨어뜨리거나 과도한 충격을 주지 않도록<br />
주의하세요.<br />
• 급격한 온도 변화가 있는 곳에서는 렌즈 사용을 자제하세요. 렌즈의 외부나<br />
내부에 물방울이 생길 때는 비닐 봉투나 카메라 가방에 렌즈를 보관한 후<br />
정상적인 온도에서 꺼내어 사용하세요.<br />
• 렌즈를 사용하지 않거나 운송 시 렌즈 덮개와 렌즈 마운트 덮개를 씌워<br />
이물질을 방지하고 렌즈를 보호하세요.<br />
• 렌즈 덮개 없이 카메라 또는 렌즈를 삼각대에 부착한 채로 두면 직사광선에<br />
의해 카메라 또는 렌즈 내부가 손상될 수 있으니 주의하세요.<br />
• 렌즈의 성능을 유지하려면 1~2년마다 렌즈를 정기 점검하세요.<br />
• 렌즈 앞부분 및 렌즈 전체에 무리한 힘을 가하지 마세요.<br />
• 렌즈를 안전하게 사용하기 위해서는 전원을 끈 상태에서 렌즈를 끼우거나<br />
빼세요.<br />
• 타사 렌즈의 사용으로 인한 사고, 손상, 고장에 대해서는 제조 회사에서<br />
책임지지 않습니다.<br />
• 렌즈 장착 시 반드시 깨끗한 환경에서 교체하고 렌즈 마운트 안에 손을<br />
넣지 않도록 주의하세요. 카메라 본체 또는 렌즈에 이물질이 들어가면 촬영<br />
결과물에 영향을 줄 수 있으며 제품에 이상이 발생할 수 있습니다.<br />
• 렌즈가 장착된 상태에서 카메라 본체만 드는 경우 카메라(렌즈가 장착된)가<br />
손상될 수 있으므로 주의하세요. 카메라와 렌즈를 모두 잡고 이동하세요.<br />
• 렌즈 마운트는 렌즈 안으로 먼지가 들어가거나 습기가 차는 것을 방지하기<br />
위해 고무 링으로 마감되어 있습니다. 고무 링이 마모된 경우 삼성전자<br />
서비스 센터에서 유상으로 교체할 수 있습니다. 고무 링으로 인해 카메라<br />
본체의 렌즈 마운트 주변이 마모될 수 있으나 사용에는 지장을 주지<br />
않습니다.<br />
• 삼각대 사용 시 렌즈가 삼각대에 닿지 않도록 삼각대의 방향을 조절하세요.<br />
English<br />
Health and Safety Information<br />
Please read the following safety tips carefully for proper and safe use.<br />
Warning<br />
Caution<br />
• Do not stare at the sun through the lens or camera.<br />
This may cause severe damage to your eyes.<br />
• Keep your lens or camera away from small children and pets.<br />
• Do not store the lens in direct sunlight without the lens cap.<br />
Direct sunlight that passes through the lens may combust if it<br />
comes into contact with fla<strong>mm</strong>able materials.<br />
• Use only sturdy tripods. Lightweight or unstable tripods may<br />
fall over and damage the camera.<br />
<strong>Lens</strong> Storage and Maintenance<br />
• Store the lens in dry and well ventilated areas.<br />
• Do not store the lens in areas of high temperature or humidity or in a closet,<br />
car, or confined area where chemicals are stored.<br />
• Do not expose the lens to water.<br />
• Avoid removing or changing the lens in dusty areas.<br />
• The lens is not water or dust proof. Exposure to severe conditions is not<br />
reco<strong>mm</strong>ended.<br />
• Do not use chemicals such as thinner, alcohol, or benzene to remove dust.<br />
• Do not drop the lens or apply excessive shock to it. The lens is a precise<br />
optical product.<br />
• Avoid using the lens anywhere there is a sudden temperature change. Keep<br />
the lens in a plastic bag or a camera case to prevent condensation from<br />
forming on the inside or outside of the lens.<br />
• When carrying or not using the lens, place the lens cap and lens mount cover<br />
on the lens to prevent contamination from foreign particles and protect the<br />
lens from scratches.<br />
• Do not keep the camera or the lens mounted on a tripod without the lens cap.<br />
The inside of the camera or the lens can be damaged by direct sunlight.<br />
• Check the lens once every year or two for best performance.<br />
• Do not apply excessive force to the front of the lens.<br />
• For safe use of the lens, mount or dismount the lens while the camera is<br />
turned off.<br />
• <strong>Samsung</strong> is not responsible for any damage incurred by using other<br />
manufacturers’ lenses.<br />
• Make sure to change lenses only in a clean environment and do not put your<br />
fingers into the lens mount when mounting the lens. Foreign particles may<br />
affect shooting results or cause a malfunction if they enter the camera body<br />
or the lens.<br />
• Do not hold the camera body when the lens is attached. Doing so may cause<br />
damage to the camera or the lens mount. Ensure that you hold the lens and<br />
the camera when you are carrying the equipment.<br />
• To reduce the amount of dust or moisture that can enter the lens, the lens<br />
mount is fitted with a rubber seal. If the seal is damaged or worn, contact<br />
a <strong>Samsung</strong> service center to have it replaced (charges may apply). The<br />
rubber seal and the surfaces it contacts may experience wear and tear. This<br />
should not affect your camera′s lifespan or performance.<br />
• When using a tripod, position the tripod to avoid contact between the lens<br />
and the tripod.<br />
Correct Disposal of This Product<br />
(Waste Electrical & Electronic Equipment)<br />
(Applicable in countries with separate collection systems)<br />
This marking on the product, accessories or literature indicates that the<br />
product and its electronic accessories (e.g. charger, headset, USB cable)<br />
should not be disposed of with other household waste at the end of their<br />
working life. To prevent possible harm to the environment or human health<br />
from uncontrolled waste disposal, please separate these items from other<br />
types of waste and recycle them responsibly to promote the sustainable<br />
reuse of material resources. Household users should contact either the<br />
retailer where they purchased this product, or their local government office,<br />
for details of where and how they can take these items for environmentally<br />
safe recycling. Business users should contact their supplier and check<br />
the terms and conditions of the purchase contract. This product and its<br />
electronic accessories should not be mixed with other co<strong>mm</strong>ercial wastes<br />
for disposal.<br />
简 体 中 文<br />
健 康 与 安 全 信 息<br />
请 仔 细 阅 读 下 列 安 全 注 意 事 项 以 确 保 正 确 和 安 全 使 用 。<br />
警 告<br />
注 意<br />
• 不 要 通 过 镜 头 或 相 机 看 太 阳 。 否 则 可 能 会 严 重 损 伤 您 的 眼 睛 。<br />
• 使 您 的 镜 头 或 相 机 远 离 儿 童 和 宠 物 。<br />
• 不 要 在 未 安 装 镜 头 盖 的 情 况 下 , 将 镜 头 放 在 阳 光 直 射 的 地 方 。 直<br />
射 的 阳 光 通 过 镜 头 后 聚 焦 在 易 燃 物 上 可 能 导 致 火 灾 。<br />
• 请 仅 使 用 坚 固 的 三 脚 架 。 轻 型 或 不 稳 定 的 三 脚 架 可 能 会 倒 塌 并<br />
损 坏 相 机 。<br />
镜 头 的 存 储 和 维 护<br />
• 请 在 干 燥 、 通 风 的 地 方 存 放 镜 头 。<br />
• 请 勿 将 镜 头 存 放 在 温 度 或 湿 度 过 高 的 区 域 , 或 者 放 置 于 壁 橱 、 车 辆 或 存 放 化<br />
学 品 的 密 闭 区 域 。<br />
• 请 勿 将 镜 头 放 在 水 中 。<br />
• 镜 头 未 完 全 密 封 , 避 免 在 多 尘 的 区 域 取 下 或 更 换 镜 头 。<br />
• 镜 头 无 法 绝 对 防 水 或 防 尘 , 它 仅 设 计 为 抵 抗 大 颗 粒 灰 尘 和 细 微 的 溅 水 , 故 不<br />
建 议 在 恶 劣 的 条 件 下 使 用 。<br />
• 不 要 使 用 任 何 化 学 药 品 如 稀 释 剂 、 酒 精 或 苯 擦 拭 灰 尘 。<br />
• 小 心 不 要 掉 落 镜 头 或 受 到 其 他 物 体 的 撞 击 。 镜 头 是 精 密 光 学 设 备 。<br />
• 避 免 在 温 度 频 繁 变 化 的 地 方 使 用 镜 头 。 将 镜 头 放 在 塑 料 袋 或 相 机 包 , 防 止 镜<br />
头 内 外 会 产 生 水 珠 。<br />
• 携 带 或 不 使 用 镜 头 时 , 请 在 镜 头 上 装 上 镜 头 盖 或 镜 头 接 口 盖 , 以 免 镜 头 被 异<br />
物 污 染 或 被 划 伤 。<br />
• 不 要 把 没 带 镜 头 盖 的 相 机 或 镜 头 放 在 三 脚 架 上 。 相 机 或 镜 头 内 部 可 能 被 阳<br />
光 直 射 损 坏 。<br />
• 为 保 持 镜 头 性 能 , 每 一 年 或 两 年 检 查 一 次 。<br />
• 不 要 对 镜 头 前 面 施 加 外 力 。<br />
• 为 了 安 全 地 使 用 镜 头 , 请 在 相 机 电 源 关 闭 的 状 态 下 安 装 或 拆 卸 镜 头 。<br />
• 对 于 使 用 其 他 公 司 镜 头 造 成 的 任 何 损 坏 , 三 星 不 承 担 任 何 责 任 。<br />
• 在 安 装 镜 头 时 , 确 保 仅 在 清 洁 的 环 境 更 换 镜 头 并 且 不 要 将 手 指 伸 到 镜 头 接<br />
口 中 。 如 果 有 异 物 进 入 相 机 机 身 或 镜 头 , 可 能 会 影 响 拍 摄 效 果 或 导 致 故 障 。<br />
• 在 安 装 镜 头 时 , 请 勿 握 住 相 机 机 身 。 否 则 可 能 导 致 相 机 或 镜 头 接 口 损 坏 。<br />
携 带 装 置 时 , 确 保 您 握 着 镜 头 和 相 机 。<br />
• 为 减 少 可 能 进 入 镜 头 的 灰 尘 或 湿 汽 量 , 镜 头 接 口 装 上 了 橡 胶 密 封 圈 。 如 果<br />
密 封 圈 损 坏 或 磨 损 , 请 联 系 三 星 服 务 中 心 以 进 行 更 换 ( 可 能 需 要 收 费 )。 橡<br />
胶 密 封 圈 及 其 接 触 表 面 可 能 发 生 磨 损 。 这 不 会 影 响 相 机 的 使 用 寿 命 或 性 能 。<br />
• 使 用 三 脚 架 时 , 调 整 三 脚 架 位 置 以 避 免 镜 头 与 三 脚 架 接 触 。<br />
Please refer to the warranty that came with your<br />
product or visit our website www.samsung.com<br />
for after-sales service or inquiries.


