

Sony RMT-DSLR2 - RMT-DSLR2 Istruzioni per l'uso Francese
Sony RMT-DSLR2 - RMT-DSLR2 Istruzioni per l'uso Francese
Sony RMT-DSLR2 - RMT-DSLR2 Istruzioni per l'uso Francese

Create successful ePaper yourself
Turn your PDF publications into a flip-book with our unique Google optimized e-Paper software.
Remote Commander<br />
Télécommande<br />
/O<strong>per</strong>ating Instructions/Mode d’emploi/<br />
Manual de instrucciones/Bedienungsanleitung/<br />
Gebruiksaanwijzing<br />
<br />
<br />
<br />
<br />
<br />
<br />
<br />
<br />
<br />
<br />
<strong>RMT</strong>-<strong>DSLR2</strong><br />
4-425-118-01 (1)<br />
© 2012 <strong>Sony</strong> Corporation Printed in China<br />
1<br />
2<br />
3<br />
4<br />
5<br />
6<br />
8 7<br />
9<br />
10<br />
<br />
<br />
<br />
<br />
<br />
11<br />
12<br />
13<br />
14<br />
15<br />
<br />
<br />
<br />
<br />
<br />
<br />
<br />
<br />
<br />
<br />
<br />
<br />
<br />
<br />
<br />
<br />
<br />
<br />
<br />
<br />
<br />
<br />
<br />
<br />
<br />
<br />
<br />
<br />
<br />
<br />
<br />
<br />
<br />
<br />
<br />
<br />
<br />
<br />
<br />
/<br />
<br />
<br />
<br />
<br />
<br />
<br />
<br />
<br />
<br />
<br />
<br />
<br />
<br />
<br />
<br />
<br />
<br />
<br />
<br />
<br />
<br />
<br />
<br />
<br />
<br />
<br />
<br />
<br />
<br />
<br />
<br />
<br />
<br />
<br />
<br />
<br />
<br />
URL<br />
<br />
http://www.sony.co.jp/support<br />
<br />
<br />
<br />
<br />
<br />
*<br />
<br />
<br />
<br />
<br />
*<br />
PictBridgePRINT<br />
<br />
**<br />
* <br />
** HDMI<br />
<br />
<br />
1 2 SEC2<br />
2 S <br />
HUTTER<br />
3 <br />
4 <br />
DISP<br />
5 <br />
6 <br />
7 <br />
8 <br />
9 M <br />
ENU<br />
10 P <br />
RINT<br />
11 <br />
12 START/STOP<br />
13 / /<br />
14 <br />
15 ////<br />
<br />
2 SECSHUTTERSTART/STOP<br />
<br />
<br />
<br />
<br />
<br />
<br />
1 <br />
<br />
2 +<br />
<br />
3 <br />
<br />
CR2025<br />
CR2025<br />
<br />
<br />
<br />
SHUTTER<br />
2 SECSTART/STOP*<br />
SHUTTER<br />
<br />
2 SEC 2<br />
<br />
START/STOP*1<br />
<br />
<br />
<br />
* <br />
AF<br />
START/STOP<br />
<br />
<br />
<br />
<br />
<br />
<br />
HDMI<br />
<br />
<br />
<br />
<br />
SHUTTER 2 SEC SRART/STOP <br />
PRINT PictBridge <br />
<br />
<br />
<br />
<br />
<br />
<br />
<br />
<br />
HDMI<br />
<br />
1 <br />
2 PictBridge<br />
3 <br />
4 PRINT<br />
<br />
<br />
<br />
<br />
<br />
<br />
<br />
<br />
<br />
<br />
3VCR2025<br />
41.5 mm 94.5 mm 13.5 mm<br />
<br />
27 g<br />
0 40 <br />
-20 +60 <br />
<strong>RMT</strong>-<strong>DSLR2</strong><br />
3VCR20251<br />
<br />
<br />
<br />
<br />
<br />
<br />
<br />
<br />
<br />
<br />
1<br />
<br />
<br />
<br />
<br />
<br />
<br />
<br />
<br />
<br />
<br />
<br />
<br />
<br />
7<br />
<br />
<br />
<br />
<br />
<br />
<br />
<strong>RMT</strong>-<strong>DSLR2</strong><br />
<br />
<br />
Before o<strong>per</strong>ating the product, please read this manual<br />
thoroughly and retain it for future reference.<br />
WARNING<br />
To reduce fire or shock hazard, do not expose the unit to<br />
rain or moisture.<br />
For the Customers in the U.S.A.<br />
CAUTION<br />
You are cautioned that any changes or modifications<br />
not expressly approved in this manual could void your<br />
authority to o<strong>per</strong>ate this equipment.<br />
Note:<br />
This equipment has been tested and found to comply with<br />
the limits for a Class B digital device, pursuant to Part 15<br />
of the FCC Rules. These limits are designed to provide<br />
reasonable protection against harmful interference in a<br />
residential installation. This equipment generates, uses,<br />
and can radiate radio frequency energy and, if not installed<br />
and used in accordance with the instructions, may cause<br />
harmful interference to radio communications. However,<br />
there is no guarantee that interference will not occur in<br />
a particular installation. If this equipment does cause<br />
harmful interference to radio or television reception,<br />
which can be determined by turning the equipment off and<br />
on, the user is encouraged to try to correct the interference<br />
by one or more of the following measures:<br />
ˋˋReorient or relocate the receiving antenna.<br />
ˋˋIncrease the separation between the equipment and<br />
receiver.<br />
ˋˋConnect the equipment into an outlet on a circuit<br />
different from that to which the receiver is connected.<br />
ˋˋConsult the dealer or an ex<strong>per</strong>ienced radio/TV<br />
technician for help.<br />
For the State of California, USA only<br />
Perchlorate Material special handling may apply, See<br />
www.dtsc.ca.gov/hazardouswaste/<strong>per</strong>chlorate<br />
Perchlorate Material: Lithium battery contains <strong>per</strong>chlorate.<br />
For the Customers in Europe<br />
Disposal of Old Electrical & Electronic<br />
Equipment (Applicable in the European<br />
Union and other European countries<br />
with separate collection systems)<br />
This symbol on the product or on its<br />
packaging indicates that this product shall<br />
not be treated as household waste. Instead<br />
it shall be handed over to the applicable<br />
collection point for the recycling of electrical and<br />
electronic equipment. By ensuring this product is disposed<br />
of correctly, you will help prevent potential negative<br />
consequences for the environment and human health,<br />
which could otherwise be caused by inappropriate waste<br />
handling of this product. The recycling of materials will<br />
help to conserve natural resources. For more detailed<br />
information about recycling of this product, please contact<br />
your local Civic Office, your household waste disposal<br />
service or the shop where you purchased the product.<br />
Disposal of waste batteries (applicable in the<br />
European Union and other European countries with<br />
separate collection systems)<br />
This symbol on the battery or on the packaging<br />
indicates that the battery provided with this<br />
product shall not be treated as household waste.<br />
On certain batteries this symbol might be used in<br />
combination with a chemical symbol. The chemical<br />
symbols for mercury (Hg) or lead (Pb) are added if the<br />
battery contains more than 0.0005% mercury or 0.004%<br />
lead.<br />
By ensuring these batteries are disposed of correctly, you<br />
will help prevent potentially negative consequences for the<br />
environment and human health which could otherwise<br />
be caused by inappropriate waste handling of the battery.<br />
The recycling of the materials will help to conserve natural<br />
resources.<br />
In case of products that for safety, <strong>per</strong>formance or data<br />
integrity reasons require a <strong>per</strong>manent connection with an<br />
incorporated battery, this battery should be replaced by<br />
qualified service staff only. To ensure that the battery will<br />
be treated pro<strong>per</strong>ly, hand over the product at end-of-life to<br />
the applicable collection point for the recycling of electrical<br />
and electronic equipment.<br />
For all other batteries, please view the section on how to<br />
remove the battery from the product safely.<br />
Hand the battery over to the applicable collection point for<br />
the recycling of waste batteries.<br />
For more detailed information about recycling of this<br />
product or battery, please contact your local Civic Office,<br />
your household waste disposal service or the shop where<br />
you purchased the product.<br />
< Notice for the customers in the<br />
countries applying EU Directives ><br />
The manufacturer of this product is <strong>Sony</strong> Corporation,<br />
1-7-1 Konan Minato-ku Tokyo, 108-0075 Japan. The<br />
Authorized Representative for EMC and product safety is<br />
<strong>Sony</strong> Deutschland GmbH, Hedelfinger Strasse 61, 70327<br />
Stuttgart, Germany. For any service or guarantee matters<br />
please refer to the addresses given in separate service or<br />
guarantee documents.<br />
Notes on use<br />
A note about the battery<br />
ˎˎ Depending on the time since the batteries were<br />
manufactured, they may ex<strong>per</strong>ience a shorter life, even<br />
if they were provided as new batteries with this unit. We<br />
recommend having spare batteries. It should be noted<br />
that battery capacity decreases as tem<strong>per</strong>atures drop.<br />
Allow the battery to return to normal room tem<strong>per</strong>ature<br />
to restore the battery to its normal charge.<br />
O<strong>per</strong>ating tem<strong>per</strong>ature<br />
ˎˎ Rapid changes in tem<strong>per</strong>ature cause condensation to<br />
form inside this unit. If you bring this unit directly in<br />
from a cold environment to a warm environment, seal<br />
the unit in a plastic bag while you are outdoors, and<br />
try to extract as much air as you can from inside the<br />
bag. You can remove the unit from the bag when the<br />
air tem<strong>per</strong>ature around the bag has had a chance to<br />
gradually rise.<br />
Other cautions<br />
ˎˎ This unit is not waterproof. If it comes in contact with<br />
water, wipe it dry with a clean cloth and take it to the<br />
nearest <strong>Sony</strong> dealer immediately.<br />
ˎˎ Never attempt to disassemble this unit. Take it to the<br />
nearest <strong>Sony</strong> dealer immediately for repair.<br />
ˎˎ When dirty, this unit may be cleaned with a clean, dry<br />
cloth. Do not allow this unit to come in contact with<br />
alcohol or other chemicals.<br />
ˎˎ Never leave this unit where it may be subjected to<br />
extreme tem<strong>per</strong>atures, such as the glove compartment of<br />
a car, or to high humidity.<br />
ˎˎ Do not touch this unit with wet hands. This may cause<br />
electric shock.<br />
Compatibility<br />
ˎˎ For details about this unit and Interchangeable Lens<br />
Digital Camera compatibility, refer to the following<br />
URL.<br />
http://www.sony.net<br />
Features<br />
The <strong>RMT</strong>-<strong>DSLR2</strong> is a Remote Commander made<br />
especially for the <strong>Sony</strong> Interchangeable Lens Digital<br />
Camera (referred below as “camera”) provided a remote<br />
sensor.<br />
You can o<strong>per</strong>ate the camera using the Remote<br />
Commander.<br />
ˎˎ By o<strong>per</strong>ating the Remote Commander, you can shoot<br />
images and play them back on a TV.*<br />
ˋˋShooting the image<br />
ˋˋPlaying back images<br />
ˋˋEnlarging or reducing the playback images<br />
ˎ ˎ The (Slide show) button easily starts/stops a slide<br />
show on a TV.*<br />
ˎˎ Once you connect the camera to a PictBridge printer,<br />
you can easily print images while viewing them on<br />
the TV by pressing the PRINT button on the Remote<br />
Commander.**<br />
* These functions only work when the camera is<br />
connected to a TV.<br />
** This function only works when the camera is<br />
connected to an HDTV with an HDMI cable.<br />
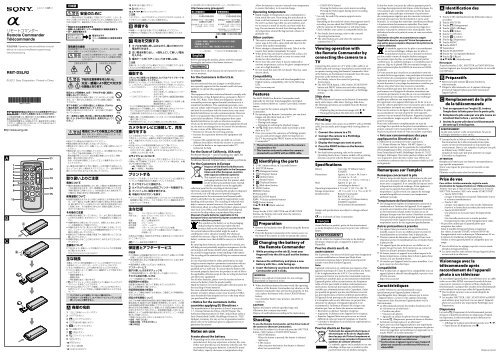
Identifying the parts<br />
1 2 SEC (shutter release in 2 seconds) button<br />
2 SHUTTER button<br />
3 (Histogram) button<br />
4 DISP (Display) button<br />
5 (Index) button<br />
6 (Rotate) button<br />
7 (Playback) button<br />
8 (Slide show) button<br />
9 MENU button<br />
10 PRINT button<br />
11 Transmitter<br />
12 START/STOP button<br />
13 / (Scale up/down) buttons<br />
14 (Delete) button<br />
15 //// (Multi-selector)<br />
Notes<br />
Except for the 2 SEC, SHUTTER and START/STOP<br />
buttons, the buttons only work when the camera is<br />
connected to a TV.<br />
Preparation<br />
ˎˎ<br />
Remove the insulation sheet before using the Remote<br />
Commander.<br />
ˎˎ Point the Remote Commander at the remote sensor on<br />
the front of the camera in order to o<strong>per</strong>ate the camera.<br />
Changing the battery of<br />
the Remote Commander<br />
1 While pressing on the tab , inset your<br />
fingernail into the slit to pull out the battery<br />
case.<br />
2 Remove the old battery and place a new<br />
battery with the + side facing up.<br />
3 Insert the battery case back into the Remote<br />
Commander until it clicks.<br />
WARNING<br />
Battery may explode if mistreated. Do not recharge,<br />
disassemble or dispose of in fire.<br />
ˎˎ When the lithium battery becomes weak, the o<strong>per</strong>ating<br />
distance of the Remote Commander may shorten, or the<br />
Remote Commander may not function pro<strong>per</strong>ly. In this<br />
case, replace the battery with a <strong>Sony</strong> CR2025 lithium<br />
battery.<br />
Use of another battery may present a risk of fire or<br />
explosion.<br />
CAUTION<br />
Replace the battery with the specified type only.<br />
Otherwise, fire or injury may result.<br />
Dispose of used batteries according to the instructions.<br />
Shooting<br />
To use the Remote Commander, set the drive mode of<br />
the camera to [Remote Commander].<br />
Verify that the subject is in focus and press the SHUTTER<br />
button, 2 SEC button or START/STOP button*.<br />
ˋˋSHUTTER button<br />
When the button is pressed, the shutter is released<br />
right away.<br />
ˋˋ2 SEC button<br />
After you press the button, the shutter is released<br />
about two seconds later.<br />
ˋˋSTART/STOP button*<br />
Pressing the button once starts movie recording.<br />
Pressing the button again during movie recording<br />
stops recording.<br />
* Can only be used if the camera supports movie<br />
recording.<br />
Depending on the model of camera that supports movie<br />
recording, you can check the START/STOP o<strong>per</strong>ation<br />
with the camera’s AF illuminator or self-timer lamp.<br />
Check whether your camera is compatible before use.<br />
ˎˎ For details about settings, refer to the camera’s<br />
O<strong>per</strong>ating Instructions.<br />
ˎˎ The other buttons are used when the camera is<br />
connected to a TV.<br />
Viewing o<strong>per</strong>ation with<br />
the Remote Commander by<br />
connecting the camera to a<br />
TV<br />
Connecting the camera to a TV with a video cable or an<br />
HDMI cable and turning to the playback mode enable you<br />
to o<strong>per</strong>ate viewing using the Remote Commander. Most<br />
of the buttons on the Remote Commander have the same<br />
functions as the buttons on the camera.<br />
ˎˎ For details, refer to the camera’s O<strong>per</strong>ating<br />
Instructions.<br />
ˎˎ The SHUTTER button, 2 SEC button, START/STOP<br />
button and PRINT button are used when shooting<br />
the image or the camera is connected to a PictBridge<br />
printer.<br />
Slide show<br />
The (Slide show) button on the Remote Commander<br />
easily starts/stops a slide show. During a slide show,<br />
the following o<strong>per</strong>ations are available from the Remote<br />
Commander.<br />
ˋˋDisplaying the previous/next image with / .<br />
ˋˋPausing/playing back the slide show with .<br />
Printing<br />
Once you connect the camera to an HDTV with an HDMI<br />
cable, you can easily print images while viewing them on<br />
the TV.<br />
1 Connect the camera to a TV.<br />
2 Connect the camera to a PictBridge<br />
compliant printer.<br />
3 Display the image you want to print.<br />
4 Press the PRINT button on the Remote<br />
Commander.<br />
ˎˎ For details about printing, refer to the camera’s<br />
O<strong>per</strong>ating Instructions. Camera models with a printing<br />
function can print with the Remote Commander.<br />
Specifications<br />
Battery<br />
Coin type 3V lithium battery<br />
(CR2025)<br />
Dimensions Approx. 41.5 mm × 94.5 mm ×<br />
13.5 mm (w / h / d)<br />
(1 11/16 in. × 3 3/4 in. × 9/16 in.)<br />
Mass<br />
Approx. 27 g (1 oz)<br />
(excluding the battery)<br />
O<strong>per</strong>ating tem<strong>per</strong>ature 0 ˚C to 40 ˚C (32 ˚F to 104 ˚F)<br />
Storage tem<strong>per</strong>ature<br />
Included items<br />
-20 ˚C to +60 ˚C (-4 ˚F to +140 ˚F)<br />
Remote Commander<br />
<strong>RMT</strong>-<strong>DSLR2</strong> (1)<br />
(A coin type 3V lithium battery<br />
(CR2025) installed)<br />
Set of printed documentation<br />
Design and specifications are subject to change without<br />
notice.<br />
is a trademark of <strong>Sony</strong> Corporation.<br />
Avant d’utiliser ce produit, prière de lire attentivement<br />
ce mode d’emploi et de le conserver pour toute référence<br />
future.<br />
AVERTISSEMENT<br />
Afin de réduire les risques d’incendie ou de décharge<br />
électrique, n’exposez pas cet appareil à la pluie ou à<br />
l’humidité.<br />
Pour les clients aux É.-U.<br />
AVERTISSEMENT<br />
Par la présente, vous êtes avisé du fait que tout changement<br />
ou toute modification ne faisant pas l’objet d’une<br />
autorisation expresse dans le présent manuel pourrait<br />
annuler votre droit d’utiliser l’appareil.<br />
Note:<br />
L’appareil a été testé et est conforme aux exigences d’un<br />
appareil numérique de Classe B, conformément à la Partie<br />
15 de la réglementation de la FCC. Ces critères sont<br />
conçus pour fournir une protection raisonnable contre les<br />
interférences nuisibles dans un environnement résidentiel.<br />
L’appareil génère, utilise et peut émettre des fréquences<br />
radio; s’il n’est pas installé et utilisé conformément aux<br />
instructions, il pourrait provoquer des interférences<br />
nuisibles aux communications radio. Cependant, il n’est<br />
pas possible de garantir que des interférences ne seront<br />
pas provoquées dans certaines conditions particulières.<br />
Si l’appareil devait provoquer des interférences nuisibles<br />
à la réception radio ou à la télévision, ce qui peut être<br />
démontré en allumant et éteignant l’appareil, il est<br />
recommandé à l’utilisateur d’essayer de corriger cette<br />
situation par l’une ou l’autre des mesures suivantes :<br />
ˋˋRéorienter ou déplacer l’antenne réceptrice.<br />
ˋˋAugmenter la distance entre l’appareil et le récepteur.<br />
ˋˋBrancher l’appareil dans une prise ou sur un circuit<br />
différent de celui sur lequel le récepteur est branché.<br />
ˋˋConsulter le détaillant ou un technicien expérimenté en<br />
radio/téléviseurs.<br />
Pour les clients en Europe<br />
Traitement des appareils électriques et<br />
électroniques en fin de vie (Applicable<br />
dans les pays de l’Union Européenne et<br />
aux autres pays européens disposant de<br />
systèmes de collecte sélective)<br />
Ce symbole, apposé sur le produit ou sur son<br />
emballage, indique que ce produit ne doit<br />
pas être traité avec les déchets ménagers.<br />
Il doit être remis à un point de collecte approprié pour le<br />
recyclage des équipements électriques et électroniques. En<br />
vous assurant que ce produit sont mis au rebut de façon<br />
appropriée, vous participez activement à la prévention<br />
des conséquences négatives que leur mauvais traitement<br />
pourrait provoquer sur l’environnement et sur la santé<br />
humaine. Le recyclage des matériaux contribue par ailleurs<br />
à la préservation des ressources naturelles. Pour toute<br />
information complémentaire au sujet du recyclage de ce<br />
produit, vous pouvez contacter votre municipalité, votre<br />
déchetterie locale ou le point de vente où vous avez acheté<br />
le produit.<br />
Elimination des piles et accumulateurs usagés<br />
(Applicable dans les pays de l’Union Européenne et<br />
aux autres pays européens disposant de systèmes de<br />
collecte sélective)<br />
Ce symbole, apposé sur les piles et accumulateurs<br />
ou sur les emballages, indique que les piles et<br />
accumulateurs fournis avec ce produit ne doivent<br />
pas être traités comme de simples déchets ménagers.<br />
Sur certains types de piles, ce symbole apparaît parfois<br />
combiné avec un symbole chimique. Les symboles pour le<br />
mercure (Hg) ou le plomb (Pb) sont rajoutés lorsque ces<br />
piles contiennent plus de 0,0005% de mercure ou 0,004%<br />
de plomb.<br />
En vous assurant que ces piles et accumulateurs sont mis<br />
au rebut de façon appropriée, vous participez activement à<br />
la prévention des conséquences négatives que leur mauvais<br />
traitement pourrait provoquer sur l’environnement et sur<br />
la santé humaine. Le recyclage des matériaux contribue par<br />
ailleurs à la préservation des ressources naturelles.<br />
Pour les produits qui pour des raisons de sécurité, de<br />
<strong>per</strong>formance ou d’intégrité de données nécessitent une<br />
connexion <strong>per</strong>manente à une pile ou à un accumulateur,<br />
il conviendra de vous rapprocher d’un service technique<br />
qualifié pour effectuer son remplacement.<br />
En rapportant votre appareil électrique en fin de vie à un<br />
point de collecte approprié vous vous assurez que la pile ou<br />
l’accumulateur incorporé sera traité correctement.<br />
Pour tous les autres cas de figure et afin d’enlever les piles<br />
ou accumulateurs en toute sécurité de votre appareil,<br />
reportez-vous au manuel d’utilisation. Rapportez les piles<br />
ou accumulateurs usagés au point de collecte approprié<br />
pour le recyclage.<br />
Pour toute information complémentaire au sujet du<br />
recyclage de ce produit ou des piles et accumulateurs, vous<br />
pouvez contacter votre municipalité, votre déchetterie<br />
locale ou le point de vente où vous avez acheté ce produit.<br />
< Avis aux consommateurs des pays<br />
appliquant les Directives UE ><br />
Le fabricant de ce produit est <strong>Sony</strong> Corporation,<br />
1-7-1 Konan Minato-ku Tokyo, 108-0075 Japon. Le<br />
représentant autorisé pour les questions de compatibilité<br />
électromagnétique (EMC) et la sécurité des produits est<br />
<strong>Sony</strong> Deutschland GmbH, Hedelfinger Strasse 61, 70327<br />
Stuttgart, Allemagne. Pour toute question relative au SAV<br />
ou à la garantie, merci de bien vouloir vous référer aux<br />
coordonnées contenues dans les documents relatifs au SAV<br />
ou la garantie.<br />
Remarques sur l’emploi<br />
Remarque concernant la pile<br />
ˎˎ Selon le temps écoulé depuis sa fabrication, la pile peut<br />
avoir une autonomie réduite, bien qu’elle ait été livrée<br />
neuve avec cet appareil. Il est conseillé de toujours avoir<br />
à disposition des piles de rechange. Il faut également<br />
savoir que la capacité d’une pile décroît à basse<br />
température. La pile revient à sa capacité de recharge<br />
normale lorsqu’elle est revenue à une température<br />
ambiante normale.<br />
Température de fonctionnement<br />
ˎˎ Des changements rapides de température causent de la<br />
condensation à l’intérieur de l’appareil. Si cet appareil<br />
est porté sans transition d’un environnement froid dans<br />
un environnement chaud, mettez-le dans un sac en<br />
plastique lorsque vous êtes encore à l’extérieur et essayez<br />
d’extraire la plus grande quantité d’air possible du sac.<br />
Vous pouvez retirer l’appareil du sac après avoir laissé la<br />
température autour du sac augmenter graduellement.<br />
Autres précautions à prendre<br />
ˎˎ Cet appareil n’est pas étanche à l’eau. S’il devait être<br />
mouillé, essuyez-le avec un chiffon propre et portez-le<br />
immédiatement au revendeur <strong>Sony</strong> le plus proche.<br />
ˎˎ N’essayez jamais de démonter cet appareil. Pour toute<br />
réparation portez-le immédiatement au revendeur <strong>Sony</strong><br />
le plus proche.<br />
ˎˎ Cet appareil peut être nettoyé avec un chiffon sec et<br />
propre lorsqu’il est sale. Ne le mettez pas au contact de<br />
l’alcool ou d’autres produits chimiques.<br />
ˎˎ Ne laissez jamais cet appareil à un endroit exposé à de<br />
hautes températures, comme dans la boîte à gants d’une<br />
voiture, ni à une humidité élevée.<br />
ˎˎ Ne touchez pas l’appareil avec les mains mouillées. Ceci<br />
peut causer un choc électrique.<br />
Compatibilité<br />
ˎˎ Pour le détail sur cet appareil et sa compatibilité avec un<br />
appareil photo à objectif interchangeable, reportez-vous<br />
à l’URL suivante.<br />
http://www.sony.net<br />
Caractéristiques<br />
La <strong>RMT</strong>-<strong>DSLR2</strong> est une télécommande conçue<br />
spécialement pour l’appareil photo à objectif<br />
interchangeable <strong>Sony</strong> (désigné ci-dessous par le terme<br />
« l’appareil photo ») pourvu d’un capteur infrarouge.<br />
Vous pouvez faire fonctionner l’appareil photo avec la<br />
télécommande.<br />
ˎˎ La télécommande <strong>per</strong>met de prendre des photos et de<br />
les visionner sur un téléviseur.*<br />
ˋˋPrendre une photo<br />
ˋˋVisionner des photos<br />
ˋˋAgrandir ou réduire les photos lors du visionnage<br />
ˎ ˎ La touche (Diaporama) <strong>per</strong>met de lancer et d’arrêter<br />
facilement un diaporama sur un téléviseur.*<br />
ˎˎ Après avoir raccordé l’appareil photo à une imprimante<br />
PictBridge, vous pouvez facilement imprimer des photos<br />
tout en les regardant sur le téléviseur en appuyant sur la<br />
touche PRINT de la télécommande.**<br />
* Ces fonctions n’agissent que lorsque l’appareil<br />
photo est raccordé à un téléviseur.<br />
** Ces fonctions n’agissent que lorsque l’appareil<br />
photo est raccordé à un téléviseur HD avec un<br />
câble HDMI.<br />
Identification des<br />
éléments<br />
1 Touche 2 SEC (déclenchement de l’obturateur dans 2<br />
secondes)<br />
2 Touche SHUTTER<br />
3 Touche (Histogramme)<br />
4 Touche DISP (Affichage)<br />
5 Touche (Index)<br />
6 Touche (Pivoter)<br />
7 Touche (Lecture)<br />
8 Touche (Diaporama)<br />
9 Touche MENU<br />
10 Touche PRINT<br />
11 Tansmetteur<br />
12 Touche START/STOP<br />
13 Touche / (Agrandir/Réduire)<br />
14 Touche (Effacer)<br />
15 //// (Multisélecteur)<br />
Remarques<br />
À part les touches 2 SEC, SHUTTER et START/STOP, les<br />
touches n’agissent que lorsque l’appareil photo est raccordé<br />
à un téléviseur.<br />
Préparatifs<br />
ˎˎ<br />
Retirez la feuille isolante avant d’utiliser la<br />
télécommande.<br />
ˎˎ Dirigez la télécommande vers le capteur infrarouge<br />
à l’avant de l’appareil photo pour faire fonctionner<br />
l’appareil photo.<br />
Remplacement de la pile<br />
de la télécommande<br />
1 Tout en appuyant sur l’onglet , insérez<br />
l’ongle dans la fente pour tirer le porte-pile.<br />
2 Remplacez la pile usée par une pile neuve en<br />
orientant bien la face + vers le haut.<br />
3 Insérez le porte-pile dans la télécommande<br />
de sorte qu’il s’encliquette.<br />
AVERTISSEMENT<br />
La pile peut exploser si elle est mal utilisée. Ne pas la<br />
recharger, démonter ni jeter au feu.<br />
ˎˎ Lorsque la pile au lithium est faible, la distance de<br />
fonctionnement de la télécommande devient plus<br />
courte ou bien la télécommande ne fonctionne pas<br />
correctement. Dans ce cas, remplacez la pile par une pile<br />
au lithium <strong>Sony</strong> CR2025 neuve.<br />
L’emploi de toute autre pile peut présenter un risque<br />
d’incendie ou d’explosion.<br />
ATTENTION<br />
Remplacez la batterie par une batterie correspondant au<br />
type spécifié uniquement.<br />
Sinon vous risquez de provoquer un incendie ou des<br />
blessures.<br />
Éliminez vos piles usées selon les instructions.<br />
Prise de vue<br />
Pour utiliser la télécommande, réglez le mode<br />
d’activation de l’appareil photo sur [Télécommande].<br />
Assurez-vous que le sujet est net et appuyez sur la touche<br />
SHUTTER, la touche 2 SEC ou la touche START/STOP*.<br />
ˋˋTouche SHUTTER<br />
Lorsque le déclencheur est pressé, l’obturateur s’ouvre<br />
et se ferme immédiatement.<br />
ˋˋTouche 2 SEC<br />
Lorsque vous appuyez sur cette touche, l’obturateur<br />
s’ouvre et se ferme deux secondes plus tard environ.<br />
ˋˋTouche START/STOP*<br />
Une pression sur la touche lance l’enregistrement<br />
vidéo.<br />
Une nouvelle pression sur la touche pendant<br />
l’enregistrement vidéo arrête l’enregistrement vidéo.<br />
* Ne peut être utilisé que si l’appareil photo peut<br />
enregistrer des vidéos.<br />
Selon le modèle de l’appareil photo enregistrant<br />
des vidéos, la marche (START) et l’arrêt (STOP) de<br />
l’enregistrement sont confirmés par l’illuminateur AF ou<br />
le témoin de retardateur de l’appareil photo.<br />
Vérifiez si votre appareil photo est compatible pour cet<br />
usage.<br />
ˎˎ Pour le détail sur les réglages, reportez-vous au mode<br />
d’emploi de l’appareil photo.<br />
ˎˎ Les autres touches sont utilisées lorsque l’appareil photo<br />
est raccordé à un téléviseur.<br />
Visionnage avec la<br />
télécommande après<br />
raccordement de l’appareil<br />
photo à un téléviseur<br />
En raccordant l’appareil photo à un téléviseur avec un câble<br />
vidéo ou un câble HDMI et activant le mode de lecture<br />
vous pouvez visionner vos photos et films à l’aide de la<br />
télécommande. La plupart des touches de la télécommande<br />
ont les mêmes fonctions que celles de l’appareil photo.<br />
ˎˎ Pour le détail, reportez-vous au mode d’emploi de<br />
l’appareil photo.<br />
ˎˎ Les touches SHUTTER, 2 SEC, START/STOP et PRINT<br />
sont utilisées pour la prise de vue ou, quand l’appareil<br />
photo est raccordé à une imprimante PictBridge, pour<br />
l’impression.<br />
Diaporama<br />
La touche (Diaporama) de la télécommande <strong>per</strong>met<br />
de lancer et d’arrêter facilement un diaporama. Pendant<br />
un diaporama, la télécommande <strong>per</strong>met d’effectuer les<br />
opérations suivantes.<br />
ˋˋAffichage de la photo précédente/suivante avec / .<br />
ˋˋPause/lecture du diaporama avec .<br />
(Suite au recto)
(Suite au recto)<br />
Impression<br />
Lorsque l’appareil photo est raccordé à un téléviseur HD<br />
avec un câble HDMI, vous pouvez facilement imprimer<br />
des photos tout en les regardant sur le téléviseur.<br />
1 Raccordez l’appareil photo au téléviseur.<br />
2 Raccordez l’appareil photo à une<br />
imprimante compatible PictBridge.<br />
3 Affichez la photo que vous voulez imprimer.<br />
4 Appuyez sur la touche PRINT de la<br />
télécommande.<br />
Pour le détail sur l’impression, reportez-vous au mode<br />
ˎˎ<br />
d’emploi de l’appareil photo. Les modèles d’appareils<br />
photo avec fonction d’impression <strong>per</strong>mettent<br />
d’imprimer avec la télécommande.<br />
Spécifications<br />
Pile<br />
Pile bouton au lithium 3 V (CR2025)<br />
Dimensions<br />
Environ 41,5 mm × 94,5 mm × 13,5 mm<br />
(l/h/p)<br />
(1 11/16 po. × 3 3/4 po. × 9/16 po.)<br />
Poids<br />
Environ 27 g (1 oz)<br />
(sans pile)<br />
Température de<br />
fonctionnement<br />
0 ˚C à 40 ˚C (32 ˚F à 104 ˚F)<br />
Température<br />
d’entreposage<br />
-20 ˚C à +60 ˚C (-4 ˚F à +140 ˚F)<br />
Articles inclus Télécommande <strong>RMT</strong>-<strong>DSLR2</strong> (1)<br />
(Une pile bouton au lithium 3 V<br />
(CR2025 en place))<br />
Jeu de documents imprimés<br />
La conception et les spécifications peuvent être modifiées<br />
sans préavis.<br />
est une marque commerciale de <strong>Sony</strong> Corporation.<br />
Antes de poner en funcionamiento el producto, lea<br />
detalladamente todo este manual y guárdelo para poderlo<br />
consultar en el futuro.<br />
AVISO<br />
Para reducir el riesgo de incendio o descarga eléctrica, no<br />
exponga la unidad a la lluvia ni a la humedad.<br />
POR FAVOR LEA DETALLADAMENTE ESTE MANUAL<br />
DE INSTRUCCIONES ANTES DE CONECTAR Y<br />
OPERAR ESTE EQUIPO.<br />
RECUERDE QUE UN MAL USO DE SU APARATO<br />
PODRÍA ANULAR LA GARANTÍA.<br />
Para los clientes en Europa<br />
Tratamiento de los equipos eléctricos y<br />
electrónicos al final de su vida útil<br />
(aplicable en la Unión Europea y en<br />
países europeos con sistemas de<br />
tratamiento selectivode residuos)<br />
Este símbolo en el equipo o en su embalaje<br />
indica que el presente producto no puede ser<br />
tratado como residuos doméstico normal.<br />
Debe entregarse en el correspondiente punto de recogida<br />
de equipos eléctricos y electrónicos. Al asegurarse de<br />
que este producto se desecha correctamente, usted ayuda<br />
a prevenir las consecuencias potencialmente negativas<br />
para el medio ambiente y la salud humana que podrían<br />
derivarse de la incorrecta manipulación en el momento<br />
de deshacerse de este producto. El reciclaje de materiales<br />
ayuda a conservar los recursos naturales. Para recibir<br />
información detallada sobre el reciclaje de este producto,<br />
póngase en contacto con el ayuntamiento, el punto de<br />
recogida más cercano o el establecimiento donde ha<br />
adquirido el producto.<br />
Tratamiento de las baterías al final de su vida útil<br />
(aplicable en la Unión Europea y en países europeos<br />
con sistemas de tratamiento selectivo de residuos)<br />
Este símbolo en la batería o en el embalaje indica<br />
que la batería proporcionada con este producto no<br />
puede ser tratada como un residuo doméstico<br />
normal.<br />
En algunas baterías este símbolo puede utilizarse en<br />
combinación con un símbolo químico. El símbolo químico<br />
del mercurio (Hg) o del plomo (Pb) se añadirá si la batería<br />
contiene más del 0,0005% de mercurio o del 0,004% de<br />
plomo.<br />
Al asegurarse de que estas baterías se desechan<br />
correctamente, usted ayuda a prevenir las consecuencias<br />
potencialmente negativas para el medio ambiente y la<br />
salud humana que podrían derivarse de la incorrecta<br />
manipulación en el momento de deshacerse de la batería.<br />
El reciclaje de materiales ayuda a conservar los recursos<br />
naturales.<br />
En el caso de productos que por razones de seguridad,<br />
rendimiento o mantenimiento de datos sea necesaria una<br />
conexión <strong>per</strong>manente con la batería incorporada, esta<br />
batería solo deberá ser reemplazada por <strong>per</strong>sonal técnico<br />
cualificado para ello.<br />
Para asegurarse de que la batería será tratada<br />
correctamente, entregue el producto al final de su vida<br />
útil en un punto de recogida para el reciclado de aparatos<br />
eléctricos y electrónicos.<br />
Para las demás baterías, consulte la sección donde se<br />
indica cómo extraer la batería del producto de forma<br />
segura. Deposite la batería en el correspondiente punto de<br />
recogida para el reciclado de baterías.<br />
Para recibir información detallada sobre el reciclaje de<br />
este producto o de la batería, póngase en contacto con<br />
el ayuntamiento, el punto de recogida más cercano o el<br />
establecimiento donde ha adquirido el producto.<br />
< Aviso para los clientes de países en los<br />
que se aplican las directivas de la UE ><br />
El fabricante de este producto es <strong>Sony</strong> Corporation, 1-7-1<br />
Konan Minato-ku Tokyo, 108-0075 Japón. El epresentante<br />
autorizado para EMC y seguridad en el producto es<br />
<strong>Sony</strong> Deutschland GmbH, Hedelfinger Strasse 61, 70327<br />
Stuttgart, Alemania. Para cualquier asunto relacionado con<br />
servicio o garantía por favor diríjase a la dirección indicada<br />
en los documentos de servicio o garantía adjuntados con<br />
el producto.<br />
Notas sobre la utilización<br />
Nota acerca de la pila<br />
Dependiendo del tiempo transcurrido desde la<br />
ˎˎ<br />
fabricación de las pilas, su duración puede ser más<br />
corta, incluso aunque se suministren como nuevas con<br />
esta unidad. Le recomendamos que tenga a mano pilas<br />
de repuesto. Tenga en cuenta que la capacidad de las<br />
pilas se reducirá a medida que descienda la tem<strong>per</strong>atura.<br />
Deje que la pila vuelva a la tem<strong>per</strong>atura ambiental<br />
normal para que se restablezca su carga normal.<br />
Tem<strong>per</strong>atura de funcionamiento<br />
Los cambios rápidos de la tem<strong>per</strong>atura causarán la<br />
ˎˎ<br />
condensación en el interior de esta unidad. Si traslada<br />
esta unidad directamente de un entorno frío a otro<br />
cálido, séllela en una bolsa de plástico cuando se<br />
encuentre en exteriores, y trate de extraer al máximo el<br />
aire del interior de la bolsa. Después podrá extraer la<br />
unidad de la bolsa cuando la tem<strong>per</strong>atura del entorno de<br />
la bolsa haya podido aumentar gradualmente.<br />
Otras precauciones<br />
Esta unidad no es resistente al agua. Si entra en contacto<br />
ˎˎ<br />
con el agua, séquela con un paño limpio y llévela<br />
inmediatamente a su proveedor <strong>Sony</strong> más cercano.<br />
No intente nunca desarmar la unidad. En caso de<br />
ˎˎ<br />
necesitar reparación, llévela inmediatamente a su<br />
proveedor <strong>Sony</strong> más cercano.<br />
Cuando la unidad se ensucie, frótela con un paño limpio<br />
ˎˎ<br />
y seco. No <strong>per</strong>mita que esta unidad entre en contacto<br />
con alcohol ni otros productos químicos.<br />
No <strong>per</strong>mita nunca que esta unidad se vea sometida a<br />
ˎˎ<br />
tem<strong>per</strong>aturas extremadas, dejándola en lugares tales<br />
como la guantera de un automóvil, ni a gran humedad.<br />
No toque esta unidad con las manos húmedas. Podría<br />
ˎˎ<br />
recibir una descarga eléctrica.<br />
Compatibilidad<br />
Con respecto a los detalles sobre esta unidad y la cámara<br />
ˎˎ<br />
digital de lentes intercambiables, consulte la dirección<br />
URL siguiente.<br />
http://www.sony.net<br />
Características<br />
El <strong>RMT</strong>-<strong>DSLR2</strong> es un controlador remoto diseñado<br />
especialmente para la cámara digital de lentes<br />
intercambiables <strong>Sony</strong> (a partir de ahora “cámara”) provista<br />
de sensor de controlador remoto.<br />
Puede utilizar la cámara con el controlador remoto.<br />
Mediante el controlador remoto, es posible tomar<br />
ˎˎ<br />
fotografías y reproducirlas en un televisor.*<br />
ˋˋToma de fotografía<br />
ˋˋReproducción de imágenes<br />
ˋˋAmpliación o reducción de las imágenes<br />
reproducidas<br />
El botón<br />
ˎ<br />
ˎ (Diapositivas) <strong>per</strong>mite iniciar/detener<br />
fácilmente un pase de diapositivas en su televisor.*<br />
Una vez conectada su cámara a una impresora<br />
ˎˎ<br />
PictBridge, es fácil imprimir imágenes al mismo tiempo<br />
que las visualiza en un televisor pulsando el botón<br />
PRINT del controlador remoto.**<br />
* Estas funciones solamente están o<strong>per</strong>ativas<br />
cuando la cámara está conectada a un televisor.<br />
** Esta función solamente está o<strong>per</strong>ativa cuando<br />
la cámara esté conectada a un televisor de alta<br />
definición con un cable HDMI.<br />
Identificación de los<br />
componentes<br />
1 Botón 2 SEC (liberación del obturador en 2 segundos)<br />
2 Botón SHUTTER<br />
3 Botón (Histograma)<br />
4 Botón DISP (Visualizar)<br />
5 Botón (Índice)<br />
6 Botón (Rotar)<br />
7 Botón (Reproducción)<br />
8 Botón (Diapositivas)<br />
9 Botón MENU<br />
10 Botón PRINT<br />
11 Transmisor<br />
12 Botón START/STOP<br />
13 Botones / (Aumentar/reducir escala)<br />
14 Botón (Borrar)<br />
15 //// (Multiselector)<br />
Notas<br />
A excepción de los botones 2 SEC, SHUTTER y START/<br />
STOP , los botones sólo funcionan cuando la cámara está<br />
conectada a un televisor.<br />
Preparativos<br />
Quite la hoja de aislamiento<br />
ˎ<br />
ˎ<br />
antes de utilizar el<br />
controlador remoto.<br />
Apunte el controlador remoto hacia el sensor de<br />
ˎˎ<br />
controlador remoto de la parte delantera de la cámara<br />
para manejar la cámara.<br />
Sustitución de la pila del<br />
controlador remoto<br />
1 Mientras presiona la lengüeta , inserte su<br />
uña en la ranura para extraer la carcasa de la<br />
pila.<br />
2 Extraiga la pila gastada y coloque una nueva<br />
con el lado + orientado hacia arriba.<br />
3 Vuelva a insertar la carcasa de la pila en el<br />
controlador remoto hasta que encaje con un<br />
clic.<br />
ADVERTENCIA<br />
La pila puede explotar si se utiliza mal. No la recargue,<br />
desmonte, ni la tire al fuego.<br />
Si la pila de litio se debilita, puede acortarse la distancia<br />
ˎˎ<br />
de funcionamiento del controlador remoto, o puede que<br />
el controlador remoto no funcione correctamente. En tal<br />
caso, sustituya la pila por otra de litio CR2025 <strong>Sony</strong>.<br />
Si utiliza otra pila, puede existir el riesgo de que se<br />
produzca un incendio o explosión.<br />
PRECAUCIÓN<br />
Sustituya la batería únicamente por otra del tipo<br />
especificado.<br />
De lo contrario, es posible que se produzcan incendios o<br />
lesiones.<br />
Tire las pilas agotadas de acuerdo con las instrucciones.<br />
Toma de imágenes<br />
Para utilizar el controlador remoto, ajuste el modo de<br />
o<strong>per</strong>ación de la cámara a [Controlador remoto].<br />
Verifique que el motivo esté enfocado y pulse el botón<br />
SHUTTER, 2 SEC, o START/STOP*.<br />
ˋˋBotón SHUTTER<br />
Cuando se pulsa el botón, el obturador se libera<br />
directamente.<br />
ˋˋBotón 2 SEC<br />
Después de pulsar el botón, el obturador se liberará<br />
unos dos segundos más tarde.<br />
ˋˋBotón START/STOP*<br />
Al pulsar una vez el botón, se iniciará la grabación de<br />
películas.<br />
Al pulsar de nuevo el botón durante la grabación de<br />
películas, ésta se detendrá.<br />
* Solamente podrá utilizarse si la cámara admite la<br />
grabación de películas.<br />
Dependiendo del modelo de cámara que admita la<br />
grabación de películas, podrá comprobar la o<strong>per</strong>ación de<br />
START/STOP con el iluminador de AF o la lámpara del<br />
autodisparador de la cámara.<br />
Compruebe si la cámara es compatible antes de utilizar.<br />
Con respecto a los ajustes, consulte el manual de<br />
ˎˎ<br />
instrucciones de la cámara.<br />
Los demás botones se utilizan cuando la cámara está<br />
ˎˎ<br />
conectada a un televisor.<br />
Visualización de la o<strong>per</strong>ación<br />
con el controlador remoto<br />
conectando la cámara a un<br />
televisor<br />
Si conecta la cámara a un televisor con un cable de vídeo<br />
o un cable HDMI y la pone en el modo de reproducción,<br />
podrá visualizar imágenes con el controlador remoto. La<br />
mayoría de los botones del controlador remoto tienen las<br />
mismas funciones que los de la cámara.<br />
Para obtener información detallada, consulte el manual<br />
ˎˎ<br />
de instrucciones de la cámara.<br />
Los botones SHUTTER, 2 SEC, START/STOP, y PRINT<br />
ˎˎ<br />
se utilizan al tomar una fotografía o cuando la cámara<br />
está conectada a una impresora PictBridge.<br />
Diapositivas<br />
El botón<br />
(Diapositivas) del controlador remoto <strong>per</strong>mite<br />
iniciar/detener fácilmente un pase de diapositivas. Durante<br />
un pase de diapositivas, están disponibles las o<strong>per</strong>aciones<br />
siguientes desde el controlador remoto.<br />
ˋˋVisualización de la imagen anterior/siguiente con<br />
/ .<br />
ˋˋPoner en pausa/reproducir el pase de diapositivas<br />
con .<br />
Impresión<br />
Tras conectar cámara a un un televisor de alta definición<br />
con un cable HDMI, se pueden imprimir imágenes<br />
fácilmente mientras se visualizan en el televisor.<br />
1 Conecte la cámara a un televisor.<br />
2 Conecte la cámara a una impresora<br />
compatible con PictBridge.<br />
3 Visualice la imagen que desee imprimir.<br />
4 Pulse el botón PRINT del controlador<br />
remoto.<br />
Para obtener más información acerca de la impresión,<br />
ˎˎ<br />
consulte el manual de instrucciones de la cámara. Los<br />
modelos de cámaras con función de impresión podrán<br />
imprimir con el controlador remoto.<br />
Especificaciones<br />
Pila<br />
Pila de litio de cc 3 V de tipo botón<br />
(CR2025)<br />
Dimensiones<br />
Aprox. 41,5 mm × 94,5 mm × 13,5 mm<br />
(an/al/prf)<br />
Peso<br />
Aprox. 27 g<br />
(excluida la pila)<br />
Tem<strong>per</strong>atura de<br />
funcionamiento<br />
entre 0 ˚C y 40 ˚C<br />
Tem<strong>per</strong>atura de<br />
almacenamiento<br />
entre -20 ˚C y +60 ˚C<br />
Elementos<br />
incluidos<br />
Controlador remoto <strong>RMT</strong>-<strong>DSLR2</strong> (1)<br />
(La pila de litio de cc 3 V de tipo botón<br />
(CR2025) ya viene instalada)<br />
Juego de documentación impresa<br />
El diseño y las especificaciones están sujetos a cambio sin<br />
previo aviso.<br />
es una marca comercial de <strong>Sony</strong> Corporation.<br />
Vor dem Betrieb dieses Produkts lesen Sie die<br />
Bedienungsanleitung gründlich durch und bewahren sie<br />
zum Nachschlagen auf.<br />
WARNUNG<br />
Um Feuergefahr und die Gefahr eines elektrischen Schlags<br />
zu verringern, setzen Sie das Gerät weder Regen noch<br />
Feuchtigkeit aus.<br />
Für Kunden in Europa<br />
Entsorgung von gebrauchten<br />
elektrischen und elektronischen<br />
Geräten (anzuwenden in den Ländern<br />
der Europäischen Union und anderen<br />
europäischen Ländern mit einem<br />
separaten Sammelsystem für diese<br />
Geräte)<br />
Das Symbol auf dem Produkt oder seiner<br />
Verpackung weist darauf hin, dass dieses Produkt nicht<br />
als normaler Haushaltsabfall zu behandeln ist, sondern an<br />
einer Annahmestelle für das Recycling von elektrischen<br />
und elektronischen Geräten abgegeben werden muss.<br />
Durch Ihren Beitrag zum korrekten Entsorgen dieses<br />
Produkts schützen Sie die Umwelt und die Gesundheit<br />
Ihrer Mitmenschen. Umwelt und Gesundheit werden<br />
durch falsches Entsorgen gefährdet. Materialrecycling<br />
hilft, den Verbrauch von Rohstoffen zu verringern. Weitere<br />
Informationen zum Recycling dieses Produkts erhalten<br />
Sie bei Ihrer Gemeindeverwaltung, den kommunalen<br />
Entsorgungsbetrieben oder dem Geschäft, in dem Sie das<br />
Produkt gekauft haben.<br />
Entsorgung von gebrauchten Batterien und Akkus<br />
(anzuwenden in den Ländern der Europäischen<br />
Union und anderen europäischen Ländern mit einem<br />
separaten Sammelsystem für diese Produkte)<br />
Das Symbol auf der Batterie/dem Akku oder der<br />
Verpackung weist darauf hin, dass diese nicht als<br />
normaler Haushaltsabfall zu behandeln sind.<br />
Ein zusätzliches chemisches Symbol Pb (Blei) oder Hg<br />
(Quecksilber) unter der durchgestrichenen Mülltonne<br />
bedeutet, dass die Batterie/der Akku einen Anteil von<br />
mehr als 0,0005% Quecksilber oder 0,004% Blei enthält.<br />
Durch Ihren Beitrag zum korrekten Entsorgen<br />
dieser Batterien/Akkus schützen Sie die Umwelt und<br />
die Gesundheit Ihrer Mitmenschen. Umwelt und<br />
Gesundheit werden durch falsches Entsorgen gefährdet.<br />
Materialrecycling hilft, den Verbrauch von Rohstoffen zu<br />
verringern.<br />
Bei Produkten, die auf Grund ihrer Sicherheit, der<br />
Funktionalität oder als Sicherung vor Datenverlust eine<br />
ständige Verbindung zur eingebauten Batterie benötigen,<br />
sollte die Batterie nur durch qualifiziertes Service<strong>per</strong>sonal<br />
ausgetauscht werden.<br />
Um sicherzustellen, dass die Batterie korrekt entsorgt<br />
wird, geben Sie das Produkt zwecks Entsorgung an einer<br />
Annahmestelle für das Recycling von elektrischen und<br />
elektronischen Geräten ab.<br />
Für alle anderen Batterien entnehmen Sie die Batterie bitte<br />
entsprechend dem Kapitel über die sichere Entfernung der<br />
Batterie. Geben Sie die Batterie an einer Annahmestelle für<br />
das Recycling von Batterien/Akkus ab.<br />
Weitere Informationen über das Recycling dieses Produkts<br />
oder der Batterie erhalten Sie von Ihrer Gemeinde, den<br />
kommunalen Entsorgungsbetrieben oder dem Geschäft, in<br />
dem Sie das Produkt gekauft haben.<br />
Für Kunden in Deutschland<br />
Entsorgungshinweis: Bitte werfen Sie nur entladene<br />
Batterien in die Sammelboxen beim Handel oder den<br />
Kommunen. Entladen sind Batterien in der Regel dann,<br />
wenn das Gerät abschaltet und signalisiert „Batterie leer“<br />
oder nach längerer Gebrauchsdauer der Batterien „nicht<br />
mehr einwandfrei funktioniert“. Um sicherzugehen, kleben<br />
Sie die Batteriepole z.B. mit einem Klebestreifen ab oder<br />
geben Sie die Batterien einzeln in einen Plastikbeutel.<br />
< Hinweis für Kunden in Ländern, in<br />
denen EU-Richtlinien gelten ><br />
Der Hersteller dieses Produktes ist <strong>Sony</strong> Corporation,<br />
1-7-1 Konan Minato-ku Tokio, 108-0075 Japan.<br />
Bevollmächtigter für EMV und Produktsicherheit<br />
ist <strong>Sony</strong> Deutschland GmbH, Hedelfinger Strasse 61,<br />
70327 Stuttgart, Deutschland. Für Kundendienstoder<br />
Garantieangelegenheiten wenden Sie sich bitte an die in<br />
Kundendienst- oder Garantiedokumenten genannten<br />
Adressen.<br />
Hinweise zur Verwendung<br />
Hinweis zur Batterie<br />
Je nach dem Herstellungsdatum der Batterien können<br />
ˎˎ<br />
diese eine kürzere Lebenszeit aufweisen, auch wenn sie<br />
als neue Batterien mit diesem Gerät geliefert wurden.<br />
Wir empfehlen, immer Ersatzbatterien bereitzuhalten.<br />
Beachten Sie, dass die Leistung von Batterien mit<br />
sinkender Tem<strong>per</strong>atur abnimmt. Lassen Sie die Batterie<br />
die normale Raumtem<strong>per</strong>atur erreichen, bevor Sie sie<br />
aufladen.<br />
Betriebstem<strong>per</strong>atur<br />
Rapide Tem<strong>per</strong>aturänderungen verursachen<br />
ˎˎ<br />
Kondensationsbildung im Gerät. Wenn das Gerät direkt<br />
von einer kalten in eine warme Umgebung gebracht<br />
wird, setzen Sie es noch in der kalten Umgebung in<br />
einen Plastikbeutel und ziehen Sie soviel Luft wie<br />
möglich aus dem Plastikbeutel, bevor Sie diesen<br />
verschließen. Wenn die Tem<strong>per</strong>atur in dem Beutel sich<br />
der Raumtem<strong>per</strong>atur angeglichen hat, können Sie das<br />
Gerät gefahrlos aus dem Beutel nehmen.<br />
Andere Vorsichtsmaßregeln<br />
Dieses Gerät ist nicht wasserfest. Wenn es in Kontakt<br />
ˎˎ<br />
mit Wasser kommt, wischen Sie es mit einem trockenen<br />
Lappen ab und bringen es sofort zur Prüfung zum<br />
nächsten <strong>Sony</strong>-Fachhändler.<br />
Versuchen Sie nicht, dieses Gerät zu zerlegen. Bringen<br />
ˎˎ<br />
Sie es sofort zum nächsten <strong>Sony</strong>-Fachhändler zur<br />
Reparatur.<br />
Wenn es verschmutzt ist, kann das Gerät mit einem<br />
ˎˎ<br />
trockenen, sauberen Lappen abgewischt werden. Setzen<br />
Sie das Gerät nicht Alkohol oder anderen Chemikalien<br />
aus.<br />
Lassen Sie das Gerät nicht an Orten liegen, wo<br />
ˎˎ<br />
es extremen Tem<strong>per</strong>aturen ausgesetzt ist, wie die<br />
Fensterablage in einem Auto, oder an Orten mit sehr<br />
hoher Luftfeuchtigkeit.<br />
Berühren Sie dieses Gerät nicht mit nassen Händen.<br />
ˎˎ<br />
Dabei besteht die Gefahr elektrischer Schläge.<br />
Kompatibilität<br />
Einzelheiten über dieses Gerät und Kompatibilität mit<br />
ˎˎ<br />
Digitalkameras mit Wechselobjektiv finden Sie bei der<br />
folgenden URL.<br />
http://www.sony.net<br />
Besondere Merkmale<br />
Die <strong>RMT</strong>-<strong>DSLR2</strong> ist eine Fernbedienung, die speziell für<br />
<strong>Sony</strong> Digitalkameras mit Wechselobjektiv (im Folgenden<br />
als „Kamera“ bezeichnet) mit einem Fernbedienungssensor<br />
hergestellt wurde.<br />
Sie können die Kamera mit der Fernbedienung bedienen.<br />
Durch Bedienen der Fernbedienung können Sie Bilder<br />
ˎˎ<br />
aufnehmen und auf einem Fernsehgerät wiedergeben.*<br />
ˋˋAufnehmen des Bildes<br />
ˋˋWiedergabe des Bildes<br />
ˋˋVergrößern oder Verkleinern des Wiedergabebildes<br />
Die Taste<br />
ˎ<br />
ˎ (Diaschau) erlaubt leichtes Starten/Stoppen<br />
einer Diashow auf einem Fernsehgerät.*<br />
Wenn Sie die Kamera an einen PictBridge-Drucker<br />
ˎˎ<br />
anschließen, können Sie leicht Bilder drucken, während<br />
Sie sie auf dem Fernsehgerät betrachten, indem Sie die<br />
PRINT-Taste an der Fernbedienung drücken.**<br />
* Diese Funktionen arbeiten nur, wenn die<br />
Kamera am Fernsehgerät angeschlossen ist.<br />
** Diese Funktion arbeitet nur, wenn die Kamera<br />
mit einem HDMI-Kabel an einem HD-Fernseher<br />
angeschlossen ist.<br />
Identifikation der Teile<br />
1 2 SEC (Verschlussauslösung in 2 Sekunden)-Taste<br />
2 SHUTTER-Taste<br />
3 (Histogramm)-Taste<br />
4 DISP (Anzeige)-Taste<br />
5 (Index)-Taste<br />
6 (Drehen)-Taste<br />
7 (Wiedergabe)-Taste<br />
8 (Diaschau)-Taste<br />
9 MENU-Taste<br />
10 PRINT-Taste<br />
11 Sender<br />
12 START/STOP-Taste<br />
13 / (Vergrößern/Verkleinern)-Tasten<br />
14 (Löschen)-Taste<br />
15 //// (Multi-Wahlschalter)<br />
Hinweise<br />
Ausgenommen bei den Tasten 2 SEC, SHUTTER und<br />
START/STOP arbeiten diese Funktionen nur, wenn die<br />
Kamera an einem Fernsehgerät angeschlossen ist.<br />
Vorbereitungen<br />
Entfernen Sie das Isolierblatt<br />
ˎ<br />
ˎ<br />
, bevor Sie die Kamera<br />
mit der Fernbedienung bedienen.<br />
Richten Sie die Fernbedienung auf den<br />
ˎˎ<br />
Fernbedienungssensor an der Vorderseite der Kamera,<br />
um die Kamera zu bedienen.<br />
Austauschen der Batterie<br />
der Fernbedienung<br />
1 Während Sie auf die Lasche drücken,<br />
setzen Sie Ihren Fingernagel in den Schlitz,<br />
um das Batteriefach herauszuziehen.<br />
2 Entfernen Sie die alte Batterie und setzen<br />
Sie eine neue Batterie mit der Seite + nach<br />
oben weisend ein.<br />
3 Setzen Sie das Batteriefach zurück in die<br />
Fernbedienung, bis es mit Klickgeräusch<br />
einrastet.<br />
WARNUNG<br />
Die Batterie kann bei falscher Behandlung explodieren.<br />
Nicht aufladen, zerlegen, oder in einem Feuer entsorgen.<br />
Wenn die Lithiumbatterie schwach wird, kann die<br />
ˎˎ<br />
Reichweite der Fernbedienung abnehmen, oder die<br />
Fernbedienung kann nicht richtig arbeiten. Ersetzen Sie<br />
in diesem Fall die Batterie so schnell wie möglich durch<br />
eine neue <strong>Sony</strong> CR2025 Lithiumbatterie.<br />
Verwendung einer anderen Batterie kann die Gefahr<br />
von Bränden oder Explosionen mit sich bringen.<br />
VORSICHT<br />
Ersetzen Sie die Batterie bzw. den Akku ausschließlich<br />
durch eine Batterie bzw. einen Akku des angegebenen<br />
Typs.<br />
Andernfalls besteht Feuer- oder Verletzungsgefahr.<br />
Alte Batterien unter Beachtung der gültigen Vorschriften<br />
entsorgen.<br />
Aufnehmen<br />
Zur Verwendung der Fernbedienung stellen Sie den<br />
Steuermodus der Kamera auf [Fernbedienung].<br />
Bestätigen Sie, dass das Motiv scharfgestellt ist, und<br />
drücken Sie die SHUTTER-Taste, die 2 SEC-Taste oder die<br />
START/STOP-Taste*.<br />
ˋˋSHUTTER-Taste<br />
Wenn die Taste gedrückt wird. wird der Auslöser<br />
sofort aktiviert.<br />
ˋˋ2 SEC-Taste<br />
Wenn Sie die Taste drücken, wird der Verschluss<br />
nach etwa zwei Sekunden ausgelöst.<br />
ˋˋSTART/STOP-Taste*<br />
Durch einmaliges Drücken der Taste wird die<br />
Filmaufnahme gestartet.<br />
Wenn die Taste erneut während der Filmaufnahme<br />
gedrückt wird, stoppt die Aufnahme.<br />
* Kann nur verwendet werden, wenn die Kamera die<br />
Filmaufnahme unterstützt.<br />
Je nach dem Modell der Kamera, die die Filmaufnahme<br />
unterstützt, können Sie den START/STOP-<br />
Betrieb mit der AF-Hilfsbeleuchtung oder dem<br />
Selbstauslöserlämpchen der Kamera prüfen.<br />
Prüfen Sie vor der Verwendung, ob Ihre Kamera<br />
kompatibel ist.<br />
Einzelheiten über die Einstellungen siehe<br />
ˎˎ<br />
Gebrauchsanleitung Ihrer Kamera.<br />
Die anderen Tasten werden verwendet, wenn die<br />
ˎˎ<br />
Kamera an einem Fernsehgerät angeschlossen ist.<br />
Betrachtungsverfahren mit<br />
der Fernbedienung durch<br />
Anschließen der Kamera an<br />
ein Fernsehgerät.<br />
Durch Anschließen der Kamera an ein Fernsehgerät über<br />
ein Videokabel oder HDMI-Kabel und Umschalten auf<br />
Wiedergabemodus können Sie die Betrachtung über die<br />
Fernbedienung steuern. Die meisten der Tasten an der<br />
Fernbedienung haben die gleichen Funktionen wie die<br />
Tasten an der Kamera.<br />
Einzelheiten dazu schlagen Sie bitte in der<br />
ˎˎ<br />
Gebrauchsanleitung Ihrer Kamera nach.<br />
Die SHUTTER-Taste, 2 SEC-Taste, START/STOP-<br />
ˎˎ<br />
Taste und PRINT-Taste werden verwendet, wenn die<br />
Aufnahme gemacht wird oder die Kamera an einen<br />
PictBridge-Drucker angeschlossen ist.<br />
Diashow<br />
Die Taste<br />
(Diaschau) an der Fernbedienung erlaubt<br />
leichtes Starten/Stoppen einer Diashow. Während einer<br />
Diashow stehen die folgenden Bedienungen von der<br />
Fernbedienung zur Verfügung.<br />
ˋAnzeige des vorherigen/nächsten Bildes mit<br />
ˋ / .<br />
ˋPausieren/Wiedergabe der Diashow mit<br />
ˋ .<br />
Drucken<br />
Wenn Sie die Kamera an über ein HDMI-Kabel an einen<br />
HD-Fernseher anschließen, können Sie leicht Bilder<br />
drucken, während Sie sie auf dem Fernsehgerät betrachten.<br />
1 Schließen Sie die Kamera an ein<br />
Fernsehgerät an.<br />
2 Schließen Sie die Kamera an einen mit<br />
PictBridge kompatiblen Drucker an.<br />
3 Zeigen Sie das zu drucken gewünschte Bild<br />
an.<br />
4 Drücken Sie die PRINT-Taste der<br />
Fernbedienung.<br />
Einzelheiten über das Drucken siehe<br />
ˎˎ<br />
Gebrauchsanleitung Ihrer Kamera. Kameramodelle mit<br />
einer Druckfunktion können mit der Fernbedienung<br />
drucken.<br />
Technische Daten<br />
Batterie<br />
3-V-Lithium-Knopfbatterie (CR2025)<br />
Abmessungen<br />
Ca. 41,5 mm × 94,5 mm × 13,5 mm<br />
(B / H / T)<br />
Gewicht<br />
Ca. 27 g<br />
(ohne Batterie)<br />
Betriebstem<strong>per</strong>atur 0 °C bis 40 °C<br />
Lagertem<strong>per</strong>atur -20 °C bis +60 °C<br />
Mitgeliefertes<br />
Zubehör<br />
Fernbedienung <strong>RMT</strong>-<strong>DSLR2</strong> (1)<br />
(Eine 3-V-Lithium-Knopfbatterie<br />
(CR2025) ist eingesetzt)<br />
Anleitungen<br />
Änderungen bei Design und technischen Daten bleiben<br />
ohne vorherige Ankündigung vorbehalten.<br />
ist ein Markenzeichen der <strong>Sony</strong> Corporation.<br />
Voordat u het product bedient, dient u eerst deze<br />
handleiding aandachtig door te lezen en hem te bewaren<br />
voor toekomstige naslag.<br />
WAARSCHUWING<br />
Om het gevaar van brand of elektrische schokken te<br />
verkleinen, mag het apparaat niet worden blootgesteld aan<br />
regen of vocht.<br />
Voor klanten in Europa<br />
Verwijdering van oude elektrische en<br />
elektronische apparaten (van<br />
toepassing in de Europese Unie en<br />
andere Europese landen met<br />
gescheiden inzamelingssystemen)<br />
Dit symbool op het product of op de<br />
verpakking wijst erop dat dit product<br />
niet als huishoudelijk afval mag worden<br />
behandeld. Het moet echter naar een inzamelingspunt<br />
worden gebracht waar elektrische en elektronische<br />
apparatuur wordt gerecycled. Als u ervoor zorgt dat<br />
dit product op de correcte manier wordt verwerkt,<br />
helpt u mogelijke negatieve gevolgen voor mens en<br />
milieu die zouden kunnen veroorzaakt worden in geval<br />
van verkeerde afvalbehandeling te voorkomen. Het<br />
recycleren van materialen draagt bij tot het behoud van<br />
natuurlijke bronnen. Voor meer details in verband met<br />
het recyclen van dit product, kan u contact opnemen met<br />
de gemeentelijke instanties, de organisatie belast met de<br />
verwijdering van huishoudelijk afval of de winkel waar u<br />
het product hebt gekocht.<br />
Verwijdering van oude batterijen (van toepassing<br />
in de Europese Unie en andere Europese landen met<br />
afzonderlijke inzamelingssystemen)<br />
Dit symbool op de batterij of op de verpakking<br />
wijst erop dat de batterij, meegeleverd met van dit<br />
product niet als huishoudelijk afval behandeld mag<br />
worden.<br />
Op sommige batterijen kan dit symbool gebruikt worden<br />
in combinatie met een chemisch symbool. Het chemisch<br />
symbool voor kwik (Hg) of lood (Pb) wordt toegevoegd<br />
wanneer de batterij meer dan 0,0005 % kwik of 0,004 %<br />
lood bevat.<br />
Door deze batterijen op juiste wijze af te voeren, helpt<br />
u mogelijke negatieve gevolgen voor mens en milieu<br />
die zouden kunnen veroorzaakt worden in geval van<br />
verkeerde afvalbehandeling te voorkomen. Het recycleren<br />
van materialen draagt bij tot het behoud van natuurlijke<br />
bronnen.<br />
In het geval dat de producten om redenen van veiligheid,<br />
prestaties dan wel in verband met data-integriteit een<br />
<strong>per</strong>manente verbinding met een ingebouwde batterij<br />
vereisen, mag deze batterij enkel door gekwalificeerd<br />
service<strong>per</strong>soneel vervangen te worden. Om ervoor te<br />
zorgen dat de batterij op een juiste wijze zal worden<br />
behandeld, dient het product aan het eind van zijn<br />
levenscyclus overhandigd te worden aan het desbetreffende<br />
inzamelingspunt voor de recyclage van elektrisch en<br />
elektronisch materiaal.<br />
Voor alle andere batterijen verwijzen we u naar het<br />
hoofdstuk over hoe de batterij veilig uit het product te<br />
verwijderen. Overhandig de batterij aan het desbetreffende<br />
inzamelingspunt voor de recyclage van batterijen.<br />
Voor meer details in verband met het recyclen van<br />
dit product of batterij, kan u contact opnemen met de<br />
gemeentelijke instanties, de organisatie het belast met de<br />
verwijdering van huishoudelijk afval of de winkel waar u<br />
het product hebt gekocht.<br />
< Kennisgeving voor klanten in<br />
de landen waar EU-richtlijnen van<br />
toepassing zijn ><br />
De fabricant van dit product is <strong>Sony</strong> Corporation,<br />
1-7-1 Konan Minato-ku Tokyo, 108-0075 Japan. De<br />
geauthoriseerde vertegenwoordiging voor EMC en produkt<br />
veiligheid is <strong>Sony</strong> Deutschland GmbH, Hedelfinger<br />
Strasse 61, 70327 Stuttgart, Duitsland. Voor service- of<br />
garantiezaken verwijzen wij u graag naar de addressen in<br />
de afzonderlijke service/garantie documenten.<br />
Opmerkingen over het<br />
gebruik<br />
Een opmerking over de batterij<br />
Afhankelijk van de tijd die is verstreken sinds de<br />
ˎˎ<br />
productie van de batterijen, kan hun levensduur<br />
korter zijn, zelfs als het toestel is geleverd met nieuwe<br />
batterijen. We raden u aan om batterijen in reserve<br />
te houden. Naarmate de tem<strong>per</strong>atuur lager is, zal de<br />
capaciteit van de batterijen afnemen. Laat de batterijen<br />
weer op normale kamertem<strong>per</strong>atuur komen, dan zal de<br />
capaciteit ook weer normaal zijn.<br />
Bedrijfstem<strong>per</strong>atuur<br />
Bij grote tem<strong>per</strong>atuurschommelingen kan er binnenin<br />
ˎˎ<br />
dit apparaat vocht uit de lucht condenseren. Als u dit<br />
apparaat direct vanuit een koude omgeving in een<br />
warme omgeving brengt, steek het toestel dan in een<br />
plastic zak terwijl u buiten bent en probeer zoveel<br />
mogelijk lucht uit de zak. Daarna kunt u het apparaat<br />
uit de zak verwijderen wanneer de lucht in de zak<br />
geleidelijk op kamertem<strong>per</strong>atuur is gekomen.<br />
Overige waarschuwingen<br />
Dit apparaat is niet waterbestendig. Als het met water in<br />
ˎˎ<br />
aanraking komt, droogt u het onmiddellijk af met een<br />
schone doek en brengt u het onverwijld naar een <strong>Sony</strong><br />
handelaar.<br />
Probeer nooit dit apparaat te demonteren. Voor<br />
ˎˎ<br />
reparaties brengt u het apparaat onmiddellijk naar de<br />
dichtstbijzijnde <strong>Sony</strong> handelaar.<br />
Als het apparaat vuil is geworden, veegt u het schoon<br />
ˎˎ<br />
met een zachte droge doek. Laat dit apparaat niet in<br />
aanraking komen met alcohol of andere chemicaliën.<br />
Laat dit apparaat nooit achter op een plaats waar het erg<br />
ˎˎ<br />
heet kan worden, zoals in het handschoenenkastje van<br />
een auto; stel het niet bloot aan vocht of waterdamp.<br />
Raak dit apparaat niet met natte handen aan. Dat kan<br />
ˎˎ<br />
een elektrische schok veroorzaken.<br />
Compatibiliteit<br />
Nadere details over de geschiktheid van dit apparaat<br />
ˎˎ<br />
voor een digitale camera met verwisselbare lens vindt u<br />
op de volgende website.<br />
http://www.sony.net<br />
Kenmerken<br />
De <strong>RMT</strong>-<strong>DSLR2</strong> is een afstandsbediening die speciaal is<br />
gemaakt voor de <strong>Sony</strong> digitale camera met verwisselbare<br />
lens (hierna genoemd "camera") wanneer deze een<br />
afstandsbedieningssensor heeft.<br />
U kunt de camera bedienen met de afstandsbediening.<br />
Via het bedienen van de afstandsbediening, kunt u<br />
ˎˎ<br />
beelden opnemen en deze afspelen op een televisie.*<br />
ˋˋHet beeld opnemen<br />
ˋˋBeelden afspelen<br />
ˋˋDe weergegeven beelden vergroten of verkleinen<br />
Met de<br />
ˎ<br />
ˎ<br />
-knop (Diavoorstelling) kunt u makkelijk een<br />
diavoorstelling op een televisie starten/stoppen.*<br />
Wanneer u een camera heeft aangesloten op een<br />
ˎˎ<br />
PictBridge-printer, kunt u gemakkelijk stilstaande<br />
beelden afdrukken terwijl u ze op de televisie<br />
bekijkt, door te drukken op de PRINT-knop op de<br />
afstandsbediening.**<br />
* Deze functies werken alleen als de camera is<br />
aangesloten op een televisie.<br />
** Deze functie werkt alleen als de camera is<br />
aangesloten op een HDTV met een HDMI-kabel.<br />
Overzicht van de<br />
onderdelen<br />
1 2 SEC-knop (ontspanning van sluiter na 2 seconden)<br />
2 SHUTTER-knop<br />
3 -knop (Histogram)<br />
4 DISP-knop (Beeld)<br />
5 -knop (Index)<br />
6 -knop (Rotatie)<br />
7 -knop (Weergave)<br />
8 -knop (Diavoorstelling)<br />
9 MENU-knop<br />
10 PRINT-knop<br />
11 Zender<br />
12 START/STOP-knop<br />
13 / -knoppen (in-/uitzoomen)<br />
14 -knop (Wissen)<br />
15 //// (Multi-selectieschakelaar)<br />
Opmerkingen<br />
Alle knoppen, behalve de knoppen 2 SEC, SHUTTER<br />
en START/STOP, zullen alleen werken als de camera is<br />
aangesloten op een televisie.<br />
Voorbereiding<br />
Verwijder het isolatievel<br />
ˎ<br />
ˎ<br />
voordat u de<br />
afstandsbediening gebruikt.<br />
Richt de afstandsbediening op de<br />
ˎˎ<br />
afstandsbedieningssensor aan de voorkant van de<br />
camera om de camera te bedienen.<br />
De batterij van de<br />
afstandsbediening<br />
verwisselen<br />
1 Stop uw vingernagel in de sleuf terwijl u het<br />
lipje indrukt, om de batterijhouder uit te<br />
trekken.<br />
2 Verwijder de oude batterij en plaats een<br />
nieuwe batterij met de +-pool naar boven<br />
gericht.<br />
3 Plaats de batterijhouder terug in de<br />
afstandsbediening tot deze op zijn plaats<br />
klikt.<br />
WAARSCHUWING<br />
Als u de batterij verkeerd hanteert, kan deze ontploffen.<br />
U mag de batterij niet opladen, demonteren of in het<br />
vuur gooien.<br />
Wanneer het vermogen van de lithiumbatterij zwak<br />
ˎˎ<br />
wordt, kan het bereik van de afstandsbediening korter<br />
worden of zal de afstandsbediening mogelijk niet<br />
werken. Vervang de batterij in dit geval voor een <strong>Sony</strong><br />
CR2025 lithium batterij.<br />
Het gebruik van andere batterijen kan brand of<br />
ontploffing veroorzaken.<br />
PAS OP<br />
U moet de batterij alleen vervangen door een batterij van<br />
het opgegeven type.<br />
Als u dit niet doet, kan dit brand of letsel tot gevolg<br />
hebben.<br />
Gooi gebruikte batterijen weg volgens de instructies.<br />
Opnames maken<br />
Om de afstandsbediening te kunnen gebruiken,<br />
zet u de actiemodus van de camera op<br />
[Afstandsbediening].<br />
Controleer of het onderwerp is scherpgesteld en druk op<br />
de knop SHUTTER, 2 SEC of START/STOP*.<br />
ˋˋSHUTTER-knop<br />
Wanneer op de knop wordt gedrukt, wordt de<br />
sluiterknop onmiddellijk vrijgegeven.<br />
ˋˋ2 SEC-knop<br />
Nadat u de sluiterknop hebt ingedrukt, wordt de<br />
sluiter ongeveer twee seconden later ontspannen.<br />
ˋˋSTART/STOP-knop*<br />
Door één maal te drukken op de knop, start het<br />
opnemen van films.<br />
Als u opnieuw op de knop drukt tijdens het opnemen<br />
van films, stopt het opnemen.<br />
* Kan alleen worden gebruikt als de camera het opnemen<br />
van films ondersteunt.<br />
Afhankelijk van het model van de camera die het<br />
opnemen van films ondersteunt, kunt u de werking van<br />
START/STOP controleren met de AF-illuminator of de<br />
zelftimerlamp van de camera.<br />
Controleer of uw camera compatibel is voor gebruik.<br />
Raadpleeg de gebruiksaanwijzing bij de camera voor<br />
ˎˎ<br />
meer informatie over instellingen.<br />
De andere knoppen worden gebruikt wanneer de<br />
ˎˎ<br />
camera wordt aangesloten op een televisie.<br />
Bewerkingen voor<br />
weergeven met de<br />
afstandsbediening door de<br />
camera aan te sluiten op een<br />
televisie.<br />
Wanneer u de camera aansluit op een televisie met een<br />
videokabel of een HDMI-kabel en u overschakelt naar<br />
de afspeelstand, kunt u bewerkingen voor weergeven<br />
uitvoeren met de afstandsbediening. De meeste knoppen<br />
op de afstandsbediening hebben dezelfde functie als de<br />
knoppen op de camera.<br />
Raadpleeg de gebruiksaanwijzing bij de camera voor<br />
ˎˎ<br />
meer informatie.<br />
De SHUTTER-knop, 2 SEC-knop, START/STOP-knop<br />
ˎˎ<br />
en PRINT-knop worden gebruikt wanneer u de beelden<br />
opneemt of wanneer de camera is aangesloten op een<br />
PictBridgeprinter.<br />
Diavoorstelling<br />
Met de<br />
-knop (Diavoorstelling) op de afstandsbediening<br />
kunt u een diavoorstelling gemakkelijk starten/stoppen.<br />
Tijdens een diavoorstelling zijn de volgende bewerkingen<br />
beschikbaar vanaf de afstandsbediening.<br />
ˋHet volgende/vorige beeld weergeven met<br />
ˋ / .<br />
ˋDe diavoorstelling pauzeren/afspelen met<br />
ˋ .<br />
Afdrukken<br />
Nadat u de camera op een HDTV hebt aangesloten<br />
met een HDMI-kabel, kunt u de beelden gemakkelijk<br />
afdrukken terwijl u ze op de tv bekijkt.<br />
1 Sluit de camera aan op een televisie.<br />
2 Sluit de camera aan op een PictBridge<br />
compatibele printer.<br />
3 Geef het beeld weer dat u wilt afdrukken.<br />
4 Druk op de PRINT-knop op de<br />
afstandsbediening.<br />
Raadpleeg de gebruiksaanwijzing bij de camera voor<br />
ˎˎ<br />
meer informatie over afdrukken. Cameramodellen<br />
met en afdrukfunctie kunnen afdrukken met de<br />
Afstandsbediening.<br />
Technische gegevens<br />
Batterij<br />
Knoopvormige 3V lithiumbatterij<br />
(CR2025)<br />
Afmetingen Ongeveer 41,5 mm × 94,5 mm ×<br />
13,5 mm (b/h/d)<br />
Gewicht<br />
Ongeveer 27 g<br />
(exclusief batterij)<br />
Bedrijfstem<strong>per</strong>atuur<br />
0 ˚C to 40 ˚C<br />
Opslagtem<strong>per</strong>atuur<br />
-20 ˚C to +60 ˚C<br />
Bijgeleverde toebehoren Afstandsbediening <strong>RMT</strong>-<strong>DSLR2</strong><br />
(1)<br />
(Knoopvormige 3V<br />
lithiumbatterij (CR2025)<br />
voorgeïnstalleerd)<br />
Handleiding en documentatie<br />
Wijzigingen in ontwerp en technische gegevens<br />
voorbehouden, zonder kennisgeving.<br />
is een handelsmerk van <strong>Sony</strong> Corporation.


