

Sony MPK-WH - MPK-WH Istruzioni per l'uso Inglese
Sony MPK-WH - MPK-WH Istruzioni per l'uso Inglese
Sony MPK-WH - MPK-WH Istruzioni per l'uso Inglese

Create successful ePaper yourself
Turn your PDF publications into a flip-book with our unique Google optimized e-Paper software.
4-417-538-11(1)<br />
O<strong>per</strong>ating Instructions<br />
Mode d’emploi<br />
Manual de instrucciones<br />
<strong>MPK</strong>-<strong>WH</strong><br />
© 2012 <strong>Sony</strong> Corporation Printed in Japan<br />
2 Replace the attachments.<br />
ˎˎDetach the DSC-WX100 front attachment F-B and rear attachment R-B.<br />
(-2)<br />
When detaching the front attachment and rear attachment, first detach the<br />
parts marked in the illustration.<br />
Then hold the front attachment F-B by the parts marked in the illustration<br />
and lift it straight out.<br />
To detach the rear attachment R-B, gently press the inside wall with your<br />
finger, hold the parts marked in the illustration, and lift straight out.<br />
ˎˎUse the correct front attachment and rear attachment for your camera.<br />
(-2)<br />
Make sure that the part of the front attachment marked in the illustration is<br />
fixed to the front case and then firmly press in the 4 parts marked .<br />
Firmly press in the 6 points marked in the illustration.<br />
Insert the points marked in the illustration into the slots.<br />
* If you remove the attachment from this unit to store it, straighten it before storing.<br />
It may be damaged if stored while not straight.<br />
Preparing the O-ring and drip-proof packing<br />
1 Remove the O-ring attached to this unit.<br />
2 Coat the O-ring with grease.<br />
3 Attach the O-ring to this unit.<br />
4 Check the drip-proof packing for any sand or dirt.<br />
Preparing the camera<br />
Install the camera in this unit in a room with low-humidity or a similar<br />
environment. Opening or closing this unit in hot or humid locations may<br />
result in fogging.<br />
Refer to the o<strong>per</strong>ating instructions supplied with the camera.<br />
1 Remove the strap from the camera.<br />
2 Insert the battery pack and memory card.<br />
Be sure to use a fully charged battery pack.<br />
Be sure that the memory card has enough space to record images.<br />
3 Press the ON/OFF (Power) button to turn on the camera.<br />
4 Select REC Mode.<br />
5 Use MENU to set [AF Illuminator] to [Off].<br />
The AF Illuminator cannot be used with this unit.<br />
6 Check the lens and LCD screen for any dirt.<br />
About the reflex prevention ring<br />
Reflected glare may occur when using this unit due to light reflecting from the lens<br />
surface. To reduce this reflected glare, we recommend that you attach the reflex<br />
prevention ring to the lens surface before recording.<br />
Attach the correct reflex prevention ring for your camera by referring to the<br />
attachment /reflex prevention ring compatibility list ().<br />
Notes<br />
ˎˎAttach the reflex prevention ring so that its outer diameter does not stick out<br />
beyond the outer diameter of the lens surface.<br />
ˎˎCheck the contact surface for dirt or dust before attaching the reflex prevention<br />
ring.<br />
ˎˎWipe any dust from the contact surface with a damp cloth.<br />
ˎAfter using the reflex prevention ring, store it with applying on the sheet<br />
ˎ .<br />
Installing the camera in this unit<br />
1 Press the ON/OFF (Power) button to turn off the camera.<br />
The lens may be damaged if the power is on.<br />
2 Install the camera in this unit. (-2)<br />
Check that the camera is placed correctly.<br />
3 Close this unit body and fasten the buckle. (-3)<br />
Secure this unit body, and fasten the buckles until the top and bottom latches<br />
catch.<br />
Notes<br />
If you press the body too strongly, the buckles may not close pro<strong>per</strong>ly.<br />
O<strong>per</strong>ate the buttons and mode dial of this unit several times to make sure they are<br />
working pro<strong>per</strong>ly.<br />
Attaching the accessories<br />
Attaching the hand strap (-)<br />
Attaching the diffuser<br />
We recommend attaching the diffuser when you record using flash.<br />
Align the diffuser with the front protector and press it firmly as illustrated. (-)<br />
Attaching and detaching the LCD hood<br />
To attach the LCD hood, align the LCD hood with the groove of the attachment<br />
guide and press it firmly. (-)<br />
To detach the LCD hood, spread the LCD hood and detach it from the groove of the<br />
guide. (-)<br />
Notes<br />
Be careful not to pinch the hand strap or the accessory strap when you close this<br />
unit body. A water leak may develop if they are caught in the body.<br />
Using this unit<br />
Before using the camera underwater, first take this unit to a depth of about 1 m<br />
(3.3 feet) and check that the camera is o<strong>per</strong>ating pro<strong>per</strong>ly and that this unit is<br />
not leaking, then commence your dive.<br />
For details on camera functions, refer to the o<strong>per</strong>ating instructions supplied with<br />
the camera.<br />
Recording<br />
Press the ON/OFF (power) button () to turn on the power.<br />
Press the shutter lever () to record images .<br />
ˎUse the zoom lever (<br />
ˎ<br />
) for zoom o<strong>per</strong>ation.<br />
ˎˎRecord movies with the MOVIE (Movie) button. (start/stop)<br />
You can also shoot still images during movie recording by pressing the shutter<br />
lever.<br />
Using/Setting functions<br />
You cannot o<strong>per</strong>ate the control wheel of the camera when using this unit, but you<br />
can change the settings with the camera menu.<br />
Depending on the camera, some functions are not available with this unit.<br />
Selecting the mode<br />
Select REC Mode ( / / ) using the Mode dial on this unit.<br />
ˎˎWhile recording movies, you cannot record audio correctly.<br />
ˎFor underwater still image recording, we recommend<br />
ˎ (Underwater) of the<br />
scene selection modes.<br />
For underwater sweep panorama image recording, we recommend<br />
(Underwater Sweep Panorama) of the sweep panorama recording modes.<br />
For underwater movie recording, we recommend<br />
(Underwater) of the movie<br />
recording modes.<br />
ˎˎWhen shooting a panorama underwater, we recommend that you hold your body<br />
steady.<br />
Selecting the underwater white balance<br />
Adjusts the color tone in (Underwater) mode under (Scene Selection), in<br />
(Underwater Sweep Panorama) mode under<br />
(Sweep Panorama) or in<br />
(Underwater) mode under<br />
(Movie).<br />
(Auto)<br />
Automatically adjusts color tones underwater so they<br />
appear natural.<br />
(Underwater 1)<br />
Adjusts for underwater conditions where blue is strong.<br />
(Underwater 2)<br />
Adjusts for underwater conditions where green is strong.<br />
(One Push)<br />
Adjusts the white balance depending on the light source.<br />
The white color memorized in [One Push Set] mode<br />
becomes the basic white color. Use this mode when [Auto]<br />
or other modes cannot be set the color pro<strong>per</strong>ly.<br />
(One Push Set)<br />
Memorizes the basic white color which will be used in [One<br />
Push] mode.<br />
Notes<br />
ˎˎDepending on the color of the water, the underwater white balance may not work<br />
correctly.<br />
ˎˎWhen flash is [On], the underwater white balance can only be adjusted to [Auto],<br />
[One Push], or [One Push Set].<br />
ˎˎ[One Push Set] is unable to be selected while charging the flash.<br />
Notes on recording<br />
ˎˎIf you do not record any images for a certain time, the camera turns off<br />
automatically to prevent the battery pack from running out. To use the camera<br />
again, turn on the power again.<br />
ˎˎWhen using a flash with this unit attached, the effective flash range is reduced and<br />
images tend to be darker overall, so the shooting distance may be greatly reduced<br />
in some environments (pitch dark, etc.). In such conditions, it is recommended<br />
that you use an external underwater light as well as the flash.<br />
ˎˎIf you use the flash underwater, the flash light may be reflected by particles in the<br />
water and appear in the image as circles of light.<br />
ˎˎReflected glare may occur depending on the shooting condition. If this happens,<br />
change the condition.<br />
Playing back<br />
To select the desired image.<br />
To previous image<br />
To next image<br />
Removing the camera<br />
1 Turn off the power.<br />
The lens may be damaged if the power is on.<br />
2 Open this unit.<br />
3 Remove the camera from this unit.<br />
When the camera has been used for a long time, the camera heats up. Turn off<br />
the power and leave for a while to cool down before removing the camera from<br />
this unit.<br />
Be careful not to drop the camera when removing it.<br />
Notes<br />
Before opening this unit, rinse it with tap water or fresh water and then wipe the<br />
water off with a soft cloth. When opening it, be careful not to let any water from<br />
your body, hair or wetsuit cuffs drip onto the camera.<br />
Troubleshooting<br />
Symptom<br />
Cause/Corrective Actions<br />
There are drops of water<br />
inside this unit.<br />
ˎˎThere are scratches or cracks on the O-ring.<br />
ppReplace the O-ring with a new one.<br />
ˎˎThe O-ring is not set correctly.<br />
ppCheck the method of O-ring attachment.<br />
The recording function<br />
does not work.<br />
ˎˎThe camera heats up.<br />
ppLeave the camera in the cool place for a while to<br />
cool down.<br />
ˎˎThe wrong attachment is attached.<br />
ppAttach the correct attachment for your camera<br />
correctly.<br />
The playback image is not<br />
displayed in the color you<br />
expected. (When recording<br />
underwater)<br />
ˎˎThe underwater white balance may not be set<br />
correctly.<br />
ppCheck the underwater white balance setting.<br />
The mode is not switched.<br />
There is dirt or dust on the attachment.<br />
ˎˎ<br />
ppRemove any dirt or dust from the attachment with<br />
a dampened cloth.<br />
ˎˎThe wrong attachment is attached.<br />
ppAttach the correct attachment for your camera<br />
correctly.<br />
The button of this unit<br />
does not depress easily,<br />
feels caught, or does not<br />
return quickly.<br />
ˎˎThere is an O-ring inside this unit’s button.<br />
ppThis may occur when you use this unit after a long<br />
<strong>per</strong>iod of disuse. This is not a malfunction.<br />
Specifications<br />
Pressure-resistance<br />
To a depth of up to 40 m (132 feet) underwater<br />
Dimensions<br />
Approx. 148 mm × 112 mm × 97 mm (5 7/8 in. × 4 1/2 in. × 3 7/8 in.) (w/h/d)<br />
(excluding the projecting parts)<br />
Mass<br />
Approx. 590 g (1 lb 5 oz) (marine pack only)<br />
Included items<br />
Waterproof case (1)<br />
Hand strap (1)<br />
LCD hood (1)<br />
Diffuser (1)<br />
Front attachment (3) (One of them is attached to the marine pack.)<br />
Rear attachment (3) (One of them is attached to the marine pack.)<br />
Reflex prevention ring (2)<br />
Grease (1)<br />
Replacement O-ring (1)<br />
Spacer (1)<br />
Set of printed documentation<br />
Optional accessories<br />
O-ring kit ACC-MP105<br />
(Check for<br />
on the package at the time of purchase.)<br />
Design and specifications are subject to change without notice.<br />
< Avis aux consommateurs des pays appliquant les Directives UE ><br />
Le fabricant de ce produit est <strong>Sony</strong> Corporation, 1-7-1 Konan Minato-ku Tokyo,<br />
108-0075 Japon. Le représentant agréé pour la compatibilité électromagnétique et<br />
la sécurité du produit est <strong>Sony</strong> Deutschland GmbH, Hedelfinger Strasse 61, 70327<br />
Stuttgart, Allemagne. Pour toute question relative à la garantie ou aux réparations,<br />
reportez-vous à ľadresse que vous trouverez dans les documents ci-joints, relatifs à la<br />
garantie et aux réparations.<br />
Caractéristiques principales<br />
Utilisable sous l’eau jusqu’à une profondeur de 40 mètres (132 pieds).<br />
ˎLe caisson marin <strong>MPK</strong>-<strong>WH</strong> (appelé ci-dessous «<br />
ˎ<br />
ce boîtier ») est destiné à être<br />
utilisé exclusivement avec les appareils photo numériques <strong>Sony</strong> (appelés cidessous<br />
« l’appareil photo ») DSC-WX50/WX100/WX150. (Tous ces appareils<br />
photos numériques ne sont pas disponibles dans tous les pays ou toutes les<br />
régions.)<br />
ˎˎCe boîtier étanche <strong>per</strong>met d’utiliser l’appareil photo sous la pluie ou la neige, sur la<br />
plage ou sous l’eau.<br />
ˎˎVous pourrez faire des prises de vue magnifiques sous l’eau si vous utilisez ce<br />
boîtier avec l’appareil photo réglé sur (Sous l’eau) ou (Panorama par<br />
balayage sous l’eau).<br />
Précautions<br />
ˎˎSi vous utilisez ce boîtier pendant la plongée, faites attention à votre<br />
environnement. Un manque d’attention peut causer un accident pendant la<br />
plongée.<br />
ˎˎSi de l’eau devait pénétrer dans ce boîtier, faites attention à votre environnement et<br />
remontez à la surface en respectant les règles de sécurité propres à la plongée.<br />
ˎˎNe soumettez pas la vitre avant à des chocs trop forts, car elle pourrait se briser.<br />
ˎˎNe pas jeter ce boîtier dans l’eau.<br />
ˎˎEvitez d’utiliser ce boîtier dans les situations suivantes :<br />
à un endroit très chaud ou humide ;<br />
ˋˋ<br />
dans une eau à plus de 40 °C (104 °F) ;<br />
ˋˋ<br />
à des températures inférieures à 0 °C (32 °F).<br />
ˋˋ<br />
Dans de telles situations, ce boîtier peut être endommagé par la condensation<br />
d’humidité ou les infiltrations d’eau.<br />
ˎˎNe pas utiliser ce boîtier pendant plus de 30 minutes à une température<br />
supérieure à 35 °C (95 °F).<br />
ˎˎNe pas laisser ce boîtier en plein soleil à un endroit très chaud et humide pendant<br />
longtemps. Si ce boîtier doit rester longtemps exposé au soleil, veillez à le<br />
recouvrir d’une serviette ou d’un tissu quelconque.<br />
ˎˎLorsque l’appareil photo est trop chaud, il peut s’éteindre ou l’enregistrement peut<br />
ne pas s’effectuer normalement. Laissez l’appareil photo un moment à un endroit<br />
frais avant de le réutiliser.<br />
ˎUtilisez l<br />
ˎ<br />
’entretoise fournie pour laisser ce boîtier ouvert si vous l’emportez à bord<br />
d’un avion. S’il est bien fermé, les changements de pression à l’intérieur de la<br />
cabine rendront l’ouverture plus difficile.<br />
Si de l’huile solaire devait tomber sur ce boîtier, prenez soin de l’enlever avec de<br />
l’eau tiède. Si vous laissez ce boîtier avec des taches d’huile au soleil, sa surface<br />
risque de se décolorer ou d’être endommagée (elle peut se craqueler).<br />
Infiltration d’eau<br />
Si de l’eau devait pénétrer dans ce boîtier, retirez-le immédiatement de l’eau.<br />
ˎˎSi l’appareil photo devait être mouillé, portez-le immédiatement au revendeur<br />
<strong>Sony</strong> le plus proche. Les frais de réparation seront à la charge du client.<br />
ˎˎSi une défectuosité du boîtier devait provoquer des dégâts à la suite d’une<br />
infiltration d’eau, <strong>Sony</strong> ne garantira pas les dégâts causés à l’appareil qu’il contient<br />
(appareil photo numérique, batterie, etc.) ni le contenu de la prise de vue ou les<br />
frais liés à la prise de vue.<br />
Joint torique et garniture pare-gouttes<br />
L’entretien du joint torique est très important. De l’eau risque de pénétrer<br />
à l’intérieur de ce boîtier et de le faire couler si vous ne nettoyez pas<br />
correctement le joint torique.<br />
Joint torique<br />
L’étanchéité de ce boîtier est garantie par un joint torique.<br />
Mise en place du joint torique<br />
Évitez de mettre le joint torique en place à un endroit poussiéreux ou sableux.<br />
1 Retirez le joint torique de ce boîtier. (-1)<br />
Pour retirer le joint torique, appuyez légèrement dessus et faites-le glisser<br />
dans le sens de la flèche, comme indiqué sur l’illustration. Le joint torique est<br />
suffisamment souple pour être facilement retiré.<br />
Veillez à ne pas abîmer le joint torique avec vos ongles.<br />
2 Inspectez le joint torique.<br />
ˎˎVérifiez avec soin la présence<br />
de saletés, grains de sable,<br />
cheveux, poussière, sel, fils,<br />
etc. sur le joint torique. Si<br />
nécessaire, essuyez le boîtier et<br />
l’étui avec un chiffon doux ou<br />
un mouchoir en papier.<br />
Saleté Sable Cheveu<br />
ˎˎPassez légèrement votre doigt sur le joint torique pour repérer les saletés<br />
invisibles.<br />
ˎˎVeillez à ne pas laisser de fibres de tissu ou de papier sur le joint torique après<br />
l’avoir nettoyé.<br />
ˎˎAssurez-vous que le joint<br />
torique ne présente aucune<br />
craquelure, déformation,<br />
irrégularité, coupure, éraflure,<br />
incrustation de sable, etc.<br />
Remplacez-le s’il en présente.<br />
Craquelures Irrégularité Rayures<br />
3 Inspectez la rainure du joint torique.<br />
Retirez avec soin les grains de sable ou de sel s’incrustant parfois dans la rainure.<br />
4 Inspectez également la surface du joint torique en contact avec la<br />
partie avant.<br />
5 Appliquez de la graisse fournie sur le joint torique.<br />
ˎˎAvec le bout du doigt, étalez une petite goutte de graisse en fine couche et<br />
régulière sur toute la surface du joint torique, comme indiqué sur l’illustration.<br />
(-5)<br />
ˎˎAssurez-vous qu’une fine couche de graisse recouvre toujours la surface du<br />
joint. La graisse protège le joint torique et l’empêche de s’user.<br />
Graisse<br />
Utilisez seulement la graisse fournie. Tout autre type de graisse peut<br />
endommager le joint torique et causer des infiltrations d’eau.<br />
6 Insérez le joint torique dans la rainure de ce boîtier.<br />
Insérez le joint torique uniformément dans la rainure en prêtant attention aux<br />
points suivants :<br />
Assurez-vous qu’il n’y a pas de saleté sur le joint torique.<br />
ˋˋ<br />
Assurez-vous que le joint torique n’est pas tordu ou ne ressort pas. (<br />
ˋ<br />
ˋ<br />
-6)<br />
Waterproof Case<br />
Marine pack<br />
Boîtier étanche<br />
Caisson étanche<br />
< Notice for the customers in the countries applying EU Directives ><br />
The manufacturer of this product is <strong>Sony</strong> Corporation, 1-7-1 Konan Minato-ku<br />
Tokyo, 108-0075 Japan. The Authorized Representative for EMC and product safety<br />
is <strong>Sony</strong> Deutschland GmbH, Hedelfinger Strasse 61, 70327 Stuttgart, Germany.<br />
For any service or guarantee matters please refer to the addresses given in separate<br />
service or guarantee documents.<br />
Main Feature<br />
Useable at a depth of up to 40 m (132 feet) underwater.<br />
ˎMarine Pack <strong>MPK</strong>-<strong>WH</strong> (referred to below as “<br />
ˎ<br />
this unit”) is exclusively for use<br />
with the <strong>Sony</strong> Digital Still Camera (referred to below as “camera”) DSC-WX50/<br />
WX100/WX150. (Not all cameras are available in all countries or regions.)<br />
ˎˎThis unit is waterproof so the camera can be used in the rain, snow, at the beach,<br />
or underwater.<br />
ˎUsing this unit with the camera set to<br />
ˎ (Underwater) or (Underwater<br />
Sweep Panorama) enables you to record beautiful underwater images.<br />
Precautions<br />
ˎˎWhen using this unit while diving, be sure to pay attention to the surrounding<br />
situation. Lack of attention may cause an accident while diving.<br />
ˎˎIn case a water leakage is occurred, be sure to pay attention to the surrounding<br />
situation and surface following the safety rules for diving.<br />
ˎˎDo not subject the front glass to strong shock, as it may crack.<br />
ˎˎDo not throw this unit into the water.<br />
ˎˎAvoid using this unit under the following situations:<br />
in a very hot or humid place.<br />
ˋˋ<br />
in water hotter than 40<br />
ˋ<br />
ˋ<br />
°C (104 °F).<br />
at tem<strong>per</strong>atures lower than 0<br />
ˋ<br />
ˋ<br />
°C (32 °F).<br />
In these situations moisture condensation or water leakage may occur and damage<br />
this unit.<br />
ˎUse this unit for no longer than 30 minutes at a time in tem<strong>per</strong>atures above 35<br />
ˎ °C<br />
(95 °F).<br />
ˎˎDo not leave this unit under direct sunlight in a very hot and humid place for a<br />
long <strong>per</strong>iod of time. If you cannot avoid leaving this unit under direct sunlight, be<br />
sure to cover this unit with a towel or other protection.<br />
ˎˎWhen the camera overheats, it may automatically turn off or recording may<br />
malfunction. To use the camera again, leave it in the cool place for a while to cool<br />
down.<br />
ˎˎUse the supplied spacer to keep this unit open if you take it onboard a plane. If it<br />
is shut tight, changes in cabin pressure may make it difficult to open.<br />
If sun oil is on this unit, be sure to wash it off thoroughly using lukewarm<br />
water. If this unit is left with sun oil on its body, the surface of this unit may<br />
become discolored or damaged (such as cracks on the surface).<br />
Water leakage<br />
If water happens to leak in, stop exposing this unit to water immediately.<br />
ˎˎIf the camera gets wet, take it to the nearest <strong>Sony</strong> dealer immediately. Repair costs<br />
must be borne by the customer.<br />
ˎˎIn the unlikely event that a malfunction of this unit causes damage due to water<br />
leakage, <strong>Sony</strong> does not guarantee against damages to the equipment contained in<br />
it (camera, battery pack, etc.) and the recorded contents, nor expenses entailed in<br />
the photography.<br />
O-ring and Drip-proof packing<br />
O-ring maintenance is very important. Failure to do O-ring maintenance<br />
according to the instructions may lead to water leaks and cause this unit to<br />
sink.<br />
O-ring<br />
This unit uses an O-ring to maintain its water resistance.<br />
Fit the O-ring<br />
Avoid fitting the O-ring in dusty or sandy locations.<br />
1 Remove the O-ring attached to this unit. (-1)<br />
To remove the O-ring, press it lightly and slide it in the direction of the arrow as<br />
illustrated. The O-ring has enough slack to be able to be removed easily.<br />
Be careful not to scratch the O-ring with your fingernail.<br />
2 Inspect the O-ring.<br />
ˎˎCarefully check that there is<br />
any dirt, sand, hair, dust, salt,<br />
threads, etc. on the O-ring. If<br />
found, be sure to wipe off with<br />
a soft cloth or tissue pa<strong>per</strong>. Dirt Sand Hair<br />
ˎˎLightly run your fingertip around the O-ring to check for any invisible dirt.<br />
ˎˎBe careful not to leave any cloth or tissue pa<strong>per</strong> fibers on the O-ring after<br />
wiping it.<br />
ˎˎCheck the O-ring for cracks,<br />
skewing, distortion, fine<br />
splitting, scratches, embedded<br />
sand, etc. Replace the O-ring if<br />
you find any of these. Cracks Distortion Scratches<br />
3 Inspect the O-ring groove.<br />
Carefully remove any grains of sand or hardened salt that get into the groove.<br />
4 Inspect the O-ring contact surface on the front case in the same way.<br />
5 Apply the grease supplied to the O-ring.<br />
ˎˎUse your fingertips to thinly and evenly coat the entire surface of the O-ring<br />
with a small drop of grease, as illustrated. (-5)<br />
ˎˎMake sure there is always a thin coating of grease on the surface of the O-ring.<br />
Grease protects the O-ring and prevents wear.<br />
Grease<br />
Only use the grease supplied. Other kinds of grease will damage the O-ring<br />
and cause water leaks.<br />
6 Fit the O-ring into the groove of this unit.<br />
Fit the O-ring evenly into the groove paying attention to the following points:<br />
Check for dirt on the O-ring.<br />
ˋˋ<br />
Check that the O-ring is not twisted or protruding. (<br />
ˋ<br />
ˋ<br />
-6)<br />
Do not pull hard on the O-ring.<br />
ˋˋ<br />
Final check<br />
Check the O-ring again for any dirt, scratches or twisting, etc.<br />
A loose or sandwiched O-ring, or sand or dirt on the O-ring may cause leaks<br />
underwater.<br />
Be sure to check the O-ring before use.<br />
How to check for water leaks<br />
Before installing the camera, always close this unit and immerse it in water to make<br />
sure no water leaks in.<br />
Drip-proof packing<br />
Do not remove or apply grease to the drip-proof packing. If the packing rises up or<br />
is nipped, this may result in water leaks.<br />
If the drip-proof packing comes off, refit it carefully so that it is not twisted.<br />
(See illustration )<br />
O-ring and drip-proof packing serviceable life<br />
O-ring<br />
The serviceable life of the O-ring varies with frequency of use of this unit and<br />
conditions. Generally, it is about one year.<br />
Drip-proof packing<br />
Replace the drip-proof packing with a new one if you find scratches or cracks on it.<br />
After replacing, check that no water leaks in.<br />
O-ring, drip-proof packing and grease<br />
You can obtain the O-ring, drip-proof packing and grease at the nearest <strong>Sony</strong> dealer.<br />
O-ring (model No. 3-080-065-1 )<br />
Drip-proof packing (model No. 3-099-284-0 )<br />
Grease (model No. 2-582-620-0 )<br />
Maintenance<br />
ˎˎAfter recording in a location with a sea breeze, wash this unit thoroughly in fresh<br />
water with the buckles fastened to remove salt and sand, then wipe with a soft dry<br />
cloth. It is recommended that you submerge this unit in fresh water for about 30<br />
minutes. If it is left with salt on it, metal portions may be damaged or rust may<br />
form and cause water leakage.<br />
ˎˎIf sun oil is on this unit, be sure to wash it off thoroughly using lukewarm water.<br />
ˎˎWipe the inside of this unit with a soft dry cloth. Do not wash it with water.<br />
Be sure to <strong>per</strong>form the above maintenance each time you use this unit. Do not use<br />
any type of solvent such as alcohol, benzine or thinner for cleaning, as this might<br />
damage the surface finish of this unit.<br />
When storing this unit<br />
ˎˎAttach the spacer supplied with this unit to prevent wear of the O-ring. (See<br />
illustration )<br />
ˎˎPrevent dust from collecting on the O-ring.<br />
ˎˎLightly coat the O-ring with grease and insert it into the seating groove, then store<br />
this unit in a cool, well-ventilated location. Do not fasten the buckle.<br />
ˎˎAvoid storing this unit in a cold, very hot or humid place, or together with<br />
naphthalene or camphor, as these conditions might damage this unit.<br />
Preparation<br />
Replacing the attachment<br />
Do not use excessive force when replacing the attachment.<br />
* If you are using the DSC-WX100, the following steps are not required.<br />
* Always fit the correct attachment for your camera by referring to the<br />
attachment/reflex prevention ring compatibility list ().<br />
* Using the wrong attachment may damage the camera or allow water to leak<br />
into this unit.<br />
1 Open this unit. (-1)<br />
Press the top and bottom OPEN buttons together and release the buckle in<br />
the direction of the arrow to open this unit body.<br />
<br />
<br />
<br />
<br />
<br />
<br />
Drip-proof packing<br />
Garniture pare-gouttes<br />
/ (In-Camera<br />
Guide/Delete)<br />
/ (Guide intégré à<br />
l’appareil/Supprimer)<br />
(Playback)<br />
(Lecture)<br />
Spacer (remove to use this unit)<br />
Attach the spacer when storing this unit.<br />
Entretoise (la retirer avant d’utiliser ce boîtier)<br />
Mettez l’entretoise avant de ranger ce boîtier.<br />
Drip-proof packing<br />
Garniture pare-gouttes<br />
O-ring<br />
Joint torique<br />
Rear attachment<br />
Fixation arrière<br />
Front attachment<br />
Fixation avant<br />
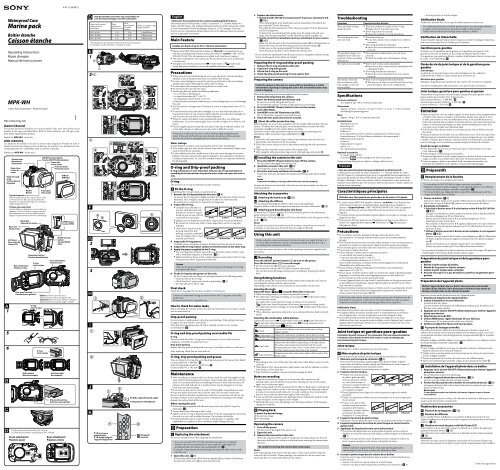
Shutter lever<br />
Manette du<br />
déclencheur<br />
Front protector<br />
Protection avant<br />
Tripod receptacle<br />
When using a tripod, use a tripod with 5.5 mm<br />
or shorter screws. This unit cannot be firmly<br />
fastened on a tripod with long screws. Doing so<br />
might damage this unit.<br />
Filetage pour pied photo<br />
Si vous utilisez un pied photo, sa vis ne doit pas<br />
dépasser 5,5 mm. Ce boîtier ne pourra pas être<br />
fixé stablement si la vis du pied photo est plus<br />
longue. De plus le boîtier peut être endommagé.<br />
ON/OFF (power) button<br />
Touche ON/OFF (Alimentation)<br />
Hook for hand<br />
strap<br />
Crochet pour la<br />
dragonne<br />
Front glass<br />
Vitre avant<br />
Diffuser<br />
Diffuseur<br />
Front case<br />
Partie avant<br />
Zoom lever<br />
Levier de<br />
zoom<br />
Buckle<br />
Boucle<br />
OPEN button<br />
Touche OPEN<br />
LCD hood<br />
Pare-soleil de<br />
l’écran LCD<br />
Rear case<br />
Partie arrière<br />
MOVIE (movie)<br />
button<br />
Touche MOVIE<br />
(film)<br />
Mode dial<br />
Sélecteur de mode<br />
O<strong>per</strong>ation buttons<br />
Touches d’exploitation<br />
Front attachment<br />
Fixation avant<br />
The illustrations below show the DSC-WX100.<br />
Les illustrations suivantes représentent le DSC-WX100.<br />
Rear attachment<br />
Fixation arrière<br />
Digital still camera/<br />
Appareil photo<br />
numérique<br />
Front<br />
attachment/<br />
Fixation avant<br />
Rear<br />
attachment/<br />
Fixation<br />
arrière<br />
Reflex prevention ring/<br />
Bague antireflet<br />
DSC-WX50 F-A R-A 1 (Small/Petite)<br />
DSC-WX100 F-B* R-B* 2 (Big/Grosse)<br />
DSC-WX150 F-C R-C 2 (Big/Grosse)<br />
* The attachments are attached to this unit at the time of purchase.<br />
* Les fixations ont été rattachées à ce boîtier en usine.<br />
Attachment/reflex prevention ring compatibility list<br />
Liste des fixations/bagues antireflet compatibles<br />
1<br />
5<br />
6<br />
Owner’s Record<br />
The model and serial numbers are located inside of the unit. Record the serial<br />
number in the space provided below. Refer to them whenever you call upon your<br />
<strong>Sony</strong> dealer regarding this product.<br />
Model No. <strong>MPK</strong>-<strong>WH</strong> Serial No.<br />
Aide-mémoire<br />
Les numéros de modèle et de série se situent dans l’appareil. Prendre en note le<br />
numéro de série dans l’espace prévu di-dessous. Se reporter à ces numéros lors des<br />
communications avec le détaillant <strong>Sony</strong> au sujet de ce produit.<br />
Modèle no. <strong>MPK</strong>-<strong>WH</strong> No de série<br />
3<br />
<br />
<br />
<br />
<br />
2<br />
<br />
1<br />
2-<br />
<br />
<br />
<br />
<br />
<br />
<br />
<br />
O-ring<br />
Joint torique<br />
Bad example<br />
Mauvais exemple<br />
Good example<br />
Bon exemple<br />
<br />
<br />
<br />
<br />
<br />
W (Wide-angle)/W (Grand-angle)<br />
T (Telephoto)/T (Téléobjectif)<br />
<br />
<br />
<br />
O-ring<br />
Joint torique<br />
Ne tirez pas fort sur le joint torique.<br />
ˋˋ<br />
Vérification finale<br />
Vérifiez une nouvelle fois s’il n’y a pas de saleté, rayures ou torsion, etc.<br />
Une infiltration d’eau dans ce boîtier peut être due à un joint torique détendu<br />
ou aplati, ou bien à la présence de grains de sable ou de poussière.<br />
Veillez à bien vérifier le joint torique avant d’utiliser ce boîtier.<br />
Vérification de l’étanchéité<br />
Avant d’installer l’appareil photo, fermez toujours ce boîtier et plongez-le dans l’eau<br />
pour vous assurer que l’eau ne s’infiltre pas à l’intérieur.<br />
Garniture pare-gouttes<br />
N’enlevez pas et n’appliquez pas de graisse sur la garniture pare-gouttes. Si la<br />
garniture ressort ou est abîmée, de l’eau risque de pénétrer dans le boîtier.<br />
Si la garniture pare-gouttes se détache, remettez-la délicatement dans la rainure sans<br />
la tordre. (Voir l’illustration )<br />
Durée de vie du joint torique et de la garniture paregouttes<br />
Joint torique<br />
La durée de vie du joint torique varie selon la fréquence et les conditions<br />
d’utilisation de ce boîtier. Le joint torique dure environ un an.<br />
Garniture pare-gouttes<br />
Remplacez la garniture pare-gouttes par une neuve si elle est rayée ou craquelée.<br />
Une fois le remplacement effectué, assurez-vous que le boîtier est étanche.<br />
Joint torique, garniture pare-gouttes et graisse<br />
Vous pouvez vous procurer un joint torique, une garniture pare-gouttes et de la<br />
graisse auprès du revendeur <strong>Sony</strong> le plus proche.<br />
Joint torique (référence : 3-080-065-1 )<br />
Garniture pare-gouttes (référence : 3-099-284-0 )<br />
Graisse (référence : 2-582-620-0 )<br />
Entretien<br />
ˎˎAprès une prise de vue à un endroit exposé à la brise marine, lavez soigneusement<br />
ce boîtier à l’eau douce, en laissant la boucle bien fermée, pour enlever le sel et<br />
le sable, puis essuyez-le avec un chiffon doux et sec. Il est conseillé de laisser ce<br />
boîtier dans de l’eau douce pendant 30 minutes environ. Si le caisson n’est pas bien<br />
nettoyé, le sel restant peut attaquer les deux parties métalliques et causer de la<br />
corrosion, et par la suite une infiltration d’eau.<br />
ˎˎSi de l’huile solaire devait tomber sur ce boîtier, prenez soin de l’enlever avec de<br />
l’eau tiède.<br />
ˎˎEssuyez l’intérieur de ce boîtier avec un chiffon doux et sec. Ne le lavez pas à l’eau.<br />
Effectuez toutes les opérations mentionnées ci-dessus chaque fois que vous utilisez<br />
ce boîtier. N’utilisez pas de solvant, comme de l’alcool, de la benzine ou du diluant<br />
pour le nettoyage, car ces substances peuvent attaquer la finition de ce boîtier.<br />
Avant de ranger ce boîtier<br />
ˎˎFixez l’entretoise fournie avec ce boîtier pour que le joint torique ne s’use pas.<br />
(Voir l’illustration )<br />
ˎˎEvitez d’exposer le joint torique à la poussière.<br />
ˎˎRecouvrez légèrement le joint torique de graisse et insérez-le dans la rainure, puis<br />
rangez ce boîtier à un endroit frais et bien aéré. Ne fermez pas la boucle.<br />
ˎˎEvitez de ranger ce boîtier à un endroit froid, très chaud ou humide, ou à<br />
proximité de naphtaline ou de camphre. Cela pourrait l’endommager.<br />
Préparatifs<br />
Remplacement de la fixation<br />
Ne forcez pas lorsque vous remplacez la fixation.<br />
* Si vous utilisez le DSC-WX100, les étapes suivantes sont inutiles.<br />
* Rattachez toujours la fixation adaptée à votre appareil photo en vous référant<br />
à la liste des fixations/bagues antireflet compatibles ().<br />
* Si vous ne le faites pas, l’appareil photo risque d’être endommagé ou de l’eau<br />
risque de s’infiltrer dans ce boîtier.<br />
1 Ouvrez ce boîtier. (-1)<br />
Appuyez en même temps sur les touches OPEN du haut et du bas et ouvrez la<br />
boucle dans le sens de la flèche pour ouvrir les deux parties du boîtier.<br />
2 Remplacez les fixations.<br />
ˎˎDétachez la fixation avant F-B et la fixation arrière R-B du DSC-WX100.<br />
(-2)<br />
Lorsque vous détachez la fixation avant et la fixation arrière, détachez d’abord<br />
les parties indiquées par sur l’illustration.<br />
Ensuite tenez la fixation avant F-B aux endroits indiqués par sur<br />
l’illustration et tirez-la tout droit.<br />
Pour détacher la fixation arrière R-B, appuyez légèrement sur la paroi intérieur<br />
avec le doigt, tenez les parties indiquées par sur l’illustration et tirez tout<br />
droit vers le haut.<br />
ˎˎUtilisez la fixation avant et la fixation arrière adaptées à votre appareil<br />
photo. (-2)<br />
Assurez-vous que la partie de la fixation avant indiquée par sur l’illustration<br />
est fixée à la partie avant, puis appuyez fermement sur les 4 parties indiquées<br />
par .<br />
Appuyez fermement aux 6 endroits indiqués par sur l’illustration.<br />
Insérez les points indiqués par sur l’illustration dans les fentes.<br />
* Si vous retirez la fixation de ce boîtier redressez-la avant de la ranger. Elle peut être<br />
endommagée si elle n’est pas droite lorsque vous la rangez.<br />
Préparation du joint torique et de la garniture paregouttes<br />
1 Retirez le joint torique du boîtier.<br />
2 Mettez de la graisse sur le joint torique.<br />
3 Insérez le joint torique dans ce boîtier.<br />
4 Assurez-vous qu’il n’y a pas de sable ou saleté sur la garniture paregouttes.<br />
Préparation de l’appareil photo<br />
Mettez l’appareil photo dans ce boîtier dans une pièce non humide<br />
ou dans un lieu similaire. De la buée peut se former si vous ouvrez ou<br />
fermez ce boîtier dans un lieu chaud ou humide.<br />
Reportez-vous au mode d’emploi fourni avec l’appareil photo.<br />
1 Détachez la dragonne de l’appareil photo.<br />
2 Insérez la batterie et la carte mémoire.<br />
La batterie doit être pleine.<br />
La carte mémoire doit disposer de suffisamment d’espace pour les photos ou le<br />
film que vous voulez prendre.<br />
3 Appuyez sur la touche ON/OFF (Alimentation) pour mettre l’appareil<br />
photo sous tension.<br />
4 Sélectionnez le mode REC.<br />
5 Utilisez MENU pour régler [Illuminat. AF] sur [Désact].<br />
L’illuminateur AF ne peut pas être utilisé avec ce boîtier.<br />
6 Vérifiez si l’objectif et l’écran LCD sont propres.<br />
À propos de la bague antireflet<br />
Des reflets peuvent être visibles lors de l’utilisation de ce boîtier à cause de la<br />
réflexion de la lumière sur la surface de l’objectif. Pour réduire ce reflet, nous vous<br />
recommandons de fixer, avant l’enregistrement, la bague antireflet sur la surface<br />
de l’objectif.<br />
Rattachez la bague antireflet adaptée à votre appareil photo en vous référant à la liste<br />
des fixations/bagues antireflet compatibles ().<br />
Remarques<br />
ˎˎFixez la bague antireflet de sorte que son diamètre extérieur ne dépasse pas du<br />
diamètre extérieur de la surface de l’objectif.<br />
ˎˎVérifiez s’il n’y a pas des saletés ou de la poussière sur la surface de contact avant<br />
de fixer la bague antireflet.<br />
ˎˎEssuyez la poussière de la surface de contact avec un chiffon humide.<br />
ˎAprès avoir utilisé la bague antireflet, rangez-la en la posant sur la feuille<br />
ˎ .<br />
Installation de l’appareil photo dans ce boîtier<br />
1 Appuyez sur la touche ON/OFF (Alimentation) pour mettre l’appareil<br />
photo hors tension.<br />
Sinon l’objectif pourrait être endommagé.<br />
2 Installez l’appareil photo dans ce boîtier. (-2)<br />
Assurez-vous que l’appareil photo est bien en place.<br />
3 Fermez les deux parties de ce boîtier et verrouillez la boucle. (-3)<br />
Les taquets du haut et du bas de la boucle doivent être encliquetés pour que ce<br />
boîtier soit bien fermé.<br />
Remarques<br />
Si vous appuyez trop fort sur le boîtier, les boucles risquent ne pas se fermer<br />
correctement.<br />
Actionnez plusieurs fois les touches et le sélecteur de mode de ce boîtier pour vous<br />
assurer qu’ils fonctionnent correctement.<br />
Fixation des accessoires<br />
Fixation de la dragonne (-)<br />
Fixation du diffuseur<br />
Il est conseillé de fixer le diffuseur si vous utilisez le flash pour la prise de vue.<br />
Alignez le diffuseur sur le protecteur avant et appuyez fermement dessus de la façon<br />
illustrée. (-)<br />
Fixation et retrait du pare-soleil de l’écran LCD<br />
Pour rattacher le pare-soleil LCD, alignez-le d’abord sur la rainure du guide puis<br />
appuyez fermement dessus. (-)<br />
Pour détacher le pare-soleil LCD, écartez-le et détachez-le de la rainure du guide.<br />
(-)<br />
Remarques<br />
Attention de ne pas coincer la dragonne ou la lanière de l’accessoire lorsque vous<br />
fermez les deux parties de ce boîtier. Sinon le boîtier risque de laisser l’eau s’infiltrer.<br />
(Suite à la page arrière)
1<br />
<br />
<br />
<br />
Palanca del<br />
disparador<br />
Palanca del<br />
zoom<br />
Gancho para la<br />
correa de mano<br />
Rosca para trípode<br />
Cuando utilice un trípode, use uno con tornillo<br />
de 5,5 mm o más corto. Esta unidad no podrá<br />
fijarse firmemente a un trípode con tornillos<br />
largos. Si lo hiciese podría dañar esta unidad.<br />
Caja posterior<br />
Cubierta de<br />
la pantalla<br />
de cristal<br />
líquido<br />
5<br />
6<br />
Acoplamiento<br />
posterior<br />
Hebilla<br />
Empaquetadura a<br />
prueba de goteo<br />
Dial de modo<br />
Mal ejemplo<br />
Acoplamiento frontal<br />
Junta tórica<br />
Botón ON/OFF<br />
(alimentación)<br />
Caja frontal<br />
Vidrio frontal<br />
Botones de o<strong>per</strong>ación<br />
Junta tórica<br />
Protector frontal<br />
Difusor<br />
Acoplamiento frontal<br />
Botón OPEN<br />
Botón MOVIE<br />
(película)<br />
Espaciador (Retírelo para utilizar esta unidad.)<br />
Fije el espaciador cuando almacene esta unidad.<br />
Junta<br />
tórica<br />
Buen ejemplo<br />
Las ilustraciones siguientes muestran en modelo DSC-WX100.<br />
Cámara fotográfica<br />
digital<br />
Acoplamiento<br />
frontal<br />
Acoplamiento<br />
posterior<br />
Empaquetadura a prueba<br />
de goteo<br />
Acoplamiento posterior<br />
Lista de compatibilidad de acoplamientos/anillos antirreflejos<br />
Anillo antirreflejos<br />
DSC-WX50 F-A R-A 1 (Pequeño)<br />
DSC-WX100 F-B* R-B* 2 (Grande)<br />
DSC-WX150 F-C R-C 2 (Grande)<br />
* Los acoplamientos están fijados a esta unidad en el momento de la adquisición.<br />
<br />
1<br />
2-<br />
<br />
2-<br />
<br />
<br />
2<br />
3<br />
<br />
<br />
<br />
<br />
<br />
<br />
<br />
<br />
<br />
<br />
/ (Guía en la<br />
cámara/Eliminar)<br />
<br />
<br />
<br />
<br />
W (Gran angular)<br />
T (Telefoto)<br />
<br />
<br />
<br />
<br />
(Reproducción)<br />
(Suite de la page avant)<br />
Utilisation de ce boîtier<br />
Avant d’utiliser l’appareil photo sous l’eau et avant la plongée, mettez ce boîtier<br />
dans l’eau à une profondeur de 1 m (3,3 pieds) et assurez-vous d’une part que<br />
l’appareil photo fonctionne correctement et d’autre part que ce boîtier est bien<br />
étanche.<br />
Pour le détail sur les fonctions de l’appareil photo, reportez-vous au mode d’emploi<br />
fourni avec l’appareil photo.<br />
Enregistrement<br />
Appuyez sur la touche ON/OFF (Alimentation) () pour mettre<br />
l’appareil photo sous tension.<br />
Appuyez sur la manette du déclencheur () pour enregistrer des<br />
images.<br />
ˎˎUtilisez le levier de zoom ( ) pour faire des zooms.<br />
ˎˎEnregistrez des films avec la touche MOVIE (Film). (marche/arrêt)<br />
Vous pouvez aussi prendre des photos pendant l’enregistrement d’un film en<br />
appuyant sur le levier du déclencheur.<br />
Utilisation/Réglage des fonctions<br />
Vous ne pouvez pas actionner la molette de commande de l’appareil photo lorsque<br />
vous utilisez ce boîtier, mais vous pouvez changer les réglages par le menu de<br />
l’appareil photo.<br />
Selon l’appareil photo, certaines fonctions ne seront pas disponibles avec ce boîtier.<br />
Sélection du mode<br />
Sélectionnez le mode REC ( / / ) avec le sélecteur de mode de ce<br />
boîtier.<br />
ˎˎLors de l’enregistrement de film, le son ne peut pas être enregistré correctement.<br />
ˎ ˎPour l’enregistrement de photos sous l’eau, il est conseillé d’utiliser (Sous l’eau)<br />
parmi les modes de sélection de scène.<br />
Pour l’enregistrement de photos en panorama par balayage sous l’eau, il est<br />
conseillé d’utiliser (Panorama par balayage sous l’eau) parmi les modes<br />
d’enregistrement en panorama par balayage.<br />
Pour l’enregistrement de photos sous l’eau, il est conseillé d’utiliser (Sous l’eau)<br />
parmi les modes d’enregistrement de films.<br />
ˎˎLors d’une prise de vue en panorama sous l’eau, il est conseillé de ne pas bouger.<br />
Sélection de la balance des blancs sous l’eau<br />
Permet de régler les teintes des couleurs dans le mode (Sous l’eau) de<br />
(Sélection scène), dans le mode (Panorama par balayage sous l’eau) de<br />
(Panorama par balayage) ou dans le mode (Sous l’eau) de (Film).<br />
(Auto)<br />
(Sous l’eau 1)<br />
L’appareil photo ajuste automatiquement les teintes des<br />
couleurs pour qu’elles paraissent plus naturelles.<br />
Ajuste la balance des blancs lorsque le bleu prédomine.<br />
(Sous l’eau 2) Ajuste la balance des blancs lorsque le vert prédomine.<br />
Ajuste la balance des blancs en fonction de la source<br />
lumineuse. La couleur blanche mémorisée en mode [Rég<br />
(Press. Uniq) pres uniq] devient la couleur blanche de référence. Utilisez<br />
ce mode lorsque [Auto] ou d’autres modes ne <strong>per</strong>mettent<br />
pas d’obtenir une couleur correcte.<br />
Mémorise la couleur blanche de base qui sera utilisée en<br />
(Rég pres uniq) mode [Press. Uniq].<br />
Remarques<br />
ˎˎSelon la couleur de l’eau, la balance des blancs sous l’eau peut ne pas fonctionner<br />
correctement.<br />
ˎˎLorsque le flash est [Activé] la balance des blancs sous l’eau peut être réglée<br />
seulement sur [Auto], [Press. Uniq] ou [Rég pres uniq].<br />
ˎˎ[Rég pres uniq] ne peut pas être sélectionné pendant la charge du flash.<br />
Remarques sur l’enregistrement<br />
ˎˎSi vous ne prenez pas de photos ou ne filmez pas pendant un certain temps,<br />
l’appareil photo se mettra de lui-même hors tension pour préserver la batterie.<br />
Pour utiliser de nouveau l’appareil photo, remettez-le sous tension.<br />
ˎˎLorsque vous utilisez un flash avec ce boîtier, la portée du flash est réduite et les<br />
images ont tendance à être plus sombres, de sorte que la distance de prise de vue<br />
peut être considérablement réduite dans certains environnement (trop sombres,<br />
etc.). Dans ce cas, il est conseillé d’utiliser une torche marine externe en plus du<br />
flash.<br />
ˎˎSi vous utilisez le flash sous l’eau, la lumière du flash peut être réfléchie par les<br />
particules présentes dans l’eau et apparaître sur la photo sous forme de cercles de<br />
lumière.<br />
ˎˎDans certaines situations, des reflets seront visibles lors de la prise de vue. Dans ce<br />
cas, changez de position.<br />
Lecture<br />
Pour sélectionner l’image souhaitée<br />
Pour voir l’image précédente<br />
Pour voir l’image suivante<br />
Retrait de l’appareil photo<br />
1 Mettez l’appareil photo hors tension.<br />
Sinon l’objectif pourrait être endommagé.<br />
2 Ouvrez ce boîtier.<br />
3 Retirez l’appareil photo du boîtier.<br />
L’appareil photo devient chaud si vous l’utilisez longtemps. Dans ce cas, mettez<br />
l’appareil photo hors tension et laissez le refroidir avant de le retirer du boîtier.<br />
Faites attention à ne pas laisser tomber l’appareil photo lorsque vous<br />
le retirez.<br />
Remarques<br />
Avant d’ouvrir ce boîtier, rincez-le à l’eau du robinet ou à l’eau fraîche et séchez-le<br />
avec un chiffon doux. Lorsque vous ouvrez ce boîtier, séchez-vous, vos cheveux ou<br />
votre vêtement pour ne pas risquer de mouiller l’appareil photo.<br />
Résolution de problèmes<br />
Symptôme<br />
Il y a des gouttelettes d’eau<br />
dans ce boîtier.<br />
La prise de vue n’est pas<br />
possible.<br />
Lors de la lecture, l’image<br />
n’a pas les couleurs<br />
attendues. (Lors de la prise<br />
de vue sous l’eau)<br />
Le mode ne change pas.<br />
Le bouton de ce boîtier ne<br />
s’enfonce pas facilement,<br />
semble se coincer ou ne<br />
ressort pas rapidement.<br />
Spécifications<br />
Cause/Mesures à prendre<br />
ˎˎLe joint torique présente des craquelures ou des<br />
rayures.<br />
ppRemplacez le joint torique par un neuf.<br />
ˎˎLe joint torique n’a pas été mis en place<br />
correctement.<br />
ppVérifiez la façon dont le joint torique doit être mis<br />
en place.<br />
ˎˎL’appareil photo est chaud.<br />
ppLaissez l’appareil photo refroidir en le mettant un<br />
instant à un endroit frais.<br />
ˎˎLa mauvaise fixation a été utilisée.<br />
ppUtilisez la fixation adaptée à votre appareil photo<br />
et rattachez-la correctement.<br />
ˎˎLa balance des blancs sous l’eau n’est pas réglée<br />
correctement.<br />
ppVérifiez le réglage de la balance des blancs sous<br />
l’eau.<br />
ˎˎIl y a de la saleté ou poussière sur la fixation.<br />
ppNettoyez la saleté ou la poussière de la fixation<br />
avec un chiffon humide.<br />
ˎˎLa mauvaise fixation a été utilisée.<br />
ppUtilisez la fixation adaptée à votre appareil photo<br />
et rattachez-la correctement.<br />
ˎˎIl y a un joint torique à l’intérieur du bouton de ce<br />
boîtier.<br />
ppCeci peut se produire si ce boîtier n’a pas été utilisé<br />
pendant un certains temps. Il ne s’agit pas d’une<br />
défectuosité.<br />
Résistance à la pression<br />
Jusqu’à 40 mètres (132 pieds) de profondeur d’eau.<br />
Dimensions<br />
Environ 148 mm × 112 mm × 97 mm (5 7/8 po. × 4 1/2 po. × 3 7/8 po.) (l/h/p)<br />
(parties saillantes non comprises)<br />
Poids<br />
Environ 590 g (1 li 5 oz) (caisson étanche seulement)<br />
Articles inclus<br />
Boîtier étanche (1)<br />
Dragonne (1)<br />
Pare-soleil de l’écran LCD (1)<br />
Diffuseur (1)<br />
Fixation avant (3) (L’une d’elles se trouve sur le boîtier.)<br />
Fixation arrière (3) (L’une d’elles se trouve sur le boîtier.)<br />
Bague antireflet (2)<br />
Graisse (1)<br />
Remplacement du joint torique (1)<br />
Entretoise (1)<br />
Jeu de documents imprimés<br />
Accessoires en option<br />
Kit de joint torique ACC-MP105<br />
(S’assurer de la présence de sur l’emballage lors de l’achat.)<br />
La conception et les spécifications peuvent être modifiées sans préavis.<br />
< Aviso para los clientes de países en los que se aplican las directivas de la<br />
UE ><br />
El fabricante de este producto es <strong>Sony</strong> Corporation, 1-7-1 Konan Minato-ku Tokyo,<br />
108-0075, Japón. El representante autorizado en lo referente al cumplimiento de<br />
la directiva EMC y a la seguridad de los productos es <strong>Sony</strong> Deutschland GmbH,<br />
Hedelfinger Strasse 61, 70327 Stuttgart, Alemania. Para resolver cualquier asunto<br />
relacionado con el soporte técnico o la garantía, consulte las direcciones que<br />
se indican en los documentos de soporte técnico y garantía suministrados por<br />
separado.<br />
Características principales<br />
Utilizable hasta una profundidad de 40 metros bajo el agua.<br />
ˎˎEl portacámara subacuático <strong>MPK</strong>-<strong>WH</strong> (en adelante “ esta unidad”) es para<br />
utilizarse exclusivamente con cámaras fotográficas digitales <strong>Sony</strong> (en adelante<br />
“cámara”) DSC-WX50/WX100/WX150. (No todas las cámaras están disponibles<br />
en todos los países o regiones.)<br />
ˎˎEsta unidad es resistente al agua, lo que <strong>per</strong>mite utilizar la cámara bajo la lluvia,<br />
nieve, en la playa, o bajo el agua.<br />
ˎ ˎUtilizando esta unidad con la cámara ajustada a (Submarino) o (Barrido<br />
panorámico submarino) podrá tomar hermosas imágenes bajo el agua.<br />
Precauciones<br />
ˎˎCuando utilice esta unidad mientras bucee, preste atención a la situación<br />
circundante. La falta de atención puede causar un accidente durante el buceo.<br />
ˎˎEn caso de producirse una infiltración de agua, preste atención a la situación<br />
circundante y emerga siguiendo las normas de seguridad para buceo.<br />
ˎˎNo someta el vidrio frontal a golpes fuertes, ya que podría rajarse.<br />
ˎˎNo arroje esta unidad al agua.<br />
ˎˎEvite utilizar esta unidad en las situaciones siguientes:<br />
ˋˋen un lugar muy cálido o húmedo.<br />
ˋˋen agua con tem<strong>per</strong>atura su<strong>per</strong>ior a 40 °C<br />
ˋˋa tem<strong>per</strong>aturas inferiores a 0 °C<br />
En estas situaciones podría condensarse humedad o infiltrarse agua, y esta unidad<br />
podría dañarse.<br />
ˎˎUtilice esta unidad durante no más de 30 minutos cada vez a tem<strong>per</strong>aturas<br />
su<strong>per</strong>iores a 35 °C<br />
ˎˎNo deje esta unidad bajo la luz solar directa en un lugar muy cálido y húmedo<br />
durante mucho tiempo. Si no puede evitar dejar esta unidad bajo la luz solar<br />
directa, cerciórese de cubrirla con una toalla u otro tipo de material protector.<br />
ˎˎCuando la cámara se recaliente, puede apagarse automáticamente o la grabación<br />
puede funcionar mal. Para volver a utilizar la cámara, déjela en un lugar fresco<br />
durante cierto tiempo para que se enfríe.<br />
ˎˎUtilice el espaciador suministrado para mantener esta unidad abierta cuando la<br />
lleve en un avión. Si estuviese bien cerrada, los cambios de presión en la cabina<br />
podrían dificultar su a<strong>per</strong>tura.<br />
Si esta unidad entra en contacto con aceite bronceador, lávela bien con agua<br />
cálida. Si dejase la unidad con aceite bronceador en el cuerpo de la misma,<br />
su su<strong>per</strong>ficie podría decolorar o dañarse (como, por ejemplo, rajas en la<br />
su<strong>per</strong>ficie).<br />
Infiltración de agua<br />
Si se infiltra agua, deje inmediatamente de exponer esta unidad al agua.<br />
ˎˎSi la cámara se moja, llévela inmediatamente a su proveedor <strong>Sony</strong> más próximo.<br />
El coste de las reparaciones tendrá que abonarlo el usuario.<br />
ˎˎEn el caso improbable de que un mal funcionamiento de esta unidad cause<br />
daños debido a la infiltración de agua, <strong>Sony</strong> no se responsabilizará de los daños<br />
ocasionados en el equipo que contenga (cámara, batería, etc.) o en el contenido<br />
grabado, ni de los gastos relacionados con la fotografía.<br />
Junta tórica y empaquetadura a prueba<br />
de goteo<br />
El mantenimiento de la junta tórica es muy importante. Si no realizase el<br />
mantenimiento de la junta tórica de acuerdo con las instrucciones, podrían<br />
producirse infiltraciones de agua y hacer que esta unidad se hundiese.<br />
Junta tórica<br />
Esta unidad utiliza una junta tórica para mantener su resistencia al agua.<br />
Fijación de la junta tórica<br />
Evite fijar la junta tórica en lugares polvorientos o arenosos.<br />
1 Retire la junta tórica fijada a esta unidad. (-1)<br />
Para quitar la junta tórica, presiónela ligeramente y deslícela en el sentido de la<br />
flecha, como se muestra en la ilustración. La junta tórica tiene holgura suficiente<br />
como para poder quitarse con facilidad.<br />
Tenga cuidado de no rayar la junta tórica con sus dedos.<br />
2 Inspeccione la junta tórica.<br />
ˎˎCompruebe cuidadosamente<br />
que no haya suciedad, arena,<br />
pelos, polvo, sal, hilos, etc., en<br />
la junta tórica. Si encuentra<br />
algo, cerciórese de limpiar con<br />
un paño suave o un pañuelo<br />
de papel.<br />
Suciedad Arena Pelo<br />
ˎˎPase ligeramente la punta de sus dedos por la junta tórica para poder detectar<br />
suciedad invisible.<br />
ˎˎTenga cuidado de no dejar ninguna hilacha ni fibras de papel en la junta tórica<br />
después de haberla limpiado.<br />
ˎˎCompruebe que la junta<br />
tórica no esté rajada, sesgada,<br />
deformada, con cortes finos,<br />
rayada, con inclusión de<br />
arena, etc. Si encuentra algo,<br />
reemplácela.<br />
Rajas Deformación Rayazos<br />
3 Inspeccione la ranura de la junta tórica.<br />
Elimine cuidadosamente cualquier grano de arena o sal solidificada que haya<br />
entrado en la ranura.<br />
4 Inspeccione, de la misma forma, la su<strong>per</strong>ficie de contacto de la junta<br />
tórica de la caja frontal.<br />
5 Aplique la grasa suministrada a la junta tórica.<br />
ˎˎUtilice la punta de sus dedos para engrasar fina y uniformemente toda la<br />
su<strong>per</strong>ficie de la junta tórica con una pequeña gota de grasa, como se muestra<br />
en la ilustración. (-5)<br />
ˎˎCerciórese de que haya siempre una ligera capa de grasa en la su<strong>per</strong>ficie de la<br />
junta tórica. La grasa protegerá la junta tórica contra el desgaste.<br />
Grasa<br />
Utilice solamente la grasa suministrada. Otros tipos de grasa dañarán la<br />
junta tórica y causarán infiltraciones de agua.<br />
6 Fije la junta tórica en la ranura de esta unidad.<br />
Fije uniformemente la junta tórica en la ranura prestando atención a los puntos<br />
siguientes:<br />
ˋˋCompruebe que no haya suciedad en la junta tórica.<br />
ˋˋCompruebe que la junta tórica no esté retorcida. ( -6)<br />
ˋˋNo tire con fuerza de la junta tórica.<br />
Comprobación final<br />
Vuelva a comprobar que no haya suciedad, rayazos, torceduras, etc., en la junta<br />
tórica.<br />
Una junta tórica floja o emparedada, o con arena o suciedad podría causar<br />
infiltraciones de agua al sumergir esta unidad.<br />
Cerciórese de comprobar la junta tórica antes de la utilización.<br />
Cómo comprobar las infiltraciones de agua<br />
Antes de instalar la cámara, cierre siempre esta unidad y sumérjala en agua para<br />
asegurarse de que no se infiltre agua.<br />
Empaquetadura a prueba de goteo<br />
No quite ni aplique grasa a la empaquetadura a prueba de goteo. Si la<br />
empaquetadura se levanta o pellizca, se puede producir la infiltración de agua.<br />
Si la empaquetadura a prueba de goteo se desprende, vuelva a fijarla de forma que<br />
no quede retorcida. (Consulte la ilustración .)<br />
Duración útil de la junta tórica y la empaquetadura a<br />
prueba de goteo<br />
Junta tórica<br />
La duración útil de la junta tórica variará con la frecuencia de utilización de esta<br />
unidad y las condiciones. En general, durará aproximadamente un año.<br />
Empaquetadura a prueba de goteo<br />
Reemplace la empaquetadura a prueba de goteo por otra nueva si encuentra en ella<br />
arañazos o rajas.<br />
Después de haberla reemplazado, compruebe que no haya infiltración de agua.<br />
Junta tórica, empaquetadura a prueba de goteo, y grasa<br />
Usted podrá adquirir la junta tórica, la empaquetadura a prueba de goteo, y la grasa<br />
en el distribuidor <strong>Sony</strong> más próximo.<br />
Junta tórica (Núm. de modelo 3-080-065-1 )<br />
Empaquetadura a prueba de goteo (Núm. de modelo 3-099-284-0 )<br />
Grasa (Núm. de modelo 2-582-620-0 )<br />
Mantenimiento<br />
ˎˎDespués de haber grabado en un lugar con brisa del mar, lave bien esta unidad<br />
con agua dulce, con la hebilla abrochada para eliminar la sal y la arena, y después<br />
frótela con un paño suave y seco. Se le recomienda que sumerja esta unidad en<br />
agua dulce durante unos 30 minutos. Si la dejase con sal, las partes metálicas<br />
podrían dañar u oxidarse y provocar la infiltración de agua.<br />
ˎˎSi esta unidad entra en contacto con aceite bronceador, lávela bien con agua<br />
cálida.<br />
ˎˎFrote el interior de esta unidad con un paño suave y seco. No la lave con agua.<br />
Cerciórese de realizar el mantenimiento indicado arriba cada vez que utilice esta<br />
unidad. No utilice ningún tipo de disolvente, como alcohol, bencina, ni diluyente<br />
de pintura para la limpieza, ya que podría dañar el acabado de la su<strong>per</strong>ficie de esta<br />
unidad.<br />
Para almacenar esta unidad<br />
ˎˎFije el espaciador suministrado con esta unidad para evitar el desgaste de la junta<br />
tórica. (Consulte la ilustración .)<br />
ˎˎEvite que se acumule polvo en la junta tórica.<br />
ˎˎAplique una ligera capa de grasa a la junta tórica e inserte ésta en la ranura de<br />
asiento, y después guarde esta unidad en un lugar fresco y bien ventilado. No<br />
abroche la hebilla.<br />
ˎˎEvite almacenar esta unidad en un lugar frío, muy cálido o húmedo, o junto con<br />
naftalina o alcanfor, ya que en estas condiciones podría dañarse esta unidad.<br />
Preparación<br />
Reemplazo del acoplamiento<br />
No utilice fuerza excesiva cuando reemplace el acoplamiento.<br />
* Si está utilizando la DSC-WX100, no se requerirán los pasos siguientes.<br />
* Fije siempre el acoplamiento correcto para su cámara consultando la lista de<br />
compatibilidad de acoplamientos/anillos antirreflejos ().<br />
* La utilización de un acoplamiento erróneo podría dañar la cámara o hacer<br />
que se infiltrase agua en esta unidad.<br />
1 Abra esta unidad. (-1)<br />
Presione juntos los botones OPEN su<strong>per</strong>ior e inferior y suelte la hebilla en el<br />
sentido de la flecha para abrir el cuerpo de esta unidad.<br />
2 Reemplace los acoplamientos.<br />
ˎˎSepare el acoplamiento frontal F-B y el acoplamiento posterior R-B<br />
para DSC-WX100. (-2)<br />
Cuando separe el acoplamiento frontal y el acoplamiento posterior, separe<br />
primero las partes marcadas con en la ilustración.<br />
Después sujete el acoplamiento frontal F-B por las partes marcadas con en<br />
la ilustración y levántelo directamente hacia afuera.<br />
Para separar el acoplamiento posterior R-B, presione suavemente la pared<br />
interior con un dedo, sujete las partes marcadas con en la ilustración, y<br />
levántelo directamente hacia afuera.<br />
ˎˎUtilice el acoplamiento frontal y el acoplamiento posterior correctos<br />
para su cámara. (-2)<br />
Cerciórese de que la parte del acoplamiento frontal marcada con en la<br />
ilustración esté fijada a la caja frontal y después presione firmemente en las 4<br />
partes marcadas .<br />
Presione firmemente los 6 puntos marcados con en la ilustración.<br />
Inserte los puntos marcados con en la ilustración en las ranuras.<br />
* Si quita el acoplamiento de esta unidad para guardarlo, enderécelo antes de<br />
guardarlo. Si lo guardase sin enderezarlo, podría dañarse.<br />
Preparación de la junta tórica y la empaquetadura a<br />
prueba de goteo<br />
1 Retire la junta tórica fijada a esta unidad.<br />
2 Recubra la junta tórica con grasa.<br />
3 Fije la junta tórica a esta unidad.<br />
4 Verifique que no haya arena ni suciedad en la empaquetadura a<br />
prueba de goteo.<br />
Preparación de la cámara<br />
Instale la cámara en esta unidad en una sala o en un entorno similar<br />
con poca humedad. Si abriese o cerrase esta unidad en lugares cálidos<br />
o húmedos, se podría empañar.<br />
Consulte el manual de instrucciones suministrado con la cámara.<br />
1 Quite la correa de la cámara.<br />
2 Inserte la batería y la tarjeta de memoria.<br />
Cerciórese de utilizar una batería completamente cargada.<br />
Cerciórese de que la tarjeta de memoria disponga de espacio suficiente para<br />
grabar imágenes.<br />
3 Pulse el botón ON/OFF (alimentación) para encender la cámara.<br />
4 Seleccione el modo REC.<br />
5 Utilice MENU para ajustar [Iluminador AF] a [Desactivar].<br />
El iluminador AF no podrá utilizarse con esta unidad.<br />
6 Compruebe que no haya suciedad en el objetivo ni en la pantalla de<br />
cristal líquido.<br />
Acerca del anillo antirreflejos<br />
Cuando se utilice esta unidad es posible que se produzcan reflejos debido a la luz<br />
reflejada en la su<strong>per</strong>ficie del objetivo. Para reducir estos reflejos, recomendamos fijar<br />
el anillo antirreflejos a la su<strong>per</strong>ficie del objetivo antes de grabar.<br />
Fije el anillo antirreflejos correcto para su cámara consultando la lista de<br />
compatibilidad de acoplamientos/anillos antirreflejos ().<br />
Notas<br />
ˎˎFije el anillo antirreflejos de forma que su diámetro exterior no sobresalga del<br />
diámetro exterior de la su<strong>per</strong>ficie del objetivo.<br />
ˎˎCompruebe que no haya suciedad ni polvo en la su<strong>per</strong>ficie de contacto antes de<br />
fijar el anillo antirreflejos.<br />
ˎˎLimpie el polvo que pueda haber en la su<strong>per</strong>ficie de contacto con un paño<br />
húmedo.<br />
ˎˎDespués de haber utilizado el anillo antirreflejos, guárdelo aplicándolo en la hoja<br />
.<br />
Instalación de la cámara en esta unidad<br />
1 Pulse el botón ON/OFF (alimentación) para apagar la cámara.<br />
El objetivo podría dañarse si la alimentación estuviese conectada.<br />
2 Instale la cámara en esta unidad. (-2)<br />
Compruebe que la cámara haya quedado correctamente colocada.<br />
3 Cierre el cuerpo de esta unidad y abroche la hebilla. (-3)<br />
Asegure el cuerpo de esta unidad, y abroche la hebilla hasta que los hasta que los<br />
seguros su<strong>per</strong>ior e inferior queden trabados.<br />
Notas<br />
Si presiona con demasiada fuerza el cuerpo, las hebillas pueden no cerrarse<br />
adecuadamente.<br />
Accione varias veces los botones y el mando de modo para asegurarse de que<br />
funcionen adecuadamente.<br />
Colocación de los accesorios<br />
Colocación de la correa de mano (-)<br />
Colocación del difusor<br />
Se recomienda colocar el difusor cuando se vaya a grabar utilizando el flash.<br />
Alinee el difusor con el protector frontal y presiónelo firmemente como se muestra<br />
en la ilustración. (-)<br />
Colocación y extracción de la cubierta de la pantalla de cristal<br />
líquido<br />
Para fijar la cubierta de la pantalla de cristal líquido, alinéela con la guía del<br />
acoplamiento y presiónela firmemente. (-)<br />
Para retirar la cubierta de la pantalla de cristal líquido, despliéguela y sáquela de la<br />
ranura de la guía. (-)<br />
Notas<br />
Tenga cuidado de no pillar la correa de mano ni la correa de accesorios cuando<br />
cierre el cuerpo de esta unidad. Si quedasen pilladas en el cuerpo, podría producirse<br />
infiltración de agua.<br />
Utilización de esta unidad<br />
Antes de utilizar la cámara bajo el agua, sumerja esta unidad a una<br />
profundidad de aproximadamente 1 metro y compruebe que la cámara<br />
funcione adecuadamente y que esta unidad no infiltre agua, y después<br />
comience su buceo.<br />
Con respecto a los detalles sobre las funciones de la cámara, consulte el manual de<br />
instrucciones suministrado con la cámara.<br />
Grabación<br />
Pulse el botón ON/OFF (alimentación) () para conectar la<br />
alimentación.<br />
Para grabar imágenes, pulse la palanca del disparador ().<br />
ˎˎPara la o<strong>per</strong>ación con zoom. utilice la palanca del zoom ( ).<br />
ˎˎGrabe películas con el botón MOVIE (película). (inicio/parada)<br />
También puede grabar imágenes fijas durante la grabación de películas pulsando<br />
la palanca del disparador.<br />
Utilización/ajuste de funciones<br />
Usted no podrá accionar la rueda de control de la cámara cuando utilice esta<br />
unidad, <strong>per</strong>o podrá cambiar los ajustes con el menú de la cámara.<br />
Dependiendo de la cámara, algunas funciones no estarán disponibles con esta<br />
unidad.<br />
Selección del modo<br />
Seleccione el modo REC ( / / ) utilizando el dial de modo de esta<br />
unidad.<br />
ˎˎDurante la grabación de películas, no podrá grabar correctamente el sonido.<br />
ˎ ˎPara grabar imágenes fijas bajo el agua, le recomendamos (Submarino) de los<br />
modos de selección escena.<br />
Para grabar imágenes de barrido panorámico bajo el agua, le recomendamos<br />
(Barrido panorámico submarino) de los modos de barrido panorámico.<br />
Para grabar películas bajo el agua, le recomendamos (Submarino) de los<br />
modos de grabación de películas.<br />
ˎˎCuando tome una vista panorámica bajo el agua, le recomendamos que mantenga<br />
su cuerpo estabilizado.<br />
Selección del balance blanco submarino<br />
Ajusta el tono de color en el modo (Submarino) bajo (Selección escena), en<br />
el modo (Barrido panorámico submarino) bajo (Barrido panorámico) o en<br />
el modo (Submarino) bajo (Película).<br />
(Auto)<br />
(Submarino 1)<br />
(Submarino 2)<br />
(Una pulsación)<br />
(Config 1 puls)<br />
La cámara ajusta automáticamente los tonos de color bajo<br />
el agua de forma que aparezcan naturales.<br />
Ajusta para las condiciones bajo el agua donde el azul sea<br />
intenso.<br />
Ajusta para las condiciones bajo el agua donde el verde<br />
sea intenso.<br />
Ajusta el balance blanco dependiendo de la fuente de<br />
iluminación. El color blanco memorizado en el modo<br />
[Config 1 puls] pasará a ser el color blanco básico. Utilice<br />
este modo cuando [Auto] u otros modos no puedan<br />
ajustar adecuadamente el color.<br />
Memoriza el color blanco básico que se utilizará en el<br />
modo [Una pulsación].<br />
Notas<br />
ˎˎDependiendo del color del agua, el balance blanco submarino puede no trabajar<br />
correctamente.<br />
ˎˎCuando el flash esté [Activado], el balance blanco submarino solamente podrá<br />
ajustarse a [Auto], [Una pulsación], o [Config 1 puls].<br />
ˎˎ[Config 1 puls] no podrá seleccionarse mientras el flash esté cargándose.<br />
Notas sobre la grabación<br />
ˎˎSi no graba ninguna imagen durante cierto tiempo, la cámara se apagará<br />
automáticamente para evitar que se agote la batería. Para volver a utilizar la<br />
cámara, conecte de nuevo la alimentación.<br />
ˎˎSi utiliza un flash con esta unidad fijada, la distancia efectiva del flash se reducirá<br />
y las imágenes tenderán a se más oscuras en general, por lo que la distancia de<br />
toma puede reducirse notablemente en algunos entornos (tono oscuro, etc.). En<br />
tales condiciones se recomienda utilizar una lámpara subacuática externa así<br />
como el flash.<br />
ˎˎSi utiliza el flash bajo el agua, la luz del flash puede reflejarse en partículas del<br />
agua y puede aparecer en la imagen como círculos de luz.<br />
ˎˎDependiendo de la condición de toma de imágenes, es posible que se produzcan<br />
reflejos. Cuando suceda esto, cambie la condición.<br />
Reproducción<br />
Para seleccionar la imagen deseada.<br />
Para la imagen anterior<br />
Para la imagen siguiente<br />
Extracción de la cámara<br />
1 Desconecte la alimentación.<br />
El objetivo podría dañarse si la alimentación estuviese conectada.<br />
2 Abra esta unidad.<br />
3 Extraiga la cámara de esta unidad.<br />
La cámara se calentará cuando se utilice durante mucho tiempo. Desconecte<br />
la alimentación y deje que la cámara se enfríe durante cierto tiempo antes de<br />
extraerla de esta unidad.<br />
Tenga cuidado de no dejar caer la cámara cuando la extraiga.<br />
Notas<br />
Antes de abrir esta unidad, lávela con agua corriente y seque el agua con un paño<br />
suave. Cuando la abra, tenga cuidado para no <strong>per</strong>mitir que entre agua de su cuerpo,<br />
pelo, ni gotas de agua de las mangas de su traje de submarinista en la cámara.<br />
Solución de problemas<br />
Síntoma<br />
Hay gotas de agua en el<br />
interior de esta unidad.<br />
La función de grabación no<br />
trabaja.<br />
Las imágenes de<br />
reproducción no se<br />
visualizan en el color<br />
es<strong>per</strong>ado. (Al grabar bajo<br />
el agua)<br />
El modo no cambia.<br />
Un botón de esta unidad<br />
no se puede pulsar<br />
fácilmente, parece<br />
encallado, o no vuelve<br />
rápidamente a su posición.<br />
Especificaciones<br />
Causa/Soluciones<br />
ˎˎLa junta tórica está rayada o rajada.<br />
ppReemplace la junta tórica por otra nueva.<br />
ˎˎLa junta tórica no está correctamente colocada.<br />
ppCompruebe el método de fijación de la junta<br />
tórica.<br />
ˎˎLa cámara se ha calentado.<br />
ppDeje la cámara en un lugar fresco durante cierto<br />
tiempo para que se enfríe.<br />
ˎˎHa fijado un acoplamiento erróneo.<br />
ppFije correctamente el acoplamiento correcto para<br />
su cámara.<br />
ˎˎEl balance blanco submarino puede no estar<br />
ajustado correctamente.<br />
ppCompruebe el ajuste del balance blanco<br />
submarino.<br />
ˎˎHay suciedad o polvo en el acoplamiento.<br />
ppElimine la suciedad o el polvo del acoplamiento<br />
con un paño humedecido.<br />
ˎˎHa fijado un acoplamiento erróneo.<br />
ppFije correctamente el acoplamiento correcto para<br />
su cámara.<br />
ˎˎHay una junta tórica en el interior del botón de esta<br />
unidad.<br />
ppEsto puede ocurrir cuando utilice esta unidad<br />
después de un largo <strong>per</strong>íodo de no haberla usado.<br />
No se trata de un fallo de funcionamiento.<br />
Resistencia a la presión<br />
Hasta una profundidad de 40 metros bajo el agua<br />
Dimensiones<br />
Aprox. 148 mm × 112 mm × 97 mm (an/al/prf)<br />
(excluyendo las partes salientes)<br />
Peso<br />
Aprox. 590 g (esta unidad solamente)<br />
Elementos incluidos<br />
Funda resistente al agua (1)<br />
Correa de mano (1)<br />
Cubierta de la pantalla de cristal líquido (1)<br />
Difusor (1)<br />
Acoplamiento frontal (3)<br />
(Uno de ellos está fijado al portacámara subacuático.)<br />
Acoplamiento posterior (3)<br />
(Uno de ellos está fijado al portacámara subacuático.)<br />
Anillo antirreflejos (2)<br />
Grasa (1)<br />
Reemplazo de la junta tórica (1)<br />
Espaciador (1)<br />
Juego de documentación impresa<br />
Accesorios opcionales<br />
Juego de juntas tóricas ACC-MP105<br />
(Compruebe en el paquete en el momento de la adquisición.)<br />
El diseño y las especificaciones están sujetos a cambio sin previo aviso.


