

Sony VG-C2EM - VG-C2EM Istruzioni per l'uso Francese
Sony VG-C2EM - VG-C2EM Istruzioni per l'uso Francese
Sony VG-C2EM - VG-C2EM Istruzioni per l'uso Francese

Create successful ePaper yourself
Turn your PDF publications into a flip-book with our unique Google optimized e-Paper software.
Vertical Grip<br />
Poignée verticale<br />
<br />
O<strong>per</strong>ating Instructions<br />
Mode d’emploi<br />
© 2014 <strong>Sony</strong> Corporation<br />
Printed in China<br />
<strong>VG</strong>-<strong>C2EM</strong><br />
<br />
<br />
<br />
<br />
<br />
<br />
<br />
<br />
Printed on 70% or more rectcled pa<strong>per</strong><br />
using VOC (Volatile Organic Compound)<br />
-free vegetable oil based ink.<br />
<br />
<br />
1 2<br />
3<br />
10<br />
1<br />
2<br />
3<br />
4<br />
5<br />
9<br />
6 7 8<br />
15<br />
<br />
1 2<br />
3 4<br />
4<br />
5<br />
11<br />
12<br />
13<br />
14<br />
4-564-088-01 (1)<br />
16<br />
17<br />
18<br />
<br />
5<br />
6<br />
<br />
7<br />
<br />
<br />
<br />
<br />
ˎˎ<br />
ˎˎ<br />
ˎˎ<br />
<br />
<br />
<br />
<br />
<br />
<br />
<br />
<br />
<br />
<br />
<br />
<br />
<br />
<br />
<br />
<br />
<br />
<br />
<br />
<br />
<br />
<br />
<br />
<br />
<br />
<br />
<br />
<br />
<br />
<br />
<br />
<br />
<br />
<br />
<br />
<br />
<br />
<br />
<br />
<br />
<br />
<br />
<br />
<br />
<br />
<br />
<br />
<br />
<br />
<br />
<br />
<br />
<br />
<br />
ˎˎ<br />
ˎˎ<br />
ˎˎ<br />
<br />
<br />
<br />
<br />
<br />
<br />
<br />
<br />
<br />
<br />
<br />
<br />
<br />
<br />
JBRC<br />
http://www.jbrc.net/hp/contents/index.html<br />
<br />
<br />
WEB<br />
<br />
<br />
<br />
ILCE-7M2<br />
<br />
*NP-FW50<br />
2<br />
*<br />
ˎˎ<br />
ˎˎ<br />
<br />
ˎˎ ()<br />
ˎˎ<br />
<br />
*InfoLITHIUM<br />
<br />
<br />
<br />
<br />
<br />
<br />
<br />
<br />
ˎˎ<br />
<br />
<br />
<br />
ˎˎ<br />
ˎˎ<br />
ˎˎ<br />
<br />
ˎˎ040<br />
ˎˎ<br />
<br />
<br />
ˎˎ<br />
<br />
<br />
<br />
ˎˎ<br />
<br />
ˎˎ<br />
<br />
<br />
<br />
<br />
ˎˎ5.5 mm<br />
5.5 mm<br />
<br />
ˎˎ<br />
<br />
ˎˎUSB<br />
<br />
<br />
1 <br />
2 <br />
3 ON/OFF<br />
4 C22<br />
5 <br />
6 C11<br />
7 <br />
8 <br />
9 <br />
10 OPEN/CLOSE<br />
11 <br />
12 <br />
13 C33<br />
14 AF/MF//AELAE<br />
<br />
ˎˎAF/MF/AEL<br />
15 <br />
16 <br />
17 <br />
18 <br />
<br />
1 OFF<br />
2 <br />
3 <br />
<br />
ˎˎ<br />
<br />
ˎˎ<br />
4 <br />
<br />
<br />
5 <br />
ˎˎ<br />
ˎˎ<br />
<br />
NP-FW5012<br />
ˎˎNP-FM55HNP-FM50NP-FM30NP-FM500HNP-FH50<br />
ˎˎ<br />
1 <br />
OFF<br />
2 OPEN/CLOSEOPEN<br />
3 <br />
<br />
ˎˎ<br />
<br />
<br />
4 <br />
5 <br />
ˎˎ1<br />
ˎˎ<br />
ˎˎ<br />
-16<br />
ˎˎ<br />
-5-<br />
ˎˎ NP-FW50<br />
<br />
ˎˎ<br />
ˎˎ2<br />
<br />
<br />
6 <br />
<br />
ˎˎ<br />
<br />
<br />
ˎˎ<br />
<br />
<br />
<br />
-6-)<br />
7 OPEN/CLOSECLOSE<br />
<br />
ˎˎ<br />
<br />
<br />
<br />
ON/OFFON<br />
ˎˎON/OFF<br />
ON/OFF<br />
ˎˎON/OFF<br />
<br />
ˎˎON/OFFON/<br />
OFFON/OFF<br />
ˎˎAF/MF//AELAE<br />
AELAF/MF<br />
AF/MF/AEL<br />
<br />
NP-FW502<br />
<br />
<br />
2<br />
<br />
<br />
<br />
<br />
<br />
<br />
<br />
<br />
ˎˎ70-200mm<br />
F2.8G70-200mm F2.8 G SSM II300mm F2.8G300mm F2.8 G SSM II <br />
500mm F4 G SSM70-400mm F4-5.6G SSM70-400mm F4-5.6 G SSM II<br />
<br />
<br />
<br />
<br />
ˎˎ70-<br />
200mm F2.8G70-200mm F2.8 G SSM II70-400mm F4-5.6G SSM<br />
<br />
<br />
ˋˋ<br />
ˋˋDMF<br />
ˋˋ<br />
<br />
<br />
<br />
ON<br />
<br />
<br />
<br />
<br />
<br />
<br />
<br />
<br />
<br />
ˎˎ<br />
<br />
ˎˎ<br />
<br />
ˎˎ<br />
<br />
<br />
ˎˎOFF<br />
<br />
<br />
ˎˎON/OFF<br />
OFF<br />
<br />
ˎˎ<br />
<br />
<br />
ˎˎOFF<br />
<br />
<br />
ˎˎ<br />
<br />
<br />
ˎˎOFF<br />
<br />
<br />
NP-FW50DC7.2V<br />
127 mm 100.5 mm 60.5 mm<br />
250 g<br />
0 40 <br />
11<br />
<br />
<br />
InfoLITHIUM<br />
<br />
<br />
ˎˎ<br />
<br />
ˎˎ<br />
ˎˎ1<br />
<br />
<br />
<br />
<br />
<br />
<br />
<br />
<br />
<br />
<br />
<br />
<br />
<br />
7<br />
<br />
<br />
<br />
<br />
<br />
ˎˎ<strong>VG</strong>-<strong>C2EM</strong><br />
ˎˎ<br />
ˎˎ<br />
Before o<strong>per</strong>ating the product, please read this manual thoroughly and retain it for<br />
future reference.<br />
WARNING<br />
To reduce fire or shock hazard, do not expose the unit to rain or moisture.<br />
Tape over lithium battery contacts to avoid short-circuit when disposing of batteries,<br />
and follow local regulations for battery disposal.<br />
Keep batteries or things that could be swallowed away from young children. Contact<br />
a doctor immediately if an object is swallowed.<br />
Immediately remove the batteries and discontinue use if...<br />
ˎˎthe product is dropped or subjected to an impact in which the interior is exposed.<br />
ˎˎthe product emits a strange smell, heat, or smoke.<br />
Do not disassemble. Electric shock may occur if a high voltage circuit inside the<br />
product is touched.<br />
CAUTION<br />
CAUTION<br />
Replace the battery with the specified type only.<br />
Otherwise, fire or injury may result.<br />
Dispose of used batteries according to the instructions.<br />
For the Customers in the U.S.A.<br />
CAUTION<br />
You are cautioned that any changes or modifications not expressly approved in this<br />
manual could void your authority to o<strong>per</strong>ate this equipment.<br />
NOTE<br />
This equipment has been tested and found to comply with the limits for a Class B<br />
digital device, pursuant to Part 15 of the FCC Rules. These limits are<br />
designed to provide reasonable protection against harmful interference in a<br />
residential installation. This equipment generates, uses, and can radiate radio<br />
frequency energy and, if not installed and used in accordance with the<br />
instructions, may cause harmful interference to radio communications.<br />
However, there is no guarantee that interference will not occur in a particular<br />
installation. If this equipment does cause harmful interference to radio or<br />
television reception, which can be determined by turning the equipment off<br />
and on, the user is encouraged to try to correct the interference by one or more of<br />
the following measures:<br />
ˋˋReorient or relocate the receiving antenna.<br />
ˋˋIncrease the separation between the equipment and receiver.<br />
ˋˋConnect the equipment into an outlet on a circuit different from that to which the<br />
receiver is connected.<br />
ˋˋConsult the dealer or an ex<strong>per</strong>ienced radio/TV technician for help.<br />
For the Customers in Europe<br />
Disposal of Old Electrical & Electronic Equipment (Applicable<br />
in the European Union and other European countries with<br />
separate collection systems)<br />
This symbol on the product or on its packaging indicates that this<br />
product shall not be treated as household waste. Instead it shall<br />
be handed over to the applicable collection point for the recycling<br />
of electrical and electronic equipment. By ensuring this product<br />
is disposed of correctly, you will help prevent potential negative<br />
consequences for the environment and human health, which could<br />
otherwise be caused by inappropriate waste handling of this product.<br />
The recycling of materials will help to conserve natural resources.<br />
For more detailed information about recycling of this product,<br />
please contact your local Civic Office, your household waste disposal<br />
service or the shop where you purchased the product.<br />
<br />
Manufacturer: <strong>Sony</strong> Corporation, 1-7-1 Konan Minato-ku Tokyo, 108-0075 Japan<br />
For EU product compliance: <strong>Sony</strong> Deutschland GmbH, Hedelfinger Strasse 61,<br />
70327 Stuttgart, Germany<br />
Notes on Use<br />
For details on compatible camera models of this unit, visit the <strong>Sony</strong> website<br />
in your area, or consult your <strong>Sony</strong> dealer or local authorized <strong>Sony</strong> service<br />
facility.<br />
Although this unit is designed with dust-proofness and splash-proofness in<br />
mind, it may not keep dust or splashes completely out.<br />
Camera<br />
Only a digital single-lens reflex camera ILCE-7M2 can be used.<br />
Battery packs<br />
Only “InfoLITHIUM” battery pack(s)* NP-FW50 can be used.<br />
You can attach up to two battery packs to this unit simultaneously.<br />
Other “InfoLITHIUM” battery packs* cannot be used with this unit.<br />
ˎˎRemove the battery pack(s) from this unit when storing this unit for an extended<br />
<strong>per</strong>iod of time.<br />
ˎˎAlways use a genuine <strong>Sony</strong> battery pack with this unit. Only charge the battery<br />
with the specified battery charger.<br />
ˎˎThis unit does not have a battery charger function. The battery pack(s) cannot be<br />
charged via this unit.<br />
ˎˎA battery pack(s) inserted in this unit cannot be charged, even if this unit is<br />
attached to a camera that has a charging function.<br />
* What is “InfoLITHIUM” ?<br />
The “InfoLITHIUM” is a lithium ion battery pack which can exchange data with<br />
compatible electronic equipment about its battery consumption. <strong>Sony</strong> recommends<br />
that you use the “InfoLITHIUM” battery pack with electronic equipment having the<br />
logo.<br />
Places to avoid for unit use and storage<br />
Regardless of whether this unit is in use or in storage, do not leave it where it can be<br />
exposed to:<br />
ˎˎExtremely high tem<strong>per</strong>atures<br />
Do not leave this unit where it might be exposed to direct sunlight; Avoid places<br />
like vehicle dashboards or near heat sources. The inside of a vehicle can become<br />
extremely hot if the vehicle windows are closed in the summer or if the vehicle is<br />
under direct sunlight. The unit can become deformed or ex<strong>per</strong>ience malfunctions<br />
if left inside a vehicle.<br />
ˎˎExcessive vibrations<br />
ˎˎStrong electromagnetism or rays<br />
ˎˎExcessive sand or dust<br />
Other cautions<br />
ˎˎThis unit is designed for use from 0 °C to 40 °C (32 °F to 104 °F).<br />
ˎˎWhen you use this unit and a lens mount adapter at the same time, it may not be<br />
possible to attach the tripod to the tripod screw hole of the lens adapter. In that<br />
case, attach the tripod to this unit.<br />
ˎˎA rapid and dramatic rise in tem<strong>per</strong>ature causes condensation to form. Therefore,<br />
seal the unit in a plastic bag and remove as much of the air inside of the bag as<br />
you can before attempting to bring this unit inside after being in the cold for any<br />
extended <strong>per</strong>iod of time. Once the tem<strong>per</strong>ature in the bag has had a change to rise<br />
gradually to the tem<strong>per</strong>ature in the room, you can safely remove the unit from the<br />
bag. These procedures will prevent the unit from changing tem<strong>per</strong>atures rapidly,<br />
thereby prevent condensation from forming.<br />
ˎˎWhen dirty, this unit may be cleaned with a clean, dry cloth. Do not allow this<br />
unit to come in contact with alcohol or other chemicals.<br />
ˎˎThis unit has an electrically-connected signal contact point with the camera.<br />
If you load the battery pack(s) while this unit is not attached to the camera, the<br />
unit could malfunction or be damaged by a shorting of the contact point.<br />
When attaching this unit to the camera, detaching this unit from the camera or<br />
storing this unit separately, be sure to remove the battery pack(s) from this unit.<br />
ˎˎWhen attaching a tripod to this unit, use one with a screw no longer than 5.5 mm.<br />
This unit cannot be firmly fastened on a tripod using long screws. Attempting to<br />
do so will damage this unit.<br />
ˎˎInterference may occur between the LCD monitor of the camera and this unit,<br />
depending on the position of the monitor.<br />
ˎˎWhen attaching this unit to the camera or replacing the battery pack(s), do not<br />
connect the USB cable to the camera.<br />
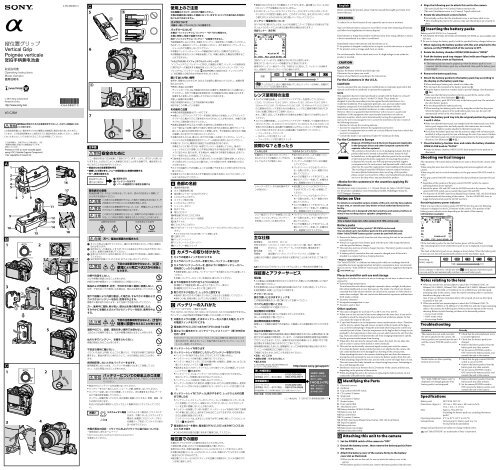
Identifying the Parts<br />
1 Electrical contacts<br />
2 Guide bar<br />
3 Grip control ON/OFF switch<br />
4 C2 (custom 2) button<br />
5 Strap hook<br />
6 C1 (custom 1) button<br />
7 Shutter button<br />
8 Front control dial<br />
9 Attachment screw<br />
10 Battery chamber OPEN/CLOSE knob<br />
11 Battery cover slot<br />
12 Rear control dial<br />
13 C3 (custom 3) button<br />
14 AF/MF (Auto focus/Manual focus) button /AEL (AE lock) button<br />
15 Tripod receptacle<br />
16 Battery pack tray<br />
17 Battery pack tray stop<strong>per</strong><br />
18 Battery detection switch<br />
Attaching this unit to the camera<br />
1 Set the POWER switch of the camera to “OFF.”<br />
2 Detach the battery cover , then remove the battery pack(s) from<br />
the camera.<br />
3 Attach the battery cover of the camera firmly to the battery<br />
cover slot as illustrated.<br />
ˎˎWhen you do not use this unit, be sure to attach the battery cover to the<br />
camera.<br />
ˎˎIf the battery pack(s) is in this unit, remove the battery pack(s) from this unit.<br />
4 Align the following part to attach this unit to the camera.<br />
[This unit] Guide bar [Camera] Battery insertion slot<br />
[This unit] Attachment screw [Camera] Tripod socket hole<br />
5 Rotate the attachment screw to lock it.<br />
ˎˎPeriodically confirm that the attachment screw is not loose while in use.<br />
ˎˎAfter attaching this unit to the camera, make sure that all parts are securely in<br />
place.<br />
Inserting the battery packs<br />
Battery pack NP-FW50 (1 or 2 required)<br />
ˎˎNP-FM55H, NP-FM50, NP-FM30, NP-FM500H, NP-FH50 are not available with<br />
this unit.<br />
ˎˎBe sure to charge the battery pack(s) with the specified battery charger before use.<br />
1 When replacing the battery pack(s) with this unit attached to the<br />
camera, set the POWER switch of the camera to OFF.<br />
2 Rotate the battery chamber OPEN/CLOSE knob to “OPEN.”<br />
3 Push the battery pack tray stop<strong>per</strong> (blue) with your finger in the<br />
direction of the arrow as illustrated.<br />
ˎˎThe battery pack tray may be popped up when the battery pack (s) is not<br />
inserted. Hold the battery pack tray as illustrated, then push the battery pack<br />
tray stop<strong>per</strong>.<br />
4 Remove the battery pack tray.<br />
5 Attach the battery pack(s) to the battery pack tray according to<br />
the display on the battery pack tray.<br />
ˎˎWhen attaching a battery pack, attach it to either side.<br />
ˎˎDo not touch the terminal of the battery pack tray .<br />
ˎˎKeep the battery detection switches clean to prevent damage. (See illustration<br />
-16.)<br />
ˎˎMake sure that the battery pack(s) is firmly secured by the catches of the<br />
battery pack tray. (See illustration -5-.)<br />
ˎˎAttach the battery pack NP-FW50 only to the battery pack tray. Do not attach<br />
the other battery pack(s).<br />
ˎˎDo not disassemble the battery pack tray.<br />
ˎˎWhen inserting two battery packs, start by using the one that has less power.<br />
When the battery capacity of the used battery pack runs out, the unit will<br />
automatically switch to the other battery pack.<br />
6 Insert the battery pack tray into the original position by pressing<br />
it until it clicks.<br />
ˎˎMake sure that the battery pack tray stop<strong>per</strong> locks the battery pack tray. If the<br />
battery pack stop<strong>per</strong> does not lock pro<strong>per</strong>ly, the camera may not correctly<br />
recognize the battery pack(s) attached to the battery pack tray.<br />
ˎˎIf you force the battery pack tray into the unit at an angle with no battery pack<br />
installed, it will go in partly, but you will damage the unit if you insert it further.<br />
Insert the battery pack tray in the horizontal position to the unit and in right<br />
direction. (See illustration -6-.)<br />
7 Close the battery chamber door and rotate the battery chamber<br />
OPEN/CLOSE knob to “CLOSE.”<br />
ˎˎRotate the battery chamber OPEN/CLOSE knob pro<strong>per</strong>ly to the position as<br />
illustrated.<br />
Shooting vertical images<br />
The o<strong>per</strong>ations of the unit’s dials and buttons are same as those for the camera main<br />
body.<br />
When using this unit, also refer to the o<strong>per</strong>ating instructions supplied with your<br />
camera.<br />
When using this unit in vertical orientation, set the grip control ON/OFF switch to<br />
“ON.”<br />
ˎˎThe grip control ON/OFF switch switches the dial and button functions ON and<br />
OFF.<br />
ˎˎRegardless of the position of the grip control ON/OFF switch, the camera<br />
o<strong>per</strong>ating button always o<strong>per</strong>ates.<br />
ˎˎSwitch the power ON and OFF with the POWER switch of the camera. The grip<br />
control ON/OFF switch can not switch the power ON and OFF.<br />
ˎˎThe function of AF/MF (Auto focus/Manual focus) button /AEL (AE lock) button<br />
is synchronized with the setting of the camera. Use the AF/MF/AEL lever to<br />
toggle the function between the AE/MF and AEL.<br />
Remaining battery power indicator<br />
When you insert the two battery packs (NP-FW50) into this unit, the following<br />
indicator is displayed on the LCD monitor of the camera. (The position of the<br />
battery power indicator varies depending on the mode of the camera.)<br />
LCD monitor (example)<br />
Of the two battery packs, the one that has less power will be used first.<br />
The remaining battery level of the battery pack in use is displayed as a <strong>per</strong>centage<br />
(%).<br />
The mark of the battery pack in use changes as shown below. When the battery pack<br />
in use runs out, the unit automatically switches to the next battery pack.<br />
Remaining<br />
battery capacity<br />
high<br />
If you continue to shoot for a while after the mark appears, that battery pack<br />
runs out and the unit automatically switches to the next battery pack.<br />
Notes relating to the lens<br />
ˎˎWhen you use the lens mount adaptor to attach the 70-200mm F2.8G, 70-<br />
200mm F2.8 G SSM II, 300mm F2.8G, 300mm F2.8 G SSM II, 500mm F4 GSSM,<br />
70-400mm F4-5.6G SSM or 70-400mm F4-5.6 G SSM II lens with the tripodmounting<br />
collar to the camera, rotate the tripod-mounting collar to a position<br />
that allows the grip to be used.<br />
Also, if you use the lens mentioned above with a tripod, do not use the tripod<br />
receptacle of this unit.<br />
ˎˎWhen you use the lens mount adaptor to attach the 70-200mm F2.8G, 70-<br />
200mm F2.8 G SSM II or 70-400mm F4-5.6G SSM lens with the tripod-mounting<br />
collar to the camera, the following lens switches may not o<strong>per</strong>ate at the vertical<br />
shooting. Before vertical shooting, set them at the horizontal position.<br />
ˋˋFocus-mode switch<br />
ˋˋDMF-mode switch<br />
ˋˋFocus-range limiter<br />
Troubleshooting<br />
Symptom<br />
The camera does not work even after<br />
the unit is attached to the camera, the<br />
battery pack(s) are inserted into the unit<br />
and the camera POWER switch is set to<br />
ON.<br />
Shutter button or other o<strong>per</strong>ating<br />
buttons do not work.<br />
“For “InfoLITHIUM” battery only” is<br />
displayed even though genuine <strong>Sony</strong><br />
battery pack(s) are being used.<br />
Specifications<br />
Remedy<br />
low<br />
ˎˎCheck that the unit attachment screw<br />
is securely tightened.<br />
ˎˎCheck that the battery pack(s) are<br />
charged.<br />
ˎˎRemove the battery pack(s) from the<br />
battery pack tray, then reattach.<br />
ˎˎSet the camera POWER switch to<br />
OFF, remove the battery pack(s), and<br />
reattach the unit to the camera.<br />
ˎˎCheck that the grip control ON/OFF<br />
switch is not set to OFF.<br />
ˎˎRemove the battery pack(s) from the<br />
battery pack tray, then reattach.<br />
ˎˎSet the camera POWER switch to<br />
OFF, remove the battery pack(s), and<br />
reattach the unit to the camera.<br />
ˎˎRemove the battery pack(s) from the<br />
battery pack tray, then reattach.<br />
ˎˎSet the camera POWER switch to<br />
OFF, remove the battery pack(s), and<br />
reattach the unit to the camera.<br />
Battery pack<br />
NP-FW50 DC7.2V<br />
Dimensions (Approx.) 127 mm × 100.5 mm × 60.5 mm (w/h/d)<br />
(5 in. × 4 in. × 2 1/2 in.)<br />
Mass<br />
Approx. 250 g (8.9 oz)<br />
(including the battery pack tray, excluding the battery<br />
packs)<br />
O<strong>per</strong>ating tem<strong>per</strong>ature 0 °C to 40 °C (32 °F to 104 °F)<br />
Included items Vertical grip (1), Battery pack tray (1),<br />
Set of printed documentation<br />
Design and specifications are subject to change without notice.<br />
and “InfoLITHIUM” are trademarks of <strong>Sony</strong> Corporation.
Avant de faire fonctionner ce produit, lisez attentivement ce mode d’emploi et<br />
conservez-le pour toute référence ultérieure.<br />
AVERTISSEMENT<br />
Afin de réduire les risques d’incendie ou de décharge électrique, n’exposez pas cet<br />
appareil à la pluie ou à l’humidité.<br />
Recouvrez les contacts de la batterie au lithium de bande adhésive pour éviter tout<br />
court-circuit lors de la mise au rebut des batteries et respectez la réglementation<br />
locale en vigueur applicable à la mise au rebut des batteries.<br />
Conservez les batteries hors de la portée des enfants, ainsi que tout objet qu’ils<br />
risqueraient d’avaler. En cas d’ingestion d’un objet, consultez immédiatement un<br />
médecin.<br />
Retirez immédiatement les batteries et arrêtez de les utiliser si...<br />
ˎ<br />
ˎ le produit est tombé ou a subi un choc qui mis à nu ses composants internes ;<br />
ˎ<br />
ˎ le produit dégage de la fumée, une odeur ou une chaleur ou inhabituelle.<br />
Ne démontez pas cet accessoire. Sinon, vous risquez de vous électrocuter en<br />
touchant un circuit haute tension situé à l’intérieur du produit.<br />
ATTENTION<br />
ATTENTION<br />
Remplacez la batterie par une batterie correspondant au type spécifié uniquement.<br />
Sinon vous risquez de provoquer un incendie ou des blessures.<br />
Éliminez vos piles usées selon les instructions.<br />
Pour les clients aux É.-U.<br />
AVERTISSEMENT<br />
Par la présente, vous êtes avisé du fait que tout changement ou toute modification<br />
ne faisant pas l’objet d’une autorisation expresse dans le présent manuel pourrait<br />
annuler votre droit d’utiliser l’appareil.<br />
Note<br />
L’appareil a été testé et est conforme aux exigences d’un appareil numérique de<br />
Classe B, conformément à la Partie 15 de la réglementation de la FCC.<br />
Ces critères sont conçus pour fournir une protection raisonnable contre les<br />
interférences nuisibles dans un environnement résidentiel. L’appareil génère, utilise et<br />
peut émettre des fréquences radio; s’il n’est pas installé et utilisé conformément aux<br />
instructions, il pourrait provoquer des interférences nuisibles aux communications<br />
radio. Cependant, il n’est pas possible de garantir que des interférences ne seront pas<br />
provoquées dans certaines conditions particulières. Si l’appareil devait provoquer<br />
des interférences nuisibles à la réception radio ou à la télévision, ce qui peut être<br />
démontré en allumant et éteignant l’appareil, il est recommandé à l’utilisateur d’essayer<br />
de corriger cette situation par l’une ou l’autre des mesures suivantes :<br />
ˋ<br />
ˋ Réorienter ou déplacer l’antenne réceptrice.<br />
ˋ<br />
ˋ Augmenter la distance entre l’appareil et le récepteur.<br />
ˋ<br />
ˋ Brancher l’appareil dans une prise ou sur un circuit différent de celui sur lequel le<br />
récepteur est branché.<br />
ˋ<br />
ˋ Consulter le détaillant ou un technicien expérimenté en radio/téléviseurs.<br />
Pour les clients en Europe<br />
Traitement des appareils électriques et électroniques en fin<br />
de vie (Applicable dans les pays de l’Union Européenne et<br />
aux autres pays européens disposant de systèmes de collecte<br />
sélective)<br />
Ce symbole, apposé sur le produit ou sur son emballage, indique<br />
que ce produit ne doit pas être traité avec les déchets ménagers. Il<br />
doit être remis à un point de collecte approprié pour le recyclage<br />
des équipements électriques et électroniques. En vous assurant que<br />
ce produit sont mis au rebut de façon appropriée, vous participez<br />
activement à la prévention des conséquences négatives que leur<br />
mauvais traitement pourrait provoquer sur l’environnement et sur<br />
la santé humaine. Le recyclage des matériaux contribue par ailleurs<br />
à la préservation des ressources naturelles. Pour toute information<br />
complémentaire au sujet du recyclage de ce produit, vous pouvez<br />
contacter votre municipalité, votre déchetterie locale ou le point de<br />
vente où vous avez acheté le produit.<br />
< Avis aux consommateurs des pays appliquant les<br />
Directives UE ><br />
Fabricant: <strong>Sony</strong> Corporation, 1-7-1 Konan Minato-ku Tokyo, 108-0075 Japon<br />
Pour toute question relative à la conformité des produits dans l’UE: <strong>Sony</strong><br />
Deutschland GmbH, Hedelfinger Strasse 61, 70327 Stuttgart, Allemagne<br />
Remarque sur l’emploi<br />
Pour le détail sur les modèles d’appareils photo compatibles avec cet<br />
accessoire, consultez le site <strong>Sony</strong> de votre région, ou adressez-vous à votre<br />
revendeur <strong>Sony</strong> ou à un service après-vente agréé <strong>Sony</strong>.<br />
Bien que cet accessoire soit de conception étanche à la poussière et<br />
aux projections de liquide, il peut ne pas être parfaitement étanche à la<br />
poussière ou aux projections.<br />
Appareil photo<br />
Seul un appareil photo numérique reflex ILCE-7M2 peut être utilisé.<br />
Batteries<br />
Seules des batteries « InfoLITHIUM »* NP-FW50 peuvent être utilisées.<br />
Vous pouvez rattacher jusqu’à deux batteries en même temps à cet<br />
accessoire.<br />
Les autres batteries « InfoLITHIUM »* ne peuvent pas être utilisées avec cet<br />
accessoire.<br />
ˎ<br />
ˎ Retirez les batteries de cet accessoire si celui-ci ne doit pas être utilisé pendant<br />
longtemps.<br />
ˎ<br />
ˎ Utilisez toujours une batterie d’alimentation <strong>Sony</strong> d’origine avec cet accessoire.<br />
Chargez uniquement la batterie avec le chargeur de batterie spécifié.<br />
ˎ<br />
ˎ Cet accessoire ne possède pas de fonction de chargeur de batterie. Il est impossible<br />
de charger la ou les batteries sur cet accessoire.<br />
ˎ<br />
ˎ Il est impossible de charger la ou les batteries insérées dans cet accessoire, même<br />
si ce dernier est installé sur une caméra dotée d’une fonction de chargement.<br />
* Que signifie « InfoLITHIUM »?<br />
Les batteries « InfoLITHIUM » sont des batteries au lithium-ion qui peuvent<br />
échanger des informations sur leur consommation avec des appareils électroniques<br />
compatibles. <strong>Sony</strong> vous recommande d’utiliser des batteries « InfoLITHIUM » avec<br />
des appareils électroniques portant le logo .<br />
Endroits à éviter pour l’utilisation et le rangement de<br />
l’accessoire<br />
N’utilisez et ne rangez jamais cet accessoire dans des endroits où il risquerait d’être<br />
exposé aux éléments suivants:<br />
ˎ<br />
ˎ Températures extrêmement élevées<br />
Ne laissez pas cet accessoire dans un endroit où il peut être exposé aux rayons<br />
directs du soleil. Évitez notamment de le placer sur le tableau de bord d’un<br />
véhicule ou près d’une source de chaleur. L’intérieur d’un véhicule peut devenir<br />
extrêmement chaud si les vitres sont fermées en plein été, ou si le véhicule est<br />
exposé aux rayons directs du soleil. Si vous laissez cet accessoire à l’intérieur d’un<br />
véhicule, il risque d’être déformé ou de ne pas fonctionner correctement.<br />
ˎ<br />
ˎ Vibrations excessives<br />
ˎ<br />
ˎ Champs ou rayons électromagnétiques puissants<br />
ˎ<br />
ˎ Sable ou poussière excessive<br />
Autres mises en garde<br />
ˎ<br />
ˎ Cet accessoire est conçu pour une utilisation entre 0 °C et 40 °C (32 °F et 104 °F).<br />
ˎ<br />
ˎ Si vous utilisez simultanément cet accessoire et un adaptateur pour monture<br />
d’objectif, il est possible que vous ne puissiez pas fixer le trépied au trou de vis du<br />
trépied de l’adaptateur d’objectif. Dans ce cas, fixez le trépied à cet accessoire.<br />
ˎ<br />
ˎ Une augmentation rapide et considérable de la température entraîne la<br />
formation de condensation. Par conséquent, si cet accessoire est resté dans un<br />
environnement froid pendant une période prolongée, mettez-le dans un sac<br />
plastique fermé et éliminez autant d’air que possible du sac avant de l’amener à<br />
l’intérieur. Lorsque la température dans le sac a augmenté graduellement jusqu’à<br />
la température de la pièce, vous pouvez retirer l’accessoire du sac en toute sécurité.<br />
Cette procédure <strong>per</strong>met d’éviter un changement de température trop rapide de<br />
l’accessoire, empêchant ainsi toute formation de condensation.<br />
ˎ<br />
ˎ Lorsqu’il est sale, l’accessoire peut être nettoyé avec un linge propre et sec. Évitez<br />
tout contact entre l’accessoire et de l’alcool ou d’autres produits chimiques.<br />
ˎ<br />
ˎ Cet accessoire possède un point de contact de signal raccordé électriquement à<br />
l’appareil photo.<br />
Si vous chargez la ou les batteries alors que cet accessoire n’est pas raccordé à<br />
l’appareil photo, il risque de ne pas fonctionner correctement ou d’être<br />
endommagé à la suite d’un court-circuit du point de contact.<br />
Lors que vous raccordez cet accessoire à l’appareil photo, que vous le débranchez<br />
de l’appareil ou que vous le rangez séparément, n’oubliez pas de retirez sa ou ses<br />
batteries.<br />
ˎ<br />
ˎ Quand vous attachez un trépied à l’accessoire, utilisez un trépied avec une vis d’une<br />
longueur inférieure à 5,5 mm.<br />
Cet accessoire ne peut pas être fixé solidement sur un trépied utilisant une longue<br />
vis. Essayer de le fixer sur un tel trépied peut endommager cet accessoire.<br />
ˎ<br />
ˎ Des interférences peuvent se produire entre l’écran LCD de la caméra et cet<br />
accessoire en fonction de la position de l’écran.<br />
ˎ<br />
ˎ Lorsque vous fixez cet accessoire à l’appareil photo ou lorsque vous remplacez la<br />
ou les batteries, ne raccordez pas le câble USB à l’appareil photo.<br />
Nomenclature des pièces<br />
1 Contacts électriques<br />
2 Barre de guidage<br />
3 Commutateur ON/OFF de commande de la poignée<br />
4 Bouton C2 (<strong>per</strong>sonnalisé 2)<br />
5 Crochet pour dragonne<br />
6 Bouton C1 <strong>per</strong>sonnalisé<br />
7 Déclencheur<br />
8 Molette de commande avant<br />
9 Vis de fixation<br />
10 Bouton OPEN/CLOSE du compartiment pour batteries<br />
11 Fente du couvercle des batteries de l’appareil photo<br />
12 Molette de commande arrière<br />
13 Bouton C3 (<strong>per</strong>sonnalisé 3)<br />
14 Bouton AF/MF (mise au point automatique/manuelle)/bouton AEL (verrouillage<br />
AE)<br />
15 Logement du trépied<br />
16 Plateau pour batterie<br />
17 Butée du plateau pour batterie<br />
18 Commutateur de détection de la batterie<br />
Fixation de cet accessoire à l’appareil<br />
photo<br />
1 Réglez le commutateur POWER de l’appareil photo sur « OFF ».<br />
2 Retirez le couvercle de la batterie, puis retirez la ou les batteries<br />
de l’appareil photo.<br />
3 Insérez correctement le couvercle de la batterie de l’appareil<br />
photo dans le logement du couvercle de la batterie, comme<br />
indiqué.<br />
ˎ<br />
ˎ Lorsque vous n’utilisez pas cet accessoire, veillez à placer le couvercle de la<br />
batterie sur l’appareil photo.<br />
ˎ<br />
ˎ Si une ou plusieurs batteries se trouvent dans cet accessoire retirez-les.<br />
4 Alignez l’élément suivant pour fixer cet accessoire à l’appareil<br />
photo.<br />
[Cet accessoire] Barre de guidage [Appareil photo] Fente d’insertion de la<br />
batterie<br />
[Cet accessoire] Vis de fixation [Appareil photo] Écrou de pied<br />
5 Tournez la vis de fixation pour verrouiller l’accessoire.<br />
ˎ<br />
ˎ Vérifiez régulièrement que la vis de fixation ne s’est pas desserrée en cours<br />
d’utilisation.<br />
ˎ<br />
ˎ Après avoir installé cet accessoire sur la caméra, vérifiez que toutes les pièces<br />
sont correctement en place.<br />
Insertion des batteries<br />
Batteries NP-FW50 (1 ou 2 requises)<br />
ˎ<br />
ˎ Les batteries NP-FM55H, NP-FM50, NP-FM30, NP-FM500H, NP-FH50 ne<br />
peuvent pas être utilisées avec cet accessoire.<br />
ˎ<br />
ˎ Avant l’emploi, veillez à charger les batteries à l’aide du chargeur de batterie<br />
spécifié.<br />
1 Si vous remplacez les batteries alors que cet accessoire est fixé à<br />
l’appareil photo, réglez le commutateur POWER de l’appareil<br />
photo sur OFF.<br />
2 Tournez le bouton OPEN/CLOSE du compartiment pour batteries<br />
sur « OPEN ».<br />
3 Poussez la butée du plateau pour batterie (bleue) avec votre<br />
doigt dans le sens de la flèche, comme illustré.<br />
ˎ<br />
ˎ Il est possible que le plateau pour batterie se soulève si les batteries ne sont<br />
pas insérées. Saisissez le plateau pour batterie comme illustré, puis appuyez<br />
sur la butée du plateau pour batterie.<br />
4 Retirez le tiroir des batteries.<br />
5 Installez les batteries dans leur tiroir en vous conformant au<br />
schéma indiqué dans ce dernier.<br />
ˎ<br />
ˎ Lors de l’insertion d’une batterie, fixez-la de part et d’autre.<br />
ˎ<br />
ˎ Ne touchez pas la borne du tiroir des batteries .<br />
ˎ<br />
ˎ Tenez propres les commutateurs de détection de la batterie afin d’éviter tout<br />
dommage. (Voir illustration -16.)<br />
ˎ<br />
ˎ Vérifiez que les loquets situés sur la butée du plateau pour batterie fixent<br />
correctement la ou les batteries. (Voir illustration -5-.)<br />
ˎ<br />
ˎ N’insérez que la batterie NP-FW50 dans le tiroir des batteries. N’insérez aucun<br />
autre type de batterie.<br />
ˎ<br />
ˎ Ne démontez pas le tiroir des batteries.<br />
ˎ<br />
ˎ Lors de l’insertion de deux batteries, commencez par utiliser la moins<br />
chargée des deux. Lorsque la capacité de celle-ci est épuisée, l’accessoire passe<br />
automatiquement sur l’autre batterie.<br />
6 Insérez le tiroir des batteries dans sa position d’origine en<br />
appuyant dessus jusqu’à ce qu’il émette un déclic.<br />
ˎ<br />
ˎ Vérifiez que le plateau pour batterie est correctement verrouillé. Si la butée<br />
de la batterie ne se verrouille pas correctement, l’appareil photo peut ne pas<br />
reconnaître correctement la ou les batteries mises dans le plateau pour batterie.<br />
ˎ<br />
ˎ Si vous insérez le tiroir des batteries de façon oblique en forçant alors<br />
qu’aucune batterie n’est installée vous pouvez l’insérer partiellement, mais ceci<br />
endommagera l’accessoire si vous insistez.<br />
Insérez le tiroir des batteries dans la position horizontale dans l’accessoire et<br />
dans la bonne direction. (Voir illustration -6-.)<br />
7 Fermez le volet du logement de batteries et mettez son bouton<br />
OPEN/CLOSE en position « CLOSE ».<br />
ˎ<br />
ˎ Tournez le bouton OPEN/CLOSE du logement de batteries pour le mettre à la<br />
position illustrée.<br />
Enregistrement d’images verticales<br />
Les fonctions des molettes et des touches de l’accessoire sont identiques à celles du<br />
corps principal de l’appareil photo.<br />
Lors de l’utilisation de cet accessoire, reportez-vous aussi au mode d’emploi fourni<br />
avec votre appareil photo.<br />
Si vous utilisez cet accessoire en orientation verticale, réglez le commutateur ON/<br />
OFF de la commande de la poignée sur « ON ».<br />
ˎ<br />
ˎ Le commutateur ON/OFF de la commande de la poignée active (ON) et désactive<br />
(OFF) les fonctions des touches et de la molette.<br />
ˎ<br />
ˎ Quelle que soit la position du commutateur ON/OFF de la commande<br />
de la poignée, les touches de commande de l’appareil photo sont toujours<br />
opérationnelles.<br />
ˎ<br />
ˎ Mettez l’accessoire sous tension (ON) et hors tension (OFF) à l’aide du<br />
commutateur POWER de l’appareil photo. Le commutateur ON/OFF de la<br />
commande de la poignée ne peut pas commander la mise sous tension (ON) et<br />
hors tension (OFF).<br />
ˎ<br />
ˎ La fonction du bouton AF/MF (mise au point automatique/manuelle)/bouton<br />
AEL (verrouillage AE) est synchronisée avec le réglage de l’appareil photo. Utilisez<br />
le levier AF/MF/AEL pour commuter les fonctions AE/MF et AEL.<br />
Témoin d’autonomie des batteries<br />
Lorsque vous insérez les deux batteries (NP-FW50) dans cet accessoire, le témoin<br />
suivant s’affiche sur l’écran LCD de l’appareil photo. (La position du témoin de la<br />
batterie varie selon le mode de l’appareil photo.)<br />
Écran LCD (exemple)<br />
Lorsque deux batteries sont en place, celle qui est la moins chargée est utilisée en<br />
premier.<br />
Le niveau de charge de la batterie utilisée est indiqué sous la forme d’un pourcentage<br />
(%).<br />
Le repère de batterie utilisée change de la façon suivante. Lorsque la batterie utilisée<br />
est vide, l’accessoire passe automatiquement à la batterie suivante.<br />
Autonomie restante<br />
des batteries<br />
haute<br />
basse<br />
Si vous continuez de prendre des photos un moment après l’apparition du repère<br />
, la batterie se videra et l’accessoire passera automatiquement à la batterie<br />
suivante.<br />
Remarques relatives à l’objectif<br />
ˎ<br />
ˎ Si vous utilisez l’adaptateur pour monture pour fixer un objectif 70-200mm<br />
F2.8G, 70-200mm F2.8 G SSM II, 300mm F2.8G, 300mm F2.8 G SSM II, 500mm<br />
F4 GSSM, 70-400mm F4-5.6G SSM ou 70-400mm F4-5.6 G SSM II avec le collier<br />
de montage du trépied sur la caméra, faites pivoter le collier de montage du<br />
trépied dans une position qui <strong>per</strong>met d’utiliser la poignée.<br />
Par ailleurs, si vous utilisez l’un des objectifs mentionnés ci-dessus avec un<br />
trépied, n’utilisez pas le logement du trépied de cet accessoire.<br />
ˎ<br />
ˎ Si vous utilisez l’adaptateur pour monture pour fixer un objectif 70-200mm<br />
F2.8G, 70-200mm F2.8 G SSM II ou 70-400mm F4-5.6G SSM avec le collier<br />
de montage du trépied, il est possible que vous ne puissiez pas utiliser les<br />
commutateurs d’objectif suivants pour une prise de vue verticale. Réglez-les en<br />
position horizontale puis faites la prise de vue en position verticale.<br />
ˋ<br />
ˋ Commutateur de mise au point<br />
ˋ<br />
ˋ Commutateur du mode DMF<br />
ˋ<br />
ˋ Limiteur de plage de mise au point<br />
Dépannage<br />
Symptôme<br />
Solution<br />
L’appareil photo ne fonctionne pas<br />
alors que l’accessoire est raccordé, que<br />
la ou les batteries sont insérées dans<br />
l’accessoire et que le commutateur<br />
POWER de l’appareil photo est réglé<br />
sur ON.<br />
ˎ<br />
ˎ Vérifiez si la vis de fixation de<br />
l’accessoire est serrée solidement.<br />
ˎ<br />
ˎ Vérifiez si la ou les batteries sont<br />
chargées.<br />
ˎ<br />
ˎ Retirez la ou les batteries du plateau<br />
pour batterie, puis replacez-les.<br />
ˎ<br />
ˎ Réglez le commutateur POWER de<br />
l’appareil photo sur OFF, retirez la ou<br />
les batteries et refixez l’accessoire sur<br />
l’appareil photo.<br />
Le déclencheur ou d’autres touches ne<br />
fonctionnent pas.<br />
ˎ<br />
ˎ Vérifiez que le commutateur ON/OFF<br />
de la commande de la poignée n’est pas<br />
réglé sur OFF.<br />
ˎ<br />
ˎ Retirez la ou les batteries du plateau<br />
pour batterie, puis replacez-les.<br />
ˎ<br />
ˎ Réglez le commutateur POWER de<br />
l’appareil photo sur OFF, retirez la ou<br />
les batteries et refixez l’accessoire sur<br />
l’appareil photo.<br />
« Pour batterie “InfoLITHIUM”<br />
seulement » s’affiche même si vous<br />
utilisez une ou plusieurs batteries <strong>Sony</strong><br />
d’origine.<br />
ˎ<br />
ˎ Retirez la ou les batteries du plateau<br />
pour batterie, puis replacez-les.<br />
ˎ<br />
ˎ Réglez le commutateur POWER de<br />
l’appareil photo sur OFF, retirez la ou<br />
les batteries et refixez l’accessoire sur<br />
l’appareil photo.<br />
Spécifications<br />
Batterie<br />
NP-FW50 7,2V CC<br />
Dimensions (environ)<br />
127 mm × 100,5 mm × 60,5 mm (l/h/p)<br />
(5 po. × 4 po. × 2 1/2 po.)<br />
Poids<br />
environ 250 g (8,9 oz)<br />
(tiroir des batteries compris, batteries non<br />
comprises)<br />
Température de fonctionnement<br />
0 °C à 40 °C (32 °F à 104 °F)<br />
Articles inclus<br />
Poignée verticale (1), Tiroir des batteries (1), Jeu<br />
de documents imprimés<br />
La conception et les spécifications peuvent être modifiées sans préavis.<br />
et « InfoLITHIUM » sont des marques commerciales de <strong>Sony</strong> Corporation.<br />
在 操 作 本 产 品 前 , 请 通 读 本 ⼿ 册 , 然 后 保 存 好 本 ⼿ 册 以 备 将 来 参 考 。<br />
保 留 备 ⽤。<br />
警 告<br />
为 减 少 发 ⽣⽕ 灾 或 触 电 的 危 险 , 请 勿 让 本 装 置 淋 ⾬ 或 受 潮 。<br />
处 理 电 池 时 要 ⽤ 胶 带 封 好 锂 电 池 触 点 以 免 短 路 , 并 遵 守 当 地 有 关 电 池<br />
处 理 ⽅⾯ 的 规 定 。<br />
使 电 池 或 部 件 远 离 ⼩ 孩 , 以 免 被 吞 下 。⼀ 旦 有 东 西 被 吞 下 , 请 ⽴ 即 看<br />
医 ⽣。<br />
如 果 出 现 下 列 情 况 , 要 ⽴ 即 取 下 电 池 并 停 ⽌ 使 ⽤ :<br />
产 品 被 摔 落 或 受 到 碰 撞 致 使 内 部 暴 露 。<br />
产 品 散 发 出 异 味 、 发 热 或 冒 烟 。<br />
不 要 拆 装 。 如 果 碰 到 产 品 内 部 的 ⾼ 压 电 流 , 可 能 会 造 成 触 电 。<br />
为 避 免 造 成 环 境 污 染 , 请 将 废 弃 产 品 按 照 当 地 法 规 进 ⾏ 处 置 。<br />
注 意<br />
请 只 使 ⽤ 指 定 类 型 的 电 池 进 ⾏ 更 换 。<br />
否 则 , 可 能 造 成 着 ⽕ 或 ⼈ 员 受 伤 。<br />
请 按 照 指 ⽰ 丢 弃 ⽤ 过 的 电 池 。<br />
使 ⽤ 须 知<br />
有 关 与 本 装 置 兼 容 的 相 机 型 号 的 详 细 信 息 , 请 访 问 所 在 地 区 的 <strong>Sony</strong><br />
⽹ 站 , 或 者 咨 询 您 的 <strong>Sony</strong> 经 销 商 或 当 地 的 <strong>Sony</strong> 授 权 服 务 机 构 。<br />
尽 管 本 装 置 采 ⽤ 了 防 尘 和 防 溅 湿 的 设 计 理 念 , 但 可 能 ⽆ 法 完 全 阻 ⽌<br />
灰 尘 或 液 体 进 ⼊。<br />
相 机<br />
仅 可 使 ⽤ 数 字 单 镜 头 反 光 相 机 ILCE-7M2。<br />
电 池<br />
仅 可 使 ⽤“InfoLITHIUM” 电 池 * NP-FW50。<br />
在 本 装 置 上 最 多 可 同 时 安 装 两 块 电 池 。<br />
其 他 “InfoLITHIUM” 电 池 * 不 能 ⽤ 于 本 装 置 。<br />
长 时 间 存 放 本 装 置 时 , 请 将 电 池 取 出 。<br />
务 必 在 本 装 置 上 使 ⽤ 真 正 的 <strong>Sony</strong> 电 池 。 只 能 使 ⽤ 指 定 的 充 电 器 为<br />
电 池 充 电 。<br />
本 装 置 没 有 充 电 器 功 能 。⽆ 法 通 过 本 装 置 对 电 池 充 电 。<br />
即 使 本 装 置 安 装 在 具 有 充 电 功 能 的 相 机 上 , 也 ⽆ 法 对 本 装 置 中 的<br />
电 池 充 电 。<br />
* 什 么 是 “InfoLITHIUM” 电 池 ?<br />
“InfoLITHIUM” 是 ⼀ 种 锂 离 ⼦ 充 电 池 组 , 它 可 与 兼 容 的 电 ⼦ 设 备 交<br />
换 其 电 池 消 耗 数 据 。<strong>Sony</strong> 建 议 您 在 带 有<br />
标 志 的 电 ⼦ 设<br />
备 上 使 ⽤“InfoLITHIUM” 电 池 。<br />
使 ⽤ 和 保 存 须 避 免 的 环 境<br />
⽆ 论 本 装 置 在 使 ⽤ 或 保 存 时 , 都 不 要 暴 露 在 下 列 环 境 :<br />
⾼ 温 环 境<br />
不 要 将 本 装 置 放 在 可 能 受 阳 光 直 射 的 位 置 ; 不 要 放 在 诸 如 汽 车 仪<br />
表 盘 或 接 近 热 源 的 地 ⽅。 在 夏 天 关 闭 车 窗 或 车 ⼦ 受 阳 光 直 射 时 ,<br />
车 内 会 ⾮ 常 热 。 如 果 将 本 装 置 留 在 车 内 会 造 成 变 形 或 发 ⽣ 故 障 。<br />
强 烈 震 动 的 环 境<br />
强 电 磁 或 强 放 射 环 境<br />
沙 尘 过 多 的 环 境<br />
其 他 注 意 事 项<br />
本 装 置 设 计 ⼯ 作 温 度 为 0 ℃⾄40 ℃。<br />
同 时 使 ⽤ 本 装 置 和 镜 头 转 接 环 时 , 可 能 ⽆ 法 将 三 脚 架 固 定 ⾄ 镜 头<br />
转 接 环 的 三 脚 架 螺 丝 孔 。 这 时 , 请 将 三 脚 架 连 接 ⾄ 本 装 置 。<br />
由 于 温 度 骤 升 会 导 致 空 ⽓ 冷 凝 , 因 此 , 本 装 置 长 时 间 处 于 寒 冷 环<br />
境 后 , 应 将 其 密 封 到 塑 料 袋 内 , 尽 量 排 空 袋 内 的 空 ⽓, 然 后 再 将<br />
其 带 ⼊ 室 内 。 当 袋 内 温 度 逐 渐 升 ⾼ 到 室 温 时 , 就 可 以 安 全 地 从 袋<br />
内 取 出 。 这 些 步 骤 可 避 免 本 装 置 温 度 的 骤 变 , 从 ⽽ 防 ⽌ 冷 凝 的 形<br />
成 。<br />
弄 脏 后 , 可 ⽤ 洁 净 的 ⼲ 布 清 洁 。 不 要 让 本 装 置 接 触 酒 精 或 其 他 化<br />
学 品 。<br />
本 装 置 设 有 与 相 机 连 接 的 信 号 电 触 点 。<br />
如 果 在 本 装 置 没 有 安 装 到 相 机 的 情 况 下 装 载 电 池 , 则 本 装 置 可 能<br />
会 因 触 点 短 路 ⽽ 造 成 故 障 或 损 坏 。<br />
在 相 机 上 安 装 或 从 相 机 上 取 下 本 装 置 时 , 或 将 本 装 置 单 独 存 放<br />
时 , 应 务 必 将 电 池 从 本 装 置 中 取 出 。<br />
将 本 装 置 安 装 到 三 脚 架 上 时 , 应 确 保 三 脚 架 的 螺 丝 长 度 不 超 过<br />
5.5 mm。 如 果 螺 丝 超 过 上 述 长 度 , 则 ⽆ 法 将 本 装 置 牢 牢 固 定 到 三 脚<br />
架 上 。 违 反 上 述 规 定 可 导 致 本 装 置 受 损 。<br />
视 相 机 LCD 监 视 器 的 位 置 ⽽ 定 , 监 视 器 和 本 装 置 之 间 可 能 出 现 ⼲<br />
扰 。<br />
将 本 装 置 安 装 到 相 机 或 更 换 电 池 时 , 请 勿 将 将 USB 电 缆 连 接 到 相<br />
机 。<br />
部 件 识 别<br />
1 电 触 点<br />
2 导 向 杆<br />
3 竖 拍 控 制 ON/OFF 开 关<br />
4 C2(⾃ 定 义 2) 按 钮<br />
5 背 带 钩<br />
6 C1(⾃ 定 义 1) 按 钮<br />
7 快 门 按 钮<br />
8 前 控 制 转 盘<br />
9 安 装 螺 丝<br />
10 电 池 室 OPEN/CLOSE 开 关<br />
11 电 池 盖 插 槽<br />
12 后 控 制 转 盘<br />
13 C3(⾃ 定 义 3) 按 钮<br />
14 AF/MF(⾃ 动 对 焦 /⼿ 动 对 焦 ) 按 钮 /AEL(AE 锁 定 ) 按 钮<br />
15 三 脚 架 安 装 孔<br />
16 电 池 托 盘<br />
17 电 池 托 盘 锁 卡<br />
18 电 池 检 测 开 关<br />
安 装 本 装 置 到 相 机 上<br />
1 将 相 机 POWER( 电 源 ) 开 关 置 于 “OFF” 位 置 。<br />
2 拆 开 电 池 盖 , 然 后 从 相 机 中 取 出 电 池 。<br />
3 如 图 所 ⽰, 将 相 机 的 电 池 盖 牢 固 安 装 在 电 池 盖 插 槽 上 。<br />
不 使 ⽤ 本 装 置 时 , 务 必 将 电 池 盖 安 装 在 相 机 上 。<br />
如 果 本 装 置 内 有 电 池 , 将 其 取 出 。<br />
4 在 相 机 上 安 装 本 装 置 时 , 应 对 准 以 下 部 分 :<br />
[ 本 装 置 ] 导 向 杆 [ 相 机 ] 电 池 插 槽<br />
[ 本 装 置 ] 安 装 螺 丝 [ 相 机 ] 三 脚 架 安 装 孔<br />
5 旋 紧 安 装 螺 丝 使 其 锁 定 。<br />
使 ⽤ 时 , 适 时 检 查 并 确 定 安 装 螺 丝 没 有 松 动 。<br />
将 本 装 置 安 装 ⾄ 相 机 后 , 确 保 所 有 部 件 均 已 固 定 到 位 。<br />
电 池 安 装<br />
使 ⽤NP-FW50 电 池 (1 块 或 2 块 )。<br />
NP-FM55H、NP-FM50、NP-FM30、NP-FM500H、NP-FH50 电 池 不 适 ⽤<br />
于 本 装 置 。<br />
使 ⽤ 前 , 务 必 使 ⽤ 指 定 电 池 充 电 器 为 电 池 充 电 。<br />
1 本 装 置 装 在 相 机 上 时 , 更 换 电 池 前 , 将 相 机 的 POWER( 电 源 ) 开 关<br />
置 于 OFF 位 置 。<br />
2 转 动 电 池 室 的 OPEN/CLOSE 开 关 到 “OPEN” 位 置 。<br />
3 按 图 中 箭 头 所 ⽰⽅ 向 ⽤⼿ 指 按 电 池 托 盘 锁 卡 ( 蓝 )。<br />
未 插 ⼊ 电 池 时 , 电 池 托 盘 可 能 会 弹 出 。 请 如 图 握 住 电 池 托 盘 ,<br />
然 后 推 动 电 池 托 盘 锁 卡 。<br />
4 取 下 电 池 托 盘 。<br />
5 按 照 托 盘 上 的 指 ⽰, 将 电 池 安 装 到 托 盘 上 。<br />
安 装 电 池 时 , 可 安 装 到 任 何 ⼀ 端 。<br />
不 要 触 碰 电 池 托 盘 端 ⼦。<br />
使 电 池 检 测 开 关 保 持 清 洁 以 免 损 坏 。( 参 见 ⽰ 图 -16)<br />
确 保 电 池 已 由 电 池 托 盘 的 锁 扣 牢 牢 固 定 。( 参 见 ⽰ 图 -5-)<br />
只 能 安 装 NP-FW50 电 池 到 托 盘 上 。 不 要 安 装 其 他 电 池 。<br />
不 要 拆 装 电 池 托 盘 。<br />
安 装 两 块 电 池 时 , 装 置 会 先 使 ⽤ 电 量 少 的 那 块 电 池 。 当 ⼀ 块 电<br />
池 电 量 ⽤ 完 后 , 会 ⾃ 动 切 换 到 另 ⼀ 块 。<br />
6 将 电 池 托 盘 装 回 原 位 , 按 住 直 ⾄ 听 到 滴 答 声 。<br />
确 认 电 池 托 盘 锁 卡 已 将 电 池 托 盘 锁 定 。 如 果 电 池 锁 卡 未 正 确 锁<br />
定 , 可 能 导 致 相 机 ⽆ 法 正 确 识 别 电 池 托 盘 上 安 装 的 电 池 。<br />
如 果 在 未 装 电 池 的 情 况 下 以 某 个 ⾓ 度 强 ⾏ 将 电 池 托 盘 按 ⼊ 本 装<br />
置 , 虽 然 可 以 将 托 盘 插 ⼊⼀ 部 分 , 但 若 继 续 插 ⼊, 就 会 损 坏 本<br />
装 置 。<br />
应 按 正 确 的 ⽅ 向 将 电 池 托 盘 ⽔ 平 插 ⼊ 本 装 置 ( 参 见 ⽰ 图<br />
-6-)。<br />
7 关 闭 电 池 室 门 , 转 动 电 池 室 的 OPEN/CLOSE 开 关 到 “CLOSE” 位 置 。<br />
按 照 图 ⽰ 正 确 转 动 电 池 室 OPEN/CLOSE 开 关 到 指 定 位 置 。<br />
竖 拍<br />
本 装 置 转 盘 及 按 钮 操 作 与 相 机 主 机 上 的 转 盘 及 按 钮 操 作 相 同 。<br />
使 ⽤ 本 装 置 时 , 另 请 参 阅 相 机 附 带 的 使 ⽤ 说 明 书 。<br />
使 ⽤ 本 装 置 进 ⾏ 竖 拍 时 , 将 竖 拍 控 制 ON/OFF 开 关 置 于 “ON” 位 置 。<br />
竖 拍 控 制 ON/OFF 开 关 ⽤ 于 切 换 转 盘 和 按 钮 功 能 的 ON 和 OFF。<br />
⽆ 论 竖 拍 控 制 ON/OFF 开 关 的 位 置 如 何 , 相 机 的 操 作 按 钮 始 终 处 于<br />
⼯ 作 的 状 态 。<br />
⽤ 相 机 上 的 POWER 开 关 切 换 电 源 的 ON 或 OFF。 竖 拍 控 制 ON/OFF 开 关<br />
不 能 切 换 电 源 的 ON 和 OFF。<br />
AF/MF(⾃ 动 对 焦 /⼿ 动 对 焦 ) 按 钮 /AEL(AE 锁 定 ) 按 钮 的 功 能 与<br />
相 机 的 设 定 同 步 。 使 ⽤AF/MF/AEL 杆 切 换 AE/MF 和 AEL 的 功 能 。<br />
剩 余 电 量 指 ⽰<br />
将 两 块 电 池 (NP-FW50) 插 ⼊ 本 装 置 时 , 相 机 的 LCD 监 视 器 上 将 出 现<br />
以 下 指 ⽰ 标 记 。( 电 池 电 量 的 指 ⽰ 位 置 视 相 机 的 模 式 ⽽ 异 。)<br />
LCD 监 视 器 (⽰ 例 )<br />
在 两 块 电 池 中 , 将 ⾸ 先 使 ⽤ 电 量 较 ⼩ 的 ⼀ 块 。<br />
所 ⽤ 电 池 的 剩 余 电 量 以 百 分 率 (%) 显 ⽰。<br />
所 ⽤ 电 池 的 标 记 变 化 如 下 。 当 所 ⽤ 电 池 的 电 量 耗 尽 时 , 本 装 置 ⾃ 动 切<br />
换 到 另 ⼀ 块 电 池 。<br />
剩 余 电 量<br />
⾼<br />
低<br />
如 果 在 出 现 标 记 后 仍 在 拍 摄 图 像 , 则 该 电 池 的 电 量 将 耗 尽 ,<br />
⽽ 本 装 置 将 ⾃ 动 切 换 到 另 ⼀ 块 电 池 。<br />
镜 头 使 ⽤ 注 意 事 项<br />
当 使 ⽤ 镜 头 转 接 环 通 过 三 脚 架 安 装 套 环 将 70-200mm F2.8G、70-<br />
200mm F2.8 G SSM II、300mm F2.8G、300mm F2.8 G SSM II、<br />
500mm F4 G SSM、70-400mm F4-5.6G SSM 或 70-400mm F4-5.6 G<br />
SSM II 镜 头 安 装 ⾄ 相 机 时 , 请 将 三 脚 架 安 装 套 环 旋 转 ⾄ 可 以 使 ⽤⼿<br />
柄 的 位 置 。<br />
另 外 , 如 果 在 三 脚 架 上 使 ⽤ 上 述 镜 头 , 请 勿 使 ⽤ 本 装 置 的 三 脚 架 安<br />
装 孔 。<br />
当 使 ⽤ 镜 头 转 接 环 通 过 三 脚 架 安 装 套 环 将 70-200mm F2.8G、70-<br />
200mm F2.8 G SSM II 或 70-400mm F4-5.6G SSM 镜 头 安 装 ⾄ 相 机 时 ,<br />
以 下 镜 头 开 关 在 竖 拍 位 置 可 能 ⽆ 法 正 常 操 作 。 在 开 始 竖 拍 之 前 , 请<br />
将 其 置 于 ⽔ 平 位 置 。<br />
对 焦 模 式 开 关<br />
DMF 模 式 开 关<br />
对 焦 范 围 限 定 器<br />
故 障 维 修<br />
故 障 情 况<br />
解 决 ⽅ 法<br />
即 使 在 本 装 置 安 装 到 相 机 上 , 将<br />
电 池 插 ⼊ 本 装 置 , 并 将 相 机 的<br />
POWER 开 关 设 为 ON 之 后 , 相 机 仍<br />
不 ⼯ 作 。<br />
检 查 本 装 置 的 安 装 螺 丝 是 否 已<br />
经 拧 紧 。<br />
检 查 电 池 是 否 已 经 充 电 。<br />
从 电 池 托 盘 中 取 出 电 池 , 然 后<br />
重 新 装 ⼊。<br />
将 相 机 的 POWER 开 关 设 为 OFF,<br />
取 下 电 池 , 再 将 本 装 置 重 新 安<br />
装 到 相 机 上 。<br />
快 门 按 钮 或 其 他 操 作 按 钮 不 ⼯<br />
作 。<br />
检 查 竖 拍 控 制 ON/OFF 开 关 是 否<br />
未 设 为 OFF。<br />
从 电 池 托 盘 中 取 出 电 池 , 然 后<br />
重 新 装 ⼊。<br />
将 相 机 的 POWER 开 关 设 为 OFF,<br />
取 下 电 池 , 再 将 本 装 置 重 新 安<br />
装 到 相 机 上 。<br />
即 使 使 ⽤ 正 宗 的 <strong>Sony</strong> 电 池 , 也 会<br />
显 ⽰“ 仅 ⽤ 于 “InfoLITHIUM”<br />
电 池 ”。<br />
从 电 池 托 盘 中 取 出 电 池 , 然 后<br />
重 新 装 ⼊。<br />
将 相 机 的 POWER 开 关 设 为 OFF,<br />
取 下 电 池 , 再 将 本 装 置 重 新 安<br />
装 到 相 机 上 。<br />
规 格<br />
电 池<br />
NP-FW50 DC7.2V<br />
尺 ⼨( 约 ) 127 mm×100.5 mm×60.5 mm( 宽 /⾼/ 深 )<br />
质 量<br />
约 250 g<br />
( 含 电 池 托 盘 , 不 包 括 电 池 )<br />
操 作 温 度 0 ℃⾄40 ℃<br />
所 含 物 品<br />
竖 拍 ⼿ 柄 兼 电 池 盒 (1), 电 池 托 盘 (1), 成 套 印 刷 ⽂ 件<br />
设 计 或 规 格 如 有 变 动 , 恕 不 另 ⾏ 通 知 。<br />
和 “InfoLITHIUM” 是 <strong>Sony</strong> Corporation 的 商 标 。<br />
制 造 商 :<br />
索 尼 公 司<br />
总 经 销 商 : 索 尼 ( 中 国 ) 有 限 公 司<br />
总 经 销 商 地 址 :<br />
北 京 市 朝 阳 区<br />
太 阳 宫 中 路 12 号 楼<br />
冠 城 ⼤ 厦 701<br />
原 产 地 : 中 国 ( 主 机 )<br />
出 版 ⽇ 期 : 2014 年 10⽉<br />
产 品 中 有 害 物 质 的 名 称 及 含 量<br />
部 件 名 称<br />
有 害 物 质<br />
铅 (Pb) 汞 (Hg) 镉 (Cd) 六 价 铬<br />
(Cr (VI))<br />
多 溴 联 苯<br />
(PBB)<br />
多 溴 ⼆ 苯 醚<br />
(PBDE)<br />
内 置 线 路 板 × ○ ○ ○ ○ ○<br />
外 壳 × ○ ○ ○ ○ ○<br />
附 件 × ○ ○ ○ ○ ○<br />
本 表 格 依 据 SJ/T 11364 的 规 定 编 制 。<br />
○.. 表 ⽰ 该 有 害 物 质 在 该 部 件 所 有 均 质 材 料 中 的 含 量 均 在 GB/T 26572 规 定 的 限 量 要 求 以 下 。<br />
×.. 表 ⽰ 该 有 害 物 质 ⾄ 少 在 该 部 件 的 某 ⼀ 均 质 材 料 中 的 含 量 超 出 GB/T 26572 规 定 的 限 量 要 求 。<br />
然 后 推 动 电 池 托 盘 锁 卡 。<br />
4 取 下 电 池 托 盘 。<br />
5 按 照 托 盘 上 的 指 ⽰, 将 电 池 安 装 到 托 盘 上 。<br />
安 装 电 池 时 , 可 安 装 到 任 何 ⼀ 端 。<br />
不 要 触 碰 电 池 托 盘 端 ⼦。<br />
使 电 池 检 测 开 关 保 持 清 洁 以 免 损 坏 。( 参 见 ⽰ 图 -16)<br />
确 保 电 池 已 由 电 池 托 盘 的 锁 扣 牢 牢 固 定 。( 参 见 ⽰ 图 -5-)<br />
只 能 安 装 NP-FW50 电 池 到 托 盘 上 。 不 要 安 装 其 他 电 池 。<br />
不 要 拆 装 电 池 托 盘 。<br />
安 装 两 块 电 池 时 , 装 置 会 先 使 ⽤ 电 量 少 的 那 块 电 池 。 当 ⼀ 块 电<br />
池 电 量 ⽤ 完 后 , 会 ⾃ 动 切 换 到 另 ⼀ 块 。<br />
6 将 电 池 托 盘 装 回 原 位 , 按 住 直 ⾄ 听 到 滴 答 声 。<br />
确 认 电 池 托 盘 锁 卡 已 将 电 池 托 盘 锁 定 。 如 果 电 池 锁 卡 未 正 确 锁<br />
定 , 可 能 导 致 相 机 ⽆ 法 正 确 识 别 电 池 托 盘 上 安 装 的 电 池 。<br />
如 果 在 未 装 电 池 的 情 况 下 以 某 个 ⾓ 度 强 ⾏ 将 电 池 托 盘 按 ⼊ 本 装<br />
置 , 虽 然 可 以 将 托 盘 插 ⼊⼀ 部 分 , 但 若 继 续 插 ⼊, 就 会 损 坏 本<br />
装 置 。<br />
应 按 正 确 的 ⽅ 向 将 电 池 托 盘 ⽔ 平 插 ⼊ 本 装 置 ( 参 见 ⽰ 图<br />
-6-)。<br />
7 关 闭 电 池 室 门 , 转 动 电 池 室 的 OPEN/CLOSE 开 关 到 “CLOSE” 位 置 。<br />
按 照 图 ⽰ 正 确 转 动 电 池 室 OPEN/CLOSE 开 关 到 指 定 位 置 。<br />
竖 拍<br />
本 装 置 转 盘 及 按 钮 操 作 与 相 机 主 机 上 的 转 盘 及 按 钮 操 作 相 同 。<br />
使 ⽤ 本 装 置 时 , 另 请 参 阅 相 机 附 带 的 使 ⽤ 说 明 书 。<br />
使 ⽤ 本 装 置 进 ⾏ 竖 拍 时 , 将 竖 拍 控 制 ON/OFF 开 关 置 于 “ON” 位 置 。<br />
竖 拍 控 制 ON/OFF 开 关 ⽤ 于 切 换 转 盘 和 按 钮 功 能 的 ON 和 OFF。<br />
⽆ 论 竖 拍 控 制 ON/OFF 开 关 的 位 置 如 何 , 相 机 的 操 作 按 钮 始 终 处 于<br />
⼯ 作 的 状 态 。<br />
⽤ 相 机 上 的 POWER 开 关 切 换 电 源 的 ON 或 OFF。 竖 拍 控 制 ON/OFF 开 关<br />
不 能 切 换 电 源 的 ON 和 OFF。<br />
AF/MF(⾃ 动 对 焦 /⼿ 动 对 焦 ) 按 钮 /AEL(AE 锁 定 ) 按 钮 的 功 能 与<br />
相 机 的 设 定 同 步 。 使 ⽤AF/MF/AEL 杆 切 换 AE/MF 和 AEL 的 功 能 。<br />
剩 余 电 量 指 ⽰<br />
将 两 块 电 池 (NP-FW50) 插 ⼊ 本 装 置 时 , 相 机 的 LCD 监 视 器 上 将 出 现<br />
以 下 指 ⽰ 标 记 。( 电 池 电 量 的 指 ⽰ 位 置 视 相 机 的 模 式 ⽽ 异 。)<br />
LCD 监 视 器 (⽰ 例 )<br />
在 两 块 电 池 中 , 将 ⾸ 先 使 ⽤ 电 量 较 ⼩ 的 ⼀ 块 。<br />
所 ⽤ 电 池 的 剩 余 电 量 以 百 分 率 (%) 显 ⽰。<br />
所 ⽤ 电 池 的 标 记 变 化 如 下 。 当 所 ⽤ 电 池 的 电 量 耗 尽 时 , 本 装 置 ⾃ 动 切<br />
换 到 另 ⼀ 块 电 池 。<br />
剩 余 电 量<br />
⾼<br />
低<br />
如 果 在 出 现 标 记 后 仍 在 拍 摄 图 像 , 则 该 电 池 的 电 量 将 耗 尽 ,<br />
⽽ 本 装 置 将 ⾃ 动 切 换 到 另 ⼀ 块 电 池 。<br />
镜 头 使 ⽤ 注 意 事 项<br />
当 使 ⽤ 镜 头 转 接 环 通 过 三 脚 架 安 装 套 环 将 70-200mm F2.8G、70-<br />
200mm F2.8 G SSM II、300mm F2.8G、300mm F2.8 G SSM II、<br />
500mm F4 G SSM、70-400mm F4-5.6G SSM 或 70-400mm F4-5.6 G<br />
SSM II 镜 头 安 装 ⾄ 相 机 时 , 请 将 三 脚 架 安 装 套 环 旋 转 ⾄ 可 以 使 ⽤⼿<br />
柄 的 位 置 。<br />
另 外 , 如 果 在 三 脚 架 上 使 ⽤ 上 述 镜 头 , 请 勿 使 ⽤ 本 装 置 的 三 脚 架 安<br />
装 孔 。<br />
当 使 ⽤ 镜 头 转 接 环 通 过 三 脚 架 安 装 套 环 将 70-200mm F2.8G、70-<br />
200mm F2.8 G SSM II 或 70-400mm F4-5.6G SSM 镜 头 安 装 ⾄ 相 机 时 ,<br />
以 下 镜 头 开 关 在 竖 拍 位 置 可 能 ⽆ 法 正 常 操 作 。 在 开 始 竖 拍 之 前 , 请<br />
将 其 置 于 ⽔ 平 位 置 。<br />
对 焦 模 式 开 关<br />
DMF 模 式 开 关<br />
对 焦 范 围 限 定 器<br />
故 障 维 修<br />
故 障 情 况<br />
解 决 ⽅ 法<br />
即 使 在 本 装 置 安 装 到 相 机 上 , 将<br />
电 池 插 ⼊ 本 装 置 , 并 将 相 机 的<br />
POWER 开 关 设 为 ON 之 后 , 相 机 仍<br />
不 ⼯ 作 。<br />
检 查 本 装 置 的 安 装 螺 丝 是 否 已<br />
经 拧 紧 。<br />
检 查 电 池 是 否 已 经 充 电 。<br />
从 电 池 托 盘 中 取 出 电 池 , 然 后<br />
重 新 装 ⼊。<br />
将 相 机 的 POWER 开 关 设 为 OFF,<br />
取 下 电 池 , 再 将 本 装 置 重 新 安<br />
装 到 相 机 上 。<br />
快 门 按 钮 或 其 他 操 作 按 钮 不 ⼯<br />
作 。<br />
检 查 竖 拍 控 制 ON/OFF 开 关 是 否<br />
未 设 为 OFF。<br />
从 电 池 托 盘 中 取 出 电 池 , 然 后<br />
重 新 装 ⼊。<br />
将 相 机 的 POWER 开 关 设 为 OFF,<br />
取 下 电 池 , 再 将 本 装 置 重 新 安<br />
装 到 相 机 上 。<br />
即 使 使 ⽤ 正 宗 的 <strong>Sony</strong> 电 池 , 也 会<br />
显 ⽰“ 仅 ⽤ 于 “InfoLITHIUM”<br />
电 池 ”。<br />
从 电 池 托 盘 中 取 出 电 池 , 然 后<br />
重 新 装 ⼊。<br />
将 相 机 的 POWER 开 关 设 为 OFF,<br />
取 下 电 池 , 再 将 本 装 置 重 新 安<br />
装 到 相 机 上 。<br />
规 格<br />
电 池<br />
NP-FW50 DC7.2V<br />
尺 ⼨( 约 ) 127 mm×100.5 mm×60.5 mm( 宽 /⾼/ 深 )<br />
质 量<br />
约 250 g<br />
( 含 电 池 托 盘 , 不 包 括 电 池 )<br />
操 作 温 度 0 ℃⾄40 ℃<br />
所 含 物 品<br />
竖 拍 ⼿ 柄 兼 电 池 盒 (1), 电 池 托 盘 (1), 成 套 印 刷 ⽂ 件<br />
设 计 或 规 格 如 有 变 动 , 恕 不 另 ⾏ 通 知 。<br />
和 “InfoLITHIUM” 是 <strong>Sony</strong> Corporation 的 商 标 。<br />
制 造 商 :<br />
索 尼 公 司<br />
总 经 销 商 : 索 尼 ( 中 国 ) 有 限 公 司<br />
总 经 销 商 地 址 :<br />
北 京 市 朝 阳 区<br />
太 阳 宫 中 路 12 号 楼<br />
冠 城 ⼤ 厦 701<br />
原 产 地 : 中 国 ( 主 机 )<br />
出 版 ⽇ 期 : 2014 年 10⽉<br />
产 品 中 有 害 物 质 的 名 称 及 含 量<br />
部 件 名 称<br />
有 害 物 质<br />
铅 (Pb) 汞 (Hg) 镉 (Cd) 六 价 铬<br />
(Cr (VI))<br />
内 置 线 路 板 × ○ ○ ○<br />
外 壳 × ○ ○ ○<br />
附 件 × ○ ○ ○<br />
本 表 格 依 据 SJ/T 11364 的 规 定 编 制 。<br />
○.. 表 ⽰ 该 有 害 物 质 在 该 部 件 所 有 均 质 材 料 中 的 含 量 均 在 GB/T 26572 规 定 的<br />
×.. 表 ⽰ 该 有 害 物 质 ⾄ 少 在 该 部 件 的 某 ⼀ 均 质 材 料 中 的 含 量 超 出 GB/T 2657<br />
<br />
<br />
<br />
<br />
<br />
6<br />
7<br />
5<br />
<br />
10<br />
1<br />
2<br />
3<br />
4<br />
5<br />
6 7 8<br />
9<br />
11<br />
12<br />
13<br />
14<br />
15<br />
16<br />
17<br />
18<br />
1 2<br />
3<br />
5<br />
4<br />
1 2<br />
3 4


