

Sony SPK-HCF - SPK-HCF Istruzioni per l'uso Francese
Sony SPK-HCF - SPK-HCF Istruzioni per l'uso Francese
Sony SPK-HCF - SPK-HCF Istruzioni per l'uso Francese

Create successful ePaper yourself
Turn your PDF publications into a flip-book with our unique Google optimized e-Paper software.
4-170-776-01(1)<br />
<br />
<br />
<br />
<br />
Sports Pack Preparation Guide<br />
Guide de préparation du caisson sport<br />
<br />
<br />
1<br />
2<br />
<strong>SPK</strong>-<strong>HCF</strong><br />
© 2010 <strong>Sony</strong> Corporation Printed in Japan<br />
1<br />
4<br />
5<br />
A<br />
B<br />
C<br />
G<br />
J<br />
<br />
<br />
D<br />
<br />
<br />
H<br />
K<br />
F<br />
I-2<br />
L<br />
<br />
<br />
<br />
<br />
D<br />
E<br />
F<br />
G<br />
H<br />
I<br />
J<br />
K<br />
<br />
L<br />
M<br />
N<br />
O<br />
<br />
<br />
<br />
<br />
<br />
<br />
<br />
<br />
<br />
Camera mounting shoe<br />
Sabot de montage de caméra<br />
<br />
Body<br />
Corps<br />
<br />
<br />
<br />
<br />
<br />
<br />
Guide<br />
Guide<br />
<br />
<br />
<br />
<br />
<br />
<br />
<br />
<br />
<br />
1 <br />
MCND<br />
<br />
<br />
<br />
2 <br />
<br />
3 <br />
<br />
<br />
<br />
<br />
<br />
<br />
<br />
4 <br />
<br />
<br />
<br />
<br />
<br />
<br />
HDR-UX20/UX19/UX10/UX9,<br />
DCR-DVD910/DVD708/DVD608/DVD510/<br />
DVD308/DVD306/DVD109/DVD108/<br />
M3043<br />
DVD106,<br />
DCR-HC62/HC54/HC53/HC52/HC51/<br />
HC48/HC47/HC45/HC38/HC37<br />
HDR-XR155/XR150,<br />
HDR-CX120/CX106/CX105/CX100,<br />
3047<br />
DCR-SR87/SR77/SR67/SR57/SR48/SR47/<br />
SR38/SR37<br />
DCR-DVD850/DVD810/DVD710/DVD650/<br />
(M3050)<br />
DVD610/DVD450/DVD410/DVD310/<br />
DVD150/DVD115/DVD110,<br />
DCR-SR88/SR78/SR68/SR58<br />
HDR-XR350V/XR350,<br />
(M3058) DCR-SR85/SR75/SR65/SR55/SR46/SR45/<br />
SR36/SR35<br />
HDR-XR200V/XR200/XR106/XR105/XR101/<br />
XR100,<br />
M3062<br />
HDR-SR10,<br />
DCR-SR220/SR210<br />
HDR-XR550V/XR550/XR520V/XR520/<br />
XR500V/XR500,<br />
M3755 HDR-SR12/SR11/SR8/SR7/SR5,<br />
HDR-HC9/HC7/HC5,<br />
HDR-CX550V/CX550/CX12/CX11/CX7/CX6<br />
<br />
DCR-SX60/SX50/SX41/SX40/SX31/SX30<br />
5 <br />
6 <br />
<br />
1 <br />
<br />
HDR-HC9/HC7/HC5<br />
1 DCR-DVD708/DVD608/DVD308/DVD306/<br />
D<br />
DVD109/DVD108/DVD106<br />
2<br />
DCR-HC62/HC54/HC53/HC52/HC51/HC48/<br />
HC47/HC45/HC38/HC37<br />
1 HDR-CX12/CX11/CX7/CX6<br />
F<br />
2 HDR-SR8/SR7/SR5<br />
HDR-UX20/UX19/UX10/UX9,<br />
G 1<br />
DCR-DVD910/DVD850/DVD810/DVD710/<br />
DVD650/DVD610/DVD510/DVD450/DVD410/<br />
DVD310/DVD150/DVD115/DVD110<br />
HDR-XR520V/XR520/XR500V/XR500/XR200V/<br />
H 1<br />
XR200/XR106/XR105/XR101/XR100,<br />
HDR-SR12/SR11/SR10,<br />
DCR-SR220/SR210<br />
1<br />
DCR-SR88/SR85/SR78/SR75/SR68/SR65/SR58/<br />
I-2<br />
SR55/SR46/SR45/SR36/SR35<br />
2 HDR-XR350V/XR350<br />
J 1<br />
HDR-CX120/CX106/CX105/CX100,<br />
DCR-SX60/SX50/SX41/SX40/SX31/SX30<br />
K 1<br />
DCR-SR87/SR77/SR67/SR57/SR48/SR47/SR38/<br />
SR37<br />
1<br />
HDR-CX550V/CX550,<br />
L<br />
HDR-XR550V/XR550<br />
2 HDR-XR155/XR150<br />
2 <br />
<br />
L<br />
<br />
1 <br />
START/STOPPHOTO<br />
<br />
2 <br />
<br />
OFF<br />
ON/OFF<br />
OFF<br />
<br />
<br />
<br />
POWERON/OFF<br />
<br />
HDR-HC9/HC7/HC5 ON<br />
<br />
1 <br />
<br />
<br />
<br />
2 <br />
23<br />
<br />
<br />
3 O<br />
O<br />
<br />
OO<br />
<br />
4 <br />
<br />
/A/V<br />
A/V OUTA/V<br />
HDR-UX20/UX19/UX10/UX9DCR-DVD910/DVD510DCR-SR87/SR77/<br />
SR67/SR57/SR48/SR47/SR38/SR37DCR-SX60/SX50/SX41/SX40/SX31/<br />
SX30<br />
<br />
DCR-SR87/SR77/SR67/SR57/SR48/SR47/SR38/SR37<br />
/-5-I<br />
<br />
<br />
<br />
<br />
5 <br />
/A/VA/V OUT<br />
A/V4<br />
<br />
<br />
<br />
<br />
<br />
<br />
<br />
ON/OFF<br />
/<br />
<br />
HDR-XR520V/XR520/XR500V/XR500-5-A<br />
<br />
<br />
<br />
<br />
<br />
<br />
HDR-XR200V/XR200/XR106/XR105/XR101/XR100<br />
-5-B<br />
<br />
<br />
<br />
<br />
<br />
<br />
HDR-SR12/SR11/SR10DCR-SR220/SR210<br />
-5-C<br />
<br />
<br />
<br />
<br />
HDR-SR8/SR7/SR5-5-D<br />
<br />
<br />
<br />
HDR-XR155/XR150/XR350V/XR350HDR-CX120/CX106/CX105/CX100<br />
-5-E<br />
<br />
<br />
<br />
HDR-CX12/CX11/CX7/CX6-5-F<br />
<br />
<br />
<br />
<br />
<br />
HDR-UX20/UX19/UX10/UX9DCR-DVD910/DVD510<br />
-5-G<br />
-4<br />
<br />
<br />
<br />
HDR-HC9/HC7/HC5-5-H<br />
<br />
<br />
<br />
DCR-SR87/SR77/SR67/SR57/SR48/SR47/SR38/SR37<br />
-5-I<br />
-4<br />
<br />
<br />
<br />
<br />
<br />
<br />
<br />
<br />
DCR-SR85/SR75/SR65/SR55/SR46/SR45/SR36/SR35<br />
-5-J<br />
<br />
<br />
<br />
<br />
DCR-SX60/SX50/SX41/SX40/SX31/SX30-5-K<br />
-4<br />
<br />
<br />
<br />
<br />
DCR-DVD850/DVD810/DVD710/DVD650/DVD610/DVD450/DVD410/<br />
DVD310/DVD150/DVD115/DVD110-5-L<br />
<br />
<br />
<br />
<br />
<br />
<br />
<br />
<br />
<br />
DCR-DVD708/DVD608/DVD308/DVD306/DVD109/DVD108/DVD106<br />
-5-M<br />
<br />
<br />
<br />
HDR-CX550V/CX550/XR550V/XR550DCR-HC62/HC54/HC53/HC52/<br />
HC51/HC48/HC47/HC45/HC38/HC37-5-N<br />
<br />
<br />
<br />
DCR-SR88/SR78/SR68/SR58 (-5-O)<br />
<br />
<br />
<br />
<br />
<br />
<br />
<br />
<br />
<br />
<br />
<br />
6 <br />
<br />
<br />
<br />
<br />
<br />
English<br />
Preparing<br />
Notes<br />
The models of <strong>Sony</strong> digital video camera recorders (referred to below as “camera”)<br />
described below may not be available in all countries/regions.<br />
Preparing the Video Camera<br />
For details, refer also to the o<strong>per</strong>ating instructions supplied with the camera.<br />
1 Detach the accessory<br />
Remove the filter, conversion lens, lens cap, lens hood or the shoulder strap from the<br />
camera.<br />
When using a camera with a manual lens shutter, open the lens shutter.<br />
2 Install the battery pack.<br />
Attach a fully recharged battery.<br />
3 Insert the media.<br />
Insert a media compatible with the camera.<br />
For details, refer to the o<strong>per</strong>ating instructions supplied with the camera.<br />
Notes<br />
Unlock the write-protect tab on the “Memory Stick Duo” media and the cassette tape to<br />
enable them to record images.<br />
Make sure that the tape, “Memory Stick Duo” media, disc, hard disk and internal memory<br />
have enough space to record images.<br />
Make sure that the disc is not finalized.<br />
4 Attach the reflex prevention ring to the filter attachment screw of the<br />
camera.<br />
The reflex prevention ring prevents external light from being reflected inside the sports<br />
pack (referred to below as “this unit”) and entering the lens.<br />
When using a camera without a reflex prevention ring, keep your back away from<br />
sunlight as much as possible.<br />
Reflex prevention ring<br />
Reflex prevention ring<br />
(M30 × ø 43)<br />
Reflex prevention ring<br />
(M30 × ø 47)<br />
Reflex prevention ring<br />
(M30 × ø 50)<br />
Reflex prevention ring<br />
(M30 × ø 58)<br />
Reflex prevention ring<br />
(M30 × ø 62)<br />
Reflex prevention ring<br />
(M37 × ø 55)<br />
Unable to attach the<br />
supplied reflex prevention<br />
ring<br />
Camera<br />
HDR-UX20/UX19/UX10/UX9,<br />
DCR-DVD910/DVD708/DVD608/DVD510/DVD308/<br />
DVD306/DVD109/DVD108/DVD106,<br />
DCR-HC62/HC54/HC53/HC52/HC51/HC48/HC47/<br />
HC45/HC38/HC37<br />
HDR-XR155/XR150,<br />
HDR-CX120/CX106/CX105/CX100,<br />
DCR-SR87/SR77/SR67/SR57/SR48/SR47/SR38/SR37<br />
DCR-DVD850/DVD810/DVD710/DVD650/DVD610/<br />
DVD450/DVD410/DVD310/DVD150/DVD115/DVD110,<br />
DCR-SR88/SR78/SR68/SR58<br />
HDR-XR350V/XR350,<br />
DCR-SR85/SR75/SR65/SR55/SR46/SR45/SR36/SR35<br />
HDR-XR200V/XR200/XR106/XR105/XR101/XR100,<br />
HDR-SR10,<br />
DCR-SR220/SR210<br />
HDR-XR550V/XR550/XR520V/XR520/XR500V/XR500,<br />
HDR-SR12/SR11/SR8/SR7/SR5,<br />
HDR-HC9/HC7/HC5,<br />
HDR-CX550V/CX550/CX12/CX11/CX7/CX6<br />
DCR-SX60/SX50/SX41/SX40/SX31/SX30<br />
5 Turn the LCD panel around so that it faces outwards and place it back<br />
in the camera.<br />
6 Set functions such as focusing and lightning, to AUTO.<br />
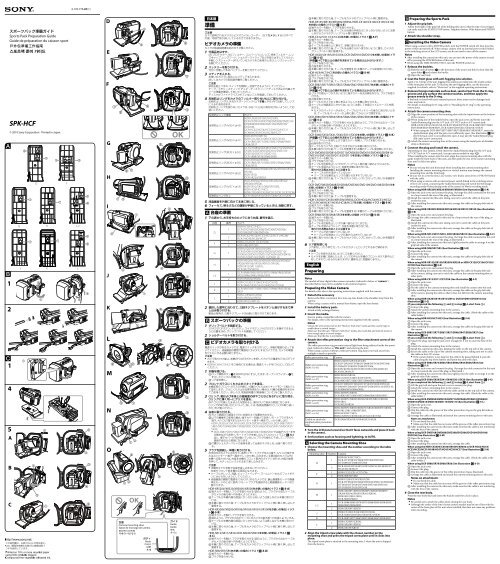
Selecting the Camera Mounting Shoe<br />
1 Choose the mounting shoe and the number according to the table<br />
below.<br />
Mounting shoe Number Camera<br />
HDR-HC9/HC7/HC5,<br />
1 DCR-DVD708/DVD608/DVD308/DVD306/<br />
D<br />
DVD109/DVD108/DVD106<br />
DCR-HC62/HC54/HC53/HC52/HC51/HC48/HC47/<br />
2<br />
HC45/HC38/HC37<br />
1 HDR-CX12/CX11/CX7/CX6<br />
F<br />
2 HDR-SR8/SR7/SR5<br />
HDR-UX20/UX19/UX10/UX9,<br />
DCR-DVD910/DVD850/DVD810/DVD710/DVD650/<br />
G 1<br />
DVD610/DVD510/DVD450/DVD410/DVD310/<br />
DVD150/DVD115/DVD110<br />
HDR-XR520V/XR520/XR500V/XR500/XR200V/<br />
XR200/XR106/XR105/XR101/XR100,<br />
H 1<br />
HDR-SR12/SR11/SR10,<br />
DCR-SR220/SR210<br />
DCR-SR88/SR85/SR78/SR75/SR68/SR65/SR58/SR55/<br />
1<br />
I-2<br />
SR46/SR45/SR36/SR35<br />
2 HDR-XR350V/XR350<br />
HDR-CX120/CX106/CX105/CX100,<br />
J 1<br />
DCR-SX60/SX50/SX41/SX40/SX31/SX30<br />
K 1 DCR-SR87/SR77/SR67/SR57/SR48/SR47/SR38/SR37<br />
HDR-CX550V/CX550,<br />
1<br />
L<br />
HDR-XR550V/XR550<br />
2 HDR-XR155/XR150<br />
2 Align the tripod screw plate with the chosen number on the<br />
mounting shoe and press the tripod screw plate until it clicks into<br />
place.<br />
The tripod screw plate is attached to the mounting shoe L when the unit is shipped<br />
from the factory.<br />
Preparing the Sports Pack<br />
1 Adjust the grip belt.<br />
Adjust the length of the grip belt while holding this unit so that the tips of your fingers<br />
can easily touch the START/STOP button, Telephoto button, Wide button and PHOTO<br />
button.<br />
2 Attach the shoulder strap.<br />
Installing the Video Camera<br />
When using a camera with a POWER switch, turn the POWER switch off. Also leave the<br />
power of this unit turned off. When using a camera with an internal power switch linked<br />
to the switching action of the LCD screen, you do not need to turn off the camera.<br />
Notes<br />
<br />
After installing the camera into this unit, you can turn the power of the camera on and<br />
off by pressing the POWER button of this unit.<br />
When using the HDR-HC9/HC7/HC5, turn the POWER switch on.<br />
<br />
1 Release the buckles.<br />
Slide the unlock button in the direction of the arrow and hold it, then slide the<br />
open slider and release the buckle.<br />
Open the rear body.<br />
2 Coat the front glass with anti-fogging lens solution.<br />
Apply 2 to 3 drops of the anti-fogging lens solution provided onto the inside surface<br />
of the front glass of this unit. To increase the anti-fogging effect, use the desiccant<br />
supplied. For details, refer to “Desiccant” in the supplied o<strong>per</strong>ating instructions.<br />
3 Remove foreign materials such as dust, sand or hair from the O-ring,<br />
groove and any surface the camera touches, and then apply the<br />
grease evenly to the O-ring.<br />
If the body is closed with such materials present, those areas may be damaged and<br />
water may leak in.<br />
For details on handling the O-ring, refer to “Handling the O-ring” in the o<strong>per</strong>ating<br />
instructions.<br />
4 Attach the camera mounting shoe.<br />
Align the screw position of the mounting shoe with the tripod screw on the bottom<br />
of the camera.<br />
When using one of the models below, open the jack cover and firmly insert the<br />
Audio/Remote plug into the A/V jack, A/V OUT jack or A/V remote jack:<br />
HDR-UX20/UX19/UX10/UX9, DCR-DVD910/DVD510, DCR-SR87/SR77/SR67/<br />
SR57/SR48/SR47/SR38/SR37, DCR-SX60/SX50/SX41/SX40/SX31/SX30<br />
<br />
When using the DCR-SR87/SR77/SR67/SR57/SR48/SR47/SR38/SR37, insert the<br />
Audio/Remote plug with the jack cover sufficiently open. (See illustration -5-I<br />
) If the jack cover is not sufficiently open, it may jam the Audio/Remote plug<br />
and cause a poor connection.<br />
Attach the camera mounting shoe to the camera using the metal parts of shoulder<br />
strap as illustrated.<br />
5 Connect the plug and install the camera.<br />
Depending on your camera, firmly insert the Audio/Remote plug into the A/V jack,<br />
A/V OUT jack or A/V remote jack. (except camera models in step 4)<br />
When installing the camera into this unit, align the camera mounting shoe with the<br />
guide inside the front body of this unit, and then push the rear of the camera mounting<br />
shoe until it clicks into place.<br />
Notes<br />
<br />
<br />
<br />
Be sure to keep this unit horizontal when installing the camera mounting shoe.<br />
Installing the camera mounting shoe in a vertical motion may damage the camera<br />
mounting shoe and the front body.<br />
Be sure not to cover the lens, LCD screen, view finder, zoom lever or PHOTO button<br />
with the cable.<br />
When using a camera with an internal power switch linked to the switching action<br />
of the LCD screen, connecting the Audio/Remote plug will switch the Still image<br />
recording mode/Video playing mode of the camera to Movie recording mode.<br />
When using HDR-XR520V/XR520/XR500V/XR500 (See illustration -5-A)<br />
Open the jack cover and connect the plug. (Arrange the cable connected to this unit<br />
in a loop towards the rear of the plug, as illustrated.)<br />
Install the camera into this unit, taking care not to catch the cable on the parts<br />
inside this unit.<br />
After installing the camera into this unit, arrange the cable on the grip belt side of<br />
the camera.<br />
When using HDR-XR200V/XR200/XR106/XR105/XR101/XR100 (See illustration<br />
-5-B)<br />
Open the jack cover and connect the plug.<br />
Arrange the cable connected to this unit in a loop towards the rear of the plug, as<br />
illustrated.<br />
Install the camera into this unit, taking care not to catch the cable on the parts<br />
inside this unit.<br />
After installing the camera into this unit, arrange the cable on the grip belt side of<br />
the camera.<br />
When using HDR-SR12/SR11/SR10, DCR-SR220/SR210 (See illustration -5-C)<br />
Open the jack cover and connect the plug. (Arrange the cable connected to this unit<br />
in a loop towards the rear of the plug, as illustrated.)<br />
After installing the camera into this unit, lightly press the cable to arrange it on the<br />
grip belt side of the camera.<br />
When using HDR-SR8/SR7/SR5 (See illustration -5-D)<br />
Open the jack cover.<br />
Connect the plug.<br />
After installing the camera into this unit, arrange the cable on the grip belt side of<br />
the camera.<br />
When using HDR-XR155/XR150/XR350V/XR350 or HDR-CX120/CX106/CX105/<br />
CX100 (See illustration -5-E)<br />
Open the jack cover and connect the plug.<br />
After installing the camera into this unit, arrange the cable on the grip belt side<br />
of the camera, taking care not to catch the cable on the camera mounting shoe or<br />
other parts.<br />
When using HDR-CX12/CX11/CX7/CX6 (See illustration -5-F)<br />
Open the jack cover.<br />
Connect the plug.<br />
Put the cable on the camera mounting shoe and install the camera into this unit.<br />
After installing the camera into this unit, arrange the cable on the grip belt side<br />
of the camera, placing the cable so that it does not fall from the camera mounting<br />
shoe.<br />
When using HDR-UX20/UX19/UX10/UX9 or DCR-DVD910/DVD510 (See<br />
illustration -5-G)<br />
(If you completed the following and in step -4, start from .)<br />
Connect the plug.<br />
Attach the camera mounting shoe to the camera.<br />
After installing the camera into this unit, arrange the cable. (Hook the cable to the<br />
cable holder.)<br />
When using HDR-HC9/HC7/HC5 (See illustration -5-H)<br />
Open the jack cover.<br />
Connect the plug.<br />
After installing the camera into this unit, arrange the cable on the grip belt side of<br />
the camera.<br />
When using DCR-SR87/SR77/SR67/SR57/SR48/SR47/SR38/SR37 (See<br />
illustration -5-I)<br />
(If you completed the following and in step -4, start from .)<br />
Attach the plug, opening the jack cover enough for it not to catch the base of the<br />
plug.<br />
Attach the camera mounting shoe to the camera.<br />
Install the camera into this unit, keeping the cable on the top side of the camera.<br />
Secure the cable in the clip of the camera mounting shoe, taking care not to catch<br />
the cable on the LCD screen.<br />
If the camera battery is too large for the cable to be passed behind it, pass the<br />
cable along the top of the battery and fasten the cable with clips.<br />
When using DCR-SR85/SR75/SR65/SR55/SR46/SR45/SR36/SR35 (See<br />
illustration -5-J)<br />
Open the jack cover and connect the plug. (Arrange the cable connected to this unit<br />
in a loop towards the rear of the plug, as illustrated.)<br />
After installing the camera into this unit, lightly press the cable to arrange it on the<br />
grip belt side of the camera.<br />
When using DCR-SX60/SX50/SX41/SX40/SX31/SX30 (See illustration -5-K)<br />
(If you completed the following and in step -4, start from .)<br />
Lift the grip belt and open the jack cover to connect the plug.<br />
Attach the camera mounting shoe to the camera.<br />
Install the camera into this unit with the cable curled on the top side of the camera.<br />
After installing the camera into this unit, arrange the cable. (Hook the cable to the<br />
cable holder.)<br />
When using DCR-DVD850/DVD810/DVD710/DVD650/DVD610/DVD450/<br />
DVD410/DVD310/DVD150/DVD115/DVD110 (See illustration -5-L)<br />
Open the jack cover.<br />
Connect the plug.<br />
Clip the cable into the groove of the reflex prevention ring on the grip belt side as<br />
illustrated.<br />
Arrange the cable as illustrated and attach the camera mounting shoe to this unit.<br />
Notes on attachment:<br />
Do not bend the cable.<br />
Make sure that the cable has not come off the groove of the reflex prevention ring.<br />
After installing the camera into this unit, make sure that the cable is not interfering<br />
with the lens of the camera.<br />
When using DCR-DVD708/DVD608/DVD308/DVD306/DVD109/DVD108/<br />
DVD106 (See illustration -5-M)<br />
Open the jack cover.<br />
Connect the plug.<br />
After installing the camera into this unit, arrange the cable.<br />
When using the HDR-CX550V/CX550/XR550V/XR550 or DCR-HC62/HC54/<br />
HC53/HC52/HC51/HC48/HC47/HC45/HC38/HC37 (See illustration -5-N)<br />
Open the jack cover.<br />
Connect the plug.<br />
After installing the camera into this unit, arrange the cable. (Hook the cable at the<br />
cable holder.)<br />
When using DCR-SR88/SR78/SR68/SR58 (See illustration -5-O)<br />
Open the jack cover.<br />
Connect the plug.<br />
Clip the cable into the groove of the reflex prevention ring as illustrated.<br />
Arrange the cable as illustrated and attach the camera mounting shoe to this unit.<br />
Notes on attachment:<br />
Do not bend the cable.<br />
Make sure that the cable has not come off the groove of the reflex prevention ring.<br />
After installing the camera into this unit, make sure that the cable is not interfering<br />
with the lens of the camera.<br />
6 Close the rear body.<br />
Press the rear body shut and fasten the buckles until they click in place.<br />
Notes<br />
<br />
<br />
Be careful not to pinch the cables when closing the rear body.<br />
Although the center of the lens of some camera models may be out of line with the<br />
center of the front glass of this unit when installed, this does not cause any problems<br />
when recording.
Français<br />
Préparation<br />
Remarques<br />
Les modèles de caméscopes numériques <strong>Sony</strong> (appelés ci-dessous le « caméscope »)<br />
mentionnés ci-dessous peuvent ne pas être commercialisés dans tous les pays ou toutes les<br />
régions.<br />
Préparation du caméscope<br />
Pour le détail, reportez-vous au mode d’emploi fourni avec le caméscope.<br />
1 Détachez l’accessoire.<br />
Retirez le filtre, le convertisseur, le capuchon d’objectif, le pare-soleil ou la bandoulière<br />
du caméscope.<br />
Si le caméscope que vous utilisez est pourvu d’un obturateur central manuel, ouvrez cet<br />
obturateur.<br />
2 Installez la batterie.<br />
Installez une batterie complètement rechargée.<br />
3 Introduisez le support.<br />
Introduisez un support compatible avec votre caméscope.<br />
Pour le détail, reportez-vous au mode d’emploi fourni avec le caméscope.<br />
Remarques<br />
Déverrouillez l’onglet de protection en écriture du « Memory Stick Duo » et de la<br />
cassette pour pouvoir enregistrer des images.<br />
Assurez-vous que l’espace sur la cassette, le « Memory Stick Duo », le disque ou le<br />
disque dur est suffisant pour l’enregistrement.<br />
Assurez-vous que le disque n’a pas été finalisé.<br />
4 Fixez la bague antireflet sur le filetage de l’objectif du caméscope.<br />
La bague antireflet empêche la lumière extérieure de se réfléchir dans le caisson sport<br />
(appelé ci-dessous « ce boîtier ») et de pénétrer dans l’objectif.<br />
Si vous utilisez un caméscope sans bague antireflet, essayez si possible de ne pas avoir<br />
le dos face au soleil pendant que vous filmez.<br />
Bague antireflet<br />
Bague antireflet<br />
(M30 × ø 43)<br />
Bague antireflet<br />
(M30 × ø 47)<br />
Bague antireflet<br />
(M30 × ø 50)<br />
Bague antireflet<br />
(M30 × ø 58)<br />
Bague antireflet<br />
(M30 × ø 62)<br />
Bague antireflet<br />
(M37 × ø 55)<br />
Impossible de fixer la bague<br />
antireflet fournie<br />
Caméscope<br />
HDR-UX20/UX19/UX10/UX9,<br />
DCR-DVD910/DVD708/DVD608/DVD510/DVD308/<br />
DVD306/DVD109/DVD108/DVD106,<br />
DCR-HC62/HC54/HC53/HC52/HC51/HC48/HC47/<br />
HC45/HC38/HC37<br />
HDR-XR155/XR150,<br />
HDR-CX120/CX106/CX105/CX100,<br />
DCR-SR87/SR77/SR67/SR57/SR48/SR47/SR38/SR37<br />
DCR-DVD850/DVD810/DVD710/DVD650/DVD610/<br />
DVD450/DVD410/DVD310/DVD150/DVD115/DVD110,<br />
DCR-SR88/SR78/SR68/SR58<br />
HDR-XR350V/XR350,<br />
DCR-SR85/SR75/SR65/SR55/SR46/SR45/SR36/SR35<br />
HDR-XR200V/XR200/XR106/XR105/XR101/XR100,<br />
HDR-SR10,<br />
DCR-SR220/SR210<br />
HDR-XR550V/XR550/XR520V/XR520/XR500V/XR500,<br />
HDR-SR12/SR11/SR8/SR7/SR5,<br />
HDR-HC9/HC7/HC5,<br />
HDR-CX550V/CX550/CX12/CX11/CX7/CX6<br />
DCR-SX60/SX50/SX41/SX40/SX31/SX30<br />
5 Tournez le panneau LCD vers l’extérieur et appliquez-le contre le<br />
caméscope.<br />
6 Réglez la mise au point, l’éclairage, etc. sur AUTO.<br />
Sélection du sabot de montage de caméscope<br />
1 Choisissez le sabot de montage et le numéro d’orifice en vous<br />
reportant au tableau suivant.<br />
Sabot de montage Numéro Caméscope<br />
HDR-HC9/HC7/HC5,<br />
1 DCR-DVD708/DVD608/DVD308/DVD306/<br />
D<br />
DVD109/DVD108/DVD106<br />
DCR-HC62/HC54/HC53/HC52/HC51/HC48/HC47/<br />
2<br />
HC45/HC38/HC37<br />
1 HDR-CX12/CX11/CX7/CX6<br />
F<br />
2 HDR-SR8/SR7/SR5<br />
HDR-UX20/UX19/UX10/UX9,<br />
DCR-DVD910/DVD850/DVD810/DVD710/DVD650/<br />
G 1<br />
DVD610/DVD510/DVD450/DVD410/DVD310/<br />
DVD150/DVD115/DVD110<br />
HDR-XR520V/XR520/XR500V/XR500/XR200V/<br />
XR200/XR106/XR105/XR101/XR100,<br />
H 1<br />
HDR-SR12/SR11/SR10,<br />
DCR-SR220/SR210<br />
DCR-SR88/SR85/SR78/SR75/SR68/SR65/SR58/SR55/<br />
1<br />
I-2<br />
SR46/SR45/SR36/SR35<br />
2 HDR-XR350V/XR350<br />
HDR-CX120/CX106/CX105/CX100,<br />
J 1<br />
DCR-SX60/SX50/SX41/SX40/SX31/SX30<br />
K 1 DCR-SR87/SR77/SR67/SR57/SR48/SR47/SR38/SR37<br />
HDR-CX550V/CX550,<br />
1<br />
L<br />
HDR-XR550V/XR550<br />
2 HDR-XR155/XR150<br />
2 Emboîtez la plaquette à vis dans l’orifice choisi sur le sabot de<br />
montage, puis appuyez dessus de sorte qu’elle s’encliquette.<br />
La plaquette à vis a été fixée sur le sabot de montage L en usine.<br />
Préparation du caisson sport<br />
1 Réglez la sangle.<br />
Réglez la longueur de la sangle tout en tenant ce boîtier de manière à toucher<br />
facilement les touches START/STOP, Téléobjectif, Grand-angle et PHOTO du bout des<br />
doigts.<br />
2 Fixez la bandoulière.<br />
Installation du caméscope<br />
Si vous utilisez un caméscope avec interrupteur POWER, réglez l’interrupteur POWER<br />
sur arrêt. Laissez aussi ce boîtier éteint. Si vous utilisez un caméscope avec interrupteur<br />
d’alimentation interne activé par l’écran LCD, vous n’avez pas besoin d’éteindre le<br />
caméscope.<br />
Remarques<br />
<br />
Après avoir installé le caméscope dans ce boîtier, vous pouvez allumer et éteindre le<br />
caméscope en appuyant sur le bouton POWER de ce boîtier.<br />
Si vous utilisez le HDR-HC9/HC7/HC5, mettez l’interrupteur POWER sur marche.<br />
<br />
1 Relâchez les fermoirs.<br />
Tout en poussant le bouton de déverrouillage dans le sens de la flèche et le<br />
tenant poussé, tirez sur le curseur et libérez le fermoir.<br />
Ouvrez la partie arrière.<br />
2 Appliquez une solution antibuée pour objectif sur la vitre avant.<br />
Appliquez 2 ou 3 gouttes de la solution antibuée pour objectif fournie sur la face interne<br />
de la vitre avant de ce boîtier. Afin d’augmenter l’effet antibuée, utilisez le dessiccatif<br />
fourni. Pour plus de détails, reportez-vous à « Dessiccatif » dans mode d’emploi fourni.<br />
3 Enlevez les matières étrangères, poussière, sable ou cheveux, du<br />
joint torique, de la rainure et des surfaces au contact du caméscope,<br />
et appliquez de la graisse régulièrement sur tout le joint torique.<br />
Si vous fermez le boîtier sans nettoyer ces parties, celles-ci risquent d’être endommagées<br />
et de laisser l’eau pénétrer à l’intérieur.<br />
Pour le détail sur l’entretien du joint torique, reportez-vous à « Entretien du joint<br />
torique » dans le mode d’emploi.<br />
4 Fixez le sabot de montage de caméscope.<br />
Alignez la vis du sabot de montage sur le filetage de pied photo sous le caméscope.<br />
Si un des modèles suivants est utilisé, ouvrez le cache-prise et insérez à fond la fiche<br />
Audio/Commande à distance dans la prise A/V, la prise A/V OUT ou la prise de<br />
commande à distance A/V :<br />
HDR-UX20/UX19/UX10/UX9, DCR-DVD910/DVD510, DCR-SR87/SR77/SR67/<br />
SR57/SR48/SR47/SR38/SR37, DCR-SX60/SX50/SX41/SX40/SX31/SX30<br />
<br />
Si vous utilisez le DCR-SR87/SR77/SR67/SR57/SR48/SR47/SR38/SR37, insérez la<br />
fiche Audio/Commande à distance en ouvrant suffisamment le cache-prise. (Voir<br />
l’illustration -5-I ) Si le cache-prise n’est pas suffisamment ouvert, la fiche<br />
Audio/Commande à distance peut être coincée et la connexion sera mauvaise.<br />
Fixez le sabot de montage de caméscope au caméscope en utilisant les pièces<br />
métalliques de la bandoulière, comme indiqué sur l’illustration.<br />
5 Raccordez la fiche et installez le caméscope.<br />
Insérez à fond la fiche Audio/Commande à distance dans la prise A/V, la prise A/V<br />
OUT ou la prise de commande à distance A/V selon le caméscope utilisé. (sauf modèles<br />
mentionnés à l’étape 4)<br />
Lorsque vous installez le caméscope dans ce boîtier, alignez le sabot de montage de<br />
caméscope sur le guide dans la partie avant de ce boîtier, puis poussez l’arrière du sabot<br />
de montage caméscope jusqu’à ce que le sabot s’encliquette.<br />
Remarques<br />
<br />
<br />
<br />
Veillez à tenir ce boîtier à l’horizontale lorsque vous installez le sabot de montage<br />
de caméscope. Si vous installez le sabot de montage de caméscope en inclinant le<br />
caméscope, vous risquez d’endommager le sabot ainsi que la partie avant du boîtier.<br />
Attention de ne pas masquer l’objectif, l’écran LCD, le viseur, le levier de zoom ou le<br />
bouton PHOTO avec le câble.<br />
Si vous utilisez un caméscope pourvu d’un interrupteur d’alimentation interne<br />
activé par l’écran LCD, le mode d’enregistrement de photos/lecture vidéo du<br />
caméscope se réglera sur le mode d’enregistrement vidéo lorsque vous branchez la<br />
fiche Audio/Commande à distance.<br />
Si vous utilisez un HDR-XR520V/XR520/XR500V/XR500 (Voir l’illustration<br />
-5-A)<br />
Ouvrez le cache-prise et branchez la fiche. (Rangez le câble raccordé à ce boîtier en<br />
formant une boucle vers l’arrière de la fiche, comme indiqué sur l’illustration.)<br />
Installez le caméscope dans ce boîtier, en prenant soin de ne pas coincer le câble<br />
dans les pièces à l’intérieur de ce boîtier.<br />
Après avoir installé le caméscope dans ce boîtier, rangez le câble du côté de la<br />
sangle du caméscope.<br />
Si vous utilisez un HDR-XR200V/XR200/XR106/XR105/XR101/XR100 (Voir<br />
l’illustration -5-B)<br />
Ouvrez le cache-prise et branchez la fiche.<br />
Rangez le câble raccordé à ce boîtier en formant une boucle vers l’arrière de la fiche,<br />
comme indiqué sur l’illustration.<br />
Installez le caméscope dans ce boîtier, en prenant soin de ne pas coincer le câble<br />
dans les pièces à l’intérieur de ce boîtier.<br />
Après avoir installé le caméscope dans ce boîtier, rangez le câble du côté de la<br />
sangle du caméscope.<br />
Si vous utilisez le HDR-SR12/SR11/SR10, DCR-SR220/SR210 (Voir l’illustration<br />
-5-C)<br />
Ouvrez le cache-prise et branchez la fiche. (Rangez le câble raccordé à ce boîtier en<br />
formant une boucle vers l’arrière de la fiche, comme indiqué sur l’illustration.)<br />
Après avoir installé le caméscope dans ce boîtier, appuyez légèrement sur le câble<br />
pour le ranger du côté de la sangle du caméscope.<br />
Si vous utilisez le HDR-SR8/SR7/SR5 (Voir l’illustration -5-D)<br />
Ouvrez le cache-prise.<br />
Branchez la prise.<br />
Après avoir installé le caméscope dans ce boîtier, rangez le câble du côté de la<br />
sangle du caméscope.<br />
Si vous utilisez le HDR-XR155/XR150/XR350V/XR350 ou le HDR-CX120/CX106/<br />
CX105/CX100 (Voir l'illustration -5-E)<br />
Ouvrez le cache-prise et branchez la fiche.<br />
Après avoir installé le caméscope dans ce boîtier, rangez le câble du côté de la sangle<br />
du caméscope, en prenant soin de ne pas coincer le câble sur le sabot de montage<br />
de caméscope ou d’autres pièces.<br />
Si vous utilisez le HDR-CX12/CX11/CX7/CX6 (Voir l’illustration -5-F)<br />
Ouvrez le cache-prise.<br />
Branchez la prise.<br />
Placez le câble sur le sabot de montage de caméscope et installez le caméscope dans<br />
ce boîtier.<br />
Après avoir installé le caméscope dans ce boîtier, rangez le câble du côté de la<br />
sangle du caméscope, en le plaçant de sorte qu’il ne tombe pas du sabot de montage<br />
de caméscope.<br />
Si vous utilisez le HDR-UX20/UX19/UX10/UX9 ou le DCR-DVD910/DVD510 (Voir<br />
l’illustration -5-G)<br />
(Si les points et suivants ont déjà été effectués à l’étape -4, continuez<br />
par .)<br />
Branchez la prise.<br />
Fixez le sabot de montage de caméscope au caméscope.<br />
Après avoir installé le caméscope dans ce boîtier, rangez le câble. (Accrochez le<br />
câble au support de câble.)<br />
Si vous utilisez le HDR-HC9/HC7/HC5 (Voir l’illustration -5-H)<br />
Ouvrez le cache-prise.<br />
Branchez la prise.<br />
Après avoir installé le caméscope dans ce boîtier, rangez le câble du côté de la<br />
sangle du caméscope.<br />
Si vous utilisez le DCR-SR87/SR77/SR67/SR57/SR48/SR47/SR38/SR37 (Voir<br />
l’illustration -5-I)<br />
(Si les points et suivants ont déjà été effectués à l’étape -4, continuez<br />
par .)<br />
Branchez la fiche en ouvrant suffisamment le cache-prise pour ne pas coincer la<br />
base de la fiche.<br />
Fixez le sabot de montage de caméscope au caméscope.<br />
Installez le caméscope dans ce boîtier en rangeant le câble du côté de la sangle du<br />
caméscope.<br />
Fixez le câble avec le clip du sabot de montage de caméscope, en prenant soin de ne<br />
pas coincer le câble sur l’écran LCD.<br />
Si la batterie du caméscope est trop grosse pour faire passer le câble derrière,<br />
faites-le passer sur la batterie et fixez-le avec les clips.<br />
Si vous utilisez le DCR-SR85/SR75/SR65/SR55/SR46/SR45/SR36/SR35 (Voir<br />
l’illustration -5-J)<br />
Ouvrez le cache-prise et branchez la fiche. (Rangez le câble raccordé à ce boîtier en<br />
formant une boucle vers l’arrière de la fiche, comme indiqué sur l’illustration.)<br />
Après avoir installé le caméscope dans ce boîtier, appuyez légèrement sur le câble<br />
pour le ranger du côté de la sangle du caméscope.<br />
Si vous utilisez le DCR-SX60/SX50/SX41/SX40/SX31/SX30 (Voir l’illustration<br />
-5-K)<br />
(Si les points et suivants ont déjà été effectués à l’étape -4, continuez<br />
par .)<br />
Levez la sangle et ouvrez le cache-prise pour brancher la fiche.<br />
Fixez le sabot de montage de caméscope au caméscope.<br />
Installez le caméscope dans ce boîtier avec le câble recourbé au-dessus du<br />
caméscope.<br />
Après avoir installé le caméscope dans ce boîtier, rangez le câble. (Accrochez le<br />
câble au support de câble.)<br />
Si vous utilisez le DCR-DVD850/DVD810/DVD710/DVD650/DVD610/DVD450/<br />
DVD410/DVD310/DVD150/DVD115/DVD110 (Voir l’illustration -5-L)<br />
Ouvrez le cache-prise.<br />
Branchez la prise.<br />
Coincez le câble dans la rainure de la bague antireflet du côté de la sangle, comme<br />
indiqué sur l’illustration.<br />
Rangez le câble de la façon illustrée et fixez le sabot de montage de caméscope à ce<br />
boîtier.<br />
Remarques sur le câble :<br />
Ne tordez pas le câble.<br />
Veillez à ce que le câble ne ressorte pas de la rainure de la bague antireflet.<br />
Après avoir installé le caméscope dans ce boîtier, assurez-vous que le câble ne gêne<br />
pas l’objectif du caméscope.<br />
Si vous utilisez le DCR-DVD708/DVD608/DVD308/DVD306/DVD109/DVD108/<br />
DVD106 (Voir l’illustration -5-M)<br />
Ouvrez le cache-prise.<br />
Branchez la prise.<br />
Après avoir installé le caméscope dans ce boîtier, rangez le câble.<br />
Si vous utilisez le HDR-CX550V/CX550/XR550V/XR550 ou le DCR-HC62/HC54/<br />
HC53/HC52/HC51/HC48/HC47/HC45/HC38/HC37 (Voir l'illustration -5-N)<br />
Ouvrez le cache-prise.<br />
Branchez la prise.<br />
Après avoir installé le caméscope dans ce boîtier, rangez le câble. (Accrochez le<br />
câble au support de câble.)<br />
Si vous utilisez le DCR-SR88/SR78/SR68/SR58 (Voir l'illustration -5-O)<br />
Ouvrez le cache-prise.<br />
Branchez la prise.<br />
Coincez le câble dans la rainure de la bague antireflet de la façon illustrée.<br />
Rangez le câble de la façon illustrée et fixez le sabot de montage de caméscope à ce<br />
boîtier.<br />
Remarques sur le câble :<br />
Ne tordez pas le câble.<br />
Veillez à ce que le câble ne ressorte pas de la rainure de la bague antireflet.<br />
Après avoir installé le caméscope dans ce boîtier, assurez-vous que le câble ne gêne<br />
pas l'objectif du caméscope.<br />
6 Fermez la partie arrière.<br />
Appuyez sur la partie arrière du boîtier pour le refermer et serrez les fermoirs jusqu’à ce<br />
qu’ils s’encliquettent.<br />
Remarques<br />
Veillez à ne pas coincer les câbles lorsque vous fermez la partie arrière.<br />
Bien que le centre de l’objectif de certains modèles de caméscopes ne soit pas aligné sur<br />
le centre de la vitre avant de ce boîtier lorsque le caméscope est installé, la prise de vue<br />
s’effectue normalement.<br />
<br />
<br />
<br />
<br />
<br />
<br />
<br />
1<br />
<br />
<br />
2<br />
<br />
3 <br />
<br />
<br />
<br />
<br />
<br />
<br />
<br />
4<br />
<br />
<br />
<br />
<br />
<br />
<br />
<br />
<br />
<br />
<br />
<br />
<br />
<br />
<br />
<br />
<br />
<br />
<br />
<br />
<br />
<br />
<br />
<br />
<br />
<br />
<br />
<br />
<br />
<br />
<br />
<br />
<br />
<br />
<br />
<br />
<br />
<br />
<br />
<br />
5<br />
6<br />
<br />
1<br />
<br />
<br />
<br />
<br />
<br />
<br />
<br />
<br />
<br />
<br />
<br />
<br />
<br />
<br />
<br />
<br />
<br />
<br />
<br />
<br />
<br />
<br />
<br />
<br />
<br />
<br />
<br />
<br />
<br />
<br />
<br />
<br />
<br />
<br />
<br />
<br />
<br />
<br />
<br />
<br />
<br />
2<br />
<br />
<br />
<br />
1<br />
<br />
<br />
2<br />
<br />
<br />
<br />
<br />
<br />
<br />
<br />
<br />
1<br />
<br />
<br />
<br />
2<br />
<br />
<br />
3<br />
<br />
<br />
<br />
4<br />
<br />
<br />
<br />
<br />
<br />
<br />
<br />
-5-I <br />
<br />
<br />
5<br />
<br />
<br />
<br />
<br />
<br />
<br />
<br />
<br />
<br />
<br />
<br />
<br />
-5-A<br />
<br />
<br />
<br />
<br />
<br />
5-B<br />
<br />
<br />
<br />
<br />
-5-C<br />
<br />
<br />
<br />
-5-D<br />
<br />
<br />
<br />
<br />
-5-E<br />
<br />
<br />
<br />
-5-F<br />
<br />
<br />
<br />
<br />
<br />
<br />
-5-G<br />
-4<br />
<br />
<br />
<br />
-5-H<br />
<br />
<br />
<br />
<br />
-5-I<br />
-4<br />
<br />
<br />
<br />
-5-H<br />
<br />
<br />
<br />
<br />
-5-I<br />
-4<br />
<br />
<br />
<br />
<br />
<br />
<br />
<br />
<br />
-5-J<br />
<br />
<br />
<br />
-5-K<br />
-4<br />
<br />
<br />
<br />
<br />
<br />
-5-L<br />
<br />
<br />
<br />
<br />
<br />
<br />
<br />
<br />
<br />
-5-M<br />
<br />
<br />
<br />
<br />
-5-N<br />
<br />
<br />
<br />
-5-O<br />
<br />
<br />
<br />
<br />
<br />
<br />
<br />
<br />
6<br />
<br />
<br />
<br />
<br />
<br />
<br />
<br />
<br />
<br />
<br />
<br />
<br />
<br />
1 <br />
<br />
<br />
<br />
2 <br />
<br />
3 <br />
<br />
<br />
<br />
<br />
<br />
<br />
<br />
<br />
4 <br />
<br />
<br />
<br />
<br />
<br />
<br />
HDR-UX20/UX19/UX10/UX9,<br />
<br />
DCR-DVD910/DVD708/DVD608/DVD510/DVD308/<br />
DVD306/DVD109/DVD108/DVD106,<br />
<br />
DCR-HC62/HC54/HC53/HC52/HC51/HC48/HC47/<br />
HC45/HC38/HC37<br />
<br />
HDR-XR155/XR150,<br />
HDR-CX120/CX106/CX105/CX100,<br />
<br />
DCR-SR87/SR77/SR67/SR57/SR48/SR47/SR38/SR37<br />
<br />
DCR-DVD850/DVD810/DVD710/DVD650/DVD610/<br />
DVD450/DVD410/DVD310/DVD150/DVD115/DVD110,<br />
<br />
DCR-SR88/SR78/SR68/SR58<br />
<br />
HDR-XR350V/XR350,<br />
<br />
DCR-SR85/SR75/SR65/SR55/SR46/SR45/SR36/SR35<br />
<br />
HDR-XR200V/XR200/XR106/XR105/XR101/XR100,<br />
HDR-SR10,<br />
<br />
DCR-SR220/SR210<br />
HDR-XR550V/XR550/XR520V/XR520/XR500V/XR500,<br />
<br />
HDR-SR12/SR11/SR8/SR7/SR5,<br />
<br />
HDR-HC9/HC7/HC5,<br />
HDR-CX550V/CX550/CX12/CX11/CX7/CX6<br />
DCR-SX60/SX50/SX41/SX40/SX31/SX30<br />
<br />
5 <br />
6 <br />
<br />
1 <br />
<br />
HDR-HC9/HC7/HC5,<br />
1 DCR-DVD708/DVD608/DVD308/DVD306/<br />
D<br />
DVD109/DVD108/DVD106<br />
DCR-HC62/HC54/HC53/HC52/HC51/HC48/HC47/<br />
2<br />
HC45/HC38/HC37<br />
1 HDR-CX12/CX11/CX7/CX6<br />
F<br />
2 HDR-SR8/SR7/SR5<br />
HDR-UX20/UX19/UX10/UX9,<br />
DCR-DVD910/DVD850/DVD810/DVD710/DVD650/<br />
G 1<br />
DVD610/DVD510/DVD450/DVD410/DVD310/<br />
DVD150/DVD115/DVD110<br />
HDR-XR520V/XR520/XR500V/XR500/XR200V/<br />
XR200/XR106/XR105/XR101/XR100,<br />
H 1<br />
HDR-SR12/SR11/SR10,<br />
DCR-SR220/SR210<br />
DCR-SR88/SR85/SR78/SR75/SR68/SR65/SR58/SR55/<br />
1<br />
I-2<br />
SR46/SR45/SR36/SR35<br />
2 HDR-XR350V/XR350<br />
HDR-CX120/CX106/CX105/CX100,<br />
J 1<br />
DCR-SX60/SX50/SX41/SX40/SX31/SX30<br />
K 1 DCR-SR87/SR77/SR67/SR57/SR48/SR47/SR38/SR37<br />
HDR-CX550V/CX550,<br />
1<br />
L<br />
HDR-XR550V/XR550<br />
2 HDR-XR155/XR150<br />
2 <br />
<br />
<br />
<br />
1 <br />
<br />
<br />
<br />
2 <br />
<br />
<br />
<br />
<br />
<br />
<br />
<br />
POWER <br />
.<br />
HDR-HC9/HC7/HC5 POWER .<br />
1 <br />
<br />
<br />
<br />
2 <br />
<br />
<br />
<br />
3 <br />
<br />
<br />
<br />
<br />
<br />
4 <br />
<br />
<br />
<br />
<br />
3 <br />
<br />
<br />
<br />
<br />
<br />
4 <br />
<br />
<br />
<br />
<br />
<br />
<br />
<br />
<br />
<br />
<br />
<br />
<br />
<br />
5 <br />
<br />
<br />
<br />
<br />
<br />
<br />
<br />
<br />
<br />
<br />
<br />
<br />
<br />
<br />
<br />
<br />
<br />
<br />
<br />
<br />
<br />
<br />
<br />
<br />
<br />
<br />
<br />
<br />
<br />
<br />
<br />
<br />
<br />
<br />
<br />
<br />
<br />
<br />
<br />
<br />
<br />
<br />
<br />
<br />
<br />
<br />
<br />
<br />
<br />
<br />
<br />
<br />
<br />
<br />
<br />
<br />
<br />
<br />
<br />
<br />
<br />
<br />
<br />
<br />
<br />
<br />
<br />
<br />
<br />
<br />
<br />
<br />
<br />
<br />
<br />
<br />
<br />
<br />
<br />
<br />
<br />
<br />
<br />
<br />
<br />
<br />
<br />
<br />
<br />
<br />
<br />
<br />
<br />
<br />
<br />
<br />
<br />
<br />
<br />
<br />
<br />
<br />
<br />
<br />
<br />
<br />
<br />
<br />
<br />
<br />
<br />
<br />
<br />
<br />
<br />
<br />
<br />
<br />
<br />
<br />
<br />
6


