

Sony HVL-F5DF - HVL-F5DF Istruzioni per l'uso Francese
Sony HVL-F5DF - HVL-F5DF Istruzioni per l'uso Francese
Sony HVL-F5DF - HVL-F5DF Istruzioni per l'uso Francese

Create successful ePaper yourself
Turn your PDF publications into a flip-book with our unique Google optimized e-Paper software.
B C D E<br />
F-1<br />
1<br />
READY<br />
1<br />
F-2 F-3<br />
2<br />
LIGHT<br />
POWER<br />
ON<br />
OFF<br />
ON<br />
1<br />
a<br />
LIGHT<br />
POWER<br />
ON<br />
OFF<br />
ON<br />
1<br />
2<br />
2<br />
1<br />
<br />
B <br />
• <br />
<br />
• <br />
<br />
<br />
• <br />
<br />
<br />
<br />
<br />
<br />
C <br />
<br />
<br />
DCR-IP220<br />
<br />
<br />
<br />
<br />
1 <br />
2 POWER<br />
1 <br />
ON<br />
READY<br />
READY<br />
<br />
3 <br />
<br />
<br />
<br />
<br />
<br />
<br />
<br />
<br />
READY<br />
<br />
<br />
<br />
<br />
<br />
4 <br />
<br />
<br />
<br />
<br />
<br />
<br />
<br />
POWEROFF<br />
<br />
<br />
• <br />
15m<br />
• A<br />
<br />
<br />
• <br />
<br />
POWER<br />
OFF<br />
OFF<br />
D <br />
<br />
1 ON<br />
<br />
2 POWER<br />
1LIGHT ON<br />
<br />
3 ON/OFF<br />
/<br />
<br />
POWEROFF<br />
<br />
<br />
<br />
<br />
E <br />
NP-FF50/FF70<br />
1 POWER<br />
OFF<br />
2 <br />
<br />
<br />
<br />
1 POWER<br />
OFF<br />
2 1<br />
2<br />
E<br />
<br />
• POWER<br />
OFF<br />
• <br />
<br />
10<br />
<br />
<br />
<br />
- <br />
<br />
<br />
<br />
<br />
- 1030AC<br />
<br />
F <br />
XB-5DX<br />
<br />
<br />
<br />
1 <br />
<br />
1<br />
2<br />
2 <br />
<br />
<br />
<br />
3 <br />
<br />
1<br />
2<br />
<br />
<br />
• <br />
<br />
• <br />
<br />
<br />
• <br />
<br />
• <br />
<br />
<br />
<br />
<br />
<br />
<br />
<br />
<br />
OFF<br />
<br />
POWER<br />
ON<br />
<br />
<br />
ONLANC<br />
<br />
<br />
POWER<br />
ON<br />
<br />
<br />
<br />
OFF<br />
<br />
POWER<br />
ON<br />
LANC<br />
<br />
<br />
<br />
LED<br />
<br />
l <br />
<br />
<br />
<br />
<br />
<br />
<br />
OFF<br />
<br />
<br />
<br />
c <br />
ON<br />
OFF<br />
<br />
<br />
LED<br />
• <br />
c <br />
• <br />
c <br />
<br />
<br />
POWER<br />
OFF<br />
<br />
LANC<br />
<br />
POWER<br />
ON/<br />
OFF/<br />
<br />
• <br />
c <br />
<br />
<br />
• <br />
<br />
• <br />
<br />
• 1<br />
<br />
<br />
<br />
<br />
<br />
<br />
<br />
<br />
<br />
<br />
<br />
<br />
<br />
<br />
• <strong>HVL</strong>-<strong>F5DF</strong><br />
• <br />
• <br />
English<br />
B Lighting up a subject<br />
• When recording indoors with this unit, you can get<br />
clear and beautiful color pictures.<br />
• For wide angle shots, the video light may not light the<br />
corners of pictures completely. Use the video light for<br />
shooting the main subject of the picture effectively.<br />
• When bright light shines from behind the subject<br />
(backlighting), the video light is very effective for<br />
lighting up the main part of the subject, such as the<br />
<strong>per</strong>son’s face.<br />
Outdoors, be sure that you do not stand facing the sun.<br />
• Fluorescent lights tend to produce flickering in the<br />
recording. Use of the video flash light may help to<br />
produce better pictures with less color blur.<br />
C Using the video flash<br />
Use the video flash only with a camcorder which has the<br />
PHOTO recording function. The DCR-IP220/IP210 is the<br />
model used for illustration purposes. For details, refer to<br />
the o<strong>per</strong>ating instructions of your camcorder.<br />
(The instructions below show the o<strong>per</strong>ations when the<br />
camcorder POWER switch is set to CAMERA. However<br />
you can also use the video flash light when the power<br />
switch is set to MEMORY.)<br />
1 Set the camcorder POWER switch to CAMERA.<br />
2 Slide the power switch to pressing the green button<br />
in the direction of the arrow 1 to set the power<br />
switch of the video flash light to ON.<br />
The charge complete lamp READY blinks as the video<br />
flash light starts to charge. When charging is<br />
complete, the charge complete lamp READY stops<br />
blinking but remains on.<br />
3 Keep pressing the camcorder PHOTO button lightly<br />
to confirm the image.<br />
Keep the camcorder PHOTO button pressed down<br />
lightly.<br />
The flashing of the video flash light is linked to the<br />
PHOTO button. A still picture appears in the<br />
viewfinder and the memory indicator comes on.<br />
Recording is not carried out at this point.<br />
To change the still picture, release the camcorder<br />
PHOTO button. The video flash light starts charging<br />
again after you release the camcorder PHOTO button.<br />
Wait until the battery charge complete lamp READY<br />
appears before lightly pressing the PHOTO button<br />
again.<br />
Because the camcorder automatically adjusts the<br />
brightness when you press the PHOTO button, the<br />
image may get darker or the colors may seem to<br />
change.<br />
4 Press the camcorder PHOTO button dee<strong>per</strong>.<br />
When you press the PHOTO button, the bar scroll<br />
indicator disappears and recording stops. During<br />
recording, captured images appear in the viewfinder<br />
or on the LCD.<br />
When you release the PHOTO button, the video flash<br />
light automatically starts to recharge after the image is<br />
recorded.<br />
After use<br />
Set the power switch to OFF.<br />
Notes<br />
• The appropriate distance between a subject and the<br />
video flash light is approx. 1 m to 5 m in a dark room.<br />
• During recording, keep your fingers away from the<br />
sensor A of this unit. Otherwise, the brightness of the<br />
flash cannot be adjusted pro<strong>per</strong>ly.<br />
• The video flash light will be recharged even if it is<br />
completely charged after:<br />
- you set the power switch to OFF.<br />
- you set the camcorder POWER switch to OFF.<br />
D Using the video light<br />
Control the video light with the camcorder in standby<br />
mode<br />
1 Set the camcorder POWER switch to ON.<br />
2 Set the power switch to LIGHT ON, pressing the<br />
green button in the direction of the arrow 1 to turn<br />
on the video light.<br />
3 Turn on/off the camcorder. The video light is turned<br />
on/off in sync with the camcorder.<br />
After use<br />
Set the power switch to OFF.<br />
Note<br />
Make sure the video light has cooled down before storing it.<br />
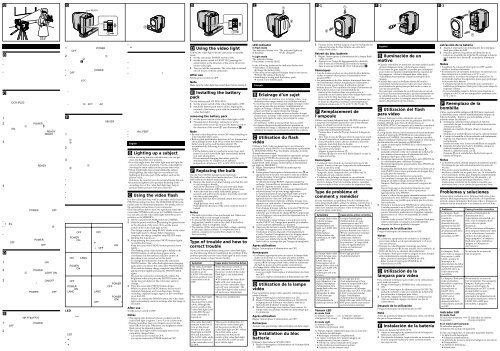
E Installing the battery<br />
pack<br />
Use the battery pack NP-FF50/FF70.<br />
1 Set the power switch of the video flash light to OFF.<br />
2 Install the battery pack until it clicks, aligning the<br />
terminal of the battery pack with the terminal of the<br />
video flash light.<br />
removing the battery pack<br />
1 Set the power switch of the video flash light to OFF.<br />
2 Pressing down the battery release lever in the<br />
direction of the arrow 1, remove the battery pack in<br />
the direction of the arrow 2. (see illustration E)<br />
Note<br />
• Be sure to turn the power switch OFF when installing or<br />
removing the battery pack.<br />
• Battery pack <strong>per</strong>formance decreases in low-tem<strong>per</strong>ature<br />
surroundings (lower than 10˚C) so that the time the<br />
battery pack can be used becomes shorter. We<br />
recommend the following to use the battery pack<br />
longer:<br />
- Put the battery pack in a pocket to warm it up, and<br />
insert it in your video flash light immediately before<br />
you start taking shots.<br />
- We recommend charging the battery pack (by<br />
attaching to the AC adapter) in an ambient<br />
tem<strong>per</strong>ature of between 10˚C to 30˚C (50°F to 86°F).<br />
F Replacing the bulb<br />
Use the <strong>Sony</strong> XB-5DX halogen lamp (optional).<br />
The bulb is hot when it has just burned out. Wait until the<br />
bulb cools down before removing it.<br />
1 Remove the front cover after making sure that the unit<br />
is cool enough to handle.<br />
Push in the direction of 1 to loosen the lock knob.<br />
Pull in the direction of 2 to remove the front cover.<br />
2 When the bulb has cooled sufficiently, grasp it<br />
securely and pull it out to replace. Insert the new bulb<br />
into the socket straightly.<br />
3 After the bulb has been inserted, attach the front cover<br />
straightly.<br />
Align the front cover with 1.<br />
Push 2 in the direction of the arrow until the knob is<br />
locked.<br />
Notes<br />
• The bulb is hot when it has just burned out. Make sure<br />
that the bulb is cool enough to handle.<br />
• To prevent the bulb from being smudged with<br />
fingerprints, handle it with a dry cloth. If the bulb is<br />
smudged, wipe it completely clean.<br />
• The interior of this unit contains high voltage, opening<br />
it can cause electrical shock. To inspect the unit’s<br />
interior, consult your nearest <strong>Sony</strong> dealer or <strong>Sony</strong><br />
Service facility.<br />
Type of trouble and how to<br />
correct trouble<br />
If you run into any problem using your video flash light,<br />
use the following table to troubleshoot the problem. If the<br />
problem <strong>per</strong>sists, turn the video flash light off and contact<br />
your <strong>Sony</strong> dealer or <strong>Sony</strong> Service facility.<br />
Symptom<br />
The video flash light<br />
lights up if the power<br />
switch is set to<br />
LIGHT ON while the<br />
power switch of your<br />
camcorder is set to<br />
OFF.<br />
The video flash light<br />
goes out if you<br />
disconnect the LANC<br />
cable, although the<br />
power switch of the<br />
video flash light is set<br />
to LIGHT ON and<br />
your camcorder is<br />
turned on.<br />
The video flash light<br />
remains turned on if<br />
you set the power<br />
switch of the video<br />
flash light to LIGHT<br />
ON and disconnect<br />
the LANC cable while<br />
the power switch of<br />
your camcorder is set<br />
to OFF.<br />
Cause and/or Corrective Action<br />
When the power switch of<br />
your camcorder is set to OFF,<br />
the power switch of the video<br />
flash light is not interlocked<br />
with it.<br />
c To interlock the video flash<br />
light with your camcorder,<br />
turn on your camcorder, then<br />
turn off your camcorder. The<br />
video flash light is also turned<br />
off and is now interlocked.<br />
This is not a malfunction.<br />
This is not a malfunction. To<br />
turn off the video flash light,<br />
set the power switch of the<br />
video flash light to OFF. When<br />
the LANC cable is not<br />
connected, set the power<br />
switch of the video flash light<br />
to LIGHT ON or OFF to turn<br />
on or off the light.<br />
LED indicator<br />
In Flash mode<br />
The indicator flashes l The indicator lights up<br />
(Charging)<br />
(Fully charged)<br />
In Light mode<br />
The indicator flashes<br />
(The battery is nearly dead)<br />
In the following instances the indicator flashes fast:<br />
• The battery is discharged.<br />
c Charge the battery fully.<br />
• The rating of the replaced halogen lamp is not correct.<br />
c Check the rating of the lamp.<br />
• Something is wrong with the battery pack.<br />
c Install a new battery pack.<br />
Français<br />
B Eclairage d’un sujet<br />
• Si vous filmez en intérieur avec la lampe vidéo, vous<br />
obtiendrez des images nettes avec de belles couleurs.<br />
• Lors de la prise de vues en grand angle, la lampe vidéo<br />
ne pourra peut-être pas éclairer complètement les<br />
angles de l’image. Utilisez la lampe vidéo pour bien<br />
éclairer et filmer le sujet principal de l’image.<br />
• Quand une lumière intense se trouve derrière le sujet<br />
(contre-jour), la lampe vidéo éclaire de manière efficace<br />
la partie principale du sujet, par exemple le visage<br />
d’une <strong>per</strong>sonne.<br />
A l’extérieur, veillez à ne pas filmer face au soleil.<br />
• Les lampes fluorescentes ont tendance à produire un<br />
vacillement de l’image. L’utilisation de la lampe vidéo peut<br />
améliorer les images en accentuant la netteté des couleurs.<br />
C Utilisation du flash<br />
vidéo<br />
Utilisez le flash vidéo seulement avec un camescope<br />
présentant le mode PHOTO. Les illustrations représentent<br />
le DCR-IP220/IP210. Pour les détails, consultez le mode<br />
d’emploi du camescope.<br />
(Les instructions ci-après montrent les opérations lorsque<br />
l'interrupteur POWER du caméscope est réglé sur<br />
CAMERA. Toutefois, vous pouvez également utiliser la<br />
lampe-flash vidéo lorsque l'interrupteur d'alimentation<br />
est réglé sur MEMORY.)<br />
1 Réglez l'interrupteur POWER du caméscope sur<br />
CAMERA.<br />
2 Faites glisser l'interrupteur d'alimentation vers en<br />
appuyant sur le bouton vert dans le sens de la flèche<br />
1 afin de régler l'interrupteur d'alimentation de la<br />
lampe-flash vidéo sur ON.<br />
Le témoin de charge READY clignote pendant la<br />
recharge. Lorsqu’elle est terminée, le témoin READY<br />
cesse de clignoter et reste allumé.<br />
3 Tenez la touche PHOTO du camescope légèrement<br />
enfoncée jusqu’à ce qu’une image apparaisse.<br />
Le fonctionnement de la lampe-flash vidéo est lié à<br />
l’activation de la touche PHOTO. Une image fixe<br />
apparaît dans le viseur et l’indicateur<br />
d’enregistrement en mémoire s’allume lorsque vous<br />
appuyez sur cette touche. L’enregistrement n’est pas<br />
encore exécuté à ce moment.<br />
Pour changer d’image, relâchez la touche PHOTO du<br />
camescope. Le flash vidéo se recharge aussitôt.<br />
Attendez que le témoin de charge READY apparaisse<br />
avant d’appuyer une nouvelle fois légèrement sur la<br />
touche PHOTO.<br />
La luminosité s’ajuste lorsque vous appuyez sur la<br />
touche PHOTO, et l’image peut paraître plus sombre<br />
ou les couleurs différentes à ce moment.<br />
4 Appuyez plus fort sur la touche PHOTO du camescope.<br />
Lorsque vous appuyez sur la touche PHOTO,<br />
l’indicateur à barres disparaît et l’enregistrement<br />
s’arrête. Pendant l’enregistrement, les images saisies<br />
apparaissent dans le viseur ou sur l’écran LCD.<br />
Lorsque vous relâchez la touche PHOTO, la lampeflash<br />
vidéo se recharge dès que l’image est enregistrée.<br />
Après utilisation<br />
Réglez l’interrupteur d’alimentation sur OFF.<br />
Remarques<br />
• La distance appropriée entre un sujet et la lampe-flash<br />
vidéo est d’environ 1 à 5 m dans une pièce sombre.<br />
• Pendant la prise de vues, ne pas mettre les doigts sur le<br />
capteur A de la lampe-flash vidéo, sinon la luminosité<br />
du flash ne pourra pas être ajustée correctement.<br />
• La lampe-flash vidéo devra être à nouveau rechargé<br />
même après une recharge si :<br />
- vous avez réglé l’interrupteur d’alimentation du flash<br />
sur OFF.<br />
- vous avez réglé le commutateur d'alimentation sur OFF.<br />
D Utilisation de la lampe<br />
vidéo<br />
Pour contrôler la lampe vidéo quand le caméscope est en<br />
mode d'attente.<br />
1 Réglez l'interrupteur d'alimentation sur ON.<br />
2 Réglez l'interrupteur d'alimentation sur LIGHT ON<br />
en appuyant sur le bouton vert dans le sens de la<br />
flèche 1 afin d'allumer la lampe vidéo.<br />
3 Mettez le caméscope sous tension/hors tension. La<br />
lampe vidéo est allumée/éteinte en même temps que<br />
le caméscope.<br />
Après utilisation<br />
Réglez l’interrupteur d’alimentation sur OFF.<br />
Remarque<br />
Assurez-vous que la lampe vidéo est froide avant de la ranger.<br />
E Installation du bloc<br />
batterie<br />
Utilisez le bloc batterie NP-FF50/FF70.<br />
1 Réglez l'interrupteur d'alimentation de la lampe-flash<br />
vidéo sur OFF.<br />
2 Poussez le bloc batterie jusqu'à ce qu'il s'encliquette en<br />
alignant la borne du bloc batterie sur celle de la<br />
lampe-flash vidéo.<br />
Retrait du bloc batterie<br />
1 Réglez l'interrupteur d'alimentation de la lampe-flash<br />
vidéo sur OFF.<br />
2 Appuyez sur l'ergot de dégagement de la batterie<br />
dans le sens de la flèche 1 puis retirez la batterie<br />
dans le sens de la flèche 2. (Voir l’illustration E)<br />
Remarques<br />
• Lors de la mise en place ou du retrait du bloc batterie,<br />
veillez à mettre l'interrupteur d'alimentation hors<br />
tension (OFF).<br />
• Les <strong>per</strong>formances du bloc batterie diminuent dans des<br />
environnements à basses températures (inférieures à<br />
10 °C) de sorte que le temps d'utilisation du bloc<br />
batterie décroît. Pour optimiser le temps d'utilisation du<br />
bloc batterie, nous vous recommandons de :<br />
- mettre le bloc batterie dans une poche pour le<br />
réchauffer et de l'insérer dans votre lampe flash-vidéo<br />
juste avant de faire des prises de vue.<br />
- Nous vous conseillons de charger le bloc batterie (en<br />
le fixant à l'adaptateur secteur) à une température<br />
ambiante située entre 10 °C et 30 °C (50 °F à 86 °F).<br />
F Remplacement de<br />
l’ampoule<br />
Utilisez une lampe halogène <strong>Sony</strong> XB-5DX (en option).<br />
L’ampoule est brûlante quand elle vient d’être éteinte.<br />
Laissez-la refroidir avant de l’enlever.<br />
1 Enlevez le capot avant après avoir vérifié que la<br />
lampe était suffisamment froide.<br />
Poussez dans le sens de 1 pour desserrer le bague de<br />
serrage.<br />
Tirez dans le sens de 2 pour retirer le capot avec avant.<br />
2 Quand l’ampoule est suffisamment froide, prenez-la<br />
avec précaution et tirez dessus. Insérez la nouvelle<br />
ampoule tout droit dans la douille.<br />
3 Après avoir remplacé l’ampoule, remettez le capot<br />
tout droit sur la lampe.<br />
Alignez le capot avant sur 1.<br />
Poussez 2 dans le sens de la flèche jusqu’à ce que la<br />
bague soit serrée.<br />
Remarques<br />
• L’ampoule reste chaude un moment après avoir été<br />
éteinte. Assurez-vous que l’ampoule est suffisamment<br />
froide avant de la sortir.<br />
• Pour éviter de laisser des traces de doigts sur<br />
l’ampoule, tenez l’ampoule avec un chiffon sec. Si<br />
l’ampoule est sale, essuyez-la bien.<br />
• L’intérieur de la lampe contient un circuit haute<br />
tension. Afin d’éviter tout risque d’électrocution, ne pas<br />
ouvrir la lampe. Pour tout contrôle interne, consultez<br />
votre revendeur <strong>Sony</strong> ou un centre de réparation <strong>Sony</strong>.<br />
Type de problème et<br />
comment y remédier<br />
Si vous rencontrez un problème lors de l'utilisation de<br />
votre lampe flash-vidéo, utilisez le tableau suivant pour y<br />
remédier. Si le problème <strong>per</strong>siste, mettez la lampe flashvidéo<br />
hors tension et contactez votre revendeur <strong>Sony</strong> ou<br />
le service après-vente <strong>Sony</strong>.<br />
Symptôme<br />
La lampe flash-vidéo<br />
s'allume lorsque<br />
l'interrupteur<br />
d'alimentation est<br />
réglé sur LIGHT ON<br />
alors que<br />
l'interrupteur<br />
d'alimentation du<br />
caméscope est réglé<br />
sur OFF.<br />
La lampe flash-vidéo<br />
s'éteint lorsque vous<br />
débranchez le câble<br />
LANC bien que<br />
l'interrupteur de la<br />
lampe flash-vidéo soit<br />
réglé sur LIGHT ON<br />
et que votre<br />
caméscope soit sous<br />
tension.<br />
La lampe flash-vidéo<br />
reste allumée si vous<br />
réglez l'interrupteur<br />
d'alimentation de la<br />
lampe flash-vidéo sur<br />
LIGHT ON et<br />
débranchez le câble<br />
LANC alors que<br />
l'interrupteur<br />
d'alimentation du<br />
caméscope est sur OFF.<br />
Cause et/ou action corrective<br />
Lorsque l'interrupteur<br />
d'alimentation de votre<br />
caméscope est sur OFF,<br />
l'interrupteur d'alimentation<br />
de la lampe flash-vidéo n'est<br />
pas synchronisé avec celui-ci.<br />
c Pour synchroniser la lampe<br />
flash-vidéo avec votre<br />
caméscope, mettez le<br />
caméscope sous tension, puis<br />
hors tension. La lampe flashvidéo<br />
est également hors<br />
tension et maintenant<br />
synchronisée.<br />
Il ne s'agit pas d'un<br />
dysfonctionnement.<br />
Il ne s'agit pas d'un<br />
dysfonctionnement. Pour<br />
mettre la lampe flash-vidéo<br />
hors tension, réglez<br />
l'interrupteur de la lampe<br />
flash-vidéo sur OFF. Si le câble<br />
LANC n'est pas branché,<br />
réglez l'interrupteur<br />
d'alimentation de la lampe<br />
flash-vidéo sur LIGHT ON ou<br />
OFF pour mettre sous tension<br />
ou hors tension la lampe.<br />
Témoin LED<br />
En mode Flash<br />
Le témoin clignote l Le témoin s'allume<br />
(chargement en cours) (chargement terminé)<br />
En mode Light<br />
Le témoin clignote<br />
(La batterie est presque vide)<br />
Le témoin clignote rapidement dans les cas suivants :<br />
• La batterie est déchargée.<br />
c Rechargez la batterie complètement.<br />
• La valeur nominale de la lampe halogène de<br />
remplacement n'est pas correcte.<br />
c Vérifiez la valeur nominale de la lampe.<br />
• Le bloc batterie ne fonctionne pas bien.<br />
c Installez un bloc batterie neuf.<br />
Español<br />
B Iluminación de un<br />
motivo<br />
• Cuando videofilme en interiores con esta unidad, podrá<br />
obtener imágenes claras y de hermosos colores.<br />
• Para tomas en gran angular, es posible que la lámpara<br />
para vídeo no ilumine completamente las esquinas de<br />
las imágenes. Utilice la lámpara para vídeo para<br />
videofilmar efectivamente el motivo principal de la<br />
imagen.<br />
• Cuando haya una luz brillante detrás del motivo<br />
(contraluz), la lámpara para vídeo será muy efectiva<br />
para iluminar la parte principal del motivo, como la<br />
cara de una <strong>per</strong>sona.<br />
En exteriores, cerciórese de no colocarse de cara al sol.<br />
• Las luces fluorescentes tienden a producir parpadeo en<br />
la videofilmación. La utilización de la lámpara para<br />
vídeo puede ayudar a conseguir mejores imágenes con<br />
menos difuminación de los colores.<br />
C Utilización del flash<br />
para vídeo<br />
Utilice el flash para vídeo solamente con una<br />
videocámara que posea función de grabación PHOTO. El<br />
modelo utilizado para fines de ilustración es el<br />
DCR-IP220/IP210. Con respecto a los detalles, consulte el<br />
manual de instrucciones de la videocámara que vaya a<br />
utilizar.<br />
(Las siguientes instrucciones muestran el funcionamiento<br />
cuando el interruptor POWER de la videocámara está<br />
ajustado en CAMERA. Sin embargo, también es posible<br />
utilizar la lámpara/flash para vídeo cuando el interruptor<br />
de alimentación está ajustado en MEMORY.)<br />
1 Ajuste el interruptor POWER de la videocámara en<br />
CAMERA.<br />
2 Deslice el interruptor de alimentación hacia<br />
pulsando el botón verde en el sentido de la flecha 1<br />
para ajustar el interruptor de alimentación de la<br />
lámpara/flash para vídeo en ON.<br />
3 Mantenga ligeramente presionada la tecla PHOTO de<br />
la videocámara para confirmar la imagen.<br />
Mantenga ligeramente presionada la tecla PHOTO de<br />
la videocámara.<br />
El parpadeo del flash para vídeo está vinculado con la<br />
tecla PHOTO. En el visor aparecerá una imagen fija y<br />
el indicador de memoria.<br />
La grabación no se realizará en este punto.<br />
Para cambiar la imagen fija, suelte la tecla PHOTO.<br />
Después de haber soltado la tecla PHOTO, la<br />
lámpara/flash para vídeo comenzará a cargarse de<br />
nuevo.<br />
Es<strong>per</strong>e hasta que se encienda la lámpara de carga<br />
completa READY antes de volver a presionar<br />
ligeramente la tecla PHOTO.<br />
Como la videocámara ajusta automáticamente el brillo<br />
al presionar la tecla PHOTO, la imagen puede<br />
obscurecerse o es posible que parezca que los colores<br />
han cambiado.<br />
4 Presione a fondo la tecla PHOTO de la videocámara.<br />
Cuando presione la tecla PHOTO, el indicador de<br />
barras desplazables desaparecerá y la grabación se<br />
parará. Durante la grabación, las imágenes captadas<br />
aparecerán en el visor o en la pantalla de cristal<br />
líquido.<br />
Cuando suelte la tecla PHOTO, la lámpara/flash para<br />
vídeo comenzará a recargarse automáticamente<br />
después de haberse grabado la imagen.<br />
Después de la utilización<br />
Ponga el interruptor de alimentación en OFF.<br />
Notas<br />
• La distancia apropiada entre el motivo y la lámpara<br />
para vídeo deberá ser de aproximadament 1 a 5 m en<br />
una sala obscura.<br />
• Durante la videofilmación, mantenga sus dedos<br />
alejados del sensor A de esta unidad. De lo contrario, el<br />
brillo del flash no se ajustaría adecuadamente.<br />
• La lámpara/flash para vídeo se cargará incluso aunque<br />
esté completamente cargada después de:<br />
- haber puesto el interruptor POWER en OFF.<br />
- haber puesto el interruptor POWER de la<br />
videocámara en OFF.<br />
D Utilización de la<br />
lámpara para vídeo<br />
Para controlar la lámpara para vídeo con la videocámara<br />
en el modo de es<strong>per</strong>a.<br />
1 Ponga el interruptor POWER de la videocámara en<br />
ON.<br />
2 Ajuste el interruptor de alimentación en LIGHT ON,<br />
pulsando el botón verde en el sentido de la flecha 1<br />
para encender la lámpara para vídeo.<br />
3 Encienda/apague la videocámara. La lámpara para<br />
vídeo se enciende/apaga a la misma vez que la<br />
videocámara.<br />
Después de la utilización<br />
Ponga el interruptor de alimentación en OFF.<br />
Nota<br />
Antes de guardar la lámpara/flash para vídeo, cerciórese<br />
de que se haya enfriado.<br />
E Instalación de la batería<br />
Utilice una batería NP-FF50/FF70.<br />
1 Ajuste el interruptor de alimentación de la lámpara/<br />
flash para vídeo en OFF.<br />
2 Para instalar la batería, haga coincidir su terminal con<br />
el de la lámpara/flash para vídeo y presione hasta<br />
que oiga un clic.<br />
extracción de la batería<br />
1 Ajuste el interruptor de alimentación de la lámpara/<br />
flash para vídeo en OFF.<br />
2 Mientras presiona la palanca de liberación de la<br />
batería en el sentido de la flecha 1, extraiga la batería<br />
en el sentido de la flecha 2. (consulte la ilustración<br />
E)<br />
Notas<br />
• Asegúrese de colocar el interruptor en OFF cuando<br />
instale o sustituya la batería.<br />
• El rendimiento de la batería disminuye en entornos con<br />
bajas tem<strong>per</strong>aturas (inferiores a 10 ºC) y, en<br />
consecuencia, se reduce su tiempo de utilización. Se<br />
recomienda realizar los siguientes pasos para prolongar<br />
la duración de la batería:<br />
- Colóquese la batería en el bolsillo para calentarla e<br />
instálela en la lámpara/flash para vídeo justo antes de<br />
empezar a filmar.<br />
- Es recomendable cargar la batería (conectándola al<br />
adaptador de CA) en una tem<strong>per</strong>atura ambiente entre<br />
10 ºC y 30 ºC.<br />
F Reemplazo de la<br />
bombilla<br />
Utilice una bombilla halógena XB-5DX <strong>Sony</strong> (opcional).<br />
La bombilla estará caliente inmediatamente después de<br />
haberse fundido. Es<strong>per</strong>e a que la bombilla se haya<br />
enfriado antes de extraerla.<br />
1 Extraiga la cubierta frontal después de haberse<br />
cerciorado de que la unidad esté suficientemente fría<br />
como para tocarla.<br />
Empuje en el sentido 1 para aflojar el mando de<br />
bloqueo.<br />
Empuje en el sentido 2 para extraer la cubierta frontal.<br />
2 Cuando la bombilla se haya enfriado suficientemente,<br />
sujétela con seguridad y tire de ella para<br />
reemplazarla.<br />
Inserte de forma recta la nueva bombilla en el casquillo.<br />
3 Después de haber insertado la bombilla, coloque la<br />
cubierta frontal en forma recta.<br />
Alinee la cubierta frontal con 1.<br />
Presione 2 en el sentido de la flecha hasta que el<br />
mando se bloquee.<br />
Notas<br />
• La bombilla estará caliente después de haberse fundido.<br />
Cerciórese de que esté suficientemente fría antes de<br />
tocarla.<br />
• Para evitar que la bombilla se manche con huellas<br />
dactilares, tómela con un paño seco, etc. Si la bombilla<br />
se ha manchado, frótela para limpiarla completamente.<br />
• En el interior de esta unidad hay alta tensión, y el<br />
abrirla podría causar descargas eléctricas. Para<br />
inspeccionar el interior de la unidad, consulte a su<br />
proveedor <strong>Sony</strong> o a un centro de reparaciones <strong>Sony</strong>.<br />
Problemas y soluciones<br />
Si tiene algún problema con la lámpara/flash para vídeo,<br />
utilice la tabla siguiente para solucionarlo. Si el problema<br />
<strong>per</strong>siste, apague la lámpara/flash para vídeo y póngase en<br />
contacto con un distribuidor o un centro de servicio <strong>Sony</strong>.<br />
Problema<br />
La lámpara/flash<br />
para vídeo se ilumina<br />
cuando su<br />
interruptor de<br />
alimentación está<br />
ajustado en LIGHT<br />
ON y el interruptor<br />
de alimentación de la<br />
videocámara se<br />
encuentra en OFF.<br />
La lámpara/flash<br />
para vídeo se apaga si<br />
desconecta el cable<br />
LANC, aunque el<br />
interruptor de<br />
alimentación de dicha<br />
lámpara esté ajustado<br />
en LIGHT ON y la<br />
videocámara esté<br />
encendida.<br />
La lámpara/flash para<br />
vídeo <strong>per</strong>manece<br />
encendida si ajusta su<br />
interruptor de<br />
alimentación en<br />
LIGHT ON y<br />
desconecta el cable<br />
LANC con el<br />
interruptor de<br />
alimentación de la<br />
videocámara ajustado<br />
en OFF.<br />
Causa y/o acción correctiva<br />
Cuando el interruptor de<br />
alimentación de la<br />
videocámara está ajustado en<br />
OFF, el de la lámpara/flash<br />
para vídeo no queda<br />
bloqueado.<br />
c Para sincronizar el bloqueo<br />
de la lámpara/flash para vídeo<br />
con la videocámara, encienda<br />
primero la videocámara y<br />
luego apáguela. La lámpara/<br />
flash para vídeo también se<br />
apagará y el bloqueo se<br />
sincronizará.<br />
No se trata de un error de<br />
funcionamiento.<br />
No se trata de un error de<br />
funcionamiento. Para apagar la<br />
lámpara/flash para vídeo,<br />
ponga su interruptor de<br />
alimentación en OFF. Cuando<br />
el cable LANC no esté<br />
conectado, ponga el<br />
interruptor de alimentación de<br />
la lámpara/flash para vídeo en<br />
LIGHT ON u OFF para<br />
encenderla o apagarla.<br />
Indicador LED<br />
En modo Flash<br />
El indicador parpadea l El indicador se ilumina<br />
(Cargando) (Carga completa)<br />
En el modo Light (Lámpara)<br />
El indicador parpadea<br />
(la batería está a punto de agotarse)<br />
En los casos siguientes, el indicador parpadea deprisa:<br />
• La batería está descargada.<br />
c Cárguela completamente.<br />
• La potencia de la nueva lámpara halógena es incorrecta.<br />
c Compruébela.<br />
• La batería es defectuosa.<br />
c Instale otra.


