

Sony XDR-S60DBP - XDR-S60DBP Istruzioni per l'uso Inglese
Sony XDR-S60DBP - XDR-S60DBP Istruzioni per l'uso Inglese
Sony XDR-S60DBP - XDR-S60DBP Istruzioni per l'uso Inglese

You also want an ePaper? Increase the reach of your titles
YUMPU automatically turns print PDFs into web optimized ePapers that Google loves.
DIGITAL RADIO<br />
DAB/FM<br />
O<strong>per</strong>ating Instructions GB<br />
4-463-181-12(1)<br />
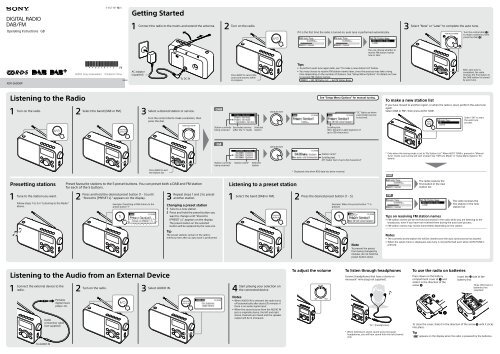
Getting Started<br />
1<br />
Connect<br />
the radio to the mains and extend the antenna.<br />
2<br />
Turn<br />
on the radio.<br />
If it is the first time the radio is turned on, auto tune is <strong>per</strong>formed automatically.<br />
3<br />
Select<br />
“Now” or “Later” to complete the auto tune.<br />
Turn the control dial ()<br />
to make a selection, then<br />
press the dial ().<br />
You can choose whether to<br />
receive FM station names<br />
now or later.<br />
<strong>XDR</strong>-<strong>S60DBP</strong><br />
©2013 <strong>Sony</strong> Corporation Printed in China<br />
AC adaptor<br />
(supplied)<br />
To DC IN<br />
Press BACK to cancel the<br />
auto tune process while<br />
in progress.<br />
Tips<br />
• To <strong>per</strong>form auto tune again later, see “To make a new station list” below.<br />
• You may choose to receive FM station names later, since the process may take a long<br />
time depending on the number of stations. See “Setup Menu Options” for details on how<br />
to receive FM station names.<br />
[MENU] Edit FM Station List Get FM Station Name<br />
After auto tune is<br />
completed, the radio<br />
receives the first station in<br />
the DAB station list stored<br />
by auto tune.<br />
Listening to the Radio<br />
1 2<br />
Turn on the radio.<br />
Select the band (DAB or FM).<br />
3<br />
Select<br />
a desired station or service.<br />
Turn the control dial to make a selection, then<br />
press the dial.<br />
See “Setup Menu Options” for manual tuning.<br />
“SC” lights up when<br />
a secondary service<br />
is received.<br />
To make a new station list<br />
If you have moved to another region, or when the radio is reset, <strong>per</strong>form the auto tune<br />
again.<br />
Select DAB or FM*, then press AUTO TUNE.<br />
Select “OK” to start<br />
the auto tune<br />
process.<br />
Station currently<br />
being received<br />
Secondary service<br />
(after the “L” mark)<br />
Selected<br />
station<br />
Scrolling text<br />
(DLS: Dynamic Label Segment of<br />
up to 128 characters)<br />
Station currently<br />
being received<br />
Station name*<br />
Selected<br />
station<br />
Station name*<br />
Scrolling text<br />
(RT: Radio Text of up to 64 characters)*<br />
* Only when the tuning mode is set to “By Station List.” When AUTO TUNE is pressed in “Manual<br />
Tune” mode, scan tuning will start instead. See “FM Tune Mode” in “Setup Menu Options” for<br />
details.<br />
Press BACK to exit<br />
the station list.<br />
* Displayed only when RDS data has been received.<br />
Presetting stations<br />
1<br />
Tune<br />
to the station you want.<br />
Follow steps 1 to 3 in “Listening to the Radio”<br />
above.<br />
Preset favourite stations to the 5 preset buttons. You can preset both a DAB and FM station<br />
for each of the 5 buttons.<br />
2 3<br />
Press and hold the desired preset button (1 – 5) until<br />
Repeat steps 1 and 2 to preset<br />
“Stored to [PRESET x].” appears on the display. another station. 1<br />
Select the band (DAB or FM).<br />
2<br />
Example: Presetting a DAB station to the<br />
preset button “1”<br />
Changing a preset station<br />
1 Tune to a new station.<br />
2 Press and hold the preset button you<br />
want to change until “Stored to<br />
[PRESET x].” appears on the display.<br />
The preset station on the selected<br />
button will be replaced by the new one.<br />
Tip<br />
The preset stations remain in the radio’s<br />
memory even after an auto tune is <strong>per</strong>formed.<br />
Listening to a preset station<br />
Press the desired preset button (1 – 5).<br />
Example: When the preset button “1” is<br />
pressed<br />
Note<br />
To prevent the preset<br />
from being changed by<br />
mistake, do not hold the<br />
preset button down.<br />
The radio receives the<br />
first station in the new<br />
station list.<br />
The radio receives the<br />
first station in the new<br />
station list.<br />
Tips on receiving FM station names<br />
• FM station names will be received and stored in the radio while you are listening to the<br />
broadcasts, even if you have not received them during the auto tune process.<br />
• FM station names may not be transmitted, depending on the station.<br />
Notes<br />
• The currently stored station list will be cleared once the auto tune process has started.<br />
• When the setup menu is displayed, auto tune is not <strong>per</strong>formed even when AUTO TUNE is<br />
pressed.<br />
Listening to the Audio from an External Device<br />
1<br />
Connect<br />
the external device to the<br />
radio.<br />
2<br />
Turn<br />
on the radio.<br />
3<br />
Select<br />
AUDIO IN.<br />
4<br />
Start<br />
playing your selection on<br />
the connected device.<br />
To adjust the volume<br />
To listen through headphones<br />
Connect headphones that have a stereo or<br />
monaural* mini plug (not supplied).<br />
To use the radio on batteries<br />
Press down on the battery<br />
compartment cover at and<br />
slide it in the direction of the<br />
arrow .<br />
Insert the side of the<br />
battery first.<br />
Three LR14 (size C)<br />
batteries (not<br />
supplied)<br />
Portable<br />
digital music<br />
player, etc.<br />
Audio<br />
connection cable<br />
(not supplied)<br />
Notes<br />
• When AUDIO IN is selected, the radio turns<br />
off automatically after about 20 minutes if<br />
there is no audio signal input.<br />
• When the sound source from the AUDIO IN<br />
jack is originally stereo, the left and right<br />
stereo channels are mixed and the speaker<br />
output will be in monaural.<br />
To (headphones)<br />
To close the cover, slide it in the direction of the arrow until it clicks<br />
into place.<br />
* When listening to stereo sound using monaural<br />
headphones, you will hear sound from the left channel<br />
only.<br />
Tip<br />
“ ” appears on the display when the radio is powered by the batteries.<br />
To AUDIO IN
Setup Menu Options<br />
About RDS Features<br />
Precautions<br />
Messages<br />
BACK<br />
To go back to the up<strong>per</strong> menu level<br />
Press BACK.<br />
To exit the setup menu<br />
Press MENU again.<br />
Sleep<br />
The radio automatically turns off after a set<br />
time has elapsed.<br />
Select the desired timer setting (minutes)<br />
from the following:<br />
Off (deactivated)/15 min./30 min./45 min./<br />
60 min.<br />
When the sleep timer is set, “SLEEP” lights up<br />
on the display.<br />
DAB Manual Tune<br />
If DAB reception by auto tune is poor, try<br />
manual tuning.<br />
1 Turn the control dial to select the desired<br />
DAB channel, then press the dial.<br />
The radio starts scanning for receivable<br />
stations in the selected channel.<br />
2 Turn the control dial to select the station<br />
you want to listen to, then press the dial.<br />
Tip<br />
The new station received by manual tuning is<br />
stored in the DAB station list.<br />
Signal Level<br />
Displays the signal level of the DAB station<br />
you are listening to, ranging from 0 (no signal)<br />
to 100 (maximum signal).<br />
FM Tune Mode<br />
Select the tuning mode for FM.<br />
By Station List: You can select a desired<br />
station from the list of FM stations stored by<br />
auto tune.<br />
Manual Tune: You can manually tune to the<br />
desired FM frequency in 0.05 MHz steps. Turn<br />
the control dial to select the frequency.<br />
Scan tuning in Manual Tune mode<br />
1 Press AUTO TUNE (SCAN) to start<br />
scanning FM stations.<br />
• To change the scanning direction, turn<br />
the control dial clockwise or<br />
counterclockwise.<br />
• When a station is received, scanning<br />
pauses for 3 seconds.<br />
2 Press the control dial or AUTO TUNE to<br />
stop scanning if the desired frequency is<br />
displayed.<br />
Edit FM Station List<br />
You can edit the FM station list.<br />
Get FM Station Name: Perform this when<br />
you want to receive RDS information such as<br />
station names. Select “OK” to start scanning<br />
for RDS data.<br />
Notes<br />
• Set “FM Tune Mode” to “By Station List” before<br />
you <strong>per</strong>form this o<strong>per</strong>ation.<br />
• The currently stored RDS information will be<br />
cleared once scanning has started.<br />
• It may take a long time to receive all the<br />
available RDS data.<br />
Delete FM Station: You can delete any<br />
unwanted stations from the FM station list.<br />
1 Turn the control dial to select the station<br />
you want to delete, then press the dial.<br />
2 Turn the control dial to select “OK”, then<br />
press the dial.<br />
Add FM Station: When listening to a<br />
manually tuned station, you can add the<br />
station to the FM station list. Select “OK” to<br />
add the station to the list.<br />
Example: When the DAB band is selected<br />
Press MENU to enter the setup menu.<br />
Turn the control dial to select the desired<br />
menu item or setting.<br />
Press the dial to confirm the selection.<br />
Information<br />
Displays information for the station you are<br />
listening to. Turn the control dial to scroll<br />
through the following information:<br />
Channel: Channel and frequency (See the<br />
DAB frequency table in “Specifications.”)<br />
Multiplex Name: Ensemble label (up to<br />
16 characters long)<br />
Service Name: Station name<br />
PTY: PTY label (See “PTY (programme type)”<br />
in “Specifications.”)<br />
Bit Rate: Bit rate<br />
Displays PTY label (see “PTY (programme<br />
type)” in “Specifications”) for the station you<br />
are listening to.<br />
Note<br />
If there is no ensemble label or no station name,<br />
the space for label or name will be blank.<br />
Time<br />
Set Time: “Auto (DAB)” is set by default. This<br />
enables the clock to synchronize with the DAB<br />
data being received. Select “Manual” to set<br />
the clock manually using the control dial.<br />
12H/24H: Select the clock display mode,<br />
12-hour clock or 24-hour clock.<br />
Note<br />
When the clock is set manually, the clock will be<br />
reset if the AC adaptor is unplugged and the<br />
batteries are removed for more than 1 minute.<br />
Beep<br />
Select “On” to activate the beep sound when<br />
you o<strong>per</strong>ate the radio.<br />
Light<br />
On: The backlight will be on all the time when<br />
the radio is powered by the AC adaptor. When<br />
you use the radio on batteries, the backlight<br />
will turn off automatically if no o<strong>per</strong>ation is<br />
<strong>per</strong>formed for 30 seconds.<br />
Auto: The backlight will turn off automatically<br />
if no o<strong>per</strong>ation is <strong>per</strong>formed for 30 seconds.<br />
Initialize<br />
Select “OK” to initialize the radio to the factory<br />
default settings. All settings, DAB and FM<br />
station lists and presets will be deleted.<br />
What is RDS?<br />
Introduced by the European Broadcasting<br />
Union (EBU) in 1987, the Radio Data System<br />
(RDS) allows information such as station<br />
names to be received via the 57 kHz subcarrier<br />
signal of FM broadcasts. However, the<br />
availability of RDS data varies depending on<br />
the area. It therefore may not be always be<br />
possible to receive RDS information.<br />
Using the RDS functions<br />
The radio supports the following RDS<br />
functions.<br />
RDS function<br />
Station name<br />
display<br />
PTY<br />
(programme<br />
type)<br />
RT (radio text)<br />
WARNING<br />
Description<br />
• Displays the station<br />
name you are listening<br />
to.<br />
• Displays the programme<br />
type of the received<br />
programme.<br />
• Displays the free-form<br />
textual information.<br />
To reduce the risk of fire or electric shock, do<br />
not expose this apparatus to rain or moisture.<br />
To avoid electrical shock, do not open the<br />
cabinet. Refer servicing to qualified <strong>per</strong>sonnel<br />
only.<br />
Do not install the appliance in a confined space,<br />
such as a bookcase or built-in cabinet.<br />
To reduce the risk of fire or electric shock, do not<br />
expose this apparatus to dripping or splashing,<br />
and do not place objects filled with liquids, such<br />
as vases, on the apparatus.<br />
As the main plug of AC adaptor is used to<br />
disconnect the AC adaptor from the mains,<br />
connect it to an easily accessible AC outlet.<br />
Should you notice an abnormality in it,<br />
disconnect it from the AC outlet immediately.<br />
The unit is not disconnected from the AC power<br />
source (mains) as long as it is connected to the<br />
wall outlet, even if the unit itself has been turned<br />
off.<br />
The nameplate and important information<br />
concerning safety are located on the bottom<br />
exterior of the main unit and on the surface of<br />
the AC adaptor.<br />
Excessive sound pressure from earphones and<br />
headphones can cause hearing loss.<br />
Batteries or batteries installed apparatus shall<br />
not be exposed to excessive heat such as<br />
sunshine, fire or the like.<br />
Notes<br />
• The RDS functions will not be activated if the<br />
FM station being received is not transmitting<br />
RDS data. They may also not work pro<strong>per</strong>ly in<br />
areas where RDS transmissions are in the<br />
ex<strong>per</strong>imental stage.<br />
• If the radio signal being received is weak, it<br />
may take time to receive the RDS data.<br />
In case of battery leakage<br />
If the battery fluid has leaked, do not touch the<br />
fluid with your bare hands.<br />
Battery fluid may remain inside the unit. Consult<br />
your nearest <strong>Sony</strong> dealer.<br />
If battery liquid gets into your eyes, do not rub<br />
your eyes, as blindness may occur. Quickly wash<br />
your eyes with plenty of clean water and<br />
immediately seek medical attention.<br />
If battery liquid gets on your body or clothing,<br />
burns or injury may occur. Quickly wash off with<br />
clean water, and seek medical attention if skin<br />
inflammation or injuries occur.<br />
Notice for customers: the following<br />
information is only applicable to equipment<br />
sold in countries applying EU directives<br />
This product has been manufactured by or on<br />
behalf of <strong>Sony</strong> Corporation, 1-7-1 Konan<br />
Minato‐ku Tokyo, 108-0075 Japan. Inquiries<br />
related to product compliance based on<br />
European Union legislation shall be addressed to<br />
the authorized representative, <strong>Sony</strong> Deutschland<br />
GmbH, Hedelfinger Strasse 61, 70327 Stuttgart,<br />
Germany. For any service or guarantee matters,<br />
please refer to the addresses provided in the<br />
separate service or guarantee documents.<br />
The validity of the CE marking is restricted to<br />
only those countries where it is legally enforced,<br />
mainly in the countries EEA (European Economic<br />
Area).<br />
• O<strong>per</strong>ate the unit only on the power sources<br />
specified in “Specifications.” For battery<br />
o<strong>per</strong>ation, use three LR14 (size C) alkaline<br />
batteries. For AC o<strong>per</strong>ation, use only the<br />
supplied AC adaptor. Do not use any other<br />
type of AC adaptor.<br />
• Failure to use the supplied AC adaptor may<br />
cause the unit to malfunction, as the polarity<br />
of the plugs of other manufacturers may be<br />
different.<br />
• When o<strong>per</strong>ating the unit on batteries, it is<br />
recommended that you remove the AC<br />
adaptor from the wall outlet and the DC IN 5V<br />
jack. Disconnect the plug of the external power<br />
source before o<strong>per</strong>ating the unit.<br />
• Use the unit within a tem<strong>per</strong>ature range of 0°C<br />
to 40°C. If it is used in tem<strong>per</strong>atures higher<br />
than this range, the display may gradually turn<br />
black. If it is used in tem<strong>per</strong>atures lower than<br />
this range, the display may change very slowly.<br />
(These irregularities will disappear and there<br />
will be no damage to the unit when the unit is<br />
used in the recommended tem<strong>per</strong>ature range<br />
again.)<br />
• When connecting headphones or an external<br />
device to the unit, use headphones or an audio<br />
connection cable with a stereo (3-pole) or<br />
monaural (2-pole) mini plug. Sound may not<br />
be heard when using other types of plugs.<br />
Compatible<br />
plug types<br />
Other types of<br />
plugs cannot be<br />
used.<br />
1 ring<br />
2 rings<br />
3 or more rings<br />
Monaural*<br />
mini plug<br />
Stereo mini<br />
plug<br />
* When listening to stereo sound using monaural<br />
headphones, you will hear sound from the left<br />
channel only.<br />
• Avoid exposure to tem<strong>per</strong>ature extremes,<br />
direct sunlight, moisture, sand, dust or<br />
mechanical shock. Never leave in a car parked<br />
in the sun.<br />
• Should any solid object or liquid fall into the<br />
unit, disconnect the AC adaptor and remove<br />
the batteries, and have the unit checked by a<br />
qualified <strong>per</strong>sonnel before o<strong>per</strong>ating it any<br />
further.<br />
• Since a strong magnet is used for the speakers,<br />
keep <strong>per</strong>sonal credit cards using magnetic<br />
coding or spring-wound watches away from<br />
the unit to prevent possible damage from the<br />
magnetism.<br />
• To clean the casing, use a soft dry cloth. Do not<br />
use any type of solvent, such as alcohol or<br />
benzine, which may damage the finish.<br />
• Do not o<strong>per</strong>ate the unit with wet hands since it<br />
may cause a short circuit.<br />
Troubleshooting<br />
Should any problem <strong>per</strong>sist after you have<br />
made the following checks, consult your<br />
nearest <strong>Sony</strong> dealer.<br />
Display is dim, or no indication is<br />
displayed.<br />
• The radio is being used in extremely high or<br />
low tem<strong>per</strong>atures or in a place with excessive<br />
moisture.<br />
Very weak or interrupted sound, or<br />
unsatisfactory reception.<br />
• If you are in a building, listen near a window.<br />
• Extend the antenna and adjust the length and<br />
the angle for best reception.<br />
• Replace all the batteries with new ones if they<br />
are exhausted.<br />
• If a mobile phone is placed close to the radio, a<br />
loud noise may be heard from the radio. Keep<br />
the phone away from the radio.<br />
Disposal of Old Electrical &<br />
Electronic Equipment (Applicable<br />
in the European Union and other<br />
European countries with<br />
separate collection systems)<br />
This symbol on the product or on its packaging<br />
indicates that this product shall not be treated as<br />
household waste. Instead it shall be handed over<br />
to the applicable collection point for the<br />
recycling of electrical and electronic equipment.<br />
By ensuring this product is disposed of correctly,<br />
you will help prevent potential negative<br />
consequences for the environment and human<br />
health, which could otherwise be caused by<br />
inappropriate waste handling of this product.<br />
The recycling of materials will help to conserve<br />
natural resources. For more detailed information<br />
about recycling of this product, please contact<br />
your local Civic Office, your household waste<br />
disposal service or the shop where you<br />
purchased the product.<br />
Europe Only<br />
Disposal of waste batteries<br />
(applicable in the European<br />
Union and other European<br />
countries with separate<br />
collection systems)<br />
This symbol on the battery or on the packaging<br />
indicates that the battery provided with this<br />
product shall not be treated as household waste.<br />
On certain batteries this symbol might be used<br />
in combination with a chemical symbol. The<br />
chemical symbols for mercury (Hg) or lead (Pb)<br />
are added if the battery contains more than<br />
0.0005% mercury or 0.004% lead. By ensuring<br />
these batteries are disposed of correctly, you will<br />
help prevent potentially negative consequences<br />
for the environment and human health which<br />
could otherwise be caused by inappropriate<br />
waste handling of the battery. The recycling of<br />
the materials will help to conserve natural<br />
resources.<br />
In case of products that for safety, <strong>per</strong>formance<br />
or data integrity reasons require a <strong>per</strong>manent<br />
connection with an incorporated battery, this<br />
battery should be replaced by qualified service<br />
staff only. To ensure that the battery will be<br />
treated pro<strong>per</strong>ly, hand over the product at<br />
end-of-life to the applicable collection point for<br />
the recycling of electrical and electronic<br />
equipment.<br />
For all other batteries, please view the section on<br />
how to remove the battery from the product<br />
safely. Hand the battery over to the applicable<br />
collection point for the recycling of waste<br />
batteries.<br />
For more detailed information about recycling of<br />
this product or battery, please contact your local<br />
Civic Office, your household waste disposal<br />
service or the shop where you purchased the<br />
product.<br />
If you have any questions or problems<br />
concerning your unit, please consult your<br />
nearest <strong>Sony</strong> dealer.<br />
Batteries get exhausted very quickly.<br />
• Be sure to turn off the radio when not using it.<br />
The estimated battery life is 20 – 23 hours.<br />
See “Specifications” for details.<br />
A desired station cannot be received<br />
when a preset button is pressed.<br />
• Make sure you have selected the desired band<br />
(DAB or FM) before you press the preset<br />
button. One station for each band can be set<br />
to each button.<br />
• You may have held down the preset button to<br />
which the station was preset, causing the<br />
station to be replaced by a new one. Preset the<br />
desired station again.<br />
• Preset buttons cannot be used when the setup<br />
menu is displayed.<br />
The preset stations may be initialized if a<br />
maintenance service is <strong>per</strong>formed.<br />
Please note your settings in case you need to<br />
preset them again.<br />
Low Battery (flashes, and the power is<br />
turned off)<br />
• The batteries are exhausted. Replace all the<br />
batteries with new ones.<br />
No preset<br />
• No station in the selected band (DAB or FM)<br />
has been preset to the pressed button.<br />
No signal<br />
• There is no supported DAB broadcast in your<br />
region.<br />
• You have lost the reception of the selected<br />
DAB broadcast.<br />
Specifications<br />
Frequency range<br />
DAB (Band-III): 174.928 MHz 239.200 MHz<br />
FM: 87.5 MHz 108 MHz (0.05 MHz step)<br />
Intermediate frequency<br />
DAB (Band-III): 2.048 MHz<br />
FM: 1.943 MHz<br />
DAB (Band-III) frequency table (MHz)<br />
Channel Frequency Channel Frequency<br />
5A 174.928 10N 210.096<br />
5B 176.640 10B 211.648<br />
5C 178.352 10C 213.360<br />
5D 180.064 10D 215.072<br />
6A 181.936 11A 216.928<br />
6B 183.648 11N 217.088<br />
6C 185.360 11B 218.640<br />
6D 187.072 11C 220.352<br />
7A 188.928 11D 222.064<br />
7B 190.640 12A 223.936<br />
7C 192.352 12N 224.096<br />
7D 194.064 12B 225.648<br />
8A 195.936 12C 227.360<br />
8B 197.648 12D 229.072<br />
8C 199.360 13A 230.784<br />
8D 201.072 13B 232.496<br />
9A 202.928 13C 234.208<br />
9B 204.640 13D 235.776<br />
9C 206.352 13E 237.488<br />
9D 208.064 13F 239.200<br />
10A 209.936<br />
Speaker: Approx. 10.2 cm dia., 4 Ω, monaural<br />
Audio power output: 1 W<br />
Output: (headphones) jack (ø 3.5 mm, stereo<br />
mini jack)<br />
Input: AUDIO IN jack (ø 3.5 mm, stereo mini jack)<br />
Power requirements: 4.5 V DC, three LR14 (size C)<br />
alkaline batteries (Rechargeable batteries are<br />
not supported.)<br />
External power source: DC IN 5 V<br />
Battery life (JEITA)* 1, * 2<br />
Approx. 16 hours (DAB reception)<br />
Approx. 14 hours (FM reception)<br />
Approx. 24 hours (AUDIO IN input)<br />
* 1 Measured by JEITA (Japan Electronics and<br />
Information Technology Industries Association)<br />
standards. The actual battery life may vary<br />
depending on usage and circumstances.<br />
* 2 When listening through the speaker on <strong>Sony</strong><br />
(LR14SG) alkaline batteries<br />
Dimensions: Approx. 240 mm × 135 mm × 85 mm<br />
(W/H/D) excl. projecting parts and controls<br />
Mass: Approx. 1.3 kg incl. batteries<br />
Supplied accessories: AC adaptor (5 V, 2 A)<br />
Design and specifications are subject to change<br />
without notice.<br />
No station list<br />
• No stations are stored in the FM station list.<br />
Station full<br />
• The list of DAB stations stored in the radio is<br />
full.<br />
Station off air<br />
• The selected station or service is currently not<br />
broadcasting.<br />
PTY (programme type)<br />
This function indicates services or RDS data in<br />
programme type, such as News or Sports,<br />
transmitted in the DAB or RDS data.<br />
If the received service or station does not<br />
transmit the programme type, “No PTY” appears.<br />
Programme type<br />
Display<br />
No programme type<br />
None<br />
News<br />
News<br />
Current Affairs<br />
Current Affairs<br />
Information<br />
Information<br />
Sport<br />
Sport<br />
Education<br />
Education<br />
Drama<br />
Drama<br />
Culture<br />
Arts<br />
Science<br />
Science<br />
Varied<br />
Talk<br />
Pop Music<br />
Pop Music<br />
Rock Music<br />
Rock Music<br />
Easy Listening Music<br />
Easy Listening<br />
Light Classical<br />
Light Classical<br />
Serious Classical<br />
Classical Music<br />
Other Music<br />
Other Music<br />
Weather<br />
Weather<br />
Finance<br />
Finance<br />
Children’s programmes Children’s<br />
Social Affairs<br />
Factual<br />
Religion<br />
Religion<br />
Phone In<br />
Phone In<br />
Travel<br />
Travel<br />
Leisure<br />
Leisure<br />
Jazz Music<br />
Jazz and Blues<br />
Country Music<br />
Country Music<br />
National Music<br />
National Music<br />
Oldies Music<br />
Oldies Music<br />
Folk Music<br />
Folk Music<br />
Documentary<br />
Documentary<br />
Alarm Test<br />
Alarm Test<br />
Alarm Alarm – Alarm !


