

Sony D-368 - D-368 Istruzioni per l'uso Inglese
Sony D-368 - D-368 Istruzioni per l'uso Inglese
Sony D-368 - D-368 Istruzioni per l'uso Inglese

Create successful ePaper yourself
Turn your PDF publications into a flip-book with our unique Google optimized e-Paper software.
Compact Disc<br />
Compact Player<br />
O<strong>per</strong>ating Instructions<br />
3-859-215-11 (1)<br />
About area code<br />
The area code of the Discman you purchased is shown on up<strong>per</strong> left of the bar<br />
code label on the package.<br />
For accessories supplied with your Discman, check the area code of your model<br />
and refer to “Supplied accessories” toward the end of this manual.<br />
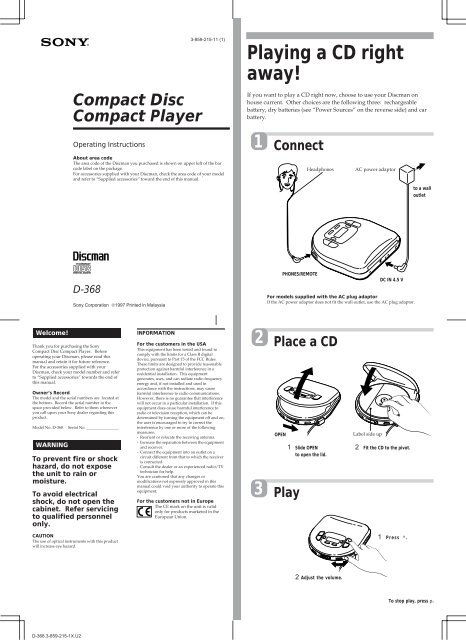
Playing a CD right<br />
away!<br />
If you want to play a CD right now, choose to use your Discman on<br />
house current. Other choices are the following three: rechargeable<br />
battery, dry batteries (see “Power Sources” on the reverse side) and car<br />
battery.<br />
1<br />
Connect<br />
Headphones<br />
AC power adaptor<br />
to a wall<br />
outlet<br />
D-<strong>368</strong><br />
<strong>Sony</strong> Corporation ©1997 Printed in Malaysia<br />
PHONES/REMOTE<br />
DC IN 4.5 V<br />
For models supplied with the AC plug adaptor<br />
If the AC power adaptor does not fit the wall outlet, use the AC plug adaptor.<br />
Welcome!<br />
Thank you for purchasing the <strong>Sony</strong><br />
Compact Disc Compact Player. Before<br />
o<strong>per</strong>ating your Discman, please read this<br />
manual and retain it for future reference.<br />
For the accessories supplied with your<br />
Discman, check your model number and refer<br />
to “Supplied accessories” towards the end of<br />
this manual.<br />
Owner’s Record<br />
The model and the serial numbers are located at<br />
the bottom. Record the serial number in the<br />
space provided below. Refer to them whenever<br />
you call upon your <strong>Sony</strong> dealer regarding this<br />
product.<br />
Model No. D-<strong>368</strong><br />
WARNING<br />
Serial No. ________________<br />
To prevent fire or shock<br />
hazard, do not expose<br />
the unit to rain or<br />
moisture.<br />
To avoid electrical<br />
shock, do not open the<br />
cabinet. Refer servicing<br />
to qualified <strong>per</strong>sonnel<br />
only.<br />
INFORMATION<br />
For the customers in the USA<br />
This equipment has been tested and found to<br />
comply with the limits for a Class B digital<br />
device, pursuant to Part 15 of the FCC Rules.<br />
These limits are designed to provide reasonable<br />
protection against harmful interference in a<br />
residential installation. This equipment<br />
generates, uses, and can radiate radio frequency<br />
energy and, if not installed and used in<br />
accordance with the instructions, may cause<br />
harmful interference to radio communications.<br />
However, there is no guarantee that interference<br />
will not occur in a particular installation. If this<br />
equipment does cause harmful interference to<br />
radio or television reception, which can be<br />
determined by turning the equipment off and on,<br />
the user is encouraged to try to correct the<br />
interference by one or more of the following<br />
measures:<br />
- Reorient or relocate the receiving antenna.<br />
- Increase the separation between the equipment<br />
and receiver.<br />
- Connect the equipment into an outlet on a<br />
circuit different from that to which the receiver<br />
is connected.<br />
- Consult the dealer or an ex<strong>per</strong>ienced radio/TV<br />
technician for help.<br />
You are cautioned that any changes or<br />
modifications not expressly approved in this<br />
manual could void your authority to o<strong>per</strong>ate this<br />
equipment.<br />
For the customers not in Europe<br />
The CE mark on the unit is valid<br />
only for products marketed in the<br />
European Union.<br />
2<br />
3<br />
Place a CD<br />
OPEN<br />
Play<br />
1 Slide OPEN<br />
to open the lid.<br />
Label side up<br />
2 Fit the CD to the pivot.<br />
CAUTION<br />
The use of optical instruments with this product<br />
will increase eye hazard.<br />
1 Press ^ .<br />
2 Adjust the volume.<br />
To stop play, press p.<br />
D-<strong>368</strong>.3-859-215-1X.U2
To<br />
Pause<br />
Resume play after<br />
pause<br />
Find the beginning<br />
of the current track<br />
(AMS*)<br />
Press<br />
^<br />
^<br />
= once**<br />
zOther O<strong>per</strong>ations<br />
Playing tracks repeatedly<br />
(Repeat Play)<br />
You can play tracks repeatedly in normal,<br />
INTRO PGM, shuffle or RMS (Random Music<br />
Sensor) play modes. Repeat all the tracks or<br />
only one track.<br />
Playing tracks in random<br />
order (Shuffle Play)<br />
You can play the tracks in a CD in random<br />
order.<br />
Using other functions<br />
To enjoy more powerful bass sound<br />
You can enjoy a powerful bass-boosted sound.<br />
Digital<br />
MEGA BASS<br />
Find the beginning<br />
of previous tracks<br />
(AMS)<br />
Find the beginning<br />
of the next track<br />
(AMS)<br />
Find the beginning<br />
of succeeding<br />
tracks (AMS)<br />
Go forward<br />
quickly<br />
Go backwards<br />
quickly<br />
= repeatedly**<br />
+ once**<br />
+ repeatedly**<br />
Hold down<br />
+ * *<br />
Hold down<br />
= * *<br />
*AMS = Automatic Music Sensor<br />
**These o<strong>per</strong>ations are possible during both<br />
play and pause.<br />
To remove the CD<br />
Remove the CD while pressing the pivot.<br />
PLAY<br />
MODE<br />
REPEAT/<br />
ENTER<br />
To repeat all the tracks<br />
Press REPEAT/ENTER during play.<br />
The ”REPEAT” indication appears.<br />
To cancel repeat play, press REPEAT/ENTER<br />
again.<br />
To repeat a single track<br />
1 Press REPEAT/ENTER while the track you<br />
want to repeat is playing.<br />
The ”REPEAT” indication appears.<br />
PLAY<br />
MODE<br />
During play, press PLAY MODE repeatedly<br />
until “SHUFFLE” appears.<br />
The tracks play in random order.<br />
To cancel shuffle play, press PLAY MODE<br />
repeatedly until no play mode is indicated in<br />
the display.<br />
Note<br />
• During shuffle play, you cannot return to<br />
previous tracks by pressing = .<br />
Playing tracks in the order<br />
you want (RMS play)<br />
Press Digital MEGA BASS to select BASS<br />
or BASS . BASS is more effective.<br />
Note<br />
• If the sound is distorted when emphasizing<br />
bass, turn down the volume.<br />
To prevent sound from skipping<br />
(ESP)<br />
The ESP (Electronic Shock Protection)<br />
function prevents the sound from skipping by<br />
using a buffer memory that stores music data<br />
for about 20 seconds. Use this function when<br />
listening in a car or during a walk.<br />
ESP<br />
Press ESP.<br />
The ESP indication appears.<br />
Notes on controlling the volume with<br />
the remote control<br />
Set the VOL (volume) control on the remote<br />
control to MAX. Then adjust the volume on<br />
the Discman to the level that you want to be<br />
the maximum volume of the remote control.<br />
Notes on display<br />
• When you press ^ (when RESUME is set<br />
to OFF), the total number of tracks in the<br />
CD and the total playing time appear for<br />
about 2 seconds.<br />
• During play, the track number and the<br />
elapsed playing time of the current track<br />
appear.<br />
• During pause, the elapsed playing time<br />
flashes in the display.<br />
• Between tracks, the time to the beginning of<br />
the next track will appear with the “–”<br />
indication.<br />
Notes on handling CDs<br />
• To keep the CD clean, handle it by its edge.<br />
Do not touch the surface.<br />
• Do not stick pa<strong>per</strong> or tape onto the CD.<br />
• Do not expose the CD to direct sunlight or<br />
heat sources such as hot air ducts. Do not<br />
leave the CD in a car parked under direct<br />
sunlight.<br />
2 Press PLAY MODE repeatedly until “1”<br />
appears.<br />
To repeat another track, press = or + .<br />
To cancel repeat play, press REPEAT/ENTER<br />
again.<br />
Playing only the tracks<br />
you want (INTRO PGM Play)<br />
You can choose and play your favorite tracks<br />
by scanning through the beginning of each<br />
track in a CD.<br />
+ ^<br />
You can program up to 22 tracks to play in<br />
any order you choose.<br />
= / +<br />
PLAY<br />
MODE<br />
1 During play, press PLAY MODE<br />
repeatedly until “RMS” flashes.<br />
2 Press = or + to choose a track.<br />
The track number and the playing order<br />
appear.<br />
Track number<br />
Flashing<br />
Flashing<br />
^<br />
REPEAT/<br />
ENTER<br />
Notes<br />
• Playing may stop when the Discman gets a<br />
strong shock even with the ESP function on.<br />
• You may hear a noise or sound skip when:<br />
— listening to a dirty or scratched CD,<br />
— listening to an audio test CD or,<br />
— the Discman receives continuous shock.<br />
• Sound may drop for a while if you press ESP<br />
during play.<br />
To lock the buttons<br />
You can lock your Discman against any<br />
accidental o<strong>per</strong>ations. (You can still o<strong>per</strong>ate<br />
the unit with the remote control.)<br />
HOLD<br />
Slide HOLD in the direction of the arrow.<br />
When you press any button, “Hold” appears<br />
in the display and you cannot o<strong>per</strong>ate the<br />
unit.<br />
To unlock, slide HOLD back.<br />
PLAY<br />
MODE<br />
REPEAT/<br />
ENTER<br />
1 During play, press PLAY MODE<br />
repeatedly until “INTRO PGM” flashes.<br />
Flashing<br />
Playing order<br />
3 Press REPEAT/ENTER to program the<br />
track.<br />
4 Repeat steps 2 and 3 to program the<br />
remaining tracks.<br />
5 Press ^ .<br />
“RMS” stops flashing and the tracks you<br />
have chosen play in the order you<br />
specified.<br />
To protect your hearing (AVLS)<br />
The AVLS (Automatic Volume Limiter<br />
System) function keeps down the maximum<br />
volume to protect your ears.<br />
NORM<br />
LIMIT<br />
AVLS<br />
(AUTO VOLUME LIMITER SYSTEM)<br />
Not these ways<br />
2 Press ^ to start scanning .<br />
The Discman plays the first 15 seconds of<br />
each track and “INTRO PGM” flashes<br />
faster.<br />
3 Press REPEAT/ENTER while the track<br />
you want is playing. To skip the track,<br />
press + or just wait for the next track.<br />
After you have gone through the CD,<br />
“INTRO PGM” stops flashing and the tracks<br />
you have chosen play automatically.<br />
To finish programming before going through<br />
the whole CD, press ^. The selected tracks<br />
will be played.<br />
To cancel RMS play, press PLAY MODE until<br />
“RMS” disappears.<br />
To check the program<br />
During programming:<br />
Press REPEAT/ENTER before step 5.<br />
During RMS play:<br />
Press PLAY MODE repeatedly until “RMS”<br />
flashes, then press REPEAT/ENTER.<br />
Each time you press REPEAT/ENTER, the<br />
track number and the playing order appear in<br />
the order you specified.<br />
Note<br />
• If you program another track after the 22nd<br />
track, the first track programed is cleared and<br />
the new track is programed instead.<br />
Set AVLS to LIMIT.<br />
The AVLS indication appears.<br />
(rear)<br />
Note<br />
• If the sound is distorted when you listen to the<br />
bass-boosted sound with the AVLS function,<br />
turn down the volume.<br />
To cancel INTRO PGM play, press PLAY<br />
MODE repeatedly until no play mode is<br />
indicated in the display.<br />
Continue to the reverse side m<br />
D-<strong>368</strong>.3-859-215-1X.U2
To resume playing from the point<br />
you stopped the CD (Resume Play)<br />
Normally, every time you stop and play,<br />
playing starts from the beginning of the CD.<br />
The resume play function, however, let you<br />
listen to from the point at which you last<br />
turned off the Discman.<br />
ON<br />
RESUME<br />
OFF<br />
Set RESUME to ON.<br />
To cancel resume play, set RESUME to OFF.<br />
Notes<br />
• Even if RESUME is set to ON, playing starts<br />
from the beginning when you open the lid.<br />
• The resume point may be inaccurate by about<br />
30 seconds.<br />
To turn off the beep<br />
You can turn off the beep that sounds as you<br />
o<strong>per</strong>ate your Discman.<br />
Disconnect the power source (AC power<br />
adaptor, rechargeable battery or alkaline<br />
batteries). While you press and hold down p,<br />
connect the power source again. To make the<br />
beep sound again, disconnect the power<br />
source, and then connect it without pressing<br />
p .<br />
Connecting to other<br />
stereo equipment<br />
You can listen to the CD through other stereo<br />
equipment or record a CD on a cassette tape.<br />
Refer to the instruction manual of the other<br />
equipment for details. Before making<br />
connections, turn off each piece of equipment.<br />
Playing a CD in a car<br />
You can use your Discman in a car as<br />
illustrated below.<br />
To connect your Discman to a car cassette<br />
deck, you need the following accessories:<br />
• Car connecting pack CPA-9<br />
• Car battery cord DCC-E245<br />
or,<br />
• Mount kit CPM-300PC (Mount plate + Car<br />
connecting pack + Car battery cord)<br />
• Car battery cord with car connecting pack<br />
DCC-E26CP<br />
Refer to the instruction manual of each<br />
accessory for details.<br />
When you use the CPM-300PC mount<br />
kit/CPM-300P mount plate<br />
Attach the car mount adaptor supplied to the<br />
CPM-300PC/300P before installing the<br />
Discman.<br />
Notes<br />
• Do not put the Discman on the dashboard.<br />
• Do not leave the Discman in a car parked in<br />
sunlight.<br />
• Use a <strong>Sony</strong> car connecting pack for reducing<br />
noise.<br />
Switched ignition function<br />
With this feature, your Discman stops<br />
automatically when you turn off the engine of<br />
the car. (This function is not possible with<br />
some cars depending on the model).<br />
zPower Sources<br />
Using rechargeable<br />
battery<br />
Charge the rechargeable battery before using<br />
it for the first time.<br />
You can use either BP-DM10 or BP-DM20<br />
rechargeable battery for this unit. You can use<br />
them in the same way, but their charging time<br />
and battery life are different. Check the model<br />
number of your rechargeable battery, and use<br />
it.<br />
1 Open the lid of the battery compartment.<br />
(rear)<br />
2 Insert the rechargeable battery so that the<br />
word “SONY” is facing the same direction<br />
as illustrated inside the lid, and close the<br />
lid.<br />
3 Connect the AC power adaptor.<br />
The indication “CHG” lights up. Charge<br />
for about 2 hours (for BP-DM10) or 3<br />
hours (for BP-DM20).<br />
(If the battery has been already charged,<br />
“CHG“ and flash. )<br />
Using dry batteries<br />
1 Open the lid of the battery compartment.<br />
2 Insert two LR6 (size AA) alkaline<br />
batteries by matching the ‘ and ’ to the<br />
diagram inside the battery compartment<br />
and close the lid.<br />
When to replace the dry batteries<br />
When the battery becomes weak,<br />
indication appears in the display. If the<br />
batteries are used up, “Lo batt” appears in<br />
the display.Replace all the batteries with new<br />
ones.<br />
Notes<br />
• Do not charge the dry batteries.<br />
• Do not mix new batteries with old ones.<br />
• Do not use different types of batteries together.<br />
• Do not use manganese batteries for this unit.<br />
Battery life (approx. hours)<br />
When using<br />
(rear)<br />
ESP function<br />
off on<br />
BP-DM20 10 7<br />
(charged for<br />
about 3 hours*)<br />
Two alkaline batteries 18 13<br />
LINE OUT<br />
BP-DM10 5 3.5<br />
(charged for<br />
about 2 hours*)<br />
Connecting cord<br />
RK-G129HG<br />
Left (white)<br />
Right (red)<br />
DC IN 4.5 V<br />
(When the unit is used on a flat and stable place)<br />
*Charging time varies depending on how the<br />
rechargeable battery is used.<br />
LINE IN or<br />
REC IN<br />
AC power adaptor<br />
Stereo system,<br />
cassette recorder,<br />
radio cassette<br />
recorder, etc.<br />
Notes<br />
• When you use a connecting cord, the Digital<br />
MEGA BASS function will be disabled.<br />
• Before you play the CD, turn down the volume<br />
of the connected equipment so as not to<br />
damage the connected speakers.<br />
• The beep sound is not output from the LINE<br />
OUT jack.<br />
• When you connect other equipment to the<br />
LINE OUT jack, you cannot adjust the volume<br />
by this unit.<br />
• When you record a CD on a cassette tape using<br />
a tape recorder that has the blank search<br />
function, release the ESP function. If the ESP<br />
function is on, the blank search function does<br />
not work.<br />
to a wall outlet<br />
4 When fully charged, “CHG” disappears.<br />
Disconnect the AC power adaptor.<br />
When to charge the battery<br />
When the battery becomes weak,<br />
indication appears in the display. If the<br />
battery is used up, “Lo batt” appears in the<br />
display. Charge the rechargeable battery.<br />
To keep the original battery capacity for a long<br />
time, recharge the battery when the battery is<br />
used up (discharged).<br />
Notes<br />
• Charging time varies depending on how the<br />
rechargeable battery is used.<br />
• If the battery is new or has not been used for a<br />
long time, it may not be charged completely<br />
until you charge and discharge it several times.<br />
• If the battery life becomes shorter by about half,<br />
replace it with <strong>Sony</strong> BP-DM10 or BP-DM20<br />
rechargeable battery. Do not use any other<br />
rechargeable battery (R6 type rechargeable<br />
battery, etc.).<br />
D-<strong>368</strong>.3-859-215-1X.U2
zAdditional Information<br />
Maintenance<br />
Troubleshooting<br />
Specifications<br />
Precautions<br />
On safety<br />
• Should any solid objects or liquid fall into the<br />
unit, unplug it and have it checked by qualified<br />
<strong>per</strong>sonnel before o<strong>per</strong>ating it any further.<br />
• Do not put any foreign objects in the DC IN<br />
4.5 V (external power input) jack.<br />
On power sources<br />
• When you are not using the unit for a long<br />
time, disconnect all power sources from the<br />
unit.<br />
• The nameplate indicating o<strong>per</strong>ating voltage,<br />
power consumption, etc. is located at the<br />
bottom of the AC power adaptor (for Middle<br />
East only.)<br />
On the AC power adaptor<br />
• Use only the supplied AC power adaptor. If<br />
your unit is not supplied with it, use AC-<br />
E45HG AC power adaptor. Do not use any<br />
other AC power adaptor.<br />
Polarity of the plug<br />
• To unplug the AC power adaptor from the wall<br />
outlet, grasp the adaptor itself, do not pull its<br />
cord.<br />
On dry and rechargeable batteries<br />
• Do not throw the batteries into fire.<br />
• Do not carry the rechargeable battery with<br />
coins or other metallic objects. It can generate<br />
heat if the positive and negative terminals of<br />
the battery are accidentally contacted by a<br />
metallic object.<br />
On the unit<br />
• Keep the lens on the unit clean and do not<br />
touch it. If you do so, the lens may be damaged<br />
and the unit will not o<strong>per</strong>ate pro<strong>per</strong>ly.<br />
• Do not put any heavy object on top of the unit.<br />
The unit and the CD may be damaged.<br />
• Do not leave the unit in a location near heat<br />
sources, or in a place subject to direct sunlight,<br />
excessive dust or sand, moisture, rain,<br />
mechanical shock, unleveled surface, or in a car<br />
with its windows closed.<br />
• If the unit causes interference to the radio or<br />
television reception, turn off the unit or move it<br />
away from the radio or television.<br />
• Do not wrap the unit in a cloth or blanket<br />
during use as it may cause malfunction or<br />
serious accidents.<br />
On headphones<br />
Road safety<br />
Do not use headphones while driving, cycling, or<br />
o<strong>per</strong>ating any motorized vehicle. It may create a<br />
traffic hazard and is illegal in some areas. It can<br />
also be potentially dangerous to play your<br />
headsets at high volume while walking,<br />
especially at pedestrian crossings. You should<br />
exercise extreme caution or discontinue use in<br />
potentially hazardous situations.<br />
Preventing hearing damage<br />
Avoid using headphones at high volume.<br />
Hearing ex<strong>per</strong>ts advise against continuous, loud<br />
and extended play. If you ex<strong>per</strong>ience a ringing<br />
in your ears, reduce volume or discontinue use.<br />
Caring for others<br />
Keep the volume at a moderate level. This will<br />
allow you to hear outside sounds and to be<br />
considerate to the people around you.<br />
To clean the lens<br />
Clean the lens with a lens cleaning kit KK-DM1.<br />
Lens<br />
To clean the casing<br />
Use a soft cloth slightly moistened in water or a<br />
mild detergent solution. Do not use alcohol,<br />
benzine or thinner.<br />
Should any problem <strong>per</strong>sist after you have made<br />
these checks, consult your nearest <strong>Sony</strong> dealer.<br />
The CD does not play or “no dlSC”<br />
appears in the display though a CD<br />
is placed in the unit.<br />
m The CD is dirty or defective.<br />
m Insert the CD with the label side up.<br />
m Moisture condensation has occurred.<br />
Leave the unit aside for several hours until<br />
the moisture evaporates.<br />
m The lens is dirty.<br />
m Close the lid of the unit and the battery<br />
compartment firmly.<br />
m Make sure the batteries are inserted<br />
correctly.<br />
m Connect the AC power adaptor to a wall<br />
outlet securely.<br />
When you press ^, “00” appears in<br />
the display for a moment, and<br />
disappears. The CD does not play.<br />
m Rechargeable battery or dry batteries are<br />
used up. Charge the rechargeable battery<br />
or replace dry batteries with new ones.<br />
No sound, or noise is heard.<br />
m Connect the plugs firmly.<br />
m Plugs are dirty. Clean the plugs with a dry<br />
soft cloth <strong>per</strong>iodically.<br />
“Hl dc ln” appears in the display.<br />
m Use only the supplied AC power adaptor<br />
or recommended AC power adaptor AC-<br />
E45HG (not supplied).<br />
“Hold” appears in the display when<br />
you press a button.<br />
m The buttons are locked. Slide HOLD back<br />
“Lo batt” appears in the display<br />
when you press a button.<br />
m The rechargeable battery is used up<br />
completely. Connect the AC power<br />
adaptor and charge the battery.<br />
m The dry batteries are use up. Replace them<br />
with new ones.<br />
The battery life is short.<br />
m Manganese batteries are used. Use alkaline<br />
batteries.<br />
m Replace the batteries with new ones.<br />
The volume is limited to a certain<br />
level even if you attempt to turn it<br />
up.<br />
m AVLS selector is set to LIMIT. Set it to<br />
NORM.<br />
System<br />
Compact disc digital audio system<br />
Laser diode pro<strong>per</strong>ties<br />
Material: GaAlAs<br />
Wavelength: λ = 780 nm<br />
Emission duration: Continuous<br />
Laser output: Less than 44.6 µW (measured at<br />
200 mm away from the objective lens surface)<br />
Error correction<br />
<strong>Sony</strong> Su<strong>per</strong> Strategy Cross Interleave Reed<br />
Solomon Code<br />
D-A conversion<br />
1-bit quartz time-axis control<br />
Frequency response<br />
20 - 20,000 Hz +1 -2dB (measured by EIAJ CP-<br />
307)<br />
Output (at 4.5 V input level)<br />
Headphones (stereo minijack)<br />
15 mW + 15 mW at 16 ohms<br />
Line output (stereo minijack)<br />
Output level 0.6 V rms at 50 kilohms<br />
Recommended load impedance over 10<br />
kilohms<br />
General<br />
Power requirements<br />
• <strong>Sony</strong> BP-DM10 Rechargeable battery:<br />
2.4 V DC, Ni-Cd, 650 mAh<br />
<strong>Sony</strong> BP-DM20 Rechargeable battery:<br />
2.4 V DC, Ni-MH, 1,200 mAh<br />
• Two LR6 (size AA) batteries: 3 V DC<br />
• AC power adaptor (DC IN 4.5 V jack):<br />
U2.CA2.E92: 120 V, 60 Hz<br />
CED.E13.CN1: 220 - 230 V, 50 Hz<br />
CEK: 230 - 240 V, 50 Hz<br />
EA3: 110 - 240 V, 50/60 Hz<br />
AU2: 240 V, 50 Hz<br />
JEW.E33: 100 - 240 V, 50/60 Hz<br />
• <strong>Sony</strong> CPM-300P mount plate for use on car<br />
battery: 4.5 V DC<br />
Dimensions (w/h/d) (without projecting parts<br />
and controls)<br />
Approx. 132 × 30.3 × 135.6 mm<br />
(5 1 ⁄4 × 1 1 ⁄4 × 5 3 ⁄8 in.)<br />
Mass (without rechargeable battery)<br />
Approx. 240 g (8.5 oz)<br />
O<strong>per</strong>ating tem<strong>per</strong>ature<br />
5°C - 35°C (41°F - 95°F)<br />
Supplied accessories<br />
AC power adaptor (1)<br />
Stereo headphones (1)<br />
Connecting cord (Phono plug × 2 ↔ stereo<br />
miniplug) (1)<br />
Design and specifications are subject to change<br />
without notice.<br />
Recommended accessories<br />
Mount plate CPM-300P<br />
Mount kit CPM-450PC*<br />
Mount kit CPM-300PC<br />
Car connecting pack CPA-9<br />
Car battery cord with car connecting pack<br />
DCC-E26CP<br />
Car battery cord DCC-E245<br />
Active speaker system SRS-A21, SRS-A41,<br />
SRS-A71<br />
Rechargeable battery BP-DM10, BP-DM20<br />
Connecting cord RK-G129HG<br />
AC power adaptor AC-E45HG<br />
Stereo headphones MDR-35, MDR-E848<br />
*Sold in Japan only<br />
Your dealer may not handle some of the above<br />
listed accessories. Please ask the dealer for<br />
detailed information about the accessories in<br />
your country.<br />
D-<strong>368</strong>.3-859-215-1X.U2


