

Sony PS-LX300USB - PS-LX300USB Istruzioni per l'uso Inglese
Sony PS-LX300USB - PS-LX300USB Istruzioni per l'uso Inglese
Sony PS-LX300USB - PS-LX300USB Istruzioni per l'uso Inglese

You also want an ePaper? Increase the reach of your titles
YUMPU automatically turns print PDFs into web optimized ePapers that Google loves.
4-548-286-11(1)<br />
Information for customers using Windows 8/8.1<br />
<strong>PS</strong>-<strong>LX300USB</strong><br />
When using the system in a Windows 8/8.1 environment, carefully read the information below in conjunction with the separately<br />
supplied installation guide for “Sound Forge Audio Studio LE” and the o<strong>per</strong>ating instructions when making settings.<br />
In this manual, Microsoft® Windows® 8, Microsoft® Windows® 8 Pro, Microsoft® Windows® 8.1, and Microsoft® Windows® 8.1 Pro are<br />
referred to as Windows 8.<br />
Microsoft and Windows are either registered trademarks or trademarks of Microsoft Corporation in the United States and/or other<br />
countries.<br />
In this manual, the setting procedure described starts with the Windows 8 Charms bar as the typical o<strong>per</strong>ation method.<br />
Installing “Sound Forge Audio Studio LE”<br />
After consulting the installation guide for “Sound Forge Audio Studio LE,” install “Sound Forge Audio Studio LE”* on your computer.<br />
If the autoplay function is disabled, click the [Libraries] icon in the task bar, then double-click the application disk displayed under<br />
[Devices and drives] to start the install.<br />
* “Sound Forge Audio Studio LE” supports both the 32-bit and 64-bit versions of Windows 8.<br />
About USB device drivers<br />
The USB device drivers required for the system to o<strong>per</strong>ate are included in Windows 8, and the appropriate drivers are installed<br />
automatically when the system is connected to the USB port of the computer for the first time. For details, refer to the o<strong>per</strong>ating<br />
instructions of your computer.<br />
Recording audio on a computer running Windows 8/8.1<br />
To record audio after connecting the system to your computer, it is necessary to add [USB AUDIO CODEC] as a recording device<br />
and set it as the default device (steps 1 to 4). In addition, sound quality settings are required in order to input stereo signals from<br />
the system to the computer (steps 5 to 7). If you wish to output sound from the speakers during recording, make the appropriate<br />
sound output setting (step 8).<br />
1 Display the Charms bar on the desktop and click the [Settings] charm.<br />
2 Click [Control Panel], and then click [Hardware and Sound].<br />
3 Click [Manage audio devices] in [Sound].<br />
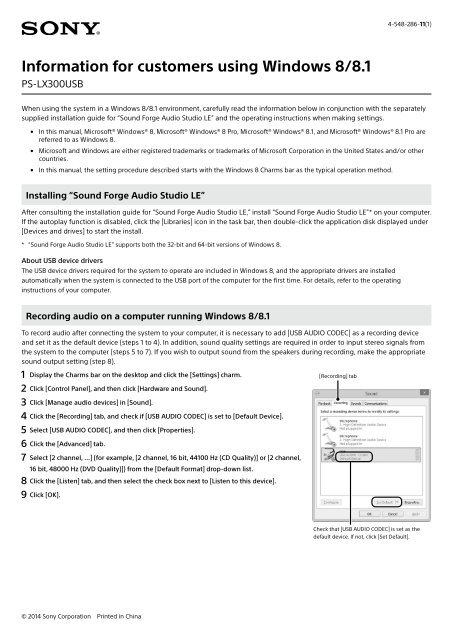
4 Click the [Recording] tab, and check if [USB AUDIO CODEC] is set to [Default Device].<br />
5 Select [USB AUDIO CODEC], and then click [Pro<strong>per</strong>ties].<br />
6 Click the [Advanced] tab.<br />
7 Select [2 channel, ...] (for example, [2 channel, 16 bit, 44100 Hz (CD Quality)] or [2 channel,<br />
16 bit, 48000 Hz (DVD Quality)]) from the [Default Format] drop-down list.<br />
8 Click the [Listen] tab, and then select the check box next to [Listen to this device].<br />
9 Click [OK].<br />
[Recording] tab<br />
Check that [USB AUDIO CODEC] is set as the<br />
default device. If not, click [Set Default].<br />
© 2014 <strong>Sony</strong> Corporation Printed in China
Outputting audio through your computer’s speakers<br />
The necessary USB device drivers are installed automatically the first time you connect the system to your computer with the USB<br />
cable. Due to the specifications of the o<strong>per</strong>ating system, [USB AUDIO CODEC] is automatically added as a playback device, and set<br />
to [Default Device]. In this state, audio is not output through your computer speakers. To change this, make settings as follows:<br />
1 Display the Charms bar on the desktop and click the [Settings] charm.<br />
2 Click [Control Panel], and then click [Hardware and Sound].<br />
3 Click [Manage audio devices] in [Sound].<br />
4 In the [Playback] tab, select the desired speakers, and then click [Set Default].<br />
The playback devices displayed will differ according to your computer model. For<br />
details, refer to the o<strong>per</strong>ating instructions of your computer.<br />
5 Click [OK].<br />
[Playback] tab<br />
Select your computer’s speakers, and then click<br />
[Set Default] to set them as the default device.<br />
If the system is not recognized by your computer<br />
When first connecting the system to your computer with the USB cable or connecting it to a different USB port, the USB device<br />
drivers may be automatically installed once again. In such a case, check as follows to confirm that the USB device drivers were<br />
installed correctly:<br />
1 Display the Charms bar on the desktop and click the [Settings] charm.<br />
2 Click [Control Panel], and then click [Hardware and Sound].<br />
3 Click [Device Manager] in [Devices and Printers].<br />
4 Check the [Device Manager] window to confirm that the following devices are<br />
installed:<br />
––<br />
[HID-compliant consumer control device] and [USB Input Device] under<br />
[Human Interface Devices]<br />
––<br />
[USB AUDIO CODEC] under [Sound, video and game controllers]<br />
––<br />
[USB Composite Device] under [Universal Serial Bus controllers]<br />
Notification of end of support for Windows XP<br />
Microsoft Corporation has ended support for Windows XP, so at present it is no longer possible to obtain important program<br />
updates with fixes for issues in Windows XP. Accordingly, support for issues affecting hardware and software from <strong>Sony</strong>, as<br />
well as security updates, will no longer be available. If you continue to use <strong>Sony</strong> products in a Windows XP environment, you<br />
may ex<strong>per</strong>ience issues such as failure of hardware or software to o<strong>per</strong>ate pro<strong>per</strong>ly and inability to maintain security.


