

Sony CMT-V75BTiP - CMT-V75BTIP Istruzioni per l'uso Inglese
Sony CMT-V75BTiP - CMT-V75BTIP Istruzioni per l'uso Inglese
Sony CMT-V75BTiP - CMT-V75BTIP Istruzioni per l'uso Inglese

You also want an ePaper? Increase the reach of your titles
YUMPU automatically turns print PDFs into web optimized ePapers that Google loves.
Micro HI-FI<br />
Component System<br />
GB O<strong>per</strong>ating Instructions<br />
<strong>CMT</strong>-<strong>V75BTiP</strong><br />
WARNING<br />
To reduce the risk of fire, do not cover the ventilation<br />
opening of the apparatus with newspa<strong>per</strong>s, tablecloths,<br />
curtains, etc. Do not place the naked flame sources such<br />
as lighted candles on the apparatus.<br />
To reduce the risk of fire or electric shock, do not expose<br />
this apparatus to dripping or splashing, and do not<br />
place objects filled with liquids, such as vases, on the<br />
apparatus.<br />
Do not install the appliance in a confined space, such as<br />
a bookcase or built-in cabinet.<br />
As the main plug is used to disconnect the unit from<br />
the mains, connect the unit to an easily accessible<br />
AC outlet. Should you notice an abnormality in the<br />
unit, disconnect the main plug from the AC outlet<br />
immediately.<br />
Do not expose batteries or apparatus with batteryinstalled<br />
to excessive heat such as sunshine, fire or the<br />
like.<br />
The unit is not disconnected from the mains as long as<br />
it is connected to the AC outlet, even if the unit itself has<br />
been turned off.<br />
The nameplate is located on the bottom exterior of the<br />
unit.<br />
Excessive sound pressure from earphones and<br />
headphones can cause hearing loss.<br />
CAUTION<br />
The use of optical instruments with this product will<br />
increase eye hazard.<br />
This appliance is classified<br />
as a CLASS 1 LASER<br />
product. This marking<br />
is located on the bottom<br />
exterior of the unit.<br />
Notice for customers: the following<br />
information is only applicable to<br />
equipment sold in countries applying EU<br />
directives.<br />
This product has been manufactured by or on behalf<br />
of <strong>Sony</strong> Corporation, 1-7-1 Konan Minato-ku Tokyo,<br />
108-0075 Japan. Inquiries related to product compliance<br />
based on European Union legislation shall be addressed<br />
to the authorized representative, <strong>Sony</strong> Deutschland<br />
GmbH, Hedelfinger Strasse 61, 70327 Stuttgart,<br />
Germany. For any service or guarantee matters, please<br />
refer to the addresses provided in the separate service or<br />
guarantee documents.<br />
For customers in Europe and Australia<br />
Disposal of Old Electrical &<br />
Electronic Equipment<br />
(Applicable in the European<br />
Union and other European<br />
countries with separate<br />
collection systems)<br />
This symbol on the product or on its packaging<br />
indicates that this product shall not be treated as<br />
household waste. Instead it shall be handed over to<br />
the applicable collection point for the recycling of<br />
electrical and electronic equipment. By ensuring this<br />
product is disposed of correctly, you will help prevent<br />
potential negative consequences for the environment<br />
and human health, which could otherwise be caused<br />
by inappropriate waste handling of this product. The<br />
recycling of materials will help to conserve natural<br />
resources. For more detailed information about<br />
recycling of this product, please contact your local Civic<br />
Office, your household waste disposal service or the<br />
shop where you purchased the product.<br />
Applicable accessory: Remote commander<br />
Europe Only<br />
4-418-714-14 (1)<br />
©2012 <strong>Sony</strong> Corporation Printed in China<br />
Disposal of waste batteries<br />
(applicable in the European<br />
Union and other European<br />
countries with separate<br />
collection systems)<br />
This symbol on the battery or on the packaging indicates<br />
that the battery provided with this product shall not be<br />
treated as household waste.<br />
On certain batteries this symbol might be used in<br />
combination with a chemical symbol. The chemical<br />
symbols for mercury (Hg) or lead (Pb) are added if the<br />
battery contains more than 0.0005% mercury or 0.004%<br />
lead.<br />
By ensuring these batteries are disposed of correctly,<br />
you will help prevent potentially negative consequences<br />
for the environment and human health which could<br />
otherwise be caused by inappropriate waste handling of<br />
the battery. The recycling of the materials will help to<br />
conserve natural resources.<br />
In case of products that for safety, <strong>per</strong>formance or data<br />
integrity reasons require a <strong>per</strong>manent connection with<br />
an incorporated battery, this battery should be replaced<br />
by qualified service staff only. To ensure that the battery<br />
will be treated pro<strong>per</strong>ly, hand over the product at endof-life<br />
to the applicable collection point for the recycling<br />
of electrical and electronic equipment.<br />
For all other batteries, please view the section on how<br />
to remove the battery from the product safely. Hand the<br />
battery over to the applicable collection point for the<br />
recycling of waste batteries.<br />
For more detailed information about recycling of this<br />
product or battery, please contact your local Civic<br />
Office, your household waste disposal service or the<br />
shop where you purchased the product.<br />
This equipment has been tested and found to comply<br />
with the limits set out in the EMC Directive using a<br />
connection cable shorter than 3 meters.<br />
Hereby, <strong>Sony</strong> Corp., declares that this equipment is in<br />
compliance with the essential requirements and other<br />
relevant provisions of Directive 1999/5/EC. For details,<br />
please access the following URL:<br />
http://www.compliance.sony.de/<br />
Norway:<br />
Use of this radio equipment is not allowed in the<br />
geographical area within a radius of 20 km from the<br />
centre of Ny-Alesund, Svalbard.<br />
Note on DualDiscs<br />
A DualDisc is a two sided disc product which mates<br />
DVD recorded material on one side with digital<br />
audio material on the other side. However, since the<br />
audio material side does not conform to the Compact<br />
Disc (CD) standard, playback on this product is not<br />
guaranteed.<br />
Music discs encoded with copyright<br />
protection technologies<br />
This product is designed to playback discs that conform<br />
to the Compact Disc (CD) standard. Recently, various<br />
music discs encoded with copyright protection<br />
technologies are marketed by some record companies.<br />
Please be aware that among those discs, there are some<br />
that do not conform to the CD standard and may not be<br />
playable by this product.<br />
License and Trademark Notice<br />
iPhone, iPod, iPod classic, iPod nano, and iPod touch<br />
are trademarks of Apple Inc., registered in the U.S. and<br />
other countries. iPad is a trademark of Apple Inc.<br />
MPEG Layer-3 audio coding technology and patents<br />
licensed from Fraunhofer IIS and Thomson.<br />
Windows Media is either a registered trademark or<br />
trademark of Microsoft Corporation in the United<br />
States and/or other countries.<br />
This product is protected by certain intellectual<br />
pro<strong>per</strong>ty rights of Microsoft Corporation. Use or<br />
distribution of such technology outside of this product<br />
is prohibited without a license from Microsoft or an<br />
authorized Microsoft subsidiary.<br />
All other trademarks and registered trademarks are<br />
of their respective holders. In this manual,<br />
and ®<br />
marks are not specified.<br />
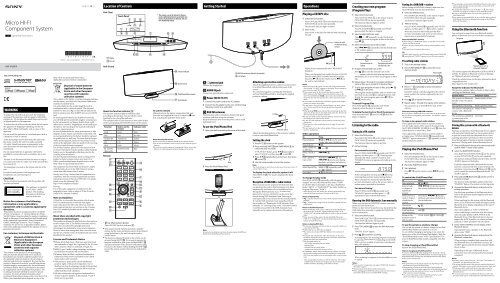
Location of Controls<br />
Unit (Top)<br />
Display<br />
Disc slot<br />
Unit (Front)<br />
About the function indicator <br />
The function indicator lights in different colors<br />
according to the function. You can tell the current<br />
function by the color of the indicator.<br />
The indicator color of each function is same color as that<br />
of the corresponding FUNCTION button on the remote.<br />
Function<br />
Button on the<br />
remote<br />
DAB DAB Pink<br />
Indicator color<br />
FM FM Sky blue<br />
AUDIO IN AUDIO IN Amber<br />
CD CD Yellow<br />
iPod iPod White<br />
BT AUDIO<br />
(Bluetooth)<br />
Remote<br />
Touch Panel*<br />
BLUETOOTH<br />
*1<br />
(Illumination) button<br />
Turn ON/OFF the dock indicator .<br />
Blue<br />
This manual mainly explains o<strong>per</strong>ations using the<br />
remote, but the same o<strong>per</strong>ations can also be <strong>per</strong>formed<br />
using the buttons on the unit having the same or<br />
similar names.<br />
The function indicated by pink on the remote can be<br />
activated using SHIFT . If you want to o<strong>per</strong>ate the<br />
function indicated by pink, press and hold SHIFT <br />
and press the button of the function indicated by pink.<br />
If you press the button without holding the SHIFT <br />
pressed the system activates the function indicated by<br />
white.<br />
* The system is set at the factory for the keytouch<br />
confirmation beep to sound when you<br />
press a touch panel key on the unit. You can<br />
turn off the beep sound.<br />
Function indicator<br />
Remote sensor<br />
iPod/iPhone/iPad connector<br />
Dock indicator<br />
To use the remote<br />
Slide and remove the battery compartment lid, and<br />
insert the two supplied R6 (size AA) batteries, side<br />
first, matching the polarities shown below.<br />
Notes on using the remote<br />
With normal use, the batteries should last for about 6 months.<br />
Do not mix an old battery with a new one or mix different types of<br />
batteries.<br />
If you do not use the remote for a long <strong>per</strong>iod of time, remove the<br />
batteries to avoid damage from battery leakage and corrosion.<br />
Getting Started<br />
(phones) jack<br />
Connect the headphones.<br />
AUDIO IN jack<br />
Connect an optional audio component.<br />
Power (DC IN 19.5 V)<br />
1 Connect the power cord to the AC adapter.<br />
2 Connect the AC adapter to the unit, and then plug<br />
the power cord in to a wall outlet.<br />
DAB/FM antennas<br />
Find a location and an orientation that provide good<br />
reception, and then set up the antennas.<br />
Keep the antennas away from the power cord to avoid<br />
picking up noise.<br />
To use the iPod/iPhone/iPad<br />
1 Open the dock by pushing the center of the dock.<br />
2 Place the iPod/iPhone/iPad.<br />
Dock<br />
Note<br />
Be careful not to drop the unit when disconnecting an iPod/iPhone/<br />
iPad from the iPod/iPhone/iPad connector.<br />
DAB/FM lead antenna (Extend it horizontally.)<br />
To AC Adapter<br />
Attaching a protective cushion<br />
Attach the supplied protective cushion to avoid contact<br />
of an iPod/iPhone/iPad with the front panel of the<br />
system.<br />
You can protect against scratching the front panel<br />
and your iPod/iPhone/iPad by attaching the supplied<br />
protective cushion.<br />
Protective cushion<br />
Adjust the attaching position of the protective cushion<br />
to suit to your iPod/iPhone/iPad.<br />
Setting the clock<br />
1 Press to turn on the system.<br />
2 Press and hold SHIFT and TIMER MENU to<br />
select the clock set mode.<br />
If “PLAY SET” flashes, press / repeatedly to<br />
select “CLOCK,” and then press (enter) .<br />
3 Press / repeatedly to set the hour, then press<br />
(enter) .<br />
4 Use the same procedure to set the minutes.<br />
Note<br />
The clock settings are reset when you disconnect the power cord or if<br />
a power failure occurs.<br />
To display the clock when the system is off<br />
Press DISPLAY . The clock is displayed for about<br />
8 seconds.<br />
Reception of DAB/DAB+ radio station<br />
When you turn on the system for the first time after<br />
you purchase the system, DAB Automatic Scan starts<br />
automatically and creates a list of available services.<br />
During the DAB Automatic Scan, “”<br />
appears. Do not press any button on the unit or the<br />
remote during DAB Automatic Scan. Scanning is<br />
interrupted and service list may not be created pro<strong>per</strong>ly.<br />
To run the DAB Automatic Scan manually, <strong>per</strong>form<br />
the procedure of “Running the DAB Automatic Scan<br />
manually” in “Listening to the radio.” If you have moved<br />
to another area, <strong>per</strong>form the DAB Automatic Scan<br />
manually and re-register the contents of broadcasts.<br />
O<strong>per</strong>ations<br />
Playing a CD/MP3 disc<br />
1 Select the CD function.<br />
Press CD FUNCTION on the remote or press<br />
FUNCTION on the unit repeatedly.<br />
The function indicator lights in yellow.<br />
2 Insert a disc.<br />
Insert a disc in the disc slot with the label side facing<br />
forward.<br />
Eject a disc<br />
Insert a disc with<br />
the label side facing<br />
forward.<br />
Playback starts automatically after “READING”<br />
disappear.<br />
When you changing from another function to the CD<br />
function while a disc is already inserted in the disc<br />
slot, press on the remote or press on<br />
the unit to start playback.<br />
Notes<br />
When you turn on the system, the disc will not be pulled into the<br />
disc slot until “NO DISC” appears in the display. Do not attempt to<br />
push in the disc until “NO DISC” appears.<br />
If you cannot insert the disc into the disc slot even when “NO<br />
DISC” appears in the display, there may already be a disc in the<br />
slot. Press and hold down to eject such a disc forcibly. If even<br />
the system does not then eject the disc, contact your nearest <strong>Sony</strong><br />
dealer.<br />
If you cannot eject the disc and “LOCKED” appears in the display,<br />
contact your nearest <strong>Sony</strong> dealer.<br />
Do not insert a disc with non-standard shapes (e.g., heart, square,<br />
star). The disc may fall into the system and cause irreparable<br />
damage.<br />
When pressing on the unit and then reinserting the disc that<br />
appears in the disc slot, do not simply push in the disc. Remove the<br />
disc from the disc slot and then reinsert it.<br />
Do not turn off the system with a disc halfway inserted in the disc<br />
slot. Doing so may cause the disc to fall.<br />
Do not use a disc with tape, seals or paste on it as this may cause<br />
malfunction.<br />
When you eject a disc, handle the disc by its edge. Do not touch<br />
the surface.<br />
Do not insert an 8 cm disc with an adapter. Doing so may cause the<br />
system to malfunction.<br />
Other o<strong>per</strong>ations<br />
To<br />
Press<br />
Pause playback (or on the unit). To<br />
resume play, press the button again.<br />
Stop playback .<br />
Select a folder on<br />
an MP3 disc<br />
+/ .<br />
Select a track or / .<br />
file<br />
Find a point in a<br />
track or file<br />
Hold down / (or<br />
/ on the unit) during<br />
playback, and release the button at<br />
the desired point.<br />
Select Repeat Play REPEAT repeatedly until “ ”<br />
or “ 1” appears.<br />
Eject a disc on the unit.<br />
To change the play mode<br />
Press PLAY MODE repeatedly while the player is<br />
stopped. You can select Normal Play mode (“FLDR”<br />
for all MP3 files in the folder on the disc), Shuffle Play<br />
mode (“SHUF” or “FLDR SHUF*” for folder shuffle), or<br />
Program Play mode (“PGM”).<br />
* When playing a CD-DA (audio) disc, FLDR or FLDR SHUF Play<br />
<strong>per</strong>forms the same o<strong>per</strong>ation as Normal or SHUF Play.<br />
Notes on Repeat Play<br />
“ ” indicates that all tracks or files will be repeated until you stop<br />
playback.<br />
“ 1” indicates that a single track or file will be repeated until you<br />
stop playback.<br />
Notes on Shuffle Play mode<br />
When Shuffle Play mode is set to “SHUF,” the system shuffle-plays<br />
all tracks or files on the disc. When Shuffle Play mode is set to<br />
“FLDR SHUF,” the system shuffle-plays all tracks or files in selected<br />
folder.<br />
When you turn off the system, the selected Shuffle Play mode<br />
(“SHUF” or “FLDR SHUF”) is cleared and the play mode returns to<br />
Normal or FLDR Play mode.<br />
Notes on playing MP3 discs<br />
Do not save other types of tracks or files, or unnecessary folders on<br />
a disc that has MP3 files.<br />
Folders that have no MP3 files are skipped.<br />
The system can only play MP3 files that have a file extension of<br />
“.mp3.”<br />
Even when file name has the “.mp3” file extension, if the actual<br />
file differs, playing this file may generate a loud noise which could<br />
damage the system may malfunction.<br />
The maximum number of:<br />
999* folders (including the root folder)<br />
999 MP3 files<br />
250 MP3 files in a single folder<br />
8 folder levels (in the tree structure of files)<br />
Compatibility with all MP3 encoding/writing software, recording<br />
device, and recording media cannot be guaranteed. Incompatible<br />
MP3 discs may produce noise or interrupted audio or may not play<br />
at all.<br />
* This include folders that have no MP3 or other files. The number<br />
of folders that the system can recognize may be less than actual<br />
number of folders, depending on the folder structure.<br />
Creating your own program<br />
(Program Play)<br />
1 Select the CD function.<br />
Press CD FUNCTION on the remote or press<br />
FUNCTION on the unit repeatedly.<br />
The function indicator lights in yellow.<br />
2 Select the play mode.<br />
Press PLAY MODE repeatedly until “PGM”<br />
appears while the player is stopped.<br />
3 Select a folder (MP3 disc only).<br />
Press +/ repeatedly to select the desired<br />
folder. If you want to program all files in the folder,<br />
press .<br />
4 Select the desired track or file number.<br />
Press / repeatedly until the desired track<br />
or file number appears.<br />
Selected track or file Total playing time of the<br />
number<br />
selected track or file<br />
5 Program the selected track or file.<br />
Press to enter the selected track or file.<br />
“--.--” appears when the total playing time exceeds<br />
100 minutes for an CD or when you program an MP3<br />
files.<br />
6 Repeat steps 3 through 5 to program additional<br />
tracks or files, up to a total of 25 tracks or files.<br />
7 To play your program of tracks or files, press <br />
(or on the unit).<br />
The program remains available until you remove the<br />
disc from the disc slot or unplug the power cord.<br />
To play the same program again, press (or<br />
on the unit).<br />
To cancel Program Play<br />
Press PLAY MODE repeatedly until “PGM”<br />
disappears while the player is stopped.<br />
To delete the last track or file of the program<br />
Press and hold SHIFT and CLEAR while the<br />
player is stopped.<br />
Listening to the radio<br />
Tuning in a FM station<br />
1 Select the FM function.<br />
Press FM FUNCTION on the remote or press<br />
FUNCTION on the unit repeatedly.<br />
The function indicator lights in sky blue.<br />
2 Perform tuning.<br />
For automatic scanning<br />
Press TUNING MODE repeatedly until “AUTO”<br />
appears, and then press +/ . Scanning stops<br />
automatically when a station is tuned in, and<br />
“STEREO” (for stereo programs only) light up in the<br />
display.<br />
If the scanning does not stop, press to stop<br />
scanning, then <strong>per</strong>form manual tuning (below).<br />
When you tune in a station that provides RDS<br />
services, information such as the service name or<br />
station name is provided by broadcasts.<br />
For manual tuning<br />
Press TUNING MODE repeatedly until<br />
“MANUAL” appears, and then press +/ <br />
repeatedly to tune in the desired station.<br />
Running the DAB Automatic Scan manually<br />
Before you can tune in DAB/DAB+ stations, you must<br />
<strong>per</strong>form a DAB Initial Scan.<br />
When you have moved to another area, also <strong>per</strong>form the<br />
DAB Initial Scan manually to update the DAB/DAB+<br />
service information.<br />
1 Select the DAB function.<br />
Press DAB FUNCTION on the remote or press<br />
FUNCTION on the unit repeatedly.<br />
The function indicator lights in pink.<br />
2 Press TOOL MENU to start the DAB Automatic<br />
Scan.<br />
“INITIAL SCAN” appear.<br />
3 Press to <strong>per</strong>form scanning.<br />
Scanning begins. The scanning progress is indicated<br />
by asterisks (). Depending on the DAB/<br />
DAB+ services available in your area, scanning may<br />
take a few minutes.<br />
When scanning is complete, a list of available services<br />
is created.<br />
Notes<br />
If your country or region does not support DAB/DAB+ broadcast,<br />
“NO SERV” appears.<br />
This procedure clears all previously stored presets.<br />
Before unplugging the DAB/FM antenna, make sure the system is<br />
turned off to preserve your own DAB/DAB+ settings.<br />
Tuning in a DAB/DAB+ station<br />
Before tuning in DAB/DAB+ stations, make sure that<br />
the DAB Initial Scan has been <strong>per</strong>formed.<br />
1 Select the DAB function.<br />
Press DAB FUNCTION on the remote or press<br />
FUNCTION on the unit repeatedly.<br />
The function indicator lights in pink.<br />
2 Perform tuning.<br />
Press TUNING MODE repeatedly until “AUTO”<br />
appears, and then press +/ to select a station.<br />
When you tune in a station that provides RDS<br />
services, information such as the service name or<br />
station name is provided by broadcasts.<br />
Notes on DAB/DAB+ stations<br />
When tuning in a DAB/DAB+ station, it may take a few seconds<br />
before you hear any sound.<br />
Primary service is automatically received when secondary service<br />
ends.<br />
This tuner does not support data services.<br />
Tip<br />
To reduce static noise on a weak FM stereo station, press FM MODE<br />
repeatedly until “MONO” appears to turn off stereo reception.<br />
Presetting radio stations<br />
1 Tune in the desired station.<br />
2 Press TUNER MEMORY to select the tuner<br />
memory mode.<br />
Preset number<br />
3 Press +/ repeatedly to select the desired<br />
preset number.<br />
If another station is already assigned to the selected<br />
preset number, the station is replaced by the new<br />
station.<br />
4 Press to register the station.<br />
5 Repeat steps 1 through 4 to register other stations.<br />
You can preset up to 20 DAB/DAB+ and 20 FM<br />
stations.<br />
Notes on presetting DAB/DAB+ stations<br />
You can preset a DAB/DAB+ service only when it can be received.<br />
If you select an unregistered preset number, “NO PRESET” appears<br />
in the display.<br />
To tune in to a preset radio station<br />
If you registered a radio station to a preset number 1<br />
to 6, the radio station will be tuned in by just pressing<br />
the TUNER MEMORY NUMBER (1 to 6) when the<br />
system function is set to FM or DAB.<br />
If you registered a radio station to a preset number 7<br />
or higher, press TUNING MODE repeatedly until<br />
“PRESET” appears then press +/- repeatedly to select<br />
the desired preset number.<br />
Playing the iPod/iPhone/iPad<br />
1 Select the iPod function.<br />
Press iPod FUNCTION on the remote or press<br />
FUNCTION on the unit repeatedly.<br />
The function indicator lights in white.<br />
2 Place the iPod/iPhone/iPad.<br />
3 Start playback.<br />
Press on the remote or press on the<br />
unit.<br />
To control the iPod/iPhone/iPad<br />
To<br />
Press<br />
Pause playback / .<br />
Select a track / . To fast-forward or<br />
or chapter of fast-rewind, hold down the button.<br />
audiobook/<br />
podcast<br />
Find a point in a<br />
track or chapter<br />
of audiobook/<br />
podcast<br />
Choose the<br />
selected item<br />
Scroll up/down<br />
the iPod menus<br />
Return to the<br />
previous menu or<br />
select a menu<br />
Hold down / during<br />
playback, and release the button at<br />
the desired point.<br />
.<br />
/ .<br />
TOOL MENU /RETURN .<br />
To use the system as a battery charger<br />
You can use the system as a battery charger for an iPod/<br />
iPhone/iPad whether the system is on or off.<br />
To see whether charging is o<strong>per</strong>ating or not, check the<br />
battery icon of the iPod/iPhone/iPad display. Check the<br />
“iPod/iPhone/iPad section” of the “Specifications” for<br />
a list of iPod/iPhone/iPad models compatible with this<br />
system.<br />
To stop charging an iPod/iPhone/iPad<br />
Remove the iPod/iPhone/iPad.<br />
Note on charging an iPod/iPhone/iPad<br />
If you press DISPLAY while charging when the system is off, the<br />
system stops charging an iPod/iPhone/iPad. To restart charging of an<br />
iPod/iPhone/iPad, reconnect the iPod/iPhone/iPad when the display<br />
mode is Power Saving mode.<br />
Notes<br />
The <strong>per</strong>formance of the system may be vary, depending on the<br />
specifications of your iPod/iPhone/iPad.<br />
When placing or removing the iPod/iPhone/iPad, handle the<br />
iPod/iPhone/iPad in the same angle as that of the iPod/iPhone/iPad<br />
connector on the unit and do not twist or sway the iPod/iPhone/<br />
iPad to prevent connector damage.<br />
Do not carry the system with an iPod/iPhone/iPad set on the<br />
connector. Doing so may cause a malfunction.<br />
When placing or removing the iPod/iPhone/iPad, brace the system<br />
with one hand and take care not to press the controls of the iPod/<br />
iPhone/iPad by mistake.<br />
To change the volume level, use VOLUME +/ . The volume<br />
level does not change if you adjust it on the iPod/iPhone/iPad.<br />
To use an iPod/iPhone/iPad, refer to the user’s guide of your<br />
iPod/iPhone/iPad.<br />
<strong>Sony</strong> cannot accept responsibility in the event that data recorded to<br />
iPod/iPhone/iPad is lost or damaged when using an iPod/iPhone/<br />
iPad with this system.<br />
Using the Bluetooth function<br />
You can listen to music from your Bluetooth mobile<br />
phone or Bluetooth device over a wireless connection.<br />
The system<br />
Bluetooth device such as<br />
a Bluetooth “Walkman”<br />
This system supports the Bluetooth A2DP and AVRCP<br />
profiles. For details on Bluetooth wireless technology,<br />
see “Bluetooth wireless technology.”<br />
Check the website below for the latest information about<br />
compatible devices.<br />
http://support.sony-europe.com/<br />
About the indicator for Bluetooth<br />
The function indicator lights or flashes in blue to allow<br />
checking the Bluetooth status.<br />
System status<br />
Indication status<br />
The system is in Bluetooth Flashes slowly in blue.<br />
Standby (when the system<br />
is on)<br />
During Bluetooth pairing Flashes quickly in blue.<br />
The system is attempting to Flashes in blue.<br />
connect with a Bluetooth<br />
device<br />
The system has established Lit in blue.<br />
in connection with a<br />
Bluetooth device<br />
Pairing this system with a Bluetooth<br />
device<br />
Pairing is an o<strong>per</strong>ation where Bluetooth devices register<br />
with each other beforehand. Use the procedure below<br />
to pair the system with your Bluetooth device. Once<br />
a pairing o<strong>per</strong>ation is <strong>per</strong>formed, it does not need to<br />
be <strong>per</strong>formed again. If pairing is already completed,<br />
proceed to “Playing music from a Bluetooth device.”<br />
1 Place the Bluetooth device to be connected to this<br />
system within 1 meter of the system.<br />
2 Select the BLUETOOTH function.<br />
Press BLUETOOTH FUNCTION on the remote<br />
or press FUNCTION on the unit repeatedly.<br />
The function indicator flashes slowly in blue and “BT<br />
AUDIO” appears in the display.<br />
If already connected with a Bluetooth device that<br />
has been connected with this system in the past by<br />
automatic connection, press (Bluetooth) on the<br />
unit to cancel the connected Bluetooth device. “BT<br />
AUDIO” appears.<br />
3 Press and hold (Bluetooth) on the unit for 2<br />
seconds or longer.<br />
The function indicator lights quickly in blue and<br />
“PAIRING” flashes. The system is in Pairing mode.<br />
4 O<strong>per</strong>ate the Bluetooth device and <strong>per</strong>form the<br />
pairing o<strong>per</strong>ation.<br />
For details on o<strong>per</strong>ations of the Bluetooth device,<br />
refer to the o<strong>per</strong>ation manual supplied with your<br />
Bluetooth device.<br />
When searching for this system with the Bluetooth<br />
device, a list of the devices found may appear on the<br />
Bluetooth device display, depending on the type of<br />
Bluetooth device.<br />
This system appears as “<strong>CMT</strong>-<strong>V75BTiP</strong> (S).”<br />
When establishing a connection with this system,<br />
select the audio profile (A2DP, AVRCP) at the<br />
Bluetooth device. If the Bluetooth device does not<br />
support the AVRCP profile, you cannot <strong>per</strong>form<br />
playback or other o<strong>per</strong>ations with the system.<br />
5 Select “<strong>CMT</strong>-<strong>V75BTiP</strong>(S)” on the display of the<br />
Bluetooth device.<br />
If prompted to enter a passkey on the Bluetooth<br />
device, enter “0000.”<br />
6 O<strong>per</strong>ate the Bluetooth device and <strong>per</strong>form the<br />
Bluetooth connection.<br />
When pairing is completed and connection with<br />
the Bluetooth device is established correctly, “BT<br />
AUDIO” appears and the function indicator flashes<br />
slowly in blue.<br />
Depending on the type of Bluetooth device,<br />
connection may start automatically after paring is<br />
completed.<br />
Notes<br />
“Passkey” may be called “Passcode,” “PIN code,” “PIN number” or<br />
“Password,” etc., depending on the device.<br />
The pairing standby status of the system is cancelled after about 5<br />
minutes. If pairing is not successful, redo the procedure from step 1.<br />
While connected to a Bluetooth device, this system cannot be<br />
detected and connection cannot be established from another<br />
Bluetooth device.<br />
If you want to pair with several Bluetooth devices, <strong>per</strong>form the<br />
procedure from step1 to 6 individually for each Bluetooth device.
To erase all the pairing registration<br />
information<br />
1 Select the BLUETOOTH function.<br />
Press BLUETOOTH FUNCTION on the remote<br />
or press FUNCTION on the unit repeatedly.<br />
The function indicator flashes slowly in blue and “BT<br />
AUDIO” appears in the display.<br />
When the system is connecting with a Bluetooth<br />
device, the Bluetooth device name that is set with the<br />
Bluetooth device appears.<br />
Press<br />
(Bluetooth) to cancel the connected<br />
Bluetooth device. “BT AUDIO” appears.<br />
2 Press and hold SHIFT and CLEAR .<br />
“DELETE” flashes.<br />
3 Press .<br />
“COMPLETE” appears and all the pairing<br />
information is erased.<br />
Notes<br />
If you erase the pairing information, you cannot make a Bluetooth<br />
connection unless pairing is <strong>per</strong>formed. In order to connect with<br />
a Bluetooth device after <strong>per</strong>forming this o<strong>per</strong>ation, you must enter<br />
the passkey again.<br />
If you erase the pairing information, the Bluetooth Standby mode<br />
setting is set to off.<br />
Playing music from a Bluetooth device<br />
You can o<strong>per</strong>ate a Bluetooth device by connecting the<br />
system and a Bluetooth device using AVRCP.<br />
Check the following before playing music:<br />
The Bluetooth function of the Bluetooth device is enabled.<br />
Pairing has been completed.<br />
1 Select the BLUETOOTH function.<br />
Press BLUETOOTH FUNCTION on the remote<br />
or press FUNCTION on the unit repeatedly.<br />
The function indicator flashes slowly in blue and “BT<br />
AUDIO” appears in the display.<br />
2 Establish connection with the Bluetooth device.<br />
For details on o<strong>per</strong>ations of the Bluetooth device,<br />
refer to the o<strong>per</strong>ation manual supplied with your<br />
Bluetooth device.<br />
Once the connection is established, “LINKED”<br />
appears then the Bluetooth device name that is set<br />
with the Bluetooth device appears.<br />
If already connected with a Bluetooth device that has<br />
been connected with this system in the past, you may<br />
be connected automatically without o<strong>per</strong>ating the<br />
Bluetooth device.<br />
3 Start playback.<br />
Press (or on the unit).<br />
Depending on the Bluetooth device, you may have to<br />
press twice.<br />
Depending on the Bluetooth device, you may have<br />
to start up the AV software of the Bluetooth device<br />
beforehand.<br />
4 Adjust the volume.<br />
Press VOLUME +/ .<br />
Other o<strong>per</strong>ations<br />
To<br />
Press<br />
Pause playback<br />
1) (or 1) on the<br />
unit).<br />
Stop playback .<br />
Select a folder +/ .<br />
Select a file / .<br />
Find a point in a file<br />
Hold down / (or<br />
/ on the unit).<br />
1) Depending on the Bluetooth device, you may have to press <br />
( on the unit) twice.<br />
Note<br />
These o<strong>per</strong>ations may not be available for certain Bluetooth devices.<br />
In addition, the actual o<strong>per</strong>ations may differ depending on the<br />
connected Bluetooth device.<br />
To check the address of a connected Bluetooth<br />
device<br />
Press DISPLAY while the Bluetooth device name that<br />
is set with the Bluetooth device is displayed.<br />
The Bluetooth device address appears in two<br />
installments on the system display for 8 seconds.<br />
To cancel the connection with a Bluetooth<br />
device<br />
Press<br />
(Bluetooth) on the unit until “UNLINKED”<br />
appears.<br />
Depending on the Bluetooth device, the connection with<br />
the Bluetooth device may be cancelled automatically if<br />
you stop playback.<br />
Setting/Canceling Bluetooth Standby<br />
mode<br />
Bluetooth Standby mode can be entered when<br />
the system goes into Wait mode for the Bluetooth<br />
connection, even when the system is turned off.<br />
You cannot set Bluetooth Standby mode if pairing has<br />
been not completed or the pairing information is erased.<br />
1 Select the BLUETOOTH function.<br />
Press BLUETOOTH FUNCTION on the remote<br />
or press FUNCTION on the unit repeatedly.<br />
The function indicator flashes in blue.<br />
If already connected with Bluetooth device that<br />
has been connected with this system in the past by<br />
automatic connection, press<br />
(Bluetooth) to<br />
cancel the connected Bluetooth device. “BT AUDIO”<br />
appears.<br />
2 Press TOOL MENU .<br />
“BT STBY” appears.<br />
If the system has no pairing information, “NOT<br />
USED” flashes.<br />
3 Press .<br />
“ON” or “OFF” appears.<br />
<br />
<br />
4 Select “ON” or “OFF.”<br />
Press / repeatedly.<br />
5 Turn off the system.<br />
Press / .<br />
When it is set to on, you can listen to music from<br />
the system that if it is turned on by o<strong>per</strong>ating the<br />
Bluetooth connection on the Bluetooth device.<br />
Note<br />
If you erase the pairing information, Bluetooth Standby mode will<br />
set to off.<br />
Using optional audio components<br />
1 Prepare the sound source.<br />
Connect additional audio component to the AUDIO<br />
IN jack on the unit using an audio analog cord<br />
(not supplied).<br />
2 Turn down the volume.<br />
Press VOLUME .<br />
3 Select the AUDIO IN function.<br />
Press AUDIO IN FUNCTION on the remote or<br />
press FUNCTION on the unit repeatedly.<br />
The function indicator lights in amber.<br />
4 Start playback.<br />
Start playback of the connected component and<br />
adjust the volume.<br />
Note<br />
The system may enter Standby mode automatically if the volume<br />
level of the connected component is too low. Adjust the component’s<br />
volume accordingly. See “To turn off the Automatic Standby<br />
function.”<br />
Adjusting the sound<br />
To<br />
Press<br />
Adjust the volume VOLUME +/ .<br />
Generate a more<br />
dynamic sound<br />
BASS BOOST .<br />
Set the sound<br />
effect<br />
SOUND EFFECT repeatedly<br />
until desired sound effect is<br />
displayed.<br />
Changing the display<br />
To<br />
Press<br />
Change<br />
information on<br />
the display 1)<br />
DISPLAY repeatedly when the<br />
system is on.<br />
Change Display<br />
mode (see below.)<br />
DISPLAY repeatedly when the<br />
system is off. 2)<br />
1) For example, you can view CD/MP3 disc information, such as:<br />
CD-DA disc<br />
remaining playing time of a track during playback<br />
total remaining playing time<br />
MP3 disc<br />
track or file name (“ ”)<br />
artist name (“ ”)<br />
album name (“ ”)<br />
You can also view DAB/DAB+ station information such as the<br />
service name, channel label, preset number, frequency, DLS<br />
(Dynamic Label Segment), or ensemble label.<br />
2) The STANDBY indicator on the unit lights up when the system is<br />
off.<br />
The system offers the following display modes.<br />
Display mode When the system is off 1)<br />
Power Saving<br />
mode 2)<br />
The display is turned off to<br />
conserve power. The timer and<br />
clock continue to o<strong>per</strong>ate.<br />
Clock 3)<br />
The clock is displayed.<br />
1) The STANDBY indicator on the unit lights up when the system is<br />
off.<br />
2) You cannot set the clock in Power Saving mode.<br />
3) The clock display automatically turns to Power Saving mode after 8<br />
seconds.<br />
Notes on the display information<br />
Characters that cannot be displayed appear as “_.”<br />
The following are not displayed:<br />
total playing time for an MP3 disc.<br />
total remaining playing time for an MP3 disc.<br />
remaining playing time for an MP3 file.<br />
The following are not displayed correctly:<br />
elapsed playing time of an MP3 file encoded using VBR (variable<br />
bit rate).<br />
folder and file names that do not follow either the ISO9660<br />
Level 1, Level 2 or Joliet in the expansion format.<br />
The following are displayed:<br />
total playing time for a CD-DA disc (except when PGM mode is<br />
selected and the player is stopped).<br />
remaining playing time for a track of CD-DA disc.<br />
remaining playing time for a CD-DA disc (only when Normal<br />
Play mode is selected during playback).<br />
ID3 tag information for MP3 files when ID3 version 1 and<br />
version 2 tags are used (ID3 version 2 tag information display has<br />
priority when both ID3 version 1 and version 2 tags are used for a<br />
single MP3 file).<br />
up to 64 characters for an ID3 tag, where characters allowed are<br />
up<strong>per</strong>case letters (A to Z), numbers (0 to 9), and symbols (˝ $ % ’<br />
( ) * + , – . / < = > @ [ \ ] _ ` { | } ! ? ^ ~).<br />
Notes on the DAB/DAB+ display information<br />
The following is also displayed;<br />
up to 8 characters of service name, up to 128 characters of DLS<br />
(Dynamic Label Segment) and up to 16 characters of ensemble<br />
label.<br />
a value between 0 and 100 indicating the signal quality is<br />
displayed.<br />
Using the timers<br />
The system offers 2 timer functions. If you use both<br />
timers, the Sleep Timer has priority.<br />
<br />
<br />
<br />
<br />
Sleep Timer:<br />
You can fall asleep to music. This function works even if<br />
the clock is not set.<br />
Press and hold SHIFT and press SLEEP <br />
repeatedly.<br />
With each press of SLEEP with SHIFT held<br />
pressed, the setting time is decreased by 10 minutes,<br />
from a maximum of 90 minutes to minimum of 10<br />
minutes. To cancel the Sleep Timer, select “OFF.”<br />
Play Timer:<br />
You can wake up to CD, FM reception, DAB/DAB+<br />
reception, or iPod/iPhone/iPad at a preset time. Make<br />
sure you have set the clock.<br />
1 Prepare the sound source.<br />
Prepare the sound source, and then press VOLUME<br />
+/ to adjust the volume.<br />
To start from a specific CD track, audio file, and<br />
radio station create your own program.<br />
2 Select the timer set mode.<br />
Press and hold SHIFT and TIMER MENU .<br />
3 Set the play timer.<br />
Press / repeatedly to select “PLAY SET,” then<br />
press .<br />
4 Set the time to start playback.<br />
Press / repeatedly to set the hour, then press<br />
. Use the procedure above to set the minutes.<br />
5 Use the same procedure as in step 4 to set the time<br />
to stop playback.<br />
6 Select the sound source.<br />
Press / repeatedly until the desired sound<br />
source appears, then press .<br />
7 Turn off the system.<br />
Press . The system automatically turns on<br />
before the preset time.<br />
If the system is on at the preset time, the Play Timer<br />
will not play. Do not o<strong>per</strong>ate the system from the<br />
time the system turns on until the playback starts.<br />
If the sound source is set to an FM station for a timer,<br />
the system automatically turns on 15 seconds before<br />
the preset time. If the sound source is set to CD, the<br />
system automatically turns on 90 seconds before the<br />
preset time. If the sound source is set to iPod/iPhone/<br />
iPad, the system automatically turns on 30 seconds<br />
before the preset time.<br />
To check the setting<br />
1 Press and hold SHIFT and TIMER MENU .<br />
2 Press / repeatedly to select “SELECT,” and<br />
then press .<br />
3 Press / repeatedly to select “PLAY SEL,” and<br />
then press .<br />
To cancel the timer<br />
Repeat the same procedure as above until “OFF” appears<br />
in step 3, and then press .<br />
To change the setting<br />
Start over from step 1.<br />
Notes<br />
When the sound source for a Play Timer is set to an FM station<br />
tuned from a preset radio station, the radio station tuning for the<br />
Play Timer is fixed at what you set for it. Even if you change the<br />
radio station after setting the Play Timer, the radio station setting<br />
for the Play Timer will not change.<br />
When the sound source for a Play Timer is set to an FM station that<br />
you set using auto tuning or manual tuning, if you change the radio<br />
station after setting the Play Timer, the radio station setting for the<br />
Play Timer also will be changed.<br />
Notes for the iPod/iPhone/iPad user<br />
Make sure the iPod/iPhone/iPad is not playing when using the Play<br />
Timer.<br />
The Play Timer may not be activated depending on the status of the<br />
connected iPod/iPhone/iPad.<br />
Tip<br />
The Play Timer setting remains as long as the setting is not cancelled<br />
manually.<br />
Troubleshooting<br />
1 Make sure the power cord is firmly connected.<br />
2 Find your problem in the checklist below, and take<br />
the indicated corrective action.<br />
If the issue <strong>per</strong>sists, contact your nearest <strong>Sony</strong> dealer.<br />
If the STANDBY indicator flashes<br />
Immediately unplug the power cord, and check the<br />
following items.<br />
Is anything blocking the ventilation holes of the<br />
system?<br />
Is the iPod/iPhone/iPad connector shortcircuited?<br />
After the STANDBY indicator stops flashing,<br />
reconnect the power cord, and turn on the system. If<br />
the issue <strong>per</strong>sists, contact your nearest <strong>Sony</strong> dealer.<br />
<br />
<br />
General<br />
The system does not turn on.<br />
Is the power cord plugged in correctly?<br />
The system has entered Standby mode<br />
unexpectedly.<br />
This is not a malfunction. The system enters Standby<br />
mode automatically in about 30 minutes when there is<br />
no o<strong>per</strong>ation or audio signal output. See “To turn off<br />
the Automatic Standby function.”<br />
The clock setting or the Play Timer o<strong>per</strong>ation<br />
has been cancelled unexpectedly.<br />
If about a minute elapses with no o<strong>per</strong>ation, the clock<br />
setting or Play Timer setting is cancelled automatically.<br />
Perform the o<strong>per</strong>ation again from the beginning.<br />
<br />
<br />
<br />
<br />
<br />
<br />
<br />
when an iPod/iPhone/iPad is connected.<br />
when a button on the remote or unit is pressed.<br />
To turn off the beep sound<br />
The system is set at the factory for the key-touch<br />
confirmation beep to sound when you press a touch<br />
panel key on the unit. You can turn off the beep sound.<br />
1 Press the / to turn on the system.<br />
2 Press and hold and VOLUME – on the unit<br />
for 3 seconds or longer.<br />
If you want to set the beep sound to on, use the same<br />
procedure as in step 1, 2.<br />
Note<br />
Even if the beep sound is set to on, the system does not<br />
beep to confirm key-touch while the Dock indicator<br />
is flashing, although o<strong>per</strong>ation of the touch panel is<br />
enabled even while the Dock indicator is flashing.<br />
Messages<br />
CAN’T PLAY : You have inserted a disc that cannot be<br />
played back on this system.<br />
COMPLETE : The preset o<strong>per</strong>ation ended normally.<br />
ERROR : Unpredictable situations or an unknown device<br />
is connected.<br />
FULL : You tried to program more than 25 tracks or files<br />
(steps).<br />
LOCKED : The disc slot does not work. Contact your<br />
nearest <strong>Sony</strong> dealer.<br />
NO DISC : There is no disc in the player, or you have<br />
loaded a disc that cannot be played.<br />
NO PRESET (DAB/DAB+ only) : There is no stored<br />
preset station.<br />
NO SERV (DAB/DAB+ only) : There is no supported<br />
DAB/DAB+ broadcast in your country or region.<br />
NO STEP : All of the programmed tracks have been<br />
erased.<br />
NO SUPPORT : An unsupported iPod/iPhone/iPad is<br />
connected or the iPod/iPhone/iPad whose battery is<br />
empty is connected.<br />
NO TEXT (DAB/DAB+ only) : There is no text<br />
information in the received service.<br />
NO TRACK : There are not playable files on the CD disc.<br />
NOT USED : You tried to <strong>per</strong>form a specific o<strong>per</strong>ation<br />
under conditions where that o<strong>per</strong>ation is prohibited.<br />
PUSH STOP : You pressed PLAY MODE during<br />
playback in the CD function.<br />
TIME NG : The Play Timer start and end times are set to<br />
the same time.<br />
Precautions<br />
Discs that this system CAN play<br />
Audio CD<br />
CD-R/CD-RW (audio data/MP3 files)<br />
Discs that this system CANNOT play<br />
CD-ROM<br />
CD-R/CD-RW other than those recorded in music CD<br />
format or MP3 format conforming to ISO9660 Level<br />
1/Level 2, Joliet<br />
CD-R/CD-RW of poor recording quality,<br />
CD-R/CD‐RW that have scratches or are dirty,<br />
or CD‐R/CD-RW recorded with an incompatible<br />
recording device<br />
CD-R/CD-RW which is finalized incorrectly<br />
Discs containing files other than MPEG 1 Audio<br />
Layer-3 (MP3) files<br />
Discs of non-standard shape (for example, heart,<br />
square, star)<br />
Discs that have adhesive tape, pa<strong>per</strong>, or sticker<br />
attached to them<br />
Rental or used discs with attached seals where the glue<br />
extends beyond the seal<br />
Discs that have labels printed using ink that feels tacky<br />
when touched<br />
Notes on discs<br />
Before playing, wipe the disc with a cleaning cloth<br />
from the center out to the edge.<br />
Do not clean discs with solvents, such as benzine,<br />
thinner, or commercially available cleaners or antistatic<br />
spray intended for vinyl LPs.<br />
Do not expose discs to direct sunlight or heat sources<br />
such as hot air ducts, nor leave it in a car parked in<br />
direct sunlight.<br />
On safety<br />
Completely disconnect the power cord (mains lead)<br />
from the wall outlet (mains) if it is not going to be used<br />
for an extended <strong>per</strong>iod of time. When unplugging the<br />
system, always grip the plug. Never pull the cord itself.<br />
Should any solid object or liquid get into the system,<br />
unplug the system, and have it checked by qualified<br />
<strong>per</strong>sonnel before o<strong>per</strong>ating it again.<br />
The AC power cord can be changed only by a qualified<br />
service facility.<br />
On placement<br />
Do not place the system in an inclined position or in<br />
locations that are extremely hot, cold, dusty, dirty, or<br />
humid or lacking adequate ventilation, or subject to<br />
vibration, direct sunlight or a bright light.<br />
Be careful when placing the system on surfaces that<br />
have been specially treated (for example, with wax, oil,<br />
polish) as staining or discoloration of the surface may<br />
result.<br />
If the system is brought directly from a cold to a warm<br />
location or is placed in a very damp room, moisture<br />
may condense on the lens inside the CD player, and<br />
cause the system to malfunction. In this situation,<br />
remove the disc, and leave the system turned on for<br />
about an hour until the moisture evaporates.<br />
<br />
<br />
<br />
<br />
<br />
<br />
<br />
<br />
<br />
<br />
<br />
<br />
<br />
<br />
<br />
<br />
<br />
<br />
<br />
<br />
There is no sound.<br />
Press VOLUME + to turn up the volume.<br />
Make sure the headphone is not connected to the <br />
(phones) jack .<br />
Make sure additional audio components are connected<br />
correctly.<br />
Make sure the function is set to AUDIO IN.<br />
Is anything blocking the ventilation holes of the<br />
system?<br />
The specified station may have temporarily stopped<br />
broadcast.<br />
Severe hum or noise.<br />
Move the system away from sources of noise.<br />
Connect the system to a different wall outlet.<br />
Install a noise filter (not supplied) to the power cord.<br />
The remote does not function.<br />
Remove any obstacles between the remote and the<br />
remote sensor on the unit, and position the unit<br />
away from fluorescent lights.<br />
Point the remote at the system’s sensor .<br />
Move the remote closer to the system.<br />
The STANDBY indicator remains lit after<br />
unplugging the power cord.<br />
The STANDBY indicator may not turn off<br />
immediately after unplugging the power cord. The<br />
indicator will turn off after about 40 seconds. This is<br />
not a malfunction.<br />
CD/MP3 disc<br />
The system does not eject the disc and<br />
“LOCKED” appears.<br />
Consult your nearest <strong>Sony</strong> dealer or local authorized<br />
<strong>Sony</strong> service facility.<br />
The disc cannot be inserted.<br />
Check that the system is turned on.<br />
Do not insert a disc into the disc slot until “NO DISC”<br />
appears in the display.<br />
a disc that has not been finalized (a disc to which data<br />
can be added).<br />
The sound skips, or the disc will not play.<br />
Wipe the disc clean, and replace it.<br />
Move the system to a location away from vibration (for<br />
example, on top of a stable stand).<br />
Play does not start from the first track.<br />
Return to normal play by pressing PLAY MODE <br />
repeatedly until both “PGM” and “SHUF” disappear.<br />
Starting playback takes more time than usual.<br />
The following discs can increase the time it takes to<br />
start playback:<br />
a disc recorded with a complicated tree structure.<br />
a disc that has many folders.<br />
Erroneous display.<br />
The data stored in the CD-DA, MP3 disc may have<br />
been corrupted, <strong>per</strong>form the transferring again.<br />
The character code that can be displayed by this<br />
system are as follows:<br />
Up<strong>per</strong> cases (A to Z).<br />
Numbers (0 to 9).<br />
Symbols (< > * +, [ ] \ _).<br />
Other characters appear as “_.”<br />
iPod/iPhone/iPad<br />
There is no sound.<br />
Make sure the iPod/iPhone/iPad is connected securely.<br />
Make sure the iPod/iPhone/iPad is playing music.<br />
Make sure the iPod/iPhone/iPad is updated with the<br />
latest software. If not, update the iPod/iPhone/iPad<br />
before using with the system.<br />
Adjust the volume.<br />
The sound is distorted.<br />
Make sure the iPod/iPhone/iPad is connected securely.<br />
Turn down the volume.<br />
Set the “EQ” setting of the iPod/iPhone/iPad to “Off ”<br />
or “Flat.”<br />
The iPod/iPhone/iPad does not function.<br />
Shut down any other iOS applications running on the<br />
iPod/iPhone/iPad. For details, refer to the o<strong>per</strong>ation<br />
manual supplied with the iPod/iPhone/iPad.<br />
Make sure the iPod/iPhone/iPad is connected securely.<br />
Make sure the iPod/iPhone/iPad is updated with the<br />
latest software. If not, update the iPod/iPhone/iPad<br />
before using with the system.<br />
Because the o<strong>per</strong>ation of the system and the iPod/<br />
iPhone/iPad are different, you may not o<strong>per</strong>ate the<br />
iPod/iPhone/iPad using buttons on the remote or unit.<br />
In this case, use the control buttons on the iPod/<br />
iPhone/iPad.<br />
The iPod/iPhone/iPad cannot be charged.<br />
Make sure the iPod/iPhone/iPad is connected securely.<br />
If you press DISPLAY while charging when the<br />
system is off, the system stops charging an iPod/<br />
iPhone/iPad. To restart charging of an iPod/iPhone/<br />
iPad, reconnect the iPod/iPhone/iPad when the display<br />
mode is Power Saving mode.<br />
The ring volume of the iPhone does not<br />
change.<br />
Adjust the ring volume on the iPhone.<br />
Bluetooth device<br />
Pairing cannot be done.<br />
Move the Bluetooth device closer to the system.<br />
Pairing may not be possible if other Bluetooth devices<br />
are present around the system. In this case, turn off the<br />
other Bluetooth devices.<br />
<br />
<br />
<br />
<br />
<br />
<br />
<br />
<br />
<br />
<br />
<br />
<br />
<br />
<br />
<br />
<br />
<br />
<br />
<br />
<br />
<br />
<br />
<br />
<br />
<br />
<br />
<br />
<br />
<br />
<br />
<br />
<br />
<br />
<br />
<br />
<br />
<br />
<br />
<br />
Enter the same passkey that was entered at the<br />
Bluetooth device correctly.<br />
Connection is not possible.<br />
The Bluetooth device you attempted to connect<br />
does not support the A2DP profile, and cannot be<br />
connected with the system.<br />
Enable the Bluetooth function of the Bluetooth device.<br />
Establish a connection from the Bluetooth device.<br />
The pairing registration information has been erased.<br />
Perform the pairing o<strong>per</strong>ation again.<br />
While connected to a Bluetooth device, this system<br />
cannot be detected and a connection cannot be<br />
established from another Bluetooth device.<br />
Erase the pairing registration information of a<br />
Bluetooth device and <strong>per</strong>form the pairing o<strong>per</strong>ation<br />
again.<br />
The sound skips or fluctuates, or the<br />
connection is lost.<br />
The system and the Bluetooth device are too far apart.<br />
If there are obstacles between the system and your<br />
Bluetooth device, remove or avoid the obstacles.<br />
If there is equipment that generates electromagnetic<br />
radiation, such as a wireless LAN, other Bluetooth<br />
device, or a microwave oven nearby, move them away.<br />
The sound of your Bluetooth device cannot be<br />
heard on this system.<br />
Turn up the volume on your Bluetooth device first,<br />
and then adjust the volume using VOLUME +/ .<br />
Severe hum or noise<br />
If there are obstacles between the system and your<br />
Bluetooth device, remove or avoid the obstacles.<br />
If there is equipment that generates electromagnetic<br />
radiation, such as a wireless LAN, other Bluetooth<br />
device, or a microwave oven nearby, move them away.<br />
Turn down the volume of the connected Bluetooth<br />
device.<br />
Tuner<br />
Severe hum or noise, or stations cannot be<br />
received. (“TUNED” or “STEREO” flashes on the<br />
display.)<br />
Connect the antenna pro<strong>per</strong>ly.<br />
Find a location and an orientation that provide good<br />
reception, and then set up the antenna again.<br />
Keep the antennas away from the power cord to avoid<br />
picking up noise.<br />
Turn off nearby electrical equipment.<br />
Several radio stations can be heard at the<br />
same time.<br />
Find a location and an orientation that provide good<br />
reception, and then set up the antenna again.<br />
Bundle the antenna cables using commercially<br />
available cord clips, for example, and adjust the cable<br />
lengths.<br />
DAB/DAB+ radio station is not received<br />
pro<strong>per</strong>ly.<br />
Check all antenna connections, then <strong>per</strong>form the DAB<br />
Automatic Scan procedure (see “Reception of DAB/<br />
DAB+ radio station”).<br />
The current DAB/DAB+ service may not be available.<br />
Press +/ to select a different service.<br />
If you have moved to another area, some services/<br />
frequencies may have changed and you may not be<br />
able to tune into your usual broadcast. Perform the<br />
DAB Automatic Scan procedure to re-register the<br />
contents of broadcasts. (Performing this procedure<br />
clears all previously stored presets.)<br />
The DAB/DAB+ broadcast of has been<br />
interrupted.<br />
Check the location of the system or adjust the<br />
orientation of the antenna to increase the indicated<br />
value of the signal quality. Refer to “Changing the<br />
display” for further details on the signal quality.<br />
To reset the system to factory settings<br />
If the system still does not o<strong>per</strong>ate pro<strong>per</strong>ly, reset the<br />
system to factory settings.<br />
Use buttons on the unit to reset the system to its factory<br />
default settings.<br />
1 Disconnect and reconnect the power cord, and<br />
then turn on the system.<br />
2 Press and hold and / on the unit until<br />
“RESET” appears in the display.<br />
All user-configured settings, such as preset radio<br />
stations, timer, and the clock, are deleted.<br />
To turn off the Automatic Standby<br />
function<br />
This system is equipped with an Automatic Standby<br />
function. With this function, the system enters Standby<br />
mode automatically in about 30 minutes when there is<br />
no o<strong>per</strong>ation or audio signal output.<br />
By default, the Automatic Standby function is turned on.<br />
Use buttons on the unit to turn off the Automatic<br />
Standby function.<br />
Hold down while the system is on, until<br />
“AUTO. STBY OFF” appears.<br />
To turn on the function, repeat the procedure until<br />
“AUTO. STBY ON” appears.<br />
Notes<br />
“AUTO. STBY” appears in the display for 2 minutes before the<br />
system enters Standby mode.<br />
The Automatic Standby function is invalid for the tuner function<br />
(DAB/FM), even when you have enabled it.<br />
The system may not enter Standby mode automatically in the<br />
following cases:<br />
while an audio signal is being detected.<br />
during playback of audio tracks or files.<br />
while the preset Sleep Timer or Play Timer is in process.<br />
The system counts down the time again until it enters Standby<br />
mode, even when Automatic Standby function is enabled in the<br />
following cases:<br />
<br />
<br />
<br />
<br />
<br />
<br />
<br />
<br />
<br />
<br />
<br />
<br />
<br />
<br />
<br />
<br />
<br />
<br />
<br />
<br />
<br />
<br />
<br />
<br />
<br />
<br />
<br />
<br />
On heat buildup<br />
Heat buildup on the unit during o<strong>per</strong>ation is normal<br />
and is not cause for alarm.<br />
Do not touch the cabinet if it has been used<br />
continuously at a high volume because the cabinet may<br />
have become hot.<br />
Do not obstruct the ventilation holes.<br />
On the speaker system<br />
This speaker system is not magnetically shielded, and<br />
the picture on nearby TV sets may become magnetically<br />
distorted. In this situation, turn off the TV, wait 15 to<br />
30 minutes, and turn it back on.<br />
Cleaning the cabinet<br />
Clean this system with a soft cloth slightly moistened<br />
with a mild detergent solution. Do not use any type of<br />
abrasive pads, scouring powder, or solvents, such as<br />
thinner, benzine, or alcohol.<br />
Bluetooth wireless technology<br />
Bluetooth wireless technology is a short-range wireless<br />
technology linking digital devices, such as <strong>per</strong>sonal<br />
computers and digital still cameras. Using the Bluetooth<br />
wireless technology, you can o<strong>per</strong>ate the units involved<br />
within a range of about 10 meters.<br />
The Bluetooth wireless technology is commonly<br />
used between two devices, but a single device can be<br />
connected to multiple devices.<br />
You do not need wires to get connected as you do with<br />
a USB connection, and you do not need to place the<br />
devices face to face as you do with wireless infrared<br />
technology. You can use the technology with one<br />
Bluetooth device in your bag or pocket.<br />
Bluetooth wireless technology is a global standard<br />
supported by thousands of companies. These companies<br />
produce products that meet the global standard.<br />
Supported Bluetooth version and profiles<br />
Profile refers to a standard set of capabilities for various<br />
Bluetooth product capabilities. This system supports the<br />
following Bluetooth version and profiles.<br />
Supported Bluetooth version:<br />
Bluetooth Standard version 2.0<br />
Supported Bluetooth profiles:<br />
A2DP (Advanced Audio Distribution Profile)<br />
AVRCP (Audio Video Remote Control Profile)<br />
Effective communication range<br />
Bluetooth devices should be used within approximately<br />
10 meters (unobstructed distance) of each other. The<br />
effective communication range may become shorter<br />
under the following conditions.<br />
When a <strong>per</strong>son, metal object, wall or other<br />
obstruction is between the devices with a Bluetooth<br />
connection<br />
Locations where a wireless LAN is installed<br />
Around microwave ovens that are in use<br />
Locations where other electromagnetic waves occur<br />
Effects of other devices<br />
Bluetooth devices and wireless LAN (IEEE 802.11b/g)<br />
use the same frequency band (2.4 GHz). When using<br />
your Bluetooth device near a device with wireless LAN<br />
capability, electromagnetic interference may occur.<br />
This could result in lower data transfer rates, noise, or<br />
inability to connect. If this happens, try the following<br />
remedies:<br />
Try connecting this system and Bluetooth mobile<br />
phone or Bluetooth device when you are at least 10<br />
meters away from the wireless LAN equipment.<br />
Turn off the power to the wireless LAN equipment<br />
when using your Bluetooth device within 10 meters<br />
Effects on other devices<br />
The radio waves broadcast by this system may interfere<br />
with the o<strong>per</strong>ation of some medical devices. Since this<br />
interference may result in malfunction, always turn off<br />
the power on this system, Bluetooth mobile phone and<br />
Bluetooth device in the following locations:<br />
In hospitals, on trains, in airplanes, at gas stations,<br />
and any place where flammable gasses may be<br />
present<br />
Near automatic doors or fire alarms<br />
Notes<br />
This system supports security functions that comply with the<br />
Bluetooth specification as a means of ensuring security during<br />
communication using Bluetooth technology. However, this security<br />
may be insufficient depending on the setting contents and other<br />
factors, so always be careful when <strong>per</strong>forming communication<br />
using Bluetooth technology.<br />
<strong>Sony</strong> cannot be held liable in any way for damages or other loss<br />
resulting from information leaks during communication using<br />
Bluetooth technology.<br />
Bluetooth communication is not necessarily guaranteed with all<br />
Bluetooth devices that have the same profile as this system.<br />
Bluetooth devices connected with this system must comply with<br />
the Bluetooth specification prescribed by the Bluetooth SIG, Inc.,<br />
and must be certified to comply. However, even when a device<br />
complies with the Bluetooth specification, there may be cases where<br />
the characteristics or specifications of the Bluetooth device make it<br />
impossible to connect, or may result in different control methods,<br />
display or o<strong>per</strong>ation.<br />
Noise may occur or the audio may cut off depending on the<br />
Bluetooth device connected with this system, the communications<br />
environment, or surrounding conditions.<br />
<br />
<br />
<br />
<br />
<br />
<br />
<br />
<br />
Specifications<br />
Amplifier section<br />
Power output (rated): 16 watts + 16 watts (8 ohms at 1 kHz, 1% THD)<br />
Continuous RMS power output (reference): 20 watts + 20 watts (8 ohms at<br />
1 kHz, 10% THD)<br />
Input<br />
AUDIO IN (stereo mini jack): Sensitivity 700 mV, impedance 47 kilohms<br />
Outputs<br />
PHONES (stereo mini jack): Accepts headphones of 8 ohms or more<br />
CD player section<br />
System: Compact disc and digital audio system<br />
Laser Diode Pro<strong>per</strong>ties<br />
Emission Duration: Continuous<br />
Laser Output*: Less than 44.6 µW<br />
* This output is the value measurement at a distance of 200 mm from the<br />
objective lens surface on the Optical Pick-up Block with 7 mm a<strong>per</strong>ture.<br />
Frequency response: 20 Hz 20 kHz<br />
Signal-to-noise ratio: More than 90 dB<br />
Dynamic range: More than 90 dB<br />
Tuner section<br />
FM stereo, FM su<strong>per</strong>heterodyne tuner<br />
Antenna: FM lead antenna<br />
Tuning range:<br />
87.5 MHz 108.0 MHz (50 kHz step)<br />
DAB/DAB+ tuner section:<br />
FM stereo, DAB/FM su<strong>per</strong>heterodyne tuner<br />
Frequency range*<br />
Band-III: 174.928 (5A) MHz 239.200 (13F) MHz<br />
* For details, see “DAB/DAB+ frequency table” below.<br />
Antenna: DAB/FM lead antenna<br />
The DAB/DAB+ services are available only in countries/regions that<br />
support DAB/DAB+ services.<br />
DAB/DAB+ frequency table (Band-III)<br />
Frequency Label Frequency Label<br />
174.928 MHz 5A 209.936 MHz 10A<br />
176.640 MHz 5B 211.648 MHz 10B<br />
178.352 MHz 5C 213.360 MHz 10C<br />
180.064 MHz 5D 215.072 MHz 10D<br />
181.936 MHz 6A 216.928 MHz 11A<br />
183.648 MHz 6B 218.640 MHz 11B<br />
185.360 MHz 6C 220.352 MHz 11C<br />
187.072 MHz 6D 222.064 MHz 11D<br />
188.928 MHz 7A 223.936 MHz 12A<br />
190.640 MHz 7B 225.648 MHz 12B<br />
192.352 MHz 7C 227.360 MHz 12C<br />
194.064 MHz 7D 229.072 MHz 12D<br />
195.936 MHz 8A 230.784 MHz 13A<br />
197.648 MHz 8B 232.496 MHz 13B<br />
199.360 MHz 8C 234.208 MHz 13C<br />
201.072 MHz 8D 235.776 MHz 13D<br />
202.928 MHz 9A 237.488 MHz 13E<br />
204.640 MHz 9B 239.200 MHz 13F<br />
206.352 MHz 9C<br />
208.064 MHz 9D<br />
* Frequencies are displayed to two decimal places on this system.<br />
iPod/iPhone/iPad section<br />
Compatible iPod/iPhone/iPad models:<br />
iPod touch 4th generation<br />
iPod touch 3rd generation<br />
iPod touch 2nd generation<br />
iPod nano 6th generation<br />
iPod nano 5th generation (video camera)<br />
iPod nano 4th generation (video)<br />
iPod nano 3rd generation (video)<br />
iPod classic 160 GB (2009)<br />
iPhone 4S<br />
iPhone 4<br />
iPhone 3GS<br />
iPhone 3G<br />
iPad2<br />
iPad<br />
“Made for iPod,” “Made for iPhone,” and “Made for iPad” mean that an<br />
electronic accessory has been designed to connect specifically to iPod, iPhone,<br />
or iPad, respectively, and has been certified by the develo<strong>per</strong> to meet Apple<br />
<strong>per</strong>formance standards. Apple is not responsible for the o<strong>per</strong>ation of this<br />
device or its compliance with safety and regulatory standards. Please note<br />
that the use of this accessory with iPod, iPhone, or iPad may affect wireless<br />
<strong>per</strong>formance.<br />
Bluetooth section<br />
Communication system:<br />
Bluetooth Standard version 2.1+EDR (Enhanced Data Rate)<br />
Output:<br />
Bluetooth Standard Power Class 2<br />
Maximum communication range:<br />
Line of sight approx. 10 m *1<br />
Frequency band:<br />
2.4 GHz band (2.4000 GHz - 2.4835 GHz)<br />
Modulation method:<br />
FHSS<br />
Compatible Bluetooth profiles *2 :<br />
A2DP (Advanced Audio Distribution Profile)<br />
AVRCP 1.3 (Audio Video Remote Control Profile)<br />
Supported codecs:<br />
Receive: SBC (Sub Band Codec)<br />
Transmit: SBC (Sub Band Codec)<br />
1) The actual range will vary depending on factors such as obstacles between<br />
devices, magnetic fields around a microwave oven, static electricity,<br />
reception sensitivity, antenna’s <strong>per</strong>formance, o<strong>per</strong>ating system, software<br />
application, etc.<br />
2) Bluetooth standard profiles indicate the purpose of Bluetooth<br />
communication between devices.<br />
Speaker section<br />
Full-range speaker: 65 mm, cone type<br />
Passive radiator: 67 mm × 108 mm<br />
Rated impedance: 8 ohms<br />
General<br />
Power requirements:<br />
AC adapter<br />
Input: 100 V 240 V AC, 50/60 Hz<br />
Output: DC 19.5 V 3.9A<br />
Power consumption: 32 watts<br />
Dimensions (W/H/D):<br />
Approx. 449 mm × 212 mm × 137 (95) mm (incl. protruding parts)<br />
Mass: Approx. 2.8 kg<br />
Quantity of the main unit: 1 piece<br />
Supplied accessories: Remote Commander (1), AC adapter (1),<br />
Power cord (1), DAB/FM lead antenna (1), Protective cushion (2),<br />
R6 (Size AA) batteries (2)<br />
Design and specifications are subject to change without notice.<br />
Standby power consumption: 0.5 W


