

Sony VCL-HG0872K - VCL-HG0872K Istruzioni per l'uso Spagnolo
Sony VCL-HG0872K - VCL-HG0872K Istruzioni per l'uso Spagnolo
Sony VCL-HG0872K - VCL-HG0872K Istruzioni per l'uso Spagnolo

Create successful ePaper yourself
Turn your PDF publications into a flip-book with our unique Google optimized e-Paper software.
A<br />
B<br />
D<br />
1<br />
E<br />
<br />
Wide Conversion Lens<br />
Objectif de conversion<br />
grand-angle<br />
<br />
<br />
<br />
<br />
<br />
<strong>VCL</strong>-<strong>HG0872K</strong><br />
©2008 <strong>Sony</strong> Corporation Printed in Japan<br />
4-122-627-02 (1)<br />
/O<strong>per</strong>ating Instructions/Mode d’emploi/<br />
Bedienungsanleitung/Manual de instrucciones/<br />
<strong>Istruzioni</strong> <strong>per</strong> l’uso/ / /<br />
1<br />
2<br />
C<br />
B<br />
2 3<br />
4<br />
F<br />
2<br />
C<br />
4<br />
A<br />
E<br />
<br />
HD<br />
HVR-Z5<br />
<br />
<br />
<br />
<br />
• <br />
• <br />
<br />
<br />
<br />
<br />
<br />
<br />
<br />
<br />
<br />
MC<br />
<br />
/<br />
A<br />
1 <br />
2 <br />
<br />
B<br />
1<br />
2<br />
<br />
• <br />
• <br />
D-3<br />
<br />
<br />
• <br />
• <br />
<br />
• <br />
<br />
• <br />
<br />
<br />
<br />
<br />
<br />
<br />
<br />
<br />
<br />
<br />
<br />
C /<br />
<br />
<br />
<br />
1 A<br />
2 <br />
<br />
3 <br />
<br />
1 <br />
2 <br />
<br />
BOPEN<br />
CLOSE<br />
D /<br />
<br />
1 C<br />
2 <br />
<br />
<br />
<br />
<br />
<br />
<br />
<br />
D-1<br />
180D-2<br />
E <br />
45.65<br />
<br />
1 1<br />
2 2<br />
3<br />
3 4<br />
4 <br />
E-4<br />
F <br />
<br />
E<br />
<br />
<br />
<br />
<br />
<br />
• <br />
<br />
• <br />
<br />
• 1<br />
<br />
<br />
<br />
<br />
<br />
<br />
<br />
<br />
<br />
<br />
<br />
0.8<br />
<br />
33<br />
ø106mm<br />
47mm<br />
550<br />
<br />
(1)<br />
1<br />
1<br />
1<br />
1<br />
1<br />
<br />
<br />
<br />
English<br />
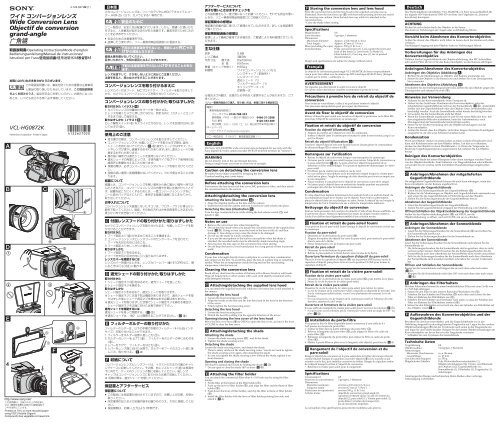
The <strong>Sony</strong> <strong>VCL</strong>-<strong>HG0872K</strong> wide conversion lens is designed for use only with the<br />
<strong>Sony</strong> digital HD video camera recorder HVR-Z5 (referred to below as “camera”).<br />
WARNING<br />
Do not directly look at the sun through this lens.<br />
Doing so might harm your eyes or cause loss of eyesight.<br />
Caution on detaching the conversion lens<br />
Be careful not to injure yourself by dropping the lens.<br />
Careless handling may cause injury.<br />
Before attaching the conversion lens<br />
First remove the lens hood with lens cover, MC protector or filter, and then attach<br />
the conversion lens to the camera.<br />
Attaching/detaching the conversion lens<br />
Attaching the lens (illustration A)<br />
1 Align the aligning marks on the lens and the camera.<br />
2 Insert the lens into the camera and turn it clockwise until it locks into place.<br />
Detaching the lens (illustration B)<br />
Turn the lens counterclockwise while sliding the lock release switch (1) and<br />
detach it (2) .<br />
Notes on use<br />
• Remove the conversion lens when transporting.<br />
• Do not hold the shade when you detach the conversion lens or the supplied lens<br />
hood (D-3). Doing so may cause the hood or the lens to fall off, and then<br />
damage it. Also doing so may cause the shade to be damaged.<br />
• Do not use the shade in windy conditions.<br />
• If you use the microphone or the built-in microphone when the shade is<br />
attached, the recorded audio may be affected by shade mounting angle.<br />
• Always place the lens caps on the conversion lens when storing.<br />
• Do not keep the lens in a very humid place for a long <strong>per</strong>iod of time to prevent<br />
mold.<br />
Condensation<br />
If your lens is brought directly from a cold place to a warm place, condensation<br />
may appear on the lens. To avoid this, place the lens in a plastic bag or something<br />
similar. When the air tem<strong>per</strong>ature inside the bag reaches the surrounding<br />
tem<strong>per</strong>ature, take the lens out.<br />
Cleaning the conversion lens<br />
Brush off any dust from the surface of the lens with a blower brush or soft brush.<br />
Wipe off fingerprints or other smears with a soft cloth slightly moistened with a<br />
mild detergent solution.<br />
C Attaching/detaching the supplied lens hood<br />
You can attach the supplied lens hood while the conversion lens is still attached to<br />
the camera.<br />
Attaching the lens hood<br />
1 Loosen the hood securing screw (A).<br />
2 Align the marks on the lens and the lens hood and fit the hood in the direction<br />
of the arrow.<br />
3 Firmly tighten the hood securing screw.<br />
Detaching the lens hood<br />
1 Loosen the hood securing screw.<br />
2 Detach the hood by pulling it in the opposite direction of the arrow.<br />
Opening/closing the lens cover of the lens hood<br />
Move the lens cover lever (B) to OPEN to open the lens cover, and move the lever<br />
to CLOSE to close the lens cover.<br />
D Attaching/detaching the shade<br />
Attaching the shade<br />
1 Loosen the shade securing screw (C) , and fit the shade.<br />
2 Tighten the shade securing screw.<br />
Detaching the shade<br />
Loosen the shade securing screw, and detach the shade.<br />
* There is safety catcher at the shade securing screw. You do not need to tighten<br />
the shade securing screw again, after detaching the shade.<br />
* In case you tighten the shade securing screw without the shade, tighten it on<br />
front direction.<br />
Opening and closing the shade<br />
The shade is opened and closed by holding the shade (D-1).<br />
* Do not open or close the shade 180º or more (D-2).<br />
E Attaching the filter holder<br />
You can attach the commercial filter what 4 × 5.65 inch size by using the filter<br />
holder.<br />
1 Fit the filter at the bottom of the filter holder (1).<br />
2 Push up the lever of filter holder (2), and align the filter and the flame of filter<br />
holder (3).<br />
3 Push down the lever of filter holder, and clip the filter to flame of filter holder<br />
(4).<br />
4 Install the filter holder with the lever of filter holder pointing lens side, and<br />
attach it (E-4).<br />
F Storing the conversion lens and lens hood<br />
Store the conversion lens and the lens hood in the supplied carrying case as<br />
illustrated. Store the front lens cap (E) with front side pointing downward and fit<br />
the carrying case cushion. Store the back lens cap while it is attached to the<br />
conversion lens.<br />
* Close the shade when storing.<br />
Specifications<br />
Magnification 0.8<br />
Lens structure<br />
3 groups, 3 elements<br />
Dimensions<br />
Maximum diameter: Approx. ø 106 mm (4 1/4 in.)<br />
Total length:<br />
Approx. 47 mm (1 7/8 in.)<br />
Mass (excluding the caps) Approx. 550 g (1 lb 3 oz.)<br />
Included items<br />
Wide conversion lens (1), Lens cap(for the front and<br />
back of the lens) (2), Lens hood (1), Shade (1),<br />
Filter holder (1), Carrying case (1), Set of printed<br />
documentation<br />
Design and specifications are subject to change without notice.<br />
Français<br />
Le objectif de conversion grand-angle <strong>VCL</strong>-<strong>HG0872K</strong> de <strong>Sony</strong> est spécialement<br />
conçu pour être utilisé avec le caméscope HD numérique HVR-Z5 <strong>Sony</strong> (désigné<br />
ci-après par le terme « caméscope »).<br />
AVERTISSEMENT<br />
Ne regardez pas directement le soleil à travers le objectif.<br />
Ceci peut causer des lésions visuelles ou entraîner la <strong>per</strong>te de la vue.<br />
Précautions à prendre lors du retrait du objectif de<br />
conversion<br />
Pour éviter de vous blesser, veillez à ne pas laisser tomber le objectif.<br />
Une mauvaise manipulation peut provoquer des blessures.<br />
Avant de fixer le objectif de conversion<br />
Retirez d’abord le pare-soleil avec bouchon d’objectif, le protecteur ou le filtre MC,<br />
puis fixez l’objectif de conversion au caméscope.<br />
Fixation et retrait du objectif de conversion<br />
Fixation du objectif (illustration A)<br />
1 Alignez les repères de l’objectif sur ceux du caméscope.<br />
2 Insérez l’objectif dans le caméscope et tournez-le dans le sens horaire, jusqu’à ce<br />
qu’il se bloque.<br />
Retrait du objectif (illustration B)<br />
Tournez l’objectif dans le sens anti-horaire tout en faisant glisser le commutateur<br />
de déverrouillage (1) et retirez-le (2).<br />
Remarques sur l’utilisation<br />
• Retirez le objectif de conversion lorsque vous transportez le caméscope.<br />
• Ne tenez pas la visière pare-soleil lorsque vous retirez l’objectif de conversion ou<br />
le pare-soleil fourni (D-3). Le pare-soleil ou l’objectif risqueraient de se<br />
détacher et d’être endommagés. Ceci pourrait également endommager la visière<br />
pare-soleil.<br />
• N’utilisez pas la visière pare-soleil en cas de vent.<br />
• Si vous utilisez le microphone ou le microphone intégré lorsque la visière paresoleil<br />
est en place, l’angle de montage de cette dernière peut avoir un impact sur<br />
le son enregistré.<br />
• Placez toujours le capuchon sur le objectif de conversion avant de le ranger.<br />
• Ne laissez pas le objectif dans un endroit très humide pendant une période<br />
prolongée afin d’éviter la formation de moisissure.<br />
Condensation<br />
Si votre objectif est déplacé directement d’un endroit froid à un endroit chaud, de<br />
la condensation risque de se former sur le objectif. Pour éviter ce phénomène,<br />
placez le objectif dans un sac plastique ou autre. Sortez le objectif du sac lorsque la<br />
température de l’air à l’intérieur du sac a atteint la température ambiante.<br />
Nettoyage du objectif de conversion<br />
Enlevez toute poussière de la surface du objectif à l’aide d’une brosse soufflante ou<br />
d’une brosse douce. Nettoyez également les traces de doigts et autres saletés à<br />
l’aide d’un chiffon doux légèrement imbibé d’une solution neutre.<br />
C Fixation et retrait du pare-soleil fourni<br />
Vous pouvez fixer le pare-soleil fourni lorsque le objectif de conversion est fixé sur<br />
le caméscope.<br />
Fixation du pare-soleil<br />
1 Desserrez la vis de fixation du pare-soleil (A).<br />
2 Alignez les repères du objectif sur ceux du pare-soleil, puis insérez le pare-soleil<br />
dans le sens de la flèche.<br />
3 Serrez fermement la vis de fixation du pare-soleil.<br />
Retrait du pare-soleil<br />
1 Desserrez la vis de fixation du pare-soleil.<br />
2 Retirez le pare-soleil en le tirant dans le sens inverse de la flèche.<br />
Ouverture/fermeture du capuchon d’objectif du pare-soleil<br />
Placez le levier du capuchon d’objectif (B) sur la position OPEN pour ouvrir le<br />
capuchon d’objectif, puis placez le levier sur la position CLOSE pour fermer le<br />
capuchon d’objectif.<br />
D Fixation et retrait de la visière pare-soleil<br />
Fixation de la visière pare-soleil<br />
1 Desserrez la vis de fixation de la visière pare-soleil (C), puis mettez-la en place.<br />
2 Serrez la vis de fixation de la visière pare-soleil.<br />
Retrait de la visière pare-soleil<br />
Desserrez la vis de fixation de la visière pare-soleil, puis retirez la visière.<br />
* La vis de fixation de la visière pare-soleil comporte un dispositif de sécurité. Une<br />
fois la visière pare-soleil retirée, vous n’avez pas besoin de resserrer la vis de<br />
fixation.<br />
* Si vous resserrez la vis de fixation de la visière pare-soleil en l’absence de cette<br />
dernière, resserrez-la de l’avant.<br />
Ouverture et fermeture de la visière pare-soleil<br />
Il vous suffit de manipuler la visière pare-soleil pour l’ouvrir et la refermer (D-1).<br />
* N’ouvrez pas ou ne refermez pas la visière pare-soleil selon un angle de 180 º ou<br />
plus (D-2).<br />
E Installation du porte-filtre<br />
Vous pouvez fixer le filtre disponible dans le commerce d’une taille de 4 ×<br />
5,65 pouces au moyen du porte-filtre.<br />
1 Insérez le filtre dans la partie inférieure du porte-filtre (1).<br />
2 Relevez la languette du porte-filtre (2), puis alignez le filtre et le cadre du<br />
porte-filtre (3).<br />
3 Rabaissez la languette du porte-filtre, puis clipsez le filtre au cadre du portefiltre<br />
(4).<br />
4 Mettez le porte-filtre en place avec la languette côté objectif, puis fixez-le (E-4).<br />
F Rangement de l’objectif de conversion et du<br />
pare-soleil<br />
Rangez l’objectif de conversion et le pare-soleil dans le boîtier de transport fourni<br />
comme illustré. Rangez le capuchon avant de l’objectif (E) avec la partie avant<br />
orientée vers le bas, puis installez coussinet du boîtier. Rangez le capuchon arrière<br />
de l’objectif lorsqu’il est fixé à l’objectif de conversion.<br />
* Refermez la visière pare-soleil pour le rangement.<br />
Spécifications<br />
Grossissement 0,8<br />
Structure du convertisseur 3 groupes, 3 éléments<br />
Dimensions<br />
Diamètre maximum : environ ø 106 mm (4 1/4 po.)<br />
Longueur totale :<br />
environ 47 mm (1 7/8 po.)<br />
Poids (sans les capuchons) environ 550 g (1 lb 3 oz)<br />
Articles inclus objectif de conversion grand-angle (1),<br />
capuchon d’objectif (pour l’avant et l’arrière du<br />
objectif) (2), pare-soleil (1), Visière pare-soleil (1),<br />
porte-filtre (1), boîtier de transport (1),<br />
jeu de documents imprimés<br />
La conception et les spécifications peuvent être modifiées sans préavis.<br />
Deutsch<br />
Das Weitwinkelkonverterobjektiv <strong>VCL</strong>-<strong>HG0872K</strong> von <strong>Sony</strong> ist ausschließlich für<br />
die digitale HD-Videokamera HVR-Z5 von <strong>Sony</strong> (im Folgenden als „Kamera“<br />
bezeichnet) konzipiert.<br />
ACHTUNG<br />
Blicken Sie nicht direkt durch das Objektiv in die Sonne.<br />
Dies kann zu Verletzungen der Augen oder zu Erblindung führen.<br />
Vorsicht beim Abnehmen des Konverterobjektivs<br />
Achten Sie darauf, das Objektiv nicht fallen zu lassen, denn Sie könnten sich dabei<br />
verletzen.<br />
Nachlässiger Umgang mit dem Objektiv kann zu Verletzungen führen.<br />
Vorbereitungen für das Anbringen des<br />
Konverterobjektivs<br />
Nehmen Sie die Gegenlichtblende mit Objektivabdeckung, den MC-Schutzfilter<br />
oder andere Filter ab, bevor Sie das Konverterobjektiv an der Kamera anbringen.<br />
Anbringen/Abnehmen des Konverterobjektivs<br />
Anbringen des Objektivs (Abbildung A)<br />
1 Richten Sie die Markierungen an Objektiv und Kamera aneinander aus.<br />
2 Setzen Sie das Objektiv in die Kamera ein und drehen Sie es im Uhrzeigersinn,<br />
bis es einrastet.<br />
Abnehmen des Objektivs (Abbildung B)<br />
Verschieben Sie den Entriegelungsschalter (1), drehen Sie das Objektiv gegen den<br />
Uhrzeigersinn und nehmen Sie es ab (2).<br />
Hinweise zur Verwendung<br />
• Nehmen Sie das Konverterobjektiv beim Transport ab.<br />
• Halten Sie das Gerät beim Abnehmen des Konverterobjektivs oder der<br />
mitgelieferten Gegenlichtblende nicht an der Sonnenblende (D-3). Andernfalls<br />
könnte sich die Gegenlichtblende oder das Objektiv lösen, herunterfallen und<br />
beschädigt werden. Auch die Sonnenblende selbst könnte beschädigt werden.<br />
• Verwenden Sie die Sonnenblende nicht bei Wind.<br />
• Wenn die Sonnenblende angebracht ist und Sie mit einem Mikrofon bzw. mit<br />
dem eingebauten Mikrofon aufnehmen, kann der Aufnahmeton je nach<br />
Montagewinkel der Sonnenblende beeinträchtigt werden.<br />
• Setzen Sie bei Nichtverwendung stets die Objektivschutzkappen auf das<br />
Konverterobjektiv.<br />
• Achten Sie darauf, dass das Objektiv nicht über längere Zeit hoher Feuchtigkeit<br />
ausgesetzt ist, da sich sonst Schimmel ansetzen kann.<br />
Kondensation<br />
Wenn das Objektiv direkt von einem kalten an einen warmen Ort gebracht wird,<br />
kann sich Kondenswasser auf dem Objektiv bilden. Um dies zu verhindern,<br />
stecken Sie das Objektiv in einen Plastikbeutel o. Ä. Wenn die Tem<strong>per</strong>atur im<br />
Beutel die Umgebungstem<strong>per</strong>atur angenommen hat, nehmen Sie das Objektiv<br />
heraus.<br />
Reinigen des Konverterobjektivs<br />
Entfernen Sie Staub mit einem Blasepinsel oder einem sonstigen weichen Pinsel<br />
von der Objektivoberfläche. Zum Entfernen von Fingerabdrücken oder Schlieren<br />
verwenden Sie ein weiches, leicht mit mildem Haushaltsreiniger angefeuchtes<br />
Tuch.<br />
C Anbringen/Abnehmen der mitgelieferten<br />
Gegenlichtblende<br />
Die mitgelieferte Gegenlichtblende können Sie auch dann anbringen, wenn das<br />
Konverterobjektiv an der Kamera angebracht ist.<br />
Anbringen der Gegenlichtblende<br />
1 Lösen Sie die Sicherungsschraube der Gegenlichtblende (A).<br />
2 Richten Sie die Markierungen an Objektiv und Gegenlichtblende aneinander aus<br />
und setzen Sie die Gegenlichtblende in Pfeilrichtung auf das Objektiv.<br />
3 Ziehen Sie die Sicherungsschraube der Gegenlichtblende fest an.<br />
Abnehmen der Gegenlichtblende<br />
1 Lösen Sie die Sicherungsschraube der Gegenlichtblende.<br />
2 Ziehen Sie die Gegenlichtblende entgegen der Pfeilrichtung vom Objektiv.<br />
Öffnen/Schließen der Objektivabdeckung der Gegenlichtblende<br />
Stellen Sie den Objektivabdeckungshebel (B) auf OPEN, um die<br />
Objektivabdeckung zu öffnen, und auf CLOSE, um sie zu schließen.<br />
D Anbringen/Abnehmen der Sonnenblende<br />
Anbringen der Sonnenblende<br />
1 Lösen Sie die Sicherungsschrauben für die Sonnenblende (C) und richten Sie<br />
die Sonnenblende korrekt aus.<br />
2 Ziehen Sie die Sicherungsschrauben für die Sonnenblende an.<br />
Abnehmen der Sonnenblende<br />
Lösen Sie die Sicherungsschrauben für die Sonnenblende und nehmen Sie die<br />
Sonnenblende ab.<br />
* Die Sicherungsschrauben für die Sonnenblende sind so gesichert, dass sie nicht<br />
verloren gehen können. Daher brauchen Sie die Sicherungsschrauben für die<br />
Sonnenblende nach dem Abnehmen der Sonnenblende nicht wieder anzuziehen.<br />
* Falls Sie die Sicherungsschrauben für die Sonnenblende nach dem Abnehmen<br />
der Sonnenblende doch anziehen möchten, schrauben Sie von der Vorderseite<br />
her.<br />
Öffnen und Schließen der Sonnenblende<br />
Fassen Sie die Sonnenblende und klappen Sie sie nach oben oder nach unten<br />
(D-1).<br />
* Klappen Sie die Sonnenblende nicht über 180º weit nach oben oder nach unten<br />
(D-2).<br />
E Anbringen des Filterhalters<br />
Mit dem Filterhalter können Sie einen handelsüblichen Filter mit einer Größe von<br />
4 × 5,65 Zoll anbringen.<br />
1 Setzen Sie den Filter in den unteren Rand des Filterhalters ein (1).<br />
2 Schieben Sie den Schieber am Filterhalter (2) nach oben und richten Sie den<br />
Filter am Rahmen des Filterhalters aus (3).<br />
3 Schieben Sie den Schieber am Filterhalter nach unten, so dass der Schieber den<br />
Filter am Rahmen des Filterhalters arretiert (4).<br />
4 Setzen Sie den Filterhalter so ins Gerät ein, dass der Schieber am Filterhalter auf<br />
das Objektiv weist (E-4).<br />
F Aufbewahren des Konverterobjektivs und der<br />
Gegenlichtblende<br />
Bewahren Sie das Konverterobjektiv und die Gegenlichtblende wie in der<br />
Abbildung dargestellt in der mitgelieferten Tragetasche auf. Legen Sie die vordere<br />
Objektivschutzkappe (E) mit der Vorderseite nach unten in die Tragetasche ein<br />
und legen Sie das Polster darüber. Bringen Sie die hintere Objektivschutzkappe am<br />
Konverterobjektiv an, bevor Sie es in der Tragetasche verstauen.<br />
* Schließen Sie zum Verstauen die Sonnenblende.<br />
Technische Daten<br />
Vergrößerung 0,8<br />
Objektivaufbau<br />
3 Gruppen, 3 Elemente<br />
Abmessungen<br />
Maximaler Durchmesser: ca. ø 106 mm<br />
Gesamtlänge:<br />
ca. 47 mm<br />
Gewicht (ohne Kappen) ca. 550 g<br />
Mitgeliefertes Zubehör Teile Weitwinkelkonverterobjektiv (1),<br />
Objektivschutzkappen (für Vorder- und Rückseite<br />
des Objektivs) (2), Gegenlichtblende (1),<br />
Sonnenblende (1), Filterhalter (1), Tragetasche (1),<br />
Anleitungen<br />
Änderungen bei Design und technischen Daten bleiben ohne vorherige<br />
Ankündigung vorbehalten.
Español<br />
El objetivo de conversión gran angular <strong>VCL</strong>-<strong>HG0872K</strong> <strong>Sony</strong> ha sido diseñado para<br />
utilizarse sólo con la videocámara digital de alta definición <strong>Sony</strong> HVR-Z5 (en<br />
adelante denominada “cámara”).<br />
ADVERTENCIA<br />
No mire directamente al sol a través del objetivo.<br />
De lo contrario, podría dañarse los ojos o provocar la pérdida de vista.<br />
Precaución al extraer el objetivo de conversión<br />
Para evitar lesiones, procure no dejar caer el objetivo.<br />
Es posible que se produzcan lesiones si no lo manipula con cuidado.<br />
Antes de colocar el objetivo de conversión<br />
En primer lugar, extraiga el parasol con tapa, el protector MC o el filtro y, a<br />
continuación, fije el objetivo de conversión a la videocámara.<br />
Colocación/extracción del objetivo de conversión<br />
Colocación del objetivo (ilustración A)<br />
1 Alinee las marcas de alineación del objetivo y las de la cámara.<br />
2 Inserte el objetivo en la cámara y gírelo en el sentido de las agujas del reloj hasta<br />
que encaje en su sitio.<br />
Extracción del objetivo (ilustración B)<br />
Gire el objetivo en el sentido contrario al de las agujas del reloj mientras pulsa el<br />
botón de liberación (1) y extráigalo (2).<br />
Notas sobre el uso<br />
• Antes de transportar el objetivo de conversión, quítelo de la cámara.<br />
• No sujete el parasol cuando extraiga el objetivo de conversión o la cubierta de<br />
este (D-3), puesto que podría causar la caída del objetivo y podría dañarse.<br />
Asimismo, podría causar que el parasol se dañase.<br />
• No utilice el parasol cuando haya viento.<br />
• Si utiliza el micrófono o el micrófono incorporado cuando el parasol está<br />
colocado, es posible que el sonido grabado se vea afectado por el ángulo de<br />
montaje del parasol.<br />
• Antes de guardar el objetivo, colóquele las tapas.<br />
• No guarde el objetivo en un lugar muy húmedo durante mucho tiempo para<br />
evitar que se enmohezca.<br />
Condensación de humedad<br />
Si traslada el objetivo directamente de un lugar frío a otro cálido, es posible que se<br />
produzca condensación de humedad en el mismo. Para evitar esto, coloque el<br />
objetivo en una bolsa de plástico o algo similar. Cuando la tem<strong>per</strong>atura del interior<br />
de la bolsa alcance la ambiental, extraiga el objetivo.<br />
Limpieza del objetivo de conversión<br />
Limpie el polvo de la su<strong>per</strong>ficie del objetivo con un cepillo soplador u otro suave.<br />
Limpie las huellas dactilares u otras manchas con un paño suave ligeramente<br />
humedecido en una solución poco concentrada de detergente.<br />
C Colocación/extracción de la cubierta del objetivo<br />
suministrada<br />
Es posible colocar la cubierta del objetivo suministrada una vez fijado el objetivo<br />
de conversión en la cámara.<br />
Colocación de la cubierta del objetivo<br />
1 Afloje el tornillo de fijación de la cubierta (A).<br />
2 Alinee las marcas del objetivo y de la cubierta para encajarla en la dirección de la<br />
flecha.<br />
3 Apriete firmemente el tornillo de fijación de la cubierta.<br />
Extracción de la cubierta del objetivo<br />
1 Afloje el tornillo de fijación de la cubierta.<br />
2 Extraiga la cubierta tirando de ella en la dirección contraria a de la flecha.<br />
A<strong>per</strong>tura y cierre de la tapa de la cubierta del objetivo<br />
Mueva la palanca de la cubierta del objetivo (B) hasta OPEN para abrirla y, a<br />
continuación, mueva la palanca hasta CLOSE para cerrar la cubierta.<br />
D Colocación/extracción del parasol<br />
Colocación del parasol<br />
1 Afloje el tornillo de fijación del parasol (C), y coloque el parasol.<br />
2 Apriete el tornillo de fijación del parasol.<br />
Extracción del parasol<br />
Afloje el tornillo de fijación del parasol, y extráigalo.<br />
* Hay un enganche de seguridad en el tornillo de fijación del parasol. No es<br />
necesario volver a apretar el tornillo de fijación del parasol una vez extraído.<br />
* En caso de apretar el tornillo de fijación del parasol sin el parasol, apriete el<br />
tornillo hacia la parte delantera.<br />
A<strong>per</strong>tura y cierre del parasol<br />
Sujete el parasol para abrirlo y cerrarlo (D-1).<br />
* No abra o cierre el parasol 180º o más (D-2).<br />
E Colocación del soporte del filtro<br />
Es posible colocar el filtro disponible en el mercado de 4 × 5,65 pulgadas mediante<br />
el soporte del filtro.<br />
1 Coloque el filtro en la parte inferior del soporte del filtro (1).<br />
2 Empuje hacia arriba la palanca del soporte del filtro (2), y alinee el filtro y la<br />
franja del soporte del filtro (3).<br />
3 Empuje hacia abajo la palanca del soporte del filtro, y sujete el filtro a la franja<br />
del soporte del filtro (4).<br />
4 Instale el soporte del filtro con la palanca del soporte del filtro orientada hacia el<br />
objetivo y colóquelo (E-4).<br />
F Almacenamiento del objetivo de conversión y el<br />
parasol<br />
Almacene el objetivo de conversión y la cubierta del objetivo en la funda de<br />
transporte suministrada, como se muestra en la ilustración. Guarde la tapa frontal<br />
del objetivo (E) con la parte frontal orientada hacia abajo y coloque la protección<br />
de la funda de transporte. Guarde la tapa posterior del objetivo cuando esté<br />
colocada en el objetivo de conversión.<br />
* Cierre el parasol cuando lo guarde.<br />
Italiano<br />
Il presente obiettivo ad ampia conversione <strong>Sony</strong> <strong>VCL</strong>-<strong>HG0872K</strong> è stato progettato<br />
<strong>per</strong> il solo uso con la videocamera HD digitale <strong>Sony</strong> HVR-Z5 (di seguito chiamata<br />
“videocamera”).<br />
ATTENZIONE<br />
Non osservare il sole direttamente attraverso il presente obiettivo.<br />
Diversamente, è possibile causare lesioni agli occhi o la <strong>per</strong>dita della vista.<br />
Avvertenza relativa alla rimozione dell’obiettivo di<br />
conversione<br />
Prestare attenzione a non ferirsi facendo cadere l’obiettivo.<br />
Maneggiare l’obiettivo con cura onde evitare di ferirsi.<br />
Prima dell’applicazione dell’obiettivo di<br />
conversione<br />
Rimuovere innanzitutto il paraluce con copriobiettivo, la protezione MC o il filtro,<br />
quindi applicare l’obiettivo di conversione alla videocamera.<br />
Applicazione/rimozione dell’obiettivo di<br />
conversione<br />
Applicazione dell’obiettivo (illustrazione A)<br />
1 Allineare i contrassegni sull’obiettivo con quelli presenti sulla videocamera.<br />
2 Inserire l’obiettivo nella videocamera e ruotarlo in senso orario finché non scatta<br />
in posizione.<br />
Rimozione dell’obiettivo (illustrazione B)<br />
Ruotare l’obiettivo in senso antiorario facendo scorrere l’interruttore di rilascio del<br />
blocco (1), quindi rimuoverlo (2).<br />
Note sull’uso<br />
• Durante il trasporto, rimuovere l’obiettivo di conversione.<br />
• Non tenere con le mani l’aletta paraluce durante la rimozione dell’obiettivo di<br />
conversione o del paraluce in dotazione (D-3). Diversamente, il paraluce e<br />
l’obiettivo potrebbero cadere e danneggiarsi. Ciò potrebbe inoltre causare danni<br />
all’aletta paraluce.<br />
• Non utilizzare l’aletta paraluce in presenza di vento.<br />
• Se si utilizza il microfono o il microfono integrato mentre è applicata l’aletta<br />
paraluce, l’audio registrato potrebbe essere influenzato dall’angolo di<br />
montaggio dell’aletta stessa.<br />
• Per il deposito, applicare sempre l’apposito copriobiettivo all’obiettivo di<br />
conversione.<br />
• Non conservare l’obiettivo in luoghi eccessivamente umidi <strong>per</strong> <strong>per</strong>iodi di tempo<br />
prolungati, onde evitare la formazione di muffa.<br />
Formazione di condensa<br />
Se l’obiettivo viene trasportato direttamente da un luogo freddo ad uno caldo, è<br />
possibile che su di esso si formi della condensa. Per evitare che questo accada,<br />
inserire l’obiettivo in una busta di plastica o simili, quindi estrarlo non appena la<br />
tem<strong>per</strong>atura all’interno della busta ha raggiunto la tem<strong>per</strong>atura circostante.<br />
Pulizia dell’obiettivo di conversione<br />
Rimuovere l’eventuale polvere dalla su<strong>per</strong>ficie dell’obiettivo utilizzando un<br />
soffietto o un pennello morbido. Eliminare eventuali impronte o macchie con un<br />
panno morbido leggermente inumidito con una soluzione detergente neutra.<br />
C Applicazione/rimozione del paraluce in<br />
dotazione<br />
È possibile applicare il paraluce in dotazione mentre l’obiettivo di conversione è<br />
applicato alla videocamera.<br />
Applicazione del paraluce<br />
1 Allentare la vite di fissaggio del paraluce (A).<br />
2 Allineare i contrassegni sull’obiettivo con quelli presenti sul paraluce, quindi<br />
inserire il paraluce nella direzione della freccia.<br />
3 Stringere in modo saldo la vite di fissaggio del paraluce.<br />
Rimozione del paraluce<br />
1 Allentare la vite di fissaggio del paraluce.<br />
2 Rimuovere il paraluce tirandolo nella direzione opposta della freccia.<br />
A<strong>per</strong>tura/chiusura del copriobiettivo del paraluce<br />
Per aprire il copriobiettivo, spostare la leva del copriobiettivo (B) sulla posizione<br />
OPEN; <strong>per</strong> chiuderlo, spostare la leva sulla posizione CLOSE.<br />
D Applicazione/rimozione dell’aletta paraluce<br />
Applicazione dell’aletta paraluce<br />
1 Allentare la vite di fissaggio dell’aletta paraluce (C), quindi applicare l’aletta.<br />
2 Stringere la vite di fissaggio dell’aletta paraluce.<br />
Rimozione dell’aletta paraluce<br />
Allentare la vite di fissaggio dell’aletta paraluce, quindi rimuovere l’aletta.<br />
* È presente un fermo di sicurezza in corrispondenza della vite di fissaggio<br />
dell’aletta paraluce. Non è necessario stringere di nuovo la vite di fissaggio<br />
dell’aletta paraluce dopo la rimozione di quest’ultima.<br />
* Per stringere la vite di fissaggio senza l’aletta paraluce, procedere verso la parte<br />
anteriore.<br />
A<strong>per</strong>tura e chiusura dell’aletta paraluce<br />
Afferrare l’aletta paraluce <strong>per</strong> aprirla e chiuderla (D-1).<br />
* Non aprire né chiudere l’aletta paraluce con un angolo pari o su<strong>per</strong>iore a 180º<br />
(D-2).<br />
E Installazione della sezione di applicazione del<br />
filtro<br />
È possibile installare il filtro da 4 × 5,65 pollici disponibile in commercio<br />
utilizzando l’apposita sezione di applicazione.<br />
1 Inserire il filtro nella parte inferiore dell’apposita sezione di applicazione (1).<br />
2 Spostare verso l’alto la leva della sezione di applicazione del filtro (2), quindi<br />
allineare il filtro alla cornice della sezione di applicazione stessa (3).<br />
3 Spostare verso il basso la leva della sezione di applicazione del filtro, quindi<br />
agganciare il filtro alla cornice della sezione di applicazione (4).<br />
4 Collocare la sezione di applicazione del filtro con la relativa leva rivolta verso<br />
l’obiettivo, quindi inserirla in posizione (E-4).<br />
<br />
<br />
<br />
<br />
<br />
<br />
<br />
<br />
<br />
<br />
<br />
<br />
A<br />
<br />
<br />
B<br />
12<br />
<br />
• <br />
• D3<br />
<br />
• <br />
• <br />
<br />
• <br />
• <br />
<br />
<br />
<br />
<br />
<br />
<br />
<br />
C <br />
<br />
<br />
A<br />
<br />
<br />
<br />
<br />
<br />
<br />
B <br />
<br />
D <br />
<br />
C<br />
<br />
<br />
<br />
<br />
<br />
<br />
D1<br />
º D2<br />
E <br />
× <br />
1<br />
23<br />
4<br />
E<br />
F <br />
<br />
E<br />
<br />
<br />
<br />
<br />
<br />
<br />
<br />
<br />
<br />
<br />
<br />
<br />
ø <br />
<br />
<br />
<br />
<br />
<br />
<br />
<br />
<br />
<br />
<br />
<br />
<br />
<br />
<br />
<br />
<br />
<br />
A<br />
<br />
<br />
B<br />
12<br />
<br />
• <br />
• D3<br />
<br />
• <br />
• <br />
<br />
• <br />
• <br />
<br />
<br />
<br />
<br />
<br />
<br />
<br />
C <br />
<br />
<br />
A<br />
<br />
<br />
<br />
<br />
<br />
<br />
B<br />
<br />
D <br />
<br />
C<br />
<br />
<br />
<br />
<br />
<br />
<br />
D1<br />
ºD2<br />
E <br />
× <br />
1<br />
23<br />
4<br />
E<br />
F <br />
<br />
E<br />
<br />
<br />
<br />
<br />
<br />
<br />
<br />
<br />
<br />
<br />
<br />
<br />
<br />
<br />
ø <br />
<br />
<br />
<br />
<br />
<br />
한국어<br />
<strong>Sony</strong> <strong>VCL</strong>-<strong>HG0872K</strong> 와이드 컨버전 렌즈는 <strong>Sony</strong> 디지털 HD 비디오 카메라 레코더<br />
HVR-Z5(이하 “카메라”라 함) 전용입니다.<br />
경고<br />
본 렌즈를 통해서 절대로 태양을 직시하지 마십시오.<br />
눈을 다치거나 시력이 저하될 염려가 있습니다.<br />
컨버전 렌즈를 분리할 때의 주의<br />
렌즈를 떨어뜨려서 다치지 않도록 주의하십시오.<br />
함부로 취급하면 다칠 염려가 있습니다.<br />
컨버전 렌즈를 장착하기 전에<br />
카메라에서 우선 렌즈 커버와 함께 렌즈 후드 또는 MC 프로텍터, 필터를 분리한 후 컨버전<br />
렌즈를 장착하여 주십시오.<br />
컨버전 렌즈 장착하기/분리하기<br />
렌즈 장착하기(그림 A)<br />
1 렌즈와 카메라의 위치결정 마크를 맞춥니다.<br />
2 카메라에 렌즈를 장착하고 소정의 장소에 고정될 때까지 오른쪽으로 돌립니다.<br />
렌즈 분리하기(그림 B)<br />
잠금 해제 스위치(1)를 밀면서 렌즈를 왼쪽으로 돌려서 분리합니다(2).<br />
사용상의 주의<br />
• 운반 중에는 컨버전 렌즈를 분리하여 주십시오.<br />
• 컨버전 렌즈 또는 부속된 렌즈 후드를 분리할 때에는 가리개를 잡지 마십시오(D-3).<br />
후드나 렌즈가 빠져서 파손될 염려가 있습니다. 또 가리개도 파손될 염려가 있습니다.<br />
• 바람이 심할 때에는 가리개를 사용하지 마십시오.<br />
• 가리개를 장착하고 있을 때 마이크로폰이나 내장 마이크로폰을 사용하면 가리개의 각도<br />
에 따라서 녹음되는 음성에 영향을 미치는 경우가 있습니다.<br />
• 컨버전 렌즈를 보관할 때에는 반드시 렌즈 캡을 장착하여 주십시오.<br />
• 렌즈는 습도가 높은 장소에서는 곰팡이가 필 염려가 있으므로 장기간 보관하지 마십시오.<br />
결로 현상<br />
온도가 낮은 장소에서 따뜻한 장소로 렌즈를 직접 이동하면 렌즈 표면에 이슬이 맺히는 경<br />
우가 있습니다. 그것을 방지하려면 렌즈를 비닐 봉지 등에 넣어 주십시오. 비닐 봉지 안의<br />
온도가 주위 온도가 되면 렌즈를 꺼내 주십시오.<br />
컨버전 렌즈 청소하기<br />
송풍 브러시나 부드러운 솔로 렌즈 표면의 먼지를 털어 주십시오. 지문 등이 묻었을 때에는<br />
묽은 중성 세제로 살짝 적신 부드러운 헝겊으로 닦아내십시오.<br />
C 부속된 렌즈 후드 장착하기/분리하기<br />
컨버전 렌즈를 카메라에 장착한 상태에서 부속된 렌즈 후드를 장착할 수 있습니다.<br />
렌즈 후드 장착하기<br />
1 후드 고정 나사(A)를 느슨하게 풉니다.<br />
2 렌즈와 렌즈 후드의 마크를 맞추어서 후드를 화살표 방향으로 장착합니다.<br />
3 나사 고정 나사를 단단히 조입니다.<br />
렌즈 후드 분리하기<br />
1 후드 고정 나사를 느슨하게 풉니다.<br />
2 후드를 화살표와 반대 방향으로 당겨서 분리합니다.<br />
렌즈 후드의 렌즈 커버를 열기/닫기<br />
렌즈 커버를 열려면 렌즈 커버 레버(B)를 OPEN으로 움직이고 렌즈 레버를 닫으려면<br />
CLOSE로 움직입니다.<br />
D 가리개 장착하기/분리하기<br />
가리개 장착하기<br />
1 가리개 고정 나사(C)를 느슨하게 풀고 가리개를 장착합니다.<br />
2 가리개 고정 나사를 조입니다.<br />
가리개 분리하기<br />
가리개 고정 나사를 느슨하게 풀고 가리개를 분리합니다.<br />
* 가리개 고정 나사에는 안전 기능이 있습니다. 가리개를 분리한 후에 가리개 고정 나사를<br />
다시 조일 필요가 없습니다.<br />
* 가리개 없이 가리개 고정 나사를 조일 때에는 정면을 향하고 조이십시오.<br />
가리개 열기 및 닫기<br />
가리개를 잡고 열거나 닫으십시오(D-1).<br />
* 가리개는 180° 이상 열거나 닫지 마십시오(D-2).<br />
E 필터 홀더 장착하기<br />
필터 홀더에는 4 × 5.65인치 사이즈의 시판용 필터를 장착할 수 있습니다.<br />
1 필터 홀더 밑면에 필터를 끼웁니다(1).<br />
2 필터 홀더의 레버를 올려서(2) 필터와 필터 홀더 프레임을 맞춥니다(3).<br />
3 필터 홀더의 레버를 내리고 필터와 필터 홀더의 프레임에 고정합니다(4).<br />
4 필터 홀더의 레버를 렌즈 쪽으로 향하고 필터 홀더를 삽입해서 장착합니다(E-4).<br />
F 컨버전 렌즈와 렌즈 후드 수납하기<br />
컨버전 렌즈와 렌즈 후드는 그림과 같이 부속된 휴대용 케이스에 수납하십시오. 앞 렌즈 캡<br />
(E)는 표면을 아래로 해서 휴대용 케이스의 쿠션 사이에 수납하십시오. 뒤 렌즈 캡은 컨버<br />
전 렌즈에 장착한 상태로 수납하십시오.<br />
* 수납할 때에는 가리개를 닫으십시오.<br />
주요 제원<br />
배율 0.8<br />
렌즈 구성<br />
3군, 3매<br />
외형 치수<br />
최대 직경:<br />
약 ø 106 mm<br />
전장:<br />
약 47 mm<br />
중량(캡은 제외)<br />
약 550 g<br />
동봉품<br />
와이드 컨버전 렌즈(1), 렌즈 캡(렌즈 앞뒤용)(2),<br />
렌즈 후드(1), 가리개(1), 필터 홀더(1), 휴대용 케이스(1),<br />
도큐먼트 세트<br />
디자인 및 주요 제원은 예고없이 변경할 경우가 있습니다.<br />
Especificaciones<br />
Ampliación 0,8<br />
Estructura del objetivo 3 grupos, 3 elementos<br />
Dimensiones<br />
Diámetro máximo: Aprox. ø 106 mm<br />
Longitud total:<br />
Aprox. 47 mm<br />
Peso (sin incluir las tapas) Aprox. 550 g<br />
Elementos incluidos objetivo de conversión para gran angular (1), tapa<br />
del objetivo (para la parte frontal y trasera del<br />
objetivo) (2), cubierta del objetivo (1), parasol (1),<br />
soporte del filtro (1), funda de transporte (1),<br />
juego de documentación impresa<br />
El diseño y las especificaciones están sujetos a cambios sin previo aviso.<br />
F Conservazione dell’obiettivo di conversione e<br />
del paraluce<br />
Riporre l’obiettivo di conversione e il paraluce nella custodia di trasporto in<br />
dotazione come illustrato. Riporre il copriobiettivo anteriore (E) con il lato<br />
anteriore rivolto verso il basso, quindi applicare il cuscinetto della custodia di<br />
trasporto. Riporre il copriobiettivo posteriore mentre è applicato all’obiettivo di<br />
conversione.<br />
* Chiudere l’aletta paraluce prima dell’inserimento nella custodia.<br />
Caratteristiche tecniche<br />
Ingrandimento 0,8<br />
Struttura dell’obiettivo 3 gruppi, 3 elementi<br />
Dimensioni<br />
Diametro massimo: circa ø 106 mm<br />
Lunghezza totale: circa 47 mm<br />
Peso (esclusi i copriobiettivi) circa 550 g<br />
Accessori inclusi<br />
Obiettivo ad ampia conversione (1), Copriobiettivo<br />
(<strong>per</strong> la parte anteriore e e posteriore dell’obiettivo)<br />
(2), Paraluce (1), Aletta paraluce (1),<br />
Sezione di applicazione del filtro (1),<br />
Custodia di trasporto (1),<br />
Corredo di documentazione stampata<br />
Disegno e caratteristiche tecniche sono soggetti a modifiche senza preavviso.


