

Sony HDR-AS15 - HDR-AS15 Istruzioni per l'uso Francese
Sony HDR-AS15 - HDR-AS15 Istruzioni per l'uso Francese
Sony HDR-AS15 - HDR-AS15 Istruzioni per l'uso Francese

You also want an ePaper? Increase the reach of your titles
YUMPU automatically turns print PDFs into web optimized ePapers that Google loves.
4-432-601-22(1)<br />
Digital HD Video Camera Recorder<br />
Caméscope numérique HD<br />
O<strong>per</strong>ating Guide<br />
Mode d’emploi<br />
Guía de o<strong>per</strong>aciones<br />
Manual de instruções<br />
O<strong>per</strong>ation List/Liste des fonctions/Lista de funciones/Lista de o<strong>per</strong>ações<br />
For details on settings and o<strong>per</strong>ations, see the following figure.<br />
Pour plus de détails sur les réglages et fonctions, consultez le tableau ci-dessous.<br />
Para conocer más detalles acerca de los ajustes y funciones, consulte la siguiente figura.<br />
Para mais detalhes sobre as definições e o<strong>per</strong>ações, consulte a figura seguinte.<br />
O<strong>per</strong>ating button/Touche de fonction/Botón de funcionamiento/Botão de funcionamento<br />
REC START/STOP<br />
button/ENTER button<br />
PREV button<br />
NEXT button<br />
O<strong>per</strong>ation/Fonction/Funcionamiento/Funcionamento<br />
ENTER<br />
PREV<br />
NEXT<br />
Auto switching/Commutation automatique/Cambio automático/Comutação automática<br />
Others/Autres/Otros/Outros<br />
Arrow/Flèche/Flecha/Seta<br />
-1 -2 <br />
<br />
Turn off the power of the camera./<br />
Éteignez le caméscope./Apague la cámara./<br />
Desligue a alimentação da câmara.<br />
-3<br />
Pinch the tab and pull out.<br />
Pincez la languette et tirez vers vous.<br />
Levante la pestaña y tire hacia afuera.<br />
A<strong>per</strong>te a patilha e puxe-a para fora.<br />
Match the<br />
direction of .<br />
Faites<br />
correspondre au<br />
sens de .<br />
Hágalo en la<br />
dirección de .<br />
Faça corresponder<br />
a direcção de .<br />
Charge lamp/<br />
Témoin de charge/Luz de carga/<br />
Lâmpada de carregamento<br />
Micro USB cable/Câble micro USB/<br />
Cable micro USB/Cabo micro USB<br />
microSD card/microSDHC card<br />
Carte microSD/Carte microSDHC<br />
Tarjeta microSD/tarjeta microSDHC<br />
Cartão microSD/cartão microSDHC<br />
“Memory Stick Micro” (Mark2) media<br />
« Memory Stick Micro » (Mark2)<br />
“Memory Stick Micro” (Mark2)<br />
“Memory Stick Micro” (Mark2)<br />
<strong>HDR</strong>-<strong>AS15</strong>/AS10<br />
Setting/Réglage/Ajuste/Definição<br />
You can return to the top screen of each setting item by pressing the ENTER button when [BACK] is displayed. Press and hold the NEXT/PREV button to cycle through the options for the item.<br />
Vous pouvez retourner à l’écran supérieur de chaque paramètre de réglage en appuyant sur la touche ENTER lorsque [BACK] est affiché. Maintenez la touche NEXT/PREV enfoncée pour faire défiler les options du paramètre.<br />
Puede regresar a la pantalla su<strong>per</strong>ior de cada elemento de ajuste si presiona el botón ENTER cuando aparece [BACK]. Presione y mantenga presionado el botón NEXT/PREV para recorrer las opciones para el elemento.<br />
Pode regressar ao ecrã su<strong>per</strong>ior de cada item de definição ao carregar no botão ENTER quando [BACK] for apresentado. Carregue sem soltar no botão NEXT/PREV para <strong>per</strong>correr as opções para o item.<br />
*1 Wi-Fi function is available only on the <strong>HDR</strong>-<strong>AS15</strong>.<br />
*2 Turn on the power with the NEXT/PREV button.<br />
La fonction Wi-Fi est disponible uniquement sur le <strong>HDR</strong>-<strong>AS15</strong>.<br />
Mettez l’appareil en marche à l’aide de la touche NEXT/PREV.<br />
La función Wi-Fi está disponible solo en el modelo <strong>HDR</strong>-<strong>AS15</strong>.<br />
Encienda la cámara con el botón NEXT/PREV.<br />
A função Wi-Fi está disponível apenas no <strong>HDR</strong>-<strong>AS15</strong>.<br />
Ligue a alimentação com o botão NEXT/PREV.<br />
Power off<br />
*2<br />
Movie Mode<br />
Interval Still Rec<br />
Setting<br />
Send to Smartphone*1<br />
Play Mode<br />
Power off<br />
-1<br />
English<br />
Read this first<br />
-2<br />
This manual covers the basic o<strong>per</strong>ation of 2 models, and their respective<br />
functions.<br />
Français<br />
Lisez ceci en premier<br />
Ce manuel présente le fonctionnement de base de 2 modèles, ainsi que leurs<br />
fonctions respectives.<br />
Español<br />
Lea esto antes de comenzar<br />
Este manual aborda el funcionamiento básico de 2 modelos y sus respectivas<br />
funciones.<br />
Português<br />
Leia primeiro<br />
Este manual abrange o funcionamento básico de 2 modelos e as respectivas<br />
funções.<br />
© 2012 <strong>Sony</strong> Corporation Printed in China<br />
You can download the image management software “PlayMemories Home”<br />
from the following URL.<br />
Vous pouvez télécharger le logiciel de gestion d’image « PlayMemories<br />
Home » à partir de l’adresse URL suivante.<br />
Puede descargar el software de administración de imágenes “PlayMemories<br />
Home” de la siguiente dirección URL.<br />
Pode transferir o software de gestão de imagem “PlayMemories Home” a<br />
partir do seguinte URL.<br />
Windows: http://www.sony.net/pm<br />
http://www.sony.net<br />
English<br />
For <strong>HDR</strong>-<strong>AS15</strong> users<br />
The information on the sticker (in the <strong>per</strong>forated box, below) is required when<br />
connecting the camera to a smartphone.<br />
If the sticker is lost, you can recall your user ID and password by the following<br />
procedure.<br />
Insert a charged battery pack into the camera.<br />
Connect the camera to a computer with the micro USB cable (supplied).<br />
Press the NEXT or PREV button to power on.<br />
Display [Computer] [PMHOME] [INFO] [HANDBOOK] on<br />
your computer, then install the Handbook (PDF).<br />
Français<br />
Pour les utilisateurs de <strong>HDR</strong>-<strong>AS15</strong><br />
Les informations sur l’autocollant (dans la case avec ligne de <strong>per</strong>foration,<br />
ci-dessous) sont requises lors de la connexion du caméscope à un téléphone<br />
intelligent.<br />
Si vous <strong>per</strong>dez l’autocollant, vous pouvez récupérer votre identifiant<br />
d’utilisateur et votre mot de passe en suivant la procédure ci-dessous.<br />
Insérez une batterie chargée dans le caméscope.<br />
Raccordez le caméscope à un ordinateur à l’aide du câble micro USB<br />
(fourni).<br />
Appuyez sur la touche NEXT ou PREV pour mettre l’appareil en marche.<br />
Affichez [Ordinateur] [PMHOME] [INFO] [HANDBOOK] sur<br />
votre ordinateur, puis installez le Guide pratique (PDF).<br />
Español<br />
Para usuarios <strong>HDR</strong>-<strong>AS15</strong><br />
La información que aparece en la etiqueta (en la recuadro <strong>per</strong>forado, abajo) es<br />
necesaria para conectar la cámara a un smartphone.<br />
Si se extravía la etiqueta, puede recu<strong>per</strong>ar su identificación de usuario y<br />
contraseña con el siguiente procedimiento.<br />
Coloque una batería cargada en la cámara.<br />
Conecte la cámara a un equipo con el cable micro USB (suministrado).<br />
Presione el botón NEXT o PREV para encender.<br />
Aparece [Equipo] [PMHOME] [INFO] [HANDBOOK] en su<br />
equipo; luego instale la Guía práctica (PDF).<br />
Português<br />
Para utilizadores do <strong>HDR</strong>-<strong>AS15</strong><br />
As informações no autocolante (na caixa <strong>per</strong>furada, abaixo) são necessárias<br />
quando ligar a câmara a um smartphone.<br />
Se <strong>per</strong>der o autocolante, pode aceder à sua ID de utilizador e palavra-passe<br />
através do seguinte procedimento.<br />
Introduza uma bateria carregada na câmara.<br />
Ligue a câmara a um computador com o cabo micro USB (fornecido).<br />
Carregue no botão NEXT ou PREV para ligar a alimentação.<br />
Apresente [Computador] [PMHOME] [INFO] [HANDBOOK]<br />
no seu computador e, em seguida, instale o Manual (PDF).<br />
Recording Mode SteadyShot Angle Interval Remote*1 Auto Power off Date Time<br />
USB Power<br />
Deciding a setting items<br />
Recording/Playback Enregistrement/Lecture Grabación/reproducción Gravar/Reproduzir<br />
*3 When the power is off, press the ENTER button to start recording.<br />
Lorsque l’appareil est éteint, appuyez sur la touche ENTER pour démarrer l’enregistrement.<br />
Cuando la cámara está apagada, presione el botón ENTER para comenzar a grabar.<br />
Quando a alimentação está desligada, carregue no botão ENTER para iniciar a gravação.<br />
*4 Turn on the power with the NEXT/PREV button.<br />
Mettez l’appareil en marche à l’aide de la touche NEXT/PREV.<br />
Encienda la cámara con el botón NEXT/PREV.<br />
Ligue a alimentação com o botão NEXT/PREV.<br />
Power off<br />
*3 *4<br />
Movie Mode<br />
Recording Movie<br />
Interval Still Rec<br />
Setting<br />
Starting Waiting Connecting<br />
Access point<br />
connection<br />
Recording mode/Mode d’enregistrement/Modo de grabación/Modo de gravação<br />
WPS connection<br />
(Accept)<br />
(Reject)<br />
Send to Smartphone*1<br />
Display Recorded image Resolution Imaging frame rate Playback frame rate<br />
Highest resolution 1920×1080 30p<br />
High resolution 1280×720 30p<br />
Slow motion image recorded at 2× frame rate 1280×720 60p<br />
Su<strong>per</strong> slow motion image recorded at 4× frame rate 1280×720 120p<br />
Standard resolution 640×480 30p<br />
Returns to the [VIDEO] menu.<br />
30p<br />
Reset<br />
Restart<br />
*5 Press and hold the button.<br />
Appuyez sur la touche et maintenez-la enfoncée.<br />
Presione y mantenga presionado el botón.<br />
Carregue sem soltar no botão.<br />
*6 Press the PREV and NEXT buttons simultaneously.<br />
Appuyez sur les touches PREV et NEXT simultanément.<br />
Presione los botones PREV y NEXT simultáneamente.<br />
Carregue no botão PREV e NEXT simultaneamente.<br />
*5<br />
Fast-reverse<br />
Slow-reverse<br />
*5 *5<br />
*5<br />
*6<br />
Pause<br />
Movie Play Mode<br />
Fast-forward<br />
*5<br />
Slow-forward<br />
*5<br />
Play Mode<br />
Photo Play Mode<br />
*5*6<br />
Volume<br />
*5*6<br />
*5<br />
Format<br />
Power off<br />
Playing Photo<br />
*6<br />
Slideshow<br />
Refer to the Handbook for details.<br />
You can install the Handbook (PDF) built in the camera by the following<br />
procedure.<br />
Insert a charged battery pack into the camera.<br />
Connect the camera to a computer with the micro USB cable (supplied).<br />
Press the NEXT or PREV button to power on.<br />
Display [Computer] [PMHOME] [INFO] [HANDBOOK] on<br />
your computer, then install the Handbook (PDF).<br />
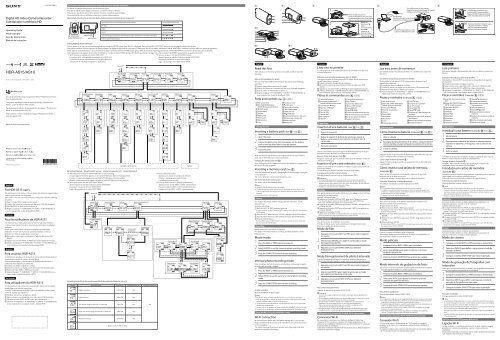
Parts and controls (See -1/2/3.)<br />
REC/access lamp<br />
REC START/STOP button/<br />
ENTER (Menu execute) button<br />
HOLD switch<br />
Display panel<br />
Speaker<br />
PREV button<br />
NEXT button<br />
Microphones<br />
Lens<br />
Getting Started<br />
Connector cover<br />
(Mic) jack<br />
Expansion connector<br />
CHG (Charge) lamp<br />
HDMI OUT jack<br />
(USB) jack<br />
Battery pack/memory card cover<br />
Memory card insertion slot<br />
Battery tray lever<br />
Battery tray<br />
Inserting a battery pack (See -1/2, .)<br />
1 Open the cover.<br />
2 Pull out the battery tray from the camera, set the battery<br />
pack on the tray, then return it into the camera.<br />
3 Close the cover.<br />
Make sure that the type of battery tray is appropriate for the type of battery<br />
pack, and set the battery pack on the tray pro<strong>per</strong>ly.<br />
Charging the battery pack (See .)<br />
Turn off the power of the camera, then connect the camera to a computer with<br />
the micro USB cable (supplied).<br />
Inserting a memory card (See .)<br />
Insert the memory card pro<strong>per</strong>ly confirming that its notched edge is facing the<br />
correct direction.<br />
The correct direction is shown inside the battery cover.<br />
On the format of the memory card<br />
For details, refer to the Handbook (PDF).<br />
Notes<br />
O<strong>per</strong>ation with all memory cards is not assured.<br />
Confirm the direction of the memory card. If you forcibly insert the memory card<br />
in the wrong direction, the memory card, memory card slot, or image data may be<br />
damaged.<br />
Format the memory card before use.<br />
Setting<br />
For details of the buttons used for settings, and their o<strong>per</strong>ations, see the<br />
O<strong>per</strong>ation List.<br />
Example: date setting<br />
Press the NEXT or PREV button to power on.<br />
To power off, press the PREV button or NEXT button to select [PwOFF], then press the<br />
ENTER button.<br />
Press the NEXT button to select [SETUP], then press the ENTER button.<br />
Press the NEXT button to select [DATE], then press the ENTER button.<br />
Press the ENTER button.<br />
Press the PREV button or NEXT button to select year, month, day, hour, minute and<br />
area, then press the ENTER button.<br />
Recording<br />
Attach accessories to the camera, as required.<br />
For details of the buttons used for recording, and their o<strong>per</strong>ations, see the<br />
O<strong>per</strong>ation List.<br />
Movie mode<br />
1 Press the NEXT or PREV button to power on.<br />
2 Select [MOVIE] to set the camera to movie recording mode.<br />
3 Press the START/STOP button to start recording.<br />
Interval photo recording mode<br />
Once recording is started, the camera records photos continuously at regular<br />
intervals until recording is stopped.<br />
1 Press the NEXT or PREV button to power on.<br />
2 Select [INTVL] to set the camera to interval photo recording<br />
mode.<br />
3 Press the START/STOP button to start recording.<br />
To stop recording<br />
Press the START/STOP button again.<br />
Notes<br />
Playback of images recorded with other cameras, is not assured on this camera.<br />
If the shooting mode is changed, the mode set when the camera is turned off will be<br />
resumed when the camera is turned on the next time.<br />
During <strong>per</strong>iods of extended shooting, camera tem<strong>per</strong>ature may rise to a point where<br />
shooting stops automatically.<br />
On what to do if this happens, see “Notes on long-time recording” on the reverse side.<br />
For details of recording modes and their recording times, see the “Recording mode.”<br />
Using the Wi-Fi function (<strong>HDR</strong>-<strong>AS15</strong> only)<br />
Wi-Fi connection<br />
By connecting the camera and a smartphone through Wi-Fi, you can view<br />
images recorded with the camera on the smartphone, and o<strong>per</strong>ate the camera<br />
by the smartphone.<br />
The sticker (showing ID/password) attached to the O<strong>per</strong>ating Guide (this<br />
manual) is required for the setting.<br />
Reportez-vous au Guide pratique pour plus de détails.<br />
Vous pouvez installer le Guide pratique (PDF) intégré dans le caméscope en<br />
suivant la procédure ci-dessous.<br />
Insérez une batterie chargée dans le caméscope.<br />
Raccordez le caméscope à un ordinateur à l’aide du câble micro USB<br />
(fourni).<br />
Appuyez sur la touche NEXT ou PREV pour mettre l’appareil en marche.<br />
Affichez [Ordinateur] [PMHOME] [INFO] [HANDBOOK] sur<br />
votre ordinateur, puis installez le Guide pratique (PDF).<br />
Pièces et commandes (Voir -1/2/3.)<br />
Témoin REC/d’accès<br />
Touche REC START/STOP/<br />
Touche ENTER (Exécuter menu)<br />
Commutateur HOLD<br />
Panneau d’affichage<br />
Haut-parleur<br />
Touche PREV<br />
Touche NEXT<br />
Microphones<br />
Objectif<br />
Préparation<br />
Couvercle de connecteur<br />
Prise (Mic)<br />
Connecteur d’extension<br />
Témoin CHG (Charge)<br />
Prise HDMI OUT<br />
Prise (USB)<br />
Couvercle de batterie/carte mémoire<br />
Fente d’insertion pour carte mémoire<br />
Levier du support de batterie<br />
Support de batterie<br />
Insertion d’une batterie (Voir -1/2, .)<br />
1 Ouvrez le couvercle.<br />
2 Retirez le support de batterie du caméscope, placez la<br />
batterie sur le support, puis réinsérez ce dernier dans le<br />
caméscope.<br />
3 Fermez le couvercle.<br />
Assurez-vous d’utiliser un type de support de batterie approprié pour le type<br />
de batterie et placez la batterie correctement sur le support.<br />
Mise en charge de la batterie (Voir .)<br />
Éteignez le caméscope, puis raccordez le caméscope à un ordinateur à l’aide du<br />
câble micro USB (fourni).<br />
Insertion d’une carte mémoire (Voir .)<br />
Insérez la carte mémoire correctement en veillant à ce que le coin arrondi soit<br />
dans le sens adéquat.<br />
Le sens adéquat est illustré à l’intérieur du couvercle de batterie.<br />
À propos du format de la carte mémoire<br />
Pour plus de détails, reportez-vous au Guide pratique (PDF).<br />
Remarques<br />
Il est impossible de garantir le fonctionnement avec toutes les cartes mémoire.<br />
Assurez-vous d’insérer la carte mémoire dans le bon sens. Si vous insérez la carte<br />
mémoire de force dans le mauvais sens, vous risquez d’endommager la carte mémoire,<br />
la fente pour carte mémoire ou les données d’image.<br />
Formatez la carte mémoire avant l’utilisation.<br />
Réglage<br />
Pour plus de détails sur les touches utilisées pour les réglages et leurs fonctions,<br />
consultez la Liste des fonctions.<br />
Exemple : réglage de la date<br />
Appuyez sur la touche NEXT ou PREV pour mettre l’appareil en marche.<br />
Pour éteindre l’appareil, appuyez sur la touche PREV ou la touche NEXT pour<br />
sélectionner [PwOFF], puis appuyez sur la touche ENTER.<br />
Appuyez sur la touche NEXT pour sélectionner [SETUP], puis appuyez sur<br />
la touche ENTER.<br />
Appuyez sur la touche NEXT pour sélectionner [DATE], puis appuyez sur<br />
la touche ENTER.<br />
Appuyez sur la touche ENTER.<br />
Appuyez sur la touche PREV ou la touche NEXT pour sélectionner année, mois, jour,<br />
l’heure, les minutes et la région, puis appuyez sur la touche ENTER.<br />
Enregistrement<br />
Fixez les accessoires au caméscope, si nécessaire.<br />
Pour plus de détails sur les touches utilisées pour l’enregistrement et leurs<br />
fonctions, consultez la Liste des fonctions.<br />
Mode de film<br />
1 Appuyez sur la touche NEXT ou PREV pour mettre l’appareil<br />
en marche.<br />
2 Sélectionnez [MOVIE] pour régler le caméscope au mode<br />
d’enregistrement de film.<br />
3 Appuyez sur la touche START/STOP pour démarrer<br />
l’enregistrement.<br />
Mode d’enregistrement de photo à intervalle<br />
Une fois l’enregistrement démarré, le caméscope enregistre des photos en<br />
continu à des intervalles réguliers, jusqu’à ce que vous arrêtiez l’enregistrement.<br />
1 Appuyez sur la touche NEXT ou PREV pour mettre l’appareil<br />
en marche.<br />
2 Sélectionnez [INTVL] pour régler le caméscope au mode<br />
d’enregistrement de photo à intervalle.<br />
3 Appuyez sur la touche START/STOP pour démarrer<br />
l’enregistrement.<br />
Pour arrêter l’enregistrement<br />
Appuyez de nouveau sur la touche START/STOP.<br />
Remarques<br />
La lecture des images enregistrées avec d’autres caméscopes n’est pas garantie sur ce<br />
caméscope.<br />
Si vous changez le mode de prise de vue, le mode réglé lorsque le caméscope est éteint<br />
sera utilisé lors de la prochaine mise en marche du caméscope.<br />
Lors des longues périodes de prise de vue, la température du caméscope peut<br />
augmenter à un niveau auquel la prise de vue s’arrête automatiquement.<br />
Pour savoir comment procéder lorsque cela se produit, consultez la section<br />
« Remarques sur l’enregistrement prolongé » au verso.<br />
Pour plus de détails sur les modes d’enregistrement et leurs durées d’enregistrement,<br />
consultez la section « Durée d’enregistrement pour chaque mode d’enregistrement ».<br />
Utilisation de la fonction Wi-Fi (<strong>HDR</strong>-<strong>AS15</strong> uniquement)<br />
Connexion Wi-Fi<br />
En connectant le caméscope et un téléphone intelligent à l’aide d’une<br />
connexion Wi-Fi, vous pouvez visionner des images enregistrées avec le<br />
caméscope sur le téléphone intelligent, ainsi que faire fonctionner le caméscope<br />
à l’aide du téléphone intelligent.<br />
L’autocollant (indiquant l’identifiant/le mot de passe) fixé au Mode d’emploi (ce<br />
manuel) est requis pour le réglage.<br />
Consulte la Guía práctica para obtener detalles.<br />
Puede instalar la Guía práctica (PDF) incorporada en la cámara con el<br />
siguiente procedimiento.<br />
Coloque una batería cargada en la cámara.<br />
Conecte la cámara a un equipo con el cable micro USB (suministrado).<br />
Presione el botón NEXT o PREV para encender.<br />
Aparece [Equipo] [PMHOME] [INFO] [HANDBOOK] en su<br />
equipo; luego instale la Guía práctica (PDF).<br />
Piezas y controles (Consulte -1/2/3.)<br />
REC/luz de acceso<br />
Botón REC START/STOP/botón<br />
ENTER (ejecución del menú)<br />
Interruptor HOLD<br />
Panel de visualización<br />
Altavoz<br />
Botón PREV<br />
Botón NEXT<br />
Micrófonos<br />
Lente<br />
Cubierta del conector<br />
Primeros pasos<br />
Toma (mic)<br />
Conector de expansión<br />
Luz CHG (carga)<br />
Toma HDMI OUT<br />
Toma (USB)<br />
Cubierta de la batería/tarjeta de<br />
memoria<br />
Ranura de inserción de la tarjeta<br />
de memoria<br />
Palanca de la bandeja de batería<br />
Bandeja de batería<br />
Cómo insertar la batería (Consulte -1/2, .)<br />
1 Abra la cubierta.<br />
2 Extraiga la bandeja de batería de la cámara, coloque la batería<br />
sobre la bandeja y luego colóquela nuevamente en la cámara.<br />
3 Cierre la cubierta.<br />
Asegúrese de que el tipo de bandeja de batería sea el adecuado para el tipo de<br />
batería y colóquela sobre la bandeja correctamente.<br />
Cómo cargar la batería (Consulte .)<br />
Apague la cámara y luego conéctela a la computadora con el cable USB micro<br />
(suministrado).<br />
Cómo insertar una tarjeta de memoria<br />
(Consulte .)<br />
Inserte la tarjeta de memoria correctamente y asegúrese de que el lado<br />
muescado esté en la dirección correcta.<br />
La dirección correcta se muestra dentro de la cubierta de la batería.<br />
Acerca del formato de la tarjeta de memoria<br />
Para obtener más detalles, consulte la Guía práctica (PDF).<br />
Notas<br />
No se garantiza el funcionamiento con todas las tarjetas de memoria.<br />
Confirme el sentido de la tarjeta de memoria. Si inserta la tarjeta de memoria por<br />
la fuerza en el sentido incorrecto, puede dañar la tarjeta de memoria, la ranura para<br />
tarjeta de memoria o los datos de imagen.<br />
Formatee la tarjeta de memoria antes de usarla.<br />
Ajuste<br />
Para conocer los detalles de los botones utilizados para los ajustes y sus<br />
funciones, consulte la lista de funciones.<br />
Ejemplo: Ajuste de la fecha<br />
Presione el botón NEXT o PREV para encender.<br />
Para apagar, presione el botón PREV o el botón NEXT para seleccionar [PwOFF]; luego<br />
presione el botón ENTER.<br />
Presione el botón NEXT para seleccionar [SETUP], luego presione el botón<br />
ENTER.<br />
Presione el botón NEXT para seleccionar [DATE], luego presione el botón<br />
ENTER.<br />
Presione el botón ENTER.<br />
Presione el botón PREV o el botón NEXT para seleccionar año, mes, día, hora, minuto y<br />
área, luego presione el botón ENTER.<br />
Grabación<br />
Conecte accesorios a la cámara, según corresponda.<br />
Para obtener detalles sobre los botones que se utilizan en la grabación y su<br />
funcionamiento, consulte la Lista de funciones.<br />
Modo película<br />
1 Presione el botón NEXT o PREV para encenderlo.<br />
2 Seleccione [MOVIE] para ajustar la cámara en el modo<br />
grabación de película.<br />
3 Presione el botón START/STOP para comenzar a grabar.<br />
Modo intervalo de grabación de fotos<br />
Una vez que comienza la grabación, la cámara graba fotos de manera continua<br />
a intervalos regulares hasta que se detiene la grabación.<br />
1 Presione el botón NEXT o PREV para encenderlo.<br />
2 Seleccione [INTVL] para ajustar la cámara en el modo<br />
intervalo de grabación de fotos.<br />
3 Presione el botón START/STOP para comenzar a grabar.<br />
Para detener la grabación<br />
Presione nuevamente el botón START/STOP.<br />
Notas<br />
No se garantiza la reproducción de imágenes grabadas con otras cámaras en esta cámara.<br />
Si cambia el modo de filmación, el modo en que se encontraba la cámara al momento<br />
de apagarse se reanudará la próxima vez que se prenda la cámara.<br />
En <strong>per</strong>íodos largos de filmación, es posible que la tem<strong>per</strong>atura de la cámara alcance un<br />
punto en el cual la filmación se detiene automáticamente.<br />
Para saber qué hacer en estos casos, consulte “Notas acerca de grabaciones de larga<br />
duración” en el reverso del manual.<br />
Para obtener detalles sobre el modo de grabación y los tiempos de la grabación,<br />
consulte “Tiempo de grabación para cada modo de grabación”.<br />
Cómo utilizar la función Wi-Fi (<strong>HDR</strong>-<strong>AS15</strong> únicamente)<br />
Conexión Wi-Fi<br />
Al conectar la cámara y el smartphone por Wi-Fi, puede ver imágenes<br />
grabadas con la cámara en el smartphone y utilizar la cámara mediante el<br />
smartphone.<br />
Se requiere la etiqueta (que contiene la identificación y la contraseña) adjunta<br />
a la Guía de o<strong>per</strong>aciones (este manual) para el ajuste.<br />
Consulte o Manual para obter mais detalhes.<br />
Pode instalar o Manual (PDF) incorporado na câmara através do seguinte<br />
procedimento.<br />
Introduza uma bateria carregada na câmara.<br />
Ligue a câmara a um computador com o cabo micro USB (fornecido).<br />
Carregue no botão NEXT ou PREV para ligar a alimentação.<br />
Apresente [Computador] [PMHOME] [INFO] [HANDBOOK]<br />
no seu computador e, em seguida, instale o Manual (PDF).<br />
Peças e controlos (Consulte -1/2/3.)<br />
Indicador luminoso de acesso/<br />
REC<br />
Botão REC START/STOP/botão<br />
ENTER (confirmar menu)<br />
Interruptor HOLD<br />
Painel do visor<br />
Altifalante<br />
Botão PREV<br />
Botão NEXT<br />
Microfones<br />
Objectiva<br />
Tampa do conector<br />
Preparativos<br />
Tomada (Microfone)<br />
Conector de expansão<br />
Indicador luminoso CHG<br />
(Carregamento)<br />
Tomada HDMI OUT<br />
Tomada (USB)<br />
Tampa da bateria/cartão de<br />
memória<br />
Ranhura de inserção do cartão de<br />
memória<br />
Patilha do tabuleiro de bateria<br />
Tabuleiro de bateria<br />
Introduzir uma bateria (Consulte -1/2, .)<br />
1 Abra a tampa.<br />
2 Puxe para fora o tabuleiro de bateria da câmara, coloque<br />
a bateria no tabuleiro e, em seguida, volte a colocá-lo na<br />
câmara.<br />
3 Feche a tampa.<br />
Certifique-se de que o tipo de tabuleiro de bateria é adequado para o tipo de<br />
bateria e coloque a bateria no tabuleiro adequadamente.<br />
Carregar a bateria (Consulte .)<br />
Desligue a alimentação da câmara e, em seguida, ligue a câmara a um<br />
computador com o cabo micro USB (fornecido).<br />
Introduzir um cartão de memória<br />
(Consulte .)<br />
Introduza o cartão de memória adequadamente, confirmando que o respectivo<br />
canto cortado está virado para a direcção correcta.<br />
A direcção correcta está ilustrada no interior da tampa da bateria.<br />
O formato do cartão de memória<br />
Para mais detalhes, consulte o Manual (PDF).<br />
Notas<br />
Não é garantido o funcionamento com todos os cartões de memória.<br />
Confirme a direcção do cartão de memória. Se forçar a entrada do cartão de memória<br />
na direcção errada, o cartão de memória, a ranhura para o cartão de memória ou os<br />
dados de imagem poderão ficar danificados.<br />
Formate o cartão de memória antes de utilizá-lo.<br />
Definição<br />
Para obter detalhes relativos aos botões utilizados para definições e as<br />
respectivas o<strong>per</strong>ações, consulta a Lista de o<strong>per</strong>ações.<br />
Exemplo: definição de data<br />
Carregue no botão NEXT ou PREV para ligar a alimentação.<br />
Para desligar a alimentação, carregue no botão PREV ou NEXT para seleccionar<br />
[PwOFF] e, em seguida, carregue no botão ENTER.<br />
Carregue no botão NEXT para seleccionar [SETUP] e, em seguida, carregue<br />
no botão ENTER.<br />
Carregue no botão NEXT para seleccionar [DATE] e, em seguida, carregue<br />
no botão ENTER.<br />
Carregue no botão ENTER.<br />
Carregue no botão PREV ou no botão NEXT para seleccionar o ano, mês, dia, hora,<br />
minuto e área e, em seguida, carregue no botão ENTER.<br />
Gravar<br />
Instale acessórios na câmara, conforme seja necessário.<br />
Para obter detalhes relativos aos botões utilizados para a gravação e as<br />
respectivas o<strong>per</strong>ações, consulta a Lista de o<strong>per</strong>ações.<br />
Modo de cinema<br />
1 Carregue no botão NEXT ou PREV para ligar a alimentação.<br />
2 Seleccione [MOVIE] para definir a câmara para o modo de<br />
gravação de filmes.<br />
3 Carregue no botão START/STOP para iniciar a gravação.<br />
Modo de gravação de fotografias com<br />
intervalos<br />
Assim que a gravação seja iniciada, a câmara grava fotografias continuamente<br />
em intervalos regulares até gravação ser interrompida.<br />
1 Carregue no botão NEXT ou PREV para ligar a alimentação.<br />
2 Seleccione [INTVL] para definir a câmara para o modo de<br />
gravação de fotografias com intervalos.<br />
3 Carregue no botão START/STOP para iniciar a gravação.<br />
Para parar a gravação<br />
Carregue novamente no botão START/STOP.<br />
Notas<br />
A reprodução de imagens gravadas com outras câmaras não é garantida nesta câmara.<br />
Se o modo de filmagem for alterado, o modo definido quando a câmara está desligada<br />
será retomado quando a câmara for ligada da próxima vez.<br />
Durante <strong>per</strong>íodos de filmagem prolongada, a tem<strong>per</strong>atura da câmara poderá aumentar<br />
para um ponto em que a filmagem pára automaticamente.<br />
Para saber o que fazer se isto ocorrer, consulte “Notas sobre a gravação prolongada” no<br />
verso.<br />
Para obter detalhes sobre os modos de gravação e os seus tempos de gravação, consulte<br />
o “Modo de gravação”.<br />
Utilizar a função Wi-Fi (apenas <strong>HDR</strong>-<strong>AS15</strong>)<br />
Ligação Wi-Fi<br />
Ao ligar a câmara e o smartphone através de Wi-Fi, pode visualizar imagens<br />
gravadas com a câmara no smartphone e o<strong>per</strong>ar a câmara através do<br />
smartphone.<br />
O autocolante (que indica a ID/palavra-passe) colado no Manual de instruções<br />
(este manual) é necessário para a definição.
English<br />
Owner’s Record<br />
The model and serial numbers are located inside the connector cover. Record<br />
the serial number in the space provided below. Refer to these numbers<br />
whenever you call your <strong>Sony</strong> dealer regarding this product.<br />
Model No. <strong>HDR</strong>-AS<br />
Serial No.<br />
WARNING<br />
To reduce the risk of fire or electric shock,<br />
1) do not expose the unit to rain or moisture.<br />
2) do not place objects filled with liquids, such as vases, on the<br />
apparatus.<br />
Do not expose the batteries to excessive heat such as sunshine, fire or<br />
the like.<br />
CAUTION<br />
Battery pack<br />
If the battery pack is mishandled, the battery pack can burst, cause a fire or<br />
even chemical burns. Observe the following cautions.<br />
Do not disassemble.<br />
Do not crush and do not expose the battery pack to any shock or force such as<br />
hammering, dropping or stepping on it.<br />
Do not short circuit and do not allow metal objects to come into contact with the<br />
battery terminals.<br />
Do not expose to high tem<strong>per</strong>ature above 60°C (140°F) such as in direct sunlight or in<br />
a car parked in the sun.<br />
Do not incinerate or dispose of in fire.<br />
Do not handle damaged or leaking lithium ion batteries.<br />
Be sure to charge the battery pack using a genuine <strong>Sony</strong> battery charger or a device that<br />
can charge the battery pack.<br />
Keep the battery pack out of the reach of small children.<br />
Keep the battery pack dry.<br />
Replace only with the same or equivalent type recommended by <strong>Sony</strong>.<br />
Dispose of used battery packs promptly as described in the instructions.<br />
Replace the battery with the specified type only. Otherwise, fire or injury may<br />
result.<br />
For Customers in the USA<br />
If you have any questions about this product, you may call:<br />
<strong>Sony</strong> Customer Information Center 1-800-222-SONY (7669).<br />
The number below is for the FCC related matters only.<br />
Regulatory Information<br />
Declaration of Conformity<br />
Trade Name: SONY<br />
Model No.: <strong>HDR</strong>-<strong>AS15</strong><br />
Responsible Party: <strong>Sony</strong> Electronics Inc.<br />
Address: 16530 Via Esprillo, San Diego, CA 92127 U.S.A.<br />
Telephone No.: 858-942-2230<br />
This device complies with Part 15 of the FCC Rules. O<strong>per</strong>ation is subject<br />
to the following two conditions: (1) This device may not cause harmful<br />
interference, and (2) this device must accept any interference received,<br />
including interference that may cause undesired o<strong>per</strong>ation.<br />
Declaration of Conformity<br />
Trade Name: SONY<br />
Model No.: <strong>HDR</strong>-AS10<br />
Responsible Party: <strong>Sony</strong> Electronics Inc.<br />
Address: 16530 Via Esprillo, San Diego, CA 92127 U.S.A.<br />
Telephone No.: 858-942-2230<br />
This device complies with Part 15 of the FCC Rules. O<strong>per</strong>ation is subject<br />
to the following two conditions: (1) This device may not cause harmful<br />
interference, and (2) this device must accept any interference received,<br />
including interference that may cause undesired o<strong>per</strong>ation.<br />
CAUTION<br />
You are cautioned that any changes or modifications not expressly approved in<br />
this manual could void your authority to o<strong>per</strong>ate this equipment.<br />
Note<br />
This equipment has been tested and found to comply with the limits for a Class<br />
B digital device, pursuant to Part 15 of the FCC Rules.<br />
These limits are designed to provide reasonable protection against harmful<br />
interference in a residential installation. This equipment generates, uses,<br />
and can radiate radio frequency energy and, if not installed and used in<br />
accordance with the instructions, may cause harmful interference to radio<br />
communications.<br />
However, there is no guarantee that interference will not occur in a particular<br />
installation. If this equipment does cause harmful interference to radio or<br />
television reception, which can be determined by turning the equipment off<br />
and on, the user is encouraged to try to correct the interference by one or more<br />
of the following measures:<br />
Reorient or relocate the receiving antenna.<br />
Increase the separation between the equipment and receiver.<br />
Connect the equipment into an outlet on a circuit different from that to which the<br />
receiver is connected.<br />
Consult the dealer or an ex<strong>per</strong>ienced radio/TV technician for help.<br />
The supplied interface cable must be used with the equipment in order to<br />
comply with the limits for a digital device pursuant to Subpart B of Part 15 of<br />
FCC Rules.<br />
For customers in the U.S.A. and CANADA<br />
Battery pack<br />
This device complies with Part 15 of the FCC Rules. O<strong>per</strong>ation is subject to the<br />
following two conditions: (1) This device may not cause harmful interference,<br />
and (2) this device must accept any interference received, including<br />
interference that may cause undesired o<strong>per</strong>ation.<br />
This Class B digital apparatus complies with Canadian ICES-003.<br />
RECYCLING LITHIUM-ION BATTERIES<br />
Lithium-Ion batteries are recyclable.<br />
You can help preserve our environment by returning your used<br />
rechargeable batteries to the collection and recycling location<br />
nearest you.<br />
For more information regarding recycling of rechargeable<br />
batteries, call toll free 1-800-822- 8837, or visit http://www.rbrc.<br />
org/<br />
Caution: Do not handle damaged or leaking Lithium-Ion<br />
batteries.<br />
For <strong>HDR</strong>-<strong>AS15</strong> only<br />
This transmitter must not be co-located or o<strong>per</strong>ated in conjunction with any<br />
other antenna or transmitter.<br />
This equipment complies with FCC/IC radiation exposure limits set forth<br />
for an uncontrolled environment and meets the FCC radio frequency (RF)<br />
Exposure Guidelines in Supplement C to OET65 and RSS-102 of the IC radio<br />
frequency (RF) Exposure rules. This equipment has very low levels of RF<br />
energy that are deemed to comply without testing of specific absorption ratio<br />
(SAR).<br />
This device complies with Industry Canada licence-exempt RSS standard(s).<br />
O<strong>per</strong>ation is subject to the following two conditions: (1) this device may not<br />
cause interference, and (2) this device must accept any interference, including<br />
interference that may cause undesired o<strong>per</strong>ation of the device.<br />
Under Industry Canada regulations, this radio transmitter may only o<strong>per</strong>ate<br />
using an antenna of a type and maximum (or lesser) gain approved for the<br />
transmitter by Industry Canada. To reduce potential radio interference to other<br />
users, the antenna type and its gain should be so chosen that the equivalent<br />
isotropically radiated power (e.i.r.p.) is not more than that necessary for<br />
successful communication.<br />
For Customers in Europe<br />
Notice for the customers in the countries applying EU Directives<br />
The manufacturer of this product is <strong>Sony</strong> Corporation, 1-7-1 Konan Minatoku<br />
Tokyo, 108-0075 Japan. The Authorized Representative for EMC and<br />
product safety is <strong>Sony</strong> Deutschland GmbH, Hedelfinger Strasse 61, 70327<br />
Stuttgart, Germany. For any service or guarantee matters please refer to the<br />
addresses given in separate service or guarantee documents.<br />
Hereby, <strong>Sony</strong> Corporation, declares that this <strong>HDR</strong>-<strong>AS15</strong> Digital HD Video<br />
Camera Recorder is in compliance with the essential requirements and other<br />
relevant provisions of the Directive 1999/5/EC. For details, please access the<br />
following URL:<br />
http://www.compliance.sony.de/<br />
This product has been tested and found compliant with the limits set out in the<br />
EMC regulation for using connection cables shorter than 3 meters (9.8 feet).<br />
Attention<br />
The electromagnetic fields at the specific frequencies may influence the picture<br />
and sound of this unit.<br />
<br />
<br />
<br />
<br />
<br />
<br />
<br />
<br />
<br />
<br />
<br />
<br />
<br />
<br />
<br />
Notice<br />
If static electricity or electromagnetism causes data transfer to discontinue<br />
midway (fail), restart the application or disconnect and connect the<br />
communication cable (USB, etc.) again.<br />
Disposal of Old Electrical & Electronic Equipment (Applicable in the European<br />
Union and other European countries with separate collection systems)<br />
This symbol on the product or on its packaging indicates that<br />
this product shall not be treated as household waste. Instead it<br />
shall be handed over to the applicable collection point for the<br />
recycling of electrical and electronic equipment. By ensuring this<br />
product is disposed of correctly, you will help prevent potential<br />
negative consequences for the environment and human health,<br />
which could otherwise be caused by inappropriate waste<br />
handling of this product. The recycling of materials will help to conserve<br />
natural resources. For more detailed information about recycling of this<br />
product, please contact your local Civic Office, your household waste disposal<br />
service or the shop where you purchased the product.<br />
Disposal of waste batteries (applicable in the European Union and other<br />
European countries with separate collection systems)<br />
This symbol on the battery or on the packaging indicates that the<br />
battery provided with this product shall not be treated as<br />
household waste.<br />
On certain batteries this symbol might be used in combination<br />
with a chemical symbol. The chemical symbols for mercury (Hg)<br />
or lead (Pb) are added if the battery contains more than 0.0005% mercury or<br />
0.004% lead.<br />
By ensuring these batteries are disposed of correctly, you will help prevent<br />
potentially negative consequences for the environment and human health<br />
which could otherwise be caused by inappropriate waste handling of the<br />
battery. The recycling of the materials will help to conserve natural resources.<br />
In case of products that for safety, <strong>per</strong>formance or data integrity reasons<br />
require a <strong>per</strong>manent connection with an incorporated battery, this battery<br />
should be replaced by qualified service staff only.<br />
To ensure that the battery will be treated pro<strong>per</strong>ly, hand over the product at<br />
end-of-life to the applicable collection point for the recycling of electrical and<br />
electronic equipment.<br />
For all other batteries, please view the section on how to remove the battery<br />
from the product safely. Hand the battery over to the applicable collection<br />
point for the recycling of waste batteries.<br />
For more detailed information about recycling of this product or battery,<br />
please contact your local Civic Office, your household waste disposal service or<br />
the shop where you purchased the product.<br />
Notice for customers in the United Kingdom<br />
A moulded plug complying with BS 1363 is fitted to this equipment for your<br />
safety and convenience.<br />
Should the fuse in the plug supplied need to be replaced, a fuse of the same<br />
rating as the supplied one and approved by ASTA or BSI to BS 1362,<br />
(i.e., marked with an or mark) must be used.<br />
If the plug supplied with this equipment has a detachable fuse cover, be sure to<br />
attach the fuse cover after you change the fuse. Never use the plug without the<br />
fuse cover. If you should lose the fuse cover, please contact your nearest <strong>Sony</strong><br />
service station.<br />
Notes on long-time recording<br />
If the power is turned off, leave the camera for 10 minutes or longer to allow the<br />
tem<strong>per</strong>ature inside the camera to decrease to a safe level.<br />
Under high ambient tem<strong>per</strong>atures, the tem<strong>per</strong>ature of the camera rises quickly.<br />
When the tem<strong>per</strong>ature of the camera rises, the image quality may deteriorate.<br />
It is recommended that you wait until the tem<strong>per</strong>ature of the camera drops before<br />
continuing to shoot.<br />
The surface of the camera may get hot. This is not a malfunction.<br />
Error messages<br />
BATT : Battery error<br />
MEDIA: Media error<br />
HEAT : Tem<strong>per</strong>ature rise error, High battery tem<strong>per</strong>ature<br />
LowPw: Battery power low<br />
ERROR: System error, Voltage abnormality, other error<br />
For details, refer to the Handbook (PDF).<br />
Checking the bundled items<br />
Camera (1)<br />
Micro USB cable (1)<br />
Rechargeable battery pack (NP-BX1) (1)<br />
Battery tray, type X (only for NP-BX1) (1)<br />
Attached to the camera.<br />
Battery tray, type G (only for NP-FG1/BG1) (1)<br />
Waterproof Case (1)<br />
Attachment Buckle (1)<br />
Flat Adhesive Mount (1)<br />
Curved Adhesive Mount (1)<br />
Handbook<br />
Included in the internal memory of this camera.<br />
Set of printed documentation<br />
Specifications<br />
Signal format: NTSC color, EIA standards<br />
HDTV 1080/60i, 1080/60p specification<br />
Power requirements: Rechargeable battery pack, 3.6 V (NP-BX1)<br />
Rechargeable battery pack, 3.6 V (NP-BG1)<br />
USB, 5.0 V<br />
USB charging: DC 5.0 V, 500 mA/600 mA<br />
For more specifications, refer to “Specifications” in Handbook (PDF).<br />
Design and specifications are subject to change without notice.<br />
On trademarks<br />
“Memory Stick,” “ ,” “Memory Stick Duo,” “ ,” “Memory Stick<br />
PRO Duo,” “<br />
,” “Memory Stick PRO-HG Duo,”<br />
“ ,” “Memory Stick Micro,” “MagicGate,”<br />
“ ,” “MagicGate Memory Stick” and “MagicGate Memory Stick Duo”<br />
are trademarks or registered trademarks of <strong>Sony</strong> Corporation.<br />
HDMI, the HDMI logo and High-Definition Multimedia Interface are trademarks<br />
or registered trademarks of HDMI Licensing LLC in the United States and other<br />
countries.<br />
Microsoft, Windows, Windows Vista, and DirectX are either registered trademarks or<br />
trademarks of Microsoft Corporation in the United States and/or other countries.<br />
Mac and Mac OS are registered trademarks of Apple Inc. in the U.S. and other<br />
countries.<br />
Intel, Intel Core, and Pentium are trademarks or registered trademarks of Intel<br />
Corporation or its subsidiaries in the United States and other countries.<br />
“ ” and “PlayStation” are registered trademarks of <strong>Sony</strong> Computer Entertainment Inc.<br />
Add further enjoyment with your PlayStation 3 by downloading the application for<br />
PlayStation 3 from PlayStation Store (where available.)<br />
The application for PlayStation 3 requires PlayStation Network account and application<br />
download. Accessible in areas where the PlayStation Store is available.<br />
Adobe, the Adobe logo, and Adobe Acrobat are either registered trademarks or<br />
trademarks of Adobe Systems Incorporated in the United States and/or other countries.<br />
microSD logo and microSDHC logo are trademarks of SD-3C, LLC.<br />
In addition, system and product names used in this manual are, in general, trademarks or<br />
registered trademarks of their respective develo<strong>per</strong>s or manufacturers. However, the or<br />
marks are not used in all cases in this manual.<br />
<br />
<br />
<br />
<br />
<br />
<br />
<br />
<br />
<br />
<br />
<br />
<br />
<br />
<br />
<br />
<br />
<br />
<br />
<br />
Français<br />
Aide-mémoire<br />
Les numéros de modèle et de série sont situés dans le couvercle de connecteur.<br />
Prendre en note le numéro de série dans l’espace prévu ci-dessous. Se reporter<br />
à ces numéros lors des communications avec le détaillant <strong>Sony</strong> au sujet de ce<br />
produit.<br />
Modèle no <strong>HDR</strong>-AS<br />
No de série<br />
AVERTISSEMENT<br />
Afin de réduire les risques d’incendie ou de choc électrique,<br />
1) n’exposez pas cet appareil à la pluie ou à l’humidité.<br />
2) ne placez pas d’objets remplis de liquide, tels que des vases, sur<br />
l’appareil.<br />
N’exposez pas les piles à une chaleur excessive, notamment aux rayons<br />
directs du soleil, à une flamme, etc.<br />
ATTENTION<br />
Batterie<br />
Toute erreur de manipulation de la batterie peut provoquer son explosion,<br />
entraîner un incendie, voire même des brûlures de substances chimiques.<br />
Respectez les précautions suivantes :<br />
Ne démontez pas la batterie.<br />
N’écrasez et n’exposez pas la batterie à des chocs ou à une force extérieure. Vous ne<br />
devez pas la frap<strong>per</strong> avec un marteau, la laisser tomber ou marcher dessus.<br />
Ne court-circuitez pas les bornes de la batterie et maintenez-les à l’écart de tout contact<br />
avec des objets métalliques.<br />
N’exposez pas la batterie à des températures supérieures à 60 °C (140 °F), notamment les<br />
rayons directs du soleil ou l’habitacle d’un véhicule garé au soleil.<br />
N’incinérez pas la batterie et ne la jetez pas au feu.<br />
Ne manipulez jamais des batteries lithium ion qui sont endommagées ou présentent une<br />
fuite.<br />
Veillez à recharger la batterie à l’aide d’un chargeur <strong>Sony</strong> authentique ou d’un appareil<br />
capable de la recharger.<br />
Tenez la batterie hors de la portée des petits enfants.<br />
Gardez la batterie au sec.<br />
Remplacez-la uniquement par une batterie de même type ou d’un type équivalent<br />
recommandé par <strong>Sony</strong>.<br />
Mettez les batteries au rebut sans attendre, de la manière décrite dans les instructions.<br />
Remplacez la batterie par une batterie correspondant au type spécifié<br />
uniquement. Sinon vous risquez de provoquer un incendie ou des blessures.<br />
À l’intention des clients aux É.- U.<br />
Pour toute question au sujet de cet appareil, appeler :<br />
<strong>Sony</strong> Centre d’information à la clientèle 1-800-222-SONY (7669).<br />
Le numéro ci-dessous concerne seulement les questions relevant de la<br />
Commission fédérale des communications des États-Unis (FCC).<br />
Information réglementaire<br />
Déclaration de conformité<br />
Nom commercial : SONY<br />
No de modèle : <strong>HDR</strong>-<strong>AS15</strong><br />
Responsable : <strong>Sony</strong> Electronics Inc.<br />
Adresse : 16530 Via Esprillo, San Diego, CA 92127 É.-U.<br />
No de téléphone : 858-942-2230<br />
Cet appareil est conforme à la Partie 15 de la réglementation de la FCC des<br />
États-Unis. Son utilisation est sujette aux deux conditions suivantes : (1)<br />
Cet appareil ne doit pas générer d’interférences nuisibles et (2) il doit être<br />
en mesure d’accepter toute interférence reçue, y compris les interférences<br />
pouvant générer un fonctionnement indésirable.<br />
Déclaration de conformité<br />
Nom commercial : SONY<br />
No de modèle : <strong>HDR</strong>-AS10<br />
Responsable : <strong>Sony</strong> Electronics Inc.<br />
Adresse : 16530 Via Esprillo, San Diego, CA 92127 É.-U.<br />
No de téléphone : 858-942-2230<br />
Cet appareil est conforme à la Partie 15 de la réglementation de la FCC des<br />
États-Unis. Son utilisation est sujette aux deux conditions suivantes : (1)<br />
Cet appareil ne doit pas générer d’interférences nuisibles et (2) il doit être<br />
en mesure d’accepter toute interférence reçue, y compris les interférences<br />
pouvant générer un fonctionnement indésirable.<br />
AVERTISSEMENT<br />
Par la présente, vous êtes avisé du fait que tout changement ou toute<br />
modification ne faisant pas l’objet d’une autorisation expresse dans le présent<br />
manuel pourrait annuler votre droit d’utiliser l’appareil.<br />
Note<br />
L’appareil a été testé et est conforme aux exigences d’un appareil numérique de<br />
Classe B, conformément à la Partie 15 de la réglementation de la FCC.<br />
Ces critères sont conçus pour fournir une protection raisonnable contre les<br />
interférences nuisibles dans un environnement résidentiel. L’appareil génère,<br />
utilise et peut émettre des fréquences radio; s’il n’est pas installé et utilisé<br />
conformément aux instructions, il pourrait provoquer des interférences<br />
nuisibles aux communications radio.<br />
Cependant, il n’est pas possible de garantir que des interférences ne seront<br />
pas provoquées dans certaines conditions particulières. Si l’appareil devait<br />
provoquer des interférences nuisibles à la réception radio ou à la télévision, ce<br />
qui peut être démontré en allumant et éteignant l’appareil, il est recommandé à<br />
l’utilisateur d’essayer de corriger cette situation par l’une ou l’autre des mesures<br />
suivantes :<br />
Réorienter ou déplacer l’antenne réceptrice.<br />
Augmenter la distance entre l’appareil et le récepteur.<br />
Brancher l’appareil dans une prise ou sur un circuit différent de celui sur lequel le<br />
récepteur est branché.<br />
Consulter le détaillant ou un technicien expérimenté en radio/téléviseurs.<br />
Le câble d’interface fourni doit être utilisé avec l’appareil pour que celui-ci soit<br />
conforme aux critères régissant les appareils numériques, conformément à la<br />
sous-partie B de la Partie 15 de la réglementation de la FCC.<br />
Pour les utilisateurs au Canada<br />
Batterie<br />
Cet appareil est conforme à la section 15 des règlements FCC. Son<br />
fonctionnement est soumis aux deux conditions suivantes : (1) cet appareil ne<br />
doit pas provoquer d’interférences nuisibles, (2) cet appareil doit accepter toute<br />
interférence, y compris celles susceptibles de provoquer son fonctionnement<br />
indésirable.<br />
Cet appareil numérique de la classe B est conforme à la norme NMB-003 du<br />
Canada.<br />
RECYCLAGE DES ACCUMULATEURS AUX IONS DE LITHIUM<br />
Les accumulateurs aux ions de lithium sont recyclables. Vous<br />
pouvez contribuer à préserver l’environnement en rapportant<br />
les piles usagées dans un point de collecte et de recyclage le<br />
plus proche. Pour plus d’informations sur le recyclage des<br />
accumulateurs, téléphonez au numéro gratuit 1-800-822-8837<br />
(Etats-Unis et Canada uniquement), ou visitez<br />
http://www.rbrc.org/<br />
Avertissement : Ne pas utiliser des accumulateurs aux ions de lithium qui<br />
sont endommagés ou qui fuient.<br />
Pour <strong>HDR</strong>-<strong>AS15</strong> uniquement<br />
Cet émetteur ne doit pas être placé à proximité ou utilisé conjointement avec<br />
d’autres antennes ou émetteurs.<br />
Cet équipement est conforme aux limitations concernant l’exposition aux<br />
radiations établies par la FCC/IC pour un environnement non contrôlé, ainsi<br />
qu’aux directives relatives à l’exposition aux radiofréquences (RF) de la FCC<br />
spécifiées dans le supplément C du bulletin OET65 et au règlement CNR-102<br />
relatif à l’exposition aux radiofréquences (RF) d’IC. Cet équipement émet de<br />
très faibles niveaux d’énergie RF qui sont considérés comme étant conformes<br />
sans évaluation de débit d’absorption spécifique (DAS).<br />
Cet appareil est conforme aux normes CNR exemptes de licence d’Industrie<br />
Canada. Le fonctionnement est soumis à ces deux conditions : (1) cet<br />
appareil ne doit pas causer d’interférences, et (2) cet appareil doit accepter<br />
toutes les interférences, incluant celles qui pourraient compromettre son<br />
fonctionnement.<br />
Conformément aux réglementations d’Industrie Canada, cet émetteur<br />
radio peut fonctionner uniquement avec une antenne d’un type et d’un gain<br />
maximal (ou inférieur) approuvés pour l’émetteur par Industrie Canada. Pour<br />
réduire les risques d’interférence radio à l’intention des autres utilisateurs,<br />
vous devez choisir le type d’antenne et son gain de façon à ce que la puissance<br />
isotrope rayonnée équivalente (p.i.r.e.) ne dépasse pas l’intensité nécessaire à<br />
l’établissement d’une communication satisfaisante.<br />
Note pour les clients européens<br />
Avis aux consommateurs des pays appliquant les Directives UE<br />
Le fabricant de ce produit est <strong>Sony</strong> Corporation, 1-7-1 Konan Minatoku<br />
Tokyo, 108-0075 Japon. Le représentant agréé pour la compatibilité<br />
électromagnétique et la sécurité du produit est <strong>Sony</strong> Deutschland GmbH,<br />
Hedelfinger Strasse 61, 70327 Stuttgart, Allemagne. Pour toute question<br />
relative à la garantie ou aux réparations, reportez-vous à l’adresse que vous<br />
trouverez dans les documents ci-joints, relatifs à la garantie et aux réparations.<br />
<br />
<br />
<br />
<br />
<br />
<br />
<br />
<br />
<br />
<br />
<br />
<br />
<br />
<br />
<br />
Par la présente <strong>Sony</strong> Corporation déclare que ce caméscope numérique HD<br />
(<strong>HDR</strong>-<strong>AS15</strong>) est conforme aux exigences essentielles et aux autres dispositions<br />
<strong>per</strong>tinentes de la directive 1999/5/CE. Pour toute information complémentaire,<br />
veuillez consulter l’URL<br />
suivante: http://www.compliance.sony.de/<br />
Cet appareil a été testé et jugé conforme aux limites établies par la<br />
réglementation EMC visant l’utilisation de câbles de connexion de moins de 3<br />
mètres (9,8 pi.).<br />
Attention<br />
Le champ électromagnétique à des fréquences particulières peut avoir une<br />
incidence sur l’image et le son de cet appareil.<br />
Avis<br />
Si l’électricité statique ou les champs électrostatiques entraînent une<br />
interruption lors du transfert des données (échec), redémarrez l’application ou<br />
débranchez, puis rebranchez le câble de connexion (USB, etc.).<br />
Traitement des appareils électriques et électroniques en fin de vie (Applicable<br />
dans les pays de l’Union Européenne et aux autres pays européens disposant de<br />
systèmes de collecte sélective)<br />
Ce symbole, apposé sur le produit ou sur son emballage, indique<br />
que ce produit ne doit pas être traité avec les déchets ménagers. Il<br />
doit être remis à un point de collecte approprié pour le recyclage<br />
des équipements électriques et électroniques. En vous assurant<br />
que ce produit sont mis au rebut de façon appropriée, vous<br />
participez activement à la prévention des conséquences négatives<br />
que leur mauvais traitement pourrait provoquer sur<br />
l’environnement et sur la santé humaine. Le recyclage des matériaux contribue<br />
par ailleurs à la préservation des ressources naturelles. Pour toute information<br />
complémentaire au sujet du recyclage de ce produit, vous pouvez contacter<br />
votre municipalité, votre déchetterie locale ou le point de vente où vous avez<br />
acheté le produit.<br />
Elimination des piles et accumulateurs usagés (Applicable dans les pays de<br />
l’Union Européenne et aux autres pays européens disposant de systèmes de<br />
collecte sélective)<br />
Ce symbole, apposé sur les piles et accumulateurs ou sur les<br />
emballages, indique que les piles et accumulateurs fournis avec<br />
ce produit ne doivent pas être traités comme de simples déchets<br />
ménagers.<br />
Sur certains types de piles, ce symbole apparaît parfois combiné<br />
avec un symbole chimique. Les symboles pour le mercure (Hg) ou le plomb<br />
(Pb) sont rajoutés lorsque ces piles contiennent plus de 0,0005% de mercure ou<br />
0,004% de plomb.<br />
En vous assurant que ces piles et accumulateurs sont mis au rebut de façon<br />
appropriée, vous participez activement à la prévention des conséquences<br />
négatives que leur mauvais traitement pourrait provoquer sur l’environnement<br />
et sur la santé humaine. Le recyclage des matériaux contribue par ailleurs à la<br />
préservation des ressources naturelles.<br />
Pour les produits qui pour des raisons de sécurité, de <strong>per</strong>formance ou<br />
d’intégrité de données nécessitent une connexion <strong>per</strong>manente à une pile ou<br />
à un accumulateur, il conviendra de vous rapprocher d’un service technique<br />
qualifié pour effectuer son remplacement.<br />
En rapportant votre appareil électrique en fin de vie à un point de collecte<br />
approprié vous vous assurez que la pile ou l’accumulateur incorporé sera traité<br />
correctement.<br />
Pour tous les autres cas de figure et afin d’enlever les piles ou accumulateurs<br />
en toute sécurité de votre appareil, reportez-vous au manuel d’utilisation.<br />
Rapportez les piles ou accumulateurs usagés au point de collecte approprié<br />
pour le recyclage.<br />
Pour toute information complémentaire au sujet du recyclage de ce produit<br />
ou des piles et accumulateurs, vous pouvez contacter votre municipalité, votre<br />
déchetterie locale ou le point de vente où vous avez acheté ce produit.<br />
Remarques sur l’enregistrement prolongé<br />
Si l’appareil s’éteint, laissez le caméscope inutilisé pendant au moins 10 minutes pour<br />
<strong>per</strong>mettre à la température interne du caméscope de retourner à un niveau sécuritaire.<br />
Lorsque les températures ambiantes sont élevées, la température du caméscope<br />
augmente rapidement.<br />
Lorsque la température du caméscope augmente, la qualité d’image peut se détériorer.<br />
Il est recommandé d’attendre que la température du caméscope diminue avant de<br />
continuer à effectuer des prises de vue.<br />
La surface du caméscope peut devenir chaude. Il ne s’agit pas d’un problème de<br />
fonctionnement.<br />
Messages d’erreur<br />
BATT : Erreur de batterie<br />
MEDIA : Erreur de support<br />
HEAT : Erreur d’augmentation de température, température de batterie élevée<br />
LowPw : Niveau de batterie faible<br />
ERROR : Erreur de système, anomalie de tension, autre erreur<br />
Pour plus de détails, reportez-vous au Guide pratique (PDF).<br />
Vérification des accessoires fournis<br />
Caméscope (1)<br />
Câble micro USB (1)<br />
Batterie rechargeable (NP-BX1) (1)<br />
Support de batterie, type X (uniquement pour NP-BX1) (1)<br />
Fixé au caméscope.<br />
Support de batterie, type G (uniquement pour NP-FG1/BG1) (1)<br />
Boîtier étanche (1)<br />
Boucle de fixation (1)<br />
Support adhésif plat (1)<br />
Support adhésif incurvé (1)<br />
Guide pratique<br />
Inclus dans la mémoire interne de ce caméscope.<br />
Ensemble de documentation imprimée<br />
Caractéristiques techniques<br />
Format de signal : NTSC couleur, normes EIA<br />
Spécification HDTV 1080/60i, 1080/60p<br />
Alimentation requise : Batterie rechargeable, 3,6 V (NP-BX1)<br />
Batterie rechargeable, 3,6 V (NP-BG1)<br />
USB, 5,0 V<br />
Charge USB : 5,0 V CC, 500 mA/600 mA<br />
Pour des caractéristiques techniques supplémentaires, reportez-vous à la<br />
section « Caractéristiques techniques » du Guide pratique (PDF).<br />
La conception et les caractéristiques techniques sont sujettes à modifications<br />
sans préavis.<br />
À propos des marques de commerce<br />
« Memory Stick », « », « Memory Stick Duo », « », « Memory<br />
Stick PRO Duo », « », « Memory Stick PRO-HG Duo »,<br />
« », « Memory Stick Micro », « MagicGate »,<br />
« », « MagicGate Memory Stick » et « MagicGate Memory Stick<br />
Duo » sont des marques de commerce ou des marques déposées de <strong>Sony</strong> Corporation.<br />
HDMI, le logo HDMI et High-Definition Multimedia Interface sont des marques de<br />
commerce ou des marques déposées de HDMI Licensing LLC aux États-Unis et dans<br />
d’autres pays.<br />
Microsoft, Windows, Windows Vista et DirectX sont des marques de commerce ou des<br />
marques déposées de Microsoft Corporation aux États-Unis et/ou dans d’autres pays.<br />
Mac et Mac OS sont des marques déposées de Apple Inc. aux États-Unis et dans d’autres<br />
pays.<br />
Intel, Intel Core et Pentium sont des marques de commerce ou des marques déposées<br />
de Intel Corporation ou de ses filiales aux États-Unis et dans d’autres pays.<br />
« » et « PlayStation » sont des marques déposées de <strong>Sony</strong> Computer Entertainment Inc.<br />
Profitez davantage de votre PlayStation 3 en téléchargeant l’application pour<br />
PlayStation 3 à partir de la boutique PlayStation Store (lorsque disponible).<br />
L’application pour PlayStation 3 nécessite un compte PlayStation Network et doit être<br />
téléchargée. Accessible dans les régions où le PlayStation Store est disponible.<br />
Adobe, le logo Adobe et Adobe Acrobat sont des marques de commerce ou des marques<br />
déposées de Adobe Systems Incorporated aux États-Unis et/ou dans d’autres pays.<br />
Les logos microSD et microSDHC sont des marques de commerce de SD-3C, LLC.<br />
De plus, les noms de système et produit utilisés dans ce manuel sont en général des marques<br />
de commerce ou des marques déposées de leurs développeurs ou fabricants respectifs.<br />
Toutefois, les symboles ou ne sont pas utilisés à chaque mention dans ce manuel.<br />
<br />
<br />
<br />
<br />
<br />
<br />
<br />
<br />
<br />
<br />
<br />
<br />
<br />
<br />
<br />
<br />
<br />
<br />
<br />
Español<br />
ADVERTENCIA<br />
Para reducir el riesgo de incendios o electrocución,<br />
1) no exponga la unidad a la lluvia ni a la humedad.<br />
2) no ponga objetos llenos de líquido, como floreros, sobre el aparato.<br />
No exponga las pilas a fuentes de calor excesivo, como la luz solar<br />
directa, el fuego o similares.<br />
PRECAUCIÓN<br />
Batería<br />
Si la batería se manipula indebidamente, puede explotar y causar un incendio o<br />
provocarle quemaduras químicas. Tenga en cuenta las siguientes precauciones.<br />
No desmonte el producto.<br />
No aplaste ni exponga la batería a impactos tales como golpes o caídas, ni la deje caer<br />
o la pise.<br />
No provoque un cortocircuito en la batería ni <strong>per</strong>mita que objetos metálicos entren en<br />
contacto con sus terminales.<br />
No exponga la batería a tem<strong>per</strong>aturas su<strong>per</strong>iores a 60 °C como a la luz solar directa, o<br />
en el interior de un automóvil estacionado al sol.<br />
No la incinere ni la arroje al fuego.<br />
No manipule baterías de iones de litio dañadas o con fugas.<br />
Asegúrese de cargar la batería con un cargador de baterías original de <strong>Sony</strong> o con un<br />
dispositivo que pueda cargarla.<br />
Mantenga la batería fuera del alcance de niños pequeños.<br />
Mantenga la batería seca.<br />
Sustitúyala únicamente por otra del mismo tipo o equivalente recomendada por <strong>Sony</strong>.<br />
Deshágase de la baterías usada lo antes posible según el procedimiento que se describe<br />
en las instrucciones.<br />
Sustituya la batería únicamente por otra del tipo especificado. De lo contrario,<br />
es posible que se produzcan incendios o lesiones.<br />
Atención para los clientes en Europa<br />
Aviso para los clientes de países en los que se aplican las directivas de la UE<br />
El fabricante de este producto es <strong>Sony</strong> Corporation, 1-7-1 Konan Minato-ku<br />
Tokyo, 108-0075, Japón. El representante autorizado en lo referente al<br />
cumplimiento de la directiva EMC y a la seguridad de los productos es <strong>Sony</strong><br />
Deutschland GmbH, Hedelfinger Strasse 61, 70327 Stuttgart, Alemania. Para<br />
resolver cualquier asunto relacionado con el soporte técnico o la garantía,<br />
consulte las direcciones que se indican en los documentos de soporte técnico y<br />
garantía suministrados por separado.<br />
Por medio de la presente <strong>Sony</strong> Corporation declara que esta Videocámara<br />
Digital HD <strong>HDR</strong>-<strong>AS15</strong> cumple con los requisitos esenciales y cualesquiera<br />
otras disposiciones aplicables o exigibles de la Directiva 1999/5/CE. Para<br />
mayor información, por favor consulte el siguiente URL:<br />
http://www.compliance.sony.de/<br />
Este producto ha sido probado y cumple con los límites estipulados por el<br />
reglamento EMC para utilizar cables de conexión de menos de 3 metros de<br />
longitud.<br />
Atención<br />
Los campos electromagnéticos a frecuencias específicas podrán influir en la<br />
imagen y el sonido de esta unidad.<br />
Aviso<br />
Si la electricidad estática o el electromagnetismo interrumpen la transmisión<br />
de datos (fallo), reinicie la aplicación o desconecte el cable de comunicación<br />
(USB, etc.) y vuelva a conectarlo.<br />
Tratamiento de los equipos eléctricos y electrónicos al final de su vida útil<br />
(aplicable en la Unión Europea y en países europeos con sistemas de tratamiento<br />
selectivo de residuos)<br />
Este símbolo en el equipo o en su embalaje indica que el presente<br />
producto no puede ser tratado como residuos doméstico normal.<br />
Debe entregarse en el correspondiente punto de recogida de<br />
equipos eléctricos y electrónicos. Al asegurarse de que este<br />
producto se desecha correctamente, usted ayuda a prevenir las<br />
consecuencias potencialmente negativas para el medio ambiente<br />
y la salud humana que podrían derivarse de la incorrecta<br />
manipulación en el momento de deshacerse de este producto. El reciclaje de<br />
materiales ayuda a conservar los recursos naturales. Para recibir información<br />
detallada sobre el reciclaje de este producto, póngase en contacto con el<br />
ayuntamiento, el punto de recogida más cercano o el establecimiento donde ha<br />
adquirido el producto.<br />
Tratamiento de las baterías al final de su vida útil (aplicable en la Unión Europea<br />
y en países europeos con sistemas de tratamiento selectivo de residuos)<br />
Este símbolo en la batería o en el embalaje indica que la batería<br />
proporcionada con este producto no puede ser tratada como un<br />
residuo doméstico normal.<br />
En algunas baterías este símbolo puede utilizarse en combinación<br />
con un símbolo químico. El símbolo químico del mercurio (Hg)<br />
o del plomo (Pb) se añadirá si la batería contiene más del 0,0005% de mercurio<br />
o del 0,004% de plomo.<br />
Al asegurarse de que estas baterías se desechan correctamente, usted ayuda a<br />
prevenir las consecuencias potencialmente negativas para el medio ambiente<br />
y la salud humana que podrían derivarse de la incorrecta manipulación en<br />
el momento de deshacerse de la batería. El reciclaje de materiales ayuda a<br />
conservar los recursos naturales.<br />
En el caso de productos que por razones de seguridad, rendimiento o<br />
mantenimiento de datos sea necesaria una conexión <strong>per</strong>manente con la batería<br />
incorporada, esta batería solo deberá ser reemplazada por <strong>per</strong>sonal técnico<br />
cualificado para ello.<br />
Para asegurarse de que la batería será tratada correctamente, entregue el<br />
producto al final de su vida útil en un punto de recogida para el reciclado de<br />
aparatos eléctricos y electrónicos.<br />
Para las demás baterías, consulte la sección donde se indica cómo extraer la<br />
batería del producto de forma segura. Deposite la batería en el correspondiente<br />
punto de recogida para el reciclado de baterías.<br />
Para recibir información detallada sobre el reciclaje de este producto o de la<br />
batería, póngase en contacto con el ayuntamiento, el punto de recogida más<br />
cercano o el establecimiento donde ha adquirido el producto.<br />
Información adicional sobre la grabación de larga duración<br />
Si se apaga la potencia, deje la cámara durante 10 minuto o más para <strong>per</strong>mitir que la<br />
tem<strong>per</strong>atura dentro de la cámara baje a un nivel seguro.<br />
La tem<strong>per</strong>atura de la cámara aumenta rápidamente en ambientes de alta tem<strong>per</strong>atura.<br />
Cuando la tem<strong>per</strong>atura de la cámara aumenta, es posible que se deteriore la calidad de<br />
imagen.<br />
Le recomendamos que es<strong>per</strong>e a que baje la tem<strong>per</strong>atura de la cámara antes de continuar<br />
usándola.<br />
Es probable que la su<strong>per</strong>ficie de la cámara se caliente. Este no es un caso de error de<br />
funcionamiento.<br />
Mensajes deerror<br />
BATT: Error de batería<br />
MEDIA: Error de medios<br />
HEAT: Error de aumento de tem<strong>per</strong>atura, tem<strong>per</strong>atura alta en la batería<br />
LowPw: Nivel de batería bajo<br />
ERROR: Error de sistema, anormalidad de tensión, otro error<br />
Para obtener más detalles, consulte la Guía práctica (PDF).<br />
<br />
<br />
<br />
<br />
<br />
<br />
<br />
<br />
<br />
<br />
<br />
<br />
<br />
<br />
<br />
<br />
<br />
<br />
<br />
<br />
Cómo verificar los elementos en grupo<br />
Cámara (1)<br />
Cable micro USB (1)<br />
Batería recargable (NP-BX1) (1)<br />
Bandeja de batería, tipo X (solo para NP-BX1) (1)<br />
Conectada a la cámara.<br />
Bandeja de batería, tipo G (solo para NP-FG1/BG1) (1)<br />
Funda resistente al agua (1)<br />
Hebilla de sujeción (1)<br />
Soporte adhesivo plano (1)<br />
Soporte adhesivo curvado (1)<br />
Guía práctica<br />
Incluido en la memoria interna de esta cámara.<br />
Conjunto de documentación impresa<br />
Especificaciones<br />
Formato de señal: color NTSC, estándares EIA<br />
Especificación HDTV 1080/60i, 1080/60p<br />
Requisitos de potencia: Batería recargable, cc de 3,6 V (NP-BX1)<br />
Batería recargable, cc de 3,6 V (NP-BG1)<br />
USB, cc de 5,0 V<br />
Consumo de alimentación: 1,7 W (cuando el tamaño de la imagen de la<br />
película es [1920 × 1080 30P])<br />
USB cargando: cc de 5,0 V 500 mA/600 mA<br />
Para conocer más especificaciones, consulte “Especificaciones” en la Guía<br />
práctica (PDF).<br />
El diseño y las especificaciones están sujetos a cambios sin previo aviso.<br />
Acerca de las marcas comerciales<br />
“Memory Stick”, “ ”, “Memory Stick Duo”, “ ”, “Memory Stick<br />
PRO Duo”, “<br />
”, “Memory Stick PRO-HG Duo”,<br />
“ ”, “Memory Stick Micro”, “MagicGate”, “ ”,<br />
“MagicGate Memory Stick” y “MagicGate Memory Stick Duo” son marcas comerciales<br />
o marcas registradas de <strong>Sony</strong> Corporation.<br />
HDMI, el logo de HDMI y la interfaz multimedia de alta definición son marcas<br />
comerciales o marcas registradas de HDMI Licensing LLC en los Estados Unidos y<br />
otros países.<br />
Microsoft, Windows, Windows Vista y DirectX son marcas registradas o marcas<br />
comerciales de Microsoft Corporation en los Estados Unidos y otros países.<br />
Mac y Mac OS son marcas registradas de Apple Inc. en los Estados Unidos y otros<br />
países.<br />
Intel, Intel Core y Pentium son marcas comerciales o marcas registradas de Intel<br />
Corporation o sus subsidiarias en los Estados Unidos y otros países.<br />
“ ” y “PlayStation” son marcas registradas de <strong>Sony</strong> Computer Entertainment Inc.<br />
Puede disfrutar más con su PlayStation 3 si descarga la aplicación para PlayStation 3 de<br />
PlayStation Store (donde esté disponible).<br />
La aplicación en la PlayStation 3 requiere una cuenta PlayStation Network y la descarga<br />
de la aplicación. Podrá acceder a ella en las zonas donde la PlayStation Store esté<br />
disponible.<br />
Adobe, el logo de Adobe y Adobe Acrobat son marcas registradas o marcas comerciales<br />
de Adobe Systems Incorporated en los Estados Unidos y otros países.<br />
El logo de microSD y el logo de microSDHC son marcas comerciales de SD-3C, LLC.<br />
Asimismo, los nombres de productos y sistemas utilizados en este manual son, en general,<br />
marcas comerciales o marcas registradas de sus respectivos desarrolladores o fabricantes.<br />
Sin embargo, no se utilizan los símbolos o todas las veces que aparecen en este<br />
manual.<br />
<br />
<br />
<br />
<br />
<br />
<br />
<br />
<br />
<br />
<br />
Português<br />
AVISO<br />
Para reduzir o risco de incêndio ou choque eléctrico<br />
1) não exponha a unidade à chuva ou à humidade;<br />
2) não coloque objectos cheios de líquidos como, por exemplo, jarras,<br />
sobre o aparelho.<br />
Não exponha as pilhas a fontes de calor excessivo, como o sol, fogo ou<br />
outras.<br />
ATENÇÃO<br />
Bateria<br />
Se a bateria for indevidamente utilizada, a mesma pode rebentar, provocar um<br />
incêndio ou queimaduras químicas. Tenha em atenção as seguintes precauções.<br />
Não desmonte.<br />
Não esmague nem exponha a bateria a nenhum choque ou força como martelar, deixar<br />
cair, ou pisar a bateria.<br />
Não cause curto-circuitos e não toque com objectos metálicos nos terminais da bateria.<br />
Não exponha a uma tem<strong>per</strong>atura su<strong>per</strong>ior a 60 °C como, por exemplo, à luz solar<br />
directa ou dentro de um automóvel estacionado ao sol.<br />
Não proceda à incineração nem queime.<br />
Não manuseie baterias de iões de lítio danificadas ou que estejam a derramar líquido.<br />
Certifique-se de que carrega a bateria, utilizando um carregador de bateria <strong>Sony</strong><br />
autêntico ou um dispositivo que possa fazê-lo.<br />
Mantenha a bateria fora do alcance das crianças.<br />
Não molhe a bateria.<br />
Substitua-a apenas por outra do mesmo tipo ou por um tipo equivalente recomendado<br />
pela <strong>Sony</strong>.<br />
Desfaça-se imediatamente de baterias usadas, tal como descrito nas instruções.<br />
Substitua a bateria apenas por uma do tipo especificado. Se não o fizer pode<br />
provocar um incêndio ou choque eléctrico.<br />
PARA OS CLIENTES DA EUROPA<br />
Nota para os clientes nos países que apliquem as Directivas da UE<br />
O fabricante deste produto é a <strong>Sony</strong> Corporation, 1-7-1 Konan Minato-ku<br />
Tokyo, 108-0075 Japan. O Representante Autorizado para EMC e segurança de<br />
produto é a <strong>Sony</strong> Deutschland GmbH, Hedelfinger Strasse 61, 70327, Stuttgart,<br />
Germany. Para questões acerca de serviço e acerca da garantia, consulte as<br />
moradas fornecidas em separado, nos documentos de serviço e garantia.<br />
<strong>Sony</strong> Corporation declara que esta Câmara de vídeo digital HD <strong>HDR</strong>-<strong>AS15</strong><br />
está conforme com os requisitos essenciais e outras disposições da Directiva<br />
1999/5/CE. Para mais informações, por favor consulte a seguinte URL:<br />
http://www.compliance.sony.de/<br />
Este produto foi testado e está em conformidade com os limites estabelecidos<br />
no regulamento EMC relativamente à utilização de cabos com comprimento<br />
inferior a 3 metros.<br />
Atenção<br />
Os campos magnéticos em frequências específicas podem influenciar a<br />
imagem e o som desta unidade.<br />
Nota<br />
Se a transferência de dados for interrompida a meio (falhar) devido a<br />
interferências electromagnéticas ou electricidade estática, reinicie a aplicação<br />
ou desligue e volte a ligar o cabo de comunicação (USB, etc.) de novo.<br />
Tratamento de Equipamentos Eléctricos e Electrónicos no final da sua vida útil<br />
(Aplicável na União Europeia e em países Europeus com sistemas de recolha<br />
selectiva de resíduos)<br />
Este símbolo, colocado no produto ou na sua embalagem, indica<br />
que este não deve ser tratado como resíduo urbano<br />
indiferenciado. Deve sim ser colocado num ponto de recolha<br />
destinado a resíduos de equipamentos eléctricos e electrónicos.<br />
Assegurandose que este produto é correctamente depositado, irá<br />
prevenir potenciais consequências negativas para o ambiente<br />
bem como para a saúde, que de outra forma poderiam ocorrer<br />
pelo mau manuseamento destes produtos. A reciclagem dos materiais<br />
contribuirá para a conservação dos recursos naturais. Para obter informação<br />
mais detalhada sobre a reciclagem deste produto, por favor contacte o<br />
município onde reside, os serviços de recolha de resíduos da sua área ou a loja<br />
onde adquiriu o produto.<br />
Tratamento de pilhas no final da sua vida útil (Aplicável na União Europeia e em<br />
países Europeus com sistemas de recolha selectiva de resíduos)<br />
Este símbolo, colocado na pilha ou na sua embalagem, indica que<br />
estes produtos não devem ser tratados como resíduos urbanos<br />
indiferenciados.<br />
Em determinadas pilhas este símbolo pode ser usado em<br />
combinação com um símbolo químico. Os símbolos químicos<br />
para o mercúrio (Hg) ou chumbo (Pb) são adicionados se a pilha contiver mais<br />
de 0,0005% em mercúrio ou 0,004% em chumbo.<br />
Devem antes ser colocados num ponto de recolha destinado a resíduos de<br />
pilhas e acumuladores.<br />
Assegurando-se que estas pilhas são correctamente depositadas, irá prevenir<br />
potenciais consequências negativas para o ambiente bem como para a saúde,<br />
que de outra forma poderiam ocorrer pelo mau manuseamento destas pilhas.<br />
A reciclagem dos materiais contribuirá para a conservação dos recursos<br />
naturais.<br />
Se por motivos de segurança, desempenho ou protecção de dados, os produtos<br />
necessitarem de uma ligação <strong>per</strong>manente a uma pilha integrada, esta só deve<br />
ser substituída por profissionais qualificados.<br />
Acabado o <strong>per</strong>íodo de vida útil do aparelho, coloque-o no ponto de recolha de<br />
produtos eléctricos/electrónicos de forma a garantir o tratamento adequado<br />
da bateria integrada. Para as restantes pilhas, por favor, consulte as instruções<br />
do equipamento sobre a remoção da mesma. Deposite a bateria num ponto de<br />
recolha destinado a resíduos de pilhas e baterias.<br />
Para informações mais detalhadas sobre a reciclagem deste produto, por favor<br />
contacte o município onde reside, os serviços de recolha de resíduos da sua<br />
área ou a loja onde adquiriu o produto.<br />
Notas sobre a gravação prolongada<br />
Se a alimentação estiver desligada, deixe a câmara durante 10 minutos ou mais, para<br />
<strong>per</strong>mitir que a tem<strong>per</strong>atura no interior da câmara diminua para um nível seguro.<br />
Sob altas tem<strong>per</strong>aturas ambiente, a tem<strong>per</strong>atura da câmara aumenta rapidamente.<br />
Quando a tem<strong>per</strong>atura da câmara aumenta, a qualidade da imagem pode deteriorar-se.<br />
Recomenda-se que aguarde até que a tem<strong>per</strong>atura da câmara diminua antes de<br />
continuar a filmar.<br />
A su<strong>per</strong>fície da câmara pode aquecer. Tal não se trata de uma avaria.<br />
Mensagens de erro<br />
BATT: Erro da bateria<br />
MEDIA: Erro do suporte<br />
HEAT: Erro de subida de tem<strong>per</strong>atura, Tem<strong>per</strong>atura elevada da bateria<br />
LowPw: Carga reduzida da bateria<br />
ERROR: Erro do sistema, Anomalia de tensão, outro erro<br />
Para mais detalhes, consulte o Manual (PDF).<br />
Verificar os itens incluídos no pacote<br />
Câmara (1)<br />
Cabo micro USB (1)<br />
Bateria recarregável (NP-BX1) (1)<br />
Tabuleiro de bateria, tipo X (apenas para NP-BX1) (1)<br />
Montado na câmara.<br />
Tabuleiro de bateria, tipo G (apenas para NP-FG1/BG1) (1)<br />
Caixa estanque (1)<br />
Fivela de encaixe (1)<br />
Suporte adesivo plano (1)<br />
Suporte adesivo curvo (1)<br />
Manual<br />
Incluído na memória interna desta câmara.<br />
Documentos impressos<br />
<br />
<br />
<br />
<br />
<br />
<br />
<br />
<br />
<br />
<br />
<br />
<br />
<br />
<br />
<br />
<br />
<br />
<br />
<br />
<br />
Especificações<br />
Formato de sinal: cores NTSC, padrões EIA<br />
Especificação HDTV 1080/60i, 1080/60p<br />
Requisitos de alimentação: Bateria recarregável, 3,6 V (NP-BX1)<br />
Bateria recarregável, 3,6 V (NP-BG1)<br />
USB, 5,0 V<br />
Carregamento USB: CC 5,0 V, 500 mA/600 mA<br />
Para obter mais especificações, consulte as “Especificações” no Manual (PDF).<br />
O design e as especificações estão sujeitos a alterações sem aviso prévio.<br />
Sobre marcas comerciais<br />
“Memory Stick”, “ ”, “Memory Stick Duo”, “ ”, “Memory Stick<br />
PRO Duo”, “<br />
”, “Memory Stick PRO-HG Duo”,<br />
“ ”, “Memory Stick Micro”, “MagicGate”,<br />
“ ”, “MagicGate Memory Stick” e “MagicGate Memory Stick Duo”<br />
são marcas comerciais ou marcas comerciais registadas da <strong>Sony</strong> Corporation.<br />
HDMI, o logótipo HDMI e High-Definition Multimedia Interface são marcas<br />
comercias ou marcas comerciais registadas da HDMI Licensing LLC nos Estados<br />
Unidos e noutros países.<br />
Microsoft, Windows, Windows Vista e DirectX são marcas comerciais registadas ou<br />
marcas comerciais da Microsoft Corporation nos Estados Unidos e/ou noutros países.<br />
Mac e Mac OS são marcas comerciais registadas da Apple Inc. nos EUA e noutros<br />
países.<br />
Intel, Intel Core e Pentium são marcas comerciais ou marcas comerciais registadas da<br />
Intel Corporation ou das suas subsidiárias nos Estados Unidos e noutros países.<br />
“ ” e “PlayStation” são marcas comerciais registadas da <strong>Sony</strong> Computer<br />
Entertainment Inc.<br />
Aumente a diversão com a sua PlayStation 3 ao transferir a aplicação para a PlayStation<br />
3 a partir da PlayStation Store (se disponível).<br />
A aplicação para a PlayStation 3 requer uma conta PlayStation Network e a<br />
transferência da aplicação. Acessível em áreas onde a PlayStation Store está disponível.<br />
Adobe, o logótipo Adobe e Adobe Acrobat são marcas comerciais registadas ou marcas<br />
comerciais da Adobe Systems Incorporated nos Estados Unidos e/ou noutros países.<br />
O logótipo microSD e o logótipo microSDHC são marcas comerciais da SD-3C, LLC.<br />
Além disso, os nomes de produtos e sistemas utilizados neste manual são, em geral,<br />
marcas comerciais ou marcas comerciais registadas dos respectivos programadores ou<br />
fabricantes. No entanto, as marcas ou não são utilizadas em todos os casos neste<br />
manual.


