

Sony HMZ-T2 - HMZ-T2 Guida di configurazione rapid Inglese
Sony HMZ-T2 - HMZ-T2 Guida di configurazione rapid Inglese
Sony HMZ-T2 - HMZ-T2 Guida di configurazione rapid Inglese

Create successful ePaper yourself
Turn your PDF publications into a flip-book with our unique Google optimized e-Paper software.
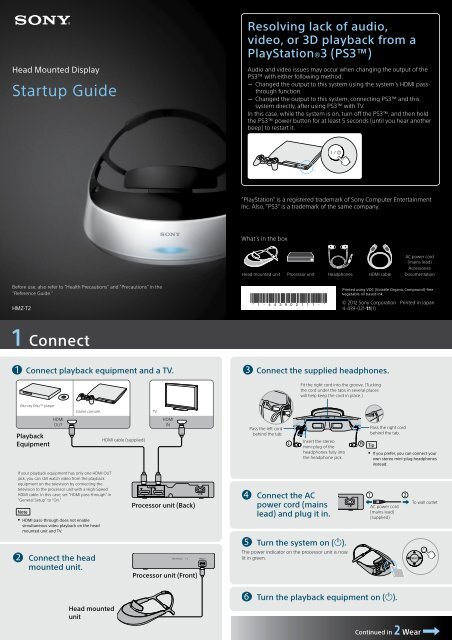
Head Mounted Display<br />
Startup Guide<br />
Resolving lack of au<strong>di</strong>o,<br />
video, or 3D playback from a<br />
PlayStation ® 3 (PS3)<br />
Au<strong>di</strong>o and video issues may occur when changing the output of the<br />
PS3 with either following method.<br />
Changed the output to this system using the system’s HDMI passthrough<br />
function.<br />
Changed the output to this system, connecting PS3 and this<br />
system <strong>di</strong>rectly, after using PS3 with TV.<br />
In this case, while the system is on, turn off the PS3, and then hold<br />
the PS3 power button for at least 5 seconds (until you hear another<br />
beep) to restart it.<br />
”PlayStation” is a registered trademark of <strong>Sony</strong> Computer Entertainment<br />
Inc. Also, ”PS3” is a trademark of the same company.<br />
What’s in the box<br />
Head mounted unit Processor unit Headphones HDMI cable<br />
AC power cord<br />
(mains lead)<br />
Accessories<br />
Documentation<br />
Before use, also refer to “Health Precautions” and “Precautions” in the<br />
“Reference Guide.”<br />
<strong>HMZ</strong>-<strong>T2</strong><br />
© 2012 <strong>Sony</strong> Corporation Printed in Japan<br />
4-439-021-11(1)<br />
1 Connect<br />
Connect playback equipment and a TV. Connect the supplied headphones.<br />
Fit the right cord into the groove. (Tucking<br />
the cord under the tabs in several places<br />
will help keep the cord in place.)<br />
Blu-ray Disc TM player<br />
Game console<br />
TV<br />
Playback<br />
Equipment<br />
HDMI<br />
OUT<br />
HDMI cable (supplied)<br />
HDMI<br />
IN<br />
Pass the left cord<br />
behind the tab.<br />
Insert the stereo<br />
mini-plug of the<br />
headphones fully into<br />
the headphone jack.<br />
Pass the right cord<br />
behind the tab.<br />
Tip<br />
If you prefer, you can connect your<br />
own stereo mini-plug headphones<br />
instead.<br />
If your playback equipment has only one HDMI OUT<br />
jack, you can still watch video from the playback<br />
equipment on the television by connecting the<br />
television to the processor unit with a High-Speed<br />
HDMI cable. In this case, set “HDMI pass-through” in<br />
“General Setup” to “On.”<br />
Note<br />
HDMI pass-through does not enable<br />
simultaneous video playback on the head<br />
mounted unit and TV.<br />
Processor unit (Back)<br />
Connect the AC<br />
power cord (mains<br />
lead) and plug it in.<br />
AC power cord<br />
(mains lead)<br />
(supplied)<br />
To wall outlet<br />
Turn the system on ().<br />
Connect the head<br />
mounted unit.<br />
Processor unit (Front)<br />
The power in<strong>di</strong>cator on the processor unit is now<br />
lit in green.<br />
Head mounted<br />
unit<br />
Turn the playback equipment on ().<br />
Continued in 2 Wear
2 Wear<br />
Wearing the unit will prevent you from seeing outside the <strong>di</strong>splay. Before you put it on, take a moment<br />
to review steps 2 – 4 (Wear, Set up, and Enjoy), so that you know the sequence of procedure.<br />
For a Comfortable Fit<br />
Support the unit with your forehead<br />
and at two positions on the back of<br />
your head.<br />
Do not rest on your nose.<br />
Adjust the unit so that the screens<br />
are in front of your eyes.<br />
Adjust the position on your head.<br />
Carefully adjust the unit left, right, up, and down to find the<br />
best position for viewing the center of the screens.<br />
Notes<br />
If the unit detects that the forehead supporter is not against<br />
your forehead during viewing, the screens will be deactivated.<br />
Make sure the forehead supporter rests securely against your<br />
forehead.<br />
If the forehead supporter is too far back (toward your<br />
forehead), it may be <strong>di</strong>fficult to see the screens. In this case,<br />
hol<strong>di</strong>ng the lock lever toward the left, lift the forehead<br />
supporter and push the supporter forward.<br />
Eye<br />
Screen<br />
Tighten the headband securely.<br />
If you normally wear glasses or contact lenses, wear them as usual during use (with the exception of rea<strong>di</strong>ng<br />
glasses). Note that watching with bifocals may be less than optimal.<br />
Tip<br />
The length of the top and bottom headband straps can be<br />
adjusted. For details, see the “Reference Guide.”<br />
Pull out the headband.<br />
On one side after another, hold the band release<br />
button down and pull out the headband.<br />
Wear the headphones.<br />
Wear the earpiece marked R in your right ear and the one<br />
marked L in your left ear.<br />
Put the head mounted unit on your<br />
head.<br />
Lower the bottom headband strap to the base of your<br />
head.<br />
To remove the head mounted unit<br />
Remove the headphones from your ears before taking off<br />
the head mounted unit.<br />
Hold the band release buttons on both sides and pull the<br />
unit forward as you lift it off.<br />
3 Set Up<br />
Follow the instructions <strong>di</strong>splayed on<br />
the screen for operations.<br />
4 Enjoy<br />
Select a <strong>di</strong>splay language (first time<br />
only).<br />
Press the / button to select a<br />
language, and then press the MENU or <br />
button.<br />
Control playback from compatible playback<br />
sources.<br />
Controlling Playback from the Unit<br />
Adjust the lens span.<br />
Slide each lens span<br />
adjuster until you can see<br />
both screens clearly.<br />
After adjustment, press the MENU button or button.<br />
Tips<br />
If you cannot see the screen clearly after lens span<br />
adjustment, start over from “2 Wear.”<br />
If adjustment is <strong>di</strong>fficult, try sli<strong>di</strong>ng both adjusters to the<br />
center position before adjustment.<br />
Fast-rewind<br />
Hold the button down<br />
to jump to the previous<br />
chapter.<br />
Play<br />
Power on/<br />
standby<br />
Hold the button down<br />
to enter standby mode.<br />
Fast-forward<br />
Hold the button down<br />
to jump to the next<br />
chapter.<br />
All three “I” marks and the<br />
horizontal line intersect.<br />
More than one of the “I” marks and<br />
the horizontal line do not intersect.<br />
Check <strong>di</strong>splay alignment.<br />
Confirm that all three “I” marks and the horizontal line<br />
intersect, and then press the MENU or button.<br />
It is acceptable if the “I” marks and the horizontal line<br />
intersect in a position other than the center of the<br />
screen.<br />
Note<br />
If even one of the “I” marks and the horizontal line do<br />
not intersect, stop using the system. For details, see the<br />
“Reference Guide.”<br />
Follow the instructions <strong>di</strong>splayed.<br />
After rea<strong>di</strong>ng the information, press the MENU or <br />
button.<br />
For details on configuring menu settings and attaching accessories, see<br />
the “Reference Guide.”<br />
Note<br />
Volume<br />
Notes<br />
Pause<br />
The system cannot be used for advanced<br />
playback equipment control, such as menu<br />
operations.<br />
Control using these buttons is only possible when<br />
the “Control for HDMI” in “General Setup” is set to<br />
“On” (default setting).<br />
Some playback equipment cannot be controlled<br />
using the head mounted unit buttons.<br />
To resolve a lack of au<strong>di</strong>o, video, or 3D playback when the system is connected to a PlayStation ® 3<br />
(PS3), see the instructions on the page to the right of the cover for troubleshooting.


