

BlackandDecker Soffiatore- Gw200 - Type 3 - Instruction Manual (Inglese)
BlackandDecker Soffiatore- Gw200 - Type 3 - Instruction Manual (Inglese)
BlackandDecker Soffiatore- Gw200 - Type 3 - Instruction Manual (Inglese)

You also want an ePaper? Increase the reach of your titles
YUMPU automatically turns print PDFs into web optimized ePapers that Google loves.
4<br />
!<br />
• Replacement fans are available from a<br />
Black & Decker service agent.<br />
Warning! If the supply cord is damaged, it<br />
must be replaced by a special cord or<br />
assembly available from Black & Decker or a<br />
recognised service agent (Black & Decker<br />
part number: 372832-01 - UK only and part<br />
number: 370017-04 - Australia and New<br />
Zealand only).<br />
The Black & Decker policy is one of continuous<br />
improvement to their product and as such they<br />
reserve the right to change product specification<br />
without prior notice.<br />
Double insulation<br />
Your machine is double insulated. This<br />
means that all external metal parts are<br />
electrically isolated from the power supply.<br />
This is achieved by placing an extra<br />
insulation barrier between the electrical and<br />
mechanical parts. Double insulation means<br />
greater electrical safety and obviates the<br />
necessity of having the machine earthed.<br />
Electrical safety (UK only)<br />
Your machine should always be switched off at the<br />
mains before disconnecting any plug and socket<br />
connector or extension cables.<br />
Fuse replacement<br />
If your machine is supplied with cable, fitted with a<br />
non-re-wireable plug:<br />
• The plug is fitted with a 13 amp fuse which is the<br />
recommended fuse for your machine.<br />
• Only use replacement fuses which are approved<br />
to BS1362.<br />
• When changing the fuse in your plug, always<br />
ensure the fuse cover is refitted. If the fuse cover<br />
is missing or damaged do not use the plug.<br />
Note: Fuses do not give personal protection against<br />
electric shock.<br />
Plug replacement<br />
• Disconnect the plug from the supply.<br />
• Cut off the plug and dispose of immediately.<br />
Insertion of a detached plug into a 13 amp<br />
socket outlet may result in electric shock.<br />
• Only fit BS1363A approved plugs fitted with the<br />
correctly rated fuse.<br />
• The cable wire colours, or a letter, will be marked<br />
at the connection points of most good quality<br />
plugs. Attach the wires to their respective points<br />
in the plug (see above). Brown is for “Live” (L)<br />
and blue is for “Neutral” (N).<br />
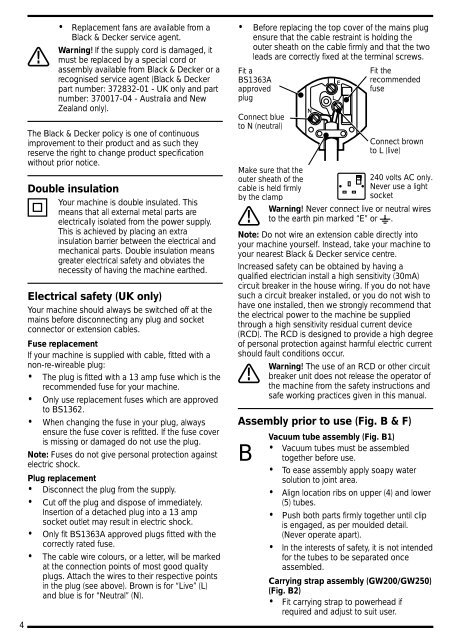
• Before replacing the top cover of the mains plug<br />
ensure that the cable restraint is holding the<br />
outer sheath on the cable firmly and that the two<br />
leads are correctly fixed at the terminal screws.<br />
Fit a<br />
BS1363A<br />
approved<br />
plug<br />
Connect blue<br />
to N (neutral)<br />
Make sure that the<br />
outer sheath of the<br />
cable is held firmly<br />
by the clamp<br />
Fit the<br />
recommended<br />
fuse<br />
Connect brown<br />
to L (live)<br />
240 volts AC only.<br />
Never use a light<br />
socket<br />
Warning! Never connect live or neutral wires<br />
! to the earth pin marked “E” or .<br />
Note: Do not wire an extension cable directly into<br />
your machine yourself. Instead, take your machine to<br />
your nearest Black & Decker service centre.<br />
Increased safety can be obtained by having a<br />
qualified electrician install a high sensitivity (30mA)<br />
circuit breaker in the house wiring. If you do not have<br />
such a circuit breaker installed, or you do not wish to<br />
have one installed, then we strongly recommend that<br />
the electrical power to the machine be supplied<br />
through a high sensitivity residual current device<br />
(RCD). The RCD is designed to provide a high degree<br />
of personal protection against harmful electric current<br />
should fault conditions occur.<br />
Warning! The use of an RCD or other circuit<br />
! breaker unit does not release the operator of<br />
the machine from the safety instructions and<br />
safe working practices given in this manual.<br />
Assembly prior to use (Fig. B & F)<br />
Vacuum tube assembly (Fig. B1)<br />
• Vacuum tubes must be assembled<br />
B together before use.<br />
• To ease assembly apply soapy water<br />
solution to joint area.<br />
• Align location ribs on upper (4) and lower<br />
(5) tubes.<br />
• Push both parts firmly together until clip<br />
is engaged, as per moulded detail.<br />
(Never operate apart).<br />
• In the interests of safety, it is not intended<br />
for the tubes to be separated once<br />
assembled.<br />
Carrying strap assembly (GW200/GW250)<br />
(Fig. B2)<br />
• Fit carrying strap to powerhead if<br />
required and adjust to suit user.


