

BlackandDecker Lavapavimenti A Vapore- Fsmh1621 - Type 1 - Instruction Manual (Inglese)
BlackandDecker Lavapavimenti A Vapore- Fsmh1621 - Type 1 - Instruction Manual (Inglese)
BlackandDecker Lavapavimenti A Vapore- Fsmh1621 - Type 1 - Instruction Manual (Inglese)

Create successful ePaper yourself
Turn your PDF publications into a flip-book with our unique Google optimized e-Paper software.
FSMH1621D
A<br />
B<br />
C<br />
D<br />
E<br />
2
F<br />
G<br />
H<br />
I<br />
J<br />
3
K<br />
L<br />
M<br />
N<br />
4
(Original instructions)<br />
ENGLISH<br />
Intended use<br />
Your Black & Decker steam mop has been designed for<br />
sanitising and cleaning sealed hardwood, sealed laminate,<br />
linoleum, vinyl, ceramic tile, stone and marble floors and for<br />
refreshing carpets. This appliance is intended for indoor<br />
household use only.<br />
Warning! Read all of the 'Safety, Maintenance,<br />
Service' manual carefully before operating<br />
this appliance.<br />
Read all of this manual carefully before operating<br />
the appliance.<br />
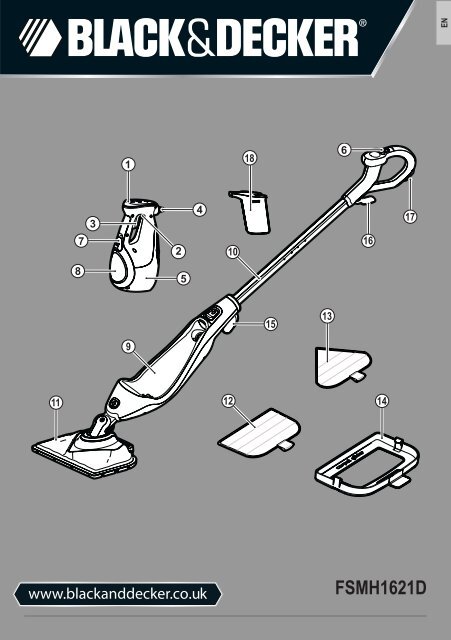
Features<br />
This appliance includes some or all of the following features.<br />
1. ON/Off switch<br />
2. Lock off button<br />
3. Trigger switch<br />
4. Steam nozzle<br />
5. Hand held steam cleaner<br />
6. Autoselect TM button<br />
7. Filler cap<br />
8. Water tank<br />
9. Steam mop body<br />
10. Handle<br />
11. Steam head<br />
12. Steam head cleaning pad<br />
13. Delta head cleaning pad<br />
14. Carpet glider<br />
15. Bottom cable tidy hook<br />
16. Top cable tidy hook<br />
17. Cable management clip<br />
18. Jug<br />
Accessories<br />
This appliance includes some of the following accessories<br />
others are available to purchase from the Black & Decker<br />
website.<br />
The performance of your appliance depends on the accessory<br />
used. Black & Decker accessories are engineered to high<br />
quality standards and designed to enhance the performance<br />
of your appliance. By using these accessories you will get the<br />
very best from your appliance.<br />
Flexible hose and handle<br />
For convenient use of all accessories.<br />
Variable steam jet nozzle<br />
For higher pressure steam bursts, twist to change<br />
the spray pattern of the steam burst.<br />
Hand held delta head<br />
For cleaning large tiled areas and work surfaces.<br />
Small brush (Yellow)<br />
For cleaning kitchens.<br />
Large Squeegee<br />
For cleaning glass doors and windows.<br />
Warning! Do not use the window squeegee on cold<br />
glass. It may cause the glass to break.<br />
Assembly<br />
Warning! Before attempting any of the following operations,<br />
make sure that the appliance is switched off and unplugged<br />
and that the appliance is cold and does not contain any water.<br />
Attaching the handle (Fig. A)<br />
u Slide the bottom end of the handle (10) into the top end of<br />
the steam mop body (9) until it clicks into place. The arrow<br />
on the handle (10) should be aligned with the top of the<br />
steam mop body (9).<br />
Attaching the steam head (Fig. B)<br />
u Slide the bottom end of the steam mop body (9) onto the<br />
steam head (11) until it clicks into place.<br />
u The steam head can be removed from the Steam mop<br />
body by pressing the steam head release button (19) and<br />
pulling the steam mop body (9) off the steam head (11).<br />
Attaching the hand held steam cleaner (Fig. C)<br />
u Holding the back of the steam mop body (9) Push the<br />
hand held steam cleaner (5) firmly into the steam mop<br />
body (9) until it clicks into place.<br />
Caution! Always ensure the handle command lights up to<br />
confirm the unit is docked.<br />
Warning! Inspect that the seal (26 Fig. J) on the steam nozzle<br />
(4) before fitting the hand held steam mop to the steam mop<br />
body. If the seal is missing or damaged then please contact<br />
your nearest authorised repair agent. Do not use the appliance.<br />
5
ENGLISH<br />
(Original instructions)<br />
Removing the hand held steam cleaner (Fig. C)<br />
u Push the release button (20) down and pull the hand held<br />
steam cleaner (5) away from the steam mop body<br />
Attaching a cleaning pad (Fig. D)<br />
Replacement cleaning pads are available from your Black &<br />
Decker dealer:<br />
Steam head cleaning pad (12) - cat. no. FSMP20-XJ.<br />
Delta head cleaning pad (13) - cat. no. FSMP30-XJ.<br />
u Place a cleaning pad (12 or 13) on the floor with the ‘hook<br />
& loop’ side facing up.<br />
u Lightly press the steam mop down onto the cleaning pad<br />
(12 or 13).<br />
Caution! Always place your steam mop with the handle (10)<br />
in the upright position when stationary and make sure the<br />
steam mop is turned off when not in use.<br />
Removing a cleaning pad (Fig. E)<br />
Caution! Always wear suitable shoes when changing the<br />
cleaning pad on your steam mop. Do not wear slippers or<br />
open toed footwear.<br />
u Return the handle (10) to the upright position and turn the<br />
steam mop ‘OFF’.<br />
u Wait until the steam mop cools down. (approximately five<br />
minutes)<br />
u Place the front of your shoe onto the cleaning pad removal<br />
tab (21) and press down firmly.<br />
u Lift the steam mop up off the cleaning pad.<br />
Caution! Always place your steam mop with the handle (10)<br />
in the upright position when stationary and make sure the<br />
steam mop is turned off when not in use.<br />
Filling the water tank (Fig. F)<br />
This Steam cleaner incorporates an anti-calc system to help<br />
prolong the life of the system.<br />
Note: Fill the water tank with clean tap water.<br />
Note: In areas of very hard water, the use of de-ionised water<br />
is recommended.<br />
u Open the filler cap (7) by flipping it down.<br />
u Using the jug, fill the water tank (8) with water.<br />
Warning! Your water tank has a 0.36 litre capacity.<br />
u Re-fit the filler cap (7).<br />
Note: Ensure the filler cap is firmly secured.<br />
Note: When not in use, the jug (18) may be clipped to the<br />
handle for convenient storage.<br />
Note: Do not use chemical cleaners with your steam mop..<br />
Attaching the carpet glider (Fig. G) (For use on<br />
carpets only)<br />
u Place carpet glider on the floor.<br />
u Attach a cleaning pad to the unit.<br />
u Lightly press the steam mop down onto the carpet glider<br />
(14) until it clicks into place.<br />
6<br />
Caution! Always place your steam mop with the handle (10)<br />
in the upright position when stationary and make sure the<br />
steam mop is turned off when not in use.<br />
Removing the carpet glider (Fig. G)<br />
Caution! Always wear suitable shoes when changing the<br />
carpet glider on your steam mop. Do not wear slippers or<br />
open toed footwear.<br />
u Return the handle (10) to the upright position and turn the<br />
steam mop ‘OFF’.<br />
u Wait until the steam mop cools down. (approximately five<br />
minutes)<br />
u Place the front of your shoe onto the carpet glider removal<br />
tab (22) and press down firmly.<br />
u Lift the steam mop up off the carpet glider (14).<br />
Caution! Always place your steam mop with the handle (10)<br />
in the upright position when stationary and make sure the<br />
steam mop is turned off when not in use.<br />
The Delta Head (Fig. H)<br />
This Steam Mop incorporates a built in delta head which<br />
enables you to access into tight corners and narrow gaps.<br />
Caution! Always wear suitable shoes when accessing the<br />
delta head on your steam mop. Do not wear slippers or open<br />
toed footwear.<br />
u Return the handle (10) to the upright position and turn the<br />
steam mop ‘OFF’.<br />
u Wait until the steam mop cools down. (approximately five<br />
minutes)<br />
u Place the front of your shoe onto the steam head removal<br />
tab (24) and press down gently.<br />
u Lift the delta head (23) up off the steam head (5).<br />
u Fit the delta head cleaning pad to the bottom of the delta<br />
head.<br />
Note: Remove the cleaning pad before re-fitting the delta<br />
head to the steam head.<br />
u To refit the delta head, place the tip of the delta head into<br />
the steam head then press down firmly ensuring that the<br />
delta head clicks into place.<br />
Caution! Always place your steam mop with the handle (10)<br />
in the upright position when stationary and make sure the<br />
steam mop is turned off when not in use.<br />
Attaching the hose and accessories to the Hand<br />
held steam cleaner (Fig. J & K)<br />
Warning! Inspect the seal (26) on the steam nozzle (4) and<br />
hose (27) before each use. If the seal is missing or damaged<br />
then please contact your nearest authorised repair agent. Do<br />
not use the appliance.
(Original instructions)<br />
ENGLISH<br />
Attaching the hose (Fig. J)<br />
u Press in the clips (28) on either side of the hose (27).<br />
u Press the hose (27) onto the steam nozzle (4) and release<br />
the clips (28).<br />
Important! Ensure that the hose (27) is securely fastened<br />
before using the hand held steam cleaner. If steam escapes<br />
from the joint then the hose is not correctly fit, allow the unit to<br />
cool then remove and re-fit the hose.<br />
Attaching the variable steam jet nozzle (Fig. K)<br />
u Press in the clips (30) on either side of the variable steam<br />
jet nozzle (31).<br />
u Press the variable steam jet nozzle onto the steam nozzle<br />
(4) or the hose (27) and release the clips (30).<br />
Important! Ensure that the variable steam jet nozzle (31) is<br />
securely fastened before using the hand held steam cleaner.<br />
If steam escapes from the joint then the variable steam jet<br />
nozzle is not correctly fit, allow the unit to cool then remove<br />
and re-fit the variable steam jet nozzle.<br />
Attaching other accessories (Fig. J)<br />
u Align the lugs on the hose with the recesses on the accessory.<br />
u Press the accessory (29) onto the hose (27) and twist<br />
anti-clockwise until the accessory clicks into place.<br />
Note! The variable steam jet nozzle may be used without the<br />
hose by fitting them directly to steam nozzle. All other accessories<br />
must be connected to the hose for use.<br />
Removing the hose and accessories(Fig. J & K)<br />
Warning! The Steam nozzle, variable steam jet nozzle, hose<br />
and accessories become hot during use. Allow the unit and all<br />
accessories to cool before removing any accessories.<br />
Removing an accessory (Fig. J)<br />
u Twist the accessory (29) clockwise then pull away from<br />
the hose (27).<br />
Removing the hose (Fig. J)<br />
u Press in the clips (29) on either side of the hose (27) and<br />
pull away from the steam nozzle (4).<br />
Removing the variable steam jet nozzle (Fig. K)<br />
u Press in the clips (30) on either side of the variable steam<br />
jet nozzle (31) and pull away from the steam nozzle (4).<br />
Use<br />
Important! This unit will kill 99.9% of bacteria & germs when<br />
used in accordance with this manual and with the micro fibre<br />
pad fitted and a continuous run time of 90 seconds.<br />
Switching on and off (Steam mop)<br />
u To switch the appliance on, press the ON/OFF button (1).<br />
It takes approximately 15 seconds for the steam mop to<br />
heat up.<br />
Note: When the steam mop is first turned on the water reservoir<br />
will glow red. Once the steam mop is ready to use the<br />
water reservoir will glow blue.<br />
u To switch the appliance off, press the ON/OFF button (1).<br />
Caution! Never leave the steam mop in one spot on any<br />
surface for any period of time. Always place the steam mop<br />
with the handle (10) in the upright position when stationary<br />
and make sure the steam mop is turned off when not in use.<br />
Caution! Always empty the steam mop after use.<br />
Note: When first filled or after running dry it can take up to 45<br />
seconds for steam to be produced.<br />
Autoselect TM Technology (Fig. I)<br />
This steam mop is fitted with an Autoselect TM button (6)<br />
which shows various cleaning applications. They are used to<br />
select the correct operating mode for your particular cleaning<br />
operation.<br />
Using Autoselect TM , choose from one of the following applications<br />
by pressing the autoselect button (6) until the required<br />
setting is selected:<br />
Wood/Laminate<br />
Stone/Marble<br />
Tiles/Vinyl<br />
The steam mop will select the correct volume of steam<br />
required for your particular cleaning operation.<br />
Note: Always check you are using the correct setting before<br />
using your steam mop. For convenience the steam mop will<br />
remember the last setting you chose.<br />
Steam burst (Fig. I)<br />
The steam mop is equipped with a steam burst button to aid in<br />
the removal of stubborn marks and stains.<br />
u During use, press the steam burst button (25) to apply<br />
extra cleaning power.<br />
Note: The steam burst will last for 10 seconds then the steam<br />
mop will return to the chosen setting.<br />
Switching on and off (Hand held steam cleaner)<br />
(Fig. L)<br />
u To switch the appliance on, press the ON/OFF button (1).<br />
It takes approximately 15 seconds for the hand held steam<br />
cleaner to heat up.<br />
7
ENGLISH<br />
(Original instructions)<br />
Note: When the hand held steam cleaner is first turned on<br />
the water reservoir will glow red. Once the hand held steam<br />
cleaner is ready to use the water reservoir will glow blue.<br />
u Lift the lock off switch (2) and pull the trigger switch (3).<br />
After a few seconds steam will be produced.<br />
u To switch the appliance off, release the trigger switch (3)<br />
then press the ON/OFF button (1).<br />
Caution! Always empty the hand held steam cleaner after<br />
use.<br />
Caution! Steam may continue to be produced for a short time<br />
after the trigger switch (3) is released, this is normal. Switch<br />
off and allow the unit to cool before removing any accessories.<br />
Hints for optimum use<br />
General<br />
Caution! Never use the steam mop without first attaching a<br />
cleaning pad.<br />
u During steam mop use you can use the cable management<br />
clip (17) to keep your cable out of the way of the<br />
work area..<br />
u Always vacuum or sweep the floor before using the steam<br />
mop.<br />
u The easiest way to use the machine is to tilt the handle to<br />
a 45˚ angle and clean slowly, covering a small area at a<br />
time.<br />
u Do not use chemical cleaners with your steam mop. To<br />
remove stubborn stains from vinyl or linoleum floors, you<br />
can use the steam burst button to apply extra steam to<br />
the area or pre-treat with a mild detergent and some water<br />
before using the steam mop.<br />
Steam cleaning with the mop<br />
u Fit hand held steam cleaner (5) to the steam mop body<br />
(9).<br />
u Place a cleaning pad (12) on the floor with the ‘hook &<br />
loop’ side facing up.<br />
u Lightly press the steam mop down onto the cleaning pad<br />
(12).<br />
u Connect the steam mop to the mains.<br />
u Press the ON/OFF button (1). It takes approximately 15<br />
seconds for the steam mop to heat up.<br />
u Press the Autoselect TM button (6) till the required setting is<br />
reached.<br />
u Pulling the handle (10) back will activate the steam pump.<br />
After a few seconds steam will start to come out of the<br />
steam head.<br />
Note: When first filled or after running dry it can take up to 45<br />
seconds for steam to be produced.<br />
u It takes a few seconds for steam to enter the cleaning pad.<br />
The steam mop will now glide easily over the surface to be<br />
sanitised/cleaned.<br />
u Push and pull the steam mop slowly across the floor to<br />
thoroughly steam clean each section.<br />
Note: During use you may turn off the steam pump by returning<br />
the handle to the upright position, this convenient feature<br />
will allow you to leave the steam mop for a short time so that<br />
you may move items of furniture, then continue cleaning<br />
without the need to switch the appliance off.<br />
u When you have finished using the steam mop, return the<br />
handle (10) to the upright position and turn it ‘OFF’ and<br />
wait until the steam mop cools down. (approximately five<br />
minutes)<br />
Caution! It is important to monitor the water level in the water<br />
tank. To refill the water tank and continue to sanitise/clean, return<br />
the handle (10) to the upright position and turn the steam<br />
mop ‘OFF’. Unplug the unit from the electrical wall outlet, refill<br />
the water tank (8).<br />
Caution! Never leave the steam mop in one spot on any<br />
surface for any period of time. Always place the steam mop<br />
with the handle (10) in the upright position when stationary<br />
and make sure the steam mop is turned off when not in use.<br />
Carpet refreshing<br />
u Place a cleaning pad (12) on the floor with the ‘hook &<br />
loop’ side facing up.<br />
u Lightly press the steam mop down onto the cleaning pad<br />
(12).<br />
u Place the carpet glider (14) on the floor.<br />
u Lightly press the steam mop down onto the carpet glider<br />
(14) until it clicks into place.<br />
u Connect the steam mop to the mains.<br />
u Press the ON/OFF button (1). It takes approximately 15<br />
seconds for the steam mop to heat up.<br />
u Press the Autoselect TM button (6) to the Wood/Laminate<br />
setting.<br />
u Pulling the handle (10) back will activate the steam pump.<br />
After a few seconds steam will start to come out of the<br />
steam head.<br />
Note: When first filled or after running dry it can take up to 45<br />
seconds for steam to be produced.<br />
u Push and pull the steam mop slowly across the carpet to<br />
thoroughly refresh each section.<br />
Note: During use you may turn off the steam pump by returning<br />
the handle to the upright position, this convenient feature<br />
will allow you to leave the steam mop for a short time so that<br />
you may move items of furniture, then continue cleaning<br />
without the need to switch the appliance off.<br />
u When you have finished using the steam mop, return the<br />
handle (10) to the upright position and turn it ‘OFF’ and<br />
wait until the steam mop cools down. (approximately five<br />
minutes)<br />
8
(Original instructions)<br />
ENGLISH<br />
Caution! If steam is observed escaping from the join between<br />
the hand held steam cleaner and the steam mop body, switch<br />
off and disconnect the unit from the mains supply. Allow to<br />
cool. Remove the hand held steam cleaner from the steam<br />
mop body. Inspect the seal (26) on the steam nozzle (4) and<br />
hose (27) (fig. J). If the seal is missing or damaged then<br />
please contact your nearest authorised repair agent. Do not<br />
use the appliance. If the seal is in good condition re-fit the<br />
hand held steam cleaner to the steam mop body ensuring that<br />
it is seated firmly in place.<br />
Caution! It is important to monitor the water level in the water<br />
tank. To refill the water tank and continue to sanitise/clean, return<br />
the handle (10) to the upright position and turn the steam<br />
mop ‘OFF’. Unplug the unit from the electrical wall outlet, refill<br />
the water tank (8).<br />
Caution! Never leave the steam mop in one spot on any<br />
surface for any period of time. Always place the steam mop<br />
with the handle (10) in the upright position when stationary<br />
and make sure the steam mop is turned off when not in use.<br />
After use (Fig. M & N)<br />
u Return the handle (10) to the upright position and turn the<br />
steam mop ‘OFF’,<br />
u Wait until the steam mop cools down. (approximately five<br />
minutes)<br />
u Unplug the steam mop from the electrical wall outlet.<br />
u Empty the water tank (8).<br />
u Remove the cleaning pad (12) and wash it ready for<br />
next use. (Take care to follow the wash care instructions<br />
printed on the cleaning pad).<br />
u Wrap the supply cable around the cable tidy hooks (15 &<br />
16).<br />
Note: The top cable tidy hook (16) rotates to easily release<br />
the cable ready for next use.<br />
u Clip the supply cable onto itself using the cable tidy clip<br />
(32) close to the plug.<br />
Note: With the handle (10) in the upright position, the cable<br />
neatly wrapped around the cable tidy hooks (15 & 16) and<br />
secured with the cable tidy clip (32) your steam mop will stand<br />
on its own for storage. Alternatively there is a hanging bracket<br />
(33) built into the hand grip (34) which will allow your steam<br />
mop to be hung from a suitable hook on the wall. Always<br />
ensure that your wall hook is capable of supporting the weight<br />
of the steam mop safely.<br />
Hand held steam cleaning<br />
u Attach the required accessory.<br />
u Connect the hand held steam cleaner to the mains.<br />
u Press the ON/OFF button (1). It takes approximately 15<br />
seconds for the hand held steam cleaner to heat up.<br />
u Lift the lock off (2) and pull the trigger switch (3) to activate<br />
the steam pump. After a few seconds steam will start to<br />
come out of the accessory.<br />
Note: When first filled or after running dry it can take up to 45<br />
seconds for steam to be produced.<br />
Note: During use you may turn off the steam pump by releasing<br />
the trigger switch, this convenient feature will allow you to<br />
place the hand held steam cleaner down for a short time so<br />
that you may move items of furniture, then continue cleaning<br />
without the need to switch the appliance off.<br />
u When you have finished using the hand held steam<br />
cleaner, release the trigger switch (3), turn it ‘OFF’ and<br />
disconnect from the mains supply. Wait until the steam<br />
mop cools down before storing. (approximately five<br />
minutes)<br />
Caution! It is important to monitor the water level in the water<br />
tank. To refill the water tank and continue to sanitise/clean,<br />
turn the hand held steam cleaner ‘OFF’. Unplug the unit from<br />
the electrical wall outlet, refill the water tank (8).<br />
Caution! Steam may continue to be produced for a short time<br />
after the trigger switch (3) is released, this is normal. Switch<br />
off and allow the unit to cool before removing any accessories.<br />
Technical data<br />
Voltage V ac 230<br />
Power<br />
Tank capacity<br />
W<br />
ml<br />
FSMH1621D<br />
(<strong>Type</strong> 1)<br />
1600<br />
350<br />
Weight kg 3.6<br />
9
ENGLISH<br />
(Original instructions)<br />
Troubleshooting<br />
If your appliance seems not to operate properly, follow the<br />
instructions below. If this does not solve the problem, please<br />
contact your local Black & Decker repair agent.<br />
Problem Step Possible solutions<br />
The steam mop is<br />
not turning on.<br />
1 Check the unit is plugged in at the wall<br />
socket.<br />
2 Check the unit is switched on using the on/<br />
off switch (1).<br />
3 Check the fuse in the plug.<br />
Problem Step Possible solutions<br />
No steam is being<br />
produced from the<br />
hand held steam<br />
cleaner when the<br />
17 The hand held steam cleaner has a lock off<br />
feature. Lift the lock off switch (2) and pull<br />
the trigger switch (3). After a few seconds<br />
steam will be produced.<br />
trigger is pulled. 18 Check steps 8, then 1, then 2, then 3.<br />
The hand held<br />
steam cleaner is<br />
producing too little<br />
steam during use.<br />
19 The hand held steam cleaner will begin to<br />
produce steam after 15 seconds and will<br />
reach maximum steam flow after 45<br />
seconds.<br />
The digital controls<br />
do not light up.<br />
4 Check that the handle (10) of the steam mop<br />
is pushed firmly into the steam mop body (9).<br />
Check that the arrow on the handle is flush<br />
with the top of the steam mop body (9).<br />
The hand held<br />
steam cleaner will<br />
not come out from<br />
the steam mop<br />
20 Firmly press the hand held steam cleaner<br />
release button (20) down, then pull the hand<br />
held steam (5) cleaner from the steam mop<br />
body (9).<br />
5 Check that the hand held steam cleaner (5)<br />
body.<br />
is firmly docked into the steam mop body (9).<br />
The accessories<br />
21 Refer to the assembly chapter of the manual<br />
6 Check steps 1, then 2, then 3.<br />
keep falling off the<br />
for correct fitting instructions of all parts and<br />
The steam mop is<br />
not producing<br />
steam.<br />
7 The steam mop will only produce steam<br />
once the handle is pulled back from the<br />
upright position.<br />
8 Check that the water tank (8) is full.<br />
unit.<br />
Steam is escaping<br />
from unexpected<br />
areas of the unit.<br />
accessories.<br />
22 Refer to the assembly chapter of the manual<br />
for correct fitting instructions of all parts and<br />
accessories.<br />
NOTE: When first filled or after running dry it<br />
Where can I get<br />
23 www.blackanddecker.co.uk/steammop<br />
can take up to 45 seconds for steam to be<br />
further information<br />
www.blackanddecker.ie/steammop<br />
produced.<br />
/ accessories for<br />
9 Check that the Steam head (11) is firmly<br />
my steam mop.<br />
docked into the steam mop body (9).<br />
10 Check steps 5, then 1, then 2, then 3.<br />
The digital controls<br />
11 Check steps 4, then 5, then 1, then 2, then 3<br />
go out during use.<br />
The steam mop<br />
12 Check steps 7, then 8, then 9, then 5, then 3.<br />
stops producing<br />
steam during use.<br />
The steam mop is<br />
13 The steam mop has 3 settings. Press the<br />
producing too<br />
autoselect button (6) to reduce the amount of<br />
much steam during<br />
steam being produced.<br />
use.<br />
14 Check that the steam burst button (25) has<br />
not been pressed.<br />
The steam mop is<br />
15 The steam mop has 3 settings. Press the<br />
producing too little<br />
autoselect button (6) to increase the amount<br />
steam during use.<br />
of steam being produced.<br />
16 Press the steam burst button (25) to<br />
temporarily increase the amount of steam.<br />
10
11
Australia<br />
Black & Decker (Australia) Pty. Ltd. Tel. 03-8720 5100<br />
20 Fletcher Road, Mooroolbark, Fax 03-9727 5940<br />
Victoria, 3138<br />
New Zealand<br />
Black & Decker Tel. +64 9 259 1133<br />
5 Te Apunga Place Fax +64 9 259 1122<br />
Mt Wellington<br />
Auckland 1060<br />
United Kingdom<br />
Black & Decker Tel. 01753 511234<br />
210 Bath Road Fax 01753 551155<br />
Slough, Berkshire SL1 3YD<br />
90602009 REV-0 08/2013


