

KitchenAid 300 947 66 - Oven - 300 947 66 - Oven EN (857915615510) Scheda programmi
KitchenAid 300 947 66 - Oven - 300 947 66 - Oven EN (857915615510) Scheda programmi
KitchenAid 300 947 66 - Oven - 300 947 66 - Oven EN (857915615510) Scheda programmi

Create successful ePaper yourself
Turn your PDF publications into a flip-book with our unique Google optimized e-Paper software.
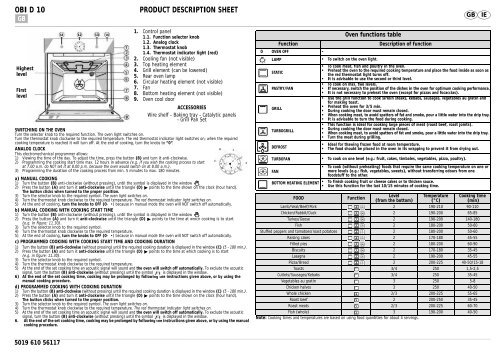
OBI D 10<br />
GB<br />
PRODUCT DESCRIPTION SHEET<br />
GB<br />
IE<br />
Highest<br />
level<br />
First<br />
level<br />
1. Control panel<br />
1.1. Function selector knob<br />
1.2. Analog clock<br />
1.3. Thermostat knob<br />
1.4. Thermostat indicator light (red)<br />
2. Cooling fan (not visible)<br />
3. Top heating element<br />
4. Grill element (can be lowered)<br />
5. Rear oven lamp<br />
6. Circular heating element (not visible)<br />
7. Fan<br />
8. Bottom heating element (not visible)<br />
9. <strong>Oven</strong> cool door<br />
ACCESSORIES<br />
Wire shelf - Baking tray - Catalytic panels<br />
- Grill Pan Set<br />
SWITCHING ON THE OV<strong>EN</strong><br />
Turn the selector knob to the required function. The oven light switches on.<br />
Turn the thermostat knob clockwise to the required temperature. The red thermostat indicator light switches on; when the required<br />
cooking temperature is reached it will turn off. At the end of cooking, turn the knobs to “0”.<br />
ANALOG CLOCK<br />
This electromechanical programmer allows:<br />
1) Viewing the time of the day. To adjust the time, press the button (B) and turn it anti-clockwise.<br />
2) Programming the cooking start time max. 12 hours in advance (e.g. if you wish the cooking process to start<br />
at 7.00 a.m. do NOT set it at 8.00 p.m. because the oven would switch on at 8.00 a.m.).<br />
3) Programming the duration of the cooking process from min. 5 minutes to max. 180 minutes.<br />
a) MANUAL COOKING<br />
1) Turn the button (B) anti-clockwise (without pressing), until the symbol is displayed in the window .<br />
2) Press the button (A) and turn it anti-clockwise until the triangle (D) points to the time shown on the clock (hour hand).<br />
The button clicks when turned to the proper position.<br />
3) Turn the selector knob to the required symbol. The oven light switches on.<br />
4) Turn the thermostat knob clockwise to the required temperature. The red thermostat indicator light switches on.<br />
5) At the end of cooking, turn the knobs to OFF (0- •) because in manual mode the oven will NOT switch off automatically.<br />
b) MANUAL COOKING WITH COOKING START TIME<br />
1) Turn the button (B) anti-clockwise (without pressing), until the symbol is displayed in the window .<br />
2) Press the button (A) and turn it anti-clockwise until the triangle (D) points to the time at which cooking is to start<br />
(e.g. in figure: 11.30).<br />
3) Turn the selector knob to the required symbol.<br />
4) Turn the thermostat knob clockwise to the required temperature.<br />
5) At the end of cooking, turn the knobs to OFF (0- •) because in manual mode the oven will NOT switch off automatically.<br />
c) PROGRAMMED COOKING WITH COOKING START TIME AND COOKING DURATION<br />
1) Turn the button (B) anti-clockwise (without pressing) until the required cooking duration is displayed in the window (C) (5 - 180 min.).<br />
2) Press the button (A) and turn it anti-clockwise until the triangle (D) points to the time at which cooking is to start<br />
(e.g. in figure: 11.30).<br />
3) Turn the selector knob to the required symbol.<br />
4) Turn the thermostat knob clockwise to the required temperature.<br />
5) At the end of the set cooking time an acoustic signal will sound and the oven will switch off automatically. To exclude the acoustic<br />
signal, turn the button (B) anti-clockwise (without pressing) until the symbol is displayed in the window.<br />
6) At the end of the set cooking time, cooking may be prolonged by following the instructions given above, or by using the<br />
manual cooking procedure.<br />
d) PROGRAMMED COOKING WITH COOKING DURATION<br />
1) Turn the button (B) anti-clockwise (without pressing) until the required cooking duration is displayed in the window (C) (5 - 180 min.).<br />
2) Press the button (A) and turn it anti-clockwise until the triangle (D) points to the time shown on the clock (hour hand).<br />
The button clicks when turned to the proper position.<br />
3) Turn the selector knob to the required symbol. The oven light switches on.<br />
4) Turn the thermostat knob clockwise to the required temperature. The red thermostat indicator light switches on.<br />
5) At the end of the set cooking time an acoustic signal will sound and the oven will switch off automatically. To exclude the acoustic<br />
signal, turn the button (B) anti-clockwise (without pressing) until the symbol is displayed in the window.<br />
6. At the end of the set cooking time, cooking may be prolonged by following the instructions given above, or by using the manual<br />
cooking procedure.<br />
Function<br />
0 OV<strong>EN</strong> OFF -<br />
<strong>Oven</strong> functions table<br />
LAMP • To switch on the oven light.<br />
STATIC<br />
PASTRY/FAN<br />
GRILL<br />
TURBOGRILL<br />
DEFROST<br />
Description of function<br />
• To cook meat, fish and poultry in the oven.<br />
• Preheat the oven to the required cooking temperature and place the food inside as soon as<br />
the red thermostat light turns off.<br />
• It is advisable to use the second or third level.<br />
• To cook on max. two levels.<br />
• If necessary, switch the position of the dishes in the oven for optimum cooking performance.<br />
• It is not necessary to preheat the oven (except for pizzas and focaccias).<br />
• Use the grill function to cook sirloin steaks, kebabs, sausages, vegetables au gratin and<br />
for making toast.<br />
• Preheat the oven for 3/5 min.<br />
• During cooking the door must remain closed.<br />
• When cooking meat, to avoid spatters of fat and smoke, pour a little water into the drip tray.<br />
• It is advisable to turn the food during cooking.<br />
• This function is ideal for cooking large pieces of meat (roast beef, roast joints).<br />
• During cooking the door must remain closed.<br />
• When cooking meat, to avoid spatters of fat and smoke, pour a little water into the drip tray.<br />
• Turn the meat during grilling.<br />
• Ideal for thawing frozen food at room temperature.<br />
• The food should be placed in the oven in its wrapping to prevent it from drying out.<br />
TURBOFAN • To cook on one level (e.g.: fruit, cakes, timbales, vegetables, pizza, poultry).<br />
FAN<br />
BOTTOM HEATING ELEM<strong>EN</strong>T<br />
• To cook (without preheating) foods that require the same cooking temperature on one or<br />
more levels (e.g.: fish, vegetables, sweets), without transferring odours from one<br />
foodstuff to the other.<br />
• To finish cooking fruit or cheese cakes or to thicken sauce.<br />
• Use this function for the last 10/15 minutes of cooking time.<br />
FOOD<br />
Function<br />
Level<br />
(from the bottom)<br />
Temperature<br />
(°C)<br />
Cooking time<br />
(min)<br />
Lamb/Veal/Beef/Pork 2 190-210 90-110<br />
Chicken/Rabbit/Duck 2 190-200 65-85<br />
Turkey/Goose 2 190-200 140-180<br />
Fish 2 180-200 50-60<br />
Stuffed peppers and tomatoes/roast potatoes 2 180-200 50-60<br />
Raising cakes 2 170-180 45-55<br />
Filled pies 2 180-200 60-90<br />
Biscuits 2 170-180 35-45<br />
Lasagna 2 190-200 45-55<br />
Pizza/Bread 2 200-225 40-50/15-18<br />
Toasts 3/4 250 1,5-2,5<br />
Cutlets/Sausages/Kebabs 3/4 250 35-45<br />
Vegetables au gratin 3 250 5-8<br />
Chicken halves 3 250 40-50<br />
Whole chicken 2/3 200-225 55-65<br />
Roast beef 2 200-250 35-45<br />
Roast meats 2/3 200-225 60-70<br />
Fish (whole) 3 190-200 40-50<br />
Note: Cooking times and temperatures are based on using food quantities for about 4 servings.<br />
5019 610 56117


