

KitchenAid F 89 P.1 IX - Oven - F 89 P.1 IX - Oven FR (F050437) Istruzioni per l'Uso
KitchenAid F 89 P.1 IX - Oven - F 89 P.1 IX - Oven FR (F050437) Istruzioni per l'Uso
KitchenAid F 89 P.1 IX - Oven - F 89 P.1 IX - Oven FR (F050437) Istruzioni per l'Uso

Create successful ePaper yourself
Turn your PDF publications into a flip-book with our unique Google optimized e-Paper software.
Care and maintenance<br />
GB<br />
Switching the appliance off<br />
Disconnect your appliance from the electricity<br />
supply before carrying out any work on it.<br />
Cleaning the appliance<br />
3. Grip the door on the two<br />
external sides and close it<br />
approximately half way. Pull<br />
the door towards you, lifting it<br />
out of its slot (see diagram).<br />
• The stainless steel or enamel-coated external<br />
parts and the rubber seals may be cleaned using<br />
a sponge that has been soaked in lukewarm water<br />
and neutral soap. Use specialised products for<br />
the removal of stubborn stains. After cleaning,<br />
rinse and dry thoroughly. Do not use abrasive<br />
powders or corrosive substances.<br />
• The inside of the oven should ideally be cleaned<br />
after each use, while it is still lukewarm. Use hot<br />
water and detergent, then rinse well and dry with<br />
a soft cloth. Do not use abrasive products.<br />
• The accessories can be washed like everyday<br />
crockery, and are even dishwasher safe.<br />
! Never use steam cleaners or pressure cleaners on<br />
the appliance.<br />
Cleaning the oven door<br />
Clean the glass part of the oven door using a<br />
sponge and a non-abrasive cleaning product, then<br />
dry thoroughly with a soft cloth. Do not use rough<br />
abrasive material or sharp metal scra<strong>per</strong>s as these<br />
could scratch the surface and cause the glass to<br />
crack. or more thorough cleaning purposes, the<br />
oven door may be removed:<br />
1. Open the oven door fully<br />
(see diagram).<br />
F<br />
3. (With glass panel fitted to<br />
the inside of the door) Grip the<br />
door on the two external sides<br />
and close it approximately<br />
half way. Unlock the door by<br />
pressing on the clamps ,<br />
then pull the door towards you<br />
lifting it out of its seat (see<br />
diagram).<br />
To replace the door, reverse this sequence.<br />
Inspecting the seals<br />
Check the door seals around the oven <strong>per</strong>iodically. If<br />
the seals are damaged, please contact your nearest<br />
After-sales Service Centre (see Assistance). We<br />
recommend that the oven is not used until the seals<br />
have been replaced.<br />
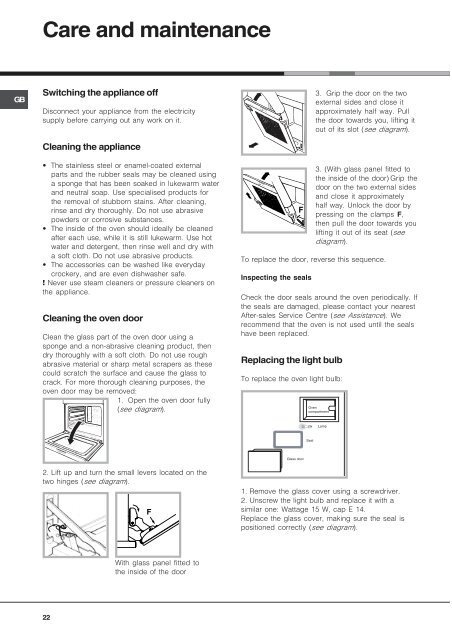
Replacing the light bulb<br />
To replace the oven light bulb:<br />
<strong>Oven</strong><br />
compartment<br />
Lamp<br />
Seal<br />
Glass door<br />
2. Lift up and turn the small levers located on the<br />
two hinges (see diagram).<br />
F<br />
1. Remove the glass cover using a screwdriver.<br />
2. Unscrew the light bulb and replace it with a<br />
similar one: Wattage 15 W, cap E 14.<br />
Replace the glass cover, making sure the seal is<br />
positioned correctly (see diagram).<br />
With glass panel fitted to<br />
the inside of the door<br />
22


