

KitchenAid ZFA101L - Freezer - ZFA101L - Freezer EN (850704101000) Istruzioni per l'Uso
KitchenAid ZFA101L - Freezer - ZFA101L - Freezer EN (850704101000) Istruzioni per l'Uso
KitchenAid ZFA101L - Freezer - ZFA101L - Freezer EN (850704101000) Istruzioni per l'Uso

Create successful ePaper yourself
Turn your PDF publications into a flip-book with our unique Google optimized e-Paper software.
61433000GB.fm Page 14 Thursday, April 7, 2005 4:43 PM<br />
KNOW YOUR APPLIANCE<br />
The appliance you have just bought, marked by the symbol, allows the freezing - in of fresh and cooked<br />
food, the production of ice cubes and the storage of frozen food. Please read these instructions carefully, as<br />
they include a description of your appliance and the useful hints to enable you to achieve the best <strong>per</strong>formances<br />
required to freeze fresh food and to store already frozen food.<br />
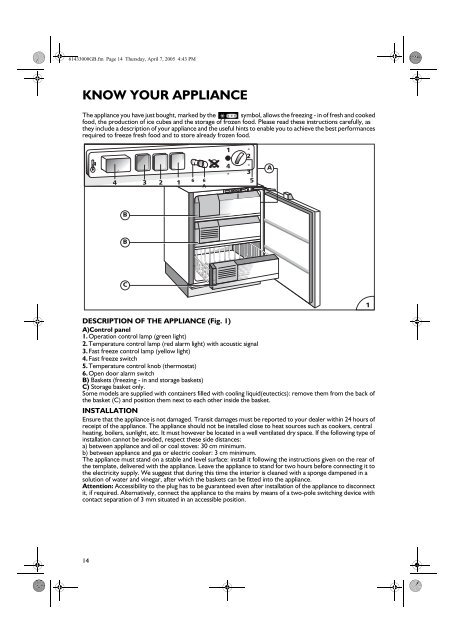
DESCRIPTION OF THE APPLIANCE (Fig. 1)<br />
A)Control panel<br />
1. O<strong>per</strong>ation control lamp (green light)<br />
2. Tem<strong>per</strong>ature control lamp (red alarm light) with acoustic signal<br />
3. Fast freeze control lamp (yellow light)<br />
4. Fast freeze switch<br />
5. Tem<strong>per</strong>ature control knob (thermostat)<br />
6. Open door alarm switch<br />
B) Baskets (freezing - in and storage baskets)<br />
C) Storage basket only.<br />
Some models are supplied with containers filled with cooling liquid(eutectics): remove them from the back of<br />
the basket (C) and position them next to each other inside the basket.<br />
INSTALLATION<br />
Ensure that the appliance is not damaged. Transit damages must be reported to your dealer within 24 hours of<br />
receipt of the appliance. The appliance should not be installed close to heat sources such as cookers, central<br />
heating, boilers, sunlight, etc. It must however be located in a well ventilated dry space. If the following type of<br />
installation cannot be avoided, respect these side distances:<br />
a) between appliance and oil or coal stoves: 30 cm minimum.<br />
b) between appliance and gas or electric cooker: 3 cm minimum.<br />
The appliance must stand on a stable and level surface: install it following the instructions given on the rear of<br />
the template, delivered with the appliance. Leave the appliance to stand for two hours before connecting it to<br />
the electricity supply. We suggest that during this time the interior is cleaned with a sponge dampened in a<br />
solution of water and vinegar, after which the baskets can be fitted into the appliance.<br />
Attention: Accessibility to the plug has to be guaranteed even after installation of the appliance to disconnect<br />
it, if required. Alternatively, connect the appliance to the mains by means of a two-pole switching device with<br />
contact separation of 3 mm situated in an accessible position.<br />
14


