KitchenAid S 14/1 - Freezer - S 14/1 - Freezer EN (850790063120) Istruzioni per l'Uso
KitchenAid S 14/1 - Freezer - S 14/1 - Freezer EN (850790063120) Istruzioni per l'Uso
KitchenAid S 14/1 - Freezer - S 14/1 - Freezer EN (850790063120) Istruzioni per l'Uso
You also want an ePaper? Increase the reach of your titles
YUMPU automatically turns print PDFs into web optimized ePapers that Google loves.
42007bGB.FM5 Page 9 Wednesday, September 27, 2000 3:28 PM<br />
INSTALLATION<br />
• Unpack the appliance and ensure that the<br />
various elements (plastic bags, polystyrene<br />
pieces, etc.) are well out of the reach of<br />
children.<br />
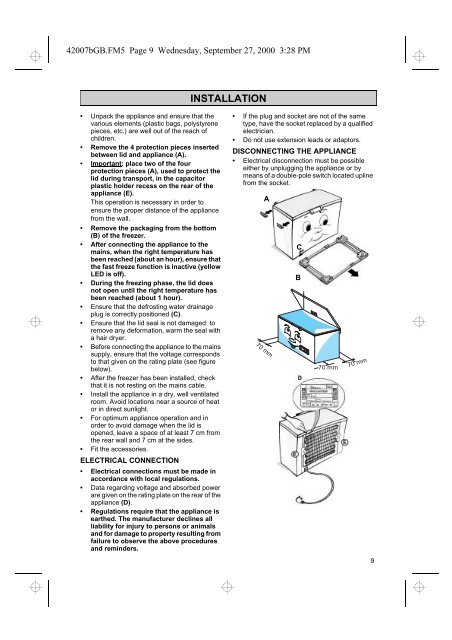
• Remove the 4 protection pieces inserted<br />
between lid and appliance (A).<br />
• Important: place two of the four<br />
protection pieces (A), used to protect the<br />
lid during transport, in the capacitor<br />
plastic holder recess on the rear of the<br />
appliance (E).<br />
This o<strong>per</strong>ation is necessary in order to<br />
ensure the pro<strong>per</strong> distance of the appliance<br />
from the wall.<br />
• Remove the packaging from the bottom<br />
(B) of the freezer.<br />
• After connecting the appliance to the<br />
mains, when the right tem<strong>per</strong>ature has<br />
been reached (about an hour), ensure that<br />
the fast freeze function is inactive (yellow<br />
LED is off).<br />
• During the freezing phase, the lid does<br />
not open until the right tem<strong>per</strong>ature has<br />
been reached (about 1 hour).<br />
• Ensure that the defrosting water drainage<br />
plug is correctly positioned (C).<br />
• Ensure that the lid seal is not damaged: to<br />
remove any deformation, warm the seal with<br />
a hair dryer.<br />
• Before connecting the appliance to the mains<br />
supply, ensure that the voltage corresponds<br />
to that given on the rating plate (see figure<br />
below).<br />
• After the freezer has been installed, check<br />
that it is not resting on the mains cable.<br />
• Install the appliance in a dry, well ventilated<br />
room. Avoid locations near a source of heat<br />
or in direct sunlight.<br />
• For optimum appliance o<strong>per</strong>ation and in<br />
order to avoid damage when the lid is<br />
opened, leave a space of at least 7 cm from<br />
the rear wall and 7 cm at the sides.<br />
• Fit the accessories.<br />
ELECTRICAL CONNECTION<br />
• Electrical connections must be made in<br />
accordance with local regulations.<br />
• Data regarding voltage and absorbed power<br />
are given on the rating plate on the rear of the<br />
appliance (D).<br />
• Regulations require that the appliance is<br />
earthed. The manufacturer declines all<br />
liability for injury to <strong>per</strong>sons or animals<br />
and for damage to pro<strong>per</strong>ty resulting from<br />
failure to observe the above procedures<br />
and reminders.<br />
• If the plug and socket are not of the same<br />
type, have the socket replaced by a qualified<br />
electrician.<br />
• Do not use extension leads or adaptors.<br />
DISCONNECTING THE APPLIANCE<br />
• Electrical disconnection must be possible<br />
either by unplugging the appliance or by<br />
means of a double-pole switch located upline<br />
from the socket.<br />
A<br />
70 mm<br />
C<br />
B<br />
70 mm<br />
70 mm<br />
9


