

KitchenAid F 1002.1 IX - Oven - F 1002.1 IX - Oven EN (F038402) Istruzioni per l'Uso
KitchenAid F 1002.1 IX - Oven - F 1002.1 IX - Oven EN (F038402) Istruzioni per l'Uso
KitchenAid F 1002.1 IX - Oven - F 1002.1 IX - Oven EN (F038402) Istruzioni per l'Uso

Create successful ePaper yourself
Turn your PDF publications into a flip-book with our unique Google optimized e-Paper software.
Cooking modes<br />
GB<br />
Cooking modes<br />
! All cooking modes have a default cooking<br />
tem<strong>per</strong>ature which may be adjusted manually<br />
between 40°C and 250°C as desired.<br />
In the BARBECUE mode, the default power level value<br />
is indicated as a <strong>per</strong>centage (%) and may also be<br />
adjusted manually.<br />
TRADITIONAL OV<strong>EN</strong> mode<br />
Both the top and bottom heating elements will come<br />
on. With this traditional cooking mode, it is best to use<br />
one cooking rack only; if more than one rack is used,<br />
the heat will be distributed unevenly.<br />
MULTI-COOKING mode<br />
All the heating elements (top, bottom and circular), as<br />
well as the fan, will come on. Since the heat remains<br />
constant throughout the oven, the air cooks and<br />
browns food uniformly. A maximum of two racks may<br />
be used at the same time.<br />
BARBECUE mode<br />
The top heating element and the rotisserie (where<br />
present) come on. By pressing "+" and "-" on the right<br />
side of the control panel, the power levels that may be<br />
set will appear on the TEMPERATURE display; these<br />
range between 50% and 100%. The high and direct<br />
tem<strong>per</strong>ature of the grill is recommended for food that<br />
requires high surface tem<strong>per</strong>ature. Always cook in this<br />
mode with the oven door closed.<br />
GRATIN mode<br />
The top heating element as well as the fan and the<br />
rotisserie (where present) come on. This combination<br />
of features increases the effectiveness of the<br />
unidirectional thermal radiation of the heating<br />
elements through forced circulation of the air<br />
throughout the oven.<br />
This helps prevent food from burning on the surface,<br />
allowing the heat to penetrate right into the food.<br />
Always cook in this mode with the oven door closed.<br />
PIZZA mode<br />
The heating elements (bottom and circular) and the<br />
fan come on. This combination heats the oven rapidly<br />
by producing a considerable amount of heat,<br />
particularly from the bottom element. If you use more<br />
than one rack simultaneously, switch the position of<br />
the dishes halfway through the cooking process.<br />
BAKING mode<br />
The rear heating element and the fan come on,<br />
guaranteeing the distribution of heat delicately and<br />
uniformly throughout the oven. This mode is ideal for<br />
baking and cooking tem<strong>per</strong>ature sensitive foods such<br />
as cakes that need to rise and to prepare certain<br />
tartlets on 3 shelves simultaneously.<br />
FAST COOKING mode<br />
The heating elements and the fan come on,<br />
guaranteeing the distribution of heat consistently and<br />
uniformly throughout the oven.<br />
Pre-heating is not necessary for this cooking mode.<br />
This mode is especially recommended for cooking<br />
pre-packed food quickly (frozen or pre-cooked). The<br />
best results are obtained if you use one cooking rack<br />
only.<br />
LEAV<strong>EN</strong>ING mode<br />
The oven reaches and maintains a tem<strong>per</strong>ature of<br />
40°C and cannot be changed. This mode is ideal for<br />
leavening dough made with yeast.<br />
FAST CLEAN mode<br />
This mode cleans the oven automatically and<br />
thoroughly by pyrolysis (see Maintenance and care).<br />
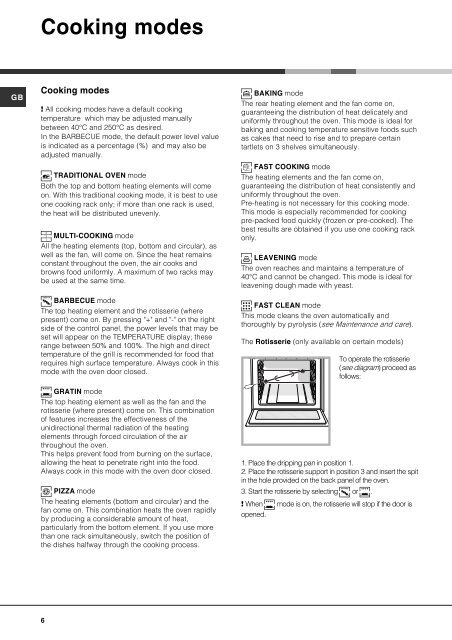
The Rotisserie (only available on certain models)<br />
To o<strong>per</strong>ate the rotisserie<br />
(see diagram) proceed as<br />
follows:<br />
1. Place the dripping pan in position 1.<br />
2. Place the rotisserie support in position 3 and insert the spit<br />
in the hole provided on the back panel of the oven.<br />
3. Start the rotisserie by selecting or .<br />
! When mode is on, the rotisserie will stop if the door is<br />
opened.<br />
6


