

KitchenAid B 18 A1 D/I - Fridge/freezer combination - B 18 A1 D/I - Fridge/freezer combination EN (853903601500) Istruzioni per l'Uso
KitchenAid B 18 A1 D/I - Fridge/freezer combination - B 18 A1 D/I - Fridge/freezer combination EN (853903601500) Istruzioni per l'Uso
KitchenAid B 18 A1 D/I - Fridge/freezer combination - B 18 A1 D/I - Fridge/freezer combination EN (853903601500) Istruzioni per l'Uso

Create successful ePaper yourself
Turn your PDF publications into a flip-book with our unique Google optimized e-Paper software.
USING FOR THE FIRST TIME<br />
Connect the appliance to the power supply.<br />
In models with electronics, a sound signal may be emitted, which means that the tem<strong>per</strong>ature<br />
alarm has been activated: press the sound alarm off button. Where provided, position the<br />
antibacterial anti-odour filter in the fan as demonstrated in the filter packaging.<br />
Note: After turning the appliance on, you must wait for 4-5 hours for the correct storage<br />
tem<strong>per</strong>ature to be reached for a normally filled appliance.<br />
MAINT<strong>EN</strong>ANCE AND CLEANING<br />
OF THE APPLICANCE<br />
Clean the appliance occasionally with a cloth and a solution of warm<br />
water and neutral cleaning agents specifically for cleaning the inside<br />
of the refrigerator. Do not use abrasive cleaning agents. To ensure<br />
the constant and correct flow of the defrosting water, regularly clean<br />
the inside of the drain situated in the back wall of the refrigerator<br />
compartment near the fruit and vegetable drawer using the utensil<br />
provided (see figure).<br />
Before carrying out any maintenance or cleaning, take the plug out of the socket or disconnect the<br />
appliance from the power supply.<br />
REPLACING THE LIGHT BULB OR LED<br />
(depending on the model)<br />
Always disconnect the appliance from the power supply before replacing the light bulb. Then<br />
follow the instructions based on the type of light bulb for your product.<br />
Replace the light bulb with one with the same features, available from the Technical Assistance<br />
Service and authorised sellers.<br />
Light type 1)<br />
To remove the light bulb, unscrew it in an anti-clockwise direction, as<br />
shown in the figure. Wait 5 minutes before reconnecting the appliance.<br />
- traditional light bulb (max 25W)<br />
or<br />
- LED light bulb (with the same features)<br />
only available from the Technical Assistance Service<br />
Light bulb<br />
LED light bulb<br />
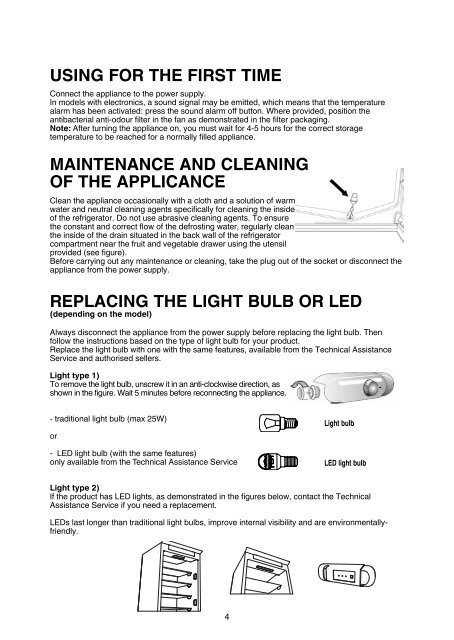
Light type 2)<br />
If the product has LED lights, as demonstrated in the figures below, contact the Technical<br />
Assistance Service if you need a replacement.<br />
LEDs last longer than traditional light bulbs, improve internal visibility and are environmentallyfriendly.<br />
LED- strip<br />
Dragon<br />
et2<br />
4


