

KitchenAid JLE61P - Cooker - JLE61P - Cooker EN (F084154) Istruzioni per l'Uso
KitchenAid JLE61P - Cooker - JLE61P - Cooker EN (F084154) Istruzioni per l'Uso
KitchenAid JLE61P - Cooker - JLE61P - Cooker EN (F084154) Istruzioni per l'Uso

Create successful ePaper yourself
Turn your PDF publications into a flip-book with our unique Google optimized e-Paper software.
Care and Cleaning<br />
Wall-mounted splashpanel:<br />
A wall-mounted splashpanel is available as an<br />
optional extra from the Spare Parts Department. See<br />
back cover for details.<br />
Care must be taken that rating label edges are not<br />
lifted during cleaning and furthermore that the<br />
lettering is not blurred or removed.<br />
For details of your nearest Service Centre please see<br />
the separate service leaflet. If you have any queries<br />
regarding service or spares, our Spares and Service<br />
Division will be pleased to advise.<br />
See back cover for details.<br />
Glass Inner Door with three Panels<br />
Open the door fully<br />
and carefully slide the<br />
inner glass towards<br />
you, taking care not to<br />
allow the glass to fall.<br />
The glass panel may now be washed at the sink.<br />
Stubborn stains can be removed by using a fine<br />
steel wool soap pad. Ensure the glass panel is<br />
not subjected to any sharp mechanical<br />
blows. Take particular care not to damage the inner<br />
surface which is coated with a heat reflective layer.<br />
After cleaning, rinse and dry with a soft cloth. For<br />
slight soiling the inner glass panel may be cleaned,<br />
while still warm, without removing it from the door.<br />
Warning: Oven must not be o<strong>per</strong>ated with inner door<br />
glass removed.<br />
SIDE OP<strong>EN</strong>ING DOORS<br />
Cleaning the door glass is the same as the drop<br />
down doors, except take care to support the weight<br />
of the inner glass when removing and refitting.<br />
Take care during cleaning not to damage or distort<br />
the door seals. Do not lift the door seal from the<br />
oven chassis, if necessary remove the seal by<br />
carefully unhooking the corner clips.<br />
Take care that the rating label edges are not lifted<br />
during cleaning, and furthermore that the lettering is<br />
not blurred or removed.<br />
When refitting the glass make sure it is fitted<br />
correctly i.e. reflective face is fitted the right way<br />
round.<br />
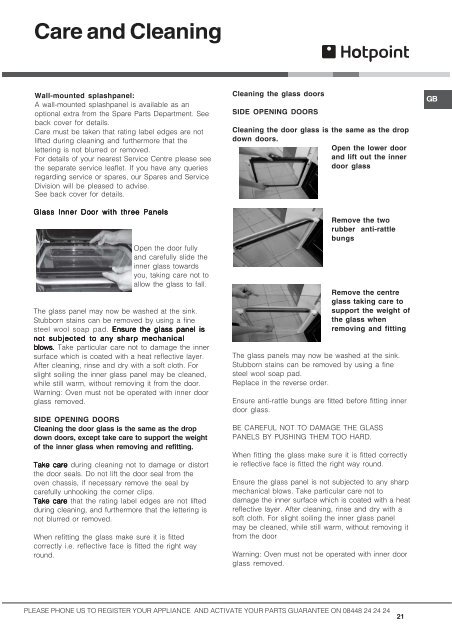
Cleaning the glass doors<br />
SIDE OP<strong>EN</strong>ING DOORS<br />
Cleaning the door glass is the same as the drop<br />
down doors.<br />
Open the lower door<br />
and lift out the inner<br />
door glass<br />
Remove the two<br />
rubber anti-rattle<br />
bungs<br />
Remove the centre<br />
glass taking care to<br />
support the weight of<br />
the glass when<br />
removing and fitting<br />
The glass panels may now be washed at the sink.<br />
Stubborn stains can be removed by using a fine<br />
steel wool soap pad.<br />
Replace in the reverse order.<br />
Ensure anti-rattle bungs are fitted before fitting inner<br />
door glass.<br />
BE CAREFUL NOT TO DAMAGE THE GLASS<br />
PANELS BY PUSHING THEM TOO HARD.<br />
When fitting the glass make sure it is fitted correctly<br />
ie reflective face is fitted the right way round.<br />
Ensure the glass panel is not subjected to any sharp<br />
mechanical blows. Take particular care not to<br />
damage the inner surface which is coated with a heat<br />
reflective layer. After cleaning, rinse and dry with a<br />
soft cloth. For slight soiling the inner glass panel<br />
may be cleaned, while still warm, without removing it<br />
from the door<br />
Warning: Oven must not be o<strong>per</strong>ated with inner door<br />
glass removed.<br />
GB<br />
PLEASE PHONE US TO REGISTER YOUR APPLIANCE AND ACTIVATE YOUR PARTS GUARANTEE ON 08448 24 24 24<br />
21


