

KitchenAid 5100700015 - Refrigerator - 5100700015 - Refrigerator EN (855162916040) Istruzioni per l'Uso
KitchenAid 5100700015 - Refrigerator - 5100700015 - Refrigerator EN (855162916040) Istruzioni per l'Uso
KitchenAid 5100700015 - Refrigerator - 5100700015 - Refrigerator EN (855162916040) Istruzioni per l'Uso

Create successful ePaper yourself
Turn your PDF publications into a flip-book with our unique Google optimized e-Paper software.
USING THE REFRIGERATOR<br />
Switching the appliance on<br />
1. Connect the appliance to the mains supply.<br />
2. When the appliance is plugged in at the<br />
mains, the refrigerator compartment is<br />
normally pre-set to an inside tem<strong>per</strong>ature of<br />
5°C. When control light A (Standby) lights<br />
up, press symbol A.<br />
Adjusting the tem<strong>per</strong>ature<br />
Instructions on adjusting the tem<strong>per</strong>ature can<br />
be found in the product information enclosed.<br />
Note:<br />
The following factors can affect the inside<br />
tem<strong>per</strong>ature of the refrigerator: the room<br />
tem<strong>per</strong>ature, how often the door is opened,<br />
if warm food is placed inside, and if the<br />
refrigerator is not installed in an appropriate<br />
location. The tem<strong>per</strong>atures can then deviate<br />
from the values indicated on the control panel.<br />
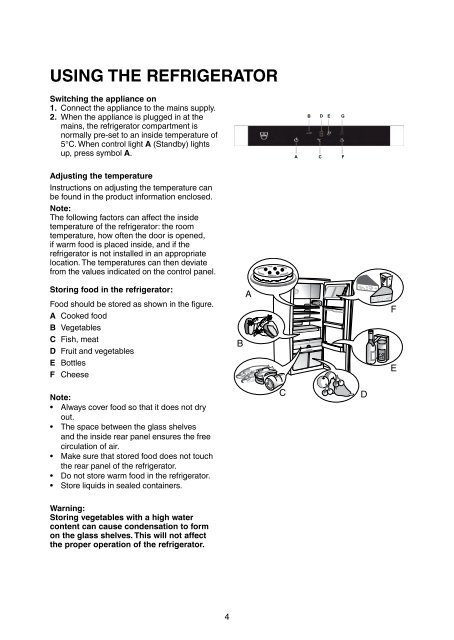
Storing food in the refrigerator:<br />
Food should be stored as shown in the figure.<br />
A Cooked food<br />
B Vegetables<br />
C Fish, meat<br />
D Fruit and vegetables<br />
E Bottles<br />
F Cheese<br />
Note:<br />
• Always cover food so that it does not dry<br />
out.<br />
• The space between the glass shelves<br />
and the inside rear panel ensures the free<br />
circulation of air.<br />
• Make sure that stored food does not touch<br />
the rear panel of the refrigerator.<br />
• Do not store warm food in the refrigerator.<br />
• Store liquids in sealed containers.<br />
Warning:<br />
Storing vegetables with a high water<br />
content can cause condensation to form<br />
on the glass shelves. This will not affect<br />
the pro<strong>per</strong> o<strong>per</strong>ation of the refrigerator.<br />
4
USING THE “FRESHBOX” (if applicable) Fig. 1<br />
The refrigerator is fitted with a Freshbox for the<br />
pro<strong>per</strong> storage of meat, fish and poultry.<br />
The inside tem<strong>per</strong>ature of the Freshbox is<br />
cooler than the rest of the refrigerator.<br />
This means that fresh food (meat and fish)<br />
can be stored for a considerably longer <strong>per</strong>iod<br />
without having to deep-freeze it and without<br />
the food’s nutritional value and freshness being<br />
affected.<br />
The optimum tem<strong>per</strong>ature of the Freshbox is<br />
obtained from the average tem<strong>per</strong>ature setting.<br />
Fruit and vegetables must not be stored in this<br />
Freshbox as the tem<strong>per</strong>ature can drop below<br />
0°C causing the water contained in the food to<br />
freeze.<br />
Tem<strong>per</strong>ature indicator (Variofresh)<br />
• The inside tem<strong>per</strong>ature of this Freshbox is<br />
shown by a tem<strong>per</strong>ature indicator located<br />
on the front panel of the Freshbox (Fig. 1).<br />
• The coloured area indicates the ideal<br />
storage tem<strong>per</strong>ature for meat and fish.<br />
• The inside tem<strong>per</strong>ature of the Freshbox<br />
becomes stable after approximately one<br />
hour.<br />
Warning:<br />
The tem<strong>per</strong>ature of the Freshbox depends on<br />
the tem<strong>per</strong>ature of the refrigerator. If the<br />
tem<strong>per</strong>ature of the refrigerator is in the<br />
range, press button (C) to change the<br />
refrigerator tem<strong>per</strong>ature. The tem<strong>per</strong>ature of<br />
the Freshbox will then change accordingly.<br />
Taking out the Freshbox<br />
If you want to use the refrigerator without the<br />
Freshbox, carry out the following steps:<br />
1. Remove the Freshbox fastening by taking<br />
out the two side fastenings on the underside<br />
(see Fig. 3).<br />
2. Remove the Freshbox (see Fig. 2).<br />
If you want to use the Freshbox again, carry out<br />
the following steps:<br />
1. Insert the Freshbox.<br />
2. Re-install the cover panel of the Freshbox.<br />
Fig. 2<br />
Fig. 3<br />
5
Freshbox (if applicable)<br />
The Freshbox has been specially designed to stay at a low tem<strong>per</strong>ature and at the correct humidity<br />
so that fresh food (for example meat, fish, fruit and winter vegetables) can be stored for longer.<br />
Switching the Freshbox on and off<br />
If the Freshbox is switched on, the inside tem<strong>per</strong>ature will be around 0°C.<br />
The Freshbox can be switched on by pressing<br />
the corresponding button (see figure) for at<br />
least one second. The symbol lights up to<br />
confirm it is switched on.<br />
The illuminated symbol indicates that the<br />
Freshbox for meat and fish is in o<strong>per</strong>ation. To<br />
switch off the Freshbox, press the button again<br />
for 1 second.<br />
To ensure the Freshbox works pro<strong>per</strong>ly:<br />
- the refrigerator must be switched on,<br />
- the tem<strong>per</strong>ature in the refrigerator must be between +2°C and +6°C,<br />
- the Freshbox must be in its correct place so that it can be activated,<br />
- the special functions (standby, cooling-off, vacation - if applicable) must be switched off.<br />
If one of these special functions is selected, the Freshbox must be switched off manually. When<br />
doing so, make sure that any fresh food stored inside is removed. If the Freshbox is not switched off<br />
manually, it is automatically deactivated after approximately 8 hours.<br />
Note:<br />
- If the symbol does not light up when the Freshbox is activated, check that the Freshbox has been<br />
pushed in pro<strong>per</strong>ly. If the symbol still does not light up, call the After-Sales Service.<br />
- If the Freshbox is switched on and the drawer is opened, the illuminated symbol on the control<br />
panel may automatically go out. Close the drawer and the symbol will light up again.<br />
- Regardless of the status of the Freshbox, a quiet sound will be audible. This is completely normal.<br />
- If the Freshbox is switched off, the inside tem<strong>per</strong>ature of the Freshbox will depend on the general<br />
tem<strong>per</strong>ature of the refrigerator. In this case, it is recommended to use the Freshbox to store coldresistant<br />
fruit and vegetables (forest fruits, apples, apricots, carrots, spinach, salad, etc.)<br />
Important: if food with a high water content is stored in the Freshbox when it is switched on, this<br />
can cause condensation to form on the shelves. If this happens, switch the Freshbox off temporarily.<br />
When storing small foods and containers in the Freshbox, make sure that they do not accidentally<br />
fall in the space between the drawer and the rear panel of the refrigerator.<br />
Removing the Freshbox:<br />
The Freshbox can be taken out to make more room in the<br />
refrigerator. To do this, proceed as follows:<br />
- To make it easier to take the Freshbox out, it is<br />
recommended to empty (and if necessary remove) the two<br />
lower shelves.<br />
- Switch off the Freshbox.<br />
- Remove the drawer and the white plastic tray under the<br />
Freshbox.<br />
Note: The up<strong>per</strong> shelf and the side panels cannot be removed.<br />
Make sure when reinstalling the Freshbox that the white plastic tray under the Freshbox is put<br />
back before inserting the drawer and switching the Freshbox back on. To optimise energy use, it is<br />
recommended to switch off and remove the Freshbox.<br />
Clean the Freshbox and its components regularly with a cloth and a solution of lukewarm water<br />
and special neutral cleaning agent for cleaning the inside of refrigerators. Do not immerse the white<br />
plastic shelf under the drawer in the water.<br />
Remove the drawer prior to cleaning (including external cleaning) to interrupt the power<br />
supply to the Freshbox.<br />
Do not use any abrasive cleaners.<br />
6
USING THE<br />
FREEZER (if applicable)<br />
The freezer can also be used to freeze<br />
fresh food. The amount of fresh food that can<br />
be frozen within a 24 hour <strong>per</strong>iod is shown on<br />
the specification plate.<br />
Freezing fresh food<br />
• If the freezer compartment has a shelf, arrange<br />
the food to be frozen according to Fig. 1,<br />
otherwise arrange it according to Fig. 2 if it does<br />
not have a shelf.<br />
• Place the food in the middle of the freezer<br />
compartment , making sure that it does<br />
not touch food that is already frozen and keeping<br />
a distance of approx. 20 mm from the already<br />
frozen food (Fig. 1 and 2).<br />
• For appliances with a freezer compartment<br />
, press button (E) to switch on the Fast<br />
Freezing function; the white control light (E) lights<br />
up and stays on while the freezing process takes<br />
place.<br />
• After approx. 26 hours, the function automatically<br />
switches off and the white control light (E) goes<br />
out. The function can be deactivated by pressing<br />
button (E).<br />
The storage time in months for fresh frozen<br />
food is given in the table on the right.<br />
When buying deep-frozen goods, pay attention<br />
to the following:<br />
• The packaging must not be damaged, as this<br />
might affect the preservation of the contents. If<br />
the packaging is inflated or has wet patches, the<br />
product may not have been stored pro<strong>per</strong>ly and<br />
the contents could have defrosted.<br />
• Put deep-frozen goods in your shopping trolley<br />
last and always transport them in a cool bag.<br />
• When you get home, put deep-frozen goods in<br />
the freezer straight away.<br />
• Never refreeze defrosted items; instead use them<br />
within 24 hours.<br />
• Avoid tem<strong>per</strong>ature fluctuations or keep them to a<br />
minimum. Observe the use-by date indicated on<br />
the packaging.<br />
• When storing deep-frozen goods, always follow<br />
the instructions on the packaging.<br />
Preparing ice cubes<br />
• Fill the ice cube tray 2/3 with water and place<br />
inside the freezer compartment .<br />
• If the tray freezes to the bottom , do not<br />
use any sharp or pointed objects to dislodge it.<br />
• To make it easier to take the ice cubes out of the<br />
tray, bend the tray slightly.<br />
Fig. 1<br />
Fig. 2<br />
7
DEFROSTING THE APPLIANCE<br />
Before defrosting, disconnect the<br />
appliance from the mains supply or switch<br />
it off.<br />
The refrigerator defrosts automatically.<br />
Occasionally, water droplets will<br />
appear on the inside rear panel of the<br />
refrigerator; this indicates the automatic<br />
defrosting phase. The defrost water is<br />
automatically drained to a drainage outlet<br />
and then collected in a container where it<br />
evaporates.<br />
Clean the drainage outlet regularly with the<br />
tool supplied with the refrigerator to make sure<br />
that the water can drain off continuously and<br />
undisturbed. (Fig. 1)<br />
Defrosting the freezer compartment<br />
(if applicable)<br />
The freezer compartment should be defrosted<br />
once or twice a year, or if an excessively thick<br />
layer of frost builds up.<br />
The build-up of frost is completely normal. The<br />
amount and speed of frost formation depends<br />
on environmental conditions and how often the<br />
door is opened. A build-up of frost particularly<br />
in the up<strong>per</strong> part of the freezer compartment is<br />
normal and does not affect the o<strong>per</strong>ation of the<br />
freezer in any way.<br />
Defrosting should be carried out when there<br />
are not many frozen items stored in the freezer.<br />
• Open the door, remove all food items and<br />
store them in a cool place or in a cool bag.<br />
• Leave the door open to let the frost defrost.<br />
• Clean the inside compartment with a<br />
sponge and a solution of lukewarm water<br />
and/or neutral cleaning agent. Do not use<br />
any abrasive cleaners.<br />
• Rinse and dry carefully.<br />
• Replace the food items.<br />
• Close the door.<br />
Plug in the mains plug and switch on<br />
the appliance. When doing so, follow the<br />
instructions given in the section “Using the<br />
refrigerator”. The settings activated prior to<br />
switching off the appliance will be retained.<br />
Fig. 1<br />
8
CLEANING AND MAINT<strong>EN</strong>ANCE<br />
Before any cleaning and maintenance,<br />
disconnect the appliance from the mains<br />
supply or switch it off.<br />
• Clean the refrigerator regularly with a<br />
sponge and a solution of lukewarm water<br />
and/or neutral cleaning agent. Rinse it and<br />
wipe dry with a soft cloth. Do not use any<br />
abrasive cleaners.<br />
• Do not place the glass shelves in water,<br />
instead clean them with a damp cloth.<br />
• Clean the inside of the freezer compartment<br />
during defrosting.<br />
• Clean the ventilation grid and condenser<br />
on the rear of the appliance regularly with a<br />
vacuum cleaner or a brush.<br />
• Clean the outside of the appliance<br />
regularly with a soft, damp cloth. Do not<br />
use abrasives, abrasive sponges, stain<br />
removers (e. g. acetone, trichlorethylene) or<br />
vinegar.<br />
If you are going away for a long <strong>per</strong>iod of<br />
time<br />
1. Empty the refrigerator completely.<br />
2. Disconnect the appliance from the mains<br />
supply.<br />
3. Defrost and clean the inside compartment.<br />
4. Leave the appliance door slightly open<br />
to prevent mould, unpleasant odours and<br />
oxidation, if the appliance is not going to be<br />
used for a long <strong>per</strong>iod of time.<br />
5. Clean the appliance.<br />
• Clean the inside of the freezer<br />
compartment during defrosting (for<br />
models with a freezer compartment).<br />
• Clean the refrigerator with a sponge and a<br />
solution of lukewarm water and/or neutral<br />
cleaning agent. Rinse it and wipe dry<br />
with a soft cloth. Do not use any abrasive<br />
cleaners.<br />
9
WHAT TO DO IN CASE OF PROBLEMS<br />
1. The appliance is not working.<br />
• Has there been a power cut?<br />
• Is the mains plug plugged in pro<strong>per</strong>ly?<br />
• Is the main switch switched on?<br />
• Has a fuse blown?<br />
• Is the mains cable damaged?<br />
• Is button (A) in standby mode?<br />
2. The tem<strong>per</strong>ature in the fridge/freezer compartments is not cool enough.<br />
• Are the doors shutting pro<strong>per</strong>ly?<br />
• Is the appliance positioned close to a heat source?<br />
• Is the air being prevented from circulating through the ventilation grid?<br />
3. There is water collecting on the bottom of the refrigerator.<br />
• Is the defrost water outlet blocked?<br />
4. The inside light is not working.<br />
First check point 1, then:<br />
• Disconnect the appliance from the mains supply.<br />
• If your appliance is fitted with a bulb, check this and if necessary replace it according to the<br />
instructions and drawings given in the data sheet enclosed.<br />
• If your product is fitted with LED lights, please inform the After-Sales Service.<br />
5. Excessive build-up of frost in the freezer compartment.<br />
• Is the door of the deep-freeze compartment closed pro<strong>per</strong>ly?<br />
6. The acoustic alarm has been activated and the red control light (F) is flashing.<br />
• The door has been left open for more than 2 minutes. Press button (F) to switch off the alarm<br />
sound or close the door.<br />
7. The alarm is sounding, the red control light (F) is flashing and the display shows the<br />
letter “F”.<br />
• The tem<strong>per</strong>ature sensor is defective. Press button (F) to switch off the alarm sound and inform<br />
the After-Sales Service.<br />
Please note:<br />
• If the alarm sounds as described in point 7, and the tem<strong>per</strong>ature reset button (C) and button (E)<br />
are not active, the appliance will nevertheless retain the tem<strong>per</strong>atures in the compartments so<br />
that the storage of the food is not affected.<br />
• Changes in the o<strong>per</strong>ating noise of the appliance (gurgling noises or slight hissing noises of the<br />
coolant circulation) are completely normal.<br />
10
AFTER-SALES SERVICE<br />
Before contacting the After-Sales Service:<br />
1. Try to resolve the problem yourself (see “Try<br />
to resolve the problem yourself first”).<br />
2. Switch the appliance on and off to see if the<br />
problem is still there. If the problem is still<br />
there, switch the appliance off and switch it<br />
back on again after an hour.<br />
3. If the problem <strong>per</strong>sists, inform the After-<br />
Sales Service:<br />
Please provide the following information:<br />
• Nature of the fault<br />
• Appliance model<br />
• Service number (the number behind the<br />
word SERVICE on the specification plate<br />
inside the appliance)<br />
• Your full address<br />
• Your telephone number and area code<br />
Note:<br />
If the door hinge is replaced by the After-<br />
Sales Service, this does not fall under the<br />
guarantee.<br />
INSTALLATION<br />
• Do not install the appliance close to a<br />
heat source. Installation of the appliance<br />
in a warm room, close to sources of heat<br />
(radiators, ovens) or in direct sunlight<br />
increases the power consumption and<br />
should therefore be avoided.<br />
• If this is not possible, the following minimum<br />
distances must always be observed:<br />
• 30 cm from coal or oil-burning stoves;<br />
• 3 cm from electric and/or gas cookers.<br />
• Mount the spacers (if supplied with<br />
the appliance) on the rear panel of the<br />
condenser on the back of the appliance.<br />
• Install the appliance in a dry and wellventilated<br />
location and level it if necessary<br />
using the adjustable front feet.<br />
• Clean the inside compartment.<br />
• Install the accessories.<br />
• The appliance must be grounded by law.<br />
The manufacturer is not liable for any<br />
injury to <strong>per</strong>sons or animals, or damage<br />
to pro<strong>per</strong>ty due to non-compliance with<br />
the directions given above.<br />
• If the plug and socket are not of the same<br />
type, have the socket changed by a<br />
qualified electrician.<br />
• Do not use extension leads or multiple<br />
adapters.<br />
Electrical disconnection<br />
It must be possible to disconnect the appliance<br />
by disconnecting the plug from the mains<br />
supply or via an upstream two-pin switch.<br />
Electrical connection<br />
• The electrical connections must comply<br />
with local regulations.<br />
• Information on the voltage and power input<br />
is given on the specification plate inside the<br />
appliance.<br />
11


