

KitchenAid 1 CH-3710 - Freezer - 1 CH-3710 - Freezer EN (850795618010) Istruzioni per l'Uso
KitchenAid 1 CH-3710 - Freezer - 1 CH-3710 - Freezer EN (850795618010) Istruzioni per l'Uso
KitchenAid 1 CH-3710 - Freezer - 1 CH-3710 - Freezer EN (850795618010) Istruzioni per l'Uso

You also want an ePaper? Increase the reach of your titles
YUMPU automatically turns print PDFs into web optimized ePapers that Google loves.
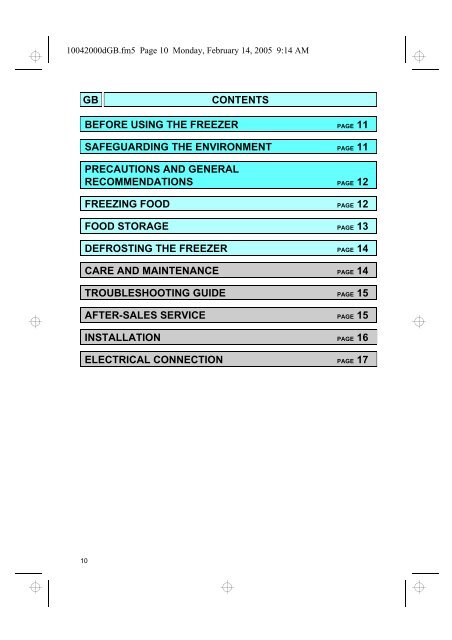
10042000dGB.fm5 Page 10 Monday, February 14, 2005 9:14 AM<br />
GB<br />
CONT<strong>EN</strong>TS<br />
BEFORE USING THE FREEZER PAGE 11<br />
SAFEGUARDING THE <strong>EN</strong>VIRONM<strong>EN</strong>T PAGE 11<br />
PRECAUTIONS AND G<strong>EN</strong>ERAL<br />
RECOMM<strong>EN</strong>DATIONS PAGE 12<br />
FREEZING FOOD PAGE 12<br />
FOOD STORAGE PAGE 13<br />
DEFROSTING THE FREEZER PAGE 14<br />
CARE AND MAINT<strong>EN</strong>ANCE PAGE 14<br />
TROUBLESHOOTING GUIDE PAGE 15<br />
AFTER-SALES SERVICE PAGE 15<br />
INSTALLATION PAGE 16<br />
ELECTRICAL CONNECTION PAGE 17<br />
10
10042000dGB.fm5 Page 11 Monday, February 14, 2005 9:14 AM<br />
BEFORE USING THE FREEZER<br />
For best use of your appliance, please read<br />
the instructions and product description<br />
sheets carefully. These contain a description<br />
of your appliance and useful tips for storing<br />
food.<br />
Keep the instruction booklet and product<br />
description sheets carefully for future use.<br />
• After unpacking the appliance, check for<br />
damage. Any damage must be reported to<br />
the supplier within 24 hours.<br />
• Following installation, wait at least 2<br />
hours without moving the appliance<br />
before connecting it to the mains supply;<br />
this will allow the refrigerant circuit to<br />
reach optimum efficiency.<br />
• Before connecting the appliance to the mains<br />
supply, please refer to the chapter<br />
“Installation”.<br />
SAFEGUARDING THE <strong>EN</strong>VIRONM<strong>EN</strong>T<br />
1. Packing<br />
The packaging material is entirely recyclable,<br />
and marked with the recycling symbol .<br />
Follow local regulations for scrapping.<br />
Keep the packaging materials (plastic bags,<br />
polystyrene parts, etc.) out of reach of children,<br />
as they are potentially dangerous.<br />
2. Appliance<br />
The freezer is made of recyclable material.<br />
Dispose of the appliance in conformity with local<br />
environmental regulations.<br />
Make the appliance unusable by cutting off the<br />
power cord. The appliance must be delivered to<br />
an authorised collection centre for the recovery<br />
of refrigerant gas.<br />
Information:<br />
This appliance does not contain CFCs (replaced<br />
with R134a) or HFCs (replaced with R600a -<br />
Isobutane). For further details, refer to the rating<br />
plate located on the rear of the appliance.<br />
11
10042000dGB.fm5 Page 12 Monday, February 14, 2005 9:14 AM<br />
PRECAUTIONS AND G<strong>EN</strong>ERAL RECOMM<strong>EN</strong>DATIONS<br />
• Do not cover or obstruct the air vent of the<br />
appliance.<br />
• Do not store liquids in glass containers in the<br />
freezer: risk of bursting.<br />
• Do not eat ice cubes or ice lollies immediately<br />
after taking them out of the freezer: risk of<br />
“cold” burns.<br />
• Do not allow children to play or hide inside<br />
the freezer: risk of becoming trapped inside<br />
and suffocating.<br />
• Keep the keys (if supplied) in a separate<br />
place and out of reach of children: risk of<br />
children becoming locked inside the<br />
appliance.<br />
• Do not ingest the contents (non-toxic) of the<br />
ice packs (if provided).<br />
• Before servicing or cleaning the appliance,<br />
unplug it from the mains or disconnect the<br />
electrical power supply.<br />
• The power cable may only be replaced by an<br />
authorised <strong>per</strong>son.<br />
DECLARATION OF CONFORMITY<br />
• This appliance is intended to come into<br />
contact with foodstuffs and conforms to<br />
D.L. 108 of 25.01.1992 (European Directive<br />
89/109/EEC).<br />
Appliances with Isobutane (R600a)<br />
Isobutane is a natural gas having low<br />
environmental impact. Caution is required,<br />
however, since isobutane is flammable.<br />
Therefore, it is essential to ensure that<br />
refrigerant pipelines are not damaged.<br />
FREEZING FOOD<br />
Only use the freezer for storing frozen food,<br />
freezing fresh food and production of ice<br />
cubes.<br />
FREEZING FOOD<br />
• Defrost the appliance when ice build-up on<br />
the freezer walls is excessive (see “Care and<br />
Maintenance”).<br />
• At least 24 hours before storing fresh food in<br />
the freezer, switch the rapid freeze button on.<br />
For freezers without this button, turn the<br />
thermostat to maximum position.<br />
• Observe the maximum freezing capacity<br />
specified on the rating plate.<br />
• Place the food you wish to freeze and keep<br />
the lid of the appliance closed for 24 hours.<br />
At the end of this <strong>per</strong>iod, switch OFF the<br />
rapid freezing function.<br />
• To freeze the maximum amount of food<br />
specified on the rating plate (see figure D<br />
in the chapter “Installation”), extend the<br />
prefreezing <strong>per</strong>iod to 48 hours.<br />
PREPARATION OF FRESH FOOD FOR<br />
FREEZING<br />
• Before freezing, wrap and seal fresh food in:<br />
aluminium foil, cling film, watertight plastic<br />
bags, polyethylene containers with lids,<br />
provided they are suitable for freezing foods.<br />
• Food must be fresh, mature and of prime<br />
quality in order to obtain high quality frozen<br />
food.<br />
• Fresh vegetables and fruit should preferably<br />
be frozen as soon as they are picked to<br />
maintain the full original nutritional value,<br />
texture, colour and flavour.<br />
• Some meat, especially game, should be<br />
hung before it is frozen.<br />
Note:<br />
• Always leave hot food to cool before placing<br />
in the freezer.<br />
12
10042000dGB.fm5 Page 13 Monday, February 14, 2005 9:14 AM<br />
FREEZING FOOD<br />
FREEZING OF FRESH FOODS<br />
• Place foods to be frozen in direct contact with<br />
the walls of the freezer, as shown in the<br />
adjacent figure:<br />
A) - foods to be frozen,<br />
B) - foods already frozen.<br />
• Avoid placing foods to be frozen in direct<br />
contact with food already frozen.<br />
• For best and fastest freezing, foods should<br />
be split into small portions; this will also be<br />
useful when the frozen items are to be used.<br />
.<br />
A<br />
B<br />
For storing fresh frozen foods, refer to the<br />
adjacent table.<br />
FOOD STORAGE<br />
MONTHS<br />
FOOD<br />
CLASSIFICATION OF FROZ<strong>EN</strong> FOODS<br />
Put the frozen products into the freezer and<br />
classify them.<br />
The storage date should be indicated on the<br />
packs, to allow use within expiry dates.<br />
ADVICE FOR STORING FROZ<strong>EN</strong> FOOD<br />
When purchasing frozen food products:<br />
• Ensure that the packaging is not damaged<br />
(frozen food in damaged packaging may<br />
have deteriorated). If the package is swollen<br />
or has damp patches, it may not have been<br />
stored under optimal conditions and<br />
defrosting may have already begun.<br />
• When shopping, leave frozen food<br />
purchases until last and transport the<br />
products in a thermally insulated cool bag.<br />
• Once at home, place the frozen foods<br />
immediately in the freezer.<br />
• Avoid, or reduce tem<strong>per</strong>ature variations to<br />
the minimum. Respect the best-before date<br />
on the package.<br />
• Always observe the storage information on<br />
the package.<br />
Note:<br />
Eat fully or partially defrosted foods<br />
immediately. Do not refreeze unless the food<br />
is cooked after it has thawed. Once cooked,<br />
the food can be refrozen.<br />
If there is a long power failure:<br />
• do not open the freezer lid except to place<br />
ice packs (if available) over the frozen<br />
foods on the right and left of the freezer.<br />
This will slow down the tem<strong>per</strong>ature<br />
increase speed.<br />
13
10042000dGB.fm5 Page 14 Monday, February 14, 2005 9:14 AM<br />
DEFROSTING THE FREEZER<br />
The appliance should be defrosted when the<br />
thickness of ice on the walls reaches 5-6 mm.<br />
• Unplug the appliance.<br />
• Remove the packs of food from the freezer<br />
and wrap them close together in newspa<strong>per</strong>.<br />
Store in a very cool place or thermally<br />
insulated bag.<br />
• Leave the freezer lid open.<br />
• Remove the internal defrost water drain plug<br />
(depending on model).<br />
• Remove the external defrost water drain plug<br />
(depending on model) and reposition it as<br />
shown in figure (A).<br />
• Place a bowl beneath the drainage channel<br />
to collect the residual water. If available, use<br />
the separator (B).<br />
• Speed up defrosting by using a spatula to<br />
detach the ice from the freezer walls.<br />
• Remove the ice from the bottom of the<br />
freezer.<br />
• In order to avoid <strong>per</strong>manent damage to<br />
the freezer interior, do not use pointed<br />
or sharp metal instruments for removing<br />
the ice.<br />
• Do not use abrasive products or heat up<br />
the interior artificially.<br />
• Dry the interior of the freezer<br />
compartment thoroughly.<br />
• On completion of the defrosting, refit the<br />
plug.<br />
• Switch on the appliance again.<br />
A<br />
B<br />
To obtain the best results from your appliance,<br />
carry out cleaning and maintenance at least<br />
once a year.<br />
• Remove the ice from the up<strong>per</strong> edge.<br />
• Clean the inside after defrosting, using a<br />
sponge dampened with warm water and/or<br />
mild detergent.<br />
• Clean the motor cooling grille (depending on<br />
model).<br />
• Remove dust from the condenser on the rear<br />
of the appliance.<br />
Note:<br />
Before carrying out maintenance, unplug the<br />
appliance.<br />
Do not use abrasive products, scourers<br />
or stain-removers (e.g. acetone,<br />
trichloroethylene) to clean the appliance.<br />
CARE AND MAINT<strong>EN</strong>ANCE<br />
14
10042000dGB.fm5 Page 15 Monday, February 14, 2005 9:14 AM<br />
TROUBLESHOOTING GUIDE<br />
1. The red LED remains lit.<br />
• Defrosting in progress?<br />
• Contents impeding correct closure of the<br />
freezer lid?<br />
• Appliance too near a source of heat?<br />
• Is the thermostat setting correct?<br />
• Are the ventilation grille and condenser<br />
clean?<br />
2. Appliance is excessivelly noisy.<br />
• Is the appliance level?<br />
• Is the appliance in contact with other<br />
fixtures or items that could give rise to<br />
vibration?<br />
• Has the packaging been removed from<br />
under the freezer?<br />
Note: Gurgling noises from the refrigerating<br />
circuit after the compressor cuts out are<br />
<strong>per</strong>fectly normal<br />
3. The green light is off and the appliance is<br />
not working.<br />
• Is there a power failure?<br />
• Is the plug pro<strong>per</strong>ly inserted in the socket?<br />
• Is the electric cable intact?<br />
4. The green light is off and the appliance is<br />
working.<br />
• The green light is not working. Contact After<br />
Sales Service for a replacement.<br />
5. Compressor runs continuously.<br />
• Have hot foods been put in the freezer?<br />
• Has the freezer lid been open for a long<br />
time?<br />
• Is the appliance located in a room which is<br />
too hot or too close to a source of heat?<br />
• Is the thermostat setting correct?<br />
• Rapid freeze button pressed inadvertently?<br />
6. Too much ice on the up<strong>per</strong> edge.<br />
• Are the defrost water drainage plugs<br />
correctly positioned?<br />
• Is the lid correctly closed?<br />
• Is the appliance lid seal damaged or<br />
deformed?<br />
(See chapter “Installation”).<br />
• Have the 4 protection pieces been<br />
removed?<br />
(See chapter “Installation”).<br />
7. Formation of condensation on the<br />
external walls of the freezer.<br />
• It is normal for condensation to form under<br />
certain atmospheric conditions (humidity<br />
above 85%) or if the appliance is located in<br />
a damp or poorly ventilated room. The<br />
<strong>per</strong>formance of the freezer is in no way<br />
affected.<br />
8. The layer of ice on the internal walls of the<br />
freezer is not uniform.<br />
• This phenomenon is quite normal.<br />
AFTER-SALES SERVICE<br />
Before contacting After-Sales Service<br />
1. See if you can solve the problem yourself<br />
with the help of the “Troubleshooting guide”).<br />
2. Switch the appliance on again to see if the<br />
problem has been solved. If it has not,<br />
disconnect the appliance from the power<br />
supply and wait for about an hour before<br />
switching on again.<br />
3. If the problem <strong>per</strong>sists, contact After Sales<br />
Service.<br />
Specify:<br />
• the nature of the problem,<br />
• the model,<br />
• the Service number<br />
(the number after the word<br />
SERVICE on the data plate<br />
on the rear of the<br />
appliance),<br />
• your full address,<br />
• your telephone number and<br />
area code.<br />
15
10042000dGB.fm5 Page 16 Monday, February 14, 2005 9:14 AM<br />
INSTALLATION<br />
• Unpack the appliance and ensure that the<br />
various elements (plastic bags, polystyrene<br />
pieces, etc.) are well out of the reach of<br />
children.<br />
• Remove the 4 protection pieces inserted<br />
between lid and appliance (A).<br />
• Important: place two of the four<br />
protection pieces (A), used to protect the<br />
lid during transport, in the capacitor<br />
plastic holder recess on the rear of the<br />
appliance (E).<br />
This o<strong>per</strong>ation is necessary in order to<br />
ensure the pro<strong>per</strong> distance of the appliance<br />
from the wall.<br />
• Remove the packaging from the bottom<br />
(B) of the freezer.<br />
• After connecting the appliance to the<br />
mains, when the right tem<strong>per</strong>ature has<br />
been reached (about an hour), ensure that<br />
the fast freeze function is inactive (yellow<br />
LED is off).<br />
• During the freezing phase, the lid does<br />
not open until the right tem<strong>per</strong>ature has<br />
been reached (about 1 hour).<br />
• Ensure that the defrosting water drainage<br />
plug is correctly positioned (C).<br />
• Ensure that the lid seal is not damaged: to<br />
remove any deformation, warm the seal with<br />
a hair dryer.<br />
• Before connecting the appliance to the mains<br />
supply, ensure that the voltage corresponds<br />
to that given on the rating plate (see figure<br />
below).<br />
• After the freezer has been installed, check<br />
that it is not resting on the mains cable.<br />
• Install the appliance in a dry, well ventilated<br />
room. Avoid locations near a source of heat<br />
or in direct sunlight.<br />
• For optimum appliance o<strong>per</strong>ation and in<br />
order to avoid damage when the lid is<br />
opened, leave a space of at least 7 cm from<br />
the rear wall and 7 cm at the sides.<br />
• Fit the accessories.<br />
ELECTRICAL CONNECTION<br />
• Electrical connections must be made in<br />
accordance with local regulations.<br />
• Data regarding voltage and absorbed power<br />
are given on the rating plate on the rear of the<br />
appliance (D).<br />
• Regulations require that the appliance is<br />
earthed. The manufacturer declines all<br />
liability for injury to <strong>per</strong>sons or animals<br />
and for damage to pro<strong>per</strong>ty resulting from<br />
failure to observe the above procedures<br />
and reminders.<br />
16<br />
• If the plug and socket are not of the same<br />
type, have the socket replaced by a qualified<br />
electrician.<br />
• Do not use extension leads or adaptors.<br />
DISCONNECTING THE APPLIANCE<br />
• Electrical disconnection must be possible<br />
either by unplugging the appliance or by<br />
means of a double-pole switch located upline<br />
from the socket.<br />
A<br />
70 mm<br />
C<br />
B<br />
70 mm<br />
70 mm
10042000dGB.fm5 Page 17 Monday, February 14, 2005 9:14 AM<br />
ELECTRICAL CONNECTION<br />
For Great Britain only<br />
The wires in the mains lead are coloured in<br />
accordance with the following code:<br />
BLUE - “NEUTRAL” (“N”)<br />
BROWN - “LIVE” (“L”)<br />
GRE<strong>EN</strong> AND YELLOW - “EARTH” (“E”)<br />
1. The GRE<strong>EN</strong> AND YELLOW wire must be<br />
connected to the terminal in the plug which is<br />
marked with the letter “E” or by the Earth<br />
symbol or coloured green or green and<br />
yellow.<br />
2. The BLUE wire must be connected to the<br />
terminal which is marked with the letter “N” or<br />
coloured black.<br />
3. The BROWN wire must be connected to the<br />
terminal which is marked with the letter “L” or<br />
coloured red.<br />
Warning - this appliance must be<br />
earthed<br />
Fuse replacement<br />
If the mains lead of this appliance is fitted with a<br />
BS 1363A 13amp fused plug, to change a fuse in<br />
this type of plug use an A.S.T.A. approved fuse<br />
to BS 1362 type and proceed as follows:<br />
1. Remove the fuse cover (A) and fuse (B).<br />
2. Fit replacement 13A fuse into fuse cover.<br />
3. Refit both into plug.<br />
Important:<br />
The fuse cover must be refitted when changing a<br />
fuse and if the fuse cover is lost the plug must not<br />
be used until a correct replacement is fitted.<br />
Correct replacement are identified by the colour<br />
insert or the colour embossed in words on the<br />
base of the plug.<br />
Replacement fuse covers are available from<br />
your local electrical store.<br />
Connection to a rewirable plug<br />
If the fitted plug is not suitable for your socket<br />
outlet, then it should be cut off and disposed of in<br />
order to avoid a possible shock hazard should it<br />
be inserted into a 13A socket elsewhere.<br />
A suitable alternative plug should then be fitted<br />
to the cable.<br />
For the Republic of Ireland only<br />
The information given in respect of Great Britain<br />
will frequently apply, but a third type of plug and<br />
socket is also used, the 2-pin, side earth type. In<br />
this case, the wire which is coloured GRE<strong>EN</strong><br />
AND YELLOW must be connected to the EARTH<br />
contact, and the two wires to the two pins,<br />
irrespective of colour. The supply to the socket<br />
must be fitted with a 16 amp fuse.<br />
17


