

Apple Power Mac G4 (Porta unità in mirroring, FireWire 800) - Ventola inferiore - Istruzioni per la sostituzione - Power Mac G4 (Porta unità in mirroring, FireWire 800) - Ventola inferiore - Istruzioni per la sostituzione
Apple Power Mac G4 (Porta unità in mirroring, FireWire 800) - Ventola inferiore - Istruzioni per la sostituzione - Power Mac G4 (Porta unità in mirroring, FireWire 800) - Ventola inferiore - Istruzioni per la sostituzione
Apple Power Mac G4 (Porta unità in mirroring, FireWire 800) - Ventola inferiore - Istruzioni per la sostituzione - Power Mac G4 (Porta unità in mirroring, FireWire 800) - Ventola inferiore - Istruzioni per la sostituzione

You also want an ePaper? Increase the reach of your titles
YUMPU automatically turns print PDFs into web optimized ePapers that Google loves.
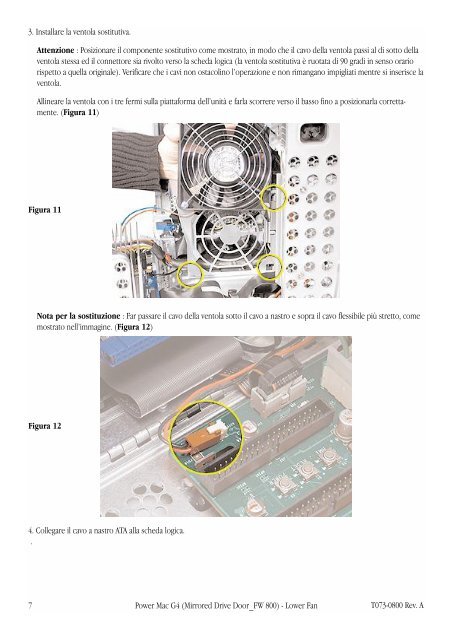
3. Instal<strong>la</strong>re <strong>la</strong> vento<strong>la</strong> sostitutiva.<br />
Attenzione : Posizionare il componente sostitutivo come mostrato, <strong>in</strong> modo che il cavo del<strong>la</strong> vento<strong>la</strong> passi al di sotto del<strong>la</strong><br />
vento<strong>la</strong> stessa ed il connettore sia rivolto verso <strong>la</strong> scheda logica (<strong>la</strong> vento<strong>la</strong> sostitutiva è ruotata di 90 gradi <strong>in</strong> senso orario<br />
rispetto a quel<strong>la</strong> orig<strong>in</strong>ale). Verificare che i cavi non ostacol<strong>in</strong>o l’o<strong>per</strong>azione e non rimangano impigliati mentre si <strong>in</strong>serisce <strong>la</strong><br />
vento<strong>la</strong>.<br />
All<strong>in</strong>eare <strong>la</strong> vento<strong>la</strong> con i tre fermi sul<strong>la</strong> piattaforma dell’unità e far<strong>la</strong> scorrere verso il basso f<strong>in</strong>o a posizionar<strong>la</strong> correttamente.<br />
(Figura 11)<br />
Figura 11<br />
Nota <strong>per</strong> <strong>la</strong> <strong>sostituzione</strong> : Far passare il cavo del<strong>la</strong> vento<strong>la</strong> sotto il cavo a nastro e sopra il cavo flessibile più stretto, come<br />
mostrato nell’immag<strong>in</strong>e. (Figura 12)<br />
Figura 12<br />
4. Collegare il cavo a nastro ATA al<strong>la</strong> scheda logica.<br />
.<br />
7 <strong>Power</strong> <strong>Mac</strong> <strong>G4</strong> (Mirrored Drive Door_FW <strong>800</strong>) - Lower Fan<br />
T073-0<strong>800</strong> Rev. A


