

Sony XDR-S100CD - XDR-S100CD Istruzioni per l'uso Inglese
Sony XDR-S100CD - XDR-S100CD Istruzioni per l'uso Inglese
Sony XDR-S100CD - XDR-S100CD Istruzioni per l'uso Inglese

You also want an ePaper? Increase the reach of your titles
YUMPU automatically turns print PDFs into web optimized ePapers that Google loves.
4-127-390-13(1)<br />
<br />
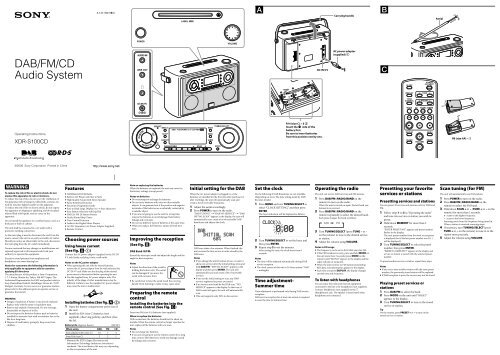
Carrying handle<br />
<br />
Aerial<br />
DAB/FM/CD<br />
Audio System<br />
DC IN 9 V<br />
AC power adaptor<br />
(supplied) <br />
<br />
O<strong>per</strong>ating Instructions<br />
<strong>XDR</strong>-<strong>S100CD</strong><br />
R14 (size C) 6 <br />
Insert the side of the<br />
battery first.<br />
Be sure to insert batteries<br />
from this position one by one.<br />
R6 (size AA) 2<br />
©2008 <strong>Sony</strong> Corporation Printed in China<br />
WARNING<br />
To reduce the risk of fire or electric shock, do not<br />
expose this apparatus to rain or moisture.<br />
To reduce the risk of fire, do not cover the ventilation of<br />
the apparatus with newspa<strong>per</strong>s, tablecloths, curtains, etc.<br />
And do not place lighted candles on the apparatus.<br />
To reduce the risk of fire or electric shock, do not expose<br />
this apparatus to dripping or splashing, and do not place<br />
objects filled with liquids, such as vases, on the<br />
apparatus.<br />
Do not install the appliance in a confined space, such as a<br />
bookcase or built-in cabinet.<br />
The unit shall be connected to a AC outlet with a<br />
protective earthing connection.<br />
As the main plug is used to disconnect the unit from the<br />
mains, connect the unit to an easily accessible AC outlet.<br />
Should you notice an abnormality in the unit, disconnect<br />
the main plug from the AC outlet immediately.<br />
You are cautioned that any changes or modifications not<br />
expressly approved in this manual could void your<br />
authority to o<strong>per</strong>ate this equipment.<br />
Excessive sound pressure from earphones and<br />
headphones can cause hearing loss.<br />
Notice for customers: the following information is<br />
only applicable to equipment sold in countries<br />
applying EU directives<br />
The manufacturer of this product is <strong>Sony</strong> Corporation,<br />
1-7-1 Konan, Minato-ku, Tokyo, 108-0075 Japan. The<br />
Authorized Representative for EMC and product safety is<br />
<strong>Sony</strong> Deutschland GmbH, Hedelfinger Strasse 61, 70327<br />
Stuttgart, Germany. For any service or guarantee matters,<br />
please refer to the addresses given in separate service or<br />
guarantee documents.<br />
WARNING<br />
Danger of explosion if battery is incorrectly replaced.<br />
Replace only with the same or equivalent type.<br />
Battery may explode if mistreated. Do not recharge,<br />
disassemble or dispose of in fire.<br />
Do not expose the batteries (battery pack or batteries<br />
installed) to excessive heat such as sunshine, fire or the<br />
like for a long time.<br />
Dispose of used battery promptly. Keep away from<br />
children.<br />
Features<br />
DAB(Band-III)/FM Radio<br />
Built-in CD Player with Slot-in Style<br />
High Quality Sound with Stereo Speaker<br />
Pause & Rewind Function<br />
Electronic Programme Guide<br />
Easy to Read Large Display (16 × 4 lines character)<br />
Easy Station Selection with Jog Dial<br />
DAB 20/ FM 20 Station Presets<br />
Guide/Alarm/Sleep Timer<br />
Tone Control Function<br />
Audio in for Digital Music Players<br />
AC/DC O<strong>per</strong>ation (AC Power Adaptor Supplied)<br />
Remote Control<br />
Choosing power sources<br />
Using house current<br />
(See fig. -)<br />
Connect the AC power adaptor (supplied) to the DC IN<br />
9 V jack firmly, and plug it into a wall outlet.<br />
Notes on the AC power adaptor<br />
When o<strong>per</strong>ating the unit with the internal batteries,<br />
remove the AC power adaptor from the wall outlet and the<br />
DC IN 9 V jack. Make sure that the plug of the external<br />
power source is disconnected before o<strong>per</strong>ating the unit.<br />
Use the supplied <strong>Sony</strong> AC power adaptor only. The<br />
polarity of the plugs of other manufacturers may be<br />
different. Failure to use the supplied AC power adaptor<br />
may cause the unit to malfunction.<br />
Installing batteries (See fig. -)<br />
1 Open the battery compartment at the rear of<br />
the unit.<br />
2 Install six R14 (size C) batteries (not<br />
supplied), observing polarity, and then close<br />
the lid.<br />
Battery Life (Approx. hours)<br />
(JEITA*)<br />
Note on replacing the batteries<br />
When the batteries are replaced, the unit may revert to<br />
the factory settings (except preset).<br />
Notes on batteries<br />
Do not attempt to recharge dry batteries.<br />
Do not carry batteries with coins or other metallic<br />
objects. It can generate heat if the positive and negative<br />
terminals of the batteries are accidentally contacted by<br />
a metallic object.<br />
If you are not going to use the unit for a long time,<br />
remove the batteries to avoid damage from battery<br />
leakage and corrosion.<br />
Do not use different types of batteries at the same time.<br />
When you replace the batteries, replace all with new<br />
ones.<br />
Improving the reception<br />
(See fig. )<br />
DAB Band-III/FM:<br />
Extend the telescopic aerial and adjust the length and the<br />
angle for best reception.<br />
Notes<br />
Adjust the direction of the aerial by<br />
holding the bottom of it. The aerial<br />
can be damaged if you move the<br />
aerial with excessive force.<br />
Be careful not to have the aerial touch the carrying<br />
handle when listening to radio. It may cause noise.<br />
Preparing the remote<br />
control<br />
Installing the batteries into the<br />
remote control (See Fig. )<br />
Insert two R6 (size AA) batteries (not supplied).<br />
When to replace the batteries<br />
With normal use, the batteries should last for about six<br />
months. When the remote control no longer o<strong>per</strong>ates the<br />
unit, replace all the batteries with new ones.<br />
Initial setting for the DAB<br />
When the AC power adaptor is plugged in, or the<br />
batteries are installed for the first time after purchase (or<br />
after resetting), the unit will automatically scan and<br />
create a list of receivable broadcasts.<br />
1 Adjust the aerial accordingly.<br />
2 Press POWER to turn on the radio.<br />
“DAB TUNING” “DAB NO SERVICE” “DAB<br />
INITIAL SCAN” appears in the display, the unit will<br />
automatically scan, create a list of receivable DAB<br />
broadcasts and adjusts the clock.<br />
DAB scan takes a few minutes. When finished, the<br />
unit receives the first service in order stored by the<br />
DAB scan.<br />
Notes<br />
If you change the unit’s location of use, or want to<br />
add a new service after the initial setting, press and<br />
hold DAB/FM. “INITIAL SCAN?” appears in the<br />
display and then press ENTER. The unit will<br />
automatically scan and create a list of receivable<br />
services.<br />
If you set the initial setting or scan, any DAB<br />
services registered as preset are erased.<br />
If no services are found by the DAB scan, “NO<br />
SERVICE” appears in the display. In that case, if<br />
DAB is selected again, the unit will automatically<br />
scan.<br />
This unit supports only EPG in data service.<br />
Set the clock<br />
Do the following if DAB broadcasts are not available<br />
(depending on area). The time setting mode by DAB<br />
becomes invalid.<br />
1 Press MENU and turn TUNING/SELECT to<br />
select “CLOCK SETTING,” and then press<br />
ENTER.<br />
The hour indication will be displayed as follows.<br />
2 Turn TUNING/SELECT to set the hour, and<br />
then press ENTER.<br />
3 Repeat step 2 to set the minutes.<br />
After setting the time, the clock starts from 0<br />
seconds.<br />
Notes<br />
The time will be adjusted automatically during DAB<br />
service reception.<br />
The clock system of this unit is 24-hour system (“0:00”<br />
= midnight).<br />
Time adjustment-<br />
Summer time<br />
Time adjustment is <strong>per</strong>formed only during DAB service<br />
reception.<br />
DAB service reception for at least one minute is required<br />
to reset the time to Summer time.<br />
O<strong>per</strong>ating the radio<br />
The unit can receive DAB services and FM stations.<br />
1 Press DAB/FM (RADIO/BAND on the<br />
remote) to turn on the radio.<br />
When the unit is turned on again, the last band you<br />
listened to is received.<br />
2 Press DAB/FM (RADIO/BAND on the<br />
remote) repeatedly to select the desired band.<br />
Each press changes the band as follows:<br />
DAB<br />
FM<br />
3 Turn TUNING/SELECT (press TUNE + or –<br />
on the remote) to tune to the desired service<br />
or station.<br />
4 Adjust the volume using VOLUME.<br />
Notes in FM usage<br />
The frequency can be set in 0.05 MHz steps for FM.<br />
If the FM broadcast is noisy, press and hold MODE on<br />
the unit more than 2 seconds (press MODE on the<br />
remote) until “MONO” appears in the display and the<br />
radio will play in monaural.<br />
When the unit receives an FM station transmitting<br />
RDS data, text information appears in the display.<br />
Each time you press DISPLAY, the display changes<br />
current time and frequency.<br />
To listen with headphones<br />
You can enjoy the radio and external equipment<br />
connected to the line in by headphones (not supplied).<br />
Connect headphones (not supplied) to the <br />
(headphones) jack. The speaker is deactivated when<br />
headphones are connected.<br />
Presetting your favorite<br />
services or stations<br />
Presetting services and stations<br />
You can preset 20 services and stations each for DAB and<br />
FM.<br />
1 Follow steps 1 to 3 in “O<strong>per</strong>ating the radio”<br />
and tune into service or station you wish to<br />
preset.<br />
2 Hold down MEMORY for more than 2<br />
seconds.<br />
“ENTER PRESET NO.” appears and preset number<br />
flashes in the display.<br />
The next preset number from the most recent preset<br />
is displayed (but if the last preset number was 20, 1<br />
will be displayed).<br />
3 Turn TUNING/SELECT to select the preset<br />
number, then press ENTER.<br />
“PRESET COMPLETE!” appears in the display and<br />
service or station is stored with the selected preset<br />
number.<br />
To preset another service or station, repeat these steps.<br />
Notes<br />
If you try to store another station with the same preset<br />
number, the previously stored station will be replaced.<br />
If DAB reception is poor, the service may not be stored.<br />
Playing preset services or<br />
stations<br />
1 Press DAB/FM to select the band.<br />
2 Press MODE on the unit until “PRESET”<br />
appears in the display.<br />
3 Turn TUNING/SELECT to tune in the stored<br />
service or station.<br />
Tip<br />
On the remote, press PRESET + or – to tune in the<br />
stored service or station.<br />
Scan tuning (for FM)<br />
The unit will automatically scan FM stations.<br />
1 Press POWER to turn on the radio.<br />
2 Press DAB/FM (RADIO/BAND on the<br />
remote) to select the FM band.<br />
3 Hold down SCAN + or – (TUNE + or – on the<br />
remote) for more than 2 seconds.<br />
+ : scans to the higher frequency.<br />
– : scans to the lower frequency.<br />
Scanning starts from the frequency being tuned in.<br />
When a station is received, scanning stops.<br />
4 If necessary, turn TUNING/SELECT (press<br />
TUNE + or – on the remote) to tune in to the<br />
station more precisely.<br />
5 Adjust the volume using VOLUME.<br />
When using DAB FM CD<br />
<strong>Sony</strong> alkaline LR14 (size C) 10 7 4<br />
<strong>Sony</strong> R14 (size C) 3 2 1<br />
* Measured by JEITA (Japan Electronics and<br />
Information Technology Industries Association)<br />
standards. The actual battery life may vary depending<br />
on the circumstance of the unit.<br />
Notes<br />
Do not charge dry batteries.<br />
If you are not going to use the remote control for a long<br />
time, remove the batteries to avoid any damage caused<br />
by leakage and corrosion.
Other useful functions<br />
for DAB<br />
Changing the display<br />
To change the display mode, press DISPLAY during DAB<br />
reception.<br />
The display can be up to 16 characters. Each time you<br />
press DISPLAY, the bottom of the display changes as<br />
follows:<br />
<br />
<br />
: Dynamic<br />
: Signal strength and PTY<br />
: Ensemble<br />
: Frequency and bit rate<br />
: Clock and date<br />
Note<br />
The display mode returns to after several seconds.<br />
The display mode will be also displayed when you<br />
turn the unit off and on again, or change to another<br />
function.<br />
Using the GUIDE<br />
This unit downloads the EPG (electronic programme<br />
guide) included in the DAB data and displays it. The unit<br />
also enables you to <strong>per</strong>form timer o<strong>per</strong>ations, using the<br />
downloaded EPG (see “Setting the guide timer”).<br />
To download the EPG<br />
1 Follow steps 1 to 3 in “O<strong>per</strong>ating the radio”<br />
and tune into DAB service.<br />
2 Press GUIDE for more than 2 seconds.<br />
“GUIDE DOWNLOAD” appears in the display.<br />
3 Turn TUNING/SELECT to select the<br />
“CURRENT” or “ALL.”<br />
“CURRENT”: Only the current station is<br />
downloaded.<br />
“ALL”: All stations are downloaded in order.<br />
4 Press ENTER.<br />
“GUIDE DOWNLOADING” flashes in the display<br />
until “%” and current ensemble name appears.<br />
When download is completed, the EPG is displayed as<br />
follows:<br />
Day of the week<br />
Component (or secondary) label<br />
Programme name<br />
Programme start time<br />
(currently broadcast programme is<br />
displayed as “NOWPLAYING”)<br />
Programme end time<br />
To display the EPG:<br />
Press GUIDE.<br />
To display the media description in EPG:<br />
Press DISPLAY.<br />
To check another station in EPG:<br />
Turn TUNING/SELECT.<br />
To check another programme time in EPG:<br />
Press SCAN + or –.<br />
To store the guide timer:<br />
Press ENTER.<br />
Notes<br />
Set this unit to receive DAB for about 2 minutes so as<br />
to download the EPG data.<br />
If DAB reception is poor, time-out error may occur<br />
while downloading the EPG data.<br />
Perform the above o<strong>per</strong>ation where the reception is<br />
good.<br />
If you move into a place with poor reception (in the<br />
building, etc.) after downloading the EPG, EPG may<br />
not be displayed.<br />
If there is no data, or data cannot be displayed, “Not<br />
Available” appears in the display.<br />
The downloaded EPG data will be erased if the either<br />
of the following o<strong>per</strong>ations is executed:<br />
–When you o<strong>per</strong>ate the power saving mode.<br />
–When you turn off the unit during battery o<strong>per</strong>ation.<br />
<br />
<br />
<br />
Pausing and rewinding radio<br />
This unit always stores DAB data and you can pause and<br />
rewind the data. When the memory becomes full, new<br />
audio data will over write from the oldest one.<br />
1 Press PAUSE & REWIND during DAB<br />
reception.<br />
The current broadcast mutes and the PAUSE &<br />
REWIND indicator and the rewind time* appear in<br />
the display.<br />
Rewind<br />
time<br />
* Rewind time: delay time from the current broadcast<br />
2 Press PAUSE & REWIND again until the<br />
desired rewind time appears.<br />
You can also rewind the current broadcast by holding<br />
down ( on the remote). You can adjust<br />
the rewind time by holding down or<br />
( or on the remote).<br />
The o<strong>per</strong>ation is cancelled when you:<br />
Change channels.<br />
Select ALL on the GUIDE DOWNLOAD menu.<br />
Press or POWER.<br />
Hold down ( on the remote) until the<br />
rewind time displays “0:00” (current time).<br />
Change a function.<br />
Notes<br />
When EPG is displayed, this o<strong>per</strong>ation is disabled. In<br />
this case, , can not be o<strong>per</strong>ated.<br />
Rewind time is depending on bit rate of broadcast.<br />
128kbps DAB data is storable for about 25 minutes.<br />
If DAB reception is poor, this function may not o<strong>per</strong>ate<br />
pro<strong>per</strong>ly.<br />
When the memory becomes full during pause mode,<br />
this function will be playback automatically.<br />
PTY (Programme type)<br />
This function indicates services by programme type, such<br />
as NEWS, SPORTS, etc., in the PTY list, transmitted as<br />
DAB.<br />
If the received service or station does not transmit the<br />
programme type, “None” appears.<br />
Programme type<br />
Undefined<br />
News<br />
Current Affairs<br />
Information<br />
Sport<br />
Education<br />
Drama<br />
Culture<br />
Science<br />
Varied<br />
Pop Music<br />
Rock Music<br />
Easy Listening Music<br />
Light Classical<br />
Serious Classical<br />
Other Music<br />
Weather<br />
Finance<br />
Children’s programmes<br />
Social Affairs<br />
Religion<br />
Phone In<br />
Travel<br />
Leisure<br />
Jazz Music<br />
Country Music<br />
National Music<br />
Oldies Music<br />
Folk Music<br />
Documentary<br />
Display<br />
None<br />
News<br />
Affairs<br />
Info<br />
Sport<br />
Educate<br />
Drama<br />
Culture<br />
Science<br />
Varied<br />
Pop M<br />
Rock M<br />
Easy M<br />
Light M<br />
Classics<br />
Other M<br />
Weather<br />
Finance<br />
Children<br />
Social<br />
Religion<br />
Phone In<br />
Travel<br />
Leisure<br />
Jazz<br />
Country<br />
National M<br />
Oldies<br />
Folk M<br />
Document<br />
Playing a CD<br />
Insert a disc<br />
with the label<br />
side facing<br />
forward.<br />
1 Press CD on the unit.<br />
2 Slot the CD into the unit.<br />
Total tracks and time appear in the display.<br />
3 Press ( on the remote).<br />
The unit plays all the tracks once.<br />
To<br />
Pause playback<br />
Stop playback<br />
Go to the next track<br />
Go back to the previous<br />
track<br />
Locate a point while<br />
listening to the sound<br />
Locate a point while<br />
observing the display<br />
Remove the CD<br />
Press<br />
( or on the<br />
remote)<br />
<br />
Turn TUNIG/SELECT or<br />
press ( on<br />
the remote)<br />
Turn TUNIG/SELECT or<br />
press ( on<br />
the remote)<br />
(forward) or<br />
(backward)<br />
( or on the<br />
remote) while playing and<br />
hold it until you find the<br />
point.<br />
(forward) or<br />
(backward)<br />
( or on the<br />
remote) in pause and hold<br />
it until you find the point.<br />
<br />
About CD-Rs/CD-RWs<br />
This unit is compatible with CD-Rs/CD-RWs but<br />
playback capability may vary depending on the quality of<br />
the disc, the recording device and application software.<br />
Music discs encoded with copyright protection<br />
technologies<br />
This product is designed to play back discs that conform<br />
to the Compact Disc (CD) standard.<br />
Recently, various music discs encoded with copyright<br />
protection technologies are marketed by some record<br />
companies. Please be aware that among those discs, there<br />
are some that do not conform to the CD standard and<br />
may not be playable by this product.<br />
To handle compact discs<br />
Correct<br />
Incorrect<br />
Handle the disc by its edge.<br />
Do not touch the surface.<br />
Do not stick pa<strong>per</strong> or<br />
tape on the surface.<br />
Note on DualDiscs<br />
A DualDisc is a two sided disc product which mates DVD<br />
recorded material on one side with digital audio material<br />
on the other side. However, since the audio material side<br />
does not conform to the Compact Disc (CD) standard,<br />
playback on this product is not guaranteed.<br />
Notes<br />
Discs with non-standard shapes (e.g., heart, square,<br />
star) cannot be played on this unit. Attempting to do so<br />
may damage the unit. Do not use such discs.<br />
To prevent a CD from being damaged while inserting/<br />
removing it, set the carrying handle down when<br />
playing a CD.<br />
When you eject a disc, handle the disc by its edge. Do<br />
not touch the surface.<br />
Using the display<br />
To check the total track number and playing time<br />
In stop mode, press DISPLAY.<br />
To check the remaining time<br />
Press DISPLAY repeatedly while playing a CD.<br />
The display changes as follows:<br />
The current track number and playing time<br />
<br />
The current track number and the remaining time of the<br />
current track<br />
<br />
The number of tracks left and remaining time on the CD<br />
<br />
Clock display (current time)<br />
Playing tracks repeatedly<br />
(repeat play)<br />
You can play tracks repeatedly in normal, shuffle or<br />
program play modes.<br />
1 Follow steps 1 and 2 in “Playing a CD”<br />
2 Proceed as follows:<br />
To repeat<br />
A single track<br />
All tracks on the<br />
CD<br />
Tracks in<br />
random order<br />
Programmed<br />
tracks files<br />
Do this<br />
1 Press REPEAT on the remote until<br />
“REPEAT 1” appears.<br />
2 Press or to<br />
select the track that you want to<br />
repeat.<br />
3 Press ( on the remote).<br />
1 Press REPEAT on the remote until<br />
“REPEAT” appears.<br />
2 Press ( on the remote).<br />
1 Start shuffle play (see “Playing<br />
tracks in random order”).<br />
2 Press REPEAT on the remote until<br />
“REPEAT” appears.<br />
3 Press ( on the remote).<br />
1 Program tracks (see “Creating<br />
your own programme”).<br />
2 Press REPEAT on the remote until<br />
“REPEAT” appears.<br />
3 Press ( on the remote).<br />
To cancel repeat play<br />
Press REPEAT on the remote until “REPEAT” disappears<br />
from the display.<br />
Playing tracks in random order<br />
(shuffle play)<br />
You can play tracks in random order.<br />
1 Follow steps 1 and 2 in “Playing a CD”<br />
2 Press MODE until “SHUFFLE” appears in the<br />
display.<br />
3 Press ( on the remote) to start shuffle<br />
play.<br />
To cancel Shuffle Play<br />
Stop playing first. Then press MODE until “SHUFFLE”<br />
disappears from the display.<br />
Tip<br />
During shuffle play, you cannot select the previous track<br />
by pressing ( on the remote).<br />
Creating your own programme<br />
(programme play)<br />
You can arrange the playing order of up to 20 tracks on a CD.<br />
1 Follow steps 1 and 2 in “Playing a CD”<br />
2 Press MODE until “PROGRAM” appears in<br />
the display.<br />
3 Press or or turn<br />
TUNING/SELECT to select the track and then<br />
press ENTER to add it to the programme.<br />
Repeat to programme other tracks in the order that<br />
you want.<br />
After programming the first track, “STEP 1” appears,<br />
followed by selected track.<br />
Each time you add a track, a step number is added.<br />
4 Press ( on the remote) to start<br />
Programme Play.<br />
To cancel programme play<br />
Stop playing first. Then press MODE until “PROGRAM”<br />
disappears from the display.<br />
To clear the programme you set<br />
Press CLEAR on the remote.<br />
Stop playback first. Then press STOP .<br />
Tip<br />
You can play the same programme again, since the<br />
programme is saved until you eject the CD.<br />
Connecting optional<br />
component<br />
To enhance your system, you can connect optional<br />
components. Be sure to turn off the power of each<br />
component before making any connections. For details, refer<br />
to the instruction manual of the component to be connected.<br />
To listen to the sound from optional<br />
components in the unit<br />
1 Connect the AUDIO IN jack on the unit to<br />
the line output jack of the portable digital<br />
music player or other components using an<br />
audio connecting cable* (not supplied).<br />
* For a PC: use a cable which fills the connector of<br />
your PC. For a TV or VCR: use a cable with a stereomini<br />
plug on one end and two phono plugs on the<br />
other end. For a portable digital music player: use a<br />
cable with a stereo-mini plug on both ends.<br />
2 Turn the unit and the connected component on.<br />
3 Press AUDIO IN and start playing sound on<br />
the connected component.<br />
The sound from the connected component is output<br />
from the speakers.<br />
To listen to the sound of the unit by optional<br />
components<br />
Connect the LINE OUT jack on the unit to the line in<br />
jack of the other components.<br />
Note<br />
The volume and tone adjusted on this unit does not<br />
affect the sound output from LINE OUT.<br />
Using the timers<br />
The unit offers three timer functions. If you use the<br />
alarm timer or guide timer with the sleep timer, the sleep<br />
timer has priority.<br />
Setting the sleep timer<br />
The sleep timer allows you to fall asleep to the sound of a<br />
CD, the radio, or input from the AUDIO IN function. It<br />
does this by automatically turning off the CD, the radio, or<br />
input from the AUDIO IN function after a preset duration.<br />
1 Press SLEEP while the unit is turned on.<br />
“SLEEP” appears in the display.<br />
2 Press SLEEP to set the sleep timer duration.<br />
Each time you press SLEEP, the duration changes as<br />
follows:<br />
“AUTO*” “60” “30” “20” “10” “OFF”.<br />
* When you select “AUTO,” the CD stops playing in<br />
90 minutes at most and the unit goes off<br />
automatically. When you are listening to the radio,<br />
the radio goes off in 90 minutes.<br />
The unit automatically turns off when the duration time<br />
is passed.<br />
4 seconds after you have finished the duration setting<br />
and released SLEEP, “SLEEP” appears in the display and<br />
back light will turn off, then the sleep timer starts. The<br />
unit will play for the duration you set, and then shut off.<br />
Note<br />
Even if the duration is passed, the optional component<br />
connected with AUDIO IN is not turned off.<br />
To change the sleep timer setting<br />
Repeat step 2 to select the desired sleep timer setting<br />
even after the sleep timer has been activated.<br />
To deactivate the sleep timer<br />
Press POWER. The unit will turn off.<br />
Press SLEEP to set the sleep timer “OFF,” only the sleep<br />
timer will be cancelled (the unit stays ON).<br />
Setting the alarm timer<br />
You can set the unit to turn on automatically at a preset time.<br />
The timer sound is selectable from DAB, FM, CD and<br />
BUZZER.<br />
Make sure you have set the clock.<br />
To set the alarm timer<br />
1 Press MENU to show the menu display.<br />
2 Turn TUNING/SELECT ( or on the<br />
remote) to select “TIMER SETTING,” then<br />
press ENTER.<br />
3 Turn TUNING/SELECT ( or on the<br />
remote) to select “TIMER A,” then press<br />
ENTER.<br />
4 Turn TUNING/SELECT ( or on the<br />
remote) to select “SETTING,” then press<br />
ENTER.<br />
5 Turn TUNING/SELECT ( or on the<br />
remote) to set the hour for on time, then press<br />
ENTER.<br />
The minute flashes. Perform the procedure above to<br />
set the minute.<br />
6 Repeat step 5 to set the time to stop playing.<br />
7 Turn TUNING/SELECT ( or on the<br />
remote) to select the desired sound from DAB,<br />
FM, CD and BUZZER, then press ENTER.<br />
8 Turn TUNING/SELECT ( or on the<br />
remote) to adjust the wake-up volume, then<br />
press ENTER.<br />
If you select DAB or FM, turn TUNING/SELECT<br />
( or on the remote) to select the desired<br />
preset number, then press ENTER.<br />
When you select the preset number “P--” during<br />
DAB service reception, the most recent reception<br />
service is received.<br />
9 Press POWER to turn off the unit.<br />
The unit turns on about 15 seconds before the preset<br />
time.<br />
If the unit is on at the preset time, the alarm timer<br />
will not play.<br />
To stop the alarm timer<br />
Press POWER.<br />
To deactivate the alarm timer<br />
Perform the same procedure as in step 4 to select “OFF.”<br />
“TIMER” and “A” turn off in the display.<br />
Setting the guide timer<br />
To set the guide timer<br />
You can set up to 10 guide timers using the EPG display<br />
based on the downloaded DAB data.<br />
Make sure you have download the EPG.<br />
1 Follow steps 1 and 2 in “To set the alarm<br />
timer.”<br />
2 Turn TUNING/SELECT ( or on the<br />
remote) to select “GUIDE,” then press ENTER.<br />
EPG appears in the display. “TIMER,” “B,” “GUIDE”<br />
and the lowest number of the guide timer on which a<br />
programme is not stored flash in the display.<br />
3 Turn TUNING/SELECT ( or on the<br />
remote) and press SCAN + or – to select the<br />
desired programme, then press ENTER.<br />
4 Turn TUNING/SELECT ( or on the<br />
remote) to adjust the volume, then press<br />
ENTER.<br />
If you select the stored number in step 2, do the<br />
following:<br />
1 Turn TUNIG/SELECT ( or on the<br />
remote) and press SCAN + or – to select the<br />
desired programme, then press ENTER.<br />
“SETTING” and “CANCEL” appear in the display.<br />
2 Turn TUNIG/SELECT ( or on the<br />
remote) to select “SETTING,” then press<br />
ENTER.<br />
3 Turn TUNIG/SELECT ( or on the<br />
remote) to adjust the volume, then press<br />
ENTER.<br />
The setting is completed.<br />
To erase the guide timer<br />
1 Perform the same procedure as in steps 1 and<br />
2 in “To set the guide timer,” turn TUNING/<br />
SELECT ( or on the remote) to<br />
select the desired number and then press<br />
ENTER.<br />
“SETTING” and “CANCEL” appear in the display.<br />
2 Turn TUNING/SELECT ( or on the<br />
remote) to select “CANCEL,” then press<br />
ENTER.<br />
To set the guide timer directly by EPG.<br />
1 Following “To display the EPG” and display<br />
the desired EPG to setting the timer.<br />
2 Press ENTER.<br />
“TIMER,” “B,” “GUIDE” and the lowest number of<br />
the guide timer on which a programme is not stored<br />
flash in the display.<br />
3 Turn TUNING/SELECT ( or on the<br />
remote) to adjust the volume, then press<br />
ENTER.<br />
Notes<br />
You cannot set the guide timer if the following<br />
indications appear.<br />
–“TIMEOVERLAPPING”: On-time of two or more<br />
guide timers overlap.<br />
–“TIMER NG”: The on-time and off-time are the<br />
same.<br />
–“TIMER FULL”: Maximum numbers of guide timers<br />
have been already set.<br />
If a guide timer activates while the power is turned on,<br />
the power is not turned off when the off-time of the<br />
guide timer passes.<br />
If another guide timer activates while a guide timer<br />
sounds, the latter one has priority.<br />
If the on-time of the alarm timer and guide timer is<br />
same, guide timer has priority.<br />
Other useful functions<br />
Adjusting the tone<br />
1 Press POWER to turn on the unit.<br />
2 Press MENU to show the menu display.<br />
3 Turn TUNING/SELECT to select “TONE<br />
CONTROL,” then press ENTER to show the<br />
setting display.<br />
4 Turn TUNING/SELECT to adjust “TREBLE,”<br />
then press ENTER.<br />
5 Turn TUNING/SELECT to adjust “BASS,” then<br />
press ENTER.<br />
Tips<br />
The adjustable range of “TREBLE” and “BASS” is from<br />
–4 to +4.<br />
You can adjust “TONE” directly by pressing TONE on<br />
the remote control. Press or to adjust the<br />
tone, then press ENTER.<br />
Using the power saving mode<br />
This unit has a power saving mode in AC o<strong>per</strong>ation.<br />
While the AC power adaptor is connected in power off,<br />
press DISPLAY for more than 2 seconds.<br />
The following will occur:<br />
Time display is turned off<br />
Remote control does not work<br />
EPG is all erased<br />
To reset the unit<br />
If the radio fails to function pro<strong>per</strong>ly, do the following:<br />
Press and hold STOP, ENTER and POWER at the same<br />
time for a few seconds.<br />
“RESET” appears in the display and the unit will revert<br />
to the factory preset.<br />
Precautions<br />
O<strong>per</strong>ate the unit only on the power sources specified in<br />
“Specifications”. For battery o<strong>per</strong>ation, use six R14 (size<br />
C) batteries. For AC o<strong>per</strong>ation, use only the supplied<br />
AC power adaptor. Do not use any other type of AC<br />
power adaptor.<br />
The unit is not disconnected from the AC power<br />
source (mains) as long as it is connected to the wall<br />
outlet, even if the unit itself has been turned off.<br />
Use the unit within a tem<strong>per</strong>ature range of 0°C to 40°C<br />
(32°F to 104°F). If it is used in tem<strong>per</strong>atures higher<br />
than this range, numbers may appear in the display<br />
which have nothing to do with the frequency being<br />
received. If it is used in tem<strong>per</strong>atures lower than this<br />
range, the numbers displayed may change very slowly.<br />
(These irregularities will disappear and there will be no<br />
damage to the unit when the unit is used in the<br />
recommended tem<strong>per</strong>ature range.)<br />
Avoid exposure to tem<strong>per</strong>ature extremes, direct<br />
sunlight, moisture, sand, dust or mechanical shock.<br />
Never leave in a car parked in the sun.<br />
Should any solid object or liquid fall into the unit,<br />
disconnect the AC power adaptor and remove the<br />
batteries, and have the unit checked by a qualified<br />
<strong>per</strong>sonnel before o<strong>per</strong>ating it any further.<br />
Do not drop objects such as clips or coins into the CD<br />
slot. If this happens, disconnect the AC power adaptor<br />
and remove the batteries, and have the unit checked by<br />
a qualified <strong>per</strong>sonnel before o<strong>per</strong>ating it any further.<br />
Be careful of objects/people around you when carrying<br />
the unit by its handle.<br />
In vehicles or buildings, radio reception may be<br />
difficult or noisy. Try listening near a window.<br />
Since a strong magnet is used for the speakers, keep<br />
away <strong>per</strong>sonal credit cards using magnetic coding or<br />
spring-wound watches from the unit to prevent<br />
possible damage from the magnet.<br />
To clean the casing, use a soft cloth dampened with a<br />
mild detergent solution.<br />
Disposal of Old Electrical & Electronic<br />
Equipment (Applicable in the<br />
European Union and other European<br />
countries with separate collection<br />
systems)<br />
This symbol on the product or on its<br />
packaging indicates that this product shall<br />
not be treated as household waste. Instead it shall be<br />
handed over to the applicable collection point for the<br />
recycling of electrical and electronic equipment. By<br />
ensuring this product is disposed of correctly, you will<br />
help prevent potential negative consequences for the<br />
environment and human health, which could otherwise<br />
be caused by inappropriate waste handling of this<br />
product. The recycling of materials will help to conserve<br />
natural resources. For more detailed information about<br />
recycling of this product, please contact your local Civic<br />
Office, your household waste disposal service or the shop<br />
where you purchased the product.<br />
Applicable accessories: Remote control<br />
Disposal of waste batteries<br />
(applicable in the European Union<br />
and other European countries with<br />
separate collection systems)<br />
This symbol on the battery or on the<br />
packaging indicates that the battery provided with this<br />
product shall not be treated as household waste.<br />
On certain batteries this symbol might be used in<br />
combination with a chemical symbol. The chemical<br />
symbols for mercury (Hg) or lead (Pb) are added if the<br />
battery contains more than 0.0005% mercury or 0.004%<br />
lead.<br />
By ensuring these batteries are disposed of correctly, you<br />
will help prevent potentially negative consequences for<br />
the environment and human health which could<br />
otherwise be caused by inappropriate waste handling of<br />
the battery. The recycling of the materials will help to<br />
conserve natural resources.<br />
In case of products that for safety, <strong>per</strong>formance or data<br />
integrity reasons require a <strong>per</strong>manent connection with<br />
an incorporated battery, this battery should be replaced<br />
by qualified service staff only.<br />
To ensure that the battery will be treated pro<strong>per</strong>ly, hand<br />
over the product at end-of-life to the applicable<br />
collection point for the recycling of electrical and<br />
electronic equipment.<br />
For all other batteries, please view the section on how to<br />
remove the battery from the product safely. Hand the<br />
battery over to the applicable collection point for the<br />
recycling of waste batteries.<br />
For more detailed information about recycling of this<br />
product or battery, please contact your local Civic Office,<br />
your household waste disposal service or the shop where<br />
you purchased the product.<br />
If you have any questions or problems concerning<br />
your unit, please consult your nearest <strong>Sony</strong> dealer.<br />
Troubleshooting<br />
Should any problem <strong>per</strong>sist after you have made the<br />
following checks, consult your nearest <strong>Sony</strong> dealer.<br />
Display is dim, or no indication is displayed.<br />
The unit is being used in extremely high or low<br />
tem<strong>per</strong>atures or in a place with excessive moisture.<br />
Very weak or interrupted sound, or unsatisfactory<br />
reception.<br />
If you are in a building, listen near a window.<br />
A station or service cannot be received when a<br />
PRESET recalls.<br />
The station or service has not been preset.<br />
Another station or service is preset. Preset the station<br />
or service again.<br />
The preset services and stations may be initialized, if a<br />
maintenance service is <strong>per</strong>formed.<br />
Please note down of your settings in case you want to<br />
preset them again.<br />
Specifications<br />
CD player section<br />
System<br />
Compact disc digital audio system<br />
Laser diode pro<strong>per</strong>ties<br />
Emission duration: Continuous<br />
Laser output: Less than 44.6 µW(This output is the value<br />
measurement at a distance of 200 mm from the objective<br />
lens surface on the optical pick-up block with 7 mm<br />
a<strong>per</strong>ture.)<br />
Number of channels<br />
2<br />
Frequency response<br />
20 - 20 000 Hz +1/–2 dB<br />
Wow and flutter<br />
Below measurable limit<br />
Radio section<br />
Frequency range<br />
Band Frequency Channel step<br />
DAB (Band-III) 174.928 - 239.200 MHz<br />
FM 87.5 - 108 MHz 0.05 MHz<br />
DAB (Band-III) frequency table<br />
(MHz)<br />
No. Channel Frequency No. Channel Frequency<br />
1 5A 174.928 20 9D 208.064<br />
2 5B 176.640 21 10A 209.936<br />
3 5C 178.352 22 10B 211.648<br />
4 5D 180.064 23 10C 213.360<br />
5 6A 181.936 24 10D 215.072<br />
6 6B 183.648 25 11A 216.928<br />
7 6C 185.360 26 11B 218.640<br />
8 6D 187.072 27 11C 220.352<br />
9 7A 188.928 28 11D 222.064<br />
10 7B 190.640 29 12A 223.936<br />
11 7C 192.352 30 12B 225.648<br />
12 7D 194.064 31 12C 227.360<br />
13 8A 195.936 32 12D 229.072<br />
14 8B 197.648 33 13A 230.784<br />
15 8C 199.360 34 13B 232.496<br />
16 8D 201.072 35 13C 234.208<br />
17 9A 202.928 36 13D 235.776<br />
18 9B 204.640 37 13E 237.488<br />
19 9C 206.352 38 13F 239.200<br />
General<br />
Time display<br />
24-hour system<br />
Speaker:<br />
Approx. 7.7 cm (3 1 ⁄8 in) dia. 6 Ω<br />
Power output:<br />
3W + 3 W (at 10 % harmonic distortion)<br />
Output:<br />
(headphones) jack (ø 3.5mm stereo mini jack)<br />
LINE OUT jack (ø 3.5mm stereo minijack)<br />
Input:<br />
AUDIO IN jack (ø 3.5mm stereo minijack)<br />
Power requirements:<br />
9 V DC, six R14 (size C) batteries<br />
External power source:<br />
DC IN 9 V<br />
Dimensions:<br />
Approx. 339 × 200 × 158 mm (w/h/d)<br />
(Approx. 13 3 ⁄8 × 7 7 ⁄8 × 6 1 ⁄4 in) incl. projecting parts<br />
and controls<br />
Mass:<br />
Approx. 3.8 kg (8 lb 6 oz) not incl. batteries<br />
Supplied accessories:<br />
AC power adaptor (1)<br />
Remote control (1)<br />
Design and specifications are subject to change without<br />
notice.


