

KitchenAid JLG61P - Double Cooker - JLG61P - Double Cooker EN (F084155) Istruzioni per l'Uso
KitchenAid JLG61P - Double Cooker - JLG61P - Double Cooker EN (F084155) Istruzioni per l'Uso
KitchenAid JLG61P - Double Cooker - JLG61P - Double Cooker EN (F084155) Istruzioni per l'Uso

Create successful ePaper yourself
Turn your PDF publications into a flip-book with our unique Google optimized e-Paper software.
Installation<br />
Prior to installation, ensure that the local distribution<br />
conditions (nature of the gas and gas pressure)<br />
and the adjustment conditions are compatible. The<br />
adjustment conditions for this appliance are stated on<br />
the data badge which is fitted on the back panel.<br />
This appliance is not designed to be connected to a<br />
combustion products evacuation device. It must be<br />
installed and connected in accordance with current<br />
installation regulations. particular attention should<br />
be given to the relevant requirements regarding<br />
ventilation.<br />
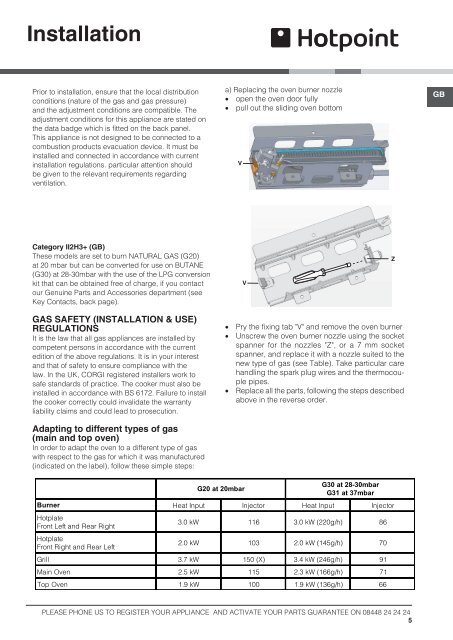
a) Replacing the oven burner nozzle<br />
open the oven door fully<br />
pull out the sliding oven bottom<br />
V<br />
GB<br />
Category II2H3+ (GB)<br />
These models are set to burn NATURAL GAS (G20)<br />
at 20 mbar but can be converted for use on BUTANE<br />
(G30) at 28-30mbar with the use of the LPG conversion<br />
kit that can be obtained free of charge, if you contact<br />
our Genuine Parts and Accessories department (see<br />
Key Contacts, back page).<br />
V<br />
Z<br />
GAS SAFETY (INSTALLATION & USE)<br />
REGULATIONS<br />
It is the law that all gas appliances are installed by<br />
competent <strong>per</strong>sons in accordance with the current<br />
edition of the above regulations. It is in your interest<br />
and that of safety to ensure compliance with the<br />
law. In the UK, CORGI registered installers work to<br />
safe standards of practice. The cooker must also be<br />
installed in accordance with BS 6172. Failure to install<br />
the cooker correctly could invalidate the warranty<br />
liability claims and could lead to prosecution.<br />
Pry the fixing tab "V" and remove the oven burner<br />
Unscrew the oven burner nozzle using the socket<br />
spanner for the nozzles "Z", or a 7 mm socket<br />
spanner, and replace it with a nozzle suited to the<br />
new type of gas (see Table). Take particular care<br />
handling the spark plug wires and the thermocouple<br />
pipes.<br />
Replace all the parts, following the steps described<br />
above in the reverse order.<br />
Adapting to different types of gas<br />
(main and top oven)<br />
In order to adapt the oven to a different type of gas<br />
with respect to the gas for which it was manufactured<br />
(indicated on the label), follow these simple steps:<br />
G20 at 20mbar<br />
G30 at 28-30mbar<br />
G31 at 37mbar<br />
Burner Heat Input Injector Heat Input Injector<br />
Hotplate<br />
Front Left and Rear Right<br />
3.0 kW 116 3.0 kW (220g/h) 86<br />
Hotplate<br />
Front Right and Rear Left<br />
2.0 kW 103 2.0 kW (145g/h) 70<br />
Grill 3.7 kW 150 (X) 3.4 kW (246g/h) 91<br />
Main Oven 2.5 kW 115 2.3 kW (166g/h) 71<br />
Top Oven 1.9 kW 100 1.9 kW (136g/h) 66<br />
PLEASE PHONE US TO REGISTER YOUR APPLIANCE AND ACTIVATE YOUR PARTS GUARANTEE ON 08448 24 24 24<br />
5


