

Sony KDL-40HX720 - KDL-40HX720 Istruzioni per l'uso Inglese
Sony KDL-40HX720 - KDL-40HX720 Istruzioni per l'uso Inglese
Sony KDL-40HX720 - KDL-40HX720 Istruzioni per l'uso Inglese

You also want an ePaper? Increase the reach of your titles
YUMPU automatically turns print PDFs into web optimized ePapers that Google loves.
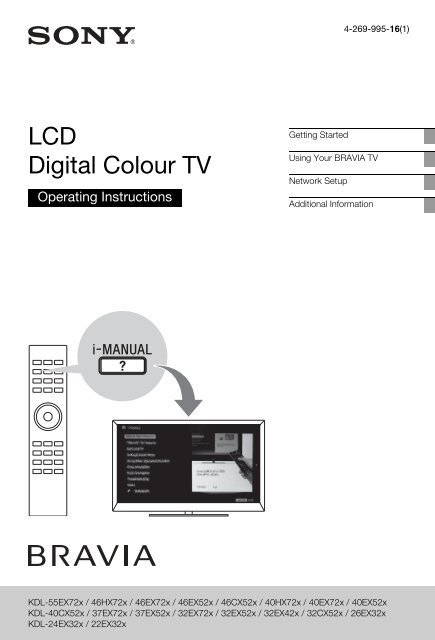
4-269-995-16(1)<br />
LCD<br />
Digital Colour TV<br />
O<strong>per</strong>ating Instructions<br />
Getting Started<br />
Using Your BRAVIA TV<br />
Network Setup<br />
Additional Information<br />
<strong>KDL</strong>-55EX72x / 46HX72x / 46EX72x / 46EX52x / 46CX52x / 40HX72x / 40EX72x / 40EX52x<br />
<strong>KDL</strong>-40CX52x / 37EX72x / 37EX52x / 32EX72x / 32EX52x / 32EX42x / 32CX52x / 26EX32x<br />
<strong>KDL</strong>-24EX32x / 22EX32x
NOTICE FOR<br />
CUSTOMERS IN<br />
THE UNITED<br />
KINGDOM<br />
A moulded plug complying with BS1363 is<br />
fitted to this equipment for your safety and<br />
convenience.<br />
Should the fuse in the plug supplied need to<br />
be replaced with the same rating of fuse<br />
approved by ASTA or BSI to BS 1362 (i.e.,<br />
marked with or ) must be used.<br />
If the plug supplied with this equipment has<br />
a detachable fuse cover, be sure to attach<br />
the fuse cover after you change the fuse.<br />
Never use the plug without the fuse cover.<br />
If you should lose the fuse cover, please<br />
contact your nearest <strong>Sony</strong> service station.<br />
FUSE<br />
FUSE<br />
How to replace the fuse<br />
Open the fuse compartment with a blade<br />
screwdriver, and replace the fuse.<br />
Please refer to the illustration that actually<br />
equipped with the product.<br />
Introduction<br />
Thank you for choosing this <strong>Sony</strong> product.<br />
Before o<strong>per</strong>ating the TV, please read this<br />
manual thoroughly and retain it for future<br />
reference.<br />
The manufacturer of this product is<br />
<strong>Sony</strong> Corporation, 1-7-1 Konan<br />
Minato-ku Tokyo, 108-0075 Japan.<br />
The Authorized Representative for<br />
EMC and product safety is <strong>Sony</strong><br />
Deutschland GmbH, Hedelfinger<br />
Strasse 61, 70327 Stuttgart,<br />
Germany. For any service or<br />
guarantee matters please refer to the<br />
addresses given in separate service<br />
or guarantee documents.<br />
Notes on Digital TV<br />
function<br />
• Any functions related to Digital TV<br />
( ) will only work in countries or<br />
areas where DVB-T (MPEG-2 and<br />
H.264/MPEG-4 AVC) digital terrestrial<br />
signals are broadcast or where you have<br />
access to a compatible DVB-C (MPEG-<br />
2 and H.264/MPEG-4 AVC) cable<br />
service. Please confirm with your local<br />
dealer if you can receive a DVB-T signal<br />
where you live or ask your cable<br />
provider if their DVB-C cable service is<br />
suitable for integrated o<strong>per</strong>ation with<br />
this TV.<br />
• Your cable provider may charge a fee for<br />
their services, or require you to agree to<br />
its terms and conditions of business.<br />
• This TV set complies with DVB-T and<br />
DVB-C specifications, but compatibility<br />
with future DVB-T digital terrestrial and<br />
DVB-C digital cable broadcasts are not<br />
guaranteed.<br />
• Some Digital TV functions may not be<br />
available in some countries/areas and<br />
DVB-C cable may not o<strong>per</strong>ate correctly<br />
with some providers.<br />
~<br />
• The “x” that appears in the model name<br />
corresponds to a numeric digit, related to<br />
design, colour or TV system.<br />
• Instructions about “Installing Wall<br />
Mount Bracket” are included within this<br />
TV’s instructions manual.<br />
• The illustrations used in this manual may<br />
differ depending on your TV model.<br />
• The illustrations of the remote used in<br />
this manual are of the RM-ED044 unless<br />
otherwise stated.<br />
• Before o<strong>per</strong>ating the TV, please read<br />
“Safety Information” (page 32). Retain<br />
this manual for future reference.<br />
Trademark information<br />
is a registered trademark of the DVB<br />
Project.<br />
HDMI, the HDMI Logo, and High-<br />
Definition Multimedia Interface are<br />
trademarks or registered trademarks of<br />
HDMI Licensing LLC in the United States<br />
and other countries.<br />
DLNA®, the DLNA Logo and DLNA<br />
CERTIFIED® are trademarks, service<br />
marks, or certification marks of the Digital<br />
Living Network Alliance.<br />
DivX® is a video file compression<br />
technology, developed by DivX, Inc.<br />
DivX®, DivX Certified®, and associated<br />
logos are trademarks of DivX, Inc. and are<br />
used under license.<br />
ABOUT DIVX VIDEO: DivX® is a<br />
digital video format created by DivX,Inc.<br />
This is an official DivX Certified device<br />
that plays DivX video. Visit<br />
www.divx.com for more information and<br />
software tools to convert your files into<br />
DivX video.<br />
ABOUT DIVX VIDEO-ON-DEMAND:<br />
This DivX Certified® device must be<br />
registered in order to play DivX Video-on-<br />
Demand (VOD) content. To generate the<br />
registration code, locate the DivX VOD<br />
section in the device setup menu. Go to<br />
vod.divx.com with this code to complete<br />
the registration process and learn more<br />
about DivX VOD.<br />
Manufactured under license from Dolby<br />
Laboratories. Dolby and the double-D<br />
symbol are trademarks of Dolby<br />
Laboratories.<br />
“BRAVIA” and<br />
are<br />
trademarks of <strong>Sony</strong> Corporation.<br />
TrackID is a trademark or registered<br />
trademark of <strong>Sony</strong> Ericsson Mobile<br />
Communications AB.<br />
Music and video recognition technology<br />
and related data are provided by<br />
Gracenote ® . Gracenote is the industry<br />
standard in music recognition technology<br />
and related content delivery. For more<br />
information, please visit<br />
www.gracenote.com.<br />
CD, DVD, Blu-ray Disc, and music and<br />
video-related data from Gracenote, Inc.,<br />
copyright © 2000-present Gracenote.<br />
Gracenote Software, copyright © 2000-<br />
present Gracenote. One or more patents<br />
owned by Gracenote apply to this product<br />
and service. See the Gracenote website for<br />
a nonexhaustive list of applicable<br />
Gracenote patents. Gracenote, CDDB,<br />
MusicID, MediaVOCS, the Gracenote<br />
logo and logotype, and the “Powered by<br />
Gracenote” logo are either registered<br />
trademarks or trademarks of Gracenote in<br />
the United States and/or other countries.<br />
O<strong>per</strong>a® Browser from O<strong>per</strong>a Software<br />
ASA. Copyright 1995-2010 O<strong>per</strong>a<br />
Software ASA. All rights reserved.<br />
Wi-Fi Protected Setup and WPA are marks<br />
of the Wi-Fi Alliance.<br />
2 GB
For <strong>KDL</strong>-55/46/40/32EX721,<br />
<strong>KDL</strong>-46/40/32EX724,<br />
<strong>KDL</strong>-26EX321, <strong>KDL</strong>-26/24/<br />
22EX320:<br />
Notice for Wireless<br />
Signal<br />
1. Hereby, <strong>Sony</strong> Corporation declares that<br />
this unit is in compliance with the essential<br />
requirements and other relevant provisions<br />
of Directive 1999/5/EC.<br />
For details, please access the following<br />
URL:<br />
http://www.compliance.sony.de/<br />
2. Notice for customers: the following<br />
information is only applicable to<br />
equipment sold in countries applying EU<br />
directives.<br />
TV wireless system may be o<strong>per</strong>ated in<br />
following countries:<br />
Austria, Belgium, Bulgaria, Cyprus, Czech<br />
Republic, Denmark, Estonia, Finland,<br />
France, Germany, Greece, Hungary,<br />
Iceland, Ireland, Italy, Latvia,<br />
Liechtenstein, Lithuania, Luxembourg,<br />
Malta, The Netherlands, Norway, Poland,<br />
Portugal, Slovak Republic, Romania,<br />
Slovenia, Spain, Sweden, Switzerland,<br />
Turkey, and The United Kingdom.<br />
This equipment can be o<strong>per</strong>ated in other<br />
non-European countries.<br />
TV Wireless System -<br />
Regulation Information<br />
For Customers in Italy<br />
Use of the RLAN network is governed: -<br />
s with respect to private use, by the<br />
Legislative Decree of 1.8.2003,<br />
no. 259 (“Code of Electronic<br />
Communications”). In particular<br />
Article 104 indicates when the prior<br />
obtainment of a general authorization is<br />
required and Art. 105 indicates when<br />
free use is <strong>per</strong>mitted;<br />
s with respect to the supply to the public<br />
of the RLAN access to telecom<br />
networks and services, by the<br />
Ministerial Decree 28.5.2003, as<br />
amended, and Art. 25 (general<br />
authorization for electronic<br />
communications networks and<br />
services) of the Code of electronic<br />
communications<br />
For Customers in Norway<br />
Use of this radio equipment is not allowed<br />
in the geographical area within a radius of<br />
20 km from the centre of Ny-Ålesund,<br />
Svalbard.<br />
For Customers in Cyprus<br />
The end user must register the RLAN (or<br />
WAS or WiFi) devices in the Department<br />
of Electronic Communications (P.I. 365/<br />
2008 and P.I. 267/2007).<br />
P.I. 365/2008 is the Radiocommunications<br />
(Categories of Stations Subject to General<br />
Authorization and Registration) Order of<br />
2008.<br />
P.I. 267/2007 is the General Authorization<br />
for the use of Radiofrequencies by Radio<br />
Local area Networks and by Wireless<br />
Access Systems, including Radio Local<br />
Area Networks (WAS/RLAN).<br />
For Customers in France<br />
The WLAN (WiFi) feature of this LCD<br />
Digital Colour TV shall exclusively be<br />
used inside buildings. Any use of the<br />
WLAN (WiFi) feature of this LCD Digital<br />
Colour TV outside of the buildings is<br />
prohibited on the French territory. Please<br />
make sure that the WLAN (WiFi) feature<br />
of this LCD Digital Colour TV is disabled<br />
before any use outside of the buildings.<br />
(ART Decision 2002-1009 as amended by<br />
ART Decision 03-908, relating to radiofrequencies<br />
use restrictions).<br />
Location of the<br />
identification label<br />
Labels for Model No., Production Date<br />
(month/year) and Power Supply rating (in<br />
accordance with applicable safety<br />
regulation) are located on the rear of the<br />
TV or package.<br />
Precautions<br />
Viewing the TV<br />
• Some people may ex<strong>per</strong>ience discomfort<br />
(such as eye strain, fatigue, or nausea)<br />
while watching 3D video images or<br />
playing stereoscopic 3D games. <strong>Sony</strong><br />
recommends that all viewers take regular<br />
breaks while watching 3D video images<br />
or playing stereoscopic 3D games. The<br />
length and frequency of necessary<br />
breaks will vary from <strong>per</strong>son to <strong>per</strong>son.<br />
You must decide what works best. If you<br />
ex<strong>per</strong>ience any discomfort, you should<br />
stop watching the 3D video images or<br />
playing stereoscopic 3D games until the<br />
discomfort ends; consult a doctor if you<br />
believe necessary. You should also<br />
review (i) the instruction manual of any<br />
other device or media used with this<br />
television and (ii) our website (http://<br />
www.sony-europe.com/myproduct) for<br />
the latest information. The vision of<br />
young children (especially those under<br />
six years old) is still under development.<br />
Consult your doctor (such as a<br />
pediatrician or eye doctor) before<br />
allowing young children to watch 3D<br />
video images or play stereoscopic 3D<br />
games. Adults should su<strong>per</strong>vise young<br />
children to ensure they follow the<br />
recommendations listed above.<br />
• Do not use, store, or leave the 3D<br />
Glasses or the battery near fire, or in<br />
places with a high tem<strong>per</strong>ature, e.g., in<br />
direct sunlight, or in sun-heated cars.<br />
• When using the simulated 3D function,<br />
please note that the displayed image is<br />
modified from the original due to the<br />
conversion done by this television.<br />
• View the TV in moderate light, as<br />
viewing the TV in poor light or during<br />
long <strong>per</strong>iod of time, strains your eyes.<br />
• When using headphones, adjust the<br />
volume so as to avoid excessive levels,<br />
as hearing damage may result.<br />
LCD Screen<br />
• Although the LCD screen is made with<br />
high-precision technology and 99.99%<br />
or more of the pixels are effective, black<br />
dots may appear or bright points of light<br />
(red, blue, or green) may appear<br />
constantly on the LCD screen. This is a<br />
structural pro<strong>per</strong>ty of the LCD screen<br />
and is not a malfunction.<br />
• Do not push or scratch the front filter, or<br />
place objects on top of this TV set. The<br />
image may be uneven or the LCD screen<br />
may be damaged.<br />
• If this TV set is used in a cold place, a<br />
smear may occur in the picture or the<br />
picture may become dark. This does not<br />
indicate a failure. These phenomena<br />
disappear as the tem<strong>per</strong>ature rises.<br />
• Ghosting may occur when still pictures<br />
are displayed continuously. It may<br />
disappear after a few moments.<br />
• The screen and cabinet get warm when<br />
this TV set is in use. This is not a<br />
malfunction.<br />
• The LCD screen contains a small<br />
amount of liquid crystal. Some<br />
fluorescent tubes used in this TV set also<br />
contain mercury (except for LED<br />
(Continued)<br />
3 GB
acklight LCD TV). Follow your local<br />
ordinances and regulations for disposal.<br />
Handling and cleaning the<br />
screen surface/cabinet of<br />
the TV set<br />
Be sure to unplug the mains lead<br />
connected to the TV set from mains socket<br />
before cleaning.<br />
To avoid material degradation or screen<br />
coating degradation, observe the following<br />
precautions.<br />
• To remove dust from the screen surface/<br />
cabinet, wipe gently with a soft cloth. If<br />
dust is <strong>per</strong>sistent, wipe with a soft cloth<br />
slightly moistened with a diluted mild<br />
detergent solution.<br />
• Never spray water or detergent directly<br />
on the TV set. It may drip to the bottom<br />
of the screen or exterior parts and enter<br />
the TV set, and may cause damage to the<br />
TV set.<br />
• Never use any type of abrasive pad,<br />
alkaline/acid cleaner, scouring powder,<br />
or volatile solvent, such as alcohol,<br />
benzene, thinner or insecticide. Using<br />
such materials or maintaining prolonged<br />
contact with rubber or vinyl materials<br />
may result in damage to the screen<br />
surface and cabinet material.<br />
• Periodic vacuuming of the ventilation<br />
openings is recommended to ensure to<br />
pro<strong>per</strong> ventilation.<br />
• When adjusting the angle of the TV set,<br />
move it slowly so as to prevent the TV<br />
set from moving or slipping off from its<br />
table stand.<br />
Optional Equipment<br />
• Keep optional components or any<br />
equipment emitting electromagnetic<br />
radiation away from the TV set.<br />
Otherwise picture distortion and/or noisy<br />
sound may occur.<br />
• This equipment has been tested and<br />
found to comply with the limits set out in<br />
the EMC Directive using a connection<br />
signal cable shorter than 3 meters.<br />
(Caution about handling the<br />
remote control)<br />
Notes<br />
• Observe the correct polarity when<br />
inserting batteries.<br />
• Do not use different types of batteries<br />
together or mix old and new batteries.<br />
• Dispose of batteries in an<br />
environmentally friendly way. Certain<br />
regions may regulate the disposal of<br />
batteries. Please consult your local<br />
authority.<br />
• Handle the remote with care. Do not<br />
drop or step on it, or spill liquid of any<br />
kind onto it.<br />
• Do not place the remote in a location<br />
near a heat source, a place subject to<br />
direct sunlight, or a damp room.<br />
Wireless Function of the<br />
unit<br />
• Do not o<strong>per</strong>ate this unit near medical<br />
equipment (pacemaker, etc.), as<br />
malfunction of the medical equipment<br />
may result.<br />
• Although this unit transmits/receives<br />
scrambled signals, be careful of<br />
unauthorised interception. We cannot be<br />
responsible for any trouble as a result.<br />
Disposal of the TV set<br />
Disposal of Old<br />
Electrical &<br />
Electronic<br />
Equipment<br />
(Applicable in<br />
the European<br />
Union and other European<br />
countries with separate<br />
collection systems)<br />
This symbol on the product or on its<br />
packaging indicates that this product shall<br />
not be treated as household waste. Instead<br />
it shall be handed over to the applicable<br />
collection point for the recycling of<br />
electrical and electronic equipment. By<br />
ensuring this product is disposed of<br />
correctly, you will help prevent potential<br />
negative consequences for the<br />
environment and human health, which<br />
could otherwise be caused by<br />
inappropriate waste handling of this<br />
product. The recycling of materials will<br />
help to conserve natural resources. For<br />
more detailed information about recycling<br />
of this product, please contact your local<br />
Civic Office, your household waste<br />
disposal service or the shop where you<br />
purchased the product.<br />
Disposal of<br />
waste batteries<br />
(applicable in the<br />
European Union<br />
and other<br />
European<br />
countries with separate<br />
collection systems)<br />
This symbol on the battery or on the<br />
packaging indicates that the battery<br />
provided with this product shall not be<br />
treated as household waste. On certain<br />
batteries this symbol might be used in<br />
combination with a chemical symbol. The<br />
chemical symbols for mercury (Hg) or<br />
lead (Pb) are added if the battery contains<br />
more than 0.0005% mercury or 0.004%<br />
lead. By ensuring these batteries are<br />
disposed of correctly, you will help<br />
prevent potentially negative consequences<br />
for the environment and human health<br />
which could otherwise be caused by<br />
inappropriate waste handling of the<br />
battery. The recycling of the materials will<br />
help to conserve natural resources. In case<br />
of products that for safety, <strong>per</strong>formance or<br />
data integrity reasons require a <strong>per</strong>manent<br />
connection with an incorporated battery,<br />
this battery should be replaced by qualified<br />
service staff only. To ensure that the<br />
battery will be treated pro<strong>per</strong>ly, hand over<br />
the product at end-of-life to the applicable<br />
collection point for the recycling of<br />
electrical and electronic equipment. For all<br />
other batteries, please view the section on<br />
how to remove the battery from the<br />
product safely. Hand the battery over to<br />
the applicable collection point for the<br />
recycling of waste batteries. For more<br />
detailed information about recycling of<br />
this product or battery, please contact your<br />
local Civic Office, your household waste<br />
disposal service or the shop where you<br />
purchased the product.<br />
4 GB
5 GB
Table of Contents<br />
Getting Started<br />
Checking the accessories ........................................................................................................8<br />
Inserting batteries into the remote............................................................................................8<br />
1: Attaching the Table-Top Stand ............................................................................................9<br />
2: Adjusting the viewing angle of the TV ................................................................................10<br />
3: Connecting an antenna (aerial)/Set Top Box/recorder (e.g. DVD recorder) ......................11<br />
4: Connecting audio/video devices ........................................................................................11<br />
5: Preventing the TV from toppling over.................................................................................12<br />
6: Organising the AC power cord (mains lead)/Bundling the cables......................................12<br />
7: Performing the initial set-up ...............................................................................................13<br />
Using Your BRAVIA TV<br />
Watching the TV.....................................................................................................................14<br />
Selecting various functions and settings (Home Menu) .........................................................16<br />
Displaying O<strong>per</strong>ating Instructions (i-Manual) .........................................................................18<br />
Network Setup<br />
Preparing a wired network .....................................................................................................20<br />
Preparing a wireless LAN.......................................................................................................20<br />
Setting up the Internet connection .........................................................................................21<br />
If you cannot connect to the Internet......................................................................................22<br />
Adjusting the server display settings......................................................................................22<br />
Additional Information<br />
Troubleshooting .....................................................................................................................23<br />
Specifications.........................................................................................................................24<br />
Installing the Accessories (Wall-Mount Bracket)....................................................................28<br />
Safety Information..................................................................................................................32<br />
6 GB
After setting up your BRAVIA TV and learning basic o<strong>per</strong>ations with<br />
this manual, see the built-in manual (i-Manual) for further<br />
explanation of the features of your TV.<br />
This TV has a built-in manual (i-Manual).<br />
To access the i-Manual, press i-MANUAL on the remote, and select an item. For details, see<br />
page 18 of this manual. Contents of the i-Manual may differ depending on the model/region/area.<br />
Contents of the i-Manual<br />
* Some models do not have this feature.<br />
How to Use i-Manual<br />
“BRAVIA” TV Features<br />
3D Feature*<br />
Presence Sensor*<br />
“BRAVIA” Internet Video<br />
Internet Widgets<br />
Wireless LAN / Wireless LAN Ready<br />
“BRAVIA” Sync with “Control for HDMI”<br />
Skype Ready<br />
TrackID/Music Search/Video Search<br />
USB HDD Recording*<br />
Watching TV<br />
3D Feature*<br />
Digital Electronic Programme Guide<br />
Favourites<br />
Screen Format<br />
Picture Mode<br />
Text<br />
Photos/Music/Videos<br />
Twin Picture (PIP)<br />
Twin Picture (P&P)<br />
NVOD/MF<br />
Settings/Home Menu<br />
About the Home Menu<br />
Settings<br />
Display<br />
Sound<br />
System Settings<br />
i-Manual<br />
Digital Set-up<br />
Analogue Set-up<br />
External Inputs<br />
Network<br />
Product Support<br />
Using Other Equipment/<br />
Internet<br />
VCR/DVD Player<br />
Audio System<br />
USB Device (e.g. Digital Camera)<br />
Picture Frame<br />
HDMI Equipment<br />
Internet/Wireless LAN<br />
Home Network<br />
Media Remote<br />
PC<br />
Parts Description<br />
Remote<br />
TV Controls and Indicators<br />
Terminals<br />
Troubleshooting<br />
Index<br />
Bookmarks<br />
7 GB
Getting Started<br />
Checking the accessories<br />
Remote (1)<br />
Size AAA batteries (R03 type) (2)<br />
Table-Top Stand (1) *1<br />
Fixing screws for Table-Top Stand<br />
(M5 x 16) (3)<br />
(except <strong>KDL</strong>-26/24/22EX32x)<br />
Fixing screws for Table-Top Stand<br />
(M4 x 12) (2)<br />
(<strong>KDL</strong>-26/24/22EX32x only)<br />
Assembling screws for Table-Top<br />
Stand (M6 x 14) (4)<br />
(<strong>KDL</strong>-55/46EX72x, <strong>KDL</strong>-46HX72x,<br />
<strong>KDL</strong>-46EX52x, <strong>KDL</strong>-46CX52x only)<br />
Assembling screws for Table-Top<br />
Stand (M6 x 14) (3)<br />
(<strong>KDL</strong>-40HX72x, <strong>KDL</strong>-40/37/32EX72x,<br />
<strong>KDL</strong>-40/37/32EX52x, <strong>KDL</strong>-40/32CX52x,<br />
<strong>KDL</strong>-32EX42x only)<br />
Assembling screws for Table-Top<br />
Stand (M6 x 14) (2)<br />
(<strong>KDL</strong>-26EX321 only)<br />
Assembling screws for Table-Top<br />
Stand (M4 x 12) (2)<br />
(<strong>KDL</strong>-26/24/22EX320 only)<br />
Hexagon wrench (1)<br />
(except <strong>KDL</strong>-26/24/22EX320)<br />
O<strong>per</strong>ating Instructions (this manual)<br />
and other documents<br />
*1 Refer to the supplied Table-Top Stand leaflet to<br />
assemble the Table-Top Stand.<br />
Inserting batteries into the<br />
remote<br />
B For <strong>KDL</strong>-55/46/40/37/32EX72x,<br />
<strong>KDL</strong>-46/40HX72x<br />
1 Remove the protection sheet.<br />
2 Push and slide the cover upward.<br />
B For <strong>KDL</strong>-46/40/37/32EX52x, <strong>KDL</strong>-46/40/<br />
32CX52x, <strong>KDL</strong>-32EX42x, <strong>KDL</strong>-26/24/<br />
22EX32x<br />
1 Remove the protection sheet.<br />
2 Push and lift the cover to open.<br />
8 GB
1: Attaching the Table-Top<br />
Stand<br />
1 Refer to the supplied Table-Top Stand<br />
leaflet for pro<strong>per</strong> attachment for some<br />
TV models.<br />
2 Place the TV set on the Table-Top<br />
Stand.<br />
B For <strong>KDL</strong>-55/46/40/37/32EX72x,<br />
<strong>KDL</strong>-46/40HX72x,<br />
<strong>KDL</strong>-46/40/37/32EX52x,<br />
<strong>KDL</strong>-46/40/32CX52x,<br />
<strong>KDL</strong>-32EX42x<br />
B For <strong>KDL</strong>-55/46/40/37/32EX72x,<br />
<strong>KDL</strong>-46/40HX72x,<br />
<strong>KDL</strong>-46/40/37/32EX52x,<br />
<strong>KDL</strong>-46/40/32CX52x,<br />
<strong>KDL</strong>-32EX42x<br />
B For <strong>KDL</strong>-26/24/22EX320<br />
Getting Started<br />
Guide<br />
pins<br />
~<br />
• Align the TV from the top, slide it in until the<br />
guide pins cannot be seen.<br />
B For <strong>KDL</strong>-26/24/22EX320<br />
B For <strong>KDL</strong>-26EX321<br />
B For <strong>KDL</strong>-26EX321<br />
~<br />
• If using an electric screwdriver, set the torque at<br />
approximately 1.5 N·m {15 kgf·cm}.<br />
3 Fix the TV to the Table-Top Stand<br />
according to the arrow marks that<br />
guide the screw holes using the<br />
supplied screws.<br />
Detaching the Table-Top Stand<br />
from the TV<br />
To detach the Table-Top Stand from the TV,<br />
remove the screws fixed in step 3.<br />
~<br />
• Do not remove the Table-Top Stand for any<br />
reason other than to install corresponding<br />
accessories on the TV.<br />
• When removing the Table-Top Stand from the<br />
TV, lay the display face down on a stable work<br />
surface that is larger than the TV.<br />
• To prevent damaging the surface of the LCD<br />
display, make sure to place a soft cloth on the<br />
work surface.<br />
(Continued)<br />
9 GB
• Be sure the TV is on the vertical position before<br />
switching on. TV set must not powered on with<br />
LCD panel face down to avoid uneven picture<br />
uniformity.<br />
B For <strong>KDL</strong>-55/46/40/37/32EX72x,<br />
<strong>KDL</strong>-46/40HX72x,<br />
<strong>KDL</strong>-46/40/37/32EX52x,<br />
<strong>KDL</strong>-46/40/32CX52x,<br />
<strong>KDL</strong>-32EX42x<br />
2: Adjusting the viewing<br />
angle of the TV<br />
This TV can be adjusted within the angles as<br />
illustrated.<br />
Angle adjustment (Swivel)<br />
(except <strong>KDL</strong>-26/24/22EX320)<br />
~<br />
• When adjusting the angle, hold the stand with one<br />
hand to avoid having the stand slip or TV tip over.<br />
20°<br />
20°<br />
20°<br />
20°<br />
Soft cloth<br />
B For <strong>KDL</strong>-26/24/22EX320<br />
Angle adjustment (Tilt)<br />
(except <strong>KDL</strong>-46/40/32CX52x)<br />
~<br />
• Be careful not to pinch your fingers between the<br />
TV and stand when adjusting the angle.<br />
B For <strong>KDL</strong>-55/46/40/37/32EX72x,<br />
<strong>KDL</strong>-46/40HX72x,<br />
<strong>KDL</strong>-46/40/37/32EX52x,<br />
<strong>KDL</strong>-32EX42x,<br />
<strong>KDL</strong>-26EX321<br />
0° - 6°<br />
Soft cloth<br />
B For <strong>KDL</strong>-26EX321<br />
B For <strong>KDL</strong>-26/24/22EX320<br />
0° - 6°<br />
Soft cloth<br />
10 GB
~<br />
• Ensure that there are no objects in front of the TV.<br />
IR Sensor<br />
Connecting a Set Top Box/recorder<br />
(e.g. DVD recorder) with HDMI<br />
3D Sync Transmitter<br />
(<strong>KDL</strong>-55/46/40/37/32EX72x,<br />
<strong>KDL</strong>-46/40HX72x only)<br />
Presence Sensor<br />
(except <strong>KDL</strong>-46/40/32EX520, <strong>KDL</strong>-40/32EX523)<br />
• Do not expose the Presence Sensor to direct<br />
sunlight or other strong light, as malfunction may<br />
occur.<br />
3: Connecting an antenna<br />
(aerial)/Set Top Box/<br />
recorder (e.g. DVD<br />
recorder)<br />
Getting Started<br />
Connecting a Set Top Box/recorder<br />
(e.g. DVD recorder) with SCART<br />
Set Top Box/recorder (e.g. DVD recorder)<br />
4: Connecting audio/video<br />
devices<br />
Set Top Box/recorder (e.g. DVD recorder)<br />
~<br />
• Right Angle Type Universal SCART Lead is<br />
recommended for this connection.<br />
Audio/video device<br />
11 GB
5: Preventing the TV from<br />
toppling over<br />
6: Organising the AC power<br />
cord (mains lead)/<br />
Bundling the cables<br />
B <strong>KDL</strong>-46/40/32CX52x<br />
AC power cord<br />
B Except <strong>KDL</strong>-46/40/32CX52x<br />
~<br />
• Before bundling the cables, remove the cable<br />
holder from the AC cover (see step 1 and 2).<br />
Reuse the cable holder (see step 3) to bundle the<br />
other cables (see step 4).<br />
• Do not bundle the AC power cord (mains lead)<br />
together with other cables.<br />
<strong>KDL</strong>-55/46/40/37/32EX72x, <strong>KDL</strong>-46/40HX72x,<br />
<strong>KDL</strong>-46/40/37/32EX52x, <strong>KDL</strong>-32EX42x,<br />
<strong>KDL</strong>-26EX321<br />
1 Install a wood screw (4 mm in<br />
diameter, not supplied) in the TV stand.<br />
2 Install a machine screw (M4, not<br />
supplied) into the screw hole of the TV.<br />
3 Tie the wood screw and the machine<br />
screw with a strong cord (not supplied).<br />
1<br />
2<br />
The length of the M4 machine screw differs<br />
depending on the cord diameter.<br />
Please refer to below illustration.<br />
5-6 mm<br />
Screw M4<br />
Cord<br />
TV’s Table-Top<br />
Stand<br />
3<br />
4<br />
<strong>KDL</strong>-26/24/22EX320<br />
1 2<br />
3<br />
4<br />
*<br />
* When installing on the wall, attach the cable<br />
holder under the terminals.<br />
12 GB
7: Performing the initial<br />
set-up<br />
Except <strong>KDL</strong>-46/40/<br />
32CX52x<br />
<strong>KDL</strong>-46/40/32CX52x<br />
1 Connect the TV to your AC power<br />
outlet (mains socket).<br />
2 Press 1 on the TV. The = (power)<br />
indicator will light up in green.<br />
When you switch on the TV for the first<br />
time, the Language menu appears on the<br />
screen.<br />
~<br />
• When you turn on the TV for the first time, the<br />
TV requires some internal processing for<br />
optimization before you can <strong>per</strong>form the<br />
initial setup. There will be no picture and<br />
sound, and the timer indicator on the front of<br />
the TV blinks orange for about 40 seconds. Do<br />
not turn off the TV during this process.<br />
This process has been completed at the factory<br />
for some TVs.<br />
provider. If no channel is found using<br />
“Quick Scan”, try “Full Scan” (though it<br />
may take some time).<br />
~<br />
• “Full Scan” may not be available depending<br />
on your region/country.<br />
Programme Sorting: Changes the order of<br />
analogue channels stored in the TV.<br />
1 Press F/f to select the channel you want<br />
to move to a new position, then press .<br />
2 Press F/f to select the new position for<br />
the channel, then press .<br />
~<br />
• You can also tune channels manually.<br />
Getting Started<br />
3<br />
Follow the instructions on the screen.<br />
Digital Auto Tuning: When you select<br />
“Cable”, we recommend that you select<br />
“Quick Scan” for quick tuning. Set<br />
“Frequency” and “Network ID” according<br />
to the information supplied from your cable<br />
13 GB
Using Your BRAVIA TV<br />
Watching the TV<br />
1<br />
1<br />
2<br />
3<br />
Turn on the TV.<br />
Press 1 on the TV to turn on the TV.<br />
Select a mode.<br />
Select a TV channel.<br />
2<br />
GUIDE<br />
To use Digital Electronic Programme Guide<br />
Press GUIDE in digital mode to display the<br />
programme guide.<br />
3<br />
Use with 0-9 to select digital channels. For channel<br />
numbers 10 and above, press the next digit quickly.<br />
z<br />
• The number 5, N, PROG + and<br />
AUDIO buttons on the remote<br />
have a tactile dot. Use the tactile<br />
dots as a reference when<br />
o<strong>per</strong>ating the TV.<br />
14 GB
Parts and controls of the remote<br />
Use the supplied remote to control your TV. Basic remote o<strong>per</strong>ations are explained here. For details<br />
on all of the remote function, press i-MANUAL and see the built-in manual (i-Manual) (page 18).<br />
1 :/1<br />
Press to turn the TV on and off from standby mode.<br />
2 i-MANUAL<br />
Displays the built-in manual (i-Manual).<br />
3 SYNC MENU<br />
Displays the BRAVIA Sync Menu to o<strong>per</strong>ate the<br />
BRAVIA Sync-compatible equipment that is<br />
connected to the TV.<br />
4 F/f/G/g/<br />
Moves the on-screen cursor, and confirm the item.<br />
5 OPTIONS<br />
Displays a list of convenient functions and menu<br />
shortcuts. The menu items vary based on the current<br />
input and/or content.<br />
Using Your BRAVIA TV<br />
6 Coloured buttons<br />
When the coloured buttons are available, an o<strong>per</strong>ation<br />
guide appears on the screen.<br />
For <strong>KDL</strong>-55/46/40/37/32EX72x,<br />
<strong>KDL</strong>-46/40HX72x<br />
7 PROG/CH +/–/Number buttons<br />
Select channels in the TV mode.<br />
8 2 +/–<br />
Adjusts the volume.<br />
Rear of Remote Control<br />
15 GB
Selecting various functions and settings (Home Menu)<br />
You can select all the features from the Home menu.<br />
See page 17 for the Home menu map.<br />
1<br />
Press HOME.<br />
2<br />
Press F/f/G/g/ to select items.<br />
2<br />
1, 3<br />
3<br />
To select items in the Home menu (e.g.,<br />
selecting “Settings”)<br />
1 Press G/g to select “Settings”.<br />
The contents of “Settings” are displayed on<br />
the right.<br />
2 Press F/f to select “Display”.<br />
3 Press to launch the menu.<br />
According to the screen instruction, press<br />
F/f/G/g to select items and press to<br />
confirm.<br />
Press HOME to exit.<br />
16 GB
Home menu map<br />
After pressing HOME on the remote, following icons are displayed as categories. The categories are<br />
available depending on your TV model, region, country and broadcasting conditions.<br />
TV<br />
You can select a list of TV channels, or a programme guide.<br />
Media<br />
Inputs<br />
You can enjoy photo/music/video content via USB devices or<br />
the home network.<br />
You can select equipment connected to the TV.<br />
Favourites/History<br />
Settings<br />
Widgets<br />
Applications<br />
Provides quick access to your frequently used and recently<br />
viewed items, such as TV channels, external inputs or your<br />
media files.<br />
Contains all of the necessary configurations to customise<br />
your TV settings.<br />
Provides access to Widgets.<br />
You can enjoy various applications such as “Music Search”,<br />
“Internet Browser”, etc.<br />
Using Your BRAVIA TV<br />
Qriocity<br />
Enable access to the “Qriocity” online service.<br />
Internet Content<br />
You can enjoy Internet content services.<br />
Recommendations<br />
Recordings<br />
Presents recommendations for programmes you may like,<br />
based on your viewing history.<br />
You can enjoy timer recordings to a connected USB HDD<br />
device, and selection of recorded content to play.<br />
17 GB
Displaying O<strong>per</strong>ating Instructions (i-Manual)<br />
O<strong>per</strong>ating instructions are built into your BRAVIA TV and can be displayed on the screen.<br />
To learn more about your TV features, access your i-Manual with the touch of a button.<br />
1<br />
Press i-MANUAL.<br />
1<br />
2<br />
Press F/f/G/g/ to select items.<br />
2<br />
To select items in the i-Manual<br />
1 Press F/f to select an item.<br />
The contents in the item are displayed on the<br />
right as the second layer.<br />
2 Press g to move to the second layer.<br />
3 Press F/f to select an item from the second<br />
layer.<br />
A digest of the item is displayed on the right.<br />
If the third layer is available, repeat this step<br />
to display the digest of the item.<br />
4 Press g to select an item.<br />
The content is displayed.<br />
18 GB
Description of the i-Manual screen<br />
Press G to go back to the previous page<br />
Press f to go to the next page<br />
Page number/Total page number<br />
Press RETURN to go back to the previous page<br />
Press to launch the function<br />
~<br />
• This will be displayed only when the function is available.<br />
To use the bookmark<br />
The i-Manual has a bookmark function. Pages can be bookmarked with coloured buttons, according<br />
to the instructions at the bottom of the screen. To access your registered bookmarks, go to the top<br />
page of the i-Manual and select “Bookmarks”.<br />
To memorise the last displayed page<br />
i-Manual memorises the last displayed page. When in the i-Manual screen, press i-MANUAL to<br />
return to the TV screen. If you press i-MANUAL again, the information you saw last time appears.<br />
For viewing from the top page of the i-Manual, return to the top page according to the instructions<br />
on the screen, or press HOME and select “i-Manual”of “Settings” in the Home menu.<br />
Using Your BRAVIA TV<br />
~<br />
• Last page memory is automatically reset when you switch the TV to standby mode.<br />
19 GB
Network Setup<br />
When you connect this TV to the Internet, you<br />
can enjoy multiple functions: displaying a<br />
photograph that shows its location on the map,<br />
enjoying Internet video, etc. For details on the<br />
functions, refer to the i-Manual.<br />
~<br />
• You will need to contract with an Internet service<br />
provider to connect to the Internet.<br />
Preparing a wired network<br />
or<br />
Internet<br />
Modem<br />
with router<br />
functions<br />
Preparing a wireless LAN<br />
For <strong>KDL</strong>-55/46/40/32EX721, <strong>KDL</strong>-46/40/<br />
32EX724, <strong>KDL</strong>-26EX321, <strong>KDL</strong>-26/24/<br />
22EX320:<br />
For models with built-in wireless LAN device,<br />
you can access the Internet and your home<br />
network without the USB Wireless LAN<br />
Adapter UWA-BR100.<br />
Except <strong>KDL</strong>-55/46/40/32EX721, <strong>KDL</strong>-46/<br />
40/32EX724, <strong>KDL</strong>-26EX321, <strong>KDL</strong>-26/24/<br />
22EX320:<br />
Wireless LAN Ready lets you easily access the<br />
Internet and your home network with the USB<br />
Wireless LAN Adapter UWA-BR100 (as of<br />
January 2010). By inserting the USB Wireless<br />
LAN Adapter into your TV’s USB port, you<br />
can easily create a cable-free network.<br />
TV<br />
Router<br />
Before setting up the wireless LAN function of<br />
the TV, be sure to set up a wireless LAN<br />
router.<br />
Modem<br />
Internet<br />
~<br />
• For LAN connections, use a Category 7 cable (not<br />
supplied).<br />
~<br />
• The USB Wireless LAN Adapter is available as an<br />
optional accessory, depending on your TV model.<br />
20 GB
Setting up the Internet<br />
connection<br />
Using the network feature you can connect the<br />
TV to the Internet. The set-up procedure<br />
differs depending on the type of network and<br />
LAN router. Before setting up the Internet<br />
connection, be sure to set up a LAN router.<br />
Check your wireless LAN environment using<br />
the following chart.<br />
Wireless LAN<br />
Secure Wireless LAN?<br />
YES m<br />
Do you use a wireless LAN<br />
router compatible with Wi-Fi<br />
Protected Set-up (WPS)?<br />
YES m<br />
Type 1*<br />
Wired LAN , Type 4<br />
NO<br />
k Type 3<br />
NO<br />
k Type 2<br />
* Type 1 is easier to set up if your router has an<br />
automatic setting button, e.g. Air Station One-<br />
Touch Secure System (AOSS). Most of the latest<br />
routers have this function. Check your router.<br />
Type 1: Follow the configuration for “Secured<br />
Network with Wi-Fi Protected Set-up (WPS)”.<br />
Type 2: Follow the configuration for “Secured<br />
Network without Wi-Fi Protected Set-up<br />
(WPS)”.<br />
Type 3: Follow the configuration for<br />
“Unsecured Network with Any Type of<br />
Wireless LAN Router”.<br />
Type 4: Follow the configuration for “Wired<br />
network set-up”.<br />
Type 1: Secured network with<br />
Wi-Fi Protected Set-up (WPS)<br />
The WPS standard makes security of a wireless<br />
home network as straightforward as pressing<br />
the WPS button on the wireless LAN router.<br />
Before setting up a wireless LAN, check the<br />
location of the WPS button on the router and<br />
verify how to use it.<br />
For security purpose, “WPS (PIN)” provides a<br />
PIN code for your router. PIN code is renewed<br />
every time you select “WPS (PIN)”.<br />
1 Press HOME, then select ><br />
“Network” > “Network Set-up”.<br />
2 Select “Wireless Set-up”.<br />
3 Select “WPS (Push Button)” for Push<br />
Button method or “WPS (PIN)” for<br />
PIN method.<br />
~<br />
• Button name of the WPS may differ<br />
depending on the router (e.g. AOSS button).<br />
4 Follow the instructions on the set-up<br />
screen.<br />
Type 2: Secured network<br />
without Wi-Fi Protected Set-up<br />
(WPS)<br />
To set up a wireless LAN, SSID (wireless<br />
network name) and security key (WEP or<br />
WPA key) will be required. If you do not know<br />
them, consult the instruction manual of your<br />
router.<br />
1 Press HOME, then select ><br />
“Network” > “Network Set-up”.<br />
2 Select “Wireless Set-up”.<br />
3 Select “Scan”, then select a network<br />
from the list of scanned wireless<br />
networks.<br />
4 Follow the instructions on the set-up<br />
screen.<br />
~<br />
• If you use WPS for network set-up, the security<br />
settings of the wireless LAN router activate, and<br />
any equipment previously connected to the<br />
wireless LAN in a non-secure status will be<br />
disconnected from the network.<br />
In this case, activate the security settings of the<br />
disconnected equipment and then reconnect. Or,<br />
you can deactivate the security settings of the<br />
wireless LAN router, and then connect the<br />
equipment to a TV in a non-secure status.<br />
Network Setup<br />
(Continued)<br />
21 GB
Type 3: Unsecured network<br />
with any type of wireless LAN<br />
router<br />
To set up a wireless LAN, SSID (wireless<br />
network name) will be required.<br />
1 Press HOME, then select ><br />
“Network” > “Network Set-up”.<br />
2 Select “Wireless Set-up”.<br />
3 Select “Scan”, then select a network<br />
from the list of scanned wireless<br />
networks.<br />
4 Follow the instructions on the set-up<br />
screen.<br />
~<br />
• Security key (WEP or WPA key) will not be<br />
required because you do not need to select any<br />
security method in this procedure.<br />
Type 4: Wired network set-up<br />
Enter the respective alphanumeric values for<br />
your router if necessary. The items that need to<br />
be set (e.g. IP Address, Subnet Mask, DHCP)<br />
may differ depending on the Internet service<br />
provider or router. For details, refer to the<br />
instruction manuals provided by your Internet<br />
service provider, or those supplied with the<br />
router.<br />
1 Press HOME, then select ><br />
“Network” > “Network Set-up”.<br />
2 Select “Wired Set-up”.<br />
3 Select “Auto” to set the IP Address and<br />
proxy server automatically, or<br />
“Custom” to set them manually.<br />
4 Follow the instructions on the set-up<br />
screen.<br />
Viewing the network status<br />
You can confirm your network status.<br />
1 Press HOME, then select ><br />
“Network” > “Network Set-up”.<br />
2 Select “View Network Status”.<br />
If you cannot connect to the<br />
Internet<br />
Use the diagnosis to check possible causes for<br />
network connection failures, and settings.<br />
1 Press HOME, then select ><br />
“Network” > “Network Set-up”.<br />
2 Select “View Network Status”.<br />
3 Select “Check Connection”.<br />
This may take several minutes. You<br />
cannot cancel the diagnosis after<br />
selecting “Check Connection”.<br />
Adjusting the server display<br />
settings<br />
You can select home network servers to be<br />
displayed on the Home Menu. Up to 10 servers<br />
can be displayed in the Home Menu<br />
automatically.<br />
1 Press HOME, then select ><br />
“Network” > “Home Network Setup”.<br />
2 Select “Server Display Settings”.<br />
3 Select the server you want to display on<br />
the Home Menu, and adjust the<br />
settings.<br />
If you cannot connect to your home<br />
network<br />
The TV detects if the server is being correctly<br />
recognised when you cannot connect it to your<br />
home network. If the diagnostic results<br />
indicate a failure, check possible causes, and<br />
network connections and settings.<br />
1 Press HOME, then select ><br />
“Network” > “Home Network Setup”.<br />
2 Select “Server Diagnostics”.<br />
The server diagnostic starts. When the<br />
server diagnostic is complete, the<br />
diagnostic result list appears.<br />
22 GB
Additional Information<br />
Troubleshooting<br />
When the 1 (standby) indicator is flashing, count how many times it flashes (interval<br />
time is three seconds).<br />
Press 1 on the TV to turn it off, disconnect the AC power cord (mains lead), and inform your dealer<br />
or <strong>Sony</strong> service centre of how the indicator flashes (number of flashes).<br />
When the 1 (standby) indicator is not flashing, check the items in the tables as<br />
follows.<br />
Also refer to “Troubleshooting” in the i-Manual. If the problem <strong>per</strong>sists, have your TV serviced by<br />
qualified service <strong>per</strong>sonnel.<br />
Condition<br />
There is no picture (screen<br />
is dark) and no sound.<br />
Tiny black points and/or<br />
bright points appear on the<br />
screen.<br />
Some programmes cannot<br />
be tuned.<br />
The TV turns off<br />
automatically (the TV<br />
enters standby mode).<br />
The remote does not<br />
function.<br />
The “Parental Lock”<br />
password has been<br />
forgotten.<br />
The TV surrounds become<br />
warm.<br />
Explanation/Solution<br />
• Check the antenna (aerial)/cable connection.<br />
• Connect the TV to the AC power (mains), and press 1 on the TV.<br />
• If the 1 (standby) indicator lights up in red, press "/1.<br />
• The screen is composed of pixels. Tiny black points and/or bright<br />
points (pixels) on the screen do not indicate a malfunction.<br />
• Check the antenna (aerial) or dish.<br />
• Check if the “Sleep Timer” is activated, or confirm the<br />
“Duration” setting of “On Timer”.<br />
• Check if the “Idle TV Standby” is activated.<br />
• Check if the “Presence Sensor” is activated. When no viewer is<br />
detected in front of the TV for a preset time, the picture<br />
automatically turns off, while leaving only the TV sound on.<br />
Additionally, after 30 minutes in picture off mode, the TV will<br />
switch to standby mode.<br />
• Replace the batteries.<br />
• Your TV may be in SYNC mode.<br />
Press SYNC MENU, select “TV Control” and then select “Home<br />
(Menu)” or “Options” to control the TV.<br />
• Enter 9999 for the PIN code. (PIN code 9999 is always accepted.)<br />
• When the TV is used for an extended <strong>per</strong>iod, the TV surrounds<br />
become warm.<br />
You may feel hot when touching there by the hand.<br />
Additional Information<br />
23 GB
Specifications<br />
System<br />
Panel system<br />
LCD (Liquid Crystal Display) Panel<br />
TV system<br />
Analogue: Depending on your country/area selection: B/G/H, D/K, L, I, M<br />
Digital: DVB-T2 (<strong>KDL</strong>-55EX723/46HX723/46EX724/46EX723/46EX524/40HX723/40EX724/<br />
40EX723/40EX524/40EX523/40CX523/37EX723/37EX524/32EX724/32EX723/32EX524/<br />
32EX523/32EX424/32CX523 only)<br />
DVB-T/DVB-C<br />
Colour/video system Analogue: PAL, PAL60 (only video input), SECAM, NTSC3.58, NTSC4.43 (only video input)<br />
Digital: MPEG-2 MP@ML/HL, H.264/MPEG-4 AVC MP/HP@L4<br />
Channel coverage<br />
Analogue: VHF: E2–E12/UHF: E21–E69/CATV: S1–S20/HYPER: S21–S41<br />
D/K: R1–R12, R21–R69/L: F2–F10, B–Q, F21–F69/I: UHF B21–B69/M: A2-A13, A14-A79<br />
Digital: VHF/UHF<br />
Sound output<br />
10 W + 10 W (<strong>KDL</strong>-55/46/40/37/32EX72x, <strong>KDL</strong>-46/40HX72x, <strong>KDL</strong>-46/40/37/32EX52x, <strong>KDL</strong>-46/40/<br />
32CX52x, <strong>KDL</strong>-32EX42x)<br />
8 W + 8 W (<strong>KDL</strong>-26/24/22EX32x)<br />
Input/Output jacks<br />
Antenna (aerial) cable 75 ohm external terminal for VHF/UHF<br />
/ AV1 21-pin scart connector (CENELEC standard) including audio/video input, RGB input and TV audio/video<br />
output.<br />
AV2<br />
Video input (phono jack)<br />
/ COMPONENT IN Supported formats: 1080p, 1080i, 720p, 576p, 576i, 480p, 480i<br />
Audio input (phono jacks)<br />
HDMI IN1, 2, 3, 4<br />
(except <strong>KDL</strong>-26/24/<br />
22EX32x)<br />
HDMI IN1, 2<br />
(<strong>KDL</strong>-26/24/22EX32x only)<br />
DIGITAL AUDIO OUT<br />
(OPTICAL)<br />
AUDIO OUT / i<br />
PC IN<br />
(<strong>KDL</strong>-26/24/22EX32x only)<br />
1, 2<br />
(<strong>KDL</strong>-46/40/32EX520,<br />
<strong>KDL</strong>-40/32EX523 only)<br />
1, 2 (HDD REC)<br />
(except <strong>KDL</strong>-46/40/<br />
32EX520, <strong>KDL</strong>-40/<br />
32EX523, <strong>KDL</strong>-26/24/<br />
22EX32x)<br />
LAN<br />
Video: 1080/24p/30p, 1080p, 1080i, 720/24p/30p, 720p, 576p, 576i, 480p, 480i<br />
Audio: Two channel linear PCM: 32, 44.1 and 48 kHz, 16, 20 and 24 bits, Dolby Digital<br />
Analogue audio input (minijack) (HDMI IN4 only)<br />
PC Input<br />
ARC (Audio Return Channel) (HDMI IN1 only)<br />
Video: 1080/24p/30p, 1080p, 1080i, 720/24p/30p, 720p, 576p, 576i, 480p, 480i<br />
Audio: Two channel linear PCM: 32, 44.1 and 48 kHz, 16, 20 and 24 bits, Dolby Digital<br />
Analogue audio input (minijack) (HDMI IN2 only)<br />
PC Input<br />
ARC (Audio Return Channel) (HDMI IN1 only)<br />
Digital optical jack (Two channel linear PCM, Dolby Digital)<br />
Audio output (stereo minijack)<br />
Headphones jack<br />
PC Input (Mini D-sub 15-pin)<br />
PC audio input (minijack)<br />
USB port (support HDD Rec)<br />
USB port<br />
USB port, USB HDD device port ( 2 only)<br />
CAM (Conditional Access Module) slot<br />
10BASE-T/100BASE-TX connector (Depending on the o<strong>per</strong>ating environment of the network,<br />
connection speed may differ. 10BASE-T/100BASE-TX communication rate and communication quality<br />
are not guaranteed for this TV.)<br />
24 GB
Model name <strong>KDL</strong>- 55EX72x 46HX72x 46EX72x 46EX52x<br />
Power and others<br />
Power requirements<br />
220 V – 240 V AC, 50 Hz<br />
Energy Efficiency Class A A A A<br />
Screen size (measured<br />
diagonally)<br />
Power<br />
consumption<br />
in “Home”/<br />
“Standard”<br />
mode<br />
in “Shop”/<br />
“Vivid” mode<br />
Approx. 138.8 cm/<br />
55 inches<br />
Approx. 116.8 cm/<br />
46 inches<br />
Approx. 116.8 cm/<br />
46 inches<br />
113 W 83.0 W 81.0 W 68.0 W<br />
177 W 153 W 133 W 114 W<br />
Average annual energy 165 kWh 115 kWh 118 kWh 99 kWh<br />
consumption* 1<br />
Standby power<br />
consumption* 2<br />
0.25 W (15 W in<br />
software / EPG update<br />
mode)<br />
0.25 W (15 W in<br />
software / EPG update<br />
mode)<br />
0.25 W (15 W in<br />
software / EPG update<br />
mode)<br />
Approx. 116.8 cm/<br />
46 inches<br />
0.3 W (13 W in<br />
software / EPG update<br />
mode)<br />
Display resolution<br />
1,920 dots (horizontal) × 1,080 lines (vertical)<br />
Dimensions (Approx.) (w × h × d)<br />
with Table-Top Stand 126.9 × 79.9 × 31.5 cm 107.8 × 69.0 × 26.0 cm 107.8 × 69.0 × 26.0 cm 107.8 × 69.0 × 26.0 cm<br />
without Table-Top Stand 126.9 × 76.9 × 4.1 cm 107.8 × 66.0 × 4.2 cm 107.8 × 66.0 × 4.2 cm 107.8 × 66.0 × 4.2 cm<br />
Mass (Approx.)<br />
with Table-Top Stand 25.4 kg 18.8 kg 17.9 kg 17.8 kg<br />
without Table-Top Stand 20.2 kg 14.4 kg 14.3 kg 14.2 kg<br />
Supplied accessories See “Checking the accessories” (page 8).<br />
Optional accessories Wall-Mount Bracket: SU-WL500<br />
3D Glasses: TDG-BR250/TDG-BR200/TDG-BR100/TDG-BR50 (<strong>KDL</strong>-55/46EX72x, <strong>KDL</strong>-46HX72x)<br />
Camera and Microphone Unit: CMU-BR100<br />
USB Wireless LAN Adapter<br />
O<strong>per</strong>ating tem<strong>per</strong>ature 0 ºC – 40 ºC<br />
O<strong>per</strong>ating humidity<br />
10 % – 80 % RH (non-condensing)<br />
Additional Information<br />
Model name <strong>KDL</strong>- 46CX52x 40HX72x 40EX72x 40EX52x<br />
Power and others<br />
Power requirements<br />
220 V – 240 V AC, 50 Hz<br />
Energy Efficiency Class C B A A<br />
Screen size (measured<br />
diagonally)<br />
Power<br />
consumption<br />
in “Home”/<br />
“Standard”<br />
mode<br />
in “Shop”/<br />
“Vivid” mode<br />
Approx. 116.8 cm/<br />
46 inches<br />
Approx. 101.6 cm/<br />
40 inches<br />
Approx. 101.6 cm/<br />
40 inches<br />
128 W 85.0 W 64.0 W 65.0 W<br />
204 W 135 W 121 W 113 W<br />
Average annual energy 187 kWh 118 kWh 93 kWh 95 kWh<br />
consumption* 1<br />
Standby power<br />
consumption* 2<br />
0.25 W (16 W in<br />
software / EPG update<br />
mode)<br />
0.25 W (14 W in<br />
software / EPG update<br />
mode)<br />
0.25 W (15 W in<br />
software / EPG update<br />
mode)<br />
Approx. 101.6 cm/<br />
40 inches<br />
0.3 W (13 W in<br />
software / EPG update<br />
mode)<br />
Display resolution<br />
1,920 dots (horizontal) × 1,080 lines (vertical)<br />
Dimensions (Approx.) (w × h × d)<br />
with Table-Top Stand 112.2 × 71.2 × 27.5 cm 94.3 × 61.5 × 21.0 cm 94.3 × 61.6 × 25.0 cm 94.3 × 61.6 × 25.0 cm<br />
without Table-Top Stand 112.2 × 68.2 × 7.4 cm 94.3 × 58.6 × 4.2 cm 94.3 × 58.6 × 4.2 cm 94.3 × 58.6 × 4.2 cm<br />
Mass (Approx.)<br />
with Table-Top Stand 20.7 kg 15.4 kg 14.4 kg 14.4 kg<br />
without Table-Top Stand 17.1 kg 11.6 kg 11.2 kg 11.2 kg<br />
Supplied accessories See “Checking the accessories” (page 8).<br />
Optional accessories Wall-Mount Bracket: SU-WL500<br />
3D Glasses: TDG-BR250/TDG-BR200/TDG-BR100/TDG-BR50 (<strong>KDL</strong>-40HX72x, <strong>KDL</strong>-40EX72x)<br />
Camera and Microphone Unit: CMU-BR100<br />
USB Wireless LAN Adapter<br />
O<strong>per</strong>ating tem<strong>per</strong>ature 0 ºC – 40 ºC<br />
O<strong>per</strong>ating humidity<br />
10% – 80% RH (non-condensing)<br />
(Continued)<br />
25 GB
Model name <strong>KDL</strong>- 40CX52x 37EX72x 37EX52x 32EX72x<br />
Power and others<br />
Power requirements<br />
220 V – 240 V AC, 50 Hz<br />
Energy Efficiency Class C A A B<br />
Screen size (measured<br />
diagonally)<br />
Power<br />
consumption<br />
in “Home”/<br />
“Standard”<br />
mode<br />
in “Shop”/<br />
“Vivid” mode<br />
Approx. 101.6 cm/<br />
40 inches<br />
Approx. 94.0 cm/<br />
37 inches<br />
Approx. 94.0 cm/<br />
37 inches<br />
120 W 56.0 W 56.0 W 59.0 W<br />
181 W 105 W 98 W 101 W<br />
Approx. 80.1 cm/<br />
32 inches<br />
Average annual energy 175 kWh 82 kWh 78 kWh 86 kWh<br />
consumption* 1<br />
Standby power<br />
consumption* 2<br />
0.25 W (15 W in<br />
software / EPG update<br />
mode)<br />
0.25 W (17 W in<br />
software / EPG update<br />
mode)<br />
0.3 W (16.5 W in<br />
software / EPG update<br />
mode)<br />
0.25 W (16 W in<br />
software / EPG update<br />
mode)<br />
Display resolution<br />
1,920 dots (horizontal) × 1,080 lines (vertical)<br />
Dimensions (Approx.) (w × h × d)<br />
with Table-Top Stand 99.1 × 63.6 × 25.0 cm 87.8 × 57.9 × 25.0 cm 87.7 × 57.9 × 25.0 cm 75.5 × 51.0 × 21.6 cm<br />
without Table-Top Stand 99.1 × 60.6 × 7.1 cm 87.8 × 54.9 × 4.2 cm 87.7 × 54.9 × 4.2 cm 75.5 × 48.0 × 4.2 cm<br />
Mass (Approx.)<br />
with Table-Top Stand 16.3 kg 13.3 kg 13.3 kg 10.4 kg<br />
without Table-Top Stand 12.9 kg 10.1 kg 10.1 kg 7.9 kg<br />
Supplied accessories See “Checking the accessories” (page 8).<br />
Optional accessories Wall-Mount Bracket: SU-WL500<br />
3D Glasses: TDG-BR250/TDG-BR200/TDG-BR100/TDG-BR50 (<strong>KDL</strong>-37/32EX72x)<br />
Camera and Microphone Unit: CMU-BR100<br />
USB Wireless LAN Adapter<br />
O<strong>per</strong>ating tem<strong>per</strong>ature 0 ºC – 40 ºC<br />
O<strong>per</strong>ating humidity<br />
10% – 80% RH (non-condensing)<br />
Model name <strong>KDL</strong>- 32EX52x 32EX42x 32CX52x<br />
Power and others<br />
Power requirements<br />
220 V – 240 V AC, 50 Hz<br />
Energy Efficiency Class B B C<br />
Screen size (measured<br />
diagonally)<br />
Power<br />
consumption<br />
in “Home”/<br />
“Standard”<br />
mode<br />
in “Shop”/<br />
“Vivid” mode<br />
Approx. 80.1 cm/<br />
32 inches<br />
Approx. 80.0 cm/<br />
32 inches<br />
56.0 W 56.0 W 73.0 W<br />
88 W 88 W 112 W<br />
Approx. 80.1 cm/<br />
32 inches<br />
Average annual energy 82 kWh 82 kWh 107 kWh<br />
consumption* 1<br />
Standby power<br />
0.3 W (17 W in software /<br />
consumption* 2 EPG update mode)<br />
Display resolution 1,920 dots (horizontal) ×<br />
1,080 lines (vertical)<br />
Dimensions (Approx.) (w × h × d)<br />
0.3 W (17 W in software /<br />
EPG update mode)<br />
1,366 dots (horizontal) ×<br />
768 lines (vertical)<br />
0.25 W (15 W in software /<br />
EPG update mode)<br />
1,920 dots (horizontal) ×<br />
1,080 lines (vertical)<br />
with Table-Top Stand 75.5 × 51.0 × 21.6 cm 75.5 × 51.0 × 21.6 cm 79.9 × 53.2 × 23.0 cm<br />
without Table-Top Stand 75.5 × 48.0 × 4.2 cm 75.5 × 48.0 × 4.2 cm 79.9 × 50.2 × 7.0 cm<br />
Mass (Approx.)<br />
with Table-Top Stand 10.2 kg 10.2 kg 11.4 kg<br />
without Table-Top Stand 7.7 kg 7.7 kg 8.7 kg<br />
Supplied accessories See “Checking the accessories” (page 8).<br />
Optional accessories Wall-Mount Bracket: SU-WL500<br />
Camera and Microphone Unit: CMU-BR100<br />
USB Wireless LAN Adapter<br />
O<strong>per</strong>ating tem<strong>per</strong>ature 0 ºC – 40 ºC<br />
O<strong>per</strong>ating humidity<br />
10% – 80% RH (non-condensing)<br />
26 GB
Model name <strong>KDL</strong>- 26EX321 26EX320 24EX32x 22EX32x<br />
Power and others<br />
Power requirements<br />
220 V – 240 V AC, 50 Hz<br />
Energy Efficiency Class B B B B<br />
Screen size (measured<br />
diagonally)<br />
Power<br />
consumption<br />
in “Home”/<br />
“Standard”<br />
mode<br />
in “Shop”/<br />
“Vivid” mode<br />
Approx. 66.1cm/<br />
26 inches<br />
Approx. 66.1 cm/<br />
26 inches<br />
Approx. 61.0 cm/<br />
24 inches<br />
38.0 W 38.0 W 35.0 W 32.0 W<br />
63 W 63 W 62 W 52 W<br />
Approx. 54.8 cm/<br />
22 inches<br />
Average annual energy 55 kWh 55 kWh 51 kWh 47 kWh<br />
consumption* 1<br />
Standby power<br />
consumption* 2<br />
0.35 W (13 W in<br />
software / EPG update<br />
mode)<br />
0.35 W (13 W in<br />
software / EPG update<br />
mode)<br />
0.35 W (13 W in<br />
software / EPG update<br />
mode)<br />
Display resolution 1,366 dots (horizontal) × 768 lines (vertical) 1,920 dots (horizontal) ×<br />
1,080 lines (vertical)<br />
Dimensions (Approx.) (w × h × d)<br />
0.35 W (13 W in<br />
software / EPG update<br />
mode)<br />
1,366 dots (horizontal) ×<br />
768 lines (vertical)<br />
with Table-Top Stand 63.1 × 43.3 × 21.5 cm 63.1 × 42.1 × 18.2 cm 58.3 × 39.1 × 18.2 cm 52.9 × 36.2 × 17.2 cm<br />
without Table-Top Stand 63.1 × 40.6 × 4.2 cm 63.1 × 40.6 × 4.2 cm 58.3 × 37.6 × 4.2 cm 52.9 × 34.7 × 4.2 cm<br />
Mass (Approx.)<br />
with Table-Top Stand 8.4 kg 7.2 kg 6.2 kg 5.1 kg<br />
without Table-Top Stand 6.1 kg 6.1 kg 5.2 kg 4.1 kg<br />
Supplied accessories See “Checking the accessories” (page 8).<br />
Optional accessories Wall-Mount Bracket: SU-WL100<br />
Camera and Microphone Unit: CMU-BR100<br />
USB Wireless LAN Adapter<br />
O<strong>per</strong>ating tem<strong>per</strong>ature 0 ºC – 40 ºC<br />
O<strong>per</strong>ating humidity<br />
10% – 80% RH (non-condensing)<br />
Additional Information<br />
* 1 Energy consumption <strong>per</strong> year, based on the power consumption of the television o<strong>per</strong>ating 4 hours <strong>per</strong> day<br />
for 365 days. The actual energy consumption will depend on how the television is used.<br />
* 2 Specified standby power is reached after the TV finishes necessary internal processes.<br />
Design and specifications are subject to change without notice.<br />
27 GB
Installing the Accessories (Wall-Mount Bracket)<br />
To Customers:<br />
When using the SU-WL500 and SU-WL100 Wall-Mount Bracket, the space between the wall and<br />
the TV will be 6 cm. Use this space to route cables to the TV.<br />
6cm<br />
Wall<br />
For product protection and safety reasons, <strong>Sony</strong> strongly recommends that installing of your TV be<br />
<strong>per</strong>formed by <strong>Sony</strong> dealers or licensed contractors. Do not attempt to install it yourself.<br />
To <strong>Sony</strong> Dealers and Contractors:<br />
Provide full attention to safety during the installation, <strong>per</strong>iodic maintenance and examination of this<br />
product.<br />
Your TV can be installed using the SU-WL500 (page 29) and SU-WL100 (page 29) Wall-Mount<br />
Bracket (sold separately).<br />
• Refer to the Instructions supplied with the Wall-Mount Bracket to pro<strong>per</strong>ly carry out the<br />
installation.<br />
• Refer to “Detaching the Table-Top Stand from the TV” (page 9).<br />
Sufficient ex<strong>per</strong>tise is required for installing this product, especially to determine the strength of<br />
the wall for withstanding the TV’s weight. Be sure to entrust the attachment of this product to the<br />
wall to <strong>Sony</strong> dealers or licensed contractors and pay adequate attention to safety during the<br />
installation. <strong>Sony</strong> is not liable for any damage or injury caused by mishandling or impro<strong>per</strong><br />
installation.<br />
When installing the TV on the wall, remove the screws from the rear of the TV. The screws and<br />
number of screws are available depending on the TV model. (They are fastened in the screw holes<br />
for wall mounting.) Be sure to store the removed screws in a safe place, keeping them away from<br />
children.<br />
B For <strong>KDL</strong>-55EX72x<br />
B For <strong>KDL</strong>-46/40HX72x, <strong>KDL</strong>-46/40/37/<br />
32EX72x, <strong>KDL</strong>-46/40/37/32EX52x,<br />
<strong>KDL</strong>-32EX42x<br />
× 4<br />
× 2<br />
× 2<br />
× 2<br />
Soft cloth<br />
Soft cloth<br />
~<br />
• When removing the Table-Top Stand from the TV, lay the display face down on a stable work surface that is<br />
larger than the TV.<br />
• To prevent damaging the surface of the LCD display, make sure to place a soft cloth on the work surface.<br />
28 GB
SU-WL500, SU-WL100<br />
For <strong>KDL</strong>-55/46/40/37/32EX72x,<br />
<strong>KDL</strong>-46/40HX72x,<br />
<strong>KDL</strong>-46/40/37/32EX52x,<br />
<strong>KDL</strong>-46/40/32CX52x,<br />
<strong>KDL</strong>-32EX42x<br />
SU-WL500<br />
Mounting<br />
Hook<br />
Screw<br />
(+PSW<br />
6 × 16)<br />
For <strong>KDL</strong>-26/24/22EX32x<br />
SU-WL100<br />
Mounting<br />
Hook<br />
Screw<br />
(+PSW<br />
4 × 12)<br />
× 4<br />
Soft cloth<br />
Soft cloth<br />
~<br />
• Attach the Mounting Hook using the four screws supplied with the Wall-Mount Bracket.<br />
• When attaching the Table-Top Stand again, be sure to fasten the screws (previously removed) to the original<br />
holes on the rear of the TV.<br />
Additional Information<br />
Screw and Hook locations diagram/table<br />
Model Name<br />
Screw location<br />
Hook location<br />
<strong>KDL</strong>-<br />
SU-WL500<br />
SU-WL500<br />
55EX72x e, j b<br />
46HX72x/46EX72x/46EX52x e, j b<br />
46CX52x d, g b<br />
40HX72x/40EX72x/40EX52x e, j b<br />
40CX52x d, g b<br />
37EX72x/37EX52x e, j b<br />
32EX72x/32EX52x/32EX42x/32CX52x e, g c<br />
SU-WL100<br />
26EX32x - a<br />
24EX32x - a<br />
22EX32x - b<br />
(Continued)<br />
29 GB
SU-WL500<br />
Screw location<br />
When installing the Mounting Hook on the<br />
TV.<br />
Hook location<br />
When installing the TV onto the Base Bracket.<br />
a<br />
b<br />
c<br />
SU-WL100<br />
Hook location<br />
When installing the TV onto the Base Bracket.<br />
a<br />
b<br />
30 GB
TV installation dimensions table<br />
1 SU-WL500<br />
A<br />
E<br />
F<br />
C<br />
B<br />
D<br />
H<br />
G<br />
Screen centre point<br />
2 SU-WL100<br />
A E F<br />
B<br />
125<br />
C<br />
D<br />
H<br />
G<br />
Additional Information<br />
Screen centre point<br />
Model<br />
Name<br />
<strong>KDL</strong>-<br />
Display<br />
dimensions<br />
Screen<br />
centre<br />
dimension<br />
Length for each mounting angle<br />
Angle (0°) Angle (20°)<br />
A B C D E F G H<br />
1 SU-WL500<br />
55EX72x 126.9 76.9 6.5 46.5 9.0 32.2 71.8 47.2<br />
46HX72x 107.8 66.0 12.0 46.5 9.1 28.6 61.5 47.1<br />
46EX72x 107.8 66.0 12.0 46.5 9.1 28.6 61.6 47.2<br />
46EX52x 107.8 66.0 12.0 46.5 9.1 28.6 61.5 47.2<br />
46CX52x 112.2 68.2 8.4 43.2 13.4 34.5 64.2 45.5<br />
40HX72x 94.3 58.6 15.7 46.5 9.1 26.1 54.5 47.1<br />
40EX72x 94.3 58.6 15.7 46.5 9.1 26.1 54.6 47.2<br />
40EX52x 94.3 58.6 15.7 46.5 9.1 26.0 54.5 47.2<br />
40CX52x 99.1 60.6 12.2 43.2 13.1 31.9 57.0 45.5<br />
37EX72x 87.8 54.9 17.5 46.5 9.1 24.8 51.1 47.2<br />
37EX52x 87.7 54.9 17.5 46.5 9.1 24.7 51.0 47.1<br />
32EX72x 75.5 48.0 16.1 41.6 9.1 24.1 44.6 42.7<br />
32EX52x/<br />
32EX42x<br />
75.5 48.0 16.1 41.6 9.1 24.1 44.6 42.6<br />
32CX52x 79.9 50.2 17.2 43.2 13.0 27.9 47.3 45.4<br />
2 SU-WL100<br />
26EX32x 63.1 40.6 7.8 29.5 9.5 20.4 37.4 26.3<br />
24EX32x 58.3 37.6 9.5 29.6 9.4 19.3 34.6 27.6<br />
22EX32x 52.9 34.7 10.8 29.5 9.3 18.2 31.9 27.6<br />
Figures in the table may differ slightly depending on the installation.<br />
Unit: cm<br />
WARNING<br />
The wall that the TV will be installed should be capable of supporting a weight of at least four times that of the<br />
TV. Refer to “Specifications” (page 24-27) for its weight.<br />
31 GB
Safety<br />
Information<br />
WARNING<br />
Batteries must not be exposed to excessive<br />
heat such as sunshine, fire or the like.<br />
Installation/Set-up<br />
Install and use the TV set in accordance<br />
with the instructions as follows in order to<br />
avoid any risk of fire, electrical shock or<br />
damage and/or injuries.<br />
Installation<br />
• The TV set should be installed near an<br />
easily accessible mains socket.<br />
• Place the TV set on a stable, level<br />
surface.<br />
• Only qualified service <strong>per</strong>sonnel should<br />
carry out wall installations.<br />
• For safety reasons, it is strongly<br />
recommended that you use <strong>Sony</strong><br />
accessories, including:<br />
– Wall Mount Bracket:<br />
SU-WL500 (except <strong>KDL</strong>-26/24/<br />
22EX32x)<br />
SU-WL100 (<strong>KDL</strong>-26/24/22EX32x)<br />
• Be sure to use the screws supplied with<br />
the Wall-mount bracket when attaching<br />
the mounting hooks to the TV set. The<br />
supplied screws are designed so that they<br />
are 8 mm to 12 mm in length when<br />
measured from the attaching surface of<br />
the mounting hook.<br />
The diameter and length of the screws<br />
differ depending on the Wall-mount<br />
bracket model.<br />
Use of screws other than those supplied<br />
may result in internal damage to the TV<br />
set or cause it to fall, etc.<br />
8 mm - 12 mm<br />
Screw (supplied with the<br />
Wall-mount bracket)<br />
Mounting Hook<br />
Hook attachment on rear<br />
of TV set<br />
Transporting<br />
• Before transporting the TV set,<br />
disconnect all cables.<br />
• Two or three people are needed to<br />
transport a large TV set.<br />
• When transporting the TV set by hand,<br />
hold it as shown in the illustration. Do<br />
not put stress on the LCD panel and the<br />
frame around the screen.<br />
<strong>KDL</strong>-26/24/22EX32x<br />
<strong>KDL</strong>-55/46/40/37/32EX72x,<br />
<strong>KDL</strong>-46/40HX72x,<br />
<strong>KDL</strong>-46/40/37/32EX52x,<br />
<strong>KDL</strong>-46/40/32CX52x,<br />
<strong>KDL</strong>-32EX42x<br />
• When transporting the TV set for repairs<br />
or when moving, pack it using the<br />
original carton and packing material.<br />
Ventilation<br />
• Never cover the ventilation holes or<br />
insert anything in the cabinet.<br />
• Leave space around the TV set as shown<br />
below.<br />
• It is strongly recommended that you use<br />
a <strong>Sony</strong> wall-mount bracket in order to<br />
provide adequate air-circulation.<br />
Installed on the wall<br />
30 cm<br />
10 cm 10 cm<br />
10 cm<br />
Leave at least this space around<br />
the set.<br />
Installed with stand<br />
30 cm<br />
10 cm 10 cm 6 cm<br />
Leave at least this space around<br />
the set.<br />
• To ensure pro<strong>per</strong> ventilation and prevent<br />
the collection of dirt or dust:<br />
– Do not lay the TV set flat, install<br />
upside down, backwards, or<br />
sideways.<br />
– Do not place the TV set on a shelf,<br />
rug, bed or in a closet.<br />
– Do not cover the TV set with a cloth,<br />
such as curtains, or items such as<br />
newspa<strong>per</strong>s, etc.<br />
– Do not install the TV set as shown<br />
below.<br />
Air circulation is blocked.<br />
Wall<br />
Wall<br />
Mains lead<br />
Handle the mains lead and socket as<br />
follows in order to avoid any risk of fire,<br />
electrical shock or damage and/or injuries:<br />
– Use only mains leads supplied by<br />
<strong>Sony</strong>, not other suppliers.<br />
– Insert the plug fully into the mains<br />
socket.<br />
– O<strong>per</strong>ate the TV set on a 220-240 V AC<br />
supply only.<br />
– When wiring cables, be sure to unplug<br />
the mains lead for your safety and take<br />
care not to catch your feet on the<br />
cables.<br />
– Disconnect the mains lead from the<br />
mains socket before working on or<br />
moving the TV set.<br />
– Keep the mains lead away from heat<br />
sources.<br />
– Unplug the mains plug and clean it<br />
regularly. If the plug is covered with<br />
dust and it picks up moisture, its<br />
insulation may deteriorate, which<br />
could result in a fire.<br />
Notes<br />
• Do not use the supplied mains lead on<br />
any other equipment.<br />
• Do not pinch, bend, or twist the mains<br />
lead excessively. The core conductors<br />
may be exposed or broken.<br />
• Do not modify the mains lead.<br />
• Do not put anything heavy on the mains<br />
lead.<br />
• Do not pull on the mains lead itself when<br />
disconnecting the mains lead.<br />
• Do not connect too many appliances to<br />
the same mains socket.<br />
• Do not use a poor fitting mains socket.<br />
Prohibited Usage<br />
Do not install/use the TV set in locations,<br />
environments or situations such as those<br />
listed below, or the TV set may<br />
malfunction and cause a fire, electrical<br />
shock, damage and/or injuries.<br />
Location:<br />
• Outdoors (in direct sunlight), at the<br />
seashore, on a ship or other vessel, inside<br />
a vehicle, in medical institutions,<br />
unstable locations, near water, rain,<br />
moisture or smoke.<br />
• If the TV is placed in the changing room<br />
of a public bath or hot spring, the TV<br />
may be damaged by airborne sulfur, etc.<br />
• For best picture quality, do not expose<br />
the screen to direct illumination or<br />
sunlight.<br />
• Avoid moving the TV from a cold area<br />
to a warm area. Sudden room<br />
tem<strong>per</strong>ature changes may cause moisture<br />
condensation. This may cause the TV to<br />
show poor picture and/or poor colour.<br />
Should this occur, allow moisture to<br />
evaporate completely before powering<br />
the TV on.<br />
• When transporting the TV set, do not<br />
subject it to jolts or excessive vibration.<br />
32 GB
• Never spray water or detergent directly<br />
on the TV set. It may drip to the bottom<br />
of the screen or exterior parts and enter<br />
the TV set, and may cause damage to the<br />
TV set.<br />
Environment:<br />
• Places that are hot, humid, or<br />
excessively dusty; where insects may<br />
enter; where it might be exposed to<br />
mechanical vibration, near flammable<br />
objects (candles, etc). The TV set shall<br />
not be exposed to dripping or splashing<br />
and no objects filled with liquids, such<br />
as vases, shall be placed on the TV.<br />
• Do not place the TV in a humid or dusty<br />
space, or in a room with oily smoke or<br />
steam (near cooking tables or<br />
humidifiers). Fire, electric shock, or<br />
warping may result.<br />
• Do not install the TV in places subject to<br />
extreme tem<strong>per</strong>ature such as in direct<br />
sunlight, near a radiator or a heating<br />
vent. The TV may overheat in such<br />
condition which can cause deformation<br />
of the enclosure and/or TV malfunction.<br />
When not in use<br />
• If you will not be using the TV set for<br />
several days, the TV set should be<br />
disconnected from the mains for<br />
environmental and safety reasons.<br />
• As the TV set is not disconnected from<br />
the mains when the TV set is just turned<br />
off, pull the plug from the mains to<br />
disconnect the TV set completely.<br />
• However, some TV sets may have<br />
features that require the TV set to be left<br />
in standby to work correctly.<br />
For children<br />
• Do not allow children to climb on the<br />
TV set.<br />
• Keep small accessories out of the reach<br />
of children, so that they are not<br />
mistakenly swallowed.<br />
If the following problems<br />
occur...<br />
Turn off the TV set and unplug the mains<br />
lead immediately if any of the following<br />
problems occur.<br />
Ask your dealer or <strong>Sony</strong> service centre to<br />
have it checked by qualified service<br />
<strong>per</strong>sonnel.<br />
When:<br />
– Mains lead is damaged.<br />
– Poor fitting of mains socket.<br />
– TV set is damaged by being dropped,<br />
hit or having something thrown at it.<br />
– Any liquid or solid object falls through<br />
openings in the cabinet.<br />
Warning<br />
To prevent the spread of fire, keep candles<br />
or other open flames away from this<br />
product at all time.<br />
Additional Information<br />
Situation:<br />
• Do not use when your hands are wet,<br />
with the cabinet removed, or with<br />
attachments not recommended by the<br />
manufacturer. Disconnect the TV set<br />
from mains socket and aerial during<br />
lightning storms.<br />
• Do not install the TV so that it sticks out<br />
into an open space. Injury or damage<br />
from a <strong>per</strong>son or object bumping into the<br />
TV may result.<br />
Broken pieces:<br />
• Do not throw anything at the TV set. The<br />
screen glass may break by the impact<br />
and cause serious injury.<br />
• If the surface of the TV set cracks, do<br />
not touch it until you have unplugged the<br />
mains lead. Otherwise electric shock<br />
may result.<br />
33 GB
Keep this Instruction<br />
manual safe you’ll<br />
need it<br />
Television in the UK is going digital, bringing us all more.<br />
Please see overleaf to find out when your area switches to digital.<br />
Digital UK is the independent, non-profit organisation leading the process of digital TV switchover<br />
in the UK. Digital UK provides impartial information on what people need to do to prepare for the<br />
move to digital, and when they need to do it.<br />
How the switchover affects your TV equipment:<br />
Your new TV has a digital tuner built in, which means it is ready to receive the Freeview signal by<br />
simply plugging it into your aerial socket (check if you can get digital TV through your aerial now,<br />
or whether you'll have to wait until switchover, at www.digitaluk.co.uk).<br />
When the TV switchover happens in your area, there are at least two occasions when you will need<br />
to re-tune your TV in order to continue receiving your existing TV channels, and also to pick up new<br />
ones. Digital UK, the body leading the digital TV switchover, will advise you when you need to retune<br />
during the switchover.<br />
34 GB
How to re-tune:<br />
1 Press "HOME" on the remote<br />
2 Press G/g to select "Settings"<br />
3 Press F/f to select "Digital Set-up", then press<br />
4 Press to select "Digital Auto Tuning"<br />
5 Press G to select "Yes" then press to start "Digital Auto Tuning"<br />
6 Follow the on screen instructions.<br />
If you are missing any channels, it may be that they are not available in your area, or that your aerial<br />
needs upgrading.<br />
If you have any questions, please contact <strong>Sony</strong> on 0844 8466555 or call Digital UK on 0845 6 50 50<br />
50 or visit www.digitaluk.co.uk<br />
Additional Information<br />
†Calls charged at BT rate of 3p <strong>per</strong> minute daytime and 1p <strong>per</strong> minute evenings and weekends.<br />
Rates may vary for calls from non-BT lines.<br />
35 GB
For useful information about <strong>Sony</strong> products<br />
4-269-995-16(1)<br />
© 2011 <strong>Sony</strong> Corporation


