

KitchenAid JLG61P - JLG61P EN (F084155) Istruzioni per l'Uso
KitchenAid JLG61P - JLG61P EN (F084155) Istruzioni per l'Uso
KitchenAid JLG61P - JLG61P EN (F084155) Istruzioni per l'Uso

Create successful ePaper yourself
Turn your PDF publications into a flip-book with our unique Google optimized e-Paper software.
Installation<br />
GB<br />
LOCATION<br />
The cooker may be located in a kitchen, kitchen/diner<br />
or a bed-sitting room, but not in a room containing a<br />
bath or shower. The cooker must not be installed in a<br />
bed-sitting room of less than 20m 3 .<br />
When adjusted for use on Butane (G30) or Propane<br />
(G31), the cooker must not be installed in a room or<br />
internal space below ground level, e.g. in a basement.<br />
PROVISION FOR V<strong>EN</strong>TILATION<br />
The room containing the cooker should have an air<br />
supply in accordance with BS 5440: Part 2.<br />
The room must have an opening window or equivalent;<br />
some rooms may also require a <strong>per</strong>manent vent. If the<br />
room has a volume between 5 and 10m 3 , it will require<br />
an air vent of 50cm 2 effective area unless it has a<br />
door which opens directly to outside. If the room has<br />
a volume of less than 5m 3 , it will require an air vent of<br />
100cm 2 effective area. If there are other fuel burning<br />
appliances in the same room, BS 5440: Part 2 should<br />
be consulted to determine air vent requirements.<br />
TECHNICAL DATA<br />
Gas connection<br />
Pressure test point<br />
injector<br />
Gas rate adjustment<br />
Aeration adjustment<br />
Electrical connection<br />
Rp ½ (½” BSP female)<br />
Front left hotplate<br />
None<br />
None<br />
Flexible cord fitted with a<br />
3 pin 13 amp plug<br />
230/240V a.c. 50Hz.<br />
13A fuse.<br />
a)The cooker may be located in a kitchen, a kitchen/<br />
diner or bed sitting room, but not in a bathroom or<br />
shower room.<br />
b)The hoods must be installed according to the<br />
requirements in the hood handbook.<br />
c)The wall in contact with the back of the cooker must<br />
be of flameproof material.<br />
d)The cooker is fitted with a safety chain that must be<br />
attached to a hook, secured to the wall behind the<br />
appliance.<br />
!Some models can have their<br />
gas connection inverted. It is<br />
important to make sure the safety<br />
chain is always situated on the<br />
side which corresponds to the<br />
hose holder (Fig. B).<br />
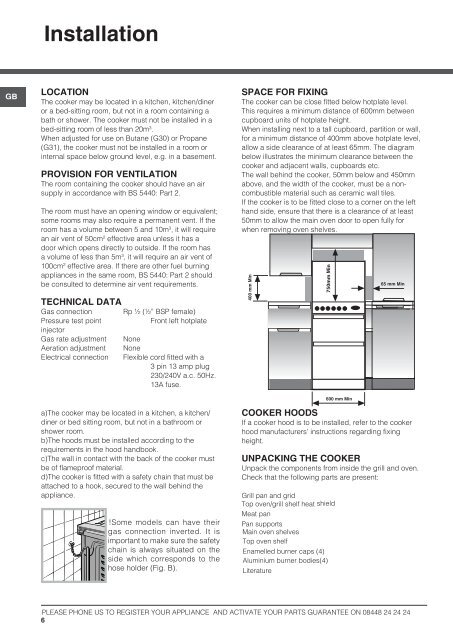
SPACE FOR FIXING<br />
The cooker can be close fitted below hotplate level.<br />
This requires a minimum distance of 600mm between<br />
cupboard units of hotplate height.<br />
When installing next to a tall cupboard, partition or wall,<br />
for a minimum distance of 400mm above hotplate level,<br />
allow a side clearance of at least 65mm. The diagram<br />
below illustrates the minimum clearance between the<br />
cooker and adjacent walls, cupboards etc.<br />
The wall behind the cooker, 50mm below and 450mm<br />
above, and the width of the cooker, must be a noncombustible<br />
material such as ceramic wall tiles.<br />
If the cooker is to be fitted close to a corner on the left<br />
hand side, ensure that there is a clearance of at least<br />
50mm to allow the main oven door to open fully for<br />
when removing oven shelves.<br />
400 mm Min<br />
750mm Min<br />
840 mm Min<br />
600 mm Min<br />
65 mm Min<br />
COOKER HOODS<br />
If a cooker hood is to be installed, refer to the cooker<br />
hood manufacturers’ instructions regarding fixing<br />
height.<br />
UNPACKING THE COOKER<br />
Unpack the components from inside the grill and oven.<br />
Check that the following parts are present:<br />
Grill pan and grid<br />
Top oven/grill shelf heat shield<br />
Meat pan<br />
Pan supports<br />
Main oven shelves<br />
Top oven shelf<br />
Enamelled burner caps (4)<br />
Aluminium burner bodies(4)<br />
Literature<br />
PLEASE PHONE US TO REGISTER YOUR APPLIANCE AND ACTIVATE YOUR PARTS GUARANTEE ON 08448 24 24 24<br />
6


