Catalogo New Decoration ristampa 2017
Pannelli in pietre riscostruite - linea New Decoration - Azienda Decor Srl
Pannelli in pietre riscostruite - linea New Decoration - Azienda Decor Srl

You also want an ePaper? Increase the reach of your titles
YUMPU automatically turns print PDFs into web optimized ePapers that Google loves.
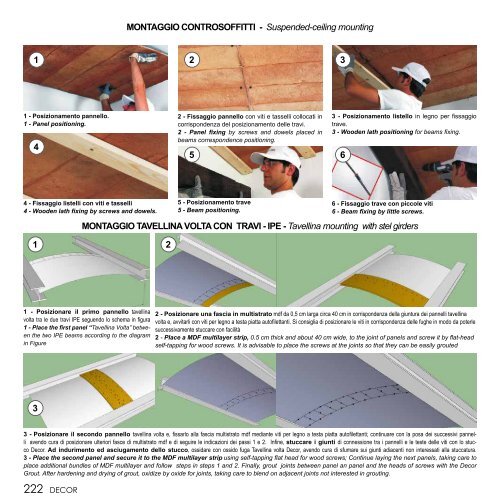
MONTAGGIO CONTROSOFFITTI - Suspended-ceiling mounting<br />
1 2 3<br />
1 - Posizionamento pannello.<br />
1 - Panel positioning.<br />
4<br />
2 - Fissaggio pannello con viti e tasselli collocati in<br />
corrispondenza del posizionamento delle travi.<br />
2 - Panel fixing by screws and dowels placed in<br />
beams correspondence positioning.<br />
5 6<br />
3 - Posizionamento listello in legno per fissaggio<br />
trave.<br />
3 - Wooden lath positioning for beams fixing.<br />
4 - Fissaggio listelli con viti e tasselli<br />
4 - Wooden lath fixing by screws and dowels.<br />
5 - Posizionamento trave<br />
5 - Beam positioning.<br />
6 - Fissaggio trave con piccole viti<br />
6 - Beam fixing by little screws.<br />
MONTAGGIO TAVELLINA VOLTA CON TRAVI - IPE - Tavellina mounting with stel girders<br />
1 2<br />
1 - Posizionare il primo pannello tavellina<br />
volta tra le due travi IPE seguendo lo schema in figura<br />
1 - Place the first panel “Tavellina Volta” between<br />
the two IPE beams according to the diagram<br />
in Figure<br />
2 - Posizionare una fascia in multistrato mdf da 0,5 cm larga circa 40 cm in corrispondenza della giuntura dei pannelli tavellina<br />
volta e, avvitarli con viti per legno a testa piatta autofilettanti. Si consiglia di posizionare le viti in corrispondenza delle fughe in modo da poterle<br />
successivamente stuccare con facilità<br />
2 - Place a MDF multilayer strip, 0.5 cm thick and about 40 cm wide, to the joint of panels and screw it by flat-head<br />
self-tapping for wood screws. It is advisable to place the screws at the joints so that they can be easily grouted<br />
3<br />
3 - Posizionare il secondo pannello tavellina volta e, fissarlo alla fascia multistrato mdf mediante viti per legno a testa piatta autofilettanti; continuare con la posa dei successivi pannelli<br />
avendo cura di posizionare ulteriori fasce di multistrato mdf e di seguire le indicazioni dei passi 1 e 2. Infine, stuccare i giunti di connessione tra i pannelli e le teste delle viti con lo stucco<br />
Decor. Ad indurimento ed asciugamento dello stucco, ossidare con ossido fuga Tavellina volta Decor, avendo cura di sfumare sui giunti adiacenti non interessati alla stuccatura.<br />
3 - Place the second panel and secure it to the MDF multilayer strip using self-tapping flat head for wood screws; Continue laying the next panels, taking care to<br />
place additional bundles of MDF multilayer and follow steps in steps 1 and 2. Finally, grout joints between panel an panel and the heads of screws with the Decor<br />
Grout. After hardening and drying of grout, oxidize by oxide for joints, taking care to blend on adjacent joints not interested in grouting.<br />
222 DECOR