

KitchenAid KEC 1532/0 WS - KEC 1532/0 WS EN (855061501000) Istruzioni per l'Uso
KitchenAid KEC 1532/0 WS - KEC 1532/0 WS EN (855061501000) Istruzioni per l'Uso
KitchenAid KEC 1532/0 WS - KEC 1532/0 WS EN (855061501000) Istruzioni per l'Uso

Create successful ePaper yourself
Turn your PDF publications into a flip-book with our unique Google optimized e-Paper software.
B"WIRBh!M<strong>EN</strong>TBb HlNTS<br />
Paking c^J<br />
Do not throw the packing into the garbage: first sort out the<br />
different materials (i.e. steel, cardboard, polystyrene) following<br />
local regulations.<br />
Information<br />
This appliance is free of CFC's (refrigerant circuit contains<br />
R134a) or free of HFC's (refrigerant circuit contains R600a -<br />
kobutane). For more details, please refer to the rating plate on<br />
the appliance.<br />
For appliances with lsobutane (R600a)<br />
The refrigerant lsobutane is a natural gas of high environmental<br />
compatibility but which is inflammable. Therefore, it is essential<br />
to ensure that the ducts of the refrigerant circuit do<br />
not get damaged.<br />
For Great Britain only:<br />
ELECTBTlCAh I ~ ~<br />
WARNING -THIS APPLIANCE MUST BE EARTHED<br />
Fuse replacement<br />
If the mains lead of this appliance is fitted with a BS 1363A 13<br />
amp fused plug, to change a fuse in this type of plug usean<br />
A.S.T.A. approved fuse to BS 1362 type and proceed as follows:<br />
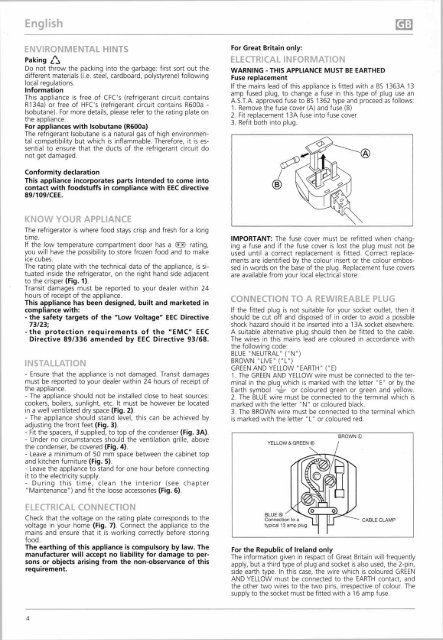
1. Remove the fuse cover (A) and fuse (B)<br />
2. Fit replacement 13A fuse into fuse cover<br />
3. Refit both into plug.<br />
Conformity declaration<br />
This appliance incorporates parts intended to come into<br />
contact with foodstuffs in compliance with EEC directive<br />
89/109/CEE.<br />
F=MO!A/ VO?,"? APPLIANCE<br />
The refrigerator is where food stays crisp and fresh for a long<br />
ti m'e.<br />
H the low tem<strong>per</strong>ature compartment door has a E B rating,<br />
you will have the possibility to store frozen food and to make<br />
ice cubes.<br />
The rating plate with the technical data of the appliance, is situated<br />
inside the refrigerator, on the right hand side adjacent<br />
to the cris<strong>per</strong> (Fig. 1).<br />
Transit damages must be reported to your dealer within 24<br />
hours of receipt of the appliance.<br />
This appliance has been designed, built and marketed in<br />
compliance with:<br />
-the safety targets of the "Low Voltage" EEC Directive<br />
73/23;<br />
-the protection requirements of the "EMC" EEC<br />
Directive 89/336 amended by EEC Directive 93/68.<br />
~ ~ ~ ~ ~ A ~ ~<br />
- Ensure that the appliance is not damaged. Transit damages<br />
must be reported to your dealer within 24 hours of receipt of<br />
the appliance.<br />
- The appliance should not be installed close to heat sources:<br />
cookers, boilers, sunlight,<br />
etc. It must be however be located<br />
in a well ventilated dry space (Fig. 2).<br />
- The appliance should stand level, this can be achieved by<br />
adjusting the front feet (Fig. 3).<br />
- Fit the spacers, if supplied, to top of the condenser (Fig. 3A).<br />
- Under no circumstances should the ventilation grille, above<br />
the condenser, be covered (Fig. 4).<br />
- Leave a minimum of 50 mm space between the cabinet top<br />
and kitchen furniture (Fig. 5).<br />
- Leave the appliance to stand for one hour before connecting<br />
it to the electricity supply.<br />
- During this time, clean the interior (see chapter<br />
"Maintenance") and fit the loose accessories (Fig. 6).<br />
IMPORTANT: The fuse cover must be refitted when changing<br />
a fuse and if the fuse cover is lost the plug must not be<br />
used until a correct replacement is fitted. Correct replacements<br />
are identified by the colour insert or the colour embossed<br />
in words on the base of the plug. Replacement fuse covers<br />
are available from your local electrical store.<br />
CONNECTlOM TO A REWCSEARLE PLUG<br />
If the fitted plug is not suitable for your socket outlet, then it<br />
should be cut off and disposed of in order to avoid a possible<br />
shock hazard should it be inserted into a 13A socket elsewhere.<br />
A suitable alternative plug should then be fitted to the cable.<br />
The wires in this mains lead are coloured in accordance with<br />
the following code:<br />
BLUE "NEUTRAL" ("N")<br />
BROWN "LIVE" ("L")<br />
GRE<strong>EN</strong> AND YELLOW "EARTH" ("E)<br />
1. The GRE<strong>EN</strong> AND YELLOW wire must be connected to the terminal<br />
in the plug which is marked with the letter "E" or by the<br />
Earth symbol -& or coloured green or green and yellow.<br />
2. The BLUE wire must be connected to the terminal which is<br />
marked with the letter "N" or coloured black.<br />
3. The BROWN wire must be connected to the terminal which<br />
is marked with the letter "L" or coloured red.<br />
ELECCTRrCAL CONNECTION<br />
Check that the voltage on the rating plate corresponds to the<br />
voltage in your home (Fig. 7). Connect the appliance to the<br />
mains and ensure that it is working correctly before storing<br />
food .<br />
The earthing of this appliance is compulsory by law. The<br />
manufacturer will accept no liability for damage to <strong>per</strong>sons<br />
or objects arising from the non-observance of this<br />
requirement.<br />
For the Republic of Ireland only<br />
The information given in respact of Great Britain will frequently<br />
apply, but a third type of plug and socket is also used, the 2-pin,<br />
side earth type. In this case, the wire which is coloured GRE<strong>EN</strong><br />
ANDYELLOW must be connected to the EARTH contact, and<br />
the other two wires to the two pins, irrespective of colour. The<br />
supply to the socket must be fitted with a 16 amp fuse.


