Sony DSC-TX9 - DSC-TX9 Istruzioni per l'uso
Sony DSC-TX9 - DSC-TX9 Istruzioni per l'uso
Sony DSC-TX9 - DSC-TX9 Istruzioni per l'uso
Create successful ePaper yourself
Turn your PDF publications into a flip-book with our unique Google optimized e-Paper software.
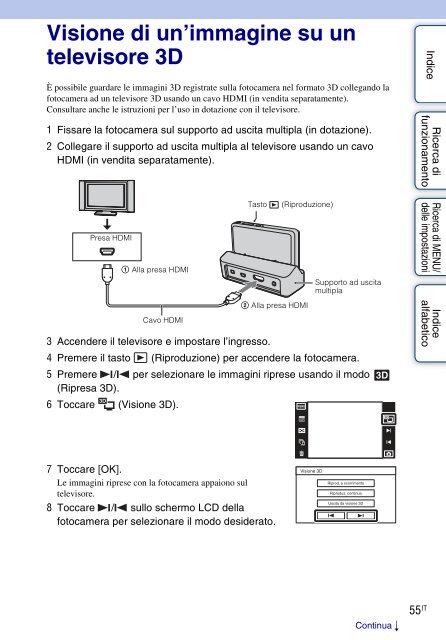
Visione di un’immagine su un<br />
televisore 3D<br />
È possibile guardare le immagini 3D registrate sulla fotocamera nel formato 3D collegando la<br />
fotocamera ad un televisore 3D usando un cavo HDMI (in vendita separatamente).<br />
Consultare anche le istruzioni <strong>per</strong> l’uso in dotazione con il televisore.<br />
1 Fissare la fotocamera sul supporto ad uscita multipla (in dotazione).<br />
2 Collegare il supporto ad uscita multipla al televisore usando un cavo<br />
HDMI (in vendita separatamente).<br />
Presa HDMI<br />
1 Alla presa HDMI<br />
Cavo HDMI<br />
Tasto<br />
(Riproduzione)<br />
2 Alla presa HDMI<br />
Supporto ad uscita<br />
multipla<br />
3 Accendere il televisore e impostare l’ingresso.<br />
4 Premere il tasto (Riproduzione) <strong>per</strong> accendere la fotocamera.<br />
5 Premere / <strong>per</strong> selezionare le immagini riprese usando il modo<br />
(Ripresa 3D).<br />
6 Toccare (Visione 3D).<br />
Indice<br />
Ricerca di<br />
funzionamento<br />
Ricerca di MENU/<br />
delle impostazioni<br />
Indice<br />
alfabetico<br />
7 Toccare [OK].<br />
Le immagini riprese con la fotocamera appaiono sul<br />
televisore.<br />
8 Toccare / sullo schermo LCD della<br />
fotocamera <strong>per</strong> selezionare il modo desiderato.<br />
Continua r<br />
55 IT


