

Sony CDX-C910RDS - CDX-C910RDS Guida di installazione
Sony CDX-C910RDS - CDX-C910RDS Guida di installazione
Sony CDX-C910RDS - CDX-C910RDS Guida di installazione

Create successful ePaper yourself
Turn your PDF publications into a flip-book with our unique Google optimized e-Paper software.
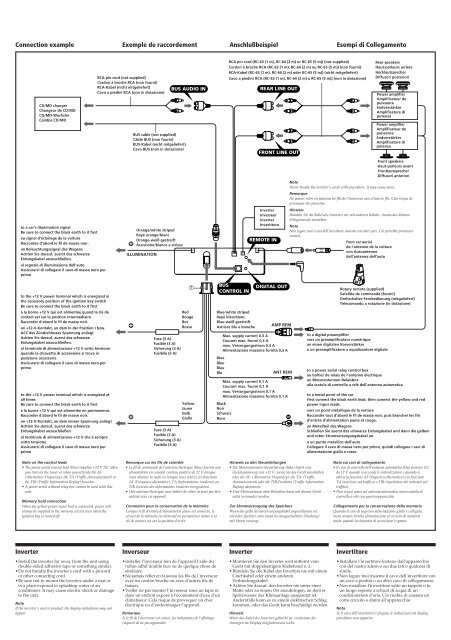
Connection example<br />
Exemple de raccordement Anschlußbeispiel Esempi <strong>di</strong> Collegamento<br />
CD/MD changer<br />
Changeur de CD/MD<br />
CD/MD-Wechsler<br />
Cambia CD/MD<br />
RCA pin cord (not supplied)<br />
Cordon à broche RCA (non fourni)<br />
RCA-Kabel (nicht mitgeliefert)<br />
Cavo a pie<strong>di</strong>ni RCA (non in dotazione)<br />
BUS cable (not supplied)<br />
Câble BUS (non fourni)<br />
BUS-Kabel (nicht mitgeliefert)<br />
Cavo BUS (non in dotazione)<br />
BUS AUDIO IN<br />
RCA pin cord (RC-63 (1 m), RC-64 (2 m) or RC-65 (5 m)) (not supplied)<br />
Cordon à broche RCA (RC-63 (1 m), RC-64 (2 m) ou RC-65 (5 m)) (non fourni)<br />
RCA-Kabel (RC-63 (1 m), RC-64 (2 m) oder RC-65 (5 m)) (nicht mitgeliefert)<br />
Cavo a pie<strong>di</strong>ni RCA (RC-63 (1 m), RC-64 (2 m) o RC-65 (5 m)) (non in dotazione)<br />
REAR LINE OUT<br />
FRONT LINE OUT<br />
Rear speakers<br />
Haut-parleurs arrière<br />
Hecklautsprecher<br />
Diffusori posteriori<br />
Power amplifier<br />
Amplificateur de<br />
puissance<br />
Endverstärker<br />
Amplificatore <strong>di</strong><br />
potenza<br />
Power amplifier<br />
Amplificateur de<br />
puissance<br />
Endverstärker<br />
Amplificatore <strong>di</strong><br />
potenza<br />
Front speakers<br />
Haut-parleurs avant<br />
Frontlautsprecher<br />
Diffusori anteriori<br />
Note<br />
Never bundle the inverter’s cords with any others. It may cause noise.<br />
Remarque<br />
Ne jamais relier en faisceau les fils de l’inverseur avec d’autres fils. Cela risque de<br />
provoquer des parasites.<br />
Hinweis<br />
Bündeln Sie <strong>di</strong>e Kabel des Inverters nie mit anderen Kabeln. Ansonsten können<br />
Störgeräusche entstehen.<br />
Nota<br />
Non legare mai i cavi dell’invetitore insieme con altri cavi. Ciò potrebbe provocare<br />
rumori.<br />
to a car’s illumination signal<br />
Be sure to connect the black earth to it first<br />
au signal d’éclairage de la voiture<br />
Raccordez d‘abord le fil de masse noir.<br />
an Beleuchtungssignal des Wagens<br />
Achten Sie darauf, zuerst das schwarze<br />
Erdungskabel anzuschließen.<br />
al segnale <strong>di</strong> illuminazione dell’auto<br />
Assicurarsi <strong>di</strong> collegare il cavo <strong>di</strong> massa nero per<br />
primo<br />
Orange/white striped<br />
Rayé orange/blanc<br />
Orange-weiß gestreift<br />
Arancione/bianco a strisce<br />
ILLUMINATION<br />
Inverter<br />
Inverseur<br />
Inverter<br />
Invertitore<br />
REMOTE IN<br />
from car aerial<br />
de l’antenne de la voiture<br />
von Autoantenne<br />
dall’antenna dell’auto<br />
to the +12 V power terminal which is energized in<br />
the accessory position of the ignition key switch<br />
Be sure to connect the black earth to it first<br />
à la borne +12 V qui est alimentée quand la clé de<br />
contact est sur la position intermé<strong>di</strong>aire.<br />
Raccorder d‘abord le fil de masse noir.<br />
an +12-V-Kontakt, an dem in der Position I bzw.<br />
ACC des Zündschlosses Spannung anliegt<br />
Achten Sie darauf, zuerst das schwarze<br />
Erdungskabel anzuschließen.<br />
al terminale <strong>di</strong> alimentazione +12 V sotto tensione<br />
quando la chiavetta <strong>di</strong> accensione si trova in<br />
posizione accessoria<br />
Assicurarsi <strong>di</strong> collegare il cavo <strong>di</strong> massa nero per<br />
primo<br />
to the +12 V power terminal which is energized at<br />
all times<br />
Be sure to connect the black earth to it first<br />
à la borne +12 V qui est alimentée en permanence.<br />
Raccorder d‘abord le fil de masse noir.<br />
an +12-V-Kontakt, an dem immer Spannung anliegt<br />
Achten Sie darauf, zuerst das schwarze<br />
Erdungskabel anzuschließen<br />
al terminale <strong>di</strong> alimentazione +12 V che è sempre<br />
sotto tensione<br />
Assicurarsi <strong>di</strong> collegare il cavo <strong>di</strong> massa nero per<br />
primo<br />
Fuse (3 A)<br />
Fusible (3 A)<br />
Sicherung (3 A)<br />
Fusibile (3 A)<br />
Fuse (3 A)<br />
Fusible (3 A)<br />
Sicherung (3 A)<br />
Fusibile (3 A)<br />
7<br />
Red<br />
Rouge<br />
Rot<br />
Rosso<br />
Yellow<br />
Jaune<br />
Gelb<br />
Giallo<br />
BUS<br />
CONTROL IN<br />
Blue/white striped<br />
Rayé bleu/blanc<br />
Blau-weiß gestreift<br />
Astrisce blu e bianche<br />
DIGITAL OUT<br />
AMP REM<br />
Max. supply current 0.3 A<br />
Courant max. fourni 0,3 A<br />
max. Versorgungsstrom 0,3 A<br />
Alimentazione massima fornita 0,3 A<br />
Blue<br />
Bleu<br />
Blau<br />
Blu<br />
ANT REM<br />
Max. supply current 0.1 A<br />
Courant max. fourni 0,1 A<br />
max. Versorgungsstrom 0,1 A<br />
Alimentazione massima fornita 0,1 A<br />
Black<br />
Noir<br />
Schwarz<br />
Nero<br />
Rotary remote (supplied)<br />
Satellite de commande (fourni)<br />
Drehschalter-Fernbe<strong>di</strong>enung (mitgeliefert)<br />
Telecomando a rotazione (in dotazione)<br />
to a <strong>di</strong>gital preamplifier<br />
vers un préamplificateur numérique<br />
an einen <strong>di</strong>gitalen Vorverstärker<br />
a un preamplificatore a equalizzatore <strong>di</strong>gitale<br />
to a power aerial relay control box<br />
au boîtier de relais de l’antenne électrique<br />
an Motorantennen-Relaisbox<br />
alla scatola <strong>di</strong> controllo a relè dell’antenna automatica<br />
to a metal point of the car<br />
First connect the black earth lead, then connect the yellow and red<br />
power input reads.<br />
vers un point métallique de la voiture<br />
Raccorder tout d’abord le fil de masse noir, puis brancher les fils<br />
d’entrée d’alimentation jaune et rouge.<br />
an Metallteil des Wagens<br />
Schließen Sie zuerst das schwarze Erdungskabel und dann <strong>di</strong>e gelben<br />
und roten Stromversorgungskabel an.<br />
a un punto metallico dell’auto<br />
Collegare il cavo <strong>di</strong> massa nero per primo, quin<strong>di</strong> collegare i cavi <strong>di</strong><br />
alimentazione giallo e rosso.<br />
Note on the control leads<br />
• The power aerial control lead (blue) supplies +12 V DC when<br />
you turn on the tuner or when you activate the AF<br />
(Alternative Frequency), the TA (Traffic Announcement) or<br />
the TIR (Traffic Information Replay) function.<br />
• A power aerial without relay box cannot be used with this<br />
unit.<br />
Memory hold connection<br />
When the yellow power input lead is connected, power will<br />
always be supplied to the memory circuit even when the<br />
ignition key is turned off.<br />
Remarque sur les fils de contrôle<br />
• Le fil de commande de l’antenne électrique (bleu) fournit une<br />
alimentation en courant continu positive de 12 V lorsque<br />
vous allumez la ra<strong>di</strong>o ou lorsque vous activez les fonctions<br />
AF (Fréquence alternative), TA (Informations routières) ou<br />
TIR (Lecture des informations routières enregistrées).<br />
• Une antenne électrique sans boîtier de relais ne peut pas être<br />
utilisée avec cet appareil.<br />
Connexion pour la conservation de la mémoire<br />
Lorsque le fil d’entrée d’alimentation jaune est connecté, le<br />
circuit de la mémoire est alimenté en permanence même si la<br />
clé de contact est sur la position d’arrêt.<br />
Hinweis zu den Steuerleitungen<br />
• Die Motorantennen-Steuerleitung (blau) liefert eine<br />
Gleichspannung von +12 V, wenn Sie das Gerät einschalten<br />
oder <strong>di</strong>e AF- (Alternative Frequency), <strong>di</strong>e TA- (Traffic<br />
Announcement) oder <strong>di</strong>e TIR-Funktion (Traffic Information<br />
Replay) aktivieren.<br />
• Eine Motorantenne ohne Relaisbox kann mit <strong>di</strong>esem Gerät<br />
nicht verwendet werden.<br />
Zur Stromversorgung des Speichers<br />
Wenn das gelbe Stromversorgungskabel angeschlossen ist,<br />
wird der Speicher stets (auch bei ausgeschalteter Zündung)<br />
mit Strom versorgt.<br />
Nota sui cavi <strong>di</strong> collegamento<br />
• Il cavo <strong>di</strong> controllo dell’antenna automatica (blu) fornisce CC<br />
da 12 V quando si accende il sintonizzatore o quando si<br />
attiva la funzione AF (frequenze alternative) o la funzione<br />
TA (notiziari sul traffico) o TIR (ripetizione dei notiziari sul<br />
traffico).<br />
• Non si può usare un’antenna automatica senza scatola <strong>di</strong><br />
controllo a relè con questo apparecchio.<br />
Collegamento per la conservazione della memoria<br />
Quando il cavo <strong>di</strong> ingresso alimentazione giallo è collegato,<br />
viene sempre fornita alimentazione al circuito <strong>di</strong> memoria<br />
anche quando la chiavetta <strong>di</strong> accensione è spenta.<br />
Inverter<br />
Inverseur<br />
Inverter<br />
Invertitore<br />
•Install the inverter far away from the unit using<br />
double-sided adhesive tape or something similar.<br />
•Do not bundle the inverter's cord with a pincord<br />
or other connecting cord.<br />
•Be sure not to mount the inverter under a mat or<br />
in a place exposed to splashing water of air<br />
con<strong>di</strong>tioner. It may cause electric shock or damage<br />
to the unit.<br />
Note<br />
If the inverter's cord is pinched, the <strong>di</strong>splay in<strong>di</strong>cations may not<br />
appear.<br />
•Installer l’inverseur loin de l’appareil l’aide du<br />
ruban adhif double face ou de quelque chose de<br />
similaire.<br />
•Ne jamais relier en faisceau les fils de l’inverseur<br />
avec un cordon broche ou avec d’autres fils de<br />
liaison.<br />
•Veiller ne pas monter l’inverseur sous un tapis ni<br />
dans un endroit exposé à l’écoulement d’eau d’un<br />
climatiseur. Cela risque de provoquer un choc<br />
électrique ou d’endommager l’appareil.<br />
Remarque<br />
Si le fil de l’inverseur est coincé, les in<strong>di</strong>cations de l’affichage<br />
risquent de ne pas apparaitre.<br />
• Montieren Sie den Inverter weit entfernt vom<br />
Gerät mit doppelseitigem Klebeband o. ä.<br />
• Bündeln Sie <strong>di</strong>e Kabel des Inverters nie mit einem<br />
Cinchkabel oder einem anderen<br />
Verbindungskabel.<br />
• Achten Sie darauf, den Inverter nie unter einer<br />
Matte oder an einem Ort anzubringen, an dem er<br />
Spritzwasser der Klimaanlage ausgesetzt ist.<br />
Andernfalls kann es zu einem elektrischen Schlag<br />
kommen, oder das Gerät kann beschä<strong>di</strong>gt werden.<br />
Hinweis<br />
Wenn das Kabel des Inverters geknickt ist, erscheinen <strong>di</strong>e<br />
Anzeigen im Display möglicherweise nicht.<br />
•Installare l’invertitore lontano dall’apparecchio<br />
con del nastro adesivo sui due lati o qualcosa <strong>di</strong><br />
simile.<br />
•Non legare mai insieme il cavo dell’invertitore con<br />
un cavo a pie<strong>di</strong>ni o un altro cavo <strong>di</strong> collegamento.<br />
•Non installare l’invertitore sotto un tappeto o in<br />
un luogo esposto a schizzi <strong>di</strong> acqua <strong>di</strong> un<br />
con<strong>di</strong>zionatore d’aria. Ciò rischia <strong>di</strong> causare un<br />
corto circuito o danni all’apparecchio.<br />
Nota<br />
Se il cavo dell’invertitore è piegato, le in<strong>di</strong>cazioni sul <strong>di</strong>splay<br />
potrebbero non apparire.


