

Sony CDX-C910RDS - CDX-C910RDS Guida di installazione Italiano
Sony CDX-C910RDS - CDX-C910RDS Guida di installazione Italiano
Sony CDX-C910RDS - CDX-C910RDS Guida di installazione Italiano

You also want an ePaper? Increase the reach of your titles
YUMPU automatically turns print PDFs into web optimized ePapers that Google loves.
TOP<br />
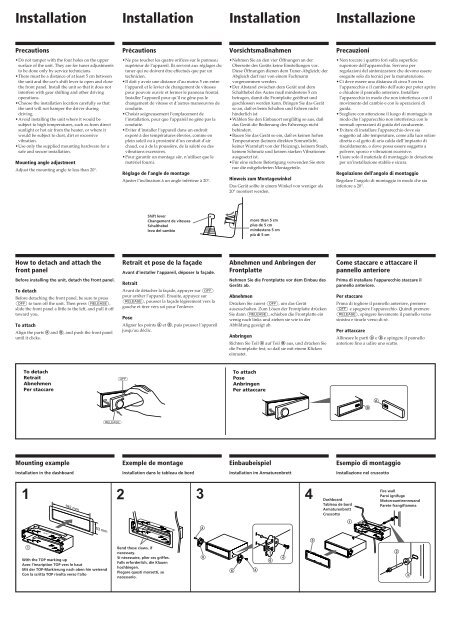
Installation Installation Installation Installazione<br />
Precautions<br />
Précautions<br />
Vorsichtsmaßnahmen<br />
Precauzioni<br />
•Do not tamper with the four holes on the upper<br />
surface of the unit. They are for tuner adjustments<br />
to be done only by service technicians.<br />
•There must be a <strong>di</strong>stance of at least 5 cm between<br />
the unit and the car’s shift lever to open and close<br />
the front panel. Install the unit so that it does not<br />
interfere with gear shifting and other driving<br />
operations.<br />
•Choose the installation location carefully so that<br />
the unit will not hamper the driver during<br />
driving.<br />
•Avoid installing the unit where it would be<br />
subject to high temperatures, such as from <strong>di</strong>rect<br />
sunlight or hot air from the heater, or where it<br />
would be subject to dust, <strong>di</strong>rt or excessive<br />
vibration.<br />
•Use only the supplied mounting hardware for a<br />
safe and secure installation.<br />
Mounting angle adjustment<br />
Adjust the mounting angle to less than 20°.<br />
•Ne pas toucher les quatre orifices sur le panneau<br />
supérieur de l’appareil. Ils servent aux réglages du<br />
tuner qui ne doivent être effectués que par un<br />
technicien.<br />
•Il doit y avoir une <strong>di</strong>stance d’au moins 5 cm entre<br />
l’appareil et le levier de changement de vitesses<br />
pour pouvoir ouvrir et fermer le panneau frontal.<br />
Installer l’appareil pour qu’il ne gêne pas le<br />
changement de vitesse et d’autres manoeuvres de<br />
conduite.<br />
•Choisir soigneusement l’emplacement de<br />
l’installation, pour que l’appareil ne gêne pas la<br />
conduite.<br />
•Eviter d’installer l’appareil dans un endroit<br />
exposé à des températures élevées, comme en<br />
plein soleil ou à proximité d’un conduit d’air<br />
chaud, ou à de la poussière, de la saleté ou des<br />
vibrations excessives.<br />
•Pour garantir un montage sûr, n’utiliser que le<br />
matériel fourni.<br />
Réglage de l’angle de montage<br />
Ajuster l’inclinaison à un angle inférieur à 20°.<br />
•Nehmen Sie an den vier Öffnungen an der<br />
Oberseite des Geräts keine Einstellungen vor.<br />
Diese Öffnungen <strong>di</strong>enen dem Tuner-Abgleich; der<br />
Abgleich darf nur von einem Fachmann<br />
vorgenommen werden.<br />
•Der Abstand zwischen dem Gerät und dem<br />
Schalthebel des Autos muß mindestens 5 cm<br />
betragen, damit <strong>di</strong>e Frontplatte geöffnet und<br />
geschlossen werden kann. Bringen Sie das Gerät<br />
so an, daß es beim Schalten und Fahren nicht<br />
hinderlich ist.<br />
•Wählen Sie den Einbauort sorgfältig so aus, daß<br />
das Gerät <strong>di</strong>e Be<strong>di</strong>enung des Fahrzeugs nicht<br />
behindert.<br />
•Bauen Sie das Gerät so ein, daß es keinen hohen<br />
Temperaturen (keinem <strong>di</strong>rekten Sonnenlicht,<br />
keiner Warmluft von der Heizung), keinem Staub,<br />
keinem Schmutz und keinen starken Vibrationen<br />
ausgesetzt ist.<br />
•Für eine sichere Befestigung verwenden Sie stets<br />
nur <strong>di</strong>e mitgelieferten Montageteile.<br />
Hinweis zum Montagewinkel<br />
Das Gerät sollte in einem Winkel von weniger als<br />
20° montiert werden.<br />
• Non toccare i quattro fori sulla superficie<br />
superiore dell’apparecchio. Servono per<br />
regolazioni del sintonizzatore che devono essere<br />
eseguite solo da tecnici per la manutenzione.<br />
• Ci deve essere una <strong>di</strong>stanza <strong>di</strong> circa 5 cm tra<br />
l’apparecchio e il cambio dell’auto per poter aprire<br />
e chiudere il pannello anteriore. Installare<br />
l’apparecchio in modo che non interferisca con il<br />
movimento del cambio e con le operazioni <strong>di</strong><br />
guida.<br />
• Scegliere con attenzione il luogo <strong>di</strong> montaggio in<br />
modo che l’apparecchio non interferisca con le<br />
normali operazioni <strong>di</strong> guida del conducente.<br />
• Evitare <strong>di</strong> installare l’apparecchio dove sia<br />
soggetto ad alte temperature, come alla luce solare<br />
<strong>di</strong>retta o al getto <strong>di</strong> aria calda dell’impianto <strong>di</strong><br />
riscaldamento, o dove possa essere soggetto a<br />
polvere, sporco e vibrazioni eccessive.<br />
• Usare solo il materiale <strong>di</strong> montaggio in dotazione<br />
per un’<strong>installazione</strong> stabile e sicura.<br />
Regolazione dell’angolo <strong>di</strong> montaggio<br />
Regolare l’angolo <strong>di</strong> montaggio in modo che sia<br />
inferiore a 20°.<br />
Shift lever<br />
Changement de vitesses<br />
Schalthebel<br />
leva del cambio<br />
more than 5 cm<br />
plus de 5 cm<br />
mindestens 5 cm<br />
più <strong>di</strong> 5 cm<br />
How to detach and attach the<br />
front panel<br />
Retrait et pose de la façade<br />
Avant d’installer l’appareil, déposer la façade.<br />
Abnehmen und Anbringen der<br />
Frontplatte<br />
Come staccare e attaccare il<br />
pannello anteriore<br />
Before installing the unit, detach the front panel.<br />
To detach<br />
Before detaching the front panel, be sure to press<br />
(OFF) to turn off the unit. Then press (RELEASE),<br />
slide the front panel a little to the left, and pull it off<br />
toward you.<br />
To attach<br />
Align the parts A and B, and push the front panel<br />
until it clicks.<br />
Retrait<br />
Avant de détacher la façade, appuyer sur (OFF)<br />
pour arrêter l’appareil. Ensuite, appuyez sur<br />
(RELEASE), pousser la façade légèrement vers la<br />
gauche et tirer vers soi pour l’enlever.<br />
Pose<br />
Aligner les points A et B, puis pousser l’appareil<br />
jusqu’au déclic.<br />
Nehmen Sie <strong>di</strong>e Frontplatte vor dem Einbau des<br />
Geräts ab.<br />
Abnehmen<br />
Drücken Sie zuerst (OFF), um das Gerät<br />
auszuschalten. Zum Lösen der Frontplatte drücken<br />
Sie dann (RELEASE), schieben <strong>di</strong>e Frontplatte ein<br />
wenig nach links und ziehen sie wie in der<br />
Abbildung gezeigt ab.<br />
Anbringen<br />
Richten Sie Teil A auf Teil B aus, und drücken Sie<br />
<strong>di</strong>e Frontplatte fest, so daß sie mit einem Klicken<br />
einrastet.<br />
Prima <strong>di</strong> installare l’apparecchio staccare il<br />
pannello anteriore.<br />
Per staccare<br />
Prima <strong>di</strong> togliere il pannello anteriore, premere<br />
(OFF) e spegnere l’apparecchio. Quin<strong>di</strong> premere<br />
(RELEASE), spingere lievemente il pannello verso<br />
sinistra e tirarlo verso <strong>di</strong> sé.<br />
Per attaccare<br />
Allineare le parti A e B e spingere il pannello<br />
anteriore fino a u<strong>di</strong>re uno scatto.<br />
To detach<br />
Retrait<br />
Abnehmen<br />
Per staccare<br />
(OFF)<br />
To attach<br />
Pose<br />
Anbringen<br />
Per attaccare<br />
B<br />
A<br />
(RELEASE)<br />
Mounting example<br />
Exemple de montage<br />
Einbaubeispiel<br />
Esempio <strong>di</strong> montaggio<br />
Installation in the dashboard<br />
Installation dans le tableau de bord<br />
Installation im Armaturenbrett<br />
Installazione nel cruscotto<br />
1<br />
182 mm<br />
2<br />
3<br />
4<br />
Dashboard<br />
Tableau de bord<br />
Armaturenbrett<br />
Cruscotto<br />
1<br />
Fire wall<br />
Paroi ignifuge<br />
Motorraumtrennwand<br />
Parete frangifiamma<br />
53 mm<br />
4<br />
TOP<br />
1<br />
With the TOP marking up<br />
Avec l’inscription TOP vers le haut<br />
Mit der TOP-Markierung nach oben hin weisend<br />
Con la scritta TOP rivolta verso l’alto<br />
Bend these claws, if<br />
necessary.<br />
Si nécessaire, plier ces griffes.<br />
Falls erforderlich, <strong>di</strong>e Klauen<br />
hochbiegen.<br />
Piegare questi morsetti, se<br />
necessario.<br />
6<br />
6 4<br />
6<br />
4<br />
5<br />
2<br />
3


