

KitchenAid 901 087 32 - 901 087 32 EN (857918216000) Istruzioni per l'Uso
KitchenAid 901 087 32 - 901 087 32 EN (857918216000) Istruzioni per l'Uso
KitchenAid 901 087 32 - 901 087 32 EN (857918216000) Istruzioni per l'Uso

Create successful ePaper yourself
Turn your PDF publications into a flip-book with our unique Google optimized e-Paper software.
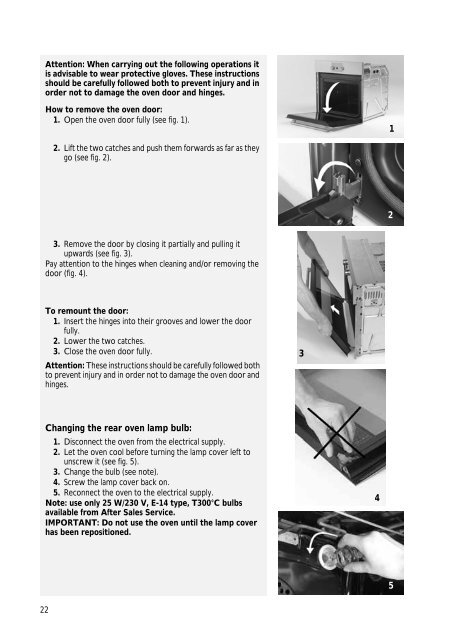
Attention: When carrying out the following o<strong>per</strong>ations it<br />
is advisable to wear protective gloves. These instructions<br />
should be carefully followed both to prevent injury and in<br />
order not to damage the oven door and hinges.<br />
How to remove the oven door:<br />
1. Open the oven door fully (see fig. 1).<br />
1<br />
2. Lift the two catches and push them forwards as far as they<br />
go (see fig. 2).<br />
2<br />
3. Remove the door by closing it partially and pulling it<br />
upwards (see fig. 3).<br />
Pay attention to the hinges when cleaning and/or removing the<br />
door (fig. 4).<br />
To remount the door:<br />
1. Insert the hinges into their grooves and lower the door<br />
fully.<br />
2. Lower the two catches.<br />
3. Close the oven door fully.<br />
Attention: These instructions should be carefully followed both<br />
to prevent injury and in order not to damage the oven door and<br />
hinges.<br />
3<br />
Changing the rear oven lamp bulb:<br />
1. Disconnect the oven from the electrical supply.<br />
2. Let the oven cool before turning the lamp cover left to<br />
unscrew it (see fig. 5).<br />
3. Change the bulb (see note).<br />
4. Screw the lamp cover back on.<br />
5. Reconnect the oven to the electrical supply.<br />
Note: use only 25 W/230 V, E-14 type, T300°C bulbs<br />
available from After Sales Service.<br />
IMPORTANT: Do not use the oven until the lamp cover<br />
has been repositioned.<br />
4<br />
5<br />
22


