

KitchenAid U 12 A1 D/HA - U 12 A1 D/HA EN (F093760) Istruzioni per l'Uso
KitchenAid U 12 A1 D/HA - U 12 A1 D/HA EN (F093760) Istruzioni per l'Uso
KitchenAid U 12 A1 D/HA - U 12 A1 D/HA EN (F093760) Istruzioni per l'Uso

Create successful ePaper yourself
Turn your PDF publications into a flip-book with our unique Google optimized e-Paper software.
INSTALLATION<br />
• Install the appliance away from heat sources.<br />
Installation in a hot environment, direct exposure to the sun<br />
or installation near heat sources (heaters, radiators, cookers)<br />
will increase power consumption and should therefore be<br />
avoided.<br />
• If this is not possible, the following minimum distances must<br />
be observed:<br />
- 30 cm from coal or paraffin stoves<br />
- 3 cm from electric stoves.<br />
• Install the appliance in a dry, well-ventilated place.<br />
• Clean the interior (see "How to defrost and clean the<br />
freezer").<br />
• Check the door seal is not damaged or deformed, especially<br />
after installation or reversal of door opening.<br />
Electrical connection<br />
• Electrical connections must be made in accordance<br />
with local regulations.<br />
• Voltage and power consumption are indicated on the rating<br />
plate inside the appliance.<br />
• Regulations require that the appliance is earthed. The<br />
manufacturer declines all liabilities for injury to<br />
<strong>per</strong>sons or animals or damage to pro<strong>per</strong>ty resulting<br />
from failure to observe these regulations.<br />
• If the plug and socket are not of the same type, have the<br />
socket replaced by a qualified electrician.<br />
• Do not use extension leads or adapters.<br />
Disconnecting the appliance<br />
• It must be possible to disconnect the appliance by unplugging<br />
it or by means of a two-pole switch fitted upline of the<br />
socket.<br />
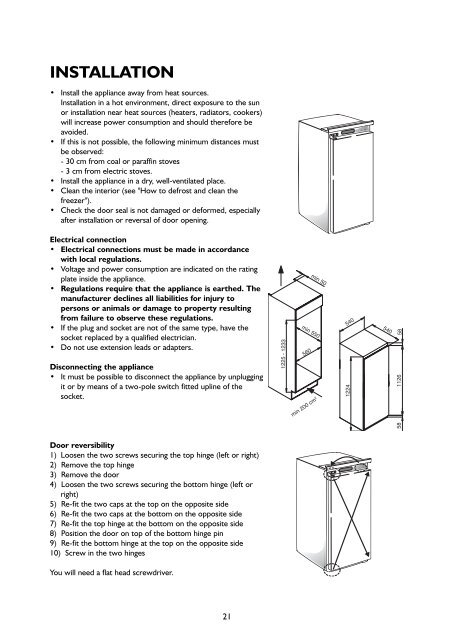
<strong>12</strong>25 - <strong>12</strong>33<br />
min 50<br />
min 550<br />
560<br />
min 200 cm 2<br />
<strong>12</strong>24<br />
540<br />
540<br />
58<br />
1<strong>12</strong>6<br />
58<br />
Door reversibility<br />
1) Loosen the two screws securing the top hinge (left or right)<br />
2) Remove the top hinge<br />
3) Remove the door<br />
4) Loosen the two screws securing the bottom hinge (left or<br />
right)<br />
5) Re-fit the two caps at the top on the opposite side<br />
6) Re-fit the two caps at the bottom on the opposite side<br />
7) Re-fit the top hinge at the bottom on the opposite side<br />
8) Position the door on top of the bottom hinge pin<br />
9) Re-fit the bottom hinge at the top on the opposite side<br />
10) Screw in the two hinges<br />
You will need a flat head screwdriver.<br />
21


