

KitchenAid XA8 T1O X - XA8 T1O X EN (F153426) Setup and user guide
KitchenAid XA8 T1O X - XA8 T1O X EN (F153426) Setup and user guide
KitchenAid XA8 T1O X - XA8 T1O X EN (F153426) Setup and user guide

You also want an ePaper? Increase the reach of your titles
YUMPU automatically turns print PDFs into web optimized ePapers that Google loves.
GB<br />
SHELVES:<br />
Due to the special <strong>guide</strong>s the shelves are removable <strong>and</strong> the<br />
height is adjustable allowing easy storage of large containers<br />
<strong>and</strong> food. Height can be adjusted without complete removal of<br />
the shelf (see diagram).<br />
! If there is a power cut or malfunction, do not open the freezer<br />
door. This will help maintain the temperature inside the freezer,<br />
ensuring that foods are conserved for at least 12-18 hours.<br />
! To get more space inside your freezer, you can take out any<br />
drawers (<strong>and</strong> flaps, if appropriate), from their slots, by putting<br />
your food directly on the provided shelves.<br />
1<br />
2<br />
Maintenance <strong>and</strong> care<br />
Switching the appliance off<br />
During cleaning <strong>and</strong> maintenance it is necessary to disconnect<br />
the appliance from the electricity supply:<br />
1. Press the ON/OFF button to turn off the device<br />
2. pull the plug out of the socket<br />
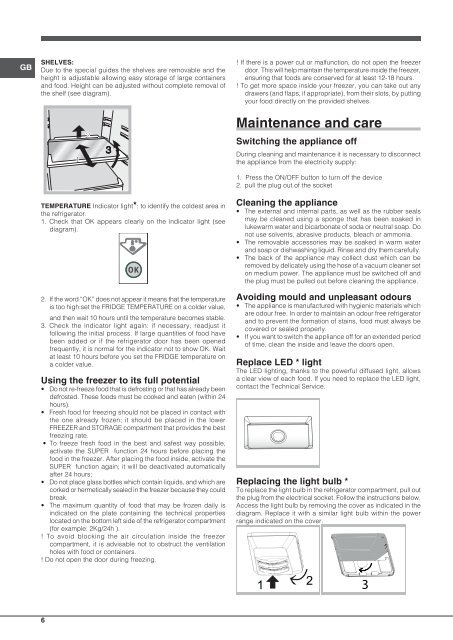
TEMPERATURE Indicator light*: to identify the coldest area in<br />
the refrigerator.<br />
1. Check that OK appears clearly on the indicator light (see<br />
diagram).<br />
2. If the word “OK” does not appear it means that the temperature<br />
is too high:set the FRIDGE TEMPERATURE on a colder value,<br />
<strong>and</strong> then wait 10 hours until the temperature becomes stable.<br />
3. Check the indicator light again: if necessary, readjust it<br />
following the initial process. If large quantities of food have<br />
been added or if the refrigerator door has been opened<br />
frequently, it is normal for the indicator not to show OK. Wait<br />
at least 10 hours before you set the FRIDGE temperature on<br />
a colder value.<br />
Using the freezer to its full potential<br />
• Do not re-freeze food that is defrosting or that has already been<br />
defrosted. These foods must be cooked <strong>and</strong> eaten (within 24<br />
hours).<br />
• Fresh food for freezing should not be placed in contact with<br />
the one already frozen; it should be placed in the lower<br />
FREEZER <strong>and</strong> STORAGE compartment that provides the best<br />
freezing rate.<br />
• To freeze fresh food in the best <strong>and</strong> safest way possible,<br />
activate the SUPER function 24 hours before placing the<br />
food in the freezer. After placing the food inside, activate the<br />
SUPER function again; it will be deactivated automatically<br />
after 24 hours;<br />
• Do not place glass bottles which contain liquids, <strong>and</strong> which are<br />
corked or hermetically sealed in the freezer because they could<br />
break.<br />
• The maximum quantity of food that may be frozen daily is<br />
indicated on the plate containing the technical properties<br />
located on the bottom left side of the refrigerator compartment<br />
(for example: 2Kg/24h ).<br />
! To avoid blocking the air circulation inside the freezer<br />
compartment, it is advisable not to obstruct the ventilation<br />
holes with food or containers.<br />
! Do not open the door during freezing.<br />
Cleaning the appliance<br />
• The external <strong>and</strong> internal parts, as well as the rubber seals<br />
may be cleaned using a sponge that has been soaked in<br />
lukewarm water <strong>and</strong> bicarbonate of soda or neutral soap. Do<br />
not use solvents, abrasive products, bleach or ammonia.<br />
• The removable accessories may be soaked in warm water<br />
<strong>and</strong> soap or dishwashing liquid. Rinse <strong>and</strong> dry them carefully.<br />
• The back of the appliance may collect dust which can be<br />
removed by delicately using the hose of a vacuum cleaner set<br />
on medium power. The appliance must be switched off <strong>and</strong><br />
the plug must be pulled out before cleaning the appliance.<br />
Avoiding mould <strong>and</strong> unpleasant odours<br />
• The appliance is manufactured with hygienic materials which<br />
are odour free. In order to maintain an odour free refrigerator<br />
<strong>and</strong> to prevent the formation of stains, food must always be<br />
covered or sealed properly.<br />
• If you want to switch the appliance off for an extended period<br />
of time, clean the inside <strong>and</strong> leave the doors open.<br />
Replace LED * light<br />
The LED lighting, thanks to the powerful diffused light, allows<br />
a clear view of each food. If you need to replace the LED light,<br />
contact the Technical Service.<br />
Replacing the light bulb *<br />
To replace the light bulb in the refrigerator compartment, pull out<br />
the plug from the electrical socket. Follow the instructions below.<br />
Access the light bulb by removing the cover as indicated in the<br />
diagram. Replace it with a similar light bulb within the power<br />
range indicated on the cover.<br />
3<br />
6


